TidBITS#1344/31-Oct-2016
We kick off this issue with iOS 10.1.1, which fixes a problem with displaying Health data. Despite a fiscal quarter that saw the launch of new iPhones and Apple Watches, Apple’s revenues are still in a slump — Josh Centers and Michael Cohen team up to explain what that means. Last week, Apple announced two major new products: new MacBook Pro laptops with the Touch Bar and a new app, called TV, that aims to integrate video content from multiple apps in both tvOS and iOS. If you’re considering one of Apple’s new notebooks, Joe Kissell offers a thorough explanation on how to migrate your data to your new Mac. Notable software releases this week include VMware Fusion 8.5.1, DEVONthink/DEVONnote 2.9.6, Final Cut Pro X 10.3, Compressor 4.3, Motion 5.3, Airfoil 5.5, GarageBand 10.1.3, iMovie 10.1.3, Pages 6.0.5, Numbers 4.0.5, and Keynote 7.0.5 for Mac, iTunes 12.5.2, MoneyWiz 2.5, Safari 10.0.1, Security Update 2016-006 (Yosemite) and 2016-002 (El Capitan), Art Text 3.1, Keyboard Maestro 7.3.1, Slack for Mac 2.3, and Moneydance 2017.
iOS 10.1.1 Fixes Viewing of Health Data
Apple has released iOS 10.1.1, the company’s third update to iOS in three weeks. The only specific fix in this update is for an issue that prevented some users from viewing Health data.
iOS 10.1.1 doesn’t offer any new security fixes.
You can install the update, which weighs in at between 50 MB and 65 MB depending on the device, via Settings > General > Software Update or through iTunes.
Despite $9 Billion Profit, Apple Revenues Slump Again in Q4 2016
Apple has announced a net profit of $9 billion ($1.67 per diluted share) on revenues of $46.9 billion for its Q4 2016 financial results — the period ending 24 September 2016. That’s a lot of money, but the company’s revenues are down 9.8 percent compared to the year-ago quarter (see “Apple Wraps up a Record-Breaking Year in Q4 2015,” 27 October 2015). Gross margin also dropped slightly, clocking in at 38 percent compared to 39.9 percent a year ago. Apple announced a cash dividend of $0.57 per share of common stock, to be paid on 10 November 2016.
Despite the new iPhone 7 and 7 Plus models being introduced in Q4 2016, iPhone unit sales were down 5 percent year over year, providing 13 percent less revenue than the year-ago quarter. The newly released iPhone 7 models had only small impact on these results as they became available for pre-order only in the last two weeks of the quarter. Interestingly, Apple does not anticipate extra sales due to the problems that its Korean competitor Samsung has recently experienced with its exploding Galaxy Note 7. CFO Luca Maestri noted that Apple already is selling every iPhone it can build.
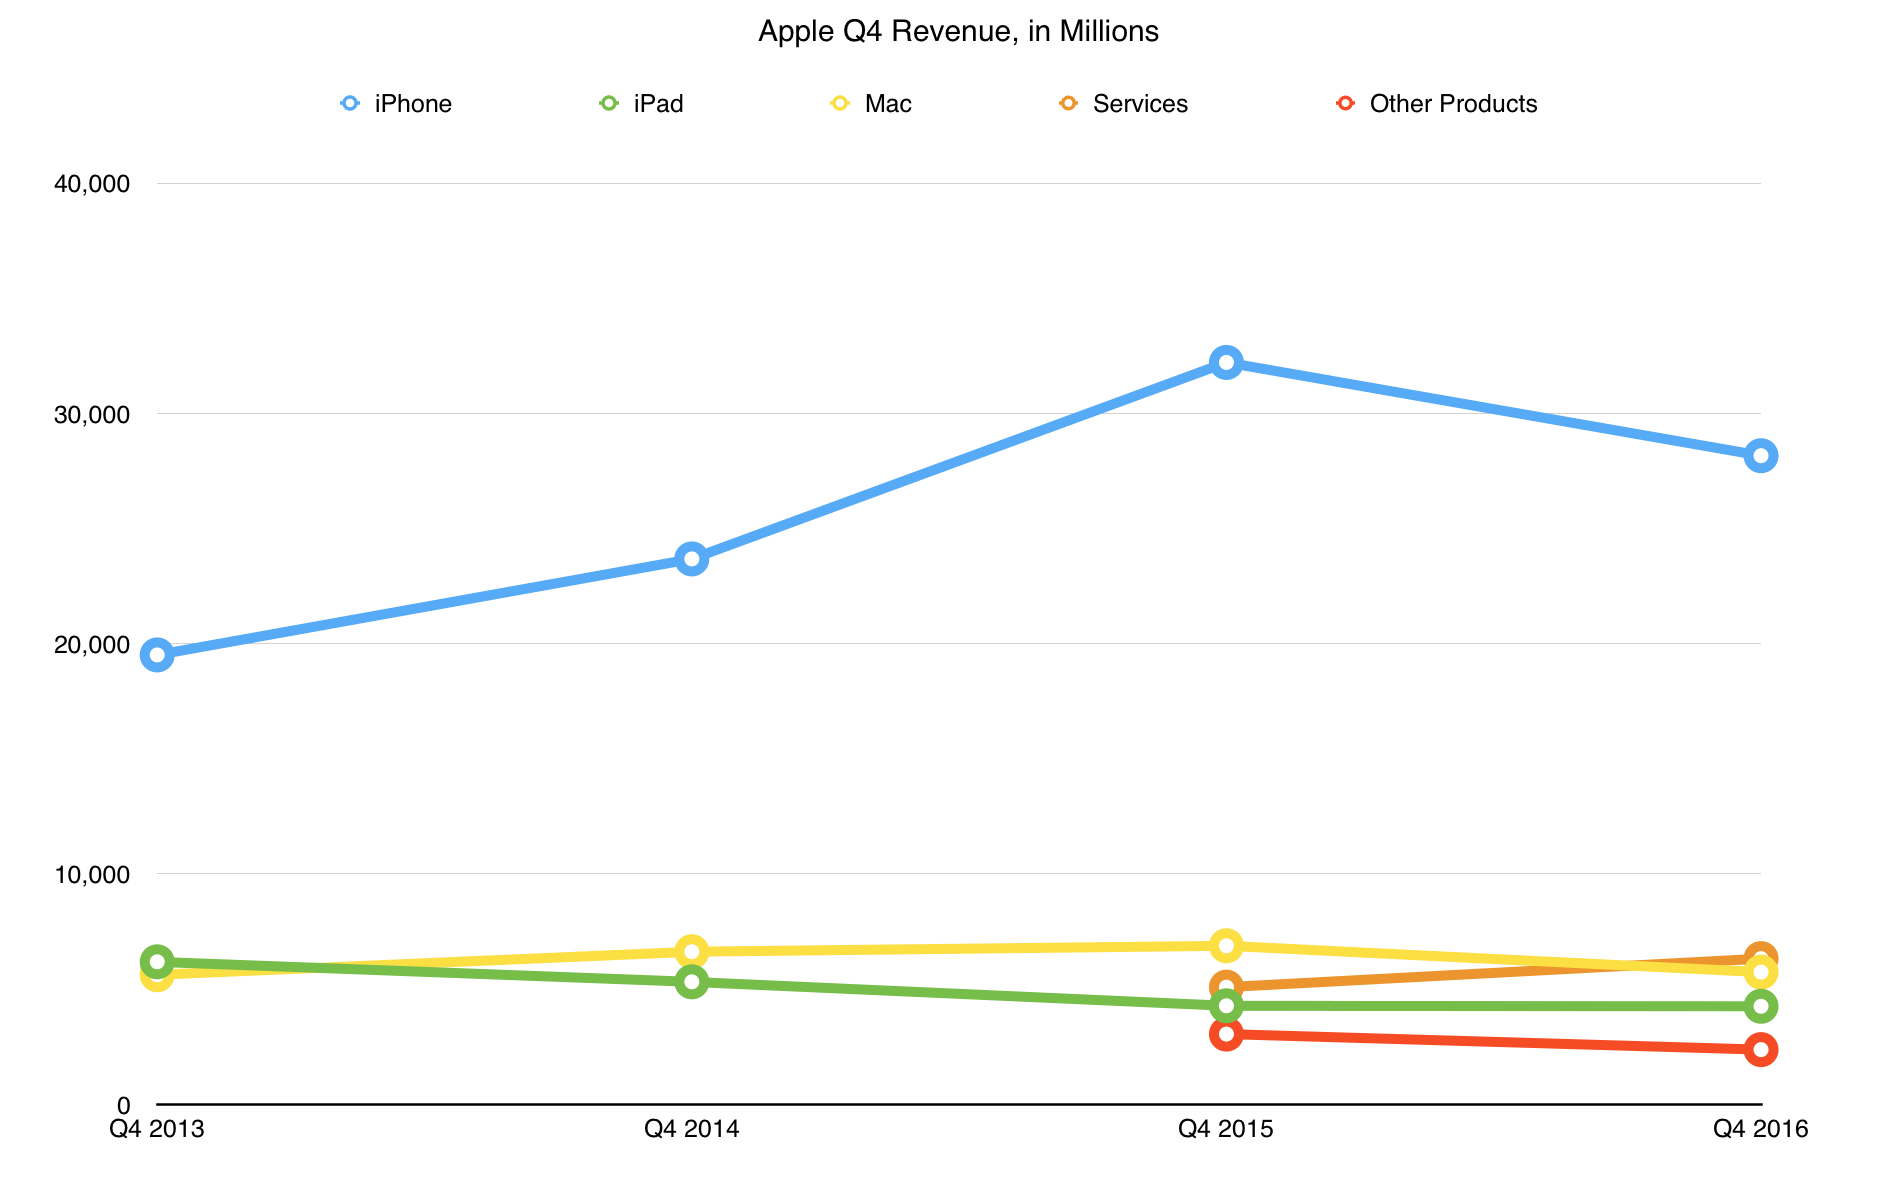
In somewhat brighter news, Apple has reduced the iPad revenue bleed, with no change in revenue over Q4 2015, despite iPad unit sales dropping by 6 percent. The explanation is Apple’s focus on the higher-margin iPad Pro line, which appears to be paying off. Apple is also more effectively targeting the business market with its tablets. The company says that 120 partners around the world are working on iPad-related enterprise initiatives.
With no new Macs in the product line, year-over-year unit sales dropped by 14 percent, for a 17 percent decrease in revenue. Nonetheless, the worldwide installed base of Macs is at an all-time high. Whether the new MacBook Pro models announced on 27 October 2016 will revitalize sales during the upcoming holiday quarter remains to be seen (see “New MacBook Pros Add Context-sensitive Touch Bar,” 27 October 2016).
The Other Products category took a beating, with a 22 percent year-over-year decline in revenue. That category includes several new products, such as the Apple Watch Series 2, Apple Watch Series 1, and the W1-powered Beats Solo3 wireless headphones (see “Apple Watch Series 2 Offers GPS, Water Resistance, and More Power,” 7 September 2016 and “W1-powered AirPods Usher in a New Era of Wireless Audio,” 7 September 2016). However, those new products debuted late in the quarter, and the AirPods have yet to reach the market.
Perhaps health insurance company Aetna buying tens of thousands of Apple Watches will turn the tide (see “Aetna to Promote Apple Watches to Employees and Customers,” 28 September 2016). If healthcare firms find that equipping employees and customers with Apple Watches saves them money in the long-term, that could be huge opportunity for Apple. The Apple Watch could use the boost: market intelligence firm IDC reported that overall smartwatch sales are down nearly 52 percent year-over-year for the third quarter of 2016, with only Garmin doing well.
Speaking of Other Products, rumors have been swirling lately that Apple will launch a smart speaker to compete with the Amazon Echo, but CEO Tim Cook seemed to downplay those rumors, saying that we live in a mobile world and people want a digital assistant like Siri with them all the time.
Also, during the Q&A portion of the conference call, Cook touched on the debate surrounding Apple’s artificial intelligence efforts. Many pundits have argued that Apple is lagging behind Google in this area due to Apple’s commitment to privacy. Cook called that a false tradeoff. “We don’t buy that. It may take a different kind of work, or more thinking, but I don’t think we should throw privacy away.”
Apple’s one area of growth continues to be the Services category, which saw a whopping 24 percent revenue increase over Q4 2015. Despite claims that services are not Apple’s strong suit, Services is now a larger category than Mac, iPad, or Other Products, and is bested only by the iPhone category. App Store revenues alone increased 43 percent, and Apple Music revenues grew by 22 percent. Apple Pay also continues to increase its profile, with transactions up 500 percent year-over-year. More Apple Pay transactions took place last quarter than in all of the previous fiscal year.
Apple’s international results were a mixed bag. Although sales in China were off, other sectors, including the Americas, Japan, Europe, and the Asia-Pacific region, tallied increased revenues. In fact, revenue from Japan increased by 23 percent compared to the previous quarter. Despite the disappointing results from China, Cook said that Apple remains “very bullish” on China and noted increasing opportunities in India, where sales were up 50 percent year-over-year. He attributed those opportunities to the preponderance of young people in India, the growth of 4G mobile networks in the region, and the increasing size of the middle class.
2016 was a rough year for Apple, marking the company’s first annual revenue decline since 2001. However, it’s inappropriate to read too much into that, since Q4 2016’s $9 billion in profit was still the second-highest profit that the company has posted in any previous Q4. Although Apple’s financials currently seem to be headed in the wrong direction, the company predicts a return to growth in the next quarter. That would come thanks to the new iPhone 7 models hitting their stride, possibly bolstered by increased MacBook Pro sales if the pent-up demand is large enough.
In any case, Apple’s massive cash pile still managed to grow by $6.1 billion since Q3 2016. It’s now up to $237.6 billion — nearly a quarter of a trillion dollars and more than the entire California state government spent in 2015 ($159 billion). Surely, Apple could do something interesting with all that money.
Apple’s TV App Seeks to Unify the Apple TV Experience
With the debut of the fourth-generation Apple TV, Apple declared that apps are the future of TV. But the trouble with iOS-style apps on your TV is that you have to dig through them to find the content you want, unless Siri can find it for you. Apple is introducing a new app, simply called TV, that the company hopes will solve this problem.
TV on the Apple TV — The new TV app is due in December 2016 and will bring together content from all the apps you have installed that opt in to Apple’s aggregation plan. About 1600 apps could currently provide content to the TV app, but Netflix has reportedly opted out, and Amazon Prime Video is still nowhere to be seen on the tvOS platform. We expect that Netflix will come around eventually, but it’s hard to imagine Amazon changing its tune at this point.
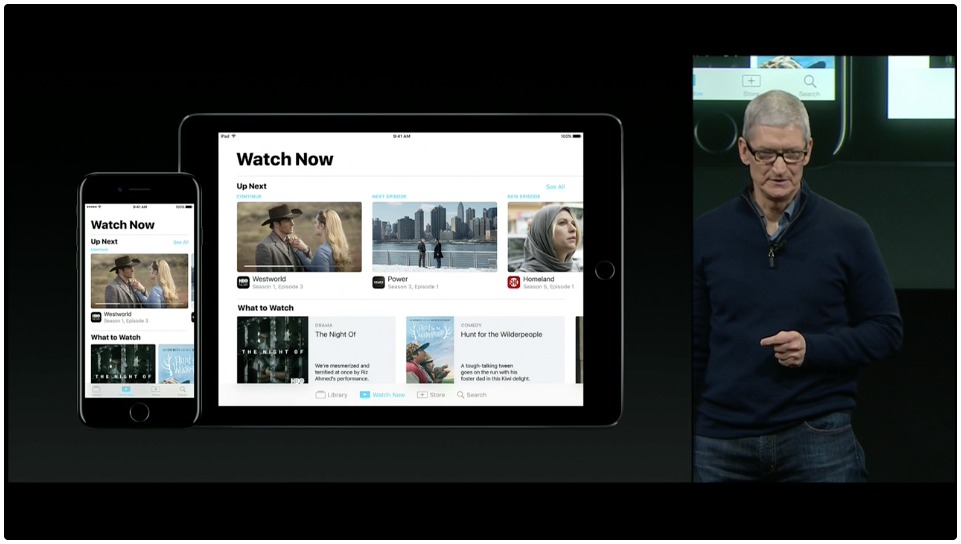
The hub of the TV app is the Watch Now screen, which presents your favorite shows in an Up Next list. The top of that screen lets you pick up shows where you left off and shows new episodes as they become available.
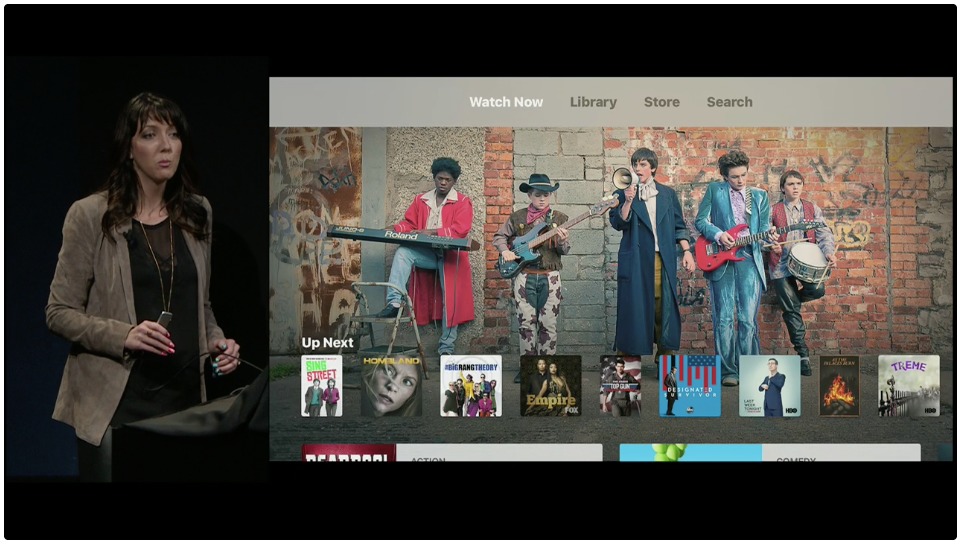
Don’t know what to watch? The Watch Now screen offers TV and movie suggestions, based on your preferences and Apple’s curation.
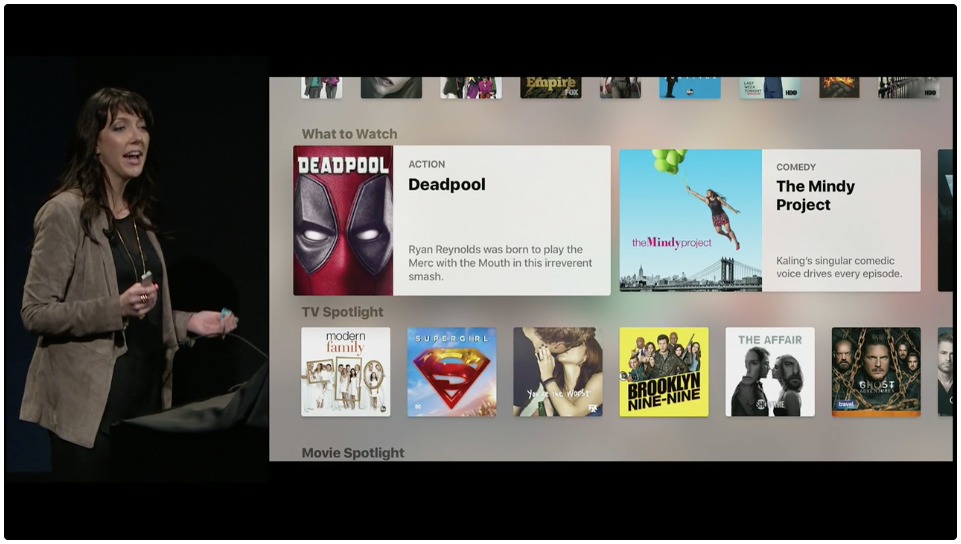
The Watch Now screen also lets you browse for TV shows and movies by category. The demo showed some unusual categories like Political Animals — presumably shows and movies with a political focus.

The TV app may suggest content provided by an app you haven’t yet installed. In such cases, you can install the app from inside the TV app, after which its content is integrated into the TV app. Apple Design Lead Jen Folse demonstrated this capability by installing the Starz app from inside the TV app and showing how the Starz show “Power” and the Starz exclusive “Star Wars: The Force Awakens” appeared under What to Watch.
As is often the case with apps available for both tvOS and iOS, apps installed from the TV app on the Apple TV also appear on iOS devices that use the same Apple ID (if, of course, you have enabled this in your devices’ settings).
The TV app also offers a Library screen that brings together all of your iTunes-purchased TV shows and movies, as well as a Store screen that enables you to rent or buy more content.
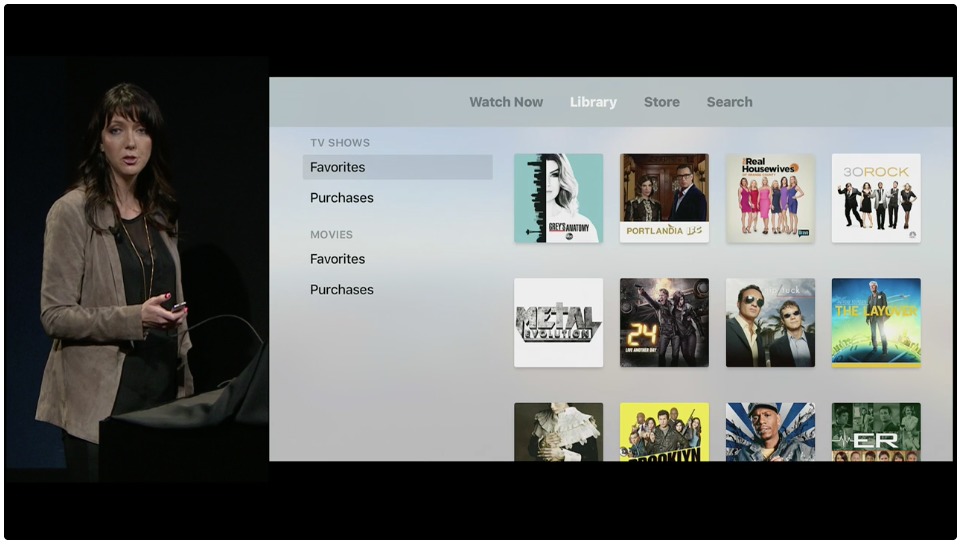

Speaking of iOS, the TV app is also coming to iOS 10, where it will replace the Videos app and provide a consistent user experience. Your content preferences will sync between the two operating systems.
The TV app will be a big change for how you use the Apple TV, so much so that the Home button on the Siri Remote will open the TV app instead of going to the Home screen. I presume that you’ll jump to the Home screen the same way you did on the third-generation Apple TV, by pressing and holding the Menu button.
Single Sign-On, Sort Of — Along with the TV app, Apple will finally introduce the Single Sign-On feature it promised for tvOS 10 (see “tvOS 10 Brings Dark Mode and More,” 13 June 2016). That feature gives you a central place to sign in to your TV provider to authenticate multiple content apps, instead of having to connect to each one individually.
Unfortunately, per Apple’s own press release, the only two major TV providers that will support Single Sign-On at launch are DirecTV and Dish. If you subscribe to Comcast, Cox, or Time Warner Cable, you’ll still have to activate every app individually for now.
Siri to Straddle Operating Systems — We’ll also see some Siri improvements alongside the TV app. Siri can already show you sports scores and display live content, but Apple is enhancing that capability soon. Folse demonstrated asking Siri about “the Louisville game,” and got back the current score and an option to view the game live.

Additionally, you’ll finally be able to search for TV and movie content on your iPhone and iPad. Right now, if you try to use Siri in iOS to search for James Bond movies, it just displays a generic list of random films. It will be nice to finally see these two Siri implementations work the same way for media content.
Minecraft Arrives on Apple TV — In other big Apple TV news, Minecraft is coming to tvOS by the end of the year! Minecraft is one of the largest gaming success stories in recent history, making its creator, Notch, an instant billionaire when Microsoft purchased Minecraft for $2.5 billion. The game combines a fantasy role-playing game with a virtual Lego set, and it has become a sensation with kids of all ages. For more on that, see “FunBITS: A Minecraft Crash Course” (19 September 2014).
I’m curious to find out how controllers will work with Minecraft. I don’t see how the game could be playable using the Siri Remote, so it might be one of the first to require a Made for iPhone (MFi) game controller. At first, almost all tvOS game developers had to support the Siri Remote for game control, but that changed with tvOS 10, which lets them instead depend on a custom MFi controller (see “tvOS 10 Brings Dark Mode and More,” 13 June 2016).
Better but Still Not Great — The TV app is a step in the right direction, making Apple TV content easier to find and improving the content viewing experience in both tvOS and iOS. However, without Netflix or Amazon Prime Video, it lacks two key sources of content that leave it crippled, if not completely dead in the water. It was hard not to snort as Apple talked about how TV would provide access to “all your video,” knowing that for many people, Netflix is all they watch.
The TV app pushes tvOS closer to competitors like Amazon’s Fire TV and Google’s Android TV, both of which implement a more content-focused approach on their home screens. But that approach has a downside: they often show you what they want you to see (and pay for), not what you necessarily want to watch. Will Apple strike pay-to-play deals for content owners to be featured in the TV app? Maybe they have already.
Another annoyance with the Apple TV is its lack of support for 4K resolution content, which Apple touts elsewhere, such as on the iPhone 6s and later and with Final Cut Pro X on the Mac. Right now, if you have a 4K TV, you need to either use its built-in apps or a 4K-capable Blu-ray player, Fire TV, or Roku box to take advantage of 4K content. Even if you don’t have a 4K set, you could still see improvements with 4K streaming. My new Sony TV has made me realize how “noisy” even 1080p streaming content is, resulting in pixelated backgrounds and other ugliness. Even though I don’t always see a huge difference in sharpness with 4K content from Netflix, I do notice its lack of visual artifacts.
One final thing to chew on. As my pal Zac Cichy pointed out, the TV app’s icon is identical to the Home button on the Siri Remote. Did Apple intend to ship the TV app with tvOS, and was it always meant to function as the Home screen? Was it held back due to a lack of content deals? Why is Apple introducing the TV app now, and why isn’t Netflix on board? I would love to learn the answers to these questions, but I’m not sure we’ll ever get them.
![]()
And now I need to get started on the third edition of “Take Control of Apple TV.”
New MacBook Pros Add Context-sensitive Touch Bar
At its “Hello Again” special event, Apple finally unveiled new models of the 13- and 15-inch MacBook Pro, the first update to the company’s professional laptops in nearly 18 months (see “Apple Releases Updated MacBook Pro, iMac, and iPhone Dock,” 19 May 2015). The new models boast an updated industrial design that takes cues from the 12-inch MacBook to reduce size and weight. They also introduced the Touch Bar, an entirely new, context-sensitive input device that replaces the function keys above the keyboard with a multi-touch–capable Retina display that includes an
integrated Touch ID sensor. Unsurprisingly, given how much time has passed since the previous models were released, the new MacBook Pros feature significantly improved performance as well.
The previous models of the MacBook Pro remain available for sale. The MacBook Air and 12-inch MacBook models received no updates, although Apple dropped the 11-inch MacBook Air. Apple made no mention of the iMac, Mac mini, or Mac Pro, so people looking to upgrade a desktop Mac will have to keep waiting.
Reach Out and Touch the Bar — Sure, the new MacBook Pros are smaller, lighter, and faster, but the big news is the Touch Bar. It’s a thin, touch-sensitive screen above the keyboard, where the function keys used to be. It extends the full width of the keyboard and is about as deep as the function key row it replaces at just over 0.4 inches (1.02 cm). Unfortunately, it does not have either 3D Touch/Force Touch or a Taptic Engine, so it accepts only simple touches and doesn’t provide any feedback.
The Touch Bar features a 2170-by-60–pixel Retina display that apps can use to show context-sensitive tools. Because it’s multi-touch and can handle up to 10 simultaneous touch inputs, app developers are letting their imaginations run wild with Touch Bar possibilities.
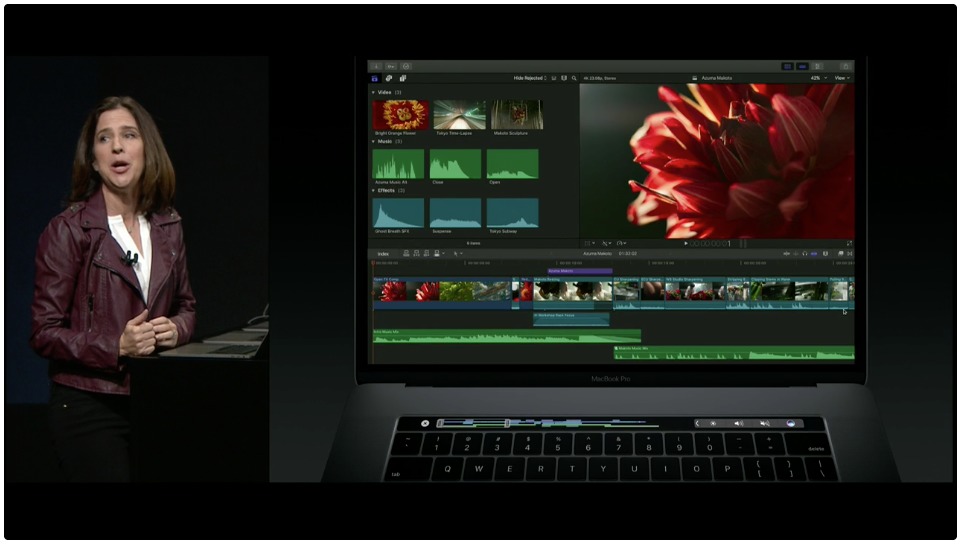
In Photos, for instance, depending on what you’re doing, the Touch Bar enables you to scrub through your photo collection, mark photos you love, and edit photos. Once you’re editing a photo, the Touch Bar changes to provide editing tools, such as exposure and color sliders and rotation controls. In video editing apps such as Final Cut Pro X, the Touch Bar can provide a timeline scrubber along with trimming tools.
Every app will take advantage of the Touch Bar in its own ways. For example, for those who use emojis, apps like Messages could display available emojis in a scrollable strip. The Touch Bar can also provide the QuickType suggestions familiar to iOS users.
Apple also showed how you can customize at least some of the Touch Bar’s tools, much like how you can choose which buttons appear in the toolbars of many Mac apps. Customizing the Touch Bar in the Finder, for example, presents an interface similar to that used for editing window toolbars, letting you drag buttons and controls down to the Touch Bar from an on-screen display of available items.
At the far right of the Touch Bar is an integrated Touch ID sensor, which enables you to log in to your Mac with the press of a finger, just like on an iPhone or iPad. Actually, it’s even better, since you can use different fingers to access different accounts on your Mac at startup or via fast user switching. For example, you could have your right index finger log you in to your main account, set your right pinky to log you into a troubleshooting account, and let your spouse log in to yet another account. The Touch
ID sensor communicates with a new Apple T1 chip that includes a Secure Enclave for storing Apple Pay information for use within Safari on the Web.
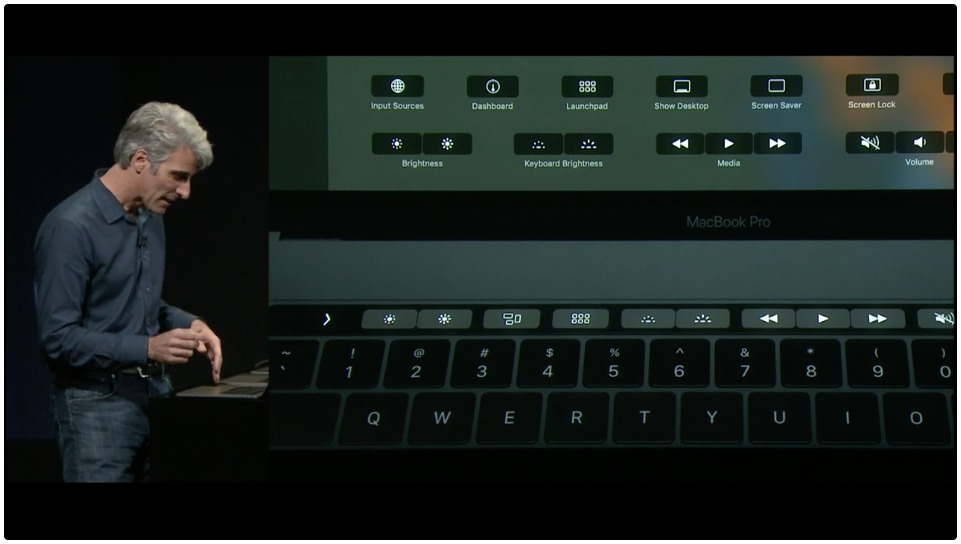
For those who still rely on function keys, a press of the physical Fn key in the lower-left corner of the keyboard instantly flips the Touch Bar back to showing classic F1 through F12 function keys.

Apple executives Phil Schiller and Craig Federighi made plenty of jokes about people still needing IBM 3270 terminal function keys, but realistically, some people have long relied on the function keys as universal shortcut keys. OK, maybe it’s just me, but several decades ago, I determined that I would be more productive if I could always invoke my preferred writing tool with F1, my default Web browser with F2, my email app with F3, my file transfer app with F4, and so on. If I end up buying one of these Touch
Bar-enabled Macs, I’ll have to see how I end up using it.
What about the Esc key, the apparent absence of which has prompted all sorts of reactions from Apple observers? Apple reserves the left end of the bar for a “system button” that is either the Esc key or some other system-provided button, depending on the context. So, in the rare event that you need to force-quit an application, Command-Option-Esc is still an option.
In fact, Apple’s developer guidelines say that the Touch Bar has three regions: the system button area, a central app region where app-specific controls go, and a control-strip spot to the right where users can manage system level tasks like adjusting the volume or brightness — this is where the dedicated Siri button lives. Users can completely hide the control-strip region in order to display more app-specific controls, and they can also choose to hide the app region.
On the one hand, the Touch Bar is a fascinating innovation on Apple’s part. It could revolutionize how Mac users, particularly professionals who manipulate the interfaces and controllers for their apps like musical instruments, interact with virtual software worlds.
On the other hand, Apple needs to go all in with the Touch Bar if it’s to become a core part of the Mac experience. Right now, it’s available only on the new 13- and 15-inch MacBook Pros. Nor did the company even hint about a new Magic Keyboard for desktop Macs. I suspect developers will support the Touch Bar right away just because it’s cool and new, but if Apple doesn’t make it universal across the product line, support will wane over time. Plus, regardless of how much better these new MacBook Pros are than the models they replace, many new buyers won’t consider them because of the inherent tradeoffs in working on a laptop versus a desktop, such as reduced performance, worse ergonomics when used at a desk, and higher cost
for an equivalently powerful setup.
In SlackBITS, where we were kibitzing with TidBITS readers during the presentation, we were pondering whether the Touch Bar is better or worse than a fully touch-sensitive screen, such as is available on many Windows laptops and Chromebooks. And if the Touch Bar’s location on the keyboard is better for ergonomic and user interface reasons, what does that say about iOS, which is all about touch-based direct manipulation of the interface? Might iOS 11 offer apps the option of including a virtual Touch Bar at the bottom of the screen as a consistent interface element, or even replace the Home button with a Touch Bar?
In any case, the idea of a separate multi-touch display dedicated to input and control in addition to the main computer display is powerful, and it will be interesting to see how its use evolves over time.
Size and Weight — Back at the basics, the new MacBook Pros boast some impressive numbers. The 13-inch MacBook Pro is significantly smaller and lighter than the previous model:
- Height: 0.59 inch (1.49 cm), down from 0.71 inch (1.8 cm)
- Width: 11.97 inches (30.41 cm), down from 12.35 inches (31.37 cm)
- Depth: 8.36 inches (21.24 cm), down from 8.62 inches (21.89 cm)
- Weight: 3.02 pounds (1.37 kg), down from 3.48 pounds (1.58 kg)
In comparison with the 13-inch MacBook Air, the new 13-inch MacBook Pro is thinner (at the MacBook Air’s thick edge), narrower, and less deep — and it weighs just 0.06 pounds (27 g) more. The 12-inch MacBook is still smaller and nearly a pound lighter, but it has a smaller screen and an anemic CPU.
The new 15-inch MacBook Pro sees similar drops in size and weight from the previous model:
- Height: 0.61 inch (1.55 cm), down from 0.71 inch (1.8 cm)
- Width: 13.75 inches (34.93 cm), down from 14.13 inches (35.89 cm)
- Depth: 9.48 inches (24.07 cm), down from 9.73 inches (24.71 cm)
- Weight: 4.02 pounds (1.83 kg), down from 4.46 pounds (2.02 kg)
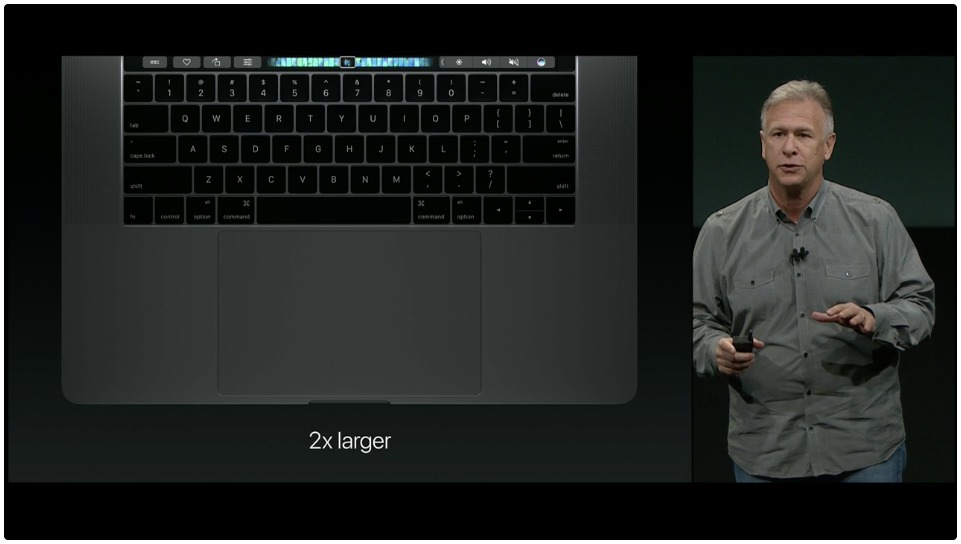
Functional Specs — One aspect of the new MacBook Pros will likely jump out at you when you see it: a Force Touch trackpad that’s twice as large as the trackpad on the previous models. In fact, as Phil Schiller noted, the Force Touch technology, which simulates the feel of clicking via a Taptic Engine, is the only reason Apple could create such a large trackpad. It would be impossible to make a mechanical system that worked consistently across such a large surface. The additional size should be better for multi-touch gestures.
Both models feature improved screens as well. The resolutions remain the same — 2560 by 1600 for the 13-inch model and 2880 by 1800 for the 15-inch — but Apple claims the displays are 67 percent brighter, have a 67 percent higher contrast ratio, and show 25 percent more colors thanks to support for the P3 wide color gamut.
Apple has apparently learned its lesson from the 12-inch MacBook, which garnered significant criticism for having only a single USB-C port for charging and expansion (see “The 12-inch MacBook: A Different Mac for a Particular User,” 29 April 2015). The new Touch Bar MacBook Pros go in the other direction with four Thunderbolt 3 ports, two on each side, any of which can be used for charging and expansion. And no, the MacBook Pro won’t charge faster if you plug in two chargers; it just picks one.
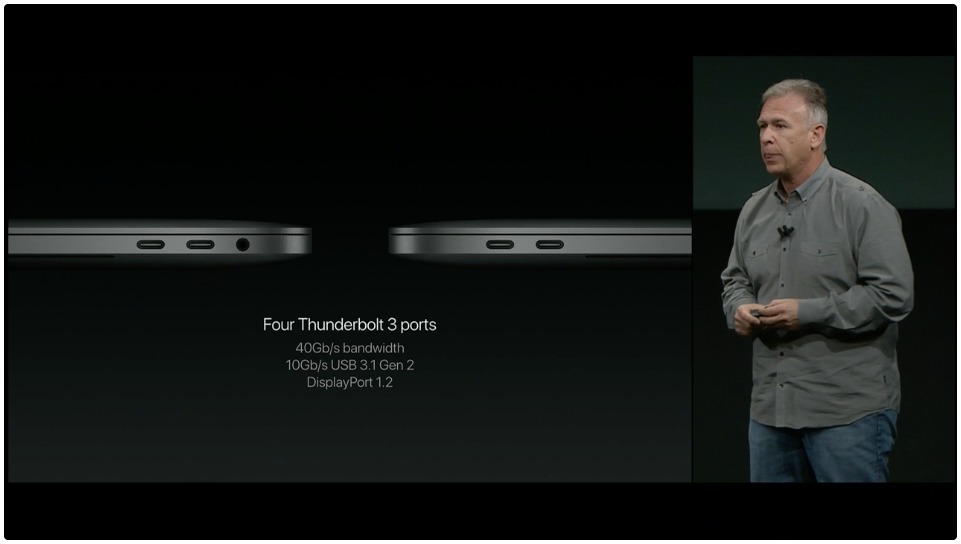
Thunderbolt 3, which provides throughput up to 40 Gbps, uses the same connector as USB-C and supports DisplayPort (and thus HDMI and VGA, plus Thunderbolt 2, via adapters) and USB 3.1 Gen 2, which runs at 10 Gbps and is backward compatible with older USB devices. We’re planning to write more about Thunderbolt 3 and USB-C soon, but for the moment, consider the fact that these new machines can drive two 5K displays or four 4K displays. That’s impressive.
At this point, I need to acknowledge that Apple actually introduced two versions of the 13-inch MacBook Pro. So far I’ve been talking about the high-end one, but for $300 less, you can get a model that lacks the Touch Bar, reverting to traditional function keys, and sports only two Thunderbolt ports on one side. Plus, it comes with slower processor options and a less-capable graphics processor.
So, regarding processors, graphics, memory, and storage, here’s how the base models stack up. Apple is being quite confusing with the Touch Bar models, offering two configurations of each, with the cheaper version lacking certain options. For instance, the $1799 model of the 13-inch MacBook Pro doesn’t let you increase storage, whereas the $1999 model includes more storage and lets you choose more yet. On the 15-inch side, the $2399 model has a slightly slower CPU, less storage by default, and a less-capable graphics processor than the $2799 model, and Apple charges more for upgrades for this model. So shop carefully!

13-inch MacBook Pro (no Touch Bar) for $1499
- 2.0 GHz dual-core Intel Core i5, configurable to a 2.4 GHz dual-core Intel Core i7 (+$300)
- Intel Iris Graphics 540
- 8 GB of RAM, upgradeable to 16 GB (+$200)
- 256 GB SSD, configurable to 512 GB (+$200) or 1 TB (+$600)
13-inch MacBook Pro (with Touch Bar) for $1799
- 2.9 GHz dual-core Intel Core i5, configurable to a 3.1 GHz dual-core Intel Core i5 (+$200) or 3.3 GHz dual-core Intel Core i7 (+$300)
- Intel Iris Graphics 550
- 8 GB of RAM, upgradeable to 16 GB (+$200)
- 256 GB SSD, configurable to 512 GB (+$200) or 1 TB (+$600)
15-inch MacBook Pro (with Touch Bar) for $2399
- 2.6/2.7 GHz quad-core Intel Core i7, configurable to a 2.9 GHz quad-core Intel Core i7 (+$300/+$200)
- Radeon Pro 450/455 with 2GB memory, upgradeable to Radeon Pro 460 with 4GB memory (+$200/+100)
- 16 GB of RAM
- 256 GB SSD, configurable to 512 GB (+$200), 1 TB (+$600), or 2 TB (+$1400)
It can be hard to know how all the new components will affect real-world performance since Apple improved the speed of multiple subsystems. It’s safe to say that these are the fastest Mac laptops ever; what remains to be seen is how they compare to Apple’s desktop models. Phil Schiller did say that Apple limited the maximum RAM to 16 GB to avoid using too much power.
In terms of wireless networking, 802.11ac Wi-Fi is standard across all models, as is Bluetooth 4.2. And despite Apple’s “courage” in dropping the headphone jack from the iPhone 7, the new MacBook Pros keep the 3.5mm jack and provide stereo speakers, three built-in microphones, and a 720p FaceTime HD camera. That’s one more mic than the previous models, and a jump from Bluetooth 4.0, but those changes aren’t major.
Battery life should also be similar, although Apple rates the new 13-inch MacBook Pro at only 10 hours of iTunes movie playback, down from 12 in the previous model. That’s likely due to significantly smaller batteries; the old 13-inch model featured a 74.9-watt-hour lithium-polymer battery, whereas the non-Touch Bar model has a 54.5-watt-hour battery, and the Touch Bar model’s is slightly smaller yet, at 49.2-watt-hours. Similarly, the 15-inch drops from a 95-watt-hour battery to a 76-watt-hour battery. The new 13-inch models come with a 61-watt USB-C power adapter, whereas the 15-inch model includes an 87-watt USB-C power adapter. No more MagSafe, sorry!
Finally, here’s an additional odd fact that came to light after the announcement. The new MacBook Pro models don’t play a startup sound by default, perhaps because they auto-boot when opened after being powered down. Happily, you can re-enable the startup sound and change the auto-boot behavior with simple Terminal commands.
The Massively Confusing MacBook Lineup — Remember the era of the Mac matrix, with a desktop and a laptop each for consumers and professionals? Those simple days of yesteryear are long gone, and it’s now impossible to keep track of Apple’s laptop line without a scorecard. That’s in part because the previous MacBook Pro models remain available, as do the 12-inch MacBook and the 13-inch MacBook Air. Apple did at least drop the 11-inch MacBook Air and the 2012 13-inch MacBook Pro that featured a SuperDrive but not a Retina display. That leaves us with the following list of laptops, sorted by increasing base cost:
- 13-inch MacBook Air (Early 2015): $999
- 12-inch MacBook (Retina, Early 2016): $1299
- 13-inch MacBook Pro (Retina, Early 2015): $1299
- 13-inch MacBook Pro (Retina, Late 2016): $1499
- 13-inch MacBook Pro (Touch Bar, Late 2016): $1799
- 15-inch MacBook Pro (Retina, Mid 2015): $1999
- 15-inch MacBook Pro (Touch Bar, Late 2016): $2399
The problem is that size, weight, performance, display quality, available upgrades, and other features see-saw across that list, creating a dizzying array of options for those who aren’t willing to just ante up to get one of the new MacBook Pro models. That’s the easy decision — these new models are the best at everything, and only a little larger and heavier than the underpowered 12-inch MacBook.
It’s hard to recommend any of the older models for any reason other than price, and even there it’s difficult since Apple didn’t drop their prices after announcing the new models. Apple doesn’t compete on price, but it’s embarrassing to try to explain to someone why a nearly two-year-old 13-inch MacBook Pro still costs $1299.
Ordering — Both of the new MacBook Pro models are available in your choice of silver or space gray, the latter of which was previously an option only for the 12-inch MacBook. Those who are desperate for some MacBook Pro bling in gold or rose gold will be disappointed.
You can order all of the new MacBook Pros immediately, but Apple said the Touch Bar-equipped models wouldn’t ship for 2 weeks, and by the time we ordered ours the next day, the shipping time had expanded to 4–5 weeks.
We’re looking forward to getting some personal experience with these new MacBook Pros, since the Touch Bar may feature heavily in the kind of documentation we write for TidBITS and Take Control. Plus, several TidBITS staffers have been waiting patiently for years for Apple to update its laptop line — it’s about time!
How to Migrate to a New Mac
When you get a new Mac — whether it’s brand new or just new to you — one of your first questions is bound to be how you move all your data from your old Mac (or PC, if you’re switching platforms) to the new one. Those of us who have moved from one Mac to another repeatedly may not give it much thought, but if you haven’t done it before, or at least recently, the prospect of dealing with loads of documents, folders, accounts, preferences, and so on can seem daunting.
In fact, there are several ways to migrate your data, and which way you choose depends on your circumstances. There are four main paths you might consider. In order from easiest to most challenging, those paths are:
- Sync from the Cloud: If you keep pretty much all your data in the cloud, all you need to do is log in to the appropriate accounts on your new Mac. Those accounts would cover documents in iCloud Drive, Dropbox, Google Drive, or whatever; email in an IMAP or Exchange account; contacts and calendars stored in CardDAV and CalDAV accounts; photos synced with iCloud Photo Library or comparable; music via streaming or synced using iTunes Match; and so on. Data that’s cached locally will sync automatically, and anything you normally leave in the cloud will remain there, just as accessible as it was on your old Mac. Migration is essentially a non-issue, except for any random files you stored only on your old Mac’s drive
— and you can copy those over to the new Mac manually. - Use a Clone to Migrate: If you have or are willing to make a bootable duplicate, or clone, of your old Mac onto an external hard drive using a utility such as Carbon Copy Cloner or SuperDuper, you can then connect the duplicate to your new Mac and boot from it. (Hold down Option on startup and select the duplicate — see “macOS Hidden Treasures: 15 Startup Key Combinations,” 1 September 2016). Now use the same backup utility to clone the duplicate onto the startup volume of your new Mac. Finally, reboot your new Mac from its internal drive. That’s it — your new Mac has all the same
apps, files, and other data as your old one.This is the approach I nearly always take, because it’s simple, it’s relatively fast, and it puts all my data exactly where I expect it to be. But, there are a couple of caveats. First, migrating via a clone assumes that the new Mac can run the same operating system that’s on your clone. But if your old Mac was running, say, Mavericks and you get a new Mac that requires Sierra or later, this procedure will leave you with a Mac that doesn’t boot. You can usually avoid this problem by upgrading your old Mac to the very latest system software before cloning it. And second, don’t use this approach if you’ve already created files on the new Mac because it will overwrite everything on that Mac’s drive.
-
Migrate via Setup Assistant: When you turn on a brand new Mac for the first time, a program called Setup Assistant runs; it walks you through creating a user account and various other essential first-run steps. One of those steps offers to transfer your data from another Mac, a Time Machine backup, an external startup disk, or a Windows PC. If your new Mac requires a newer operating system than what’s on your old Mac, using Setup Assistant is your best option — and you can still use your old system’s clone as a source if you like. Setup Assistant also runs when you install macOS onto a blank volume, giving you the same options. So, if you’re performing a clean install of a new operating system, as opposed to
an in-place upgrade, you can use this procedure to migrate your old data. -
Use Migration Assistant: Finally, there’s another utility included with every Mac called Migration Assistant, which can be used to migrate accounts and data from another Mac (or a backup) at any time. Migration Assistant looks and acts almost exactly like the file transfer portion of Setup Assistant, which is no accident — they use the same underlying code. If you’ve already been using your new Mac for a while, this may be your best option, but, for reasons I’ll explain in a moment, it’s not ideal in every situation.
If one of the first two options (cloud sync or using a clone) meets your needs, you can stop reading now. The remainder of this article is for people who need to use Apple’s migration technology via Setup Assistant or Migration Assistant. But before I launch into the steps you’ll take, I want to give you some essential background on migration that may affect your decisions.
Understand Migration Concepts — Migration is merely a fancy word for copying — a familiar, ordinary, everyday task that shouldn’t seem scary at all. Whenever you make a backup, you copy stuff from one place to another, just as when you share files over a network. You have stuff on your old computer, and you’re going to copy it onto your new one. No big deal — but there is quite a lot of copying to be done, and it has to be done in just the right way for best results.
Migration essentially involves two parts:
- Connecting the two computers: This can be a simple matter of stretching a Thunderbolt or FireWire cable between them, or having them on the same Ethernet or Wi-Fi network. If you can’t do either of those things, you can clone everything from the first computer’s disk onto an intermediate external hard drive and plug that into the new Mac.
-
Figuring Out Where the Old Stuff Needs to Go: Figuring out which stuff from the old computer needs to go where — and with which attributes (such as ownership and permissions) on the new Mac is trickier than it sounds, because some of your data may be hidden in databases or invisible folders, or may consist of numerous components scattered around your drive, as is often the case with applications.
The migration technology Apple baked into Setup Assistant and Migration Assistant knows how to copy stuff from your old computer to your new one. It knows where your old stuff is, where it should go, and how to copy it intact — even if locations and file formats have changed from your old computer to your new one. It handles the tricky bits so you don’t have to worry about them. It even simplifies the process of making a connection, in that you don’t need to mess with file sharing settings or mounting network volumes; at most you’ll have to run an app on the source computer and click a few buttons.
So far so good. But there’s a big difference between transferring stuff via Setup Assistant (in the process of setting up a brand new Mac or installing macOS on an empty volume), and running Migration Assistant manually later. With Setup Assistant, you’re starting from scratch, creating accounts on your new Mac based on the data from your old Mac. But with Migration Assistant, you’re adding to what’s already on your new Mac. And that leads to the crucial issue, which I want to emphasize:
Migration Assistant can’t merge accounts.
Here’s what I mean. Say I’ve brought home a new Mac, and I’ve gone through its Setup Assistant to set up a new user account with a full name of Joe Kissell and a short name (or “account name,” which is also the name of my home folder) of joe — for the logical reason that, well, that’s my name and it’s what I used on my old Mac or PC (Windows uses only long usernames). And I start saving files, adding calendar entries, and doing all the usual things I do. A week later, I decide to migrate the data from my old Mac or PC, which will include all the files in my main user account there. But when I try, Migration Assistant gives me some bad news: I
can’t migrate the data unless I change the account name, because every full and short username must be unique on a given Mac, and the new Mac already has an account called Joe Kissell, or joe for short!
So I could rename the account I’m transferring to Joseph Kissell with a short name of joseph or jk or whatever. But then I have something I don’t want — two accounts:
- My new
Joe Kissellaccount, which uses the name I want, and which has the data I’ve created since I set up the account a week ago -
My old account, which was called
Joe Kissellbut has now been renamed toJoseph Kissell, and which contains all my old data
If Migration Assistant could somehow merge all the stuff from my old Joe Kissell account into my new one, there’d be no problem. But it can’t! And sure, I could come up with a complicated procedure to merge the accounts manually, but it would be an awful lot of error-prone work. Not fun.
The moral of the story is: When you get a new Mac, or when you do a clean installation of macOS, the optimal time to migrate your old stuff (in order to keep account names intact) is right away, during that first run of Setup Assistant, instead of later, using Migration Assistant.
If it’s already too late — you’ve already set up a new account with a conflicting name — you have three choices, the first two of which can be performed by Migration Assistant, as I’ll describe shortly:
- Keep the existing account as is, and rename the old one as I described above. If you’re not especially tied to the old username, this might seem like a perfectly reasonable choice, but then you’ll have files under two different accounts, which is awkward at best.
-
If you’ve created relatively little new data yet in the new account, you can replace the account with the conflicting name — that is, overwrite all the data from the newer account with the data from the account you’re migrating while saving a copy of the overwritten data. If you already have important data under the new account, you can retrieve it later after logging in to the migrated account. This option is available when migrating from an account on another Mac, but not when migrating from a Windows PC.
-
Change the short (and long) name of the new account so it won’t conflict, transfer the old account, and manually copy data from the new one to the old one, deleting the new account when you’re done. If you want to do this, you can find instructions for the name-change part on Apple’s site, but I’m afraid you’ll have to do the actual data copying part manually. And, since you can’t normally access another user’s home folder, you’ll have to use the
/Users/Sharedfolder, an external drive, or some command-line magic to work around that restriction.
Having said all that, I should point out that using Migration Assistant, including the version in Setup Assistant, is not an all-or-nothing affair. You can use it to transfer only your applications, for example, or only particular user accounts, or only certain types of data from a user account. Although most people want to transfer everything, it’s entirely up to you.
With that background in mind, I’ll walk you through three scenarios:
- Migrating data from an old Mac via Setup Assistant during the initial setup of a new Mac, or after a clean install of macOS
-
Migrating data from an old Mac via Migration Assistant to a Mac that already has one or more active user accounts and data you don’t want to lose
-
Migrating data from a Windows PC
Migrate from Another Mac Using Setup Assistant — If you are transferring data from another Mac while running Setup Assistant on a brand new Mac — or during a clean installation of macOS onto a blank volume — follow these steps:
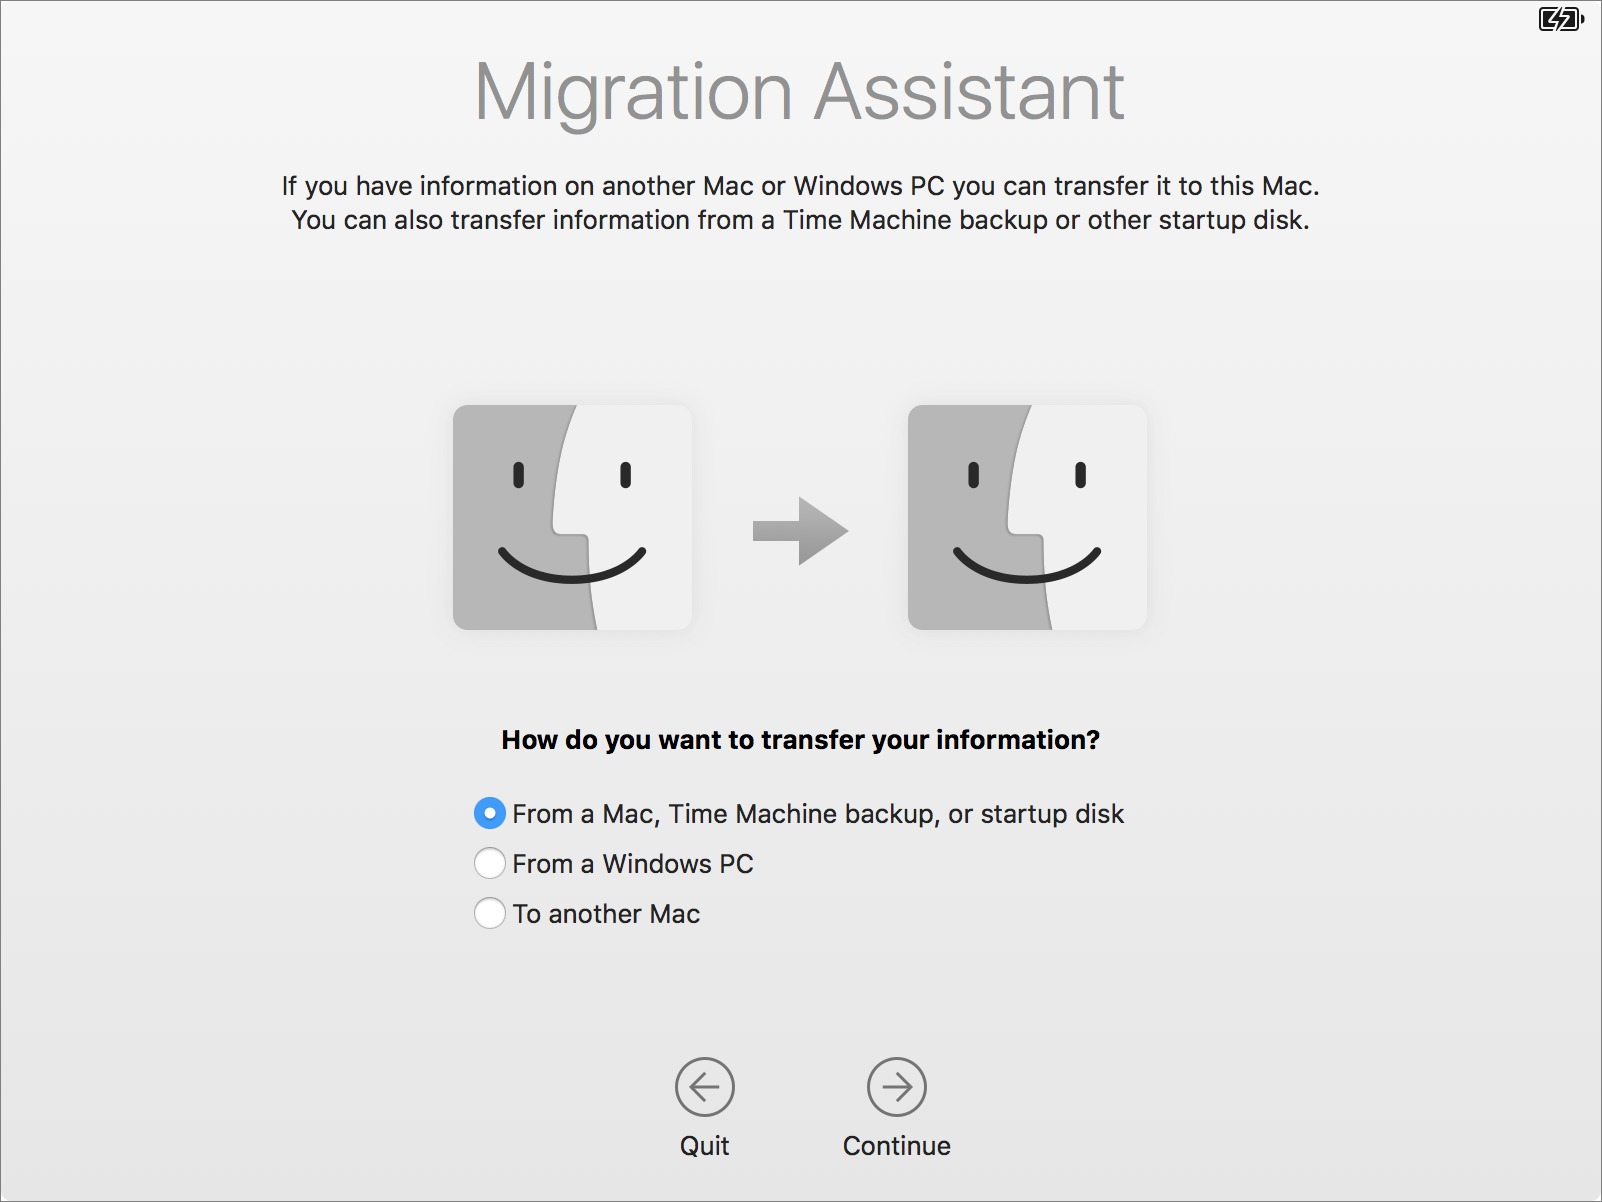
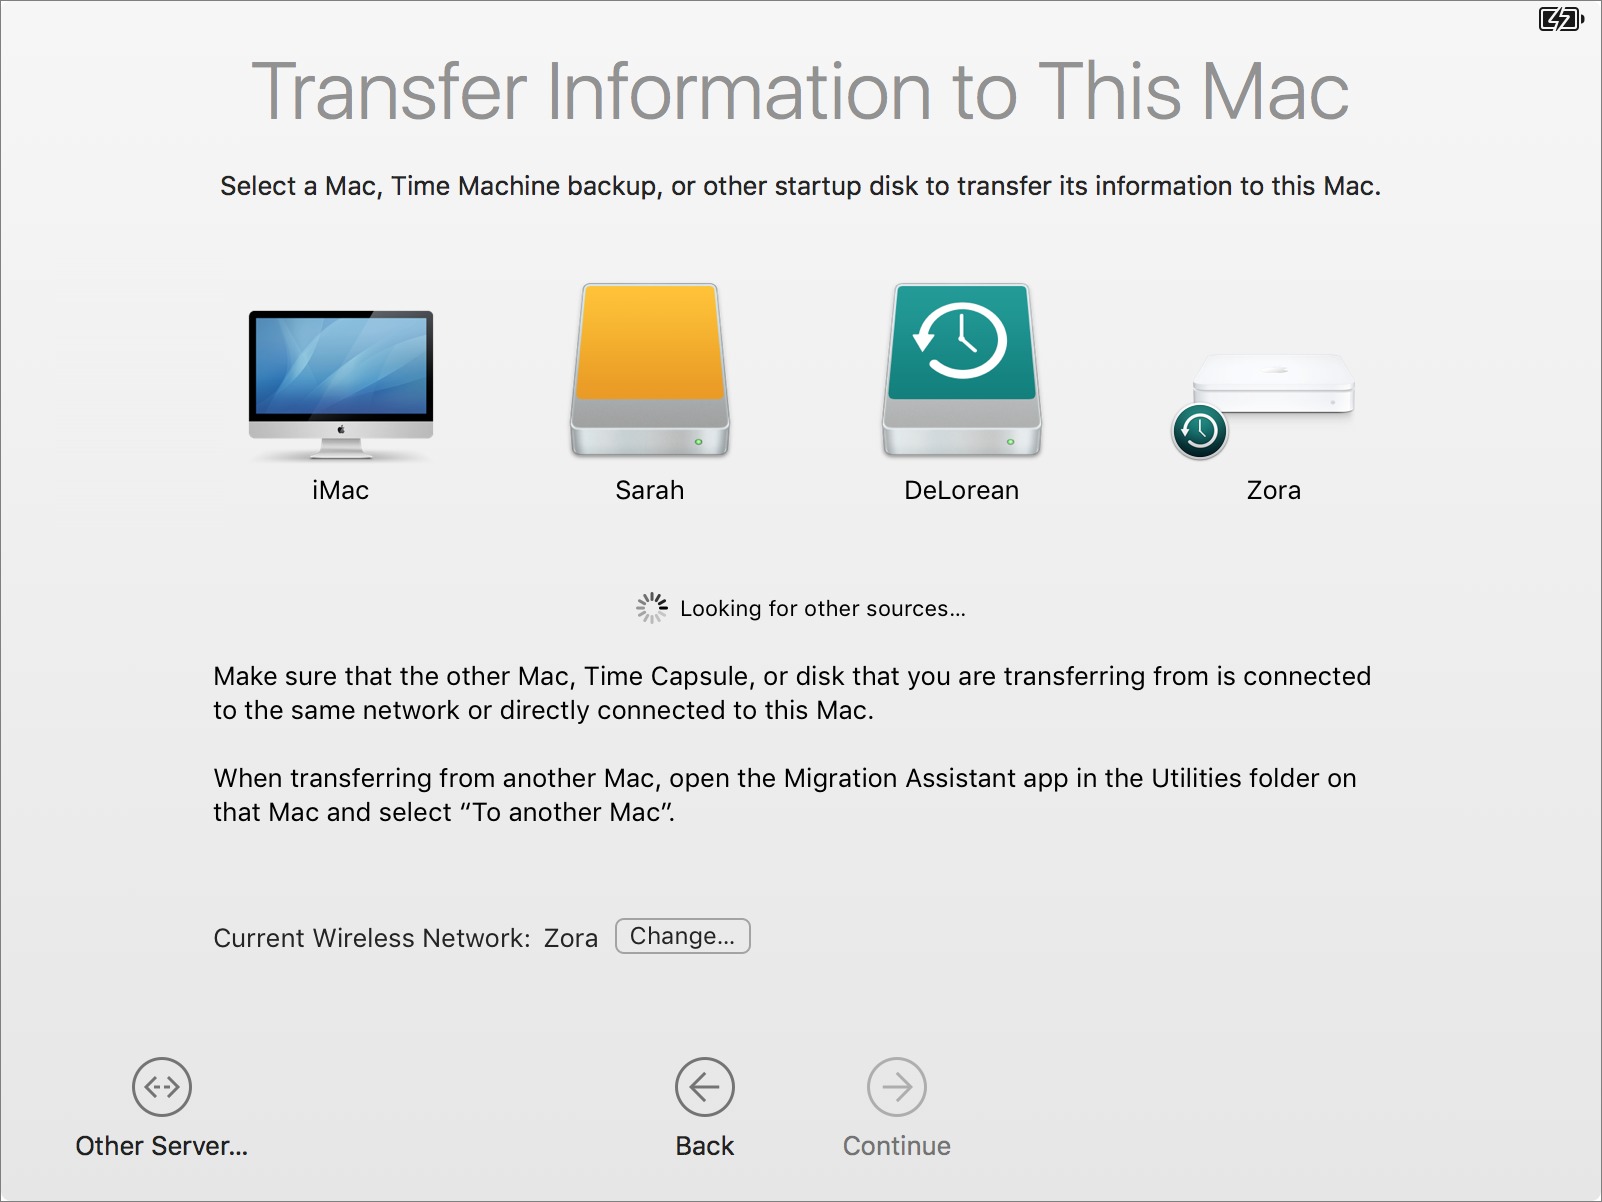
1: If you’re using a brand new Mac for the first time, work your way through Setup Assistant until you get to the Transfer Information to This Mac screen. Similarly, if you’ve just installed macOS onto a blank volume, follow the prompts until you get to this screen.
![]()
2: Select “From a Mac, Time Machine backup, or startup disk.” But don’t click Continue yet.
3: Make sure the old Mac, or the drive on which your Time Machine backup or bootable duplicate exists, is connected to your new Mac:
- Mac-to-Mac: If both Macs have Thunderbolt ports, your best bet is to connect a Thunderbolt cable to each. (If the newer Mac has a Thunderbolt 3 port, which uses the USB-C connector, you can connect it to an older Mac that has a Thunderbolt 1 or 2 port using a Thunderbolt 3 (USB-C) to Thunderbolt 2 Adapter and a conventional Thunderbolt cable.) If both Macs lack Thunderbolt but have FireWire ports, use a FireWire cable. If one has Thunderbolt and the other has FireWire, you can use a FireWire cable with a Thunderbolt-to-FireWire adapter. If neither Thunderbolt nor FireWire is an option, use an Ethernet cable. And, if even that isn’t possible because you’re using a Mac with no Ethernet port and don’t have a USB-to-Ethernet adapter, make sure the Macs are on the same Wi-Fi network — but bear in mind that Wi-Fi will nearly always be much slower than the other options.
-
Backup Drive: If you’re transferring information by way of a backup, make sure the backup drive is connected to the new Mac. If you backed up to a Time Capsule using Time Machine, connect the Time Capsule to the Mac via Ethernet if possible; if that isn’t possible, move the Mac as close as you can to the Time Capsule for better Wi-Fi reception.
4: If you’re using a Thunderbolt or FireWire cable, turn off the old Mac, and then turn it back on while holding down the T key. This puts it in Target Disk Mode, which means it functions as an external hard drive.
If you’re using an Ethernet cable or a Wi-Fi network, then on the old Mac, open Migration Assistant, from /Applications/Utilities. Follow the prompts until you get to the Migration Assistant screen. Select To Another Mac, and click Continue.
5: Back on the new Mac, click Continue.
6: Select the source from which you’ll be transferring your data (often there will be only one choice), and click Continue.
Note the following qualifications:
- Mac in Target Disk Mode or bootable duplicate on an external drive: If your source disk is encrypted with FileVault, the Continue button becomes Unlock. Click it and enter the disk’s password.
-
Mac connected via Ethernet or Wi-Fi: You’ll see additional prompts on both Macs for passcode verification. Once you’ve confirmed that they’re the same, click Continue on the source Mac.
-
Time Machine backup on a Time Capsule or an external drive: After you select the source and click Continue, you must select the backup (typically, there will be only one) and click Continue again. If prompted, also select the backup volume and click Continue.
7: Select the kinds of data you want to transfer. The screen shows the size of each item and the total size of the selected items — along with available space on your destination volume — updates automatically as you change your selections. It may take a few minutes for the installer to initially display and calculate the sizes of each option.
![]()
If the volume you’re transferring from has just one user account, you may see only three checkboxes, all selected by default: Applications, Documents & Data (with an accompanying Edit button), and Computer & Network Settings. If the volume has more than one user account, as shown above, you’ll see a scrolling list that contains numerous items — again, all selected by default: Applications, each user account listed by name, an “Other files and folders” entry, and Computer & Network
Settings.
Here’s an explanation of each option, and my recommendations:
- Applications: This option transfers the contents of your previous
/Applicationsfolder and its subfolders, such as Utilities, skipping any applications for which the new Mac already has newer versions: Safari, Mail, and so on). Because you may find it tedious to reinstall your applications, leave this option selected, as it is by default.If you select Applications, Setup Assistant also copies the contents of
/Libraryon your previous system. This is extremely good, because that folder contains many support files without which some apps wouldn’t run. As with/Applications, Setup Assistant won’t copy any older files over newer versions it has just installed. -
Documents & Data: If you have just one user account, you’ll see a checkbox labeled Documents & Data — this refers to the data in your user account. Click Edit to view its contents. In the dialog that appears, you can deselect any top-level folder within the account, except for the Library folder. Along with the visible top-level folders is a folder called Other Data. Apple doesn’t specify what this includes and my tests to find out have been inconclusive, so I suggest leaving it selected just in case it contains anything you need. Finally, there’s a checkbox labeled “Other files and folders.” This option refers to any files or folders at the root level of your old volume as well as
anything in the/Users/Sharedfolder. I suggest leaving this checkbox selected. -
User accounts: If you have more than one user account, each is shown at the top level of the list.
This list may include “users” that don’t have a conventional user account or home folder on your Mac, but which your Mac considers to have an account of a sort — people with whom you’ve shared files using System Preferences > Sharing, for example, or special low-level accounts added by software such as MacPorts or Cloak (the
cloakproxyaccount). Some of these may display messages about having no home folder or having a home location that is relocated. Don’t worry about these messages; Setup Assistant is merely pointing out that these won’t create conventional user accounts, each with its own home folder. It’s best to leave such user accounts selected, even if they appear to contain no
data.Transferring a user means copying the user’s entire home folder, if any (
/Users/some-username), to the new Mac; once a user is transferred, the user can log in without having to set up an account again. You should transfer all existing user accounts except those that are no longer in use. You can, if you like, deselect any individual (top-level) folders within a user’s home folder to skip copying those to your new Mac. As for the unexplained Other Data folder that I mentioned in the previous bullet point, the safest course is to leave it selected. -
Other files and folders: As in the single-user account setting described in the second bullet point, this option refers to any files or folders at the root level of your old volume as well as anything in the
/Users/Sharedfolder. I suggest leaving this checkbox selected. -
Computer & Network Settings: This category sometimes has up to three sub-items that you can select. Computer includes certain system-wide settings, such as sharing preferences, Energy Saver settings, and parental controls. Printers refers to your printer settings. Network includes the settings in your Network preference pane. I suggest leaving Computer & Network Settings checked, along with all sub-items that may be present.
After making your selections, click Continue.
Setup Assistant copies the selected items to your new Mac — a process that may take just a few minutes or several hours, depending on how much data you are transferring.
Be aware of the following:
- You should completely disregard any time estimates you see — they’re notoriously and often ludicrously inaccurate.
-
If Setup Assistant notices any software conflicts with the files you’ve selected, it displays an Incompatible Software warning notice and moves the conflicting items to an Incompatible Software folder at the top level of your startup volume. Click Continue to keep going.
-
If FileVault was enabled on the volume you’re migrating data from, Setup Assistant reminds you that it’s not enabled automatically on your new volume — but that you can enable it manually.
At the end of the migration process, a Migration Complete screen appears, stating that your data has been migrated and is ready to use. Click Quit to dismiss the window. At this point, your Mac should prompt you to log in, and then ask you a few final questions.
Migrate from Another Mac Using Migration Assistant — If you’ve already set up a new Mac and you want to migrate data from an old Mac, the process is almost the same as what I just described, but with two modifications:
1: On the new Mac, open Migration Assistant from /Applications/Utilities. Follow the prompts until you get to the Migration Assistant screen shown earlier.
2: Pick up with Step 2 in the previous set of instructions. But when you get to Step 6, if you’ve selected a user account on the source Mac whose name (short or long) overlaps with one already on the destination Mac, a message appears underneath the list of items to transfer: “Some conflicts were detected. Finish selecting the information you’d like to transfer, then click Continue to fix any conflicts.” When you click Continue, you’ll see the dialog shown below.
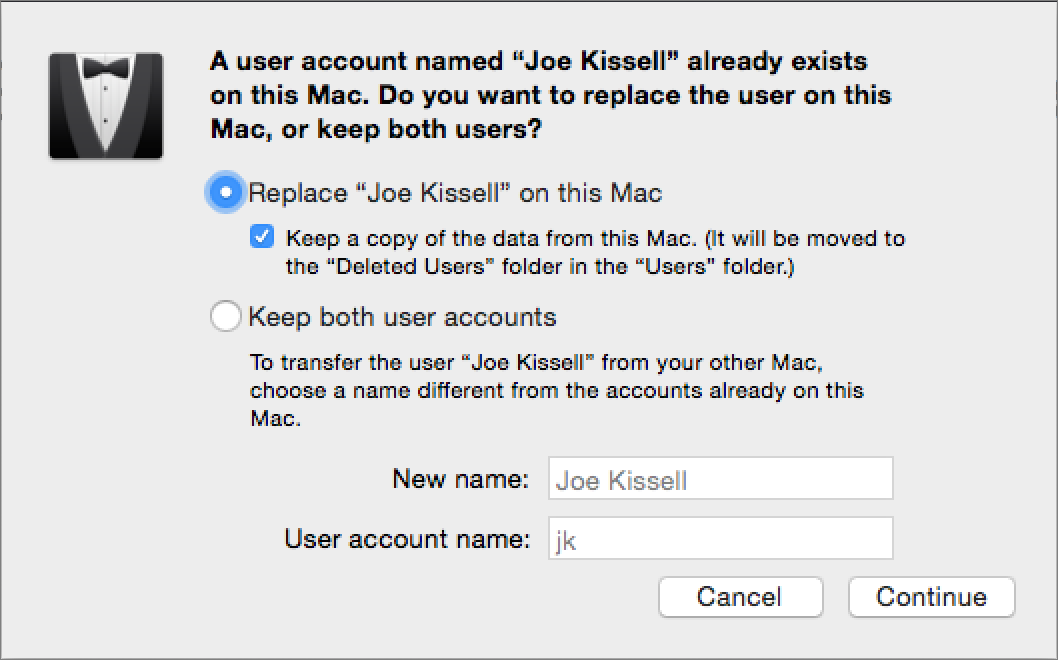
As I discussed earlier, you can select either:
- Replace “User Name” on this Mac: This choice removes the account on the destination Mac with the conflicting name. Happily, if you leave “Keep a copy of the data from this Mac” selected, as it is by default, Migration Assistant saves the account’s data in the Deleted Users subfolder of the Users folder so you can retrieve any needed files later.
-
Keep Both User Accounts: To keep both accounts, enter a new full name and User Account (short) name for the account you’re about to transfer from the other Mac.
Make your choice and click Continue. Migration Assistant copies the selected data. When it finishes, you can quit it on both Macs. You may be prompted to restart the destination Mac or to log back in.
Migrate from a Windows PC — The steps for migrating your data from a Windows PC using Migration Assistant are similar to what you would do in a Mac-to-Mac transfer.
A tip: If you’re doing this during the installation of macOS, you don’t need to jump through so many hoops. Specifically, follow Steps 1–3 below, and then, when Setup Assistant asks you where to transfer files from, select “From a Windows PC” and click Continue. Then skip ahead to Step 9, and pick up from there.
The steps to migrate from Windows to macOS are as follows:
1: Make sure the PC and the Mac are on the same Wi-Fi or, better yet, Ethernet network.
2: On the PC, download the Windows Migration Assistant and install it.
3: Run Migration Assistant on the PC and click Continue twice, which brings you to a screen that says Searching.

4: On the Mac, open Migration Assistant from /Applications/Utilities.
5: Follow the prompts until you get to the Migration Assistant screen.
6: Select “From a Windows PC” and click Continue.
7: Select the Windows PC as the source. In most cases, you’ll see only the PC on which you’re running the Windows Migration Assistant, but if you see more than one, select the one you want. Click Continue.
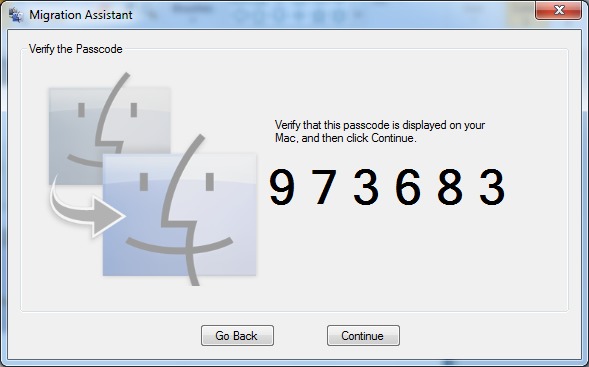
8: A passcode will appear on both your Windows screen and your Mac screen. Verify that the number is the same on both sides, and then, on the Windows PC, click Continue.
9: Back on the Mac, select the kinds of data you want to transfer. Your options are:
- Users: Each user account on the selected PC appears here, and all are selected by default. You can leave everything checked to transfer all the data to its corresponding location on your Mac, or deselect any of the folders at the top level of a user’s home directory (such as Music, Desktop, and Documents) as well as Contacts, Bookmarks, Calendars, and Settings. As when transferring data from another Mac, if you select a user whose name matches the full username of an account on your Mac, you’ll be asked to choose a new full name for the transferred account.
-
Other Files on C: This category, which may or may not appear depending on your configuration, includes other folders on your main Windows volume you may want to transfer, including Shared Files. They’re all selected by default, but you can deselect any you don’t care about.
10: After making your selections, click Continue.
The file transfer proceeds. When it’s finished, click Quit in Migration Assistant on the Windows PC, and follow the prompts on the Mac to complete setup.
Final Advice — As I noted earlier, the process of transferring files is far, far easier if you do it immediately upon unpacking your new Mac, or if you’re willing to overwrite the new Mac entirely from a bootable duplicate.
That said, if you’re reading this because you need to merge the contents of an old Mac onto a new Mac that you’ve been using for some time, I hope the advice above helps.
TidBITS Watchlist: Notable Software Updates for 31 October 2016
VMware Fusion 8.5.1 — VMware has updated the standard and Pro editions of its virtualization package to fix a crash when running a Windows 10 virtual machine in Unity mode. VMware Fusion 8.5.1 also fixes a bug that merged virtual displays into one space in different tabs when using multiple monitors in Full Screen mode in macOS 10.12 Sierra. It also resolves a problem where the tab bar on the virtual machine window became blank when moving the mouse pointer into the virtual machine when running in Sierra. ($79.99/$199.99 new, free update, 368 MB, release notes, 10.9+)
Read/post comments about VMware Fusion 8.5.1.
DEVONthink/DEVONnote 2.9.6 — DEVONtechnologies has updated all three editions of DEVONthink (Personal, Pro, and Pro Office) and DEVONnote to version 2.9.6. The three DEVONthink editions receive workarounds for issues related to PDFs when running in macOS 10.12 Sierra, improve scanning compatibility with Sierra, introduce the capability to add HTML checkboxes to formatted notes, improve synchronization performance and reliability, and add support for accepting images to the sharing extension. DEVONtechnologies also updated the DEVONthink To Go iOS app to version 2.0.5 with an added PDF thumbnail view and improved memory of your reading and playback positions
Additionally, the three editions of DEVONthink and DEVONnote now ensure that file and folder metadata exported by ELO Office won’t turn to stone, fix a bug that prevented capturing a URL from the frontmost application in Sierra, improve the smart group editor to convert multiple “kind” conditions to a valid smart group using compound predicates, and remove OpenMeta support on OS X 10.9 Mavericks. (All updates are free. DEVONthink Pro Office, $149.95 new, release notes; DEVONthink Professional, $79.95 new, release notes;
DEVONthink Personal, $49.95 new, release notes; DEVONnote, $24.95 new, release notes; 25 percent discount for TidBITS members on all editions of DEVONthink and DEVONnote. 10.9+)
Read/post comments about DEVONthink/DEVONnote 2.9.6.
Final Cut Pro X 10.3, Compressor 4.3, Motion 5.3 — Apple has updated its lineup of professional video editing apps, releasing Final Cut Pro X 10.3, Compressor 4.3, and Motion 5.3 with a redesigned dark interface, full support for wide color workflows on supported Macs and external displays, and support for the context-sensitive Touch Bar on the new MacBook Pro (see “New MacBook Pros Add Context-sensitive Touch Bar,” 27 October 2016).
Final Cut Pro X 10.3 introduces the Magnetic Timeline 2 with color coding of clips based on roles such as dialogue, music, and effects, an enhanced Timeline Index that enables you to drag and drop audio roles to rearrange the layout or highlight specific audio roles, and iXML support that enables automatic creation and assignment of roles based on metadata. The release also enables you to copy and paste timecode to speed up numerical entry from text documents, enables you to use a Thunderbolt cable for direct A/V output to an external display, and adds support for a number of video formats (MXF-wrapped Apple ProRes, Canon Log2/Cinema Gamut and Panasonic V-Log, and Sony XAVC-L at 4K).
Compressor 4.3 improves the iTunes Store Package, enabling you to audition alternative audio, closed captions, and subtitles to verify sync, bypass unnecessary compression in the media pass-through, and switch between audio streams during asset playback to speed up verification. Additionally, detailed video and audio file information is now displayed in the Inspector, and the app adds support for OpenEXR still images and image sequences.
Motion 5.3 features an updated icon arrangement, optimizes window layout for portable Macs and desktop displays, improves performance when playing and adjusting 3D text, provides more realistic brushed metal surfaces for 3D text, adds support for Live Photos, and adds the Align To behavior that enables you to connect and animate multiple objects without keyframing.
All three video apps now require a minimum of OS X 10.11.4 El Capitan. (All three apps receive free updates. Otherwise, Final Cut Pro X, $299.99 new, 2.97 GB, release notes, 10.11.4+; Compressor, $49.99 new, 445 MB, release notes, 10.11.4+; Motion, $49.99 new, 2.31 GB, release notes, 10.11.4+)
Read/post comments about Final Cut Pro X 10.3, Compressor 4.3, Motion 5.3.
Airfoil 5.5 — Rogue Amoeba has released Airfoil 5.5, a major update to the wireless audio broadcasting app that adds support for streaming audio to Google Chromecast devices (including Chromecast Audio, the second-generation Chromecast Video, and the original stick-shaped Chromecast model). The update also improves how Airfoil works with the Airfoil Satellite app for Mac and iOS, adding support for AppleScript, displaying Airfoil Satellite instantly, and offering optional global hotkeys for playback
control. The release also no longer separates speakers out by type in the main window, and it improves handling of missing audio output devices. ($29 new with a 20 percent discount for TidBITS members, free update, 14.4 MB, release notes, 10.9+)
Read/post comments about Airfoil 5.5.
GarageBand 10.1.3 — Apple has released GarageBand 10.1.3, adding support for the context-sensitive Touch Bar on the new MacBook Pro (see “New MacBook Pros Add Context-sensitive Touch Bar,” 27 October 2016). The update enables you to adjust all the Smart Controls on a selected track using the Touch Bar, as well as fine-tune the sound of instruments and effects or adjust the volume of a track with a tap of the Touch Bar. (Free with new Macs or $4.99 new from the Mac App Store, free
update, 949 MB, 10.9+)
Read/post comments about GarageBand 10.1.3.
iMovie 10.1.3 — Apple has released iMovie 10.1.3, adding support for the new context-sensitive Touch Bar on the new MacBook Pro (see “New MacBook Pros Add Context-sensitive Touch Bar,” 27 October 2016). The update enables you to add video clips to your movie using the Touch Bar, as well as use clips to create picture-in-picture, green screen, and split screen effects. It also adds support for tapping the Touch Bar to play your movie, split a clip, or adjust the volume of any clip. (Free with all new Macs or $14.99 from the Mac App Store, free update, 2.05 GB, 10.11.2+)
Read/post comments about iMovie 10.1.3.
Pages 6.0.5, Numbers 4.0.5, and Keynote 7.0.5 for Mac — Apple has released updates to its trio of iWork apps for the Mac — Pages 6.0.5, Numbers 4.0.5, and Keynote 7.0.5 — with support for the context-sensitive Touch Bar on the new MacBook Pro (see “New MacBook Pros Add Context-sensitive Touch Bar,” 27 October 2016). All three enable you to edit text, shapes, tables, and charts using the Touch Bar, and Keynote also lets you control Slideshow playback from the Touch Bar. (All
three apps are bundled with new Macs. Otherwise: $19.99 new for Pages, 228 MB; $19.99 new for Numbers, 170 MB; $19.99 new for Keynote, 469 MB; all three require 10.12+)
Read/post comments about Pages 6.0.5, Numbers 4.0.5, and Keynote 7.0.5 for Mac.
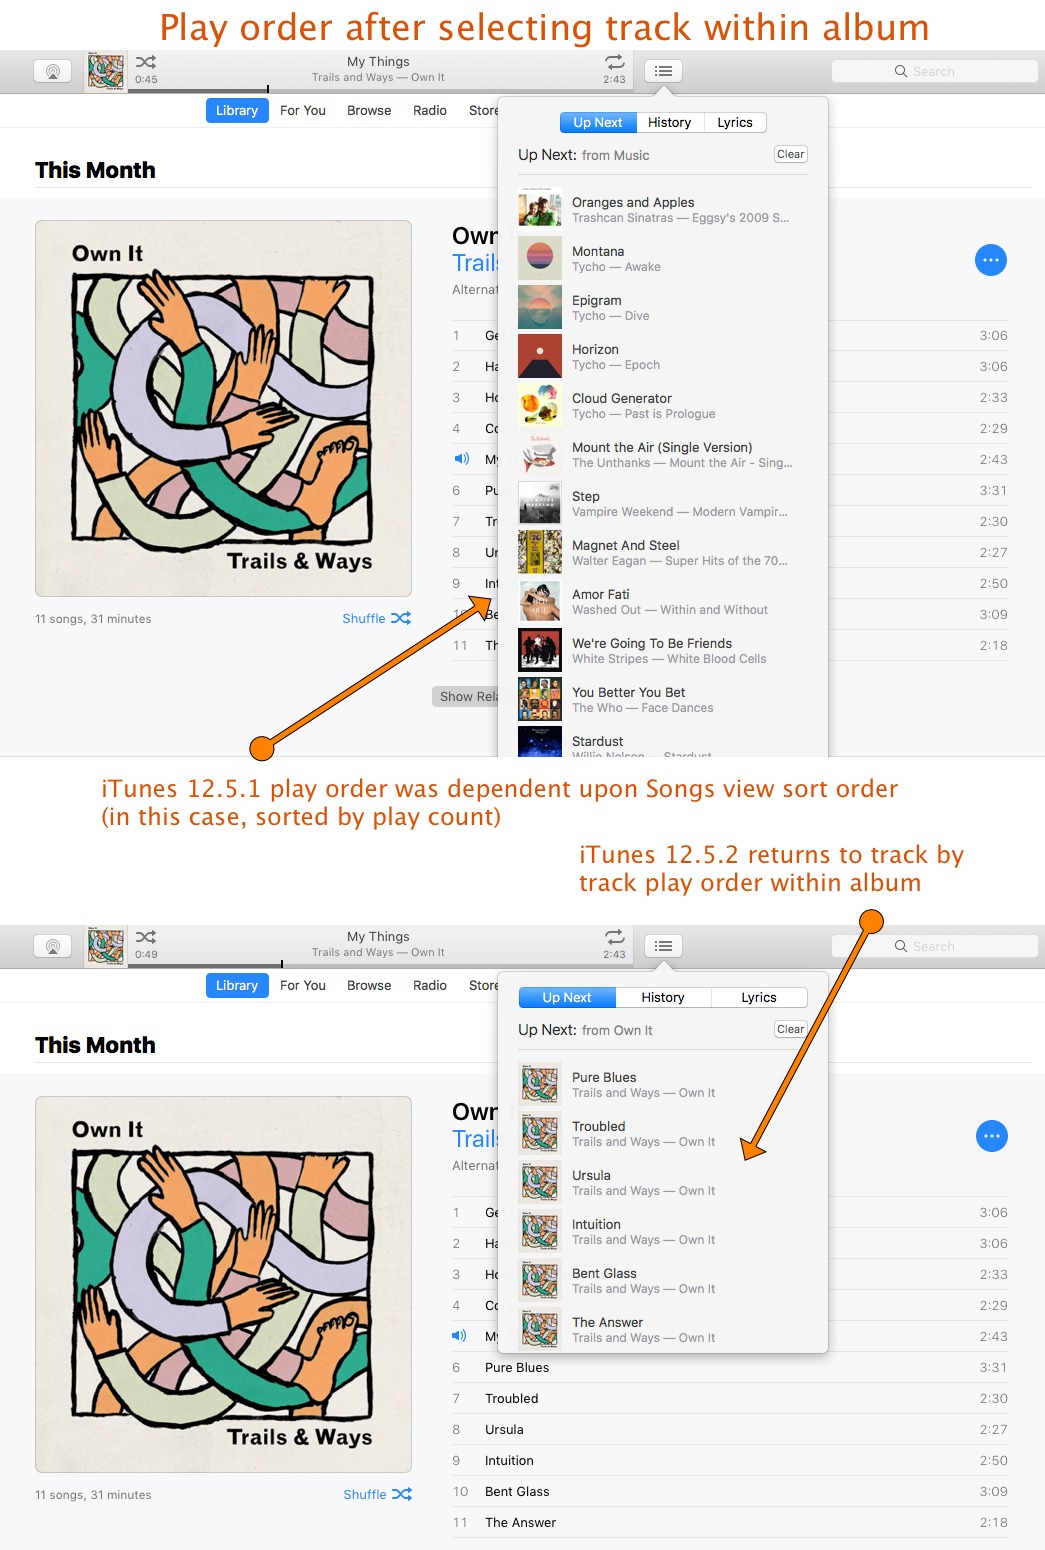
iTunes 12.5.2 — Apple has released iTunes 12.5.2 with the usual stability and performance improvements, as well as a fix for a bug that prevented lyrics from appearing while listening to Beats 1. The update also resolves a problem where albums would not play in the expected order — an issue that had bedeviled us.
If you selected a song from an album in either the Albums or Recently Added views in iTunes 12.5.1, the play order would be dictated by how the Songs view was sorted. Thus, rather than playing the next track on a selected album, as you would expect, iTunes would create a play order (viewed using Up Next) that followed the Songs view sort order (i.e., song title, play count, last played, etc.). We’ve tested version 12.5.2, and it has brought back the album play order behavior of old — going track by track within an album just as the vinyl gods intended it. (Free, 263 MB via direct download or Software Update, release notes, 10.9.5+)
Read/post comments about iTunes 12.5.2.
MoneyWiz 2.5 — SilverWiz has released version 2.5 of MoneyWiz, the personal finance app that received good notices in our roundup in early 2016 (see “Your Favorite Mac Personal Finance Apps,” 29 February 2016). The update adds support for adding tags to transactions as well as budgets, which changes the app’s data format and requires you to update MoneyWiz on all platforms to ensure that the SYNCbits system correctly synchronizes data across all your devices. MoneyWiz 2.5 also now enables you to sync transaction receipts across all devices; adds 14 new reports; improves online
banking auto-categorization; introduces the capability to add filters to reports by categories, payees, and tags; and enables you to disable auto-categorization for online banking accounts on a per account basis.
MoneyWiz is free to download and use for up to two offline accounts. To add more accounts or be able to connect to online banking or PayPal, you’ll need to purchase a subscription — either $5.99 monthly or $59.99 annually. The subscription also enables you to sync data across all of your Mac, iOS, Windows, and Android devices. ($59.99 annual subscription, free update, 20.8 MB, release notes, 10.8+)
Read/post comments about MoneyWiz 2.5.
Safari 10.0.1 — Apple has released Safari 10.0.1 for OS X 10.10.5 Yosemite and 10.11.6 El Capitan (macOS 10.12.1 Sierra also includes it) with a couple of security patches for WebKit. The update eliminates multiple memory corruption issues that could allow arbitrary code execution and an input validation issue that could result in the disclosure of user information — both occurring after processing maliciously crafted Web content. The release also addresses a number of unspecified bug fixes. Safari 10.0.1 is available only via Software Update. (Free, release notes,
10.10+)
Read/post comments about Safari 10.0.1.
Security Update 2016-006 (Yosemite) and 2016-002 (El Capitan) — Apple has released Security Update 2016-006 for OS X 10.10 Yosemite and Security Update 2016-002 for 10.11 El Capitan, bringing a few select patches from the macOS 10.12.1 Sierra release to the two older operating systems (see “macOS 10.12.1 Sierra, watchOS 3.1, and tvOS 10.0.1 Mostly Fix Bugs,” 24 October 2016). For both systems, the security update addresses a couple of memory corruption issues and an SGI image parsing issue. (Free. For 10.10.5 Yosemite,
473.6 MB; for 10.11.6 El Capitan, 414.9 MB; release notes)
Read/post comments about Security Update 2016-006 (Yosemite) and 2016-002 (El Capitan).
Art Text 3.1 — BeLight Software has released Art Text 3.1 with improvements for the graphic design app that include a new Depth Gradient effect for 3D objects, three new 3D chamfer types, and a new 3D Shear Transformation. The update also brings support for macOS 10.12 Sierra, enables you to create isometric-style graphics with the Camera Parallel Projection tool, introduces a custom image folder where you can make and fine-tune 3D textures, lets you save user style elements as a template in Custom Templates, and adds 20 logo samples. ($29.99 new from BeLight Software or the Mac App Store, free update, 628 MB, release notes, 10.10+)
Read/post comments about Art Text 3.1.
Keyboard Maestro 7.3.1 — Peter Lewis of Stairways Software has released Keyboard Maestro 7.3.1, a maintenance release that fixes the Send Now option of the Send Mail Message action when running in macOS 10.12 Sierra. The powerful automation and clipboard utility also resolves an issue with read/write variables in the Custom HTML Prompt in Sierra, ensures the Composite onto Image action works on pixels (regardless of DPI), and fixes a possible memory corruption issue. ($36 new with a 20 percent discount for TidBITS members, free update, 19.6 MB, release notes, 10.10+)
Read/post comments about Keyboard Maestro 7.3.1.
Slack for Mac 2.3 — Slack has released version 2.3 of its Mac desktop client, improving startup performance and when switching channels or teams. The group messaging system and productivity tool streamlines the user interface when you’re signed into more than one team by removing the title bar from the window, redesigns the team sidebar with better support for light themes, adds full-screen support when signing into a new team, and enables you to approve deep links from other apps. (Free from Slack and the Mac App
Store, 64.2 MB, 10.9+)
Read/post comments about Slack for Mac 2.3.
Moneydance 2017 — The Infinite Kind has released Moneydance 2017, a major upgrade for one of the top vote-getters in our reader survey of personal finance apps from early 2016 (see “Your Favorite Mac Personal Finance Apps,” 29 February 2016). The new version adds a fully encrypted incremental syncing engine that enables you to sync data across multiple computers and mobile devices, and it can now use any shared folder (such as Dropbox) to sync data with end-to-end encryption. The new version adds integrated support for Python scripts, enabling you to use the new script
editor to build and run your own scripts or extensions.
Moneydance 2017 also enables you to choose from multiple color schemes or create your own, fixes a budget calculation bug, cleans up portfolio allocation and other graphs, adds the Command-T keyboard shortcut to center you on today’s transactions in a register, improves the cleanup process that runs in the background when shutting down or switching files, and improves behavior when dealing with OFX correction transactions.
If you purchased a license to Moneydance 2015, you can upgrade to Moneydance 2017 for free. For those with licenses to releases prior to Moneydance 2015, you can upgrade to the new version at $24.99 (a 50 percent discount). Moneydance 2017 will also appear soon in the Mac App Store once it goes through Apple’s approval process, but that version will lack the extension/plug-in installer due to sandboxing issues. ($49.99 new from The Infinite Kind, free update from Moneydance 2015, $24.99 upgrade from earlier versions, 97.5 MB, release notes, 10.7+)
Read/post comments about Moneydance 2017.
ExtraBITS for 31 October 2016
In ExtraBITS this week, Chuq Von Rospach responds to complaints about Apple’s MacBook Pro event, long-time Apple advisor Ken Segall expresses his distaste for the Siri Remote, and Apple’s AirPods have been delayed.
Chuq Von Rospach on the MacBook Pro Special Event Controversy — Many people are angry about Apple’s special event last week, mainly due to Apple ignoring desktop Macs, but also because of the new MacBook Pros lacking a dedicated Esc key, having only Thunderbolt 3 ports, and being limited to 16 GB of RAM. But Apple veteran Chuq Von Rospach has penned a reasoned response to all those critiques, suggesting that Apple could have avoided much of the controversy simply by acknowledging desktop Macs and hinting at future updates. But he says the bottom line is that the Mac is
increasingly becoming a niche product again, and many of Apple’s design decisions reflect that.
Ken Segall Dislikes the Siri Remote — Ken Segall, a long-time adviser to Apple, has some harsh words for the Siri Remote bundled with the fourth-generation Apple TV. He likens it to the infamous “hockey puck” mouse included with the original iMac since both are overly symmetrical, pointing out that it’s difficult to know which way you’re holding the Siri Remote, especially in a dim room. He also criticizes its touchpad for being both too easy to engage accidentally and not as accurate as traditional directional buttons. However, Segall hopes that, as with the iMac mouse, Apple
eventually sees the error of its ways and redesigns the Siri Remote.
Apple Delays Launch of AirPods — If you were champing at the bit to buy a pair of AirPods — Apple’s upcoming wireless earbuds — you’ll have to wait a bit longer. Apple initially promised them for late October 2016, but now the company says it needs “a little more time” to get them right. “We don’t believe in shipping a product before it’s ready, and we need a little more time before AirPods are ready for our customers,” Apple said in a statement to TechCrunch. The company did not provide a date when the AirPods would go on sale.