#1433: Mojave privacy versus usability, prepare for iOS 12, iPhone 8 logic boards replaced, how to move from Evernote to Notes
Apple will be announcing new iPhones later this week. With them will almost certainly come a release date for iOS 12, so Take Control of iOS 12 author Josh Centers explains how to get ready for the update. Also this week, security expert Rich Mogull joins us to look at the usability challenges macOS 10.14 Mojave will face due to its increased security and privacy protections. Those who have an iPhone 8 should check into Apple’s free logic board replacement program, and if you’re concerned about the future of Evernote, we have a tip on how to move your data to Apple’s Notes app. Notable Mac app releases this week include Slack for Mac 3.3.1, Retrospect 15.5, Google Chrome 69, Mailplane 4.0.6, and Quicken 2018 5.8.
Apple Announces iPhone 8 Logic Board Replacement Program
Apple has announced a logic board replacement program for some iPhone 8 units. The affected devices, which have a manufacturing defect, were sold in Australia, China, Hong Kong, India, Japan, Macau, New Zealand, and the United States between September 2017 and March 2018. Note that this manufacturing defect affects only the iPhone 8 and not the iPhone 8 Plus or any other iPhone model.
Symptoms of the problem include unexpected restarts, freezing screens, and phones that won’t turn on. If your iPhone 8 has an eligible serial number, which you can check on the replacement program page, Apple will replace its logic board for free. To find your iPhone’s serial number, go to Settings > General > About and scroll down to Serial Number. Press and hold the serial number to display a Copy button; tap it to copy the number for pasting into the replacement program’s page. If everything is set up correctly, the data should also transfer to your Mac’s clipboard via Universal Clipboard for pasting there too.
If your iPhone 8 is eligible for the replacement program, you have three options: finding an Apple Authorized Service Provider, making an appointment at an Apple retail store, or contacting Apple Support to arrange mail-in service. The first two will probably offer the fastest turnaround time, assuming a reasonable driving distance.
As always, back up your device before handing it over to Apple, because the technician may need to erase it for some reason. I like to back up and then erase my devices before I send them in. That way I don’t have to give my passcode to Apple, and there’s no chance that a technician will see any of my personal information.
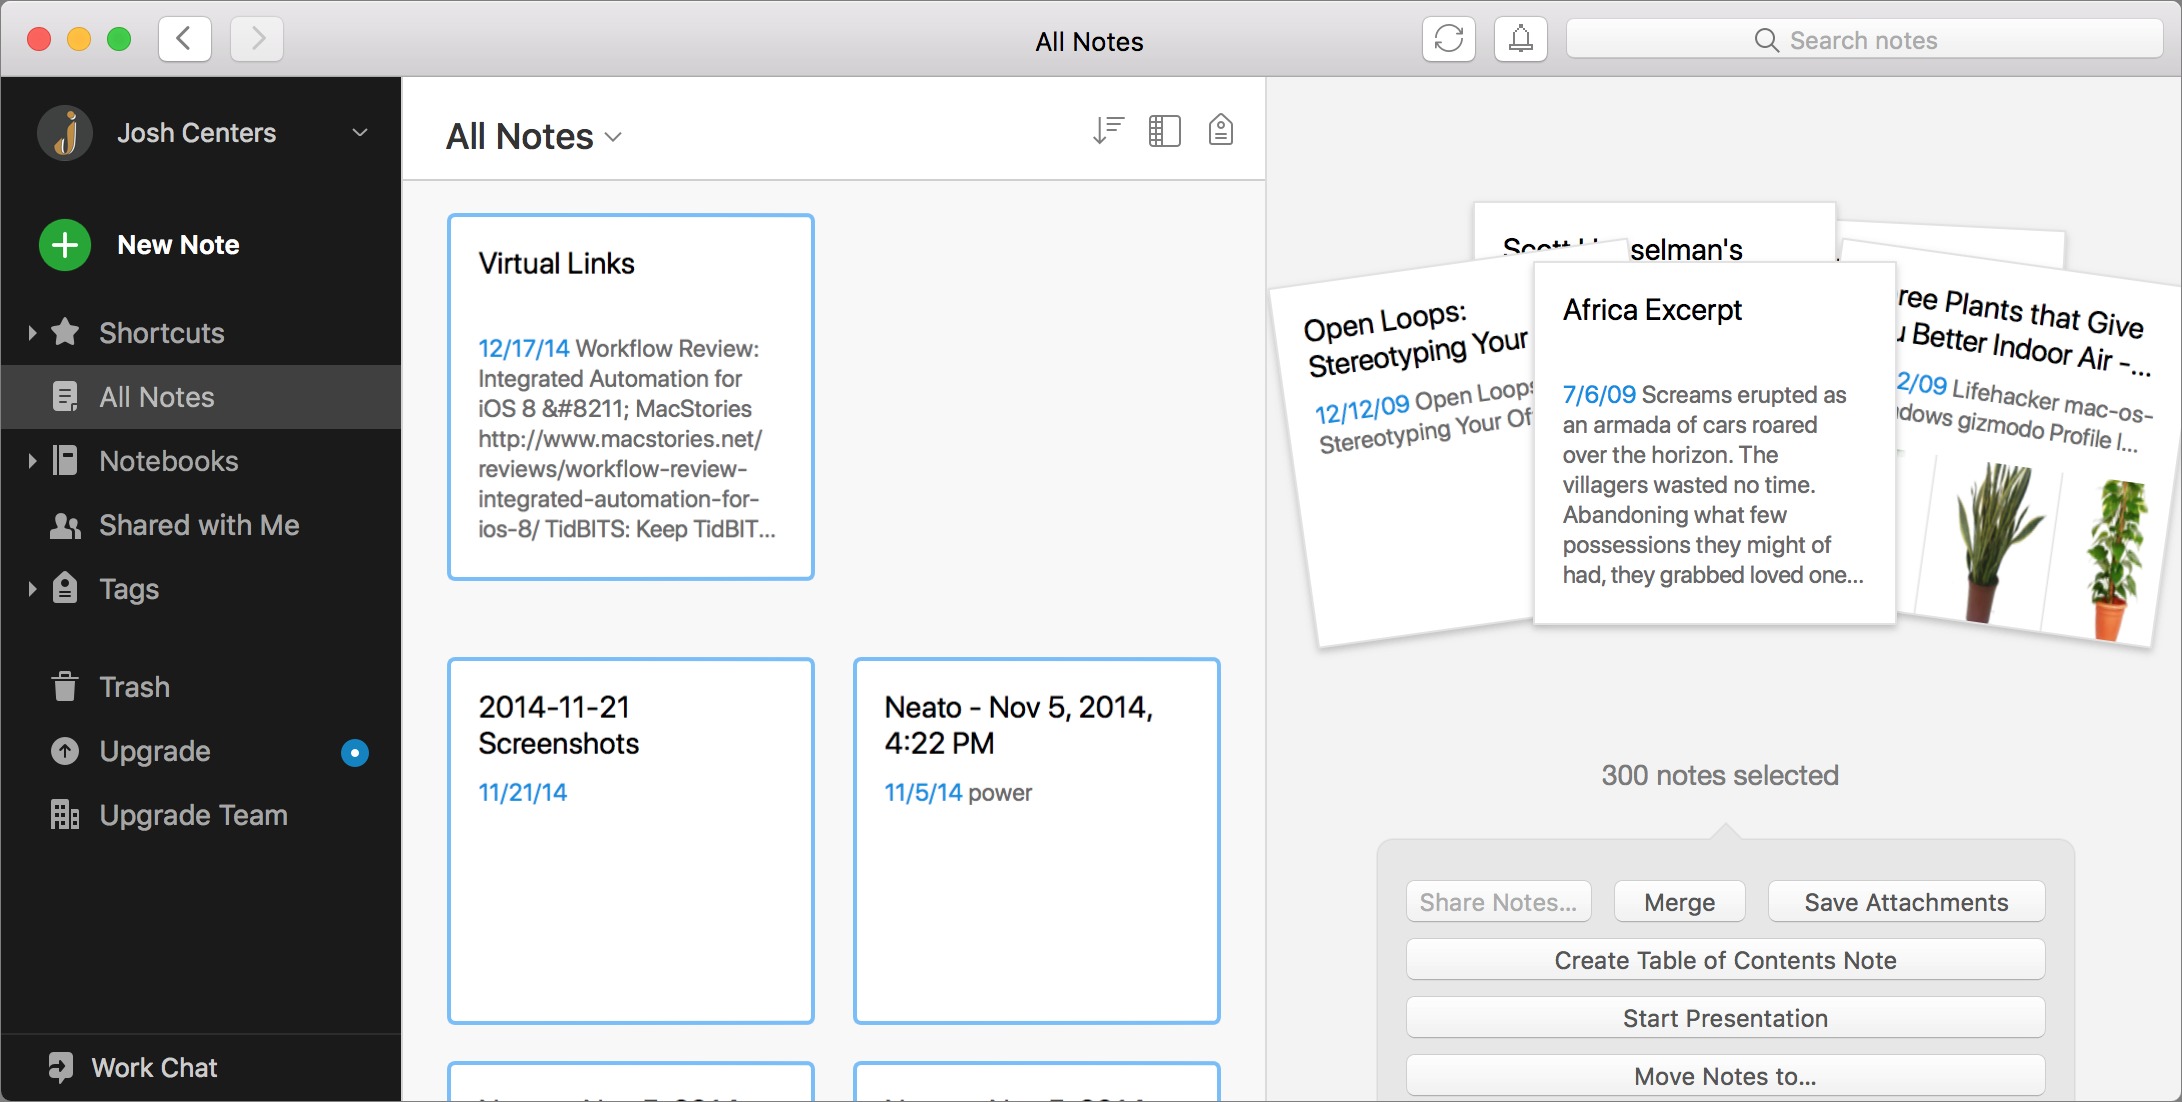
TipBITS: How to Move Your Evernote Notes to Apple’s Notes
Evernote is in trouble. In the last month, the company has lost its CTO, CFO, CPO, and HR head, and it may soon be seeking more funding. An anonymous tipster told TechCrunch that the company is in a “death spiral.” If you’re concerned about the future of the company and what might happen to your data stored on Evernote’s servers, now might be a great time to export your notes. The good news is that the macOS version of Apple’s Notes app can import them.
To export your Evernote notes, follow these steps:
- Open the Evernote Mac app.
- Click the All Notes category in the sidebar.
- Choose Edit > Select All.
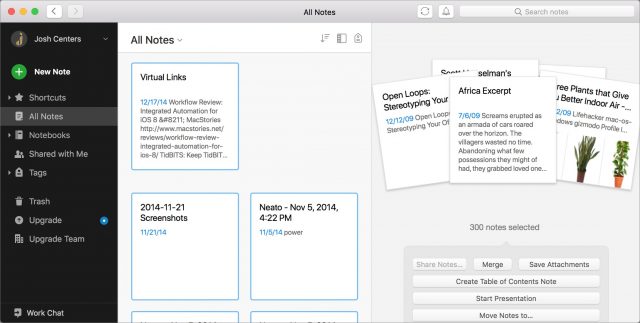
- Choose File > Export Notes.
- In the Save dialog, name the export file and choose a directory for it. Stick with the default Evernote XML Format in the Format pop-up menu.
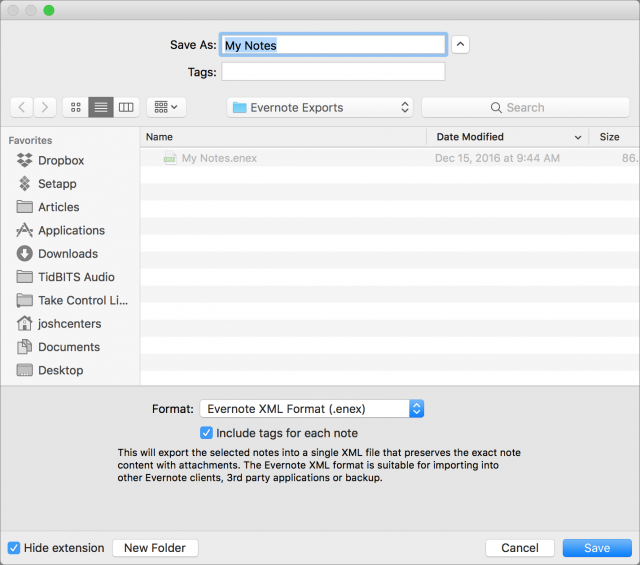
- Click Save.
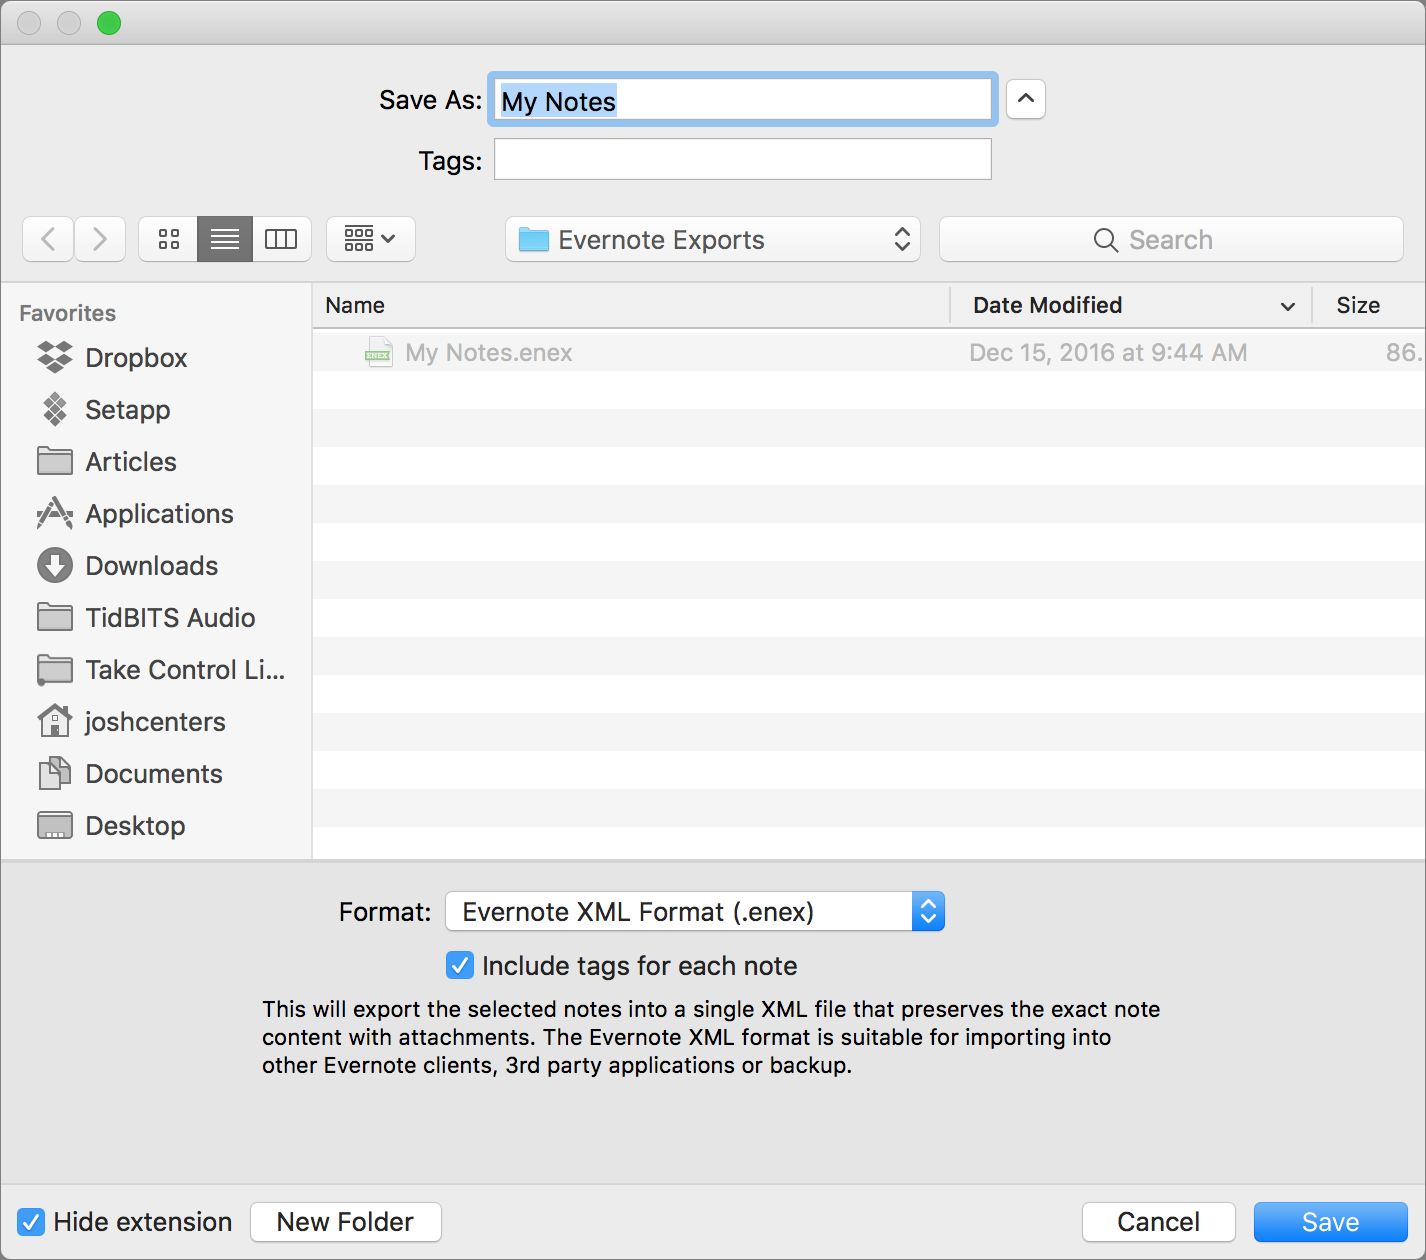
You’re left with a .enex file, which other popular note-taking apps, such as Bear and OneNote, can import (if you’re looking for an Evernote replacement, it’s worth reading “Your Favorite Mac Personal Information Managers,” 18 January 2016). But as long as you’re running OS X 10.11.4 El Capitan or later, you have an app already on your Mac that can also import .enex files: Apple’s bundled Notes app. To do that:
- Open Notes.
- Choose File > Import to Notes.
- Select the .enex file that you exported from Evernote.
- When asked if you want to continue, click Import Notes.
Your imported notes end up in a special Imported Notes folder, so they won’t clutter up any existing items you have in Notes. Overall, the notes transfer over from Evernote nicely: formatting, checklists, bullet points, and attachments all survive the import. Notes can even search for text in scanned images using OCR, though maybe not as well as Evernote can. That said, readers have reported performance problems in Notes with very large imports.
In any case, Notes isn’t going anywhere, so your notes will be safely accessible for the foreseeable future. If you end up moving away from Evernote, let us know in the comments what app you decide to use and why.
Get Ready for iOS 12 by Backing Up, Cleaning Up, and Updating Apps
It’s that season again. iOS 12 is likely due next week, making now the best time to take a few minutes to get your devices ready. I’ve been using the iOS 12 betas all summer as I wrote Take Control of iOS 12, and based on my experience, I expect a drama-free update this year. That said, there are some things you always want to do before major iOS updates—if nothing else, it’s a good time to do some housekeeping.
(It’s pretty easy to prepare for an iOS update, but getting ready for macOS 10.14 Mojave, which can’t be far behind iOS 12, requires more effort. Joe Kissell once again has the advice all Mac users need in Take Control of Upgrading to Mojave, and the early access version of Scholle McFarland’s Take Control of Mojave is also now available. In particular, these books cover Mojave’s changes to APFS, new privacy protections, major new features, and more. You can get these books in a bundle with my Take Control of iOS 12 for 35% off.)
Back Up Your Devices
You should be backing up your devices regularly, but if you’ve fallen out of the habit, now is the time to get back on the wagon! Historically, the advice here is, if you’re going to make only one backup, to do it in iTunes. However, we’ve seen problems with iTunes backups of late, and it’s clear that Apple isn’t paying much attention to iTunes these days. So we recommend that you back up to both iTunes and iCloud so if something goes wrong with one backup, you’ll have the other. Both are easy, and the only real downside of either is that you need enough space, either on your Mac’s drive or in iCloud.
Here’s how to back up your iOS device with iTunes:
- Connect your iOS device to your Mac with a Lightning-to-USB cable. (Yes, you can do this over Wi-Fi, but if you need these instructions I’m assuming you haven’t set that up.)
- Open iTunes.
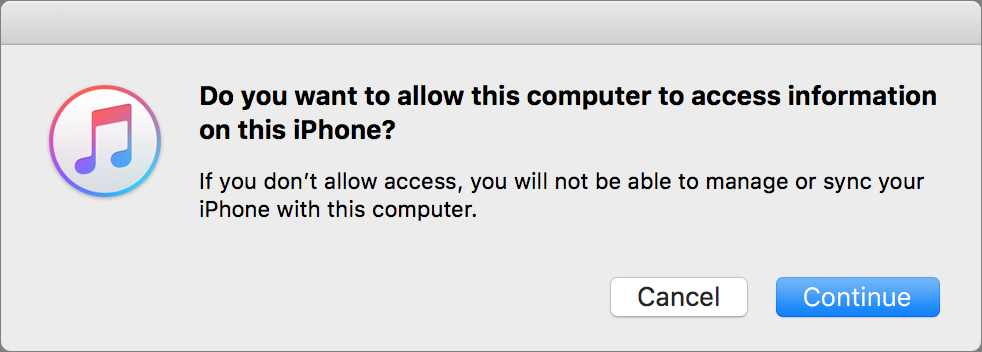
- If you haven’t connected your device in a while, a dialog will ask if you want to allow your Mac to access the information on your device.

- Click Continue.
- Enter your passcode on your device when prompted.
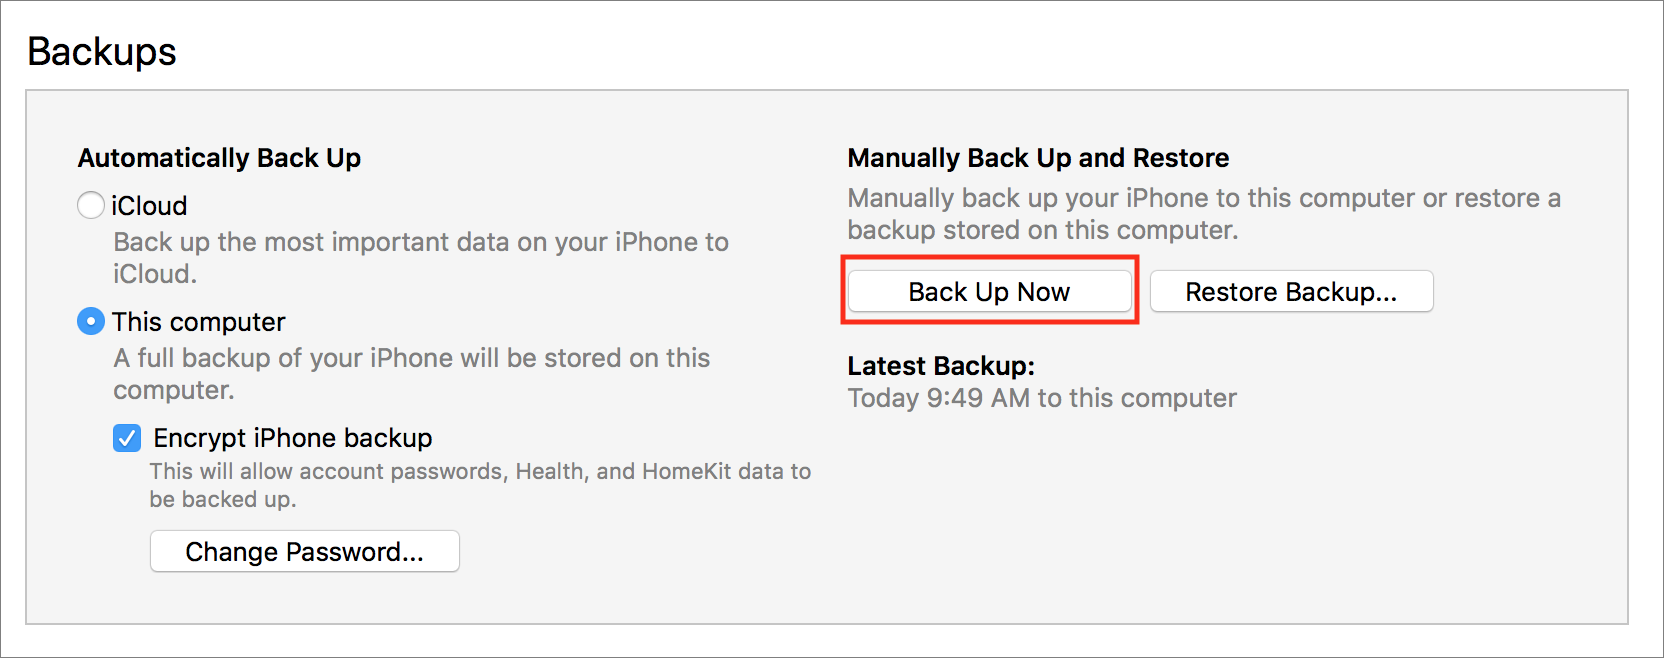
- Back in iTunes, click the device icon which is next to the media pop-up menu in the upper-left quadrant of the iTunes window.
- From the device’s Summary screen, select This Computer and Encrypt iPhone Backup and then click Back Up Now.

- If you have purchases on your device that aren’t in your iTunes library, you’re asked if you want to transfer them. Although this isn’t essential, it’s probably a good idea to do this.
Note that this process can take a long time, and your device must remain connected to your Mac until it’s finished.
To back up to iCloud, follow these steps:
- Go to Settings > Your Name > iCloud > iCloud Backup.
- Turn on iCloud Backup if it’s not already enabled.
- Tap OK.
- Tap Back Up Now.
Although an immediate backup to iCloud does not require your device to be plugged in, for automatic backups to occur—which we highly recommend!—your device must be connected to power, be on a Wi-Fi network, and have its screen locked.
There’s only one good excuse not to back up to iCloud regularly, which is not having enough iCloud space to complete the backup. Apple gives all iCloud users 5 GB of free space, but given the capacities of modern-day iOS devices, 5 GB often won’t be enough, especially if you use iCloud Drive. It might be possible to delete enough files to make a backup possible, but it’s much more likely that you’ll need to buy more storage in Settings > Your Name > iCloud > Manage Storage. 50 GB costs $0.99 per month, 200 GB is $2.99 per month, and 2 TB will run you $9.99 per month.
Ideally, you’ll perform this backup step after the rest of the tips in this article, just before you update to iOS 12, but if you haven’t backed up recently, the sooner the better!
Update Your Apps
If you update your apps manually but haven’t done so for some time, it’s a good idea to do so now. Keeping your apps up to date helps avoid security and compatibility issues, and you don’t want to be updating everything on the same day as iOS 12’s release because Apple’s servers will undoubtedly be slammed.
Frankly, so many apps get frequent minor updates that attempting to manage this process manually is more work than it’s worth. I highly recommend enabling automatic updates, which you can do by turning on Updates in Settings > iTunes & App Store. iOS will start updating apps automatically, and while you don’t get much control over when the downloads happen, you can disable the Use Cellular Data switch in Settings > iTunes & App Store to ensure they take place only over Wi-Fi. And, of course, if you know an update is pending and it hasn’t come in yet, you can kickstart app updates by opening the App Store app, tapping Updates, and tapping Update All.

Free Up Space
If your device lacks sufficient free space to install iOS 12, the installer should be able to clear enough space automatically during the installation by offloading apps and bringing them back afterward. Nonetheless, it’s worth spending a few minutes to review what’s taking up space on your device and clear out any cruft. You’ll want about 2 GB free to install iOS 12 without any fuss.
Fortunately, iOS makes clearing space easy these days. Go to Settings > General > iPhone Storage. (Or iPad Storage. Or iPod Storage. I hate these device-specific settings names.) You’ll almost certainly see a list of recommendations that you can trigger with a tap to free up storage space. iOS also provides a handy chart at the top of the screen to show what’s eating up space. Apps, music, movies, and photos are common culprits.
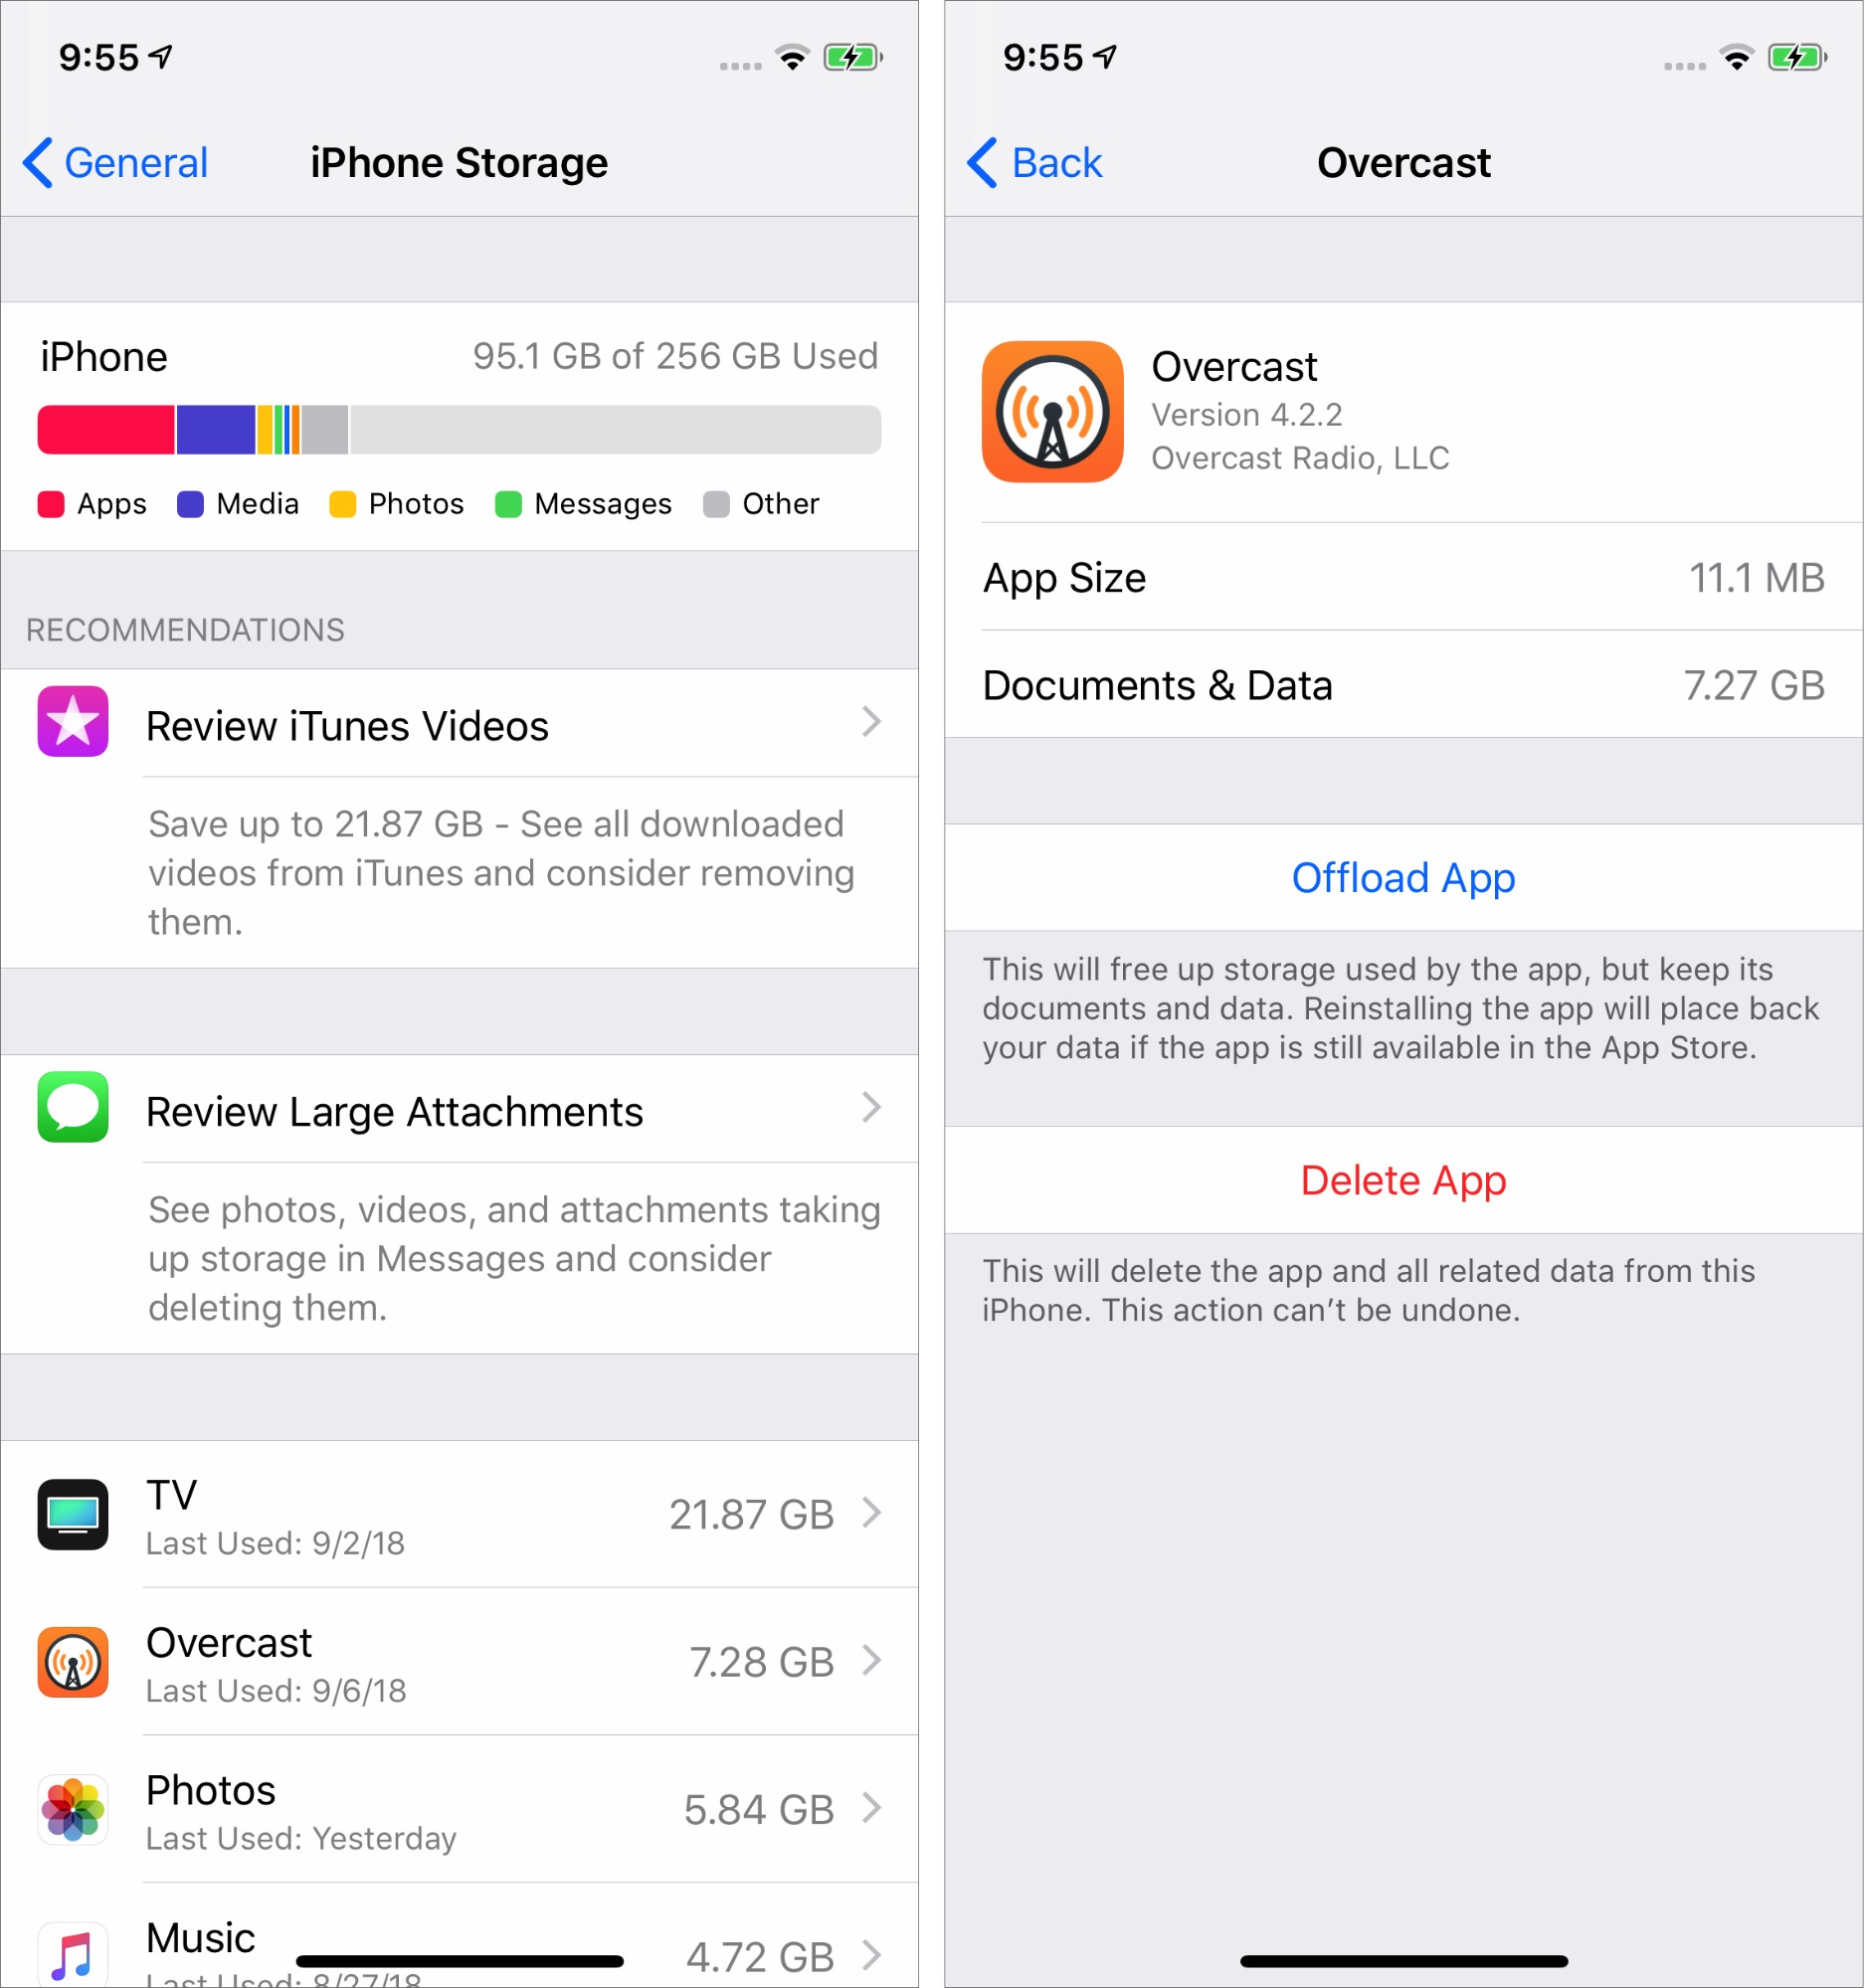
The best way to free up space quickly is by deleting unwanted apps, particularly those with a lot of data, like podcast apps you don’t use anymore. You can do this from the Home screen, but the iPhone Storage screen lists your apps in the order of how much space they consume, and tapping them gives shortcuts for deleting or offloading apps. Offloading an app gets rid of the app, but keeps its data, so you can later download the app again and pick up where you left off.
In Take Control of iOS 12, I have an entire chapter on data management, including managing space on your device, handling bandwidth usage, and juggling iCloud storage.
Opt Out of the Beta
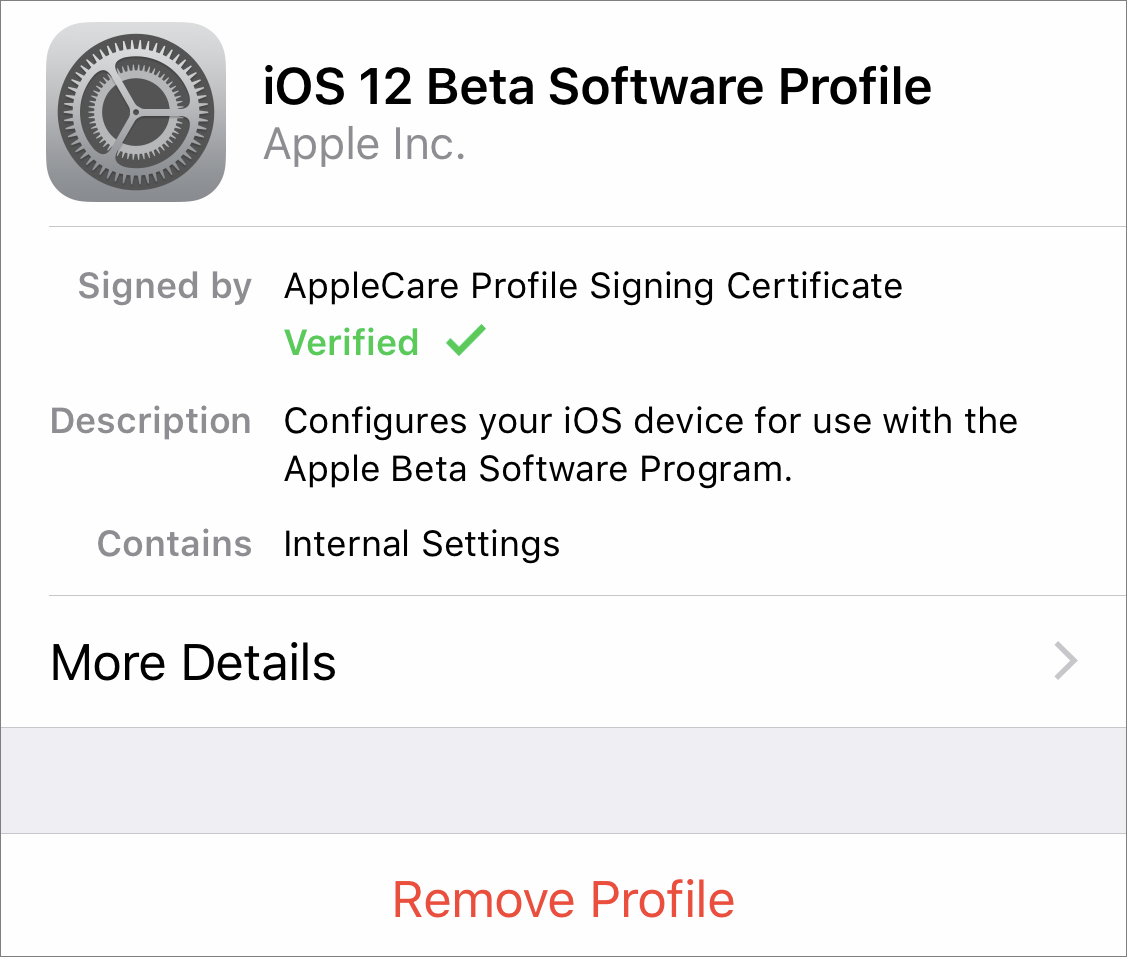
If you’re using the iOS 12 beta, you may think you’re as prepared as you can be. However, unless you want to stay on the beta track, which may be more confusing than it’s worth after the official release, you’ll want to delete the beta profile so you get regular updates instead of beta updates. To do so, go to Settings > General > Profile > iOS 12 Beta Software Profile, and tap Remove Profile.
In my experience, the ideal time to hop off the beta bandwagon is sometime after you install the golden master, which is often identical to the shipping version of iOS, but before the official release comes out. That way you can be relatively sure you’re using the release code without having to struggle to download the shipping version on launch day. And you’ll get the inevitable point updates that follow soon after.
Follow these steps before you install iOS 12, and your installation should go smoothly. And if it doesn’t, you’ll have no problem erasing your device and restoring from your backup.
Mojave’s New Security and Privacy Protections Face Usability Challenges
Back in 2016, security researcher and developer Jonathan Zdziarski released a tool called Little Flocker that could protect Macs at the file level. Much as a firewall analyzes and blocks network traffic, Little Flocker locked down the file system and allowed only authorized applications access to only approved files.
Little Flocker was too complex to manage for average users, but it quickly became a darling among Mac security experts. Most modern malware doesn’t blindly hit your computer through a network scan. Instead, it tricks you—or your computer—into installing some piece of software that then does bad things. Little Flocker ensured that applications could access only data they were supposed to, making it far more difficult for malicious software to complete its nefarious mission. In fact, this compartmentalization is the foundation of iOS security and one of the primary reasons that iOS is the most secure consumer operating system available.

When Zdziarski took a job at Apple in 2017, he sold Little Flocker to the security vendor F-Secure, which released it as Xfence. Zdziarski’s job change started the clock ticking on when we might see similar capabilities built into macOS. With macOS 10.14 Mojave, Apple has added file-level protections, plus some additional security enhancements. And you know what? Mojave is running into the same usability issues that users of Little Flocker endured.
Apple is enhancing OS security to boost OS privacy
Apple has been inching down this path of protected files in macOS since it introduced Gatekeeper and sandboxing. With each release, Apple has tightened the sandboxing screws to limit the traditionally near-unfettered access of apps. However, application sandboxing as we’ve seen it so far applies only to apps downloaded from the Mac App Store and offers no protection to apps installed from any other source.
Mojave extends these protections in three key areas across all applications on your Mac:
- Access to the camera and microphone
- Access to certain private data stores (beyond those protected in High Sierra)
- Inter-application communications with Apple events
Access to the camera and microphone is easily understood. If an app is going to use the camera or microphone, it needs to ask for permission, just as apps do in iOS. There’s little that’s controversial or potentially problematic about this privacy enhancement.
For most Mac users, the most obvious and significant changes are the enhanced notifications and protections for managing access to core privacy-related data stores: Location, Contacts, Calendars, Reminders, and Photos. In Mojave, when an application tries to access your location, contacts, calendars, reminders, or photos, you’ll need to approve that request to grant access. Again, this is similar to how things work in iOS and High Sierra—when an app wants to work with your photos or contacts, it has to ask permission first.
You might be thinking that there’s quite a bit more that deserves protection, and you’d be right. In fact, Mojave extends protection to data in Mail, Messages, Safari, Home, Time Machine, and certain administrative settings, but without the granular notifications of the data types we’ve been discussing. Apps can request access to data in Mail or Messages or Safari too, and they’ll appear in the Full Disk Access list in the Privacy pane of the Security & Privacy preference pane.

Keep in mind that non-Apple data repositories don’t receive this special protection, so if you use a third-party photo app (like Adobe Lightroom) or calendar software (such as Microsoft Outlook) with its own database and storage, these new protections won’t help you.
The first time you launch an app that tries to access these data stores, you’ll get a notification dialog asking for access. If the app was compiled with the Mojave-specific version of Xcode, the notification will feature developer-provided text describing why the app wants access. For older apps, the notification will instead show generic, Apple-provided text.

Here’s where things start to get tricky. If you provide access, all should be well, since the app is getting the data it expects, and it will appear in the appropriate list in the Privacy pane of the Security & Privacy preference pane.
But if you deny access to an older app, it may crash, since it has no way of anticipating such an error condition. Since Apple hasn’t yet officially released Mojave, we can’t say for sure what will happen, and it will undoubtedly vary by app. For a deeper dive on these changes over time, developer Howard Oakley has written some excellent posts about his struggles to update his tools for Mojave.
Protecting inter-application communication is complex
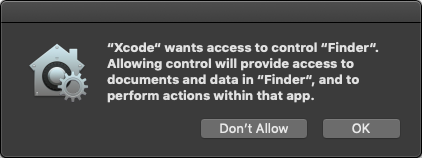
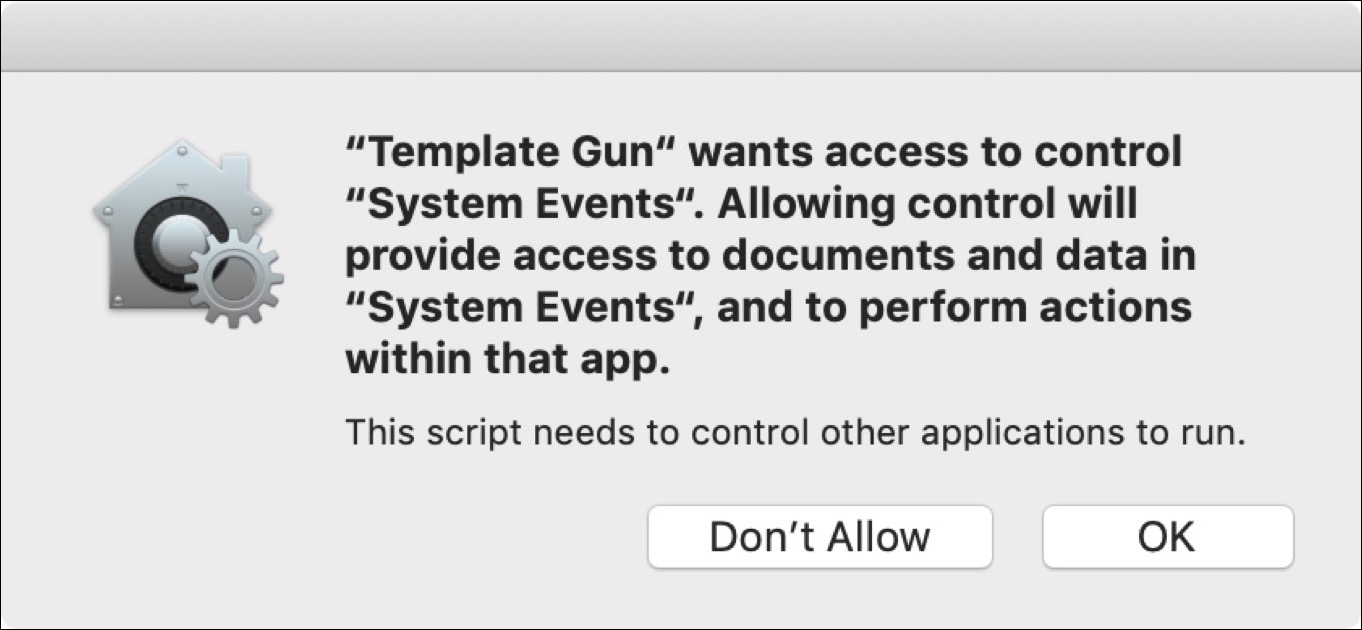
Mojave also introduces new authorizations for the Apple events that applications use to communicate with each other. Apple events are the essential backbone to Mac automation capabilities you might not even realize you are using, because Apple events enable one application to launch and sometimes control another app.
In a blog post talking about how scheduling and scripting works in Super Duper, Dave Nanian of Shirt Pocket notes that simply choosing Show in Finder in Xcode will trigger a new authorization request. (That was true in Mojave beta 8; in beta 10, Show in Finder works without an authorization request but choosing File > Open in External Editor in Xcode still asks to control the Finder.) The ability to interconnect and allow applications on the Mac to communicate and send commands to each other is deeply embedded into far more applications than the average user might realize.
These inter-application requests also trigger notifications to authorize access, again using a mix of developer-specified and default text. Combined with the personal data protections, this could lead to a flood of alerts and user confusion. Nanian compares it to the well-intentioned but eventually removed alerts that Microsoft used in Windows Vista.
And of course, lots of people write their own apps using AppleScript. Over at Six Colors, Jason Snell talks about how he wrote an AppleScript-based app that demands authorization repeatedly even after he added it to the Accessibility list in the Privacy pane of the Security & Privacy preference pane.
Developer Felix Schwarz discusses these complexities with a deconstruction of the notifications and the complexity required to manage them. Apple has addressed some of his concerns, but will likely struggle for some time to strike the right balance between security and usability.
Mojave lets developers protect their own apps
While the most visible changes in Mojave center around user notifications, the Mac’s new operating system also includes a range of additional under-the-hood hardening. Some of these are obvious evolutions, such as enhancements to the System Integrity Protection (SIP) features that defend the core operating system from malware.
In an unexpected set of changes, Apple is extending some of the runtime protections it uses for its own applications to developers. Opting into these improves an application’s ability to protect itself from being compromised by malware, with features like improved code signing, a tighter “chain of trust” to allow only expected code libraries, and restrictions on running debuggers against an app. All of these inhibit common ways attackers compromise applications to gain control of a system.
Apple has even created a notary service for developers to submit applications for additional review. Unlike app review, this notary service is available to all applications, even those distributed outside the Mac App Store. Notarized apps are checked for their security settings and embedded malware before Apple will sign them. This is merely the first step, as Apple intends to require notarization for all apps signed with developer IDs in the future. If you recall, a developer ID is required to install an app on Macs with the default Gatekeeper settings.
With great security come great usability challenges
Regardless of how Apple finesses these dialogs in Mojave and its updates, all Mac users will need to get used to authorizing app requests for privacy-protected data as they now do on iOS. Balancing security notifications and authorization requests is notoriously tricky. Prompt users too often and they will both become annoyed and reflexively click OK. A security feature has failed when the noise of so many alerts leads users to stop reading them—and that eventually leads to malware asking for and receiving authorization. It’s a modern-day version of the “The Boy Who Cried Wolf.”
These prompts are nothing new to anyone who uses a recent version of iOS, but the concern is that the Mac is a more complex environment with more inter-app communications and cross-app file access than most users tend to use on their iPhones.
As a security professional, I don’t think Apple has much of a choice in adopting file level protections. The threats are just too great, and the liability just keeps growing. Apple has, for the most part, focused on the right data to protect, but it still needs to improve the user experience surrounding notifications, especially for users with a mix of old and new applications that use different wording for their authorization requests. Practically speaking, most users don’t install that many applications that access these personal data stores. And even then, authorization requests for contacts or photos are relatively easy to explain, and for users to understand, particularly if they’ve seen similar requests in iOS.
Some types of applications, such as backup apps, face greater challenges. For example, I use Arq for system backups (see “Roll Your Own Cloud Backups with Arq and B2,” 18 May 2018). After installing the Mojave beta, I experienced a string of repetitive alerts for access to every one of my protected data categories, followed by failed backups even after I clicked OK a few dozen times. The eventual answer was to go into the Security & Privacy preference pane and add Arq to the Full Disk Access list manually. Average users would likely have trouble figuring this out on their own, and they may be confused and unhappy about having to do it even if the developer provides instructions.
Authorization requests for Apple event–based inter-application communication are even more likely to be problematic from a usability standpoint. Developers will have to update their apps with useful notification descriptions, plus include extensive error handling in case users make a decision that impedes an app’s functionality.
Apple needs to improve Mojave to provide both developers and users with clear alerts that avoid the pitfalls that crippled so many similar attempts in the past. There’s a reason any mention of Windows Vista still sends shudders down the spine of anyone who worked a help desk during those perilous times. And the company needs to improve the current situation for anyone who creates AppleScript-based apps to make sure such apps don’t prompt constantly for access.
Don’t get me wrong. Apple is moving in the right direction. These features have measurable security benefits and the potential to make attacks against Mac users dramatically harder, which will result in increased safety for all. Mojave’s security and privacy enhancements are a natural progression from Gatekeeper, sandboxing, restrictions on kernel extensions, and the under-the-hood hardening of recent years. Combine these software changes with Apple’s recent inclusion of special security hardware in the MacBook Pro and iMac Pro, and you can see how the company is driving Mac security closer to where iPhones and iPads are today, all while striving to maintain the flexibility that makes the Mac essential.
But to achieve that goal, Apple must put more work into striking the right balance between security, privacy, and usability.

