#1607: TidBITS 32nd anniversary, moving from 1Password to KeePass, pasting plain text, Mail fixes anchor links, RIP Eolake
This week we mark our 32nd year of continuous publication and the loss of a longtime friend of TidBITS, Eolake Stobblehouse. In a small bit of good news, Apple has finally fixed named anchor links in the latest versions of Mail, meaning you can finally navigate in TidBITS email issues using the table of contents links. Josh Centers has two tech solution articles for you this week: methods of pasting plaintext without formatting and how to move your login credentials from 1Password to the open-source KeePass ecosystem. Notable Mac app releases this week include Pixelmator Pro 2.4.2, Lightroom Classic 11.3, Bookends 14.0.7, Fantastical 3.6.4, iMovie 10.3.2, Tinderbox 9.2.1, and Final Cut Pro 10.6.2, Compressor 4.6.1, and Motion.
TidBITS 32nd Anniversary and the 32K Text Barrier
In the early years of TidBITS, the Mac’s built-in editing capabilities for text fields were limited to 32 kilobytes of text. That limitation trickled down to numerous apps and systems—for instance, early versions of Eudora couldn’t display more than 32K of text in a single message (see “TidBITS & Eudora,” 3 April 1995). Unsurprisingly, the venerable BBEdit, which was released on 12 April 1992 and recently celebrated its 30th anniversary, had a custom text engine that never suffered from the 32K limit.
The 32K size restriction also hampered the email gateways that allowed messages to flow between the Internet and commercial online services like AOL, AppleLink, and CompuServe (see “Gateways III/America Online,” 19 October 1992). For years, we had a self-imposed limit on the size of a TidBITS issue to ensure it wouldn’t be bounced, truncated, or prevented from display because of being too large.
The 32K limit eventually faded away, but given that this issue of TidBITS marks our 32nd anniversary, it recently popped back into my head. There is something to be said for the focus provided by an arbitrary constraint. Since the dawn of printing, publishers have edited text to fit within a physical space on a page, and by the early 1990s, desktop publishing had supplemented the editor’s efforts with powerful copyfitting tools that could adjust font size, leading, kerning, and more. But we couldn’t avail ourselves of such layout trickery—when TidBITS needed to traverse an email gateway or be displayed in a 32K-limited app, a character was a character. So we trimmed and tweaked each week until Nisus told us that the character count was low enough.
I don’t miss having to cut 1200 characters to get a TidBITS issue down to size before publishing, but there was a sense of comfort in being bounded, in not feeling the need to comment on everything because there was simply no room. Technology has infiltrated nearly every part of modern life, and it’s difficult, as a technology publisher, to resist the pull to express an opinion on every topic that comes down the pike. We may write about subjects that venture further afield at times, but it’s important to me—and you—that we maintain our attention on the world of Apple.
All this is by way of saying that even if TidBITS is on track to exceed its own 32K barrier of sorts with 32 years of publication, I hope that you’ll continue to appreciate our focus on Apple-related tech news, reviews, techniques, and explorations that ease tedious tasks, encourage good computing habits, explain complex topics, and remind us how amazing today’s technology is.
As we reach this milestone, I’d like to thank all those who have helped TidBITS over the years, especially the 3650 current TidBITS members, and I hope those whose memberships are up for renewal will continue to support our work. Voluntary contributions like these have kept TidBITS financially stable since 2011. Modern publishing trends encourage exclusive subscription-only email newsletters and website paywalls, but TidBITS will continue to be available to those who can’t pay as long as we can make ends meet. If you join the TidBITS membership program at any level, you’ll also get discounts on over 90 Mac apps, including TextExpander from longtime sponsor Smile.
LittleBITS: Named Anchors Fixed, Eolake Stobblehouse Dies
It’s a good news/bad news week. On the plus side, Apple finally fixed the bug that prevented Mail from following links to named anchors, making our table of contents links clickable again. Sadly, however, we mourn a steadfast friend of TidBITS who was responsible for ensuring that all TidBITS staffers could cover the just-released iPad.
Anchor Links Finally Work in Mail
Over six years ago, I wrote about how Apple’s Mail wasn’t honoring named anchors in HTML mail, making the table of contents that prefaces every TidBITS issue no more interactive than plain text (see “Mail in El Capitan and iOS 9 Ignores Named Anchors,” 5 January 2016). I reported it as a bug back then, but Apple’s engineers never prioritized fixing it—until sometime last year. I don’t use Mail, so I didn’t notice until someone mentioned it recently, but the versions of Mail in macOS 12 Monterey and iOS 15 both work properly when you click or tap a link to a named anchor further down in the message. Hallelujah! If you’ve trained yourself to avoid using our table of contents links at the top of the issue because they didn’t work in Mail, give them a try again.
Remembering Eolake Stobblehouse
Tempering the pleasure surrounding the Mail fix is the news that a longtime friend of TidBITS and Take Control Books, Eolake Stobblehouse, died suddenly in his home in Manchester, England, last week.

Eolake was an artist, photographer, and writer, and a genuinely thoughtful and inquisitive soul who was always involved in some sort of personal creative expression. As I eventually learned, even his name was of his own creation—when we were troubleshooting an account issue with the Take Control site in 2010, he commented, “When I went to the site, I was already logged in as ‘Frants Nielsen,’ a character I vaguely remember.”
I’ve been corresponding with Eolake about Mac and Internet topics since 1999, and in 2010, he donated $3000 so the entire TidBITS staff could get the original iPads. As I wrote to TidBITS staffers at the time:
He believes the iPad will be an important step in the evolution of computers, and he wants to encourage us to cover it since we have some of the best Mac coverage around. There are no strings attached.
The only strings ever associated with Eolake were those that connected our wide-ranging email conversations—Macs, iPads, Internet business models, health, and more. He’ll be missed.
Five Solutions for Pasting Plain Text on a Mac
Tell me if you’ve had this problem: you copy some text and paste it into a word processor, a spreadsheet, or any other app that supports stylized text and end up with text that looks different than the rest of your text. It may be a different font, font size, or color. Once it’s there, fresh text you add afterward takes on that formatting such that you find yourself fussing with formatting instead of focusing on your writing or editing.
By default, pasting text into many Mac apps brings with it any styling that had been applied. Maintaining text styles is often desirable—particularly when duplicating or moving text around within a document—but it’s often an annoying waste of time when you’re bringing content into a document from another app. In such situations, it’s best if you can paste just the text itself and have it take on the styling of the text around it.
There are numerous ways to solve this problem. Some are free, and others take advantage of a commercial utility that you may already have for another purpose. If the built-in solutions don’t work in your particular workflow, turn to one of the alternatives.
Built-in Solution: Paste and Match Style
Apple has long acknowledged this need with a command in the Edit menu: Paste and Match Style. Many other apps mimic the naming of Apple’s command, although you may also see variants like Paste and Match Formatting (Microsoft Word), Paste Text Only (Nisus Writer Pro), Paste without Formatting (Adobe InDesign), and Paste Without Format (Affinity Publisher).
For something as commonplace as pasting, a keyboard shortcut is welcome, and Apple’s default is Command-Shift-Option-V. That works in many apps, although the slightly simpler Command-Shift-V is also frequently used—it’s what you’ll find in Adobe InDesign, Nisus Writer Pro, and even the Web interface of Google Docs.
For the vast majority of situations, the built-in approach is all you need. Occasionally, however, you’ll find yourself in a situation where there seems to be no way to strip styling while pasting. Here are some alternative approaches that should work anywhere.
Quick and Clunky: Run It through a Plaintext Editor
If you already use a plaintext editor like BBEdit, a simple way to strip that unwanted formatting is to paste the text into a new document, select all, copy again, and paste it in its final destination. This approach works because BBEdit and similar apps pay no attention to text styling—they care only about the characters. It’s a fine workaround for infrequent use, but it’s slow and inefficient.
Pure Paste for Monterey
For a smoother and more flexible way of pasting plain text by default, check out Pure Paste. It lives in your menu bar and, by default, strips formatting from your clipboard automatically. You can override it on a per-copy basis, and it allows you to exclude particular apps for which pasted text should always come in with its formatting. Other options let you optionally preserve HTML links and remove tracking parameters from URLs.
Pure Paste is free, has no ads, collects no personal information, has no network connectivity, and ignores anything copied from a password manager. The only downside is it requires macOS 12.3 Monterey or later.
TextExpander
TextExpander enables you type an abbreviation to expand it into a longer word or phrase. For example, I type xte instead of TextExpander. Less well-known is the fact that it can also strip formatting from clipboard text. While I wouldn’t recommend subscribing to TextExpander just for this feature, if you already own it, you can create a snippet that pastes the clipboard contents without formatting. Follow these steps:
- Choose File > New Snippet.
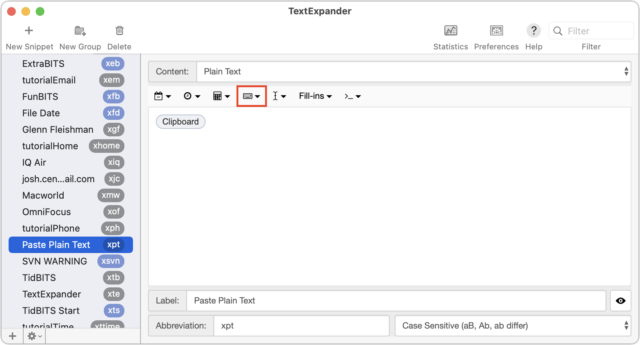
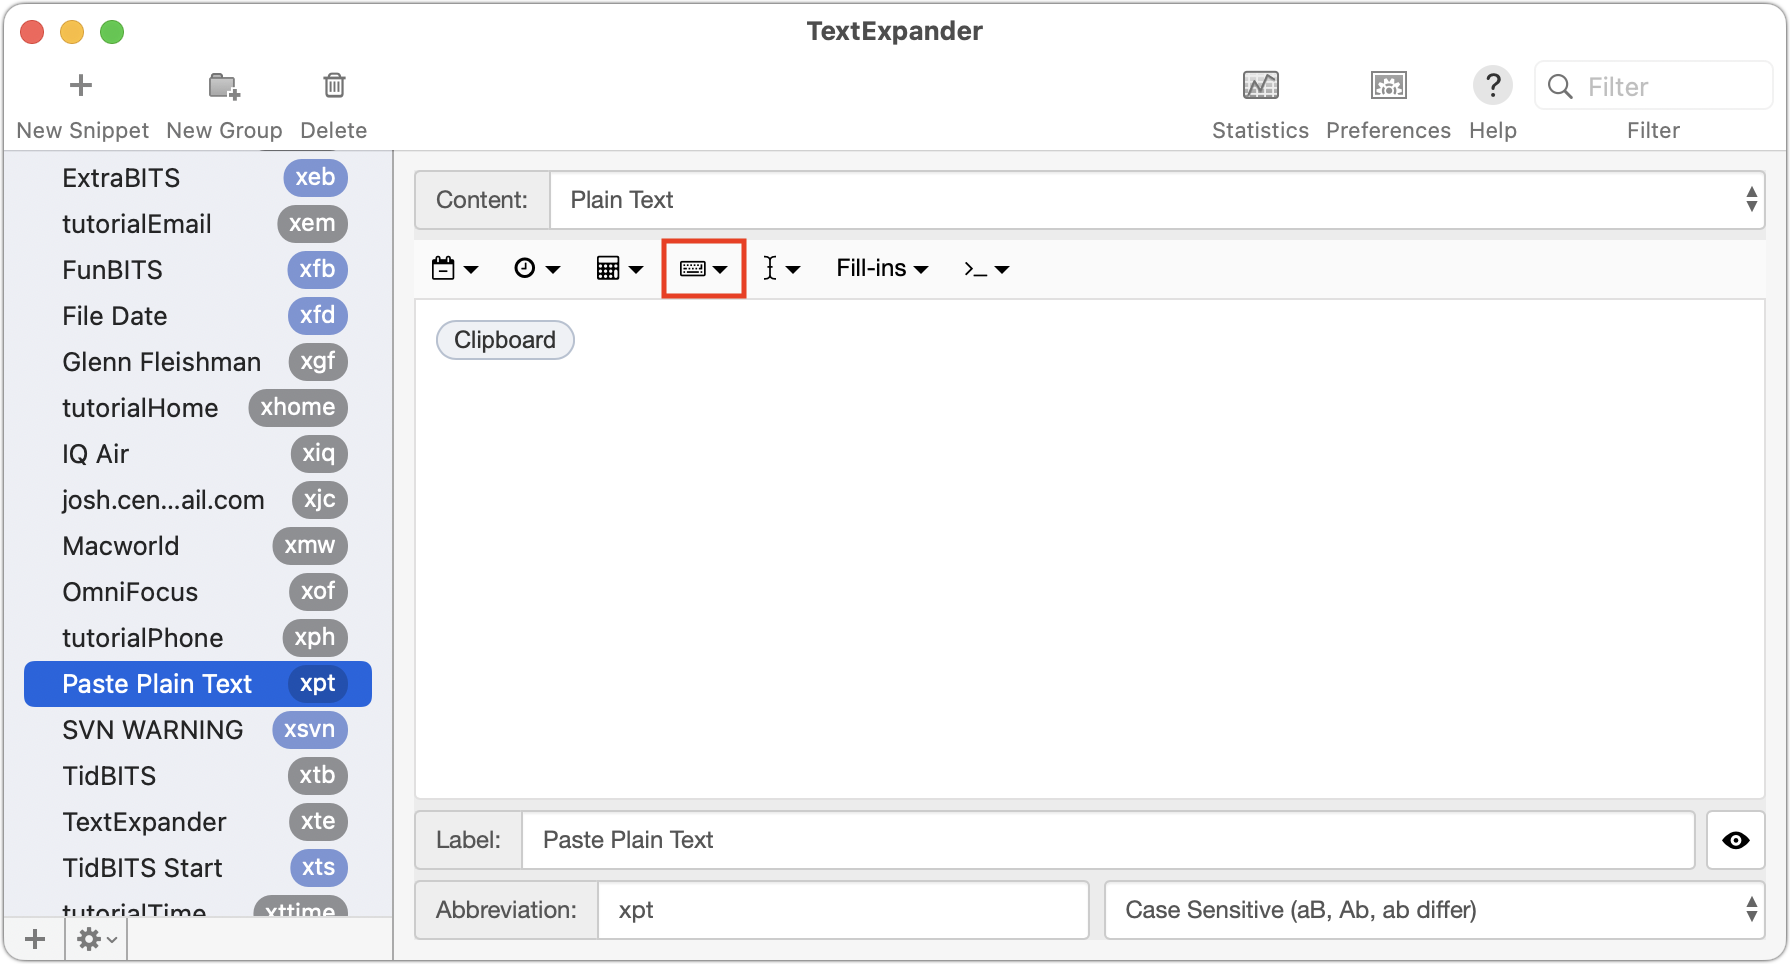
- Make sure the Content menu is set to Plain Text.
- From the little keyboard icon, choose Clipboard to insert the Clipboard token into the snippet.
- In the Label field, give it a name like “Paste Plain Text.”
- In the Abbreviation field, enter the abbreviation you’ll type to invoke the paste.
For the abbreviation trigger, I use xpt since I prefix all of my TextExpander shortcuts with “x” to make them unique and easy to type on both macOS and iOS.
Keyboard Maestro
If you already use Keyboard Maestro to automate actions on your Mac, it too offers the capability to strip formatting when pasting text. It takes only a minute to create a Paste Plain Text macro:
- Choose File > New Macro.
- Enter “Paste Plain Text” in the name field at the top.
- Click the New Trigger button, choose Hot Key Trigger, and press Command-Control-V (or whatever you like).
- Click the New Action button, search for “Filter” in the Actions list, and double-click it to add it to your macro.
- Leave the Filter pop-up menu set to System Clipboard and the To pop-up menu set to Source, but from the With pop-up menu, choose Remove Styles.
- Back in the Actions list, search for and add the Paste action.
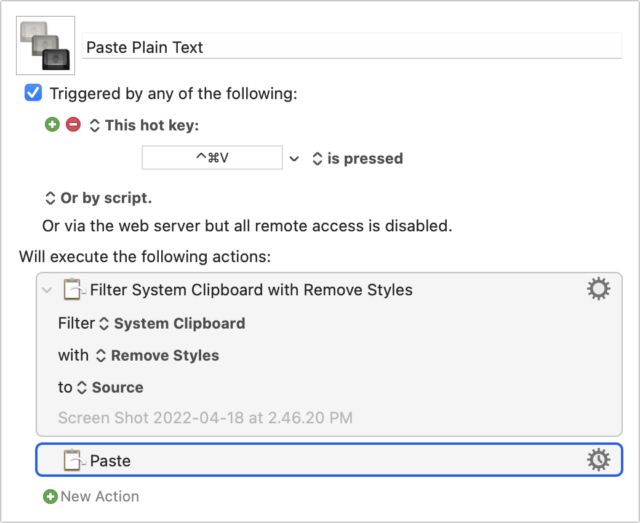
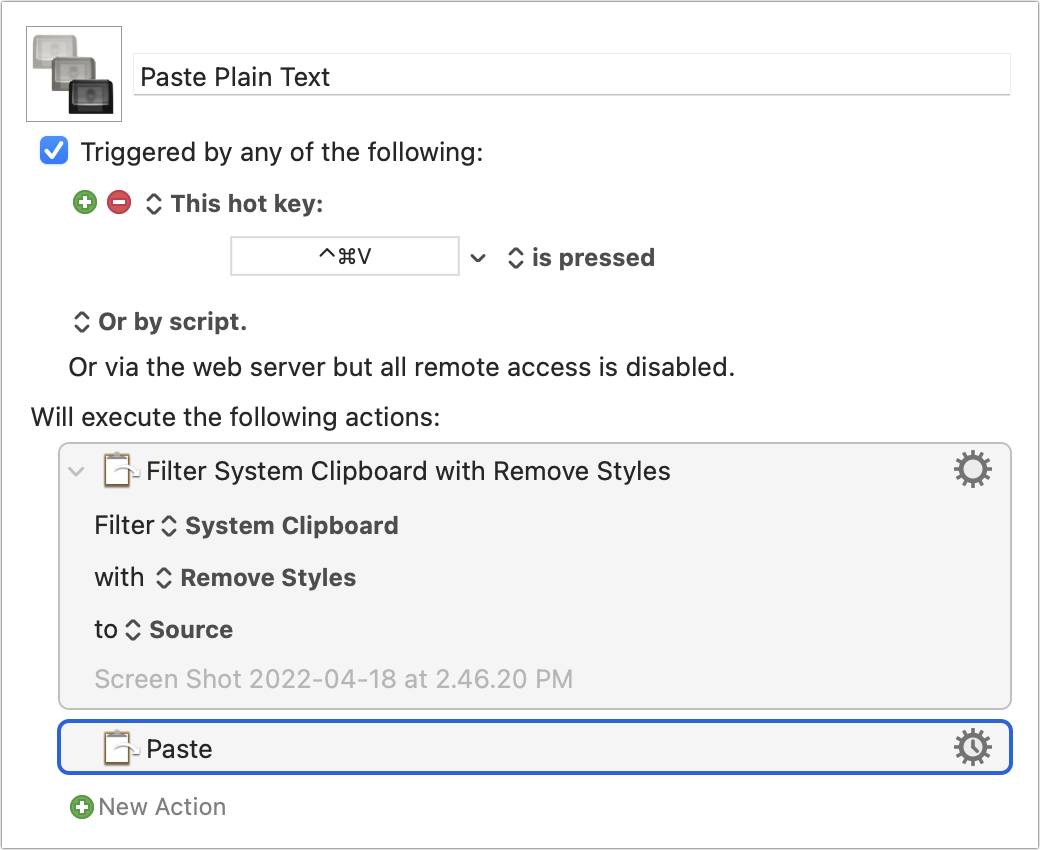
Then, whenever you press Command-Control-V, Keyboard Maestro looks at whatever is on the clipboard, filters out all the styles, and pastes it in whatever text field contains the insertion point.
More Than One Way to Skin a Character
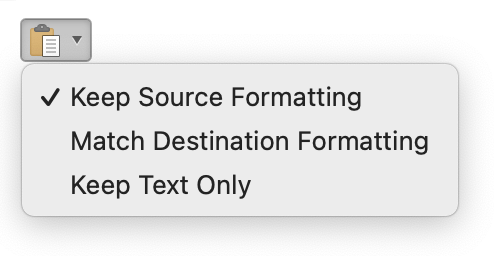
I won’t pretend this list is anywhere near comprehensive—there are many ways to paste plain text. Glenn Fleishman is a fan of Pastebot from Tapbots. The Mac App Store also has the Paste Plain Text menu bar app, though it asks for your email address. And finally, those who use Microsoft Office should also be aware of the Paste Options button, which lets you decide after pasting if you want to keep the formatting of the source you’re pasting, match the formatting of the destination where you’re pasting, or just paste plain text.
 If you have another solution for pasting plain text that you prefer, tell us about it in the comments.
Moving from 1Password to KeePass
I’ve been using password managers for a long time, starting with the open-source KeePass in Windows nearly 20 years ago. When I moved back to the Apple world in the late 2000s, I was drawn in by the shininess of 1Password. It was made just for the Mac and looked the part. KeePass was always rough around the edges, while 1Password was neatly integrated with the Mac and iPhone. (For evidence of my longtime 1Password loyalty, see “1Password 7 for Mac Offers a Fresh Look… for an Upgrade Price,” 18 June 2018.)
However, I always somewhat regretted switching away from KeePass, which stores its encrypted database in a standardized, open format. The original KeePass has always been Windows-only, but there are multiple KeePass-compatible apps for all platforms, and you’re free to pick whichever one is right for you. With KeePass, I always felt like I had complete control of my password database. I was a little uncomfortable with 1Password’s proprietary database format and later with how AgileBits pushed 1Password users to store passwords on 1Password.com, but I felt the tradeoff for less friction was worthwhile.
Unfortunately, 1Password developer AgileBits seems to be moving away from its Apple-centric roots. The upcoming 1Password 8, currently in early access, shifts the password manager to the cross-platform Electron development framework. In essence, Electron packages a Web app so that it acts like a native Mac app, which is great for cross-platform compatibility but seldom results in an app that feels like it was designed for the Mac. Electron is widely criticized, and deservedly so, but many apps might not have been ported to the Mac without it.
The other notable change is that 1Password 8 will no longer let you store your password database locally. Instead, you have to use 1Password.com, which makes some people uncomfortable. I have successfully used 1Password.com for a few years now (the company gave me a free subscription) but prefer to have my password database under my direct control.
Along with my philosophical dislike of having my essential data locked into a single provider, I’ve also been running into more annoyances with 1Password. For example, the 1Password browser extension used the Command-\ shortcut to autofill passwords—but the shortcut recently changed to Command-Shift-X to be consistent across all platforms. That’s just one small example of AgileBits changing something on the Mac to promote cross-platform compatibility. Overall, both the desktop and mobile apps have gotten clunkier and slower. Even my non-technical wife, commented on how 1Password wasn’t as smooth as it used to be.
I still think 1Password is a great product, and you are far better off with any password manager than none at all. But I decided some time ago to switch from 1Password back to the KeePass ecosystem. It’s less about being unhappy with 1Password’s direction than preferring my data in open formats, and AgileBits’ recent changes have made me decide that the tradeoff between convenience and openness was no longer worth it.
I also wanted more local control over my data. Recent iCloud outages have made me much leerier of relying on the cloud. I recently purchased a Synology NAS and several hard drives to store more of my data locally. I’ll write about that experience soon, but for now, I mention it only because that’s where I’m now storing my passwords.
So if you’re fed up with proprietary, cloud-based password managers, read on! But understand that going your own way, while empowering, isn’t as easy or necessarily as secure. There’s been a lot of talk lately about “sovereignty” with regard to software—specifically, ownership and control of your data, free of big tech’s cloud. But tech companies like Apple and Google are big for a reason: control comes with a cost. As Spider-Man says, “With great power comes great responsibility.”
If you want total control over your data and have the time and skills to maintain it securely, KeePass may be a good option. If what I describe below sounds like too much trouble, but you still want an open-source solution, check out Bitwarden, which offers both a cloud service and a self-hosted option (though the self-hosted option is a total pain to set up). I tried it but had trouble importing my 1Password vault.
Understanding the Tradeoffs of KeePass
The big selling point of cloud-based password managers like 1Password and LastPass is convenience. You don’t have to worry about securing, syncing, and backing up your password database, and there’s nothing wrong with making that choice. There’s far less risk of data loss than if you’re doing it yourself, syncing setup and maintenance are far easier, and you don’t have the headaches of system administration and security maintenance.
With KeePass, there is no cloud service. You are given an encrypted database in the open KDBX format, and you choose where to store it. That could be on your Mac, on a NAS, or in a cloud service like Dropbox, Google Drive, or iCloud. You can sync your password database directly between a Mac and your mobile devices, but it would be a hassle. A NAS or a cloud service helps you fluidly sync your passwords between platforms and devices. It’s also your responsibility to back up that file and maintain revisions in case you screw something up.
Because of this open approach, you can choose from many KeePass-compatible apps across multiple platforms. I’ve recently used:
- KeePassXC (Mac, free)
- Strongbox (Mac and iOS, free with optional subscription)
- KeePassium (iOS, free with optional subscription)
For many, choosing an app can be overwhelming, but I enjoy being able to try different approaches. And I’ve had no trouble sharing my KeePass database among multiple apps.
Whatever app you choose, be certain that you trust the developer completely—it’s not inconceivable that a malicious app could masquerade as a KeePass-compatible app and silently steal your passwords in the background. There has been at least one instance of a site modifying the KeePass code for Windows and injecting adware, though I’m not aware of passwords ever being compromised. (This is part of the tradeoff between open and closed platforms. See “Apple’s App Store Stubbornness May Be iOS’s Greatest Security Vulnerability,” 8 April 2022.)
Transferring from 1Password to KeePass
It took me a while to figure out how to switch from 1Password to KeePass. In addition to my passwords, I also maintain my two-factor authentication TOTP codes in 1Password, and I was unsure how KeePass would handle them. Thankfully, none of this turned out to be a problem.
The developer of the iOS KeePassium app has written excellent documentation for making the switch, explaining how to export your 1Password vault locally and then import it into KeePassXC on the desktop. (KeePassium is not available on the Mac.) The main limitation is that 1Password doesn’t export attachments, so you’ll have to add them back to the corresponding KeePassXC entries manually. The KeePassium method looks long, but it only took me a few minutes to complete, and that’s how I made the switch.
If you want a KeePass solution that is more coherent between Mac and iOS, Strongbox offers apps for both macOS and iOS. Its transfer process is simpler than KeePassium’s, but there is a major omission in Strongbox’s instructions: you can’t export an online database from 1Password, so you must first follow KeePassium’s instructions for transferring your 1Password database to a local vault, after which you can export from the local vault.
I tried both methods, and both worked well, with all of my TOTP codes intact. Strongbox’s import actually worked a little better since it preserved my favorite entries. However, I had already moved my 1Password vault to KeePass and made some changes, so it wasn’t worth going through the export again. I’m also not currently using Strongbox on the Mac for reasons I’ll explain below.
Syncing KeePass Between Devices
It’s easy enough to export from 1Password on your Mac, but how do you get that database onto your iPhone and other devices and keep that database in sync between them? The easy answer is to use a cloud service, and that’s what most people do. But I explicitly wanted to store my passwords on my own hardware on my local network.
Apple now relies on SMB as the standard file-sharing protocol for macOS, and you can even access SMB servers from the iOS Files app. Unfortunately, you cannot access your password database file from an SMB server via the Files app when you’re not connected to the server—there’s no offline caching—which renders it useless when you’re not on your local network. I have a VPN connection to my Synology so I can use it remotely, but I don’t want to have to activate the VPN just to access my passwords when I’m away from home.
I also tried Synology Drive, which is similar to Dropbox and Google Drive but hosted on your own Synology NAS. Synology Drive provides two apps for iOS, and both integrate with the Files app, but unfortunately, using them for syncing KeePass-compatible iOS apps is problematic.
I found the most reliable local syncing method to be an old-fashioned WebDAV server (you may remember WebDAV from the days of Apple’s iDrive). Thankfully, Synology makes it easy to set up a WebDAV server in a few clicks. The iOS Strongbox app can connect to WebDAV servers without relying on a third-party app, so that’s what I’m using on my iPhone, and it’s doing a great job of staying in sync without additional complications. I’ve even made changes to my database on Strongbox while away from the house and seen it sync when I get home. When I eventually switch my wife over from 1Password, I’ll set her up with Strongbox.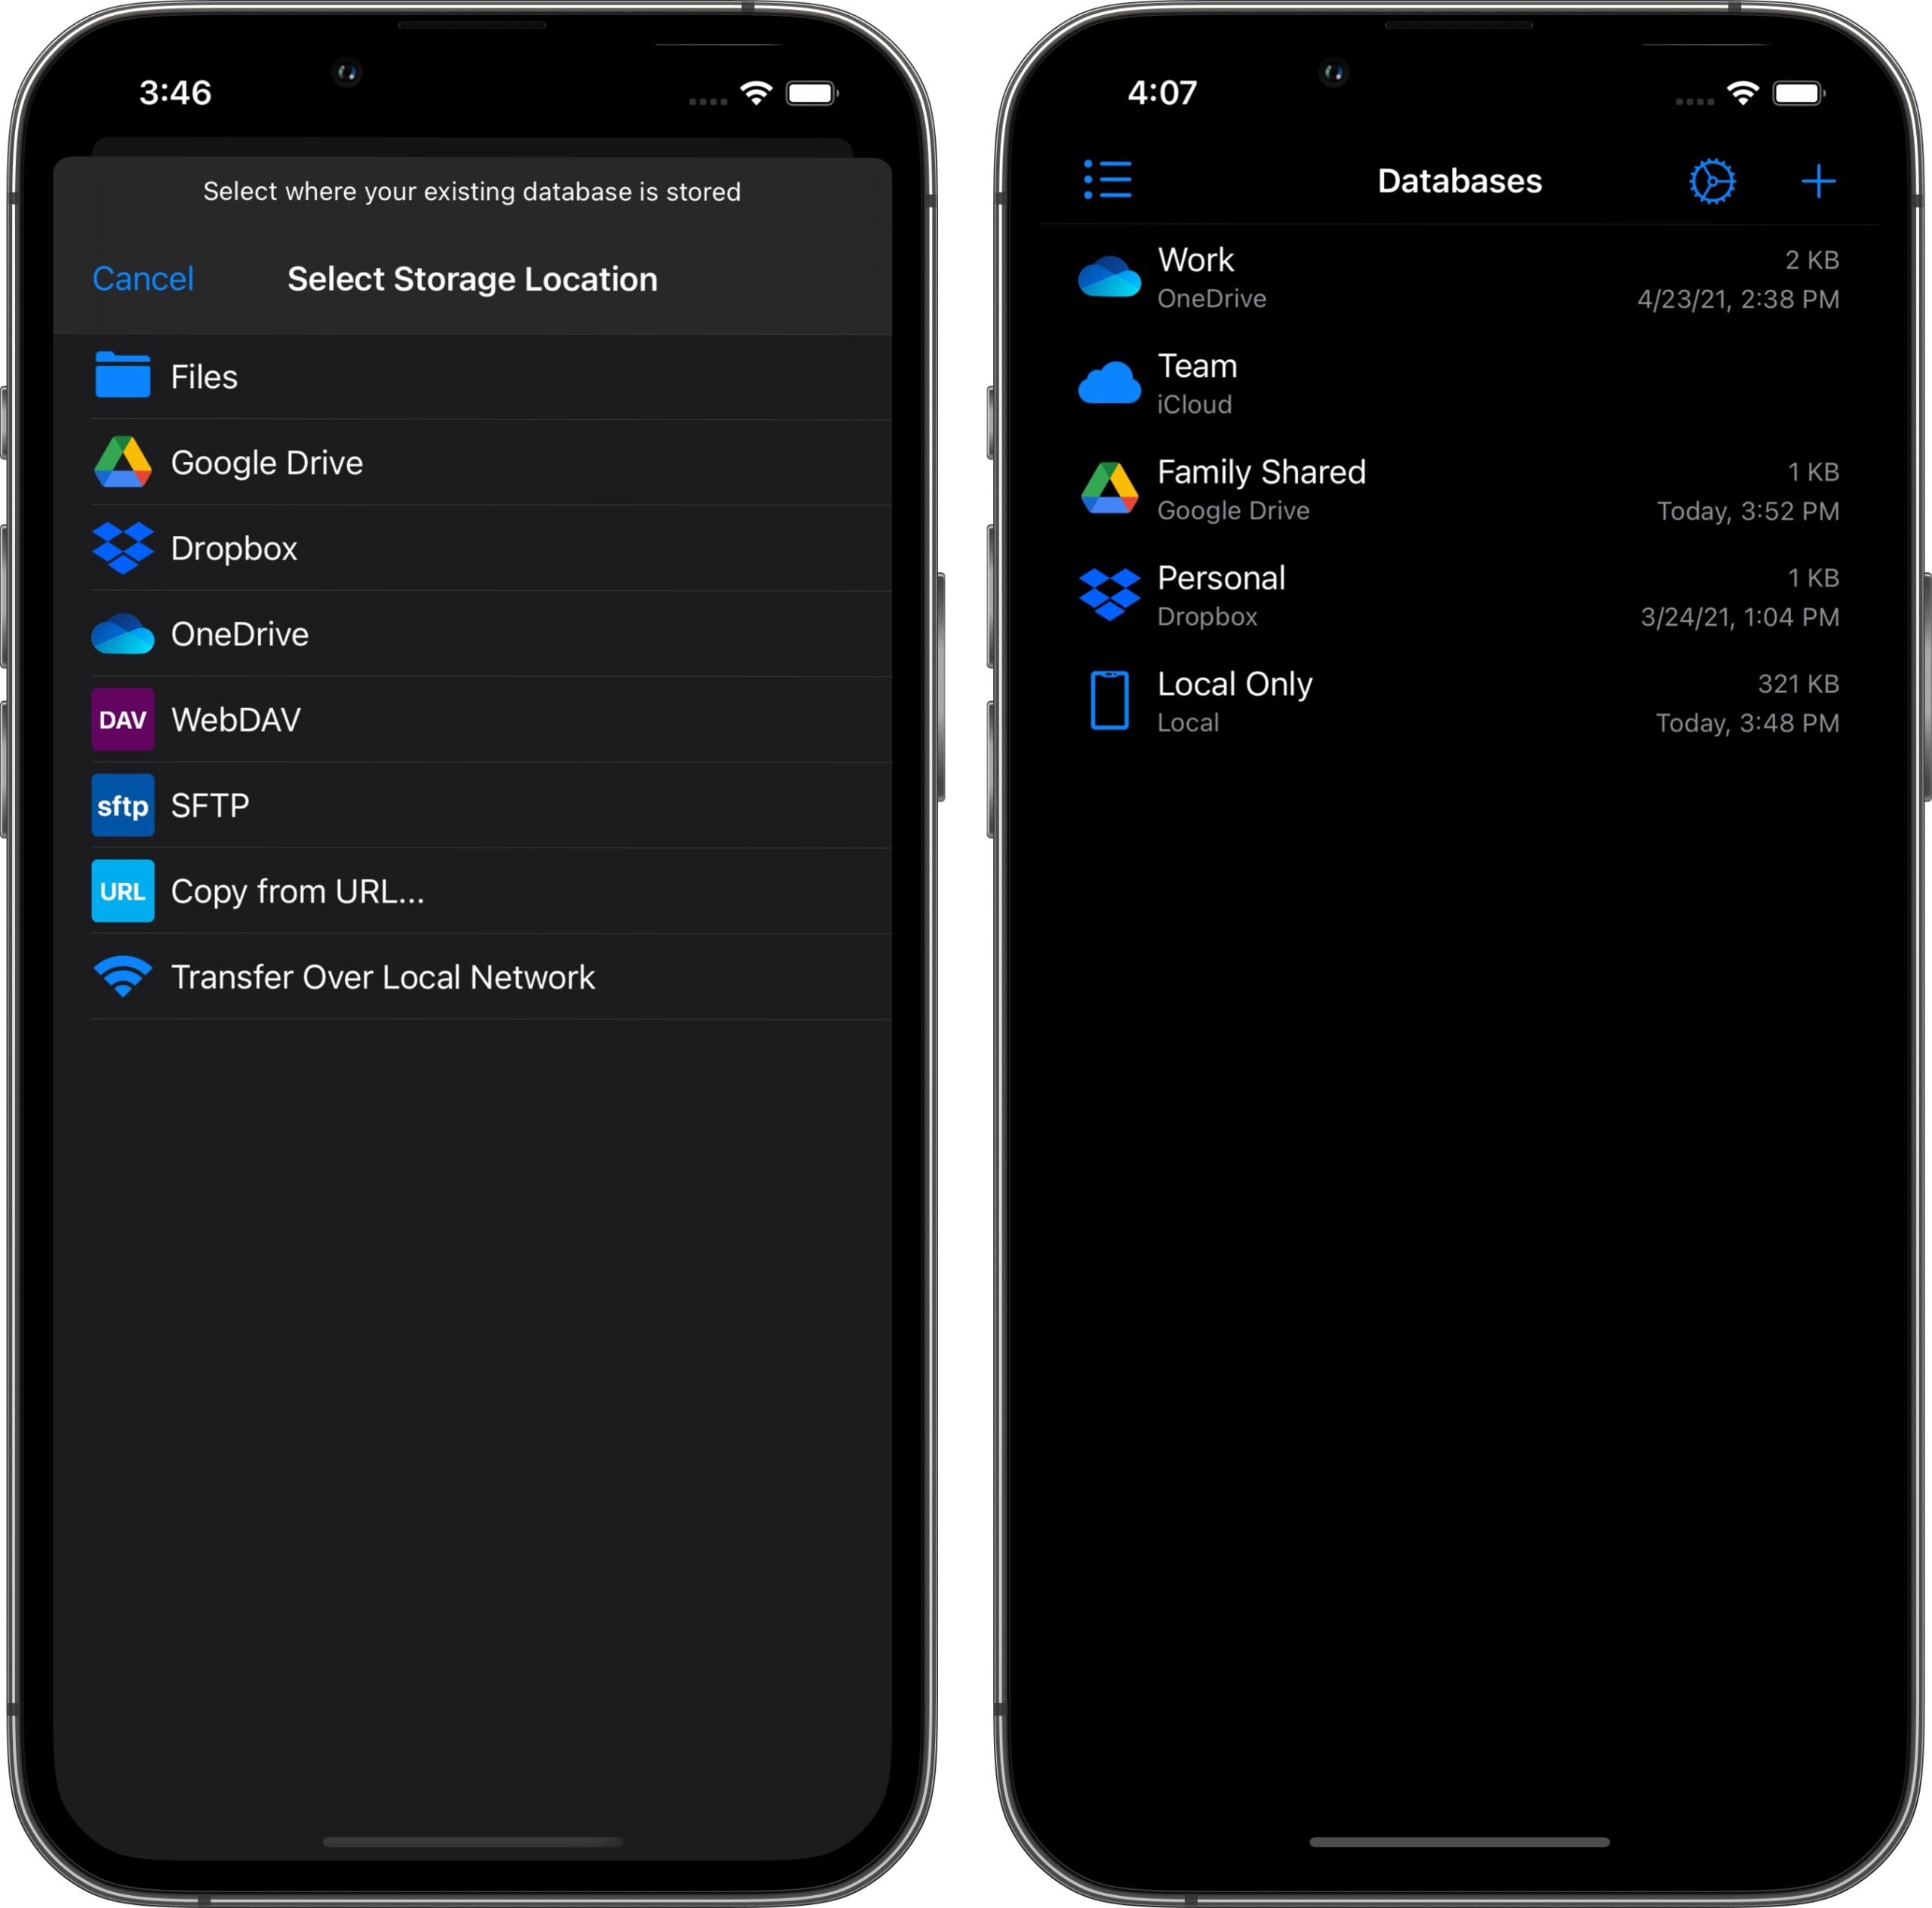
My Preferred KeePass-Compatible Apps
I’ve settled on KeePassXC for the Mac and Strongbox for the iPhone. Both apps are open source. The beauty of KeePass is I can mix and match apps as I see fit.
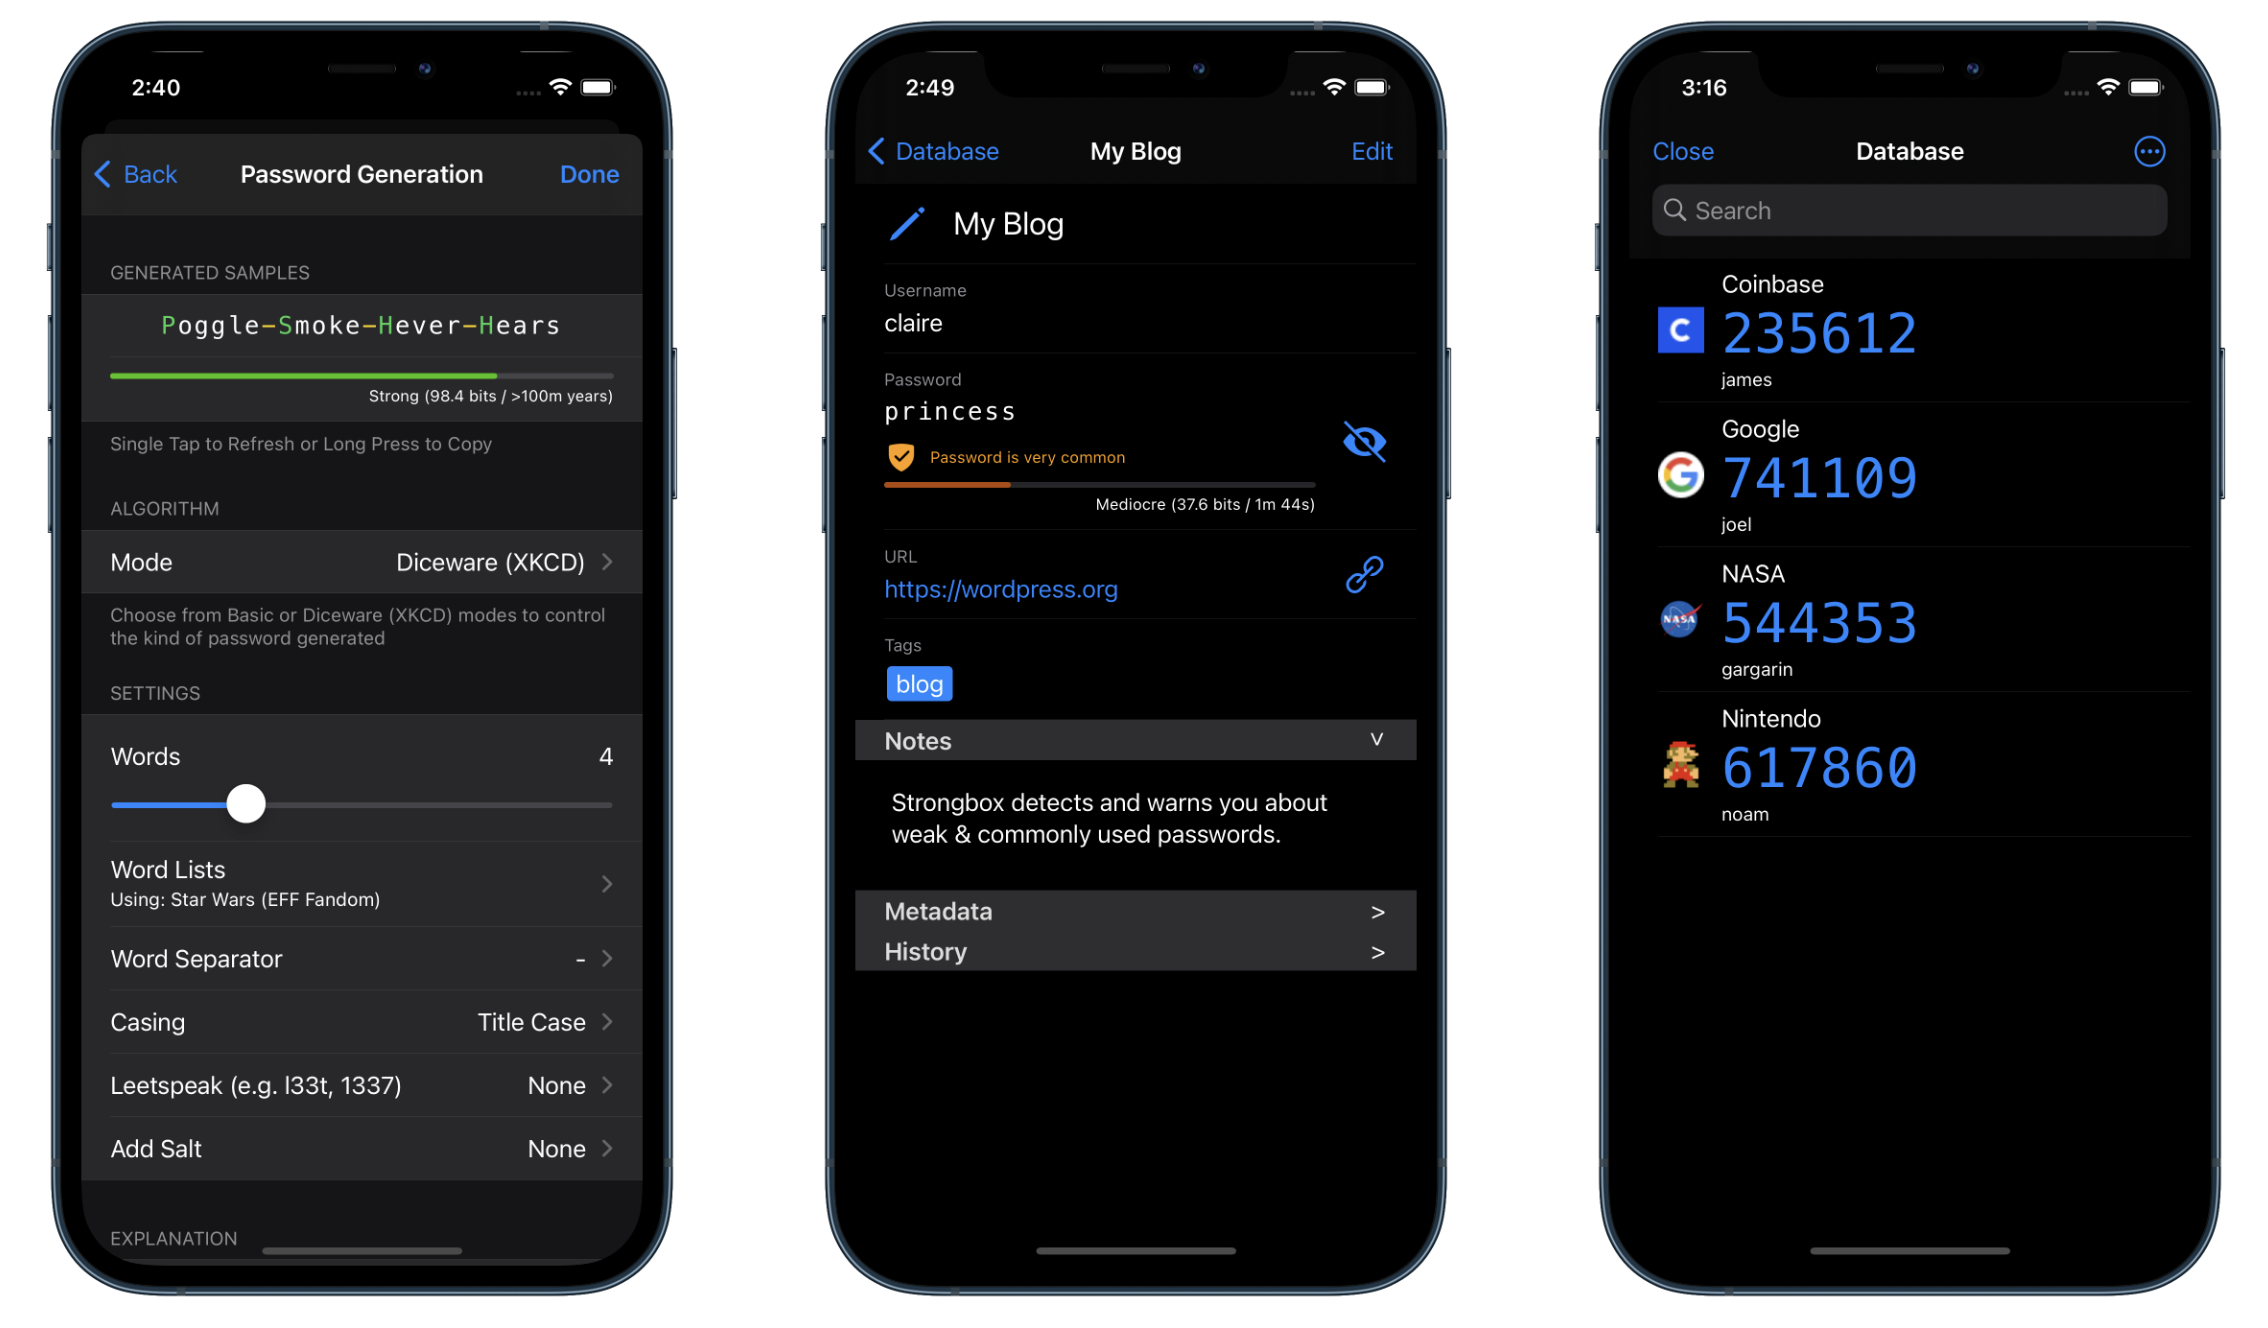
I use Strongbox on the iPhone because of its built-in WebDAV support, but it’s a powerful app in its own right. It supports autofill, Face ID, security audits, password generation, and all the modern amenities you expect in a password app.
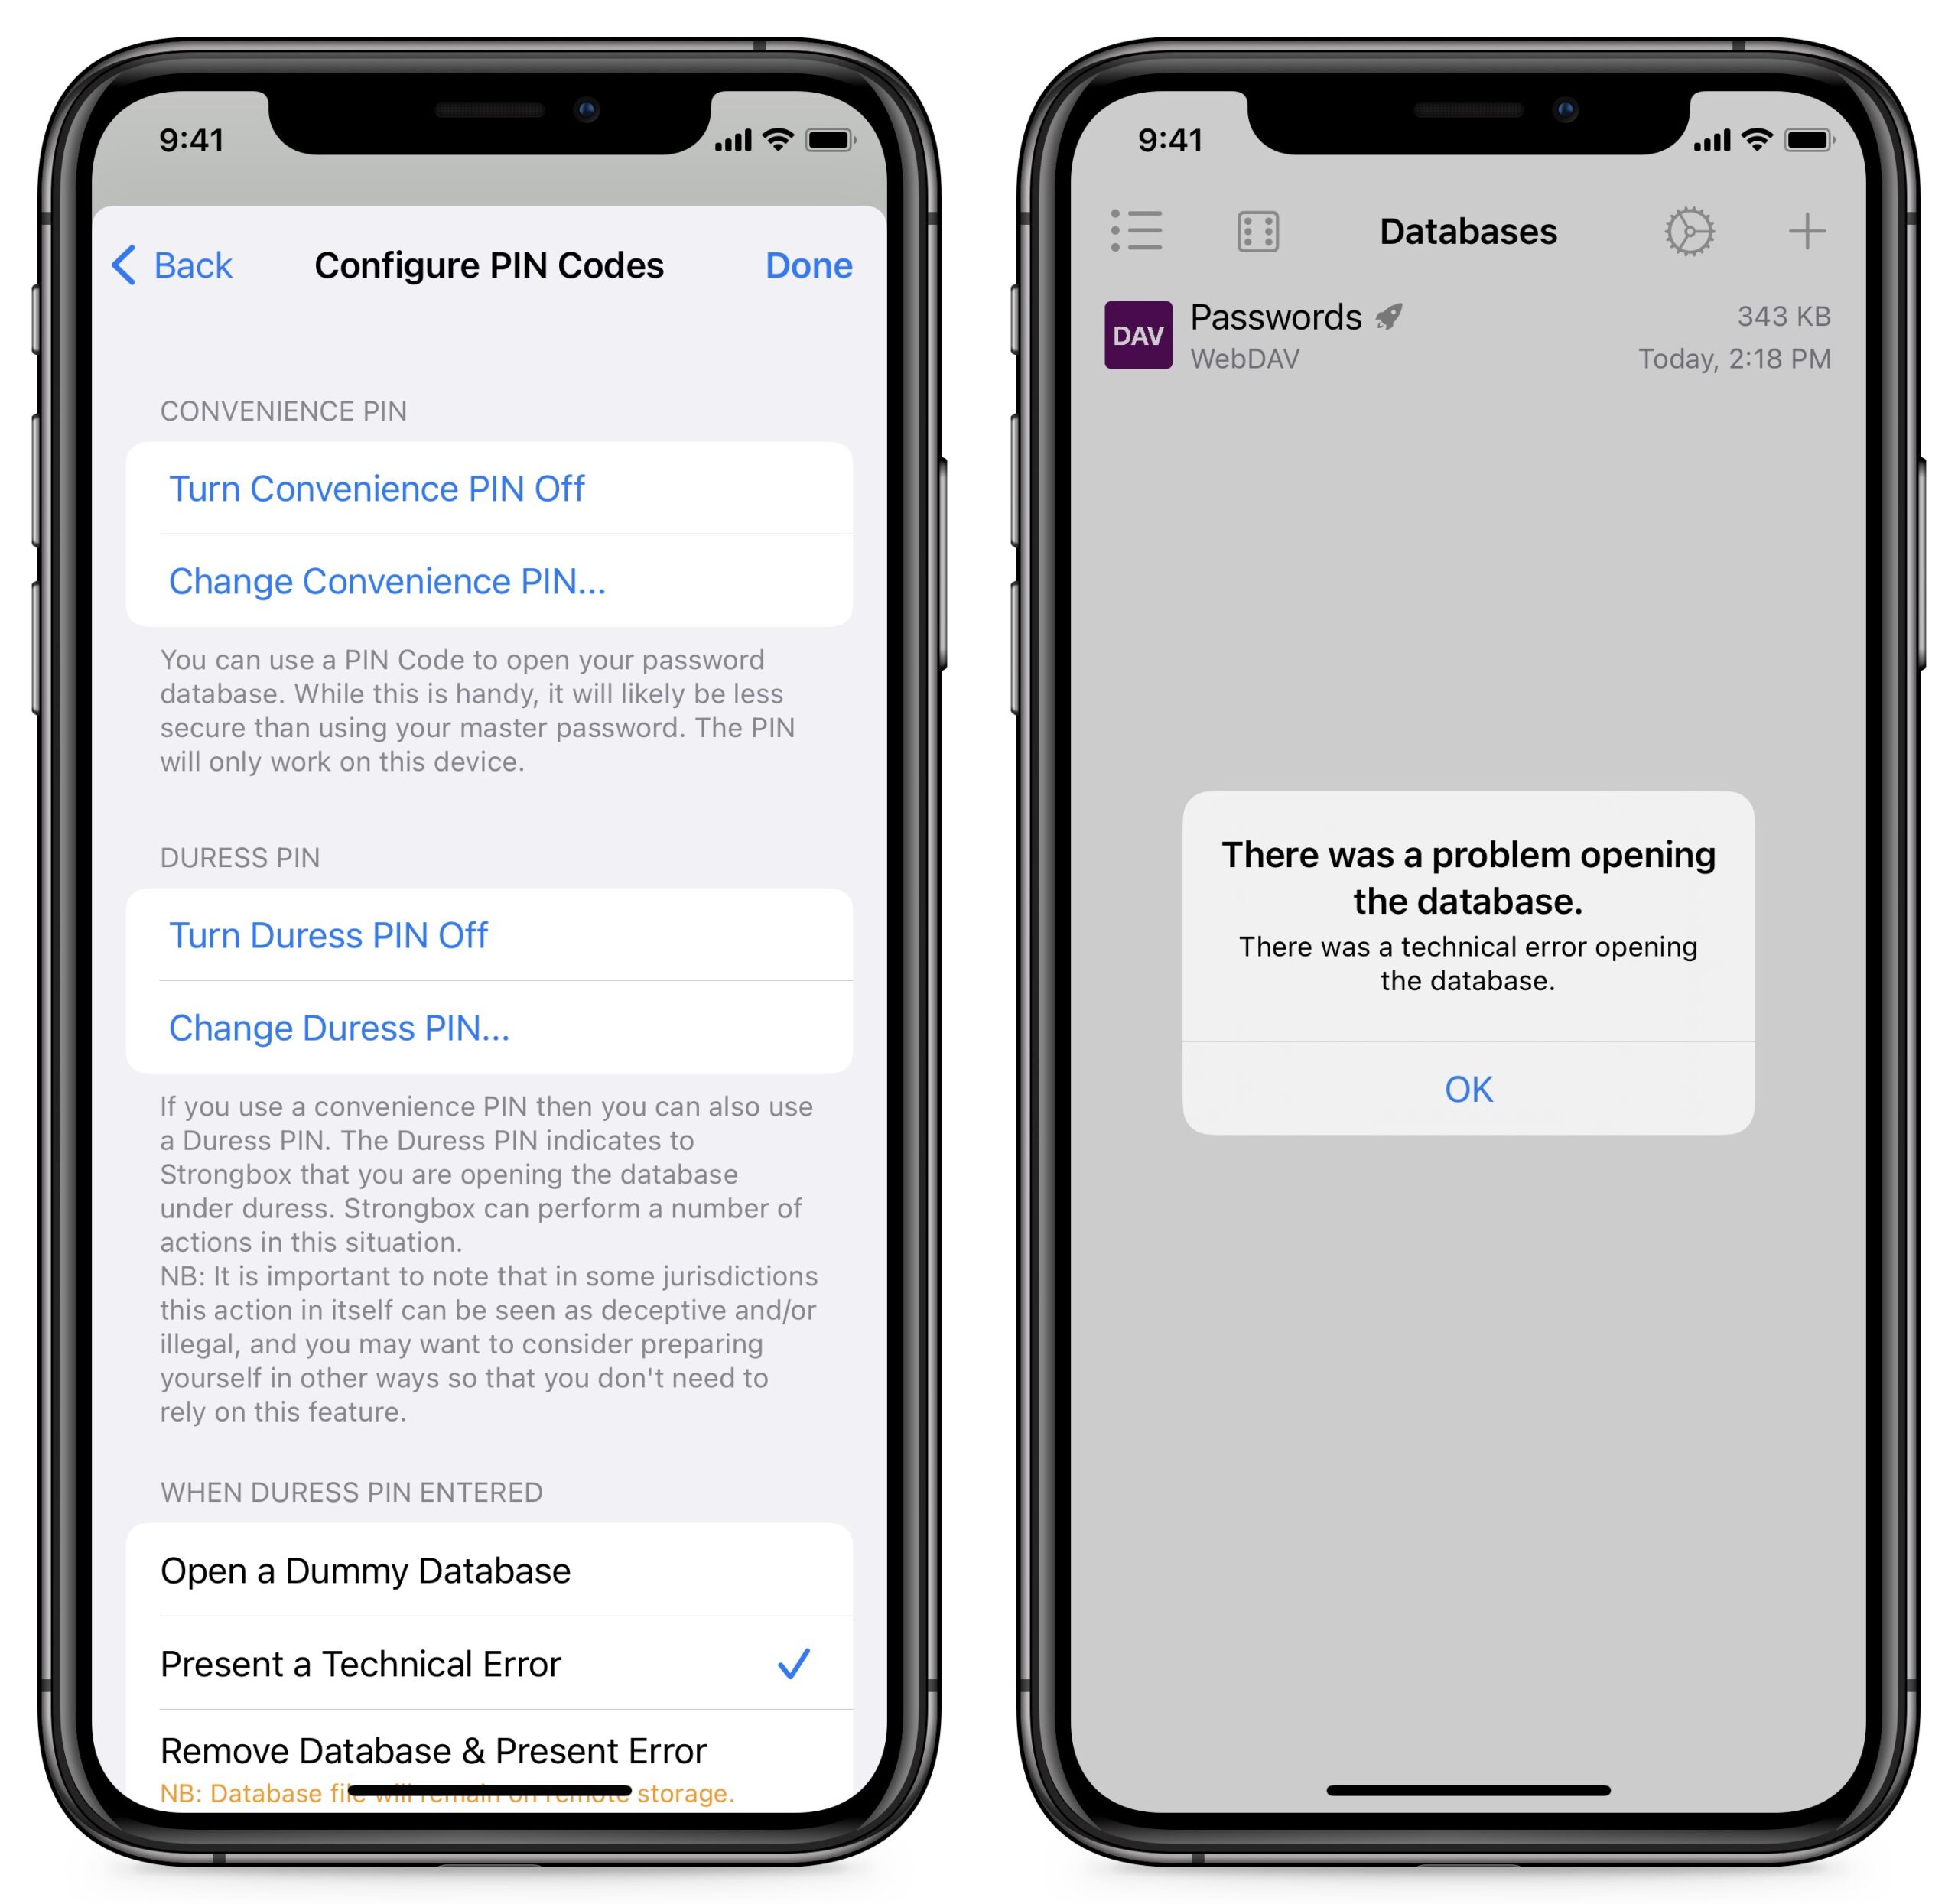
Strongbox has some neat tricks of its own. In addition to Face ID, you can also set a secondary PIN for authentication. Additionally, you can set a “duress PIN,” a secondary PIN you would enter if someone were trying to force you to let them access your passwords. You can set the duress PIN to display a dummy password database, a phony error, or even wipe the local copy of your database.
You can even change the app icon to disguise Strongbox as another kind of app, like a calculator. I’m not sure how effective that would be, given that it’s still called Strongbox, but I appreciate the novelty.
![]()
The best features of Strongbox require a subscription of about $15 per year, but I’m more than happy to support this high-quality open source app.
Strongbox for macOS also boasts a well-designed interface that feels Mac-native. It compares favorably to 1Password or any other proprietary password manager. It’s also distributed exclusively via the Mac App Store, so you get Apple’s stamp of approval. Unfortunately, as elegant as Strongbox’s macOS-native desktop version is, it doesn’t include Web browser extensions. Instead, Strongbox recommends the Mac’s built-in autofill function, which works only in Safari, not in Brave, my browser of choice.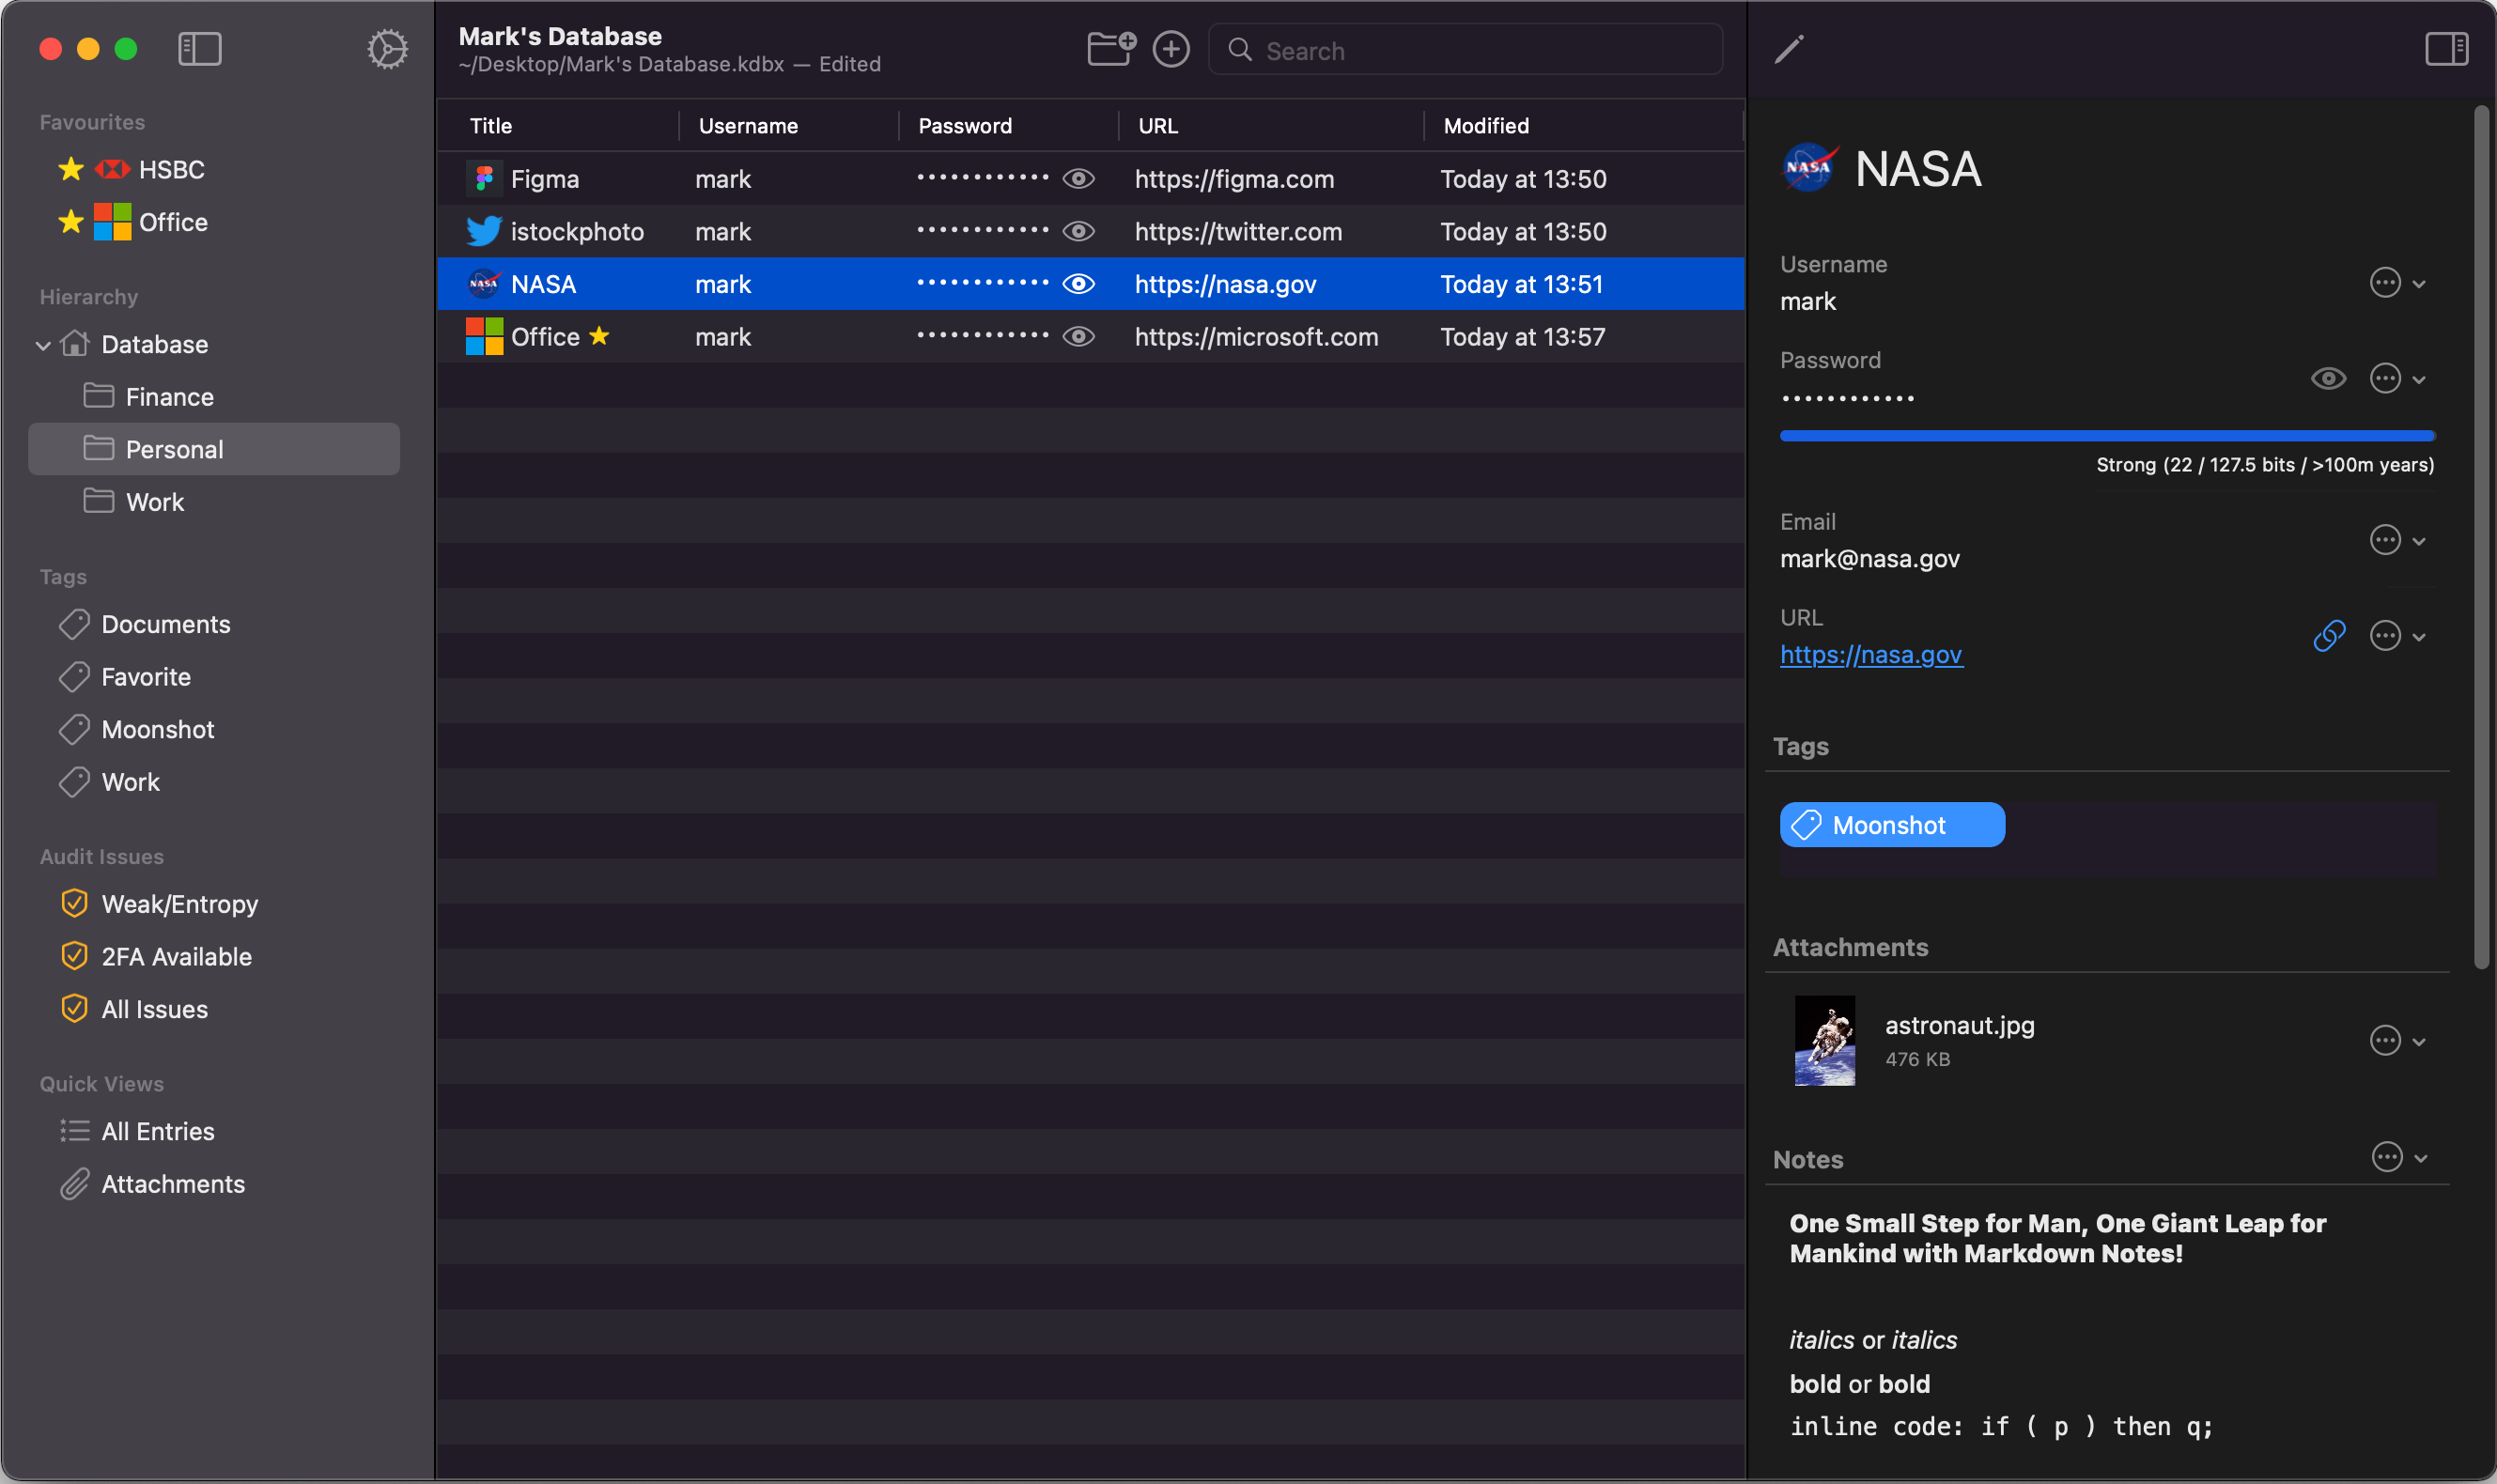 There are several possible workarounds for this. For instance, you could use one of the available standalone KeePass-compatible extensions for Google Chrome and other browsers. My current desktop solution is KeePassXC, which isn’t pretty or particularly Mac-like but does provide browser extensions. It’s also incredibly fast and lightweight. I have some criticisms but bear in mind that KeePassXC is totally free and maintained by volunteers.
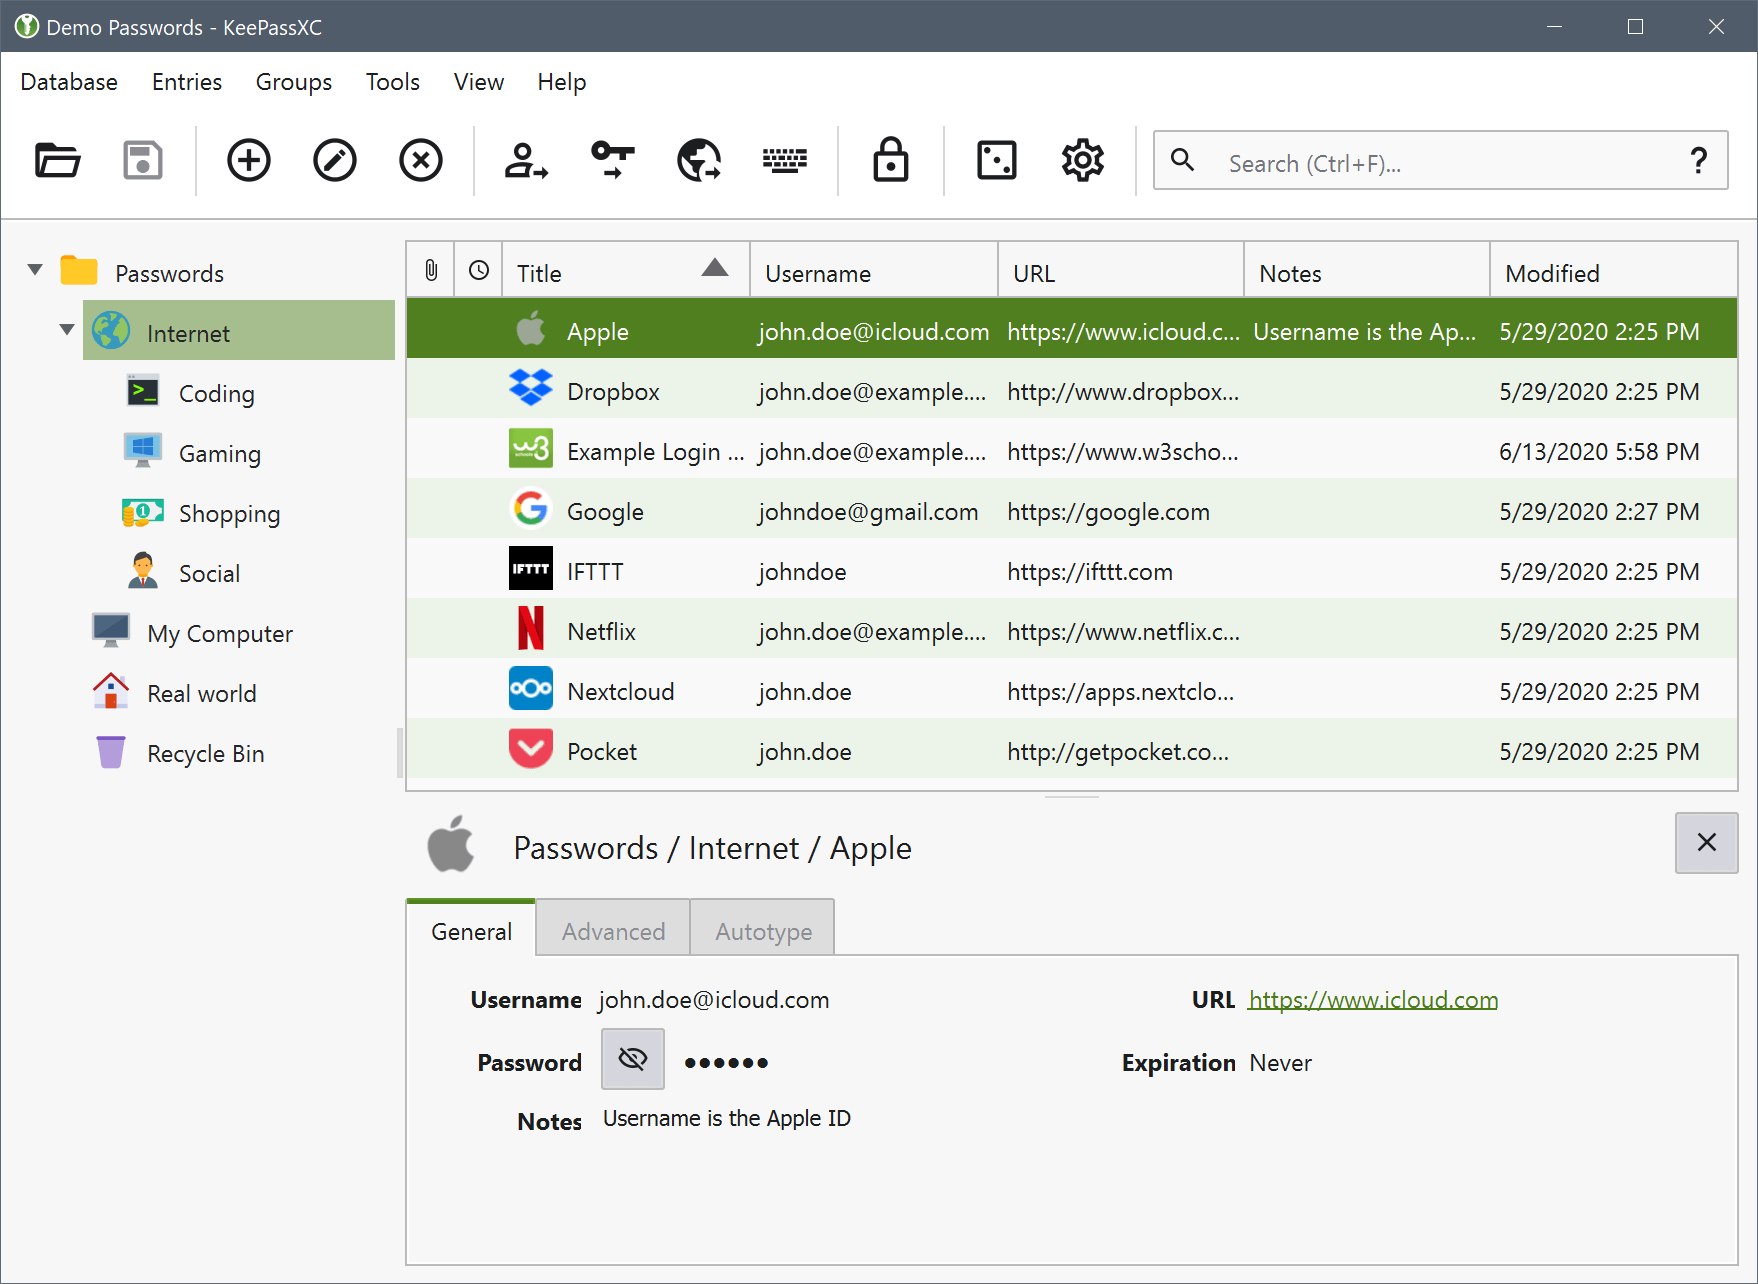
I never considered 1Password 7 sluggish until I experienced KeePassXC’s speed. On the downside, KeePassXC lacks features that are commonplace in other password managers. Notably, it has no security audit feature like 1Password, nor any way to denote a login as a favorite except by storing entries in a manually created folder.
The KeePassXC browser extension works well, but it’s not as well-integrated as 1Password’s. After installing the browser extension, you must enable it for each browser you want to use. At first, I couldn’t get it to work with just Brave selected, but it worked after I also selected Chrome and Chromium (which Brave is based on). You also have to click an authorization prompt to allow autofill on each site, which makes sense from a security standpoint but is annoying. Plus, you must select an option for websites that require you to enter your username and password on separate pages, though there’s usually an in-browser prompt for that.
As necessary as browser integration is, the KeePassXC browser extension is far from perfect. It relies on a connection to the KeePassXC desktop app, and sometimes that connection gets interrupted until I refresh it. (In my experience, this problem can crop up with any extension that has to connect to a local app instead of a cloud service. I’ve had similar issues with 1Password.)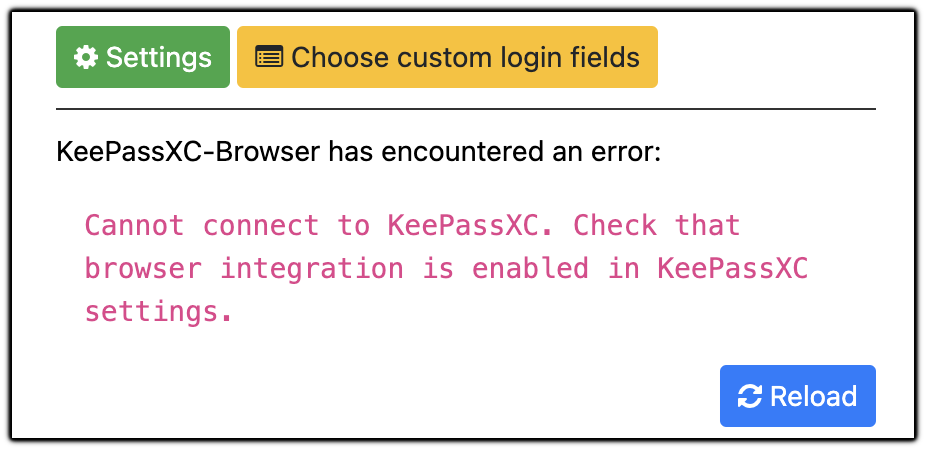
Most of the time, it works just fine, and it fulfills what I most need in a password manager browser extension: noticing when I add a new password or change a password and offering to update the database.
Data Sovereignty Isn’t for Everyone
If all this sounds like I left a smooth and perfectly functional app for a hodgepodge of cobbled-together solutions, it’s because I did. But now that I’ve hashed out the kinks, it works pretty well. I’ve created and changed several passwords on both my Mac and iPhone since switching from 1Password, and I have experienced no data corruption or loss.
The upside of doing all of this is that I now have total control over my password database. It’s stored in Synology Drive, which keeps revisions and syncs a local copy to my Mac, where Time Machine also stores revisions. Plus, my Synology NAS backs up remotely to IDrive (unrelated to Apple’s old cloud storage offering) and locally to a 14 TB external drive, and they also keep revisions, so my password database is well secured.
It was some trouble to set up, but for me, it was worth it to gain sovereignty over my password database. It’s now held right here in my home, with multiple encrypted backups both here and off-site. I don’t have to worry about a cloud service being taken offline or going out of business.
So, if you’re unhappy with 1Password’s direction and want more control over your data, check out KeePass and its open-source brethren.