#1609: Apple Q2 2022 results, Apple’s Self Service Repair program launches, escaping the cloud with a Synology NAS
Apple posted strong results in its second fiscal quarter of 2022 despite supply chain problems, a flagging economy, and tumult from Russia’s invasion of Ukraine. Apple has also launched its promised Self Service Repair program, offering parts and tools to repair recent iPhones, albeit through what looks like a generic outsourcing partner. Finally, Josh Centers discusses his month of using a Synology NAS to become less reliant on cloud services. Notable Mac app releases this week include ChronoSync 10.1 and ChronoAgent 2.1, Logic Pro 10.7.4, Little Snitch 5.4, and Quicken 6.7.
Apple’s Q2 2022 Results Help Brighten Dark Times
Apple has announced financial results for the second fiscal quarter of 2022, and to engage in some understatement, they aren’t too shabby: profits of $25 billion ($1.52 per diluted share) on revenues of $97.3 billion. The company’s revenues were up 9% compared to the year-ago quarter, with profits up by more than 5% (see Apple’s Jaw Dropping Q2 2021 By The Numbers, 28 April 2021).
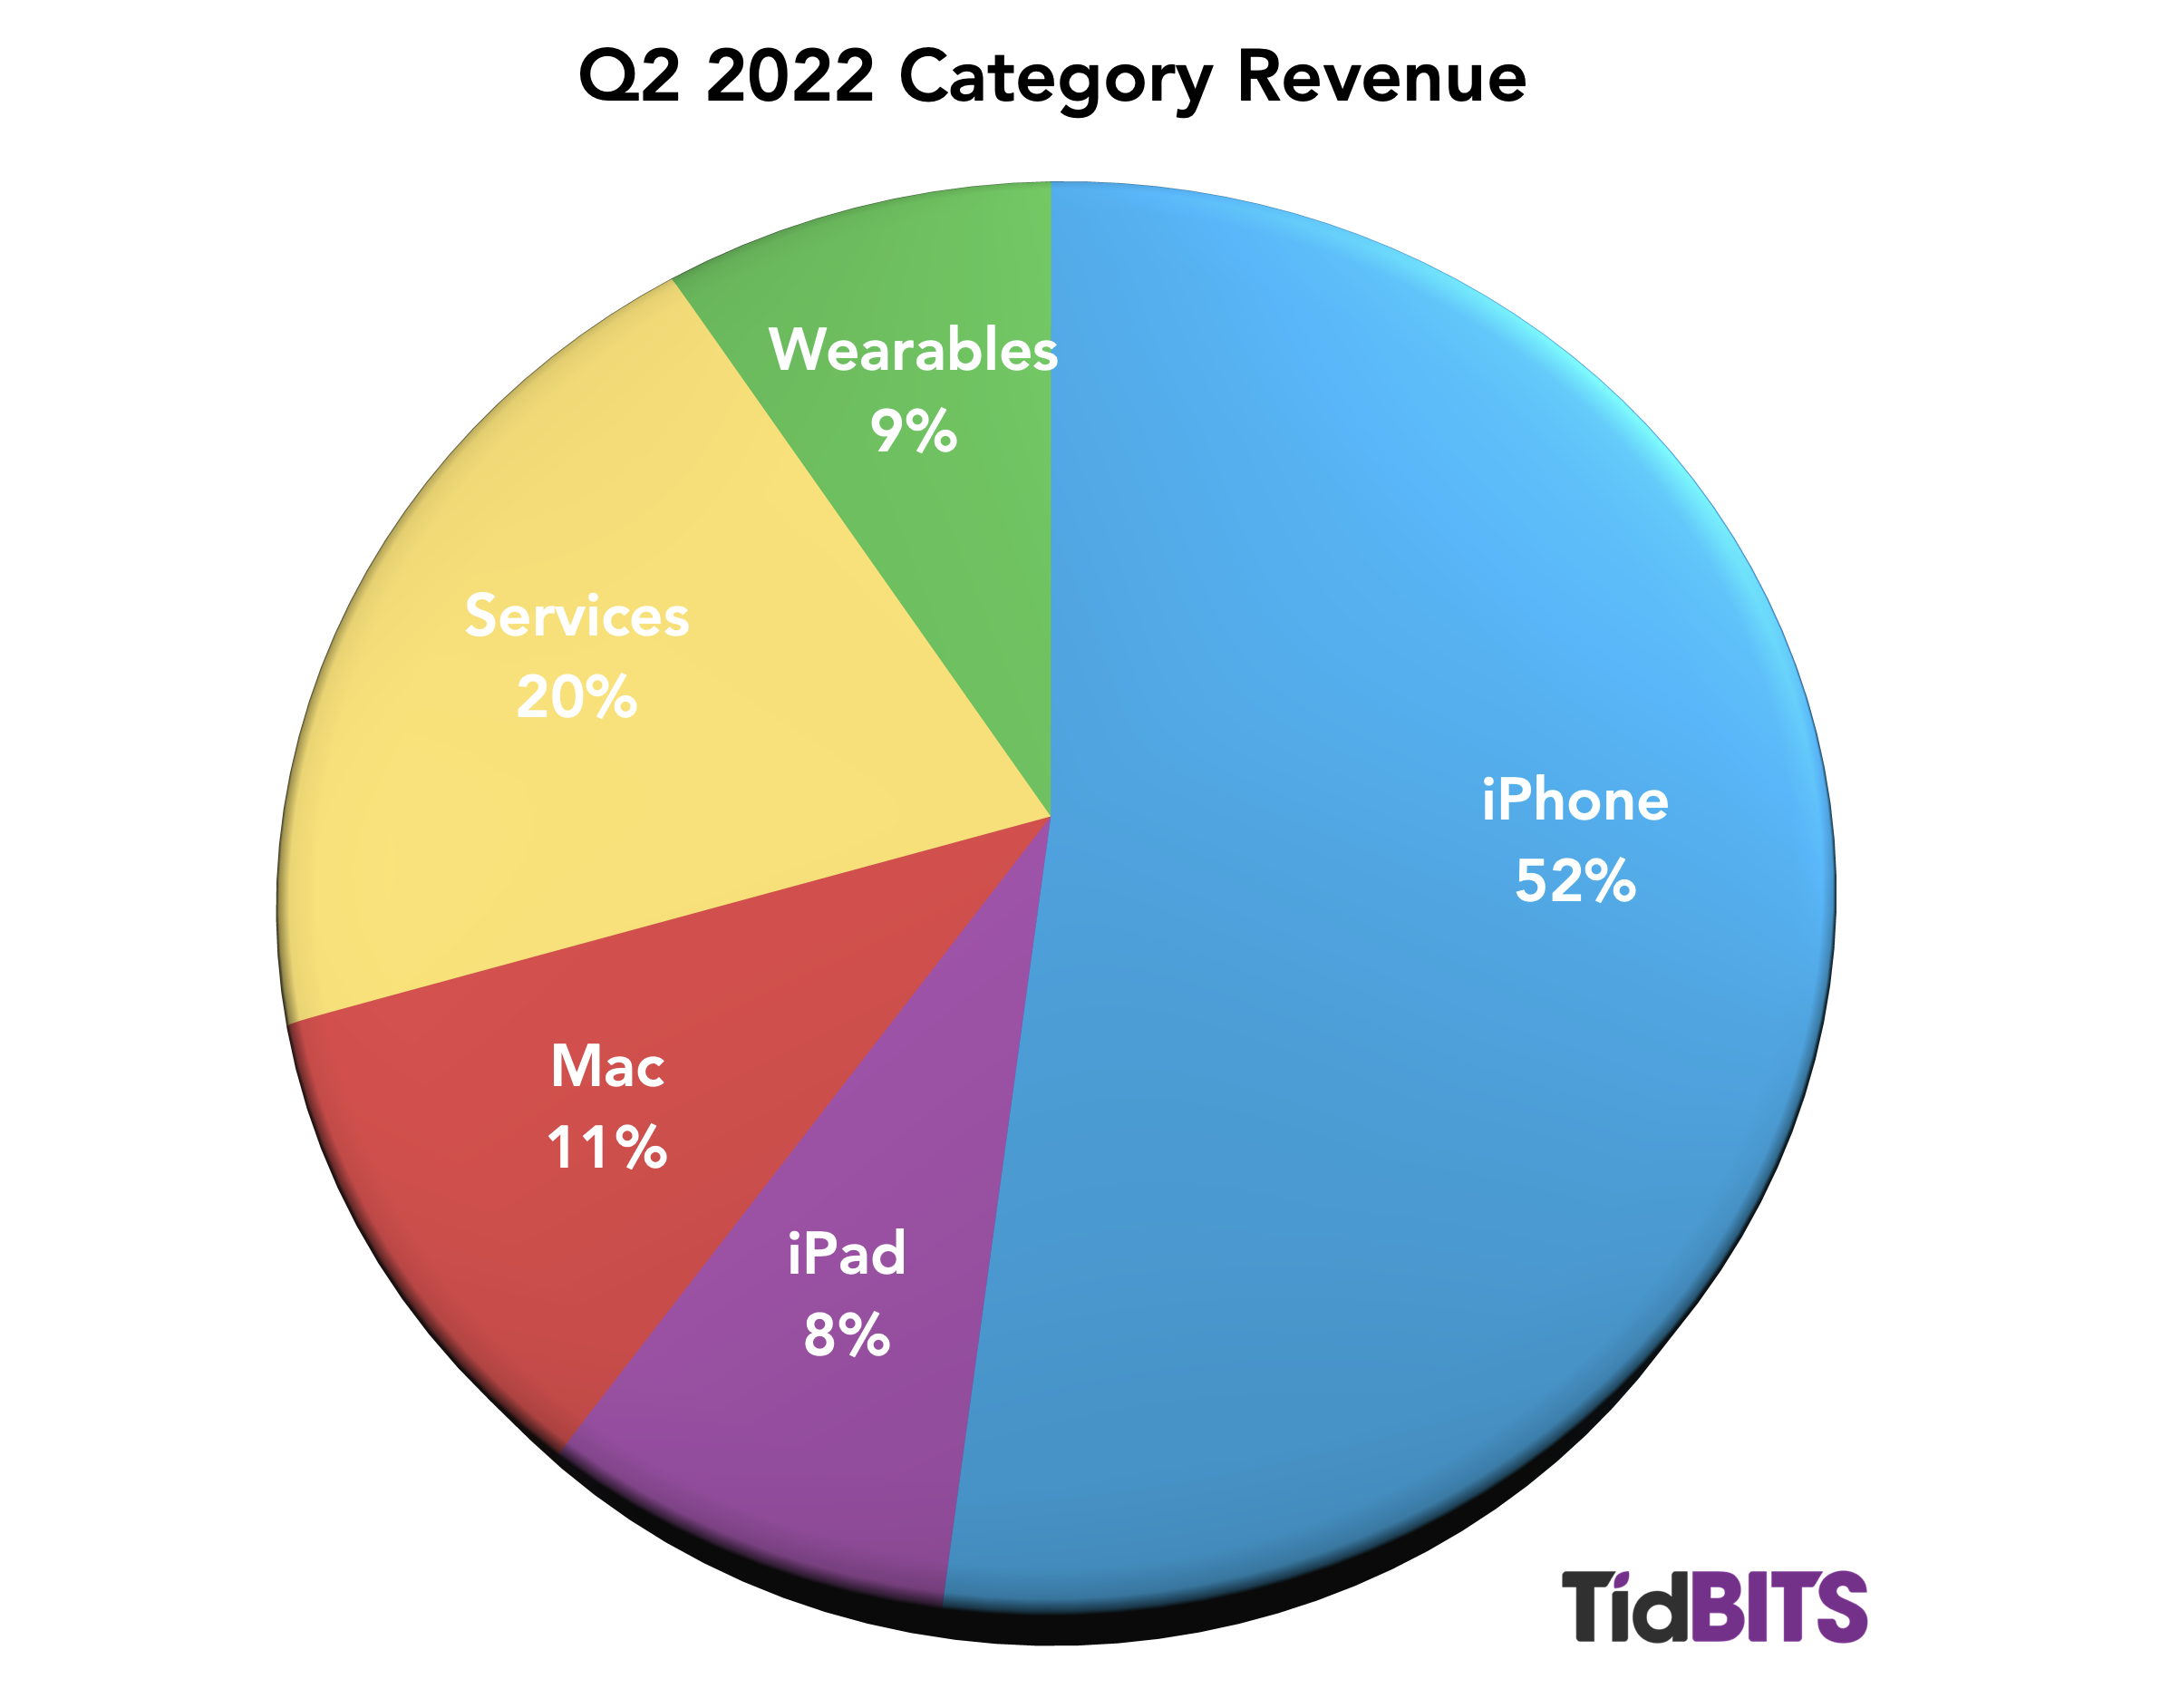
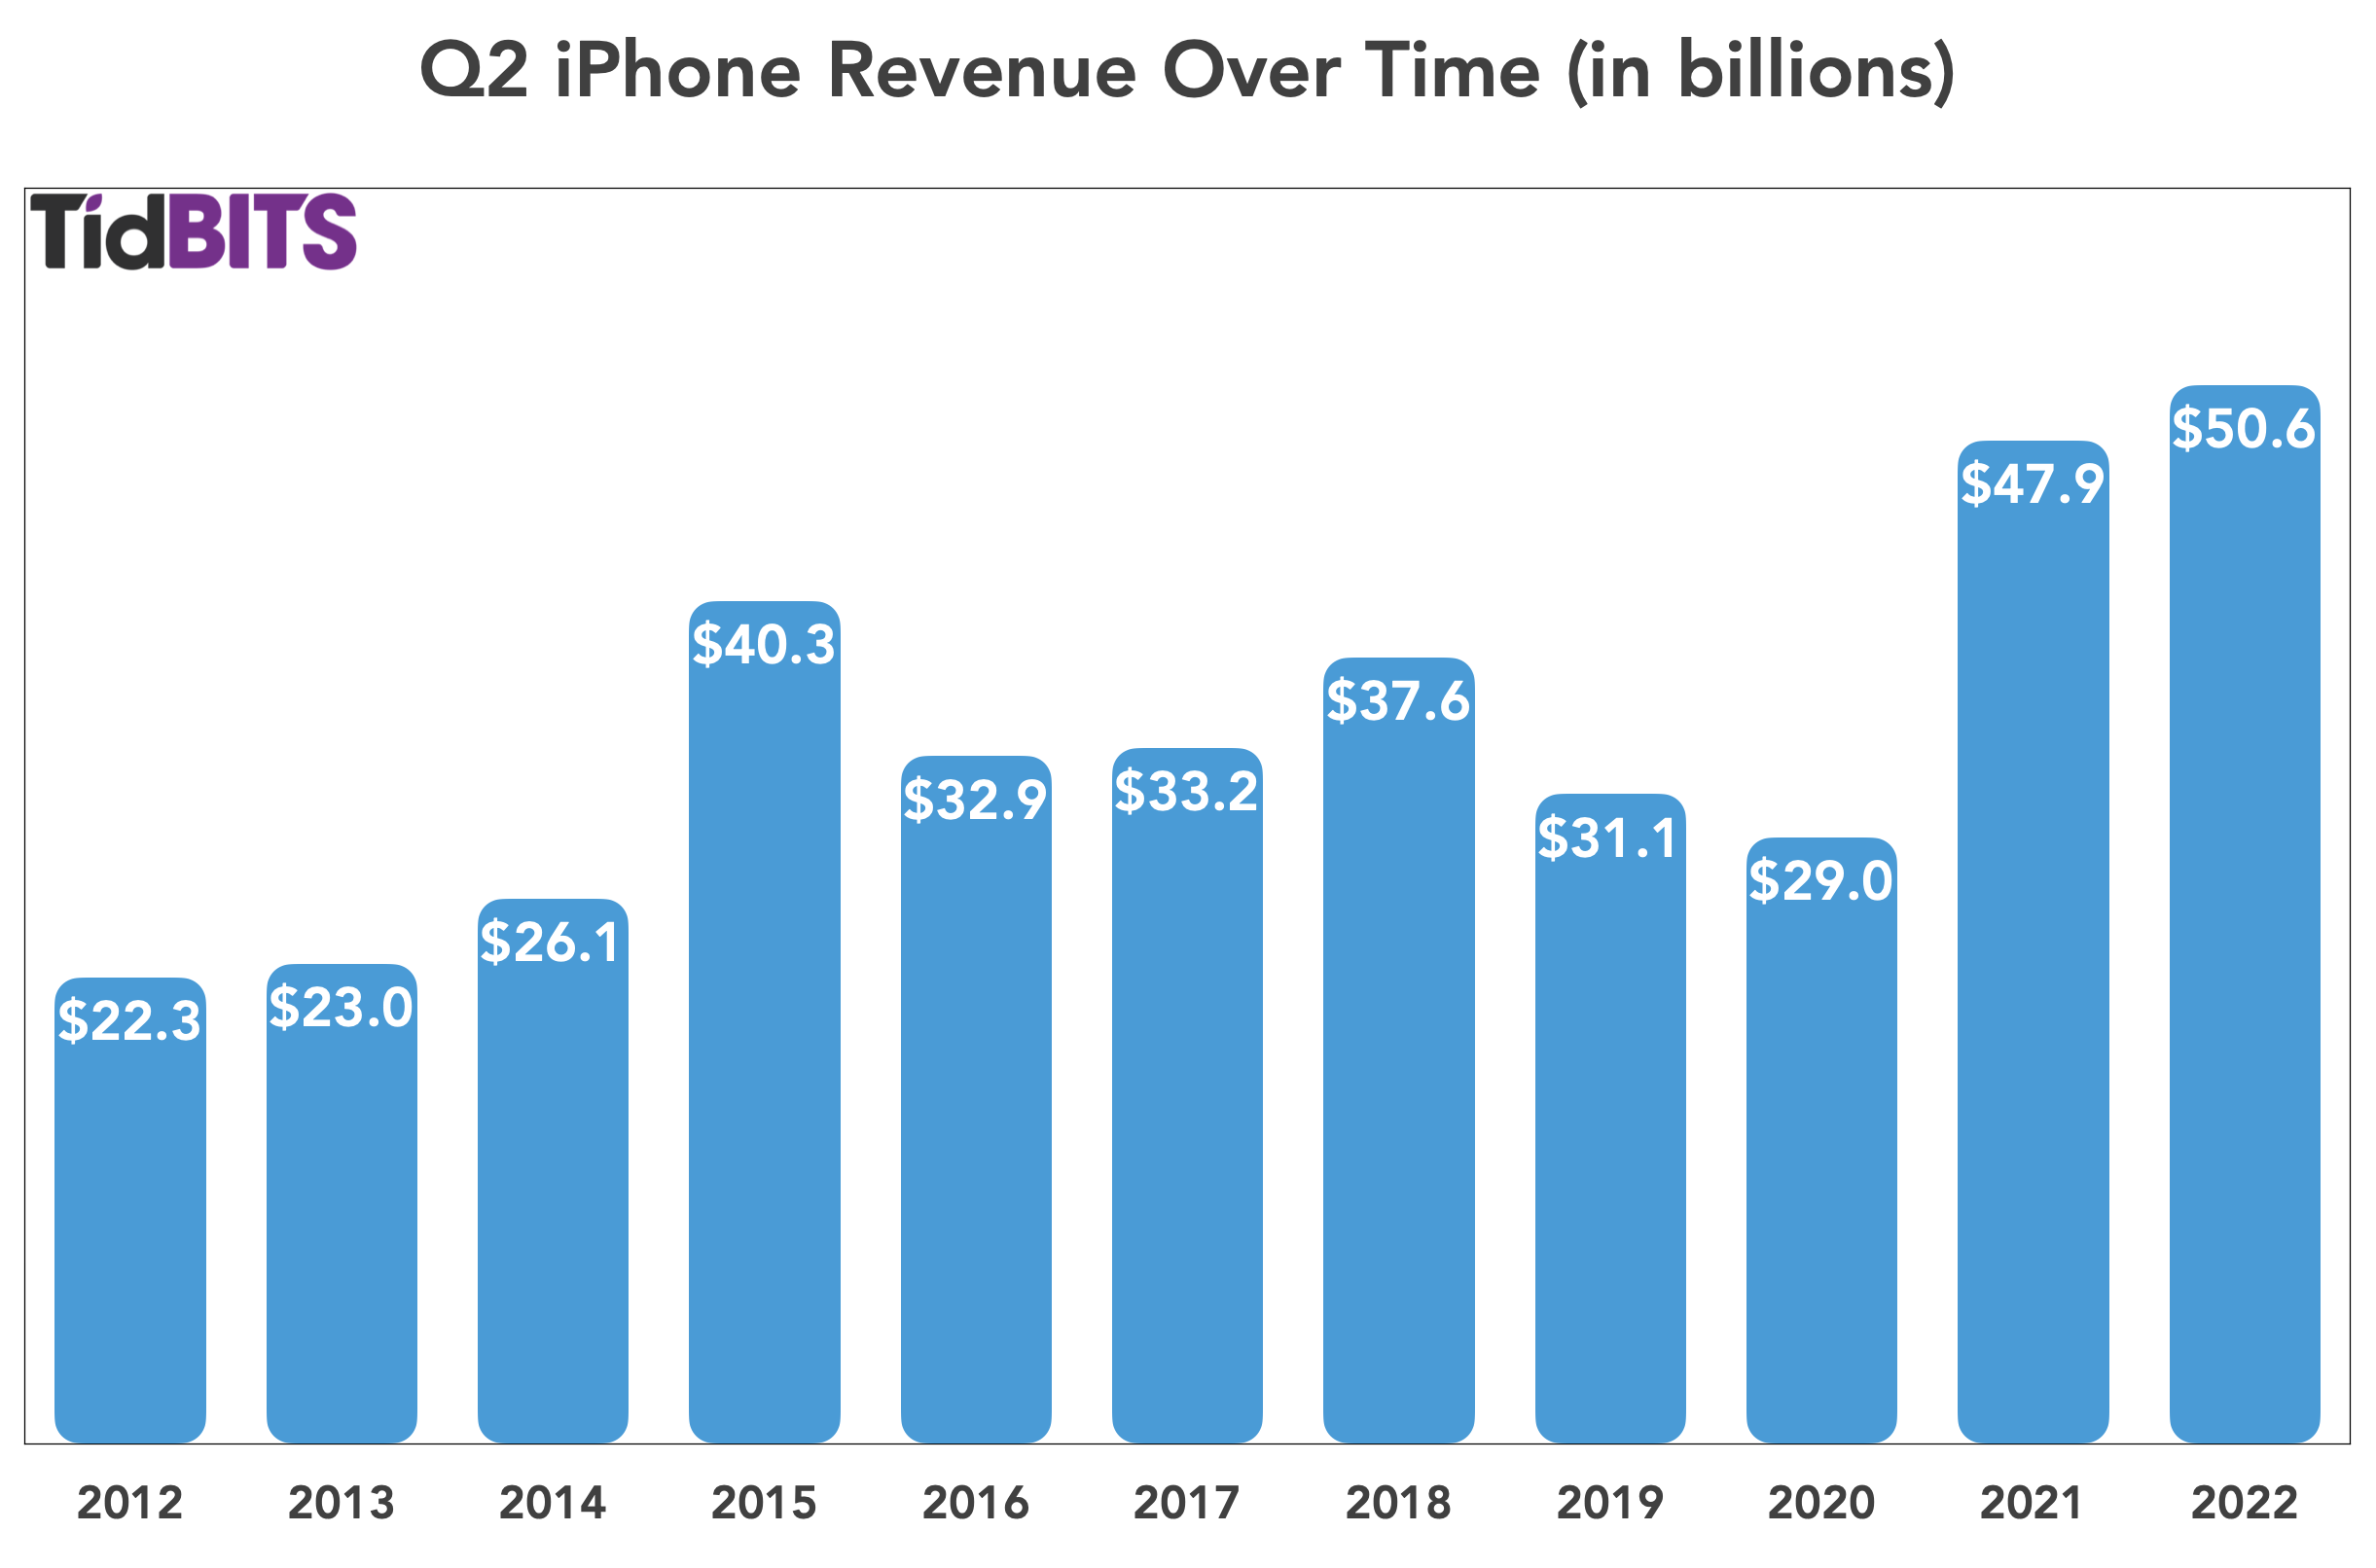
The iPhone continues to dominate Apple’s revenue chart, making up 52% of Apple’s sales in Q2. Although iPhones produced only a modest year-over-year revenue increase of 5.5%, they still achieved a Q2 revenue record, bringing in $50.6 billion. “We could not be happier with the iPhone 13 products,” CEO Tim Cook said.
In contrast, the iPad slipped a bit, with iPad revenue down 2.2% year over year, bringing in $7.6 billion. In his remarks during the earnings conference call, Cook implied that these were strong results considering the supply chain constraints that affected iPad production.

The Mac had an especially impressive quarter—a Q2 record—thanks to the popularity of the new Apple silicon models. Mac revenue shot up 14.6% over the year-ago quarter, pulling in $10.4 billion. CFO Luca Maestri said each of the past seven quarters has hit an all-time high for the Mac.

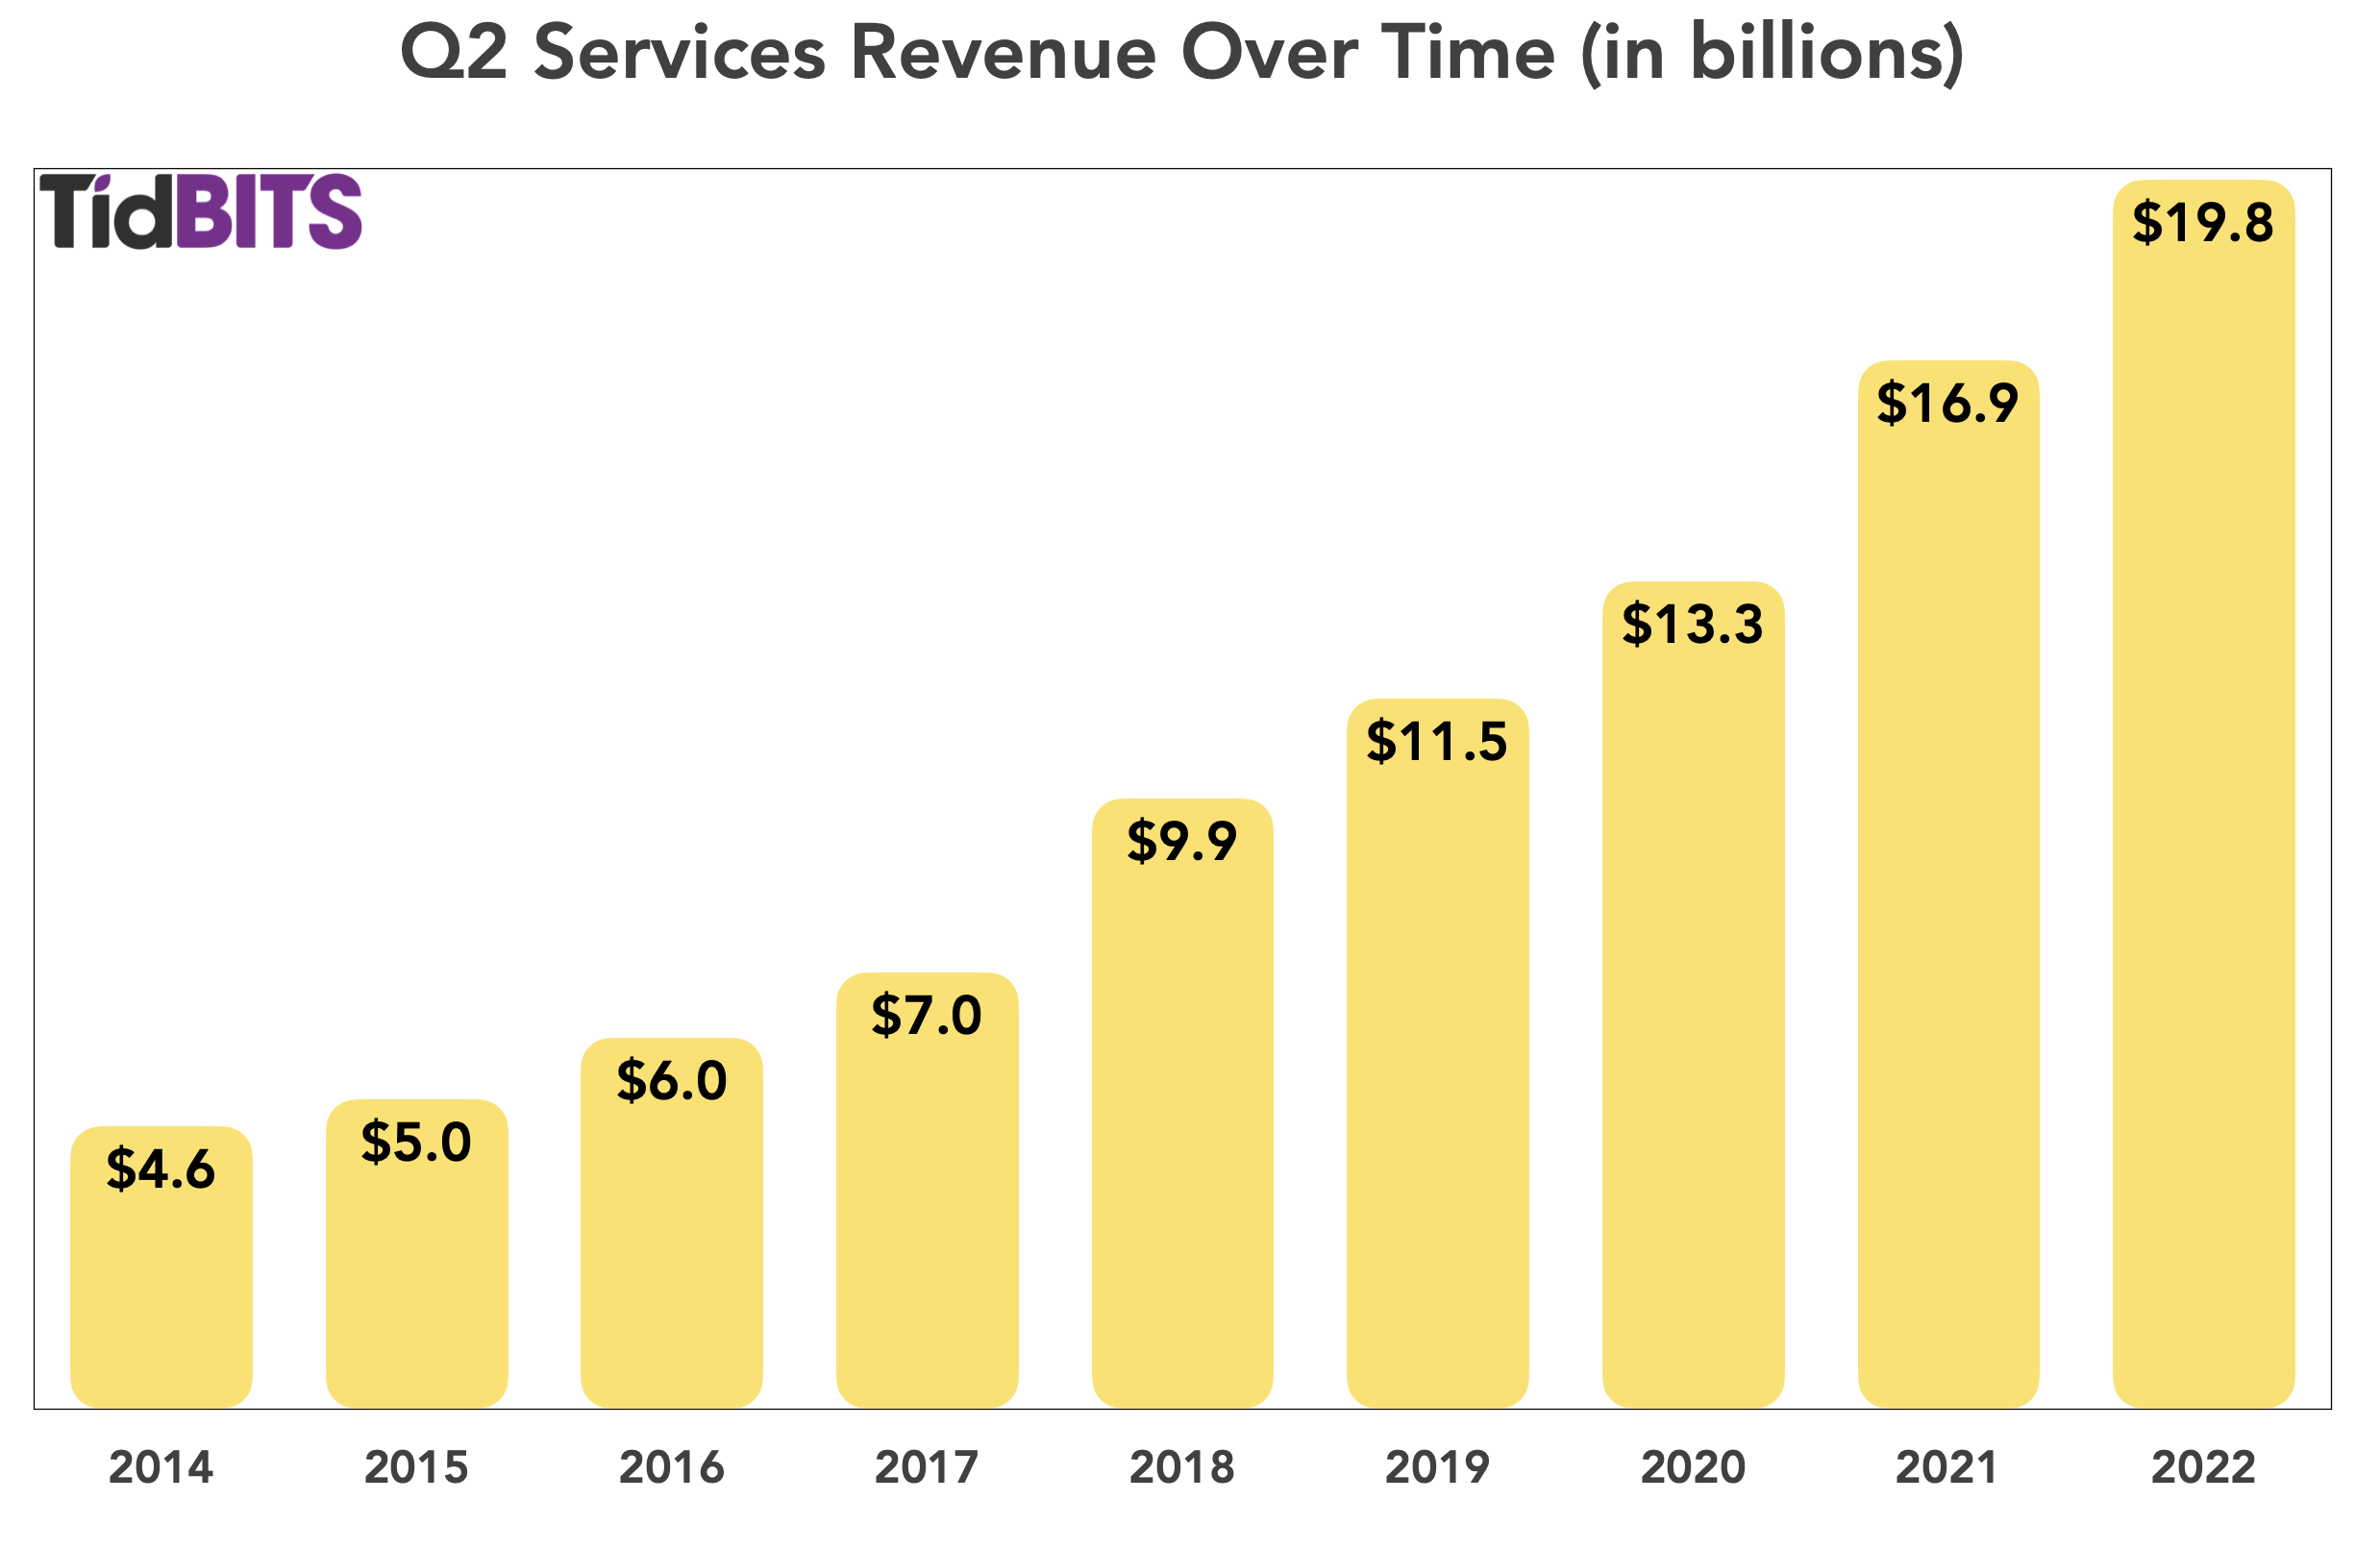
Services revenue continues to skyrocket, up 17.3% year over year to the tune of $19.8 billion—a Services revenue record. Cook highlighted the Apple TV+ movie Coda winning Best Picture at the Oscars and the addition of Friday Night Baseball to Apple TV+’s entertainment offerings. Maestri said Services growth was partly due to all-time-high installed bases for every Apple device category.
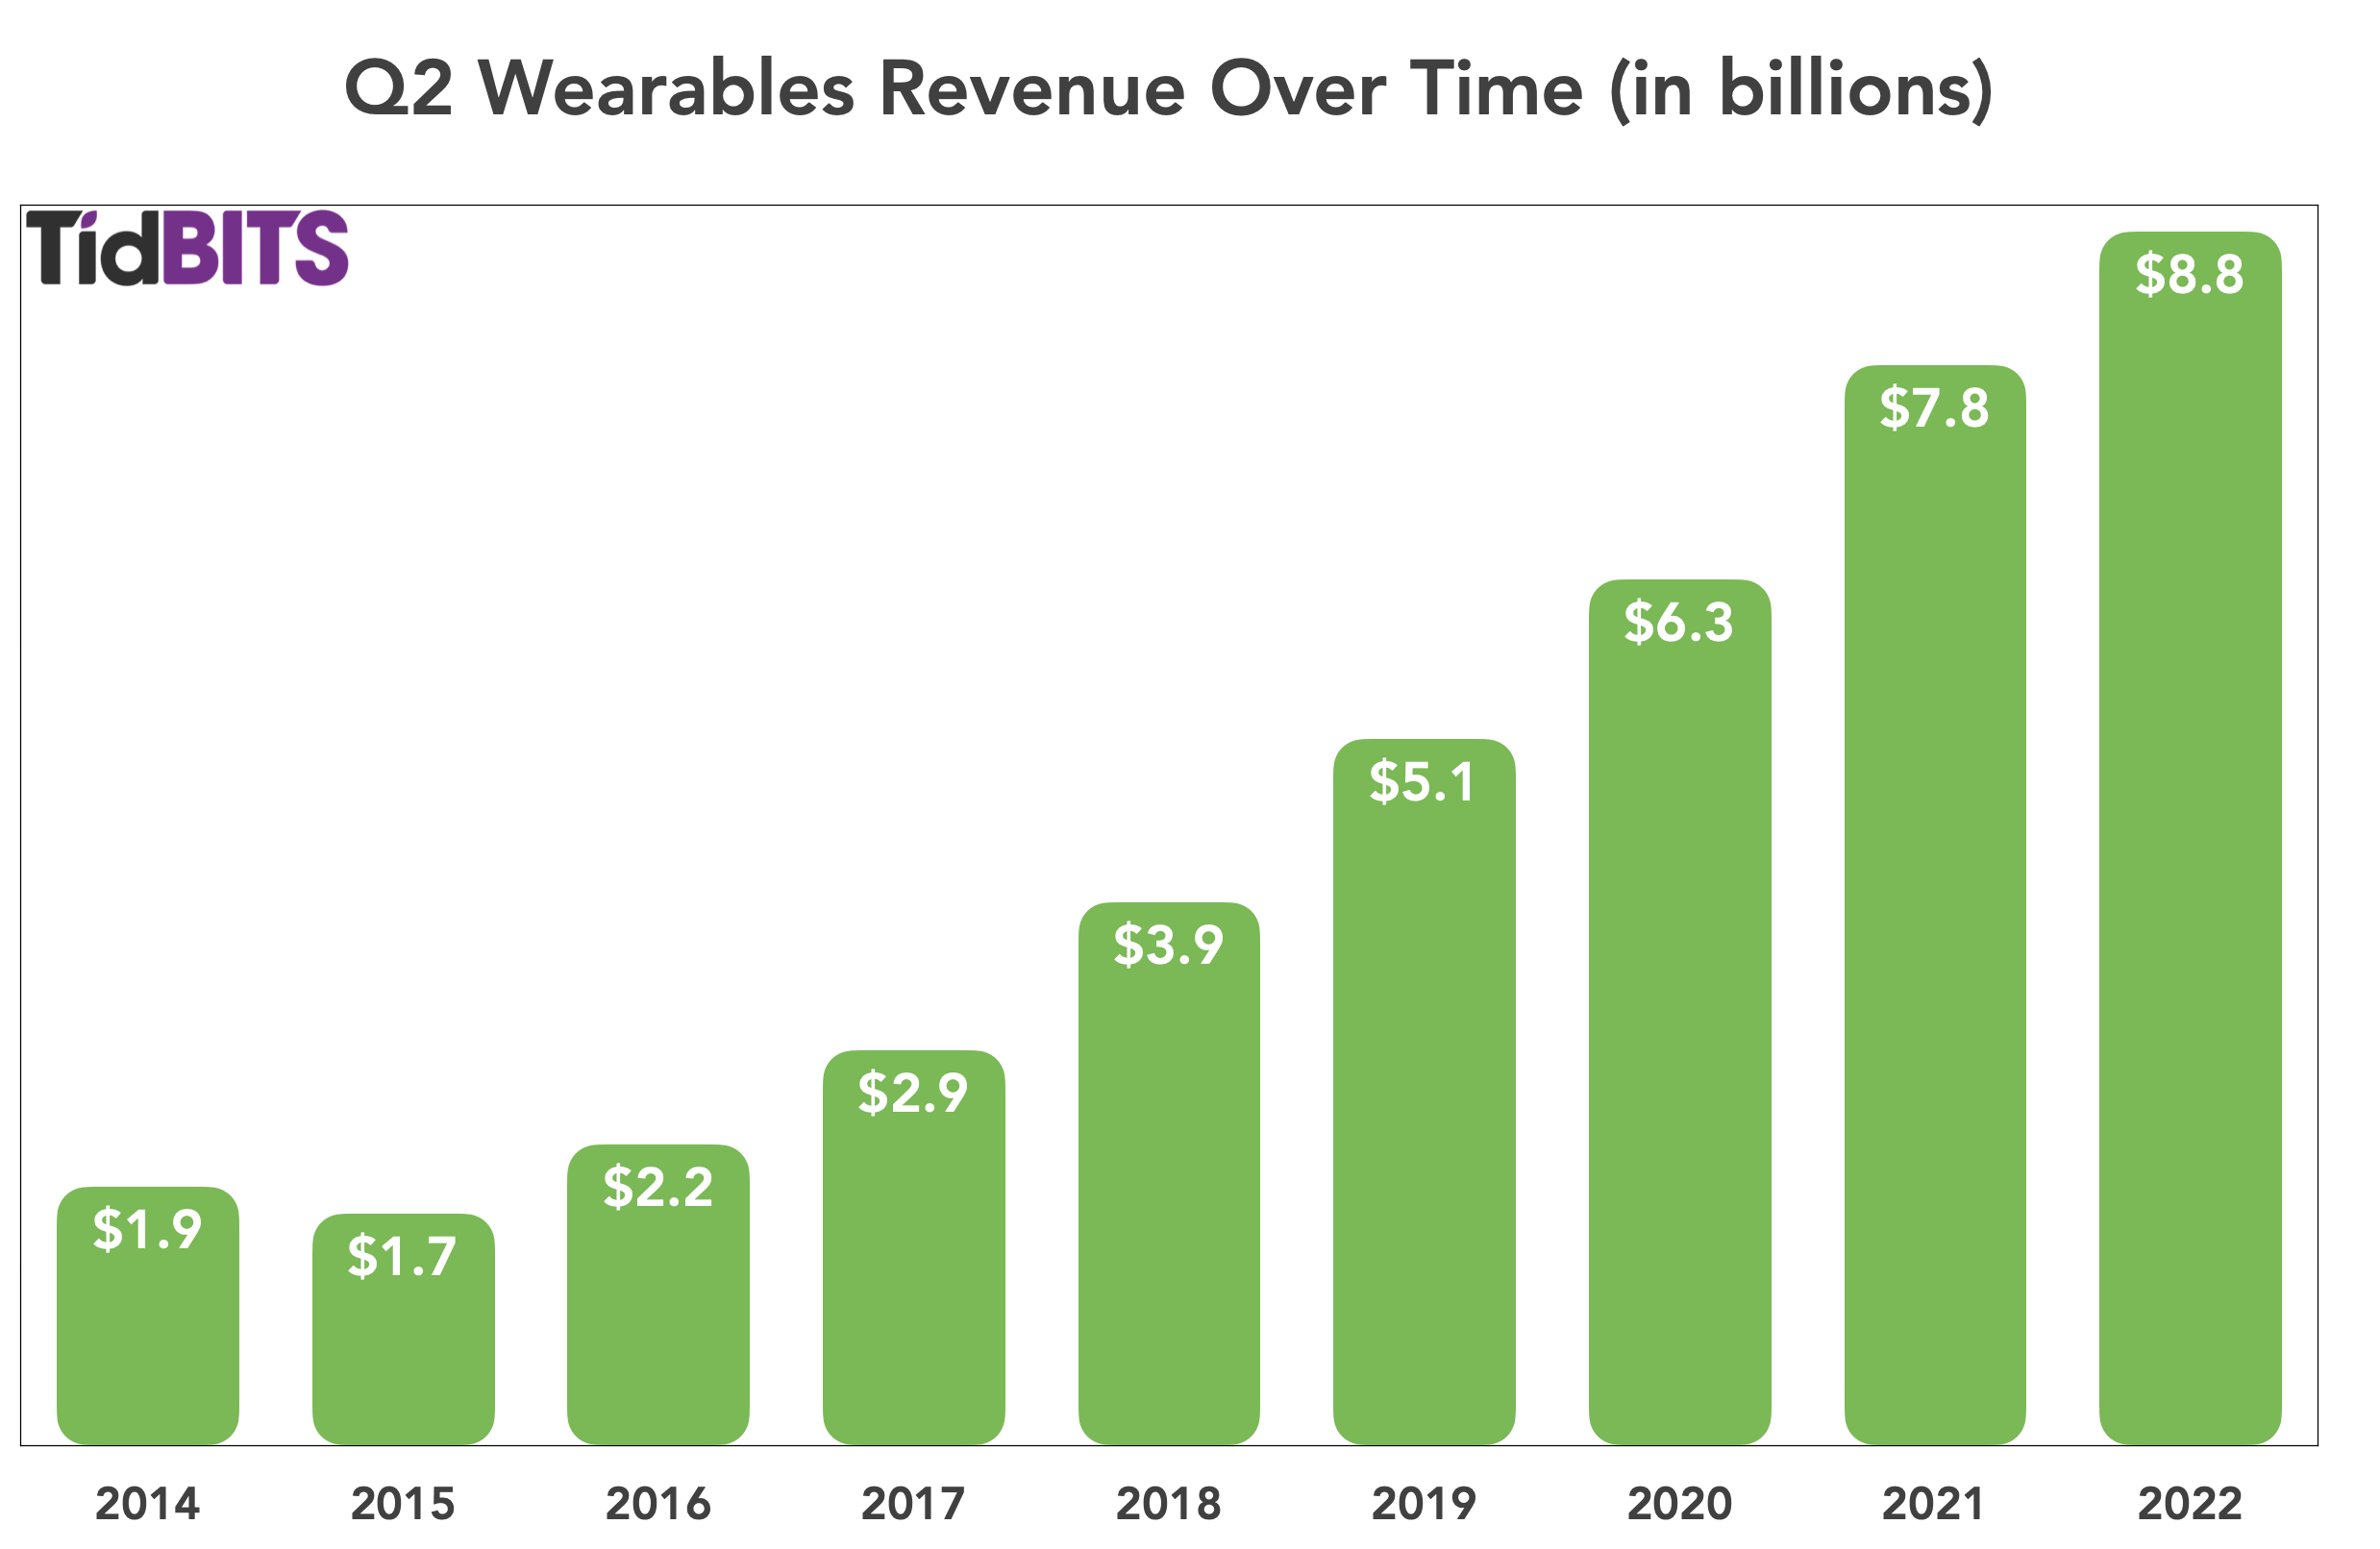
The Wearables category continues to be a strong revenue generator, showing 12.4% growth over the previous year’s quarter and drawing in $8.8 billion, another Q2 record. Maestri mentioned that two-thirds of Apple Watch buyers during the quarter had never owned one before.
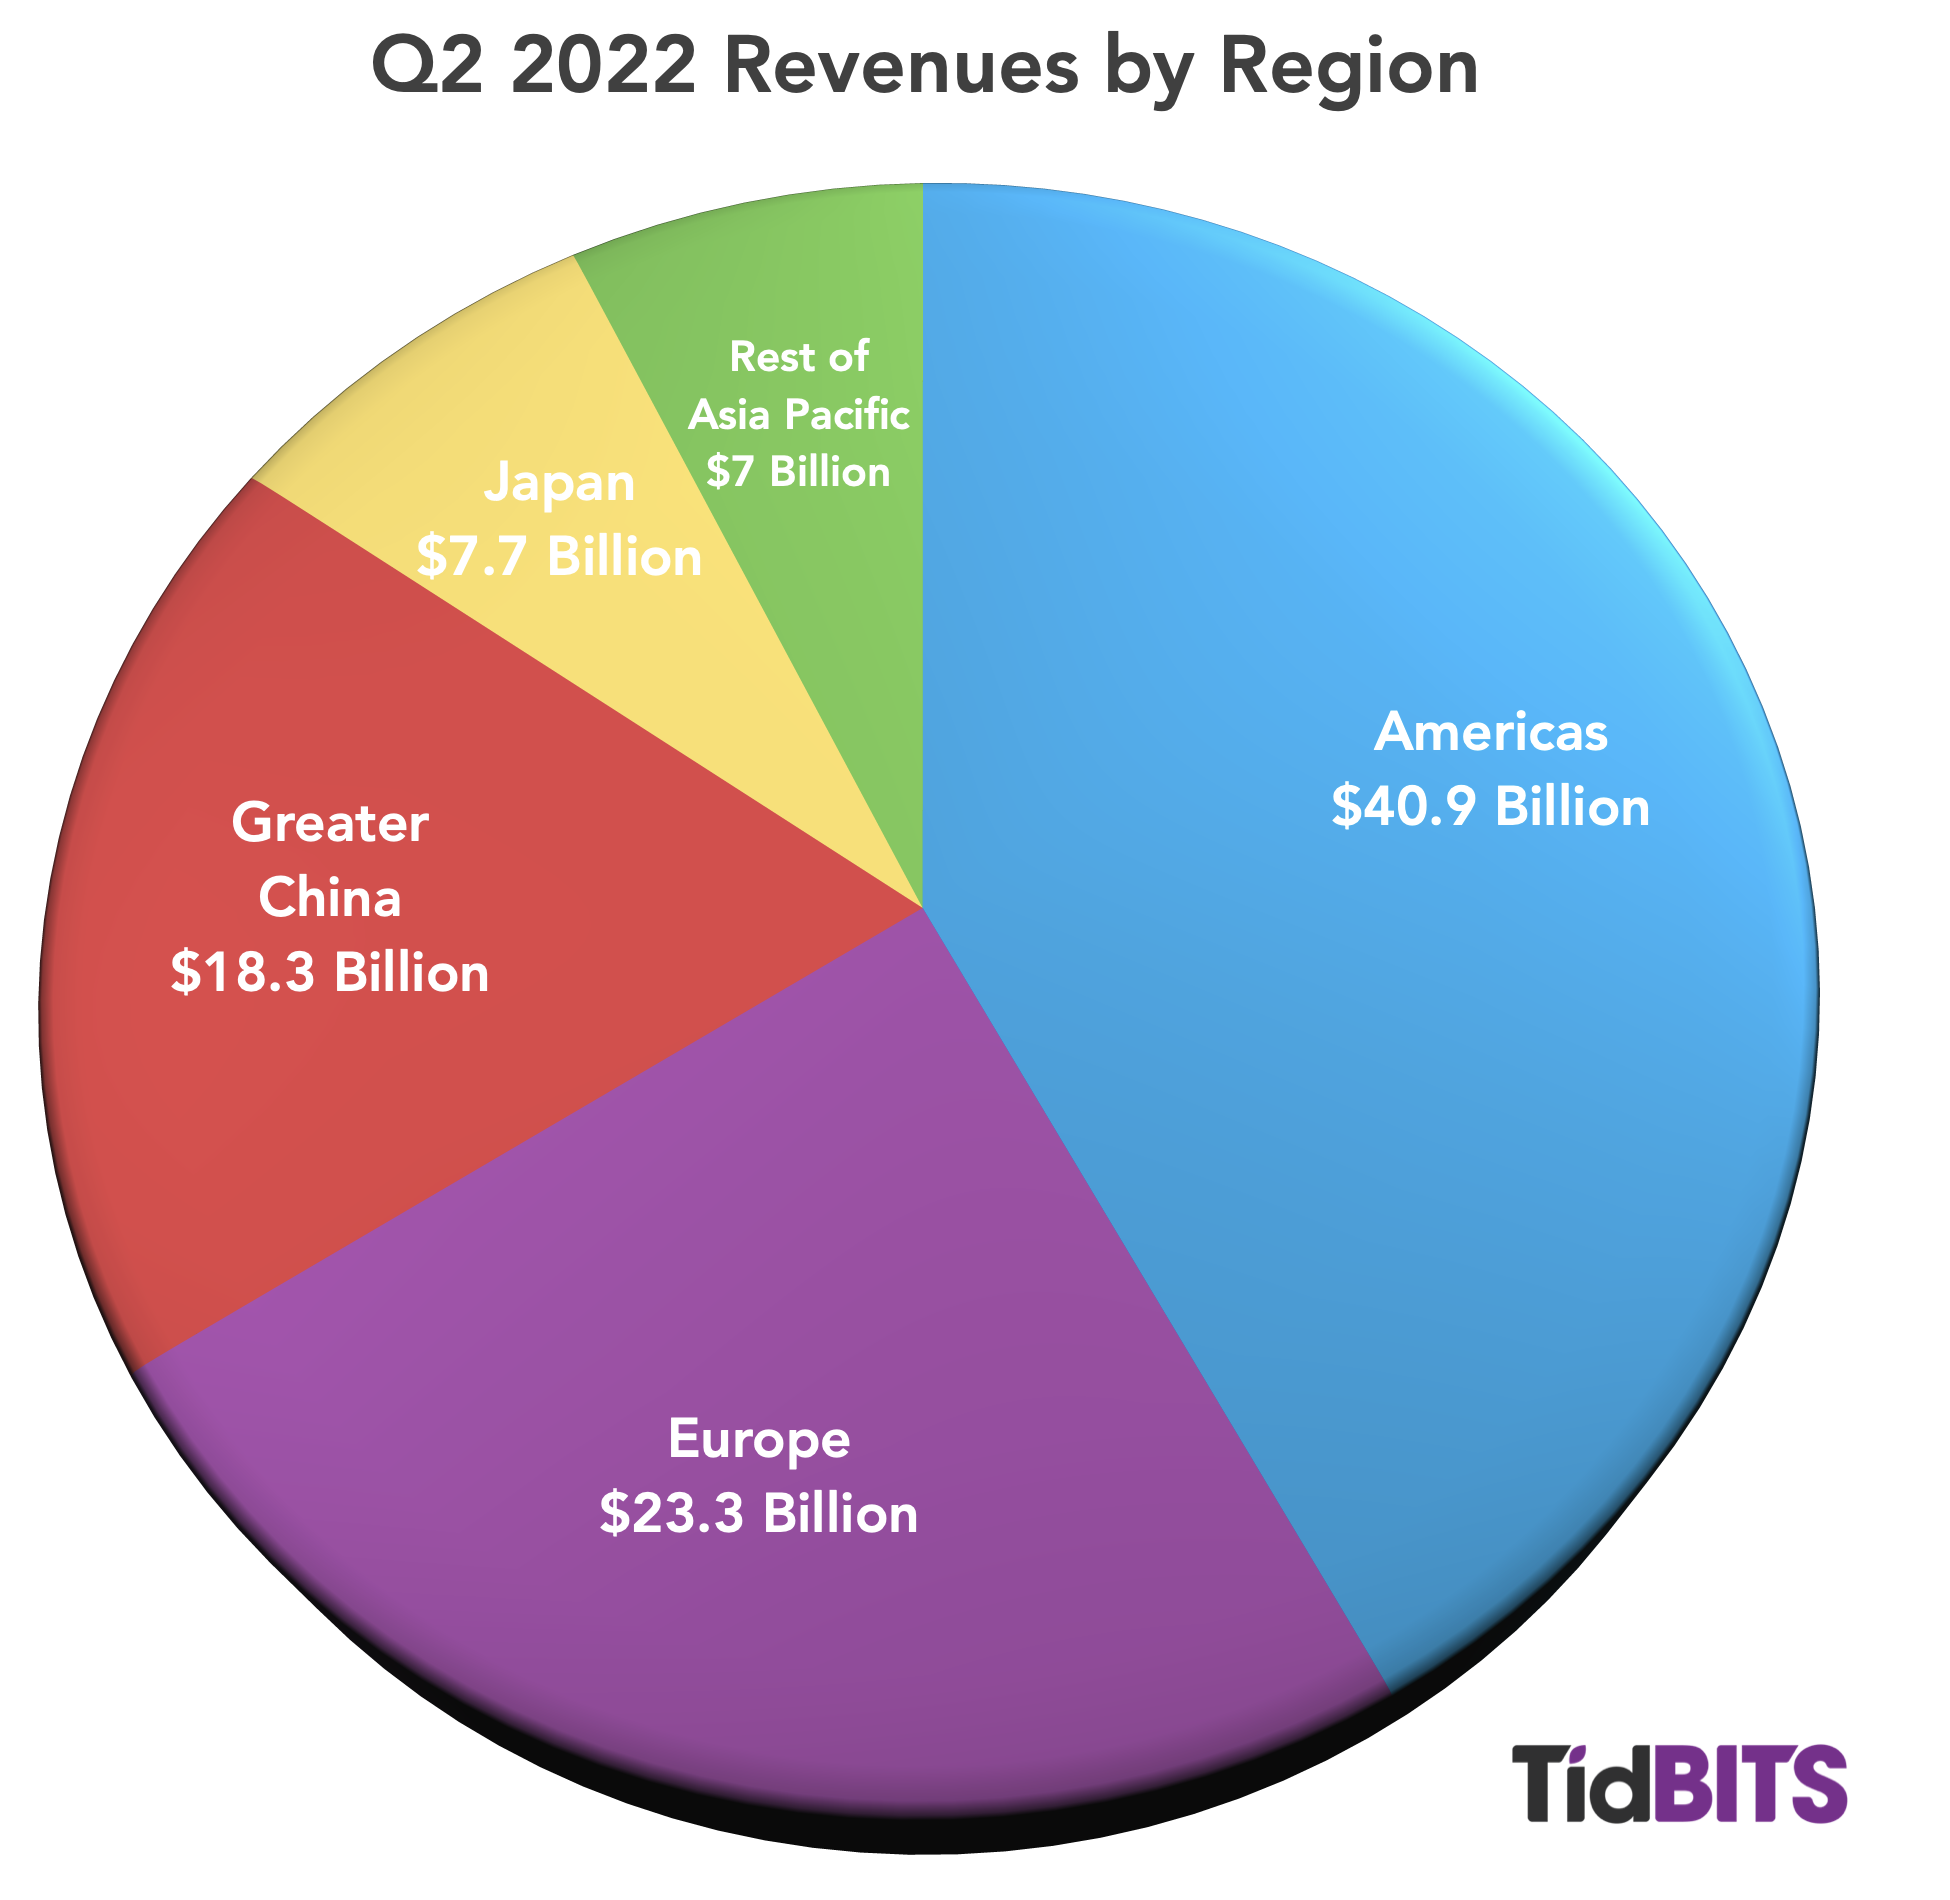
Regionally, the Americas were the big winners for Apple during the quarter, with year-over-year revenues up 16% to $40.9 billion. The run of good fortune crossed the Atlantic, with Europe reporting a 4.4% revenue increase to reach $23.3 billion, while across the Pacific, the ever-important Greater China region, although troubled with renewed pandemic problems, still managed a 3% revenue increase to set an all-time Q2 revenue record of $18.3 billion. On the other hand, Japanese revenues were flat compared to last year’s results, and the rest of the Asia Pacific region saw revenue decline by 7%.
As for the investor call itself, nearly every question was about inflation or the supply chain. Maestri pointed out Apple’s good fortune in having a burgeoning Services business that is not hampered by lockdowns in Shanghai or freight congestion. An unusually dour-sounding Cook said he was looking forward to “a better day.”
Cook admitted that, yes, Apple had seen inflation, and given all of the supply chain challenges, Apple had done a good job. Considering how many new products Apple has shipped since the beginning of the COVID-19 pandemic, including a processor migration for the Mac, he was justified in that bit of self-congratulation.
In less troubling times, Apple’s Q2 results would still be stellar, but in such a wobbly world, Apple’s solid fiscal and operational performance offers both investors and customers an encouraging example of competence and optimism. Society at large could use more of both.
Apple Launches Self Service Repair Program
It seemed as though the temperature in hell was falling fast when Apple announced the Self Service Repair program last year (see “Apple Announces Self Service Repair Program,” 17 November 2021). Steve Jobs famously despised the thought of users prying open their Macs, and that attitude has been baked deep into the company’s DNA ever since the second Jobs era. But the Right to Repair movement—especially a shareholder resolution in support of it—forced Apple’s hand.
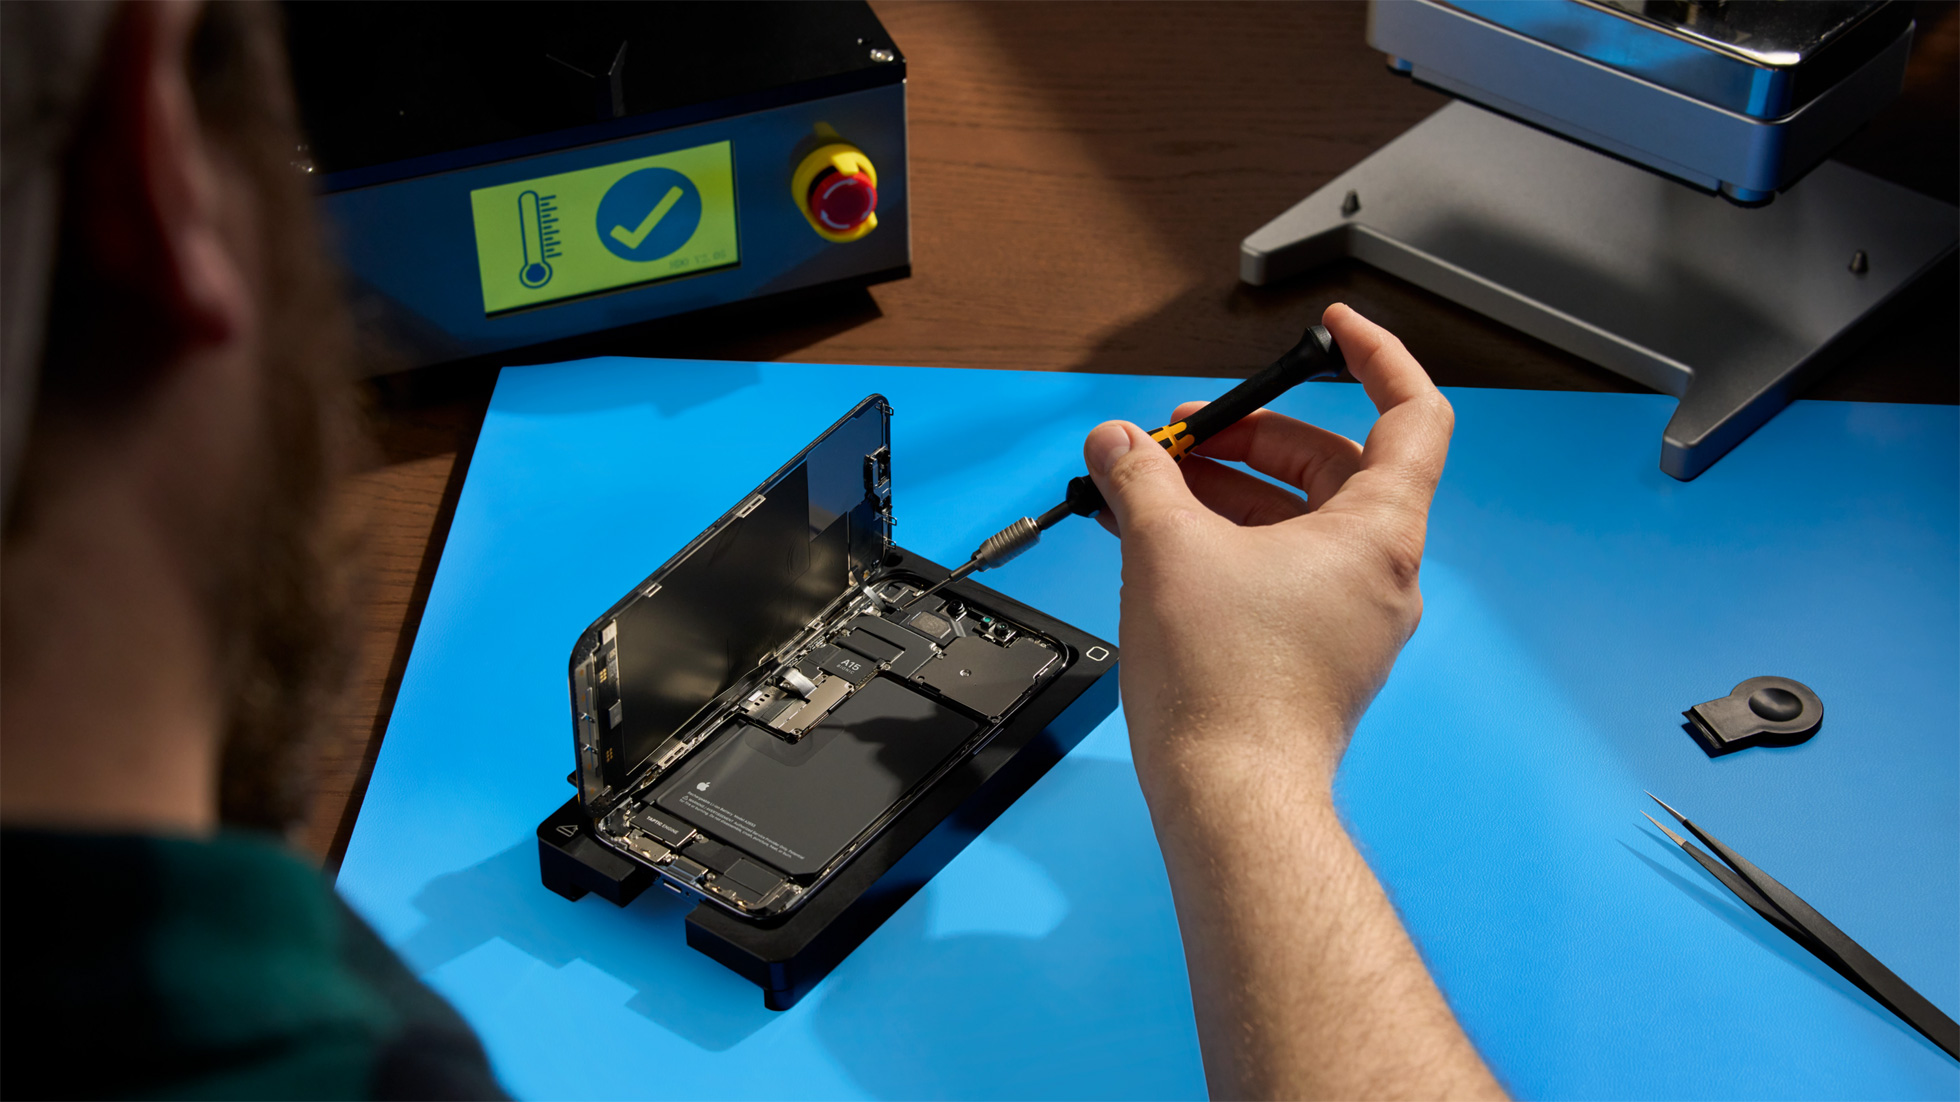
The Self Service Repair program is now available through the new Self Service Repair Store at www.selfservicerepair.com. Yes, that is the correct site despite the generic URL, complete lack of Apple branding, and WordPress template-level design. It almost looks fake.

The site is actually run by a company called Service Parts or Tools, Inc. or SPOT, demonstrating just how enthusiastic Apple is about this program. Stephen Hackett tracked the domain to an Apple partner called Communications Test Design, so perhaps Apple has outsourced the entire Self Service Repair program.
So far, the Self Service Repair program is extremely limited, covering only the iPhone 12 and iPhone 13 lineups, along with the third-generation iPhone SE. We would assume that most people who need a phone repair have an older iPhone. Also, no other devices are currently supported. In a white paper titled Expanding Access to Service and Repairs for Apple Devices, Apple says:
In its initial phase, the Self Service Repair program is offering access to more than 200 individual parts and tools, allowing customers to perform the most common repairs on iPhone 12 and later models, soon to be followed by Mac computers with Apple silicon. This program launched in April 2022 in the US and will expand to Europe later in 2022.
As it stands, the program offers the following repair types:
- Battery
- Bottom speaker
- Camera
- Display
- SIM tray
- Taptic Engine
As independent Mac repairman Louis Rossman pointed out, the Self Service Repair program doesn’t include one major repair type: the Lightning port. The last time I had to get service for an iPhone was for broken pins in the Lightning port. In that case, however, Apple replaced the entire iPhone, so maybe Apple isn’t confident that technicians can make that repair quickly or effectively.
The cost of a self-service repair varies greatly depending on which option you pick. A battery replacement bundle for the iPhone 13 costs only $70.99, but the bundle to replace the screen will set you back $269.95. You also receive a credit for returning the original part so Apple can reuse or recycle it. The battery bundle is $46.84 with the credit, and the screen kit costs $236.35 after the credit.
The Self Service Repair Store also offers miscellaneous parts, like security screws for $0.20 or a SIM tray for $7.20. Considering that these are all genuine Apple parts, these seem like fair prices.
Interestingly, the Self Service Repair Store also sells a wide assortment of official tools, like torque drivers, a heated display pocket (to glue the screen back on), and even a full display press. These too are surprisingly reasonably priced, with the most expensive tool—the heated display removal fixture—costing $256.36. You could build your own iPhone repair shop for well under $1000.
The good news is you don’t have to buy all of these tools. The Self Service Repair Store will let you rent a tool kit for 7 days for $49. Each iPhone model has a different tool kit that contains all the tools you need to perform the possible repairs.
Apple is also offering repair manuals free of charge. However, don’t expect detailed schematics. As Apple said in its white paper:
Industry and repair experts agree that the vast majority of board-level repairs are best performed in a factory environment using specialized equipment capable of producing high quality, reliable, and repeatable results to meet original equipment manufacturer (OEM) standards. Boards are packed with many small components necessary for the device’s proper functioning. For example, ball grid array (BGA) parts require specialized equipment for their repair that is restricted to factory or advanced repair environments due to its cost and complexity. Therefore, board-level repairs, particularly those involving soldered components, are best performed by certified technicians who use controlled processes, calibrated factory equipment, and rigorous testing.
While it’s fair to say that soldered repairs are difficult, that’s still not sufficient reason to withhold the full schematics. As it stands, independent repair shops like Rossman’s have to rely on bootleg schematics to perform their repairs.
You might wonder what a self-service repair does to your warranty. Happily, nothing, as long as you don’t cause more damage. Apple says:
The customer’s product warranty is not impacted by a Self Service Repair, however any issue or damage caused by the customer over the course of the repair would not be covered by Apple.
Nitpicks aside, the Self Service Repair program is substantial and more than the mere publicity stunt that Rossman seems to think it is. For the first time, the average iPhone user has access to both official repair parts and the specialized tools Apple’s own technicians use. Even if shareholders had to twist Apple’s arm to implement it, and even if Apple seems to be trying to distance itself from the Self Service Repair Store, it’s a huge step forward for Right to Repair.
Using a Synology NAS to Escape the Cloud
For a few years now, I’ve been wanting to move more of my data out of the cloud and onto my own local storage. I needed a better solution for local storage for this effort because my old system consisted of multiple external hard drives attached to my iMac, which was messy and made it hard to access files from other devices.
I knew I needed a home server, specifically a networked-attached storage (NAS) device, but I hemmed and hawed for years. A NAS is a big investment, but what finally kicked me into action was the recent iCloud outage, when I realized that my Mac had offloaded many of my important documents to iCloud and I couldn’t access them for about 2 hours.
After some research, I purchased a Synology DS 920+ and four 6 TB WD Red hard drives. The entire setup cost about $1000, but after a month of usage, I think the investment has been well worth it, even though I’m still in the process of transferring decades of data to the DS 920+.
Running a home server isn’t for everyone, but Synology makes doing so about as accessible as possible, and you can be up and running within an hour. It’s still a big investment in both money and time, but it’s well worth it if you have a lot of data you access from multiple computers. Your files are right there in your home and you don’t have to transfer them over the Internet to carry over your work to another device. A NAS makes even more sense for a small office where multiple people might be running into the same problems with needing easy access to a centralized set of files.
Why Synology?
Why did I choose Synology over the other options on the market, namely QNAP and TrueNAS? The primary answer is that the DS 920+ was in stock when I was shopping, while comparable QNAP and TrueNAS units were not.
I would have preferred a TrueNAS setup since TrueNAS is open source. However, the TrueNAS Mini X model I wanted was out of stock, and TrueNAS units are more expensive than Synology’s. Since TrueNAS is open source, I could have built my own server or repurposed some hardware, but with three kids and a farm, I don’t have time for yet another project. I wanted something that would work out of the box with minimal fiddling.
QNAP also has some advantages over Synology. Wirecutter says that some of their units perform better than Synology’s, and QNAP has a feature called QFiling that acts like the Mac app Hazel, which automatically reorganizes files based on your specifications. But again, the QNAP model I wanted wasn’t in stock. Plus, I hate how every QNAP app starts with a Q.
Other than supply chain hiccups, I chose Synology for the following reasons:
- The company makes the most popular NAS devices, which means they’re well documented and it’s easy to get help.
- The new Synology Photos app is awesome, and it’s probably the closest self-hosted photo management (if not editing) solution you can find to Apple’s Photos. It even supports Live Photos.
- While Synology NAS units aren’t cheap, they’re reasonably priced compared to other solutions.
- Synology setup is practically idiot-proof, and the company makes it easy to set up two-factor authentication and a domain name for your server.
Ultimately, what pushed me to Synology was that it’s the easy option. Easy to buy, easy to set up, easy to maintain. Years of dawdling and ruminating on options weren’t getting me any closer to a solution.
I ended up with the DiskStation DS 920+ after running a few different scenarios through the Synology NAS selector. Since I also want to use my NAS as a media server, I checked Plex’s compatibility spreadsheet and saw that the DS 920+ has some of the best support for hardware transcoding among the Synology options in its price range. Plus, the DS 920+ has a quad-core Intel Celeron CPU powerful enough to support running virtual machines, which lets you do things like run Linux or Windows.
Initial Setup
Setting up the hardware is as user-friendly as possible. The DS 920+ has four slots on the front of the unit, each containing a hard drive tray. You pop out the tray, load in a hard drive (it fits in only one way), and then insert it like an old Nintendo cartridge.

Plug in the hard drives, connect the included Ethernet cable to your router, plug in power, and you’re off to the races.

You can get a little bit fancier if you’d like. The DS 920+ comes with two keys that let you lock the hard drives in place, which I did to protect them from my kids. There is also a slot inside to upgrade the RAM. The DS920+ comes with 4 GB and you can upgrade it to 8 GB with Synology’s official module. I’ve heard of people upgrading it with 20 GB of RAM using Samsung memory modules (apparently the supplier Synology uses), but that’s not officially supported.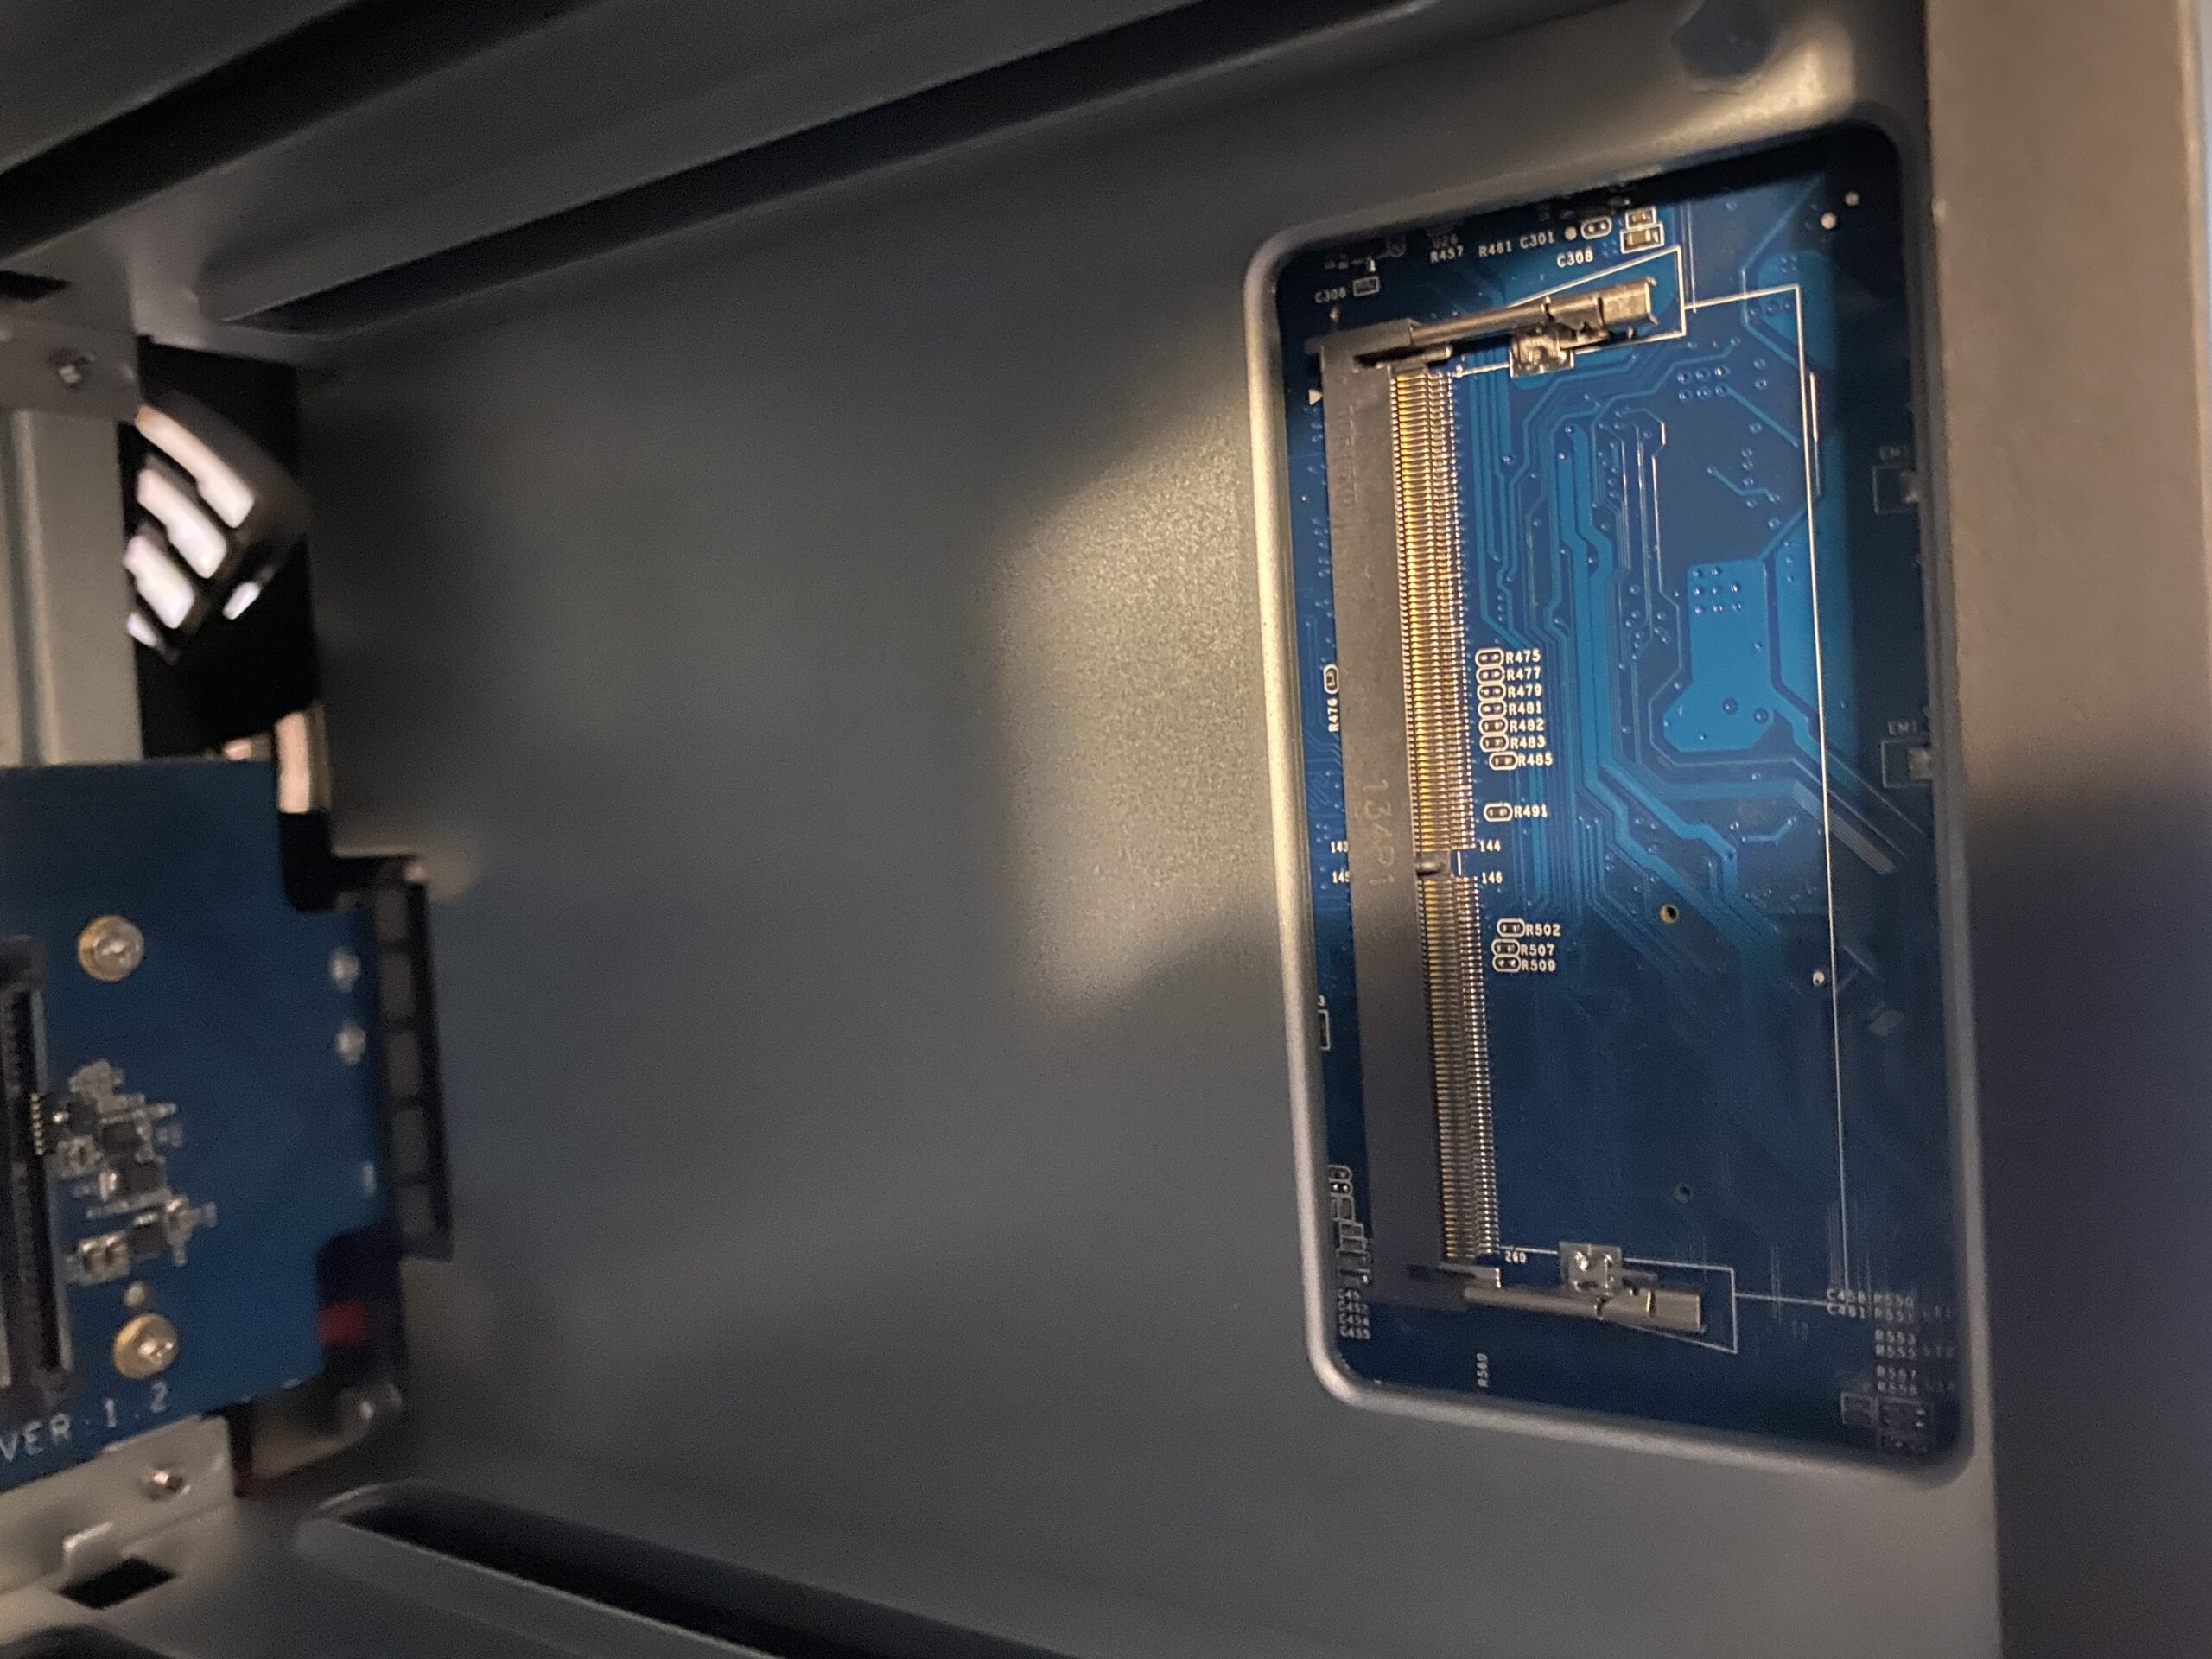
Even after running multiple services on the DS 920+, I only use up to about 50% of the RAM at any given time. But if I run a virtual machine, it’s more like 90%. I think most people will be fine with the built-in 4 GB, but if you want to run virtual machines, consider an upgrade.
You can also add two M.2 SSDs for caching, one for read and one for write. These SSDs don’t increase capacity; instead, the DS 920+ caches files to SSD to speed up performance, much like Apple’s Fusion Drives.
Synology Software Setup
Synology makes setting up a server as easy as I could imagine. That starts with actually figuring out the server address on your network. When you plug a device into your router, the router assigns it an IP address via DHCP, but you don’t know what it is, and since the Synology NAS doesn’t have a screen, you can’t just glance and see. There are various ways to figure out a headless device’s IP address, but Synology provides a dedicated Web app at find.synology.com that scans your network, finds your new device, and lets you connect to start setup.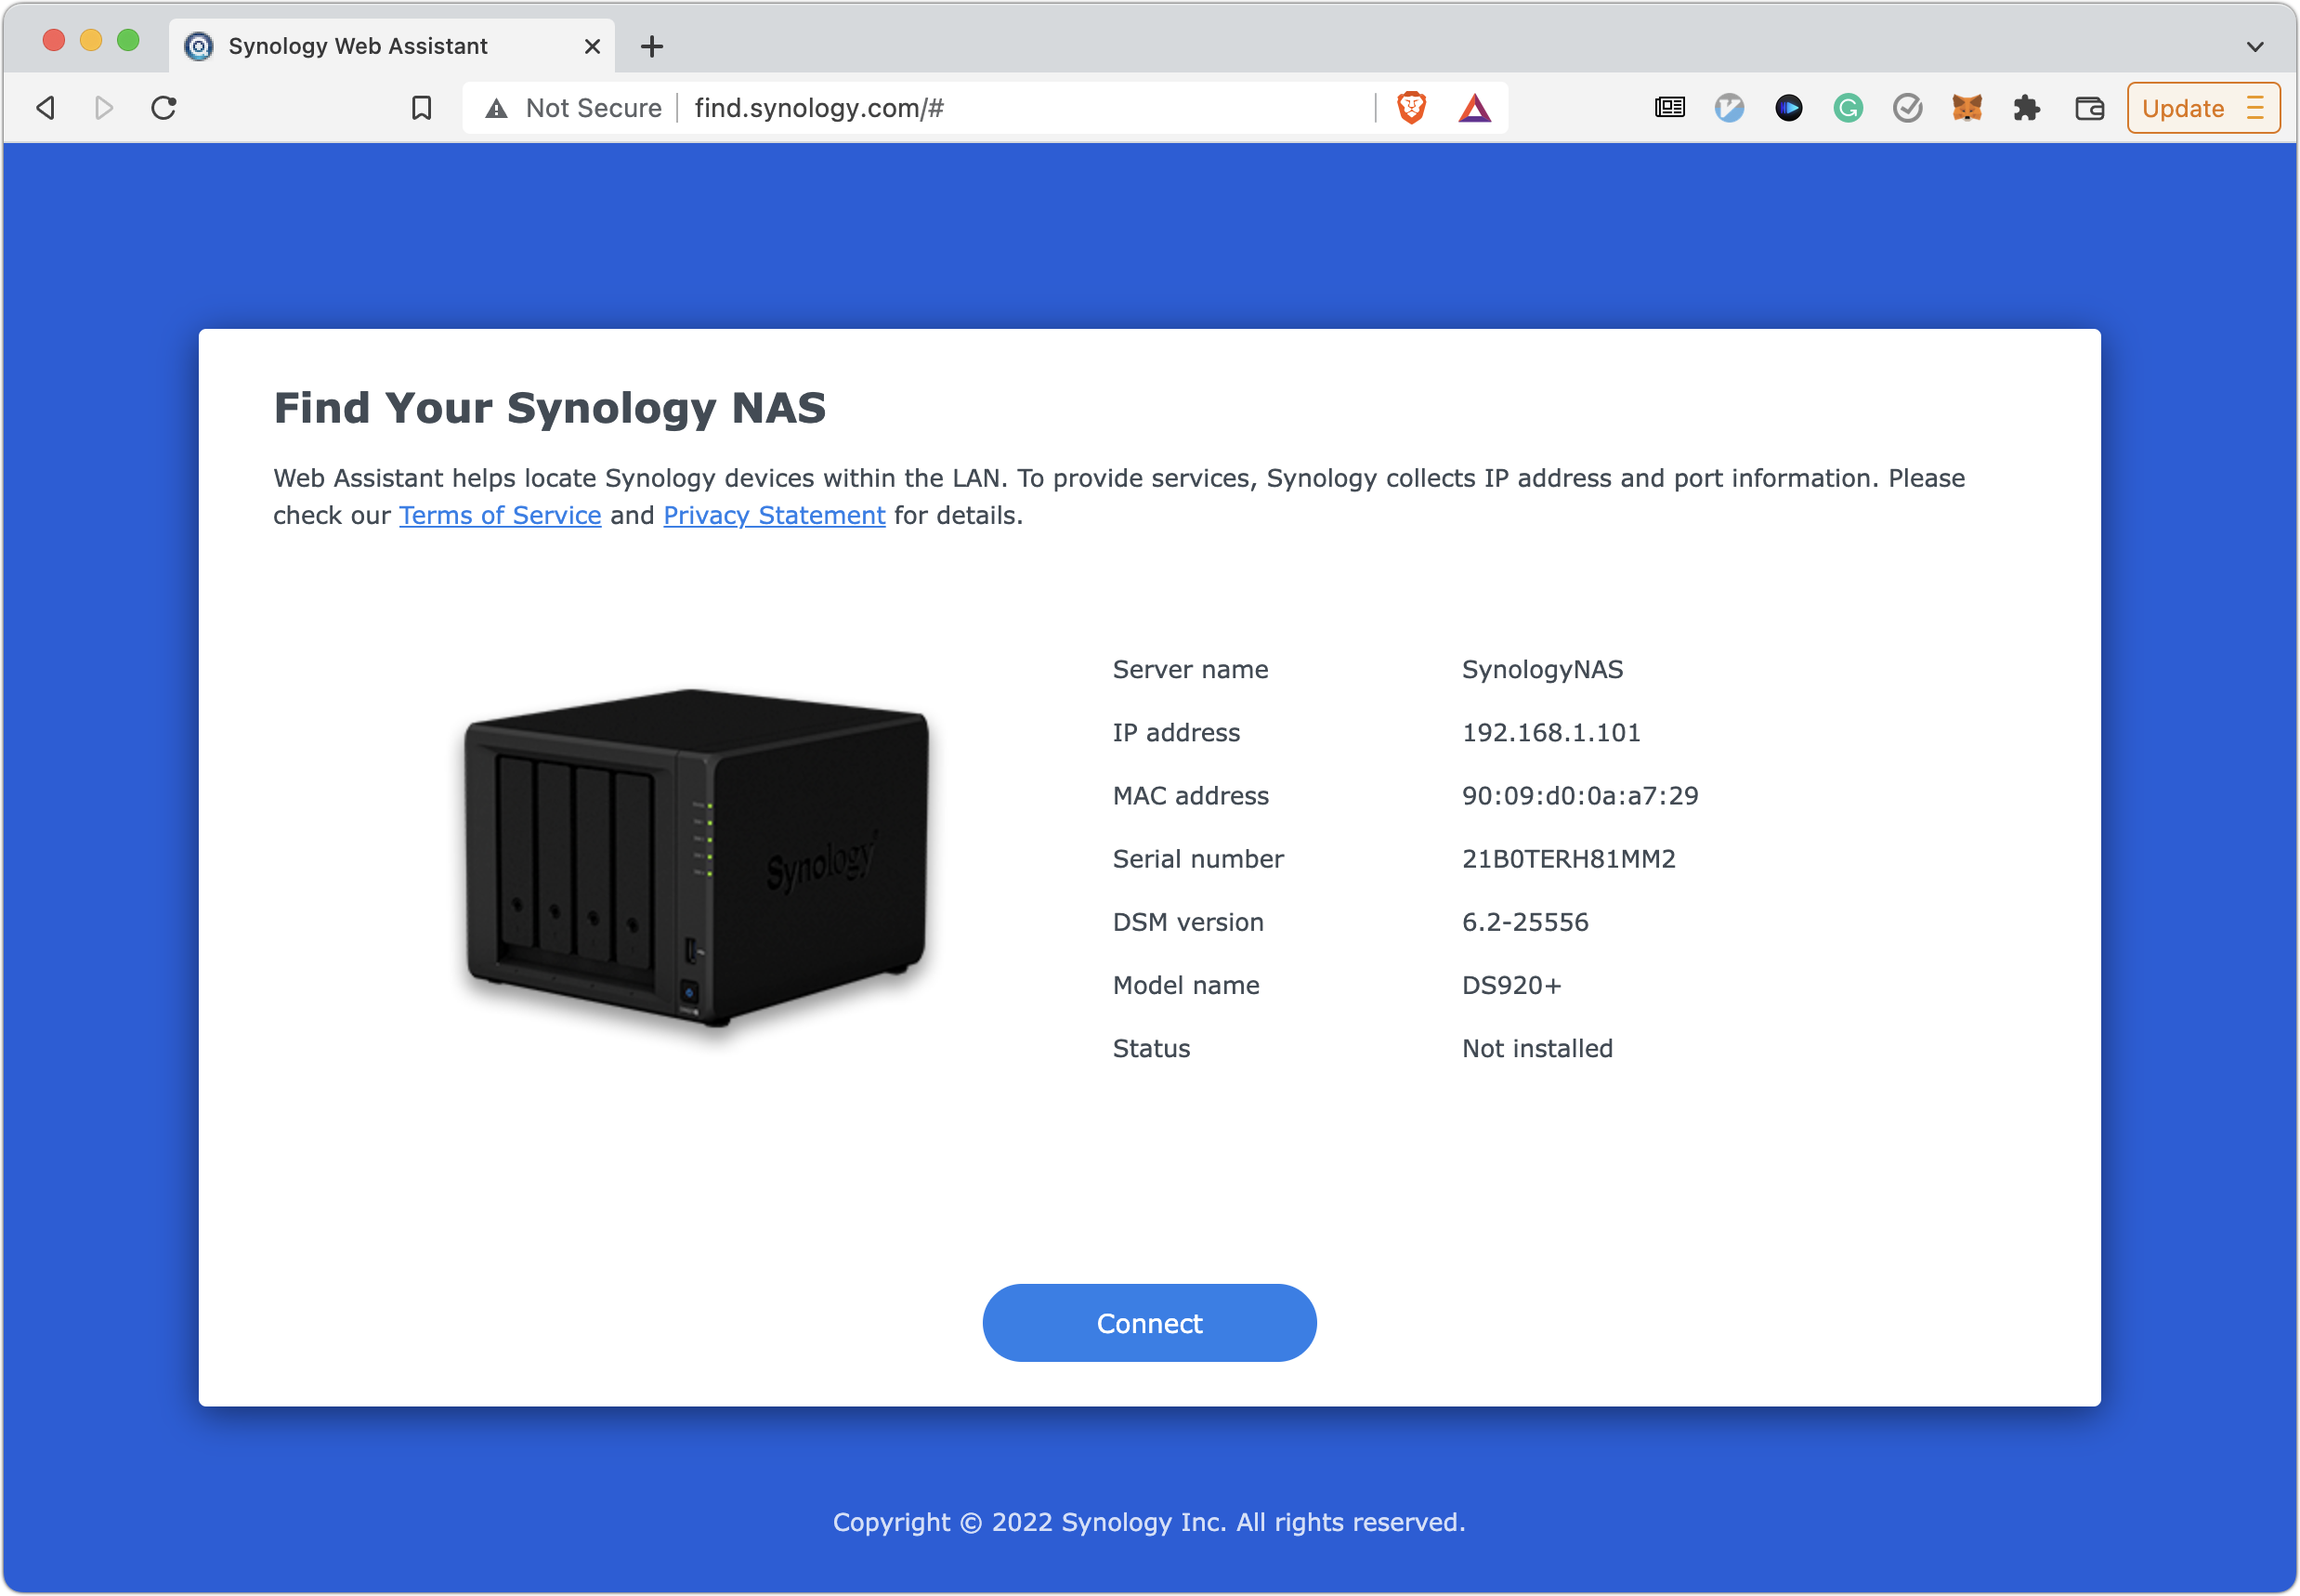
From there, it’s mostly a matter of following Synology’s setup prompts. The recommended settings are usually the best. Where things might get confusing is when you’re prompted to set up your storage pool, since it may not be immediately obvious what the right choices are.
I have a total of 24 TB in my NAS, but I don’t need that much storage. 12 TB is plenty, and I want that data mirrored so it’s redundant. That way, if one drive fails, my data is safe and repair is a simple matter of replacing the bad disk. The way to pool drives together like this is called RAID, short for “redundant array of inexpensive disks.” There are many RAID types that pool disks together in various ways depending on your configuration and whether you want to optimize for redundancy or performance. Synology offers an overview of the many RAID types it supports.
Since I wanted maximum reliability and minimal headache, I chose Synology’s SHR-2 RAID type, since SHR is what Synology recommends you use. SHR-2 takes those four drives, combines two of them for storage, and then mirrors the data on the combined drives to the other two drives.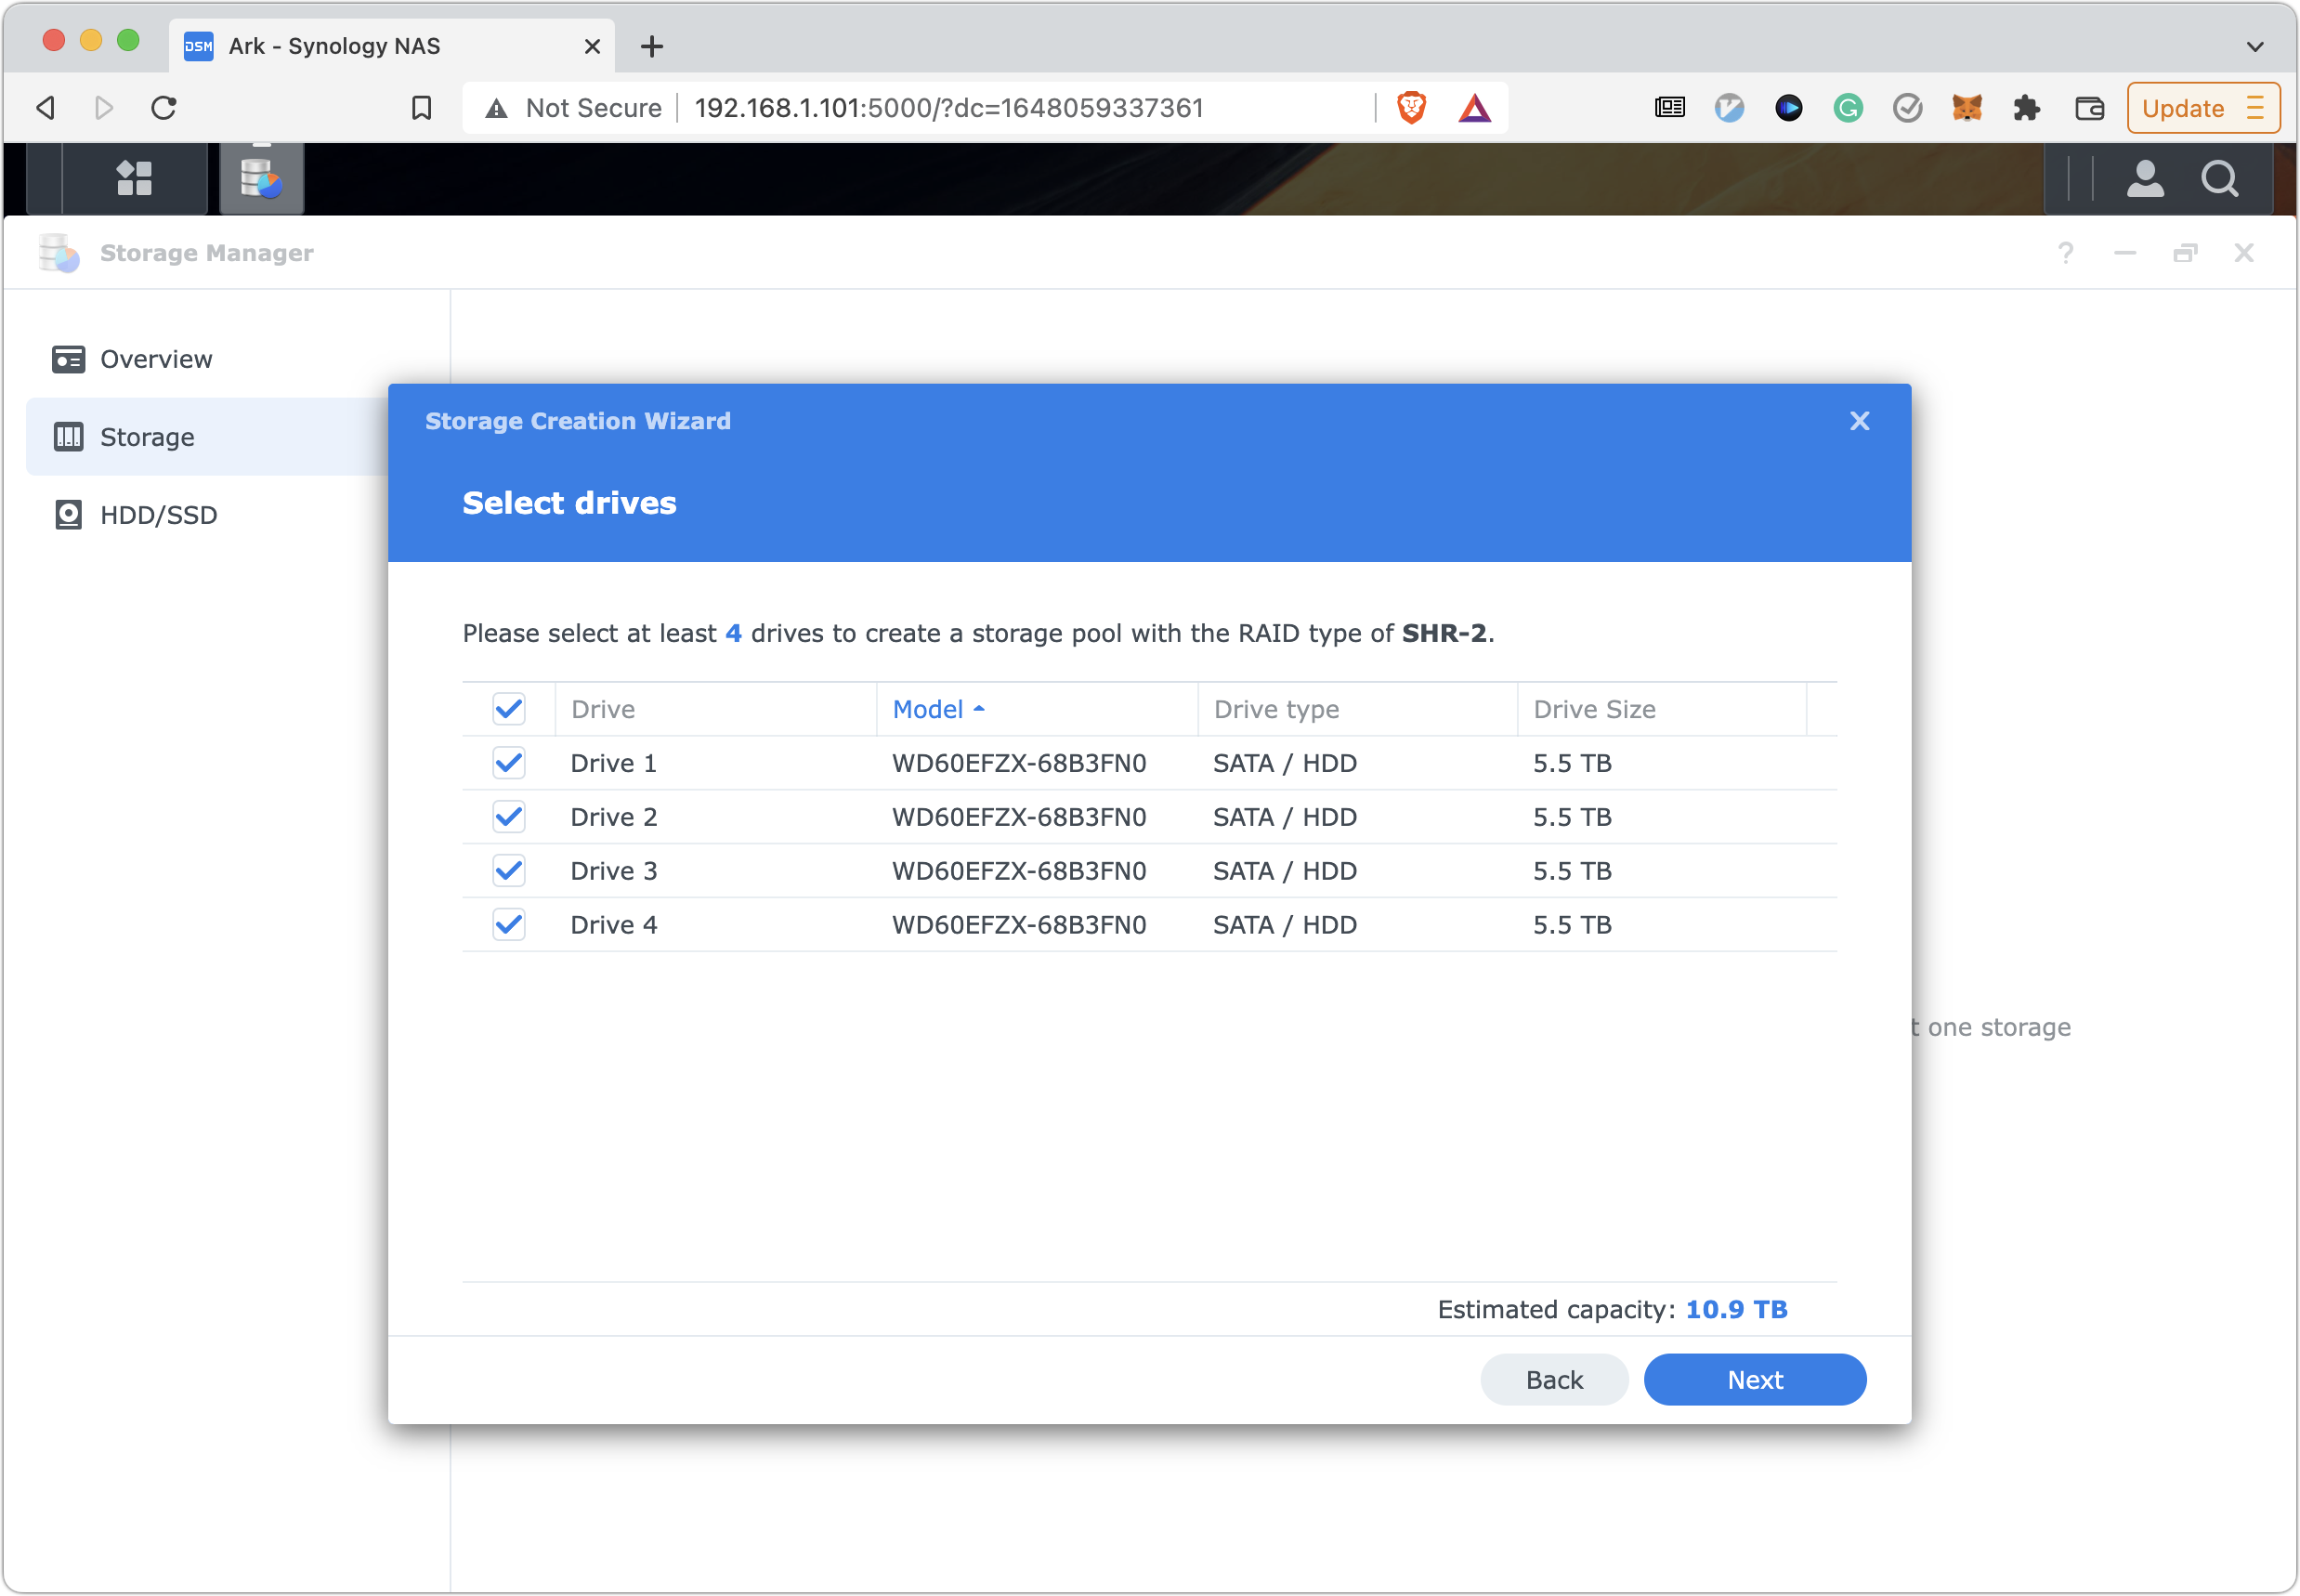
For the file system, you can choose between Btrfs and ext4. I chose Btrfs because—again—it’s what Synology recommends, and it enables advanced features like snapshots and better data integrity protection.
Once that’s done, the Synology setup assistant prompts you to take a tour of other features like system monitoring and two-factor authentication, which I strongly encourage you to enable. You can enable 2FA on both your synology.com account and on your account on the device itself, and you should enable it on both.
The only setup hiccup I encountered came when I tried to configure two-factor authentication. You must enter an email account so the DiskStation can send you an email for account recovery, but it wouldn’t take my Gmail account. The problem turned out to be a bug in the version of the Synology Disk Station Manager software that shipped with the DS 920+. Once I updated it, I was able to connect my Gmail account and enable two-factor authentication.
Aside from needing that update, this was the easiest server setup process I’ve ever experienced.
Accessing Files on the Synology NAS
Synology offers several way to access your files. Most Apple users will take advantage of SMB and Synology Drive.
After initial setup, you need to create what are called shares, which can be accessed through SMB or other standard network protocols. A share is like a virtual drive that you can mount on your Mac, and each share can have different permissions. For instance, you could set it so only you and your spouse can see your tax documents, but your kids can access stored movies.
SMB started out as a Windows file-sharing protocol, but it has become a de facto standard, even on the Mac. Some years ago, Apple deprecated its own AFP in favor of SMB, and you can connect to SMB shares in the Finder by choosing Go > Connect to Server.
The major downside of SMB is that you cannot access those files when you’re not connected to the server. I’m also not happy with the Finder’s SMB integration, which is prone to random disconnects, spontaneous slowdowns, and other issues. Working with SMB is much faster and easier on my Linux machines.
I also found that SMB tends to choke on extremely large folders. I moved my old Screenshots folder—which contains 6230 screenshots!—to the DS 920+, and sometimes the Finder chokes and eventually disconnects from the server when I open that folder. The lesson here is that you may need to divide large numbers of files into subfolders if you’re going to access them over your network.
Synology Drive is Synology’s proprietary alternative to cloud storage services like Dropbox. When you set it up, it creates a home folder for each user, with a Drive folder inside (for some reason, user home folders aren’t created automatically during account setup). You can then use the Synology Drive app to sync the files in that folder to your Mac—there’s also an iOS version that lets you access your files from your iPhone or iPad. Unfortunately, files stored in Synology Drive must also be copied to your Mac, which means they take up valuable local storage space.
I access most of my remote files via SMB but use Synology Drive under the following conditions:
- I need a local copy of the files so I can access them when I’m disconnected from the network.
- I want to keep a copy on the server, but need to sync them locally for performance reasons, like my giant Screenshots folder.
- I want to store and access multiple versions of files without logging into the DS 920+ or rifling through backups.
For instance, I keep my KeePass database file in Synology Drive so it’s always accessible and so I could revert to an older version if necessary (see “Moving from 1Password to KeePass,” 11 April 2022). Also, since it exists on my local filesystem in addition to the DS 920+, Time Machine also backs it up and maintains multiple versions as the file changes so I have multiple layers of redundancy.
Synology Apps
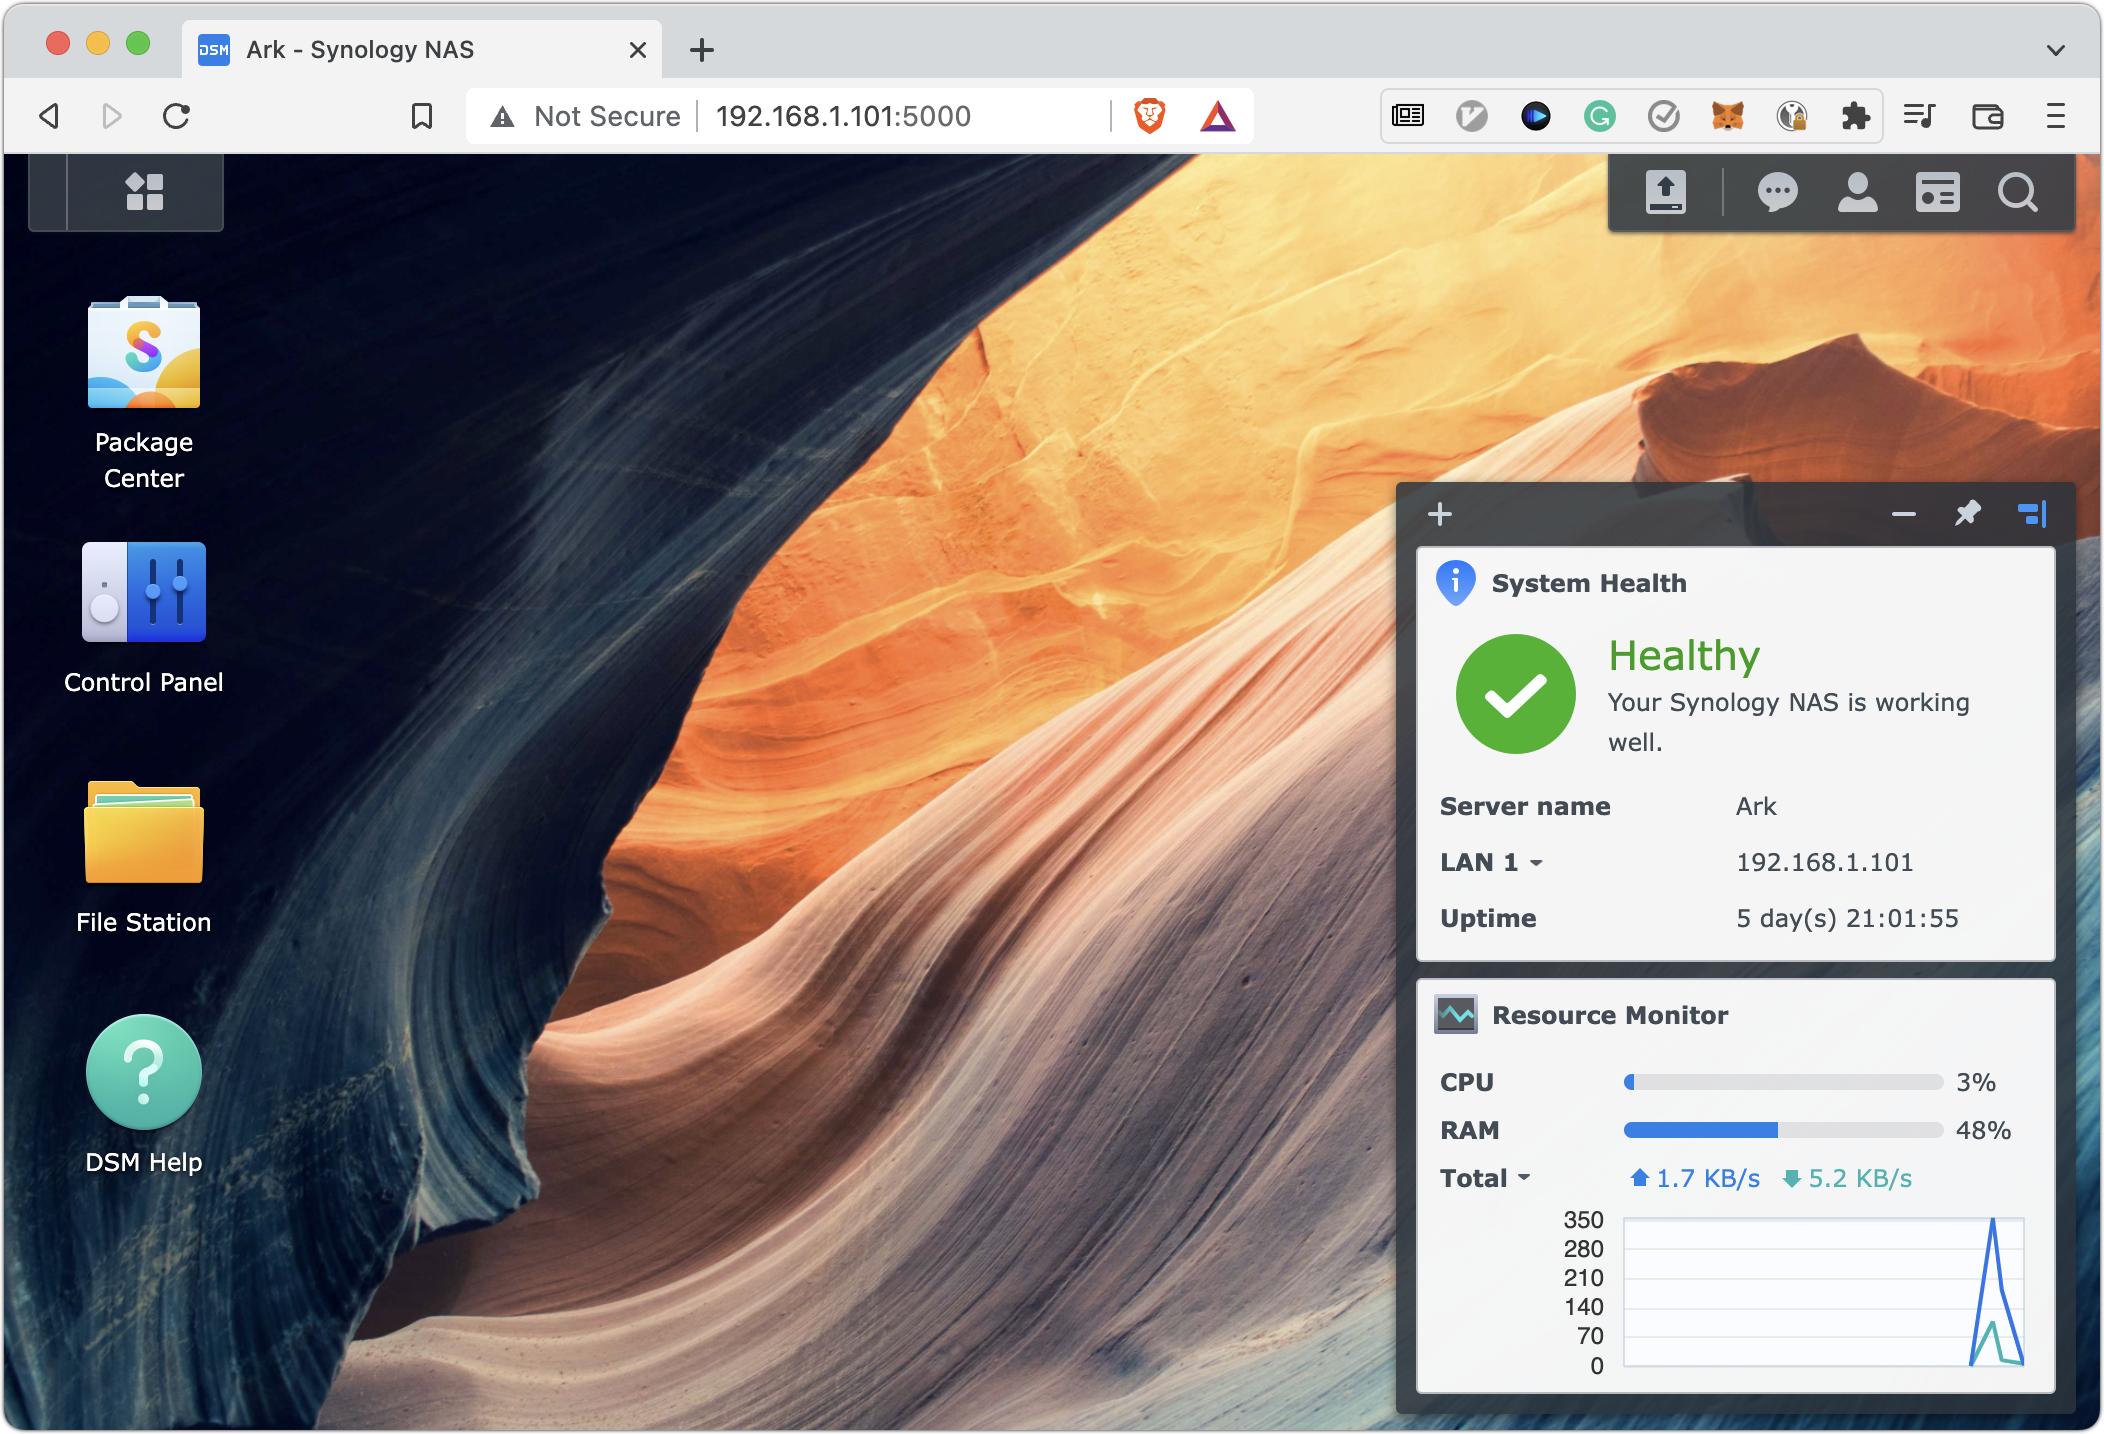
As you’ve realized by now, a Synology NAS is a full-fledged computer. In addition to their core file storage capabilities, Synology’s NAS units offer a suite of apps that you can download from the built-in Package Center and interact with through DSM—short for Disk Station Manager. DSM is essentially a Web-based Linux desktop that gives you a graphical interface to access files and settings. When I first heard about DSM, I assumed it would be painfully slow, but I’ve been impressed by how snappy it is.
I don’t use many of Synology’s apps, but here’s a partial list to give you an idea of the capabilities they provide:
- Calendar: Lets you sync your Mac and iPhone calendars with the Synology NAS instead of a cloud service like iCloud.
- Chat Server: Lets you set up a local chat server for friends and family instead of using Slack or Messages.
- Contacts: Same deal as Synology Calendar, only with your contacts.
- Office: A complete, Google Docs-like Web-based office suite. In my testing, it’s snappier than Google Docs, but I don’t use it because it stores files in weird proprietary formats.
- Plex: The Plex beta lets you play your videos and other media on a TV or other device.
- Surveillance Station: Lets you record directly to the Synology NAS from compatible IP security cameras.
- Web Station: Lets you set up your own Web server. Synology also provides packages for creating your own MediaWiki or WordPress instance.
- WebDAV Server: There are several iPhone apps that can only sync to a local server through WebDAV, and this package simplifies setting that up.
Most people probably aren’t buying a Synology NAS to use its apps, but they offer some welcome capabilities once you have an always-on, Internet-connected server.
Synology Photos
One of the big draws of a Synology NAS is the company’s new Synology Photos app. Previously, Synology split these functions between two separate apps, but with the recent DSM 7.0 overhaul, it combined them into a single app that functions similarly to Apple’s Photos and Google Photos.
It’s the best locally hosted alternative to these cloud services I’ve tried. It can recognize and play Live Photos, which is an unusual feature in third-party photo managers. Most of my photos are of my kids, and they rarely sit still, so the photo itself may be blurry, but the Live Photo has a memory I want to keep.
You can browse either by a timeline, much like Apple’s Photos, or by folder. You can also create slideshows, and it automatically creates People and Places albums, though the facial recognition isn’t great. In the albums it created of me, many of the photos don’t have me in them, or even anyone who looks like me! You can also share albums with other people or publicly, though that’s a whole other can of worms I’ll address next.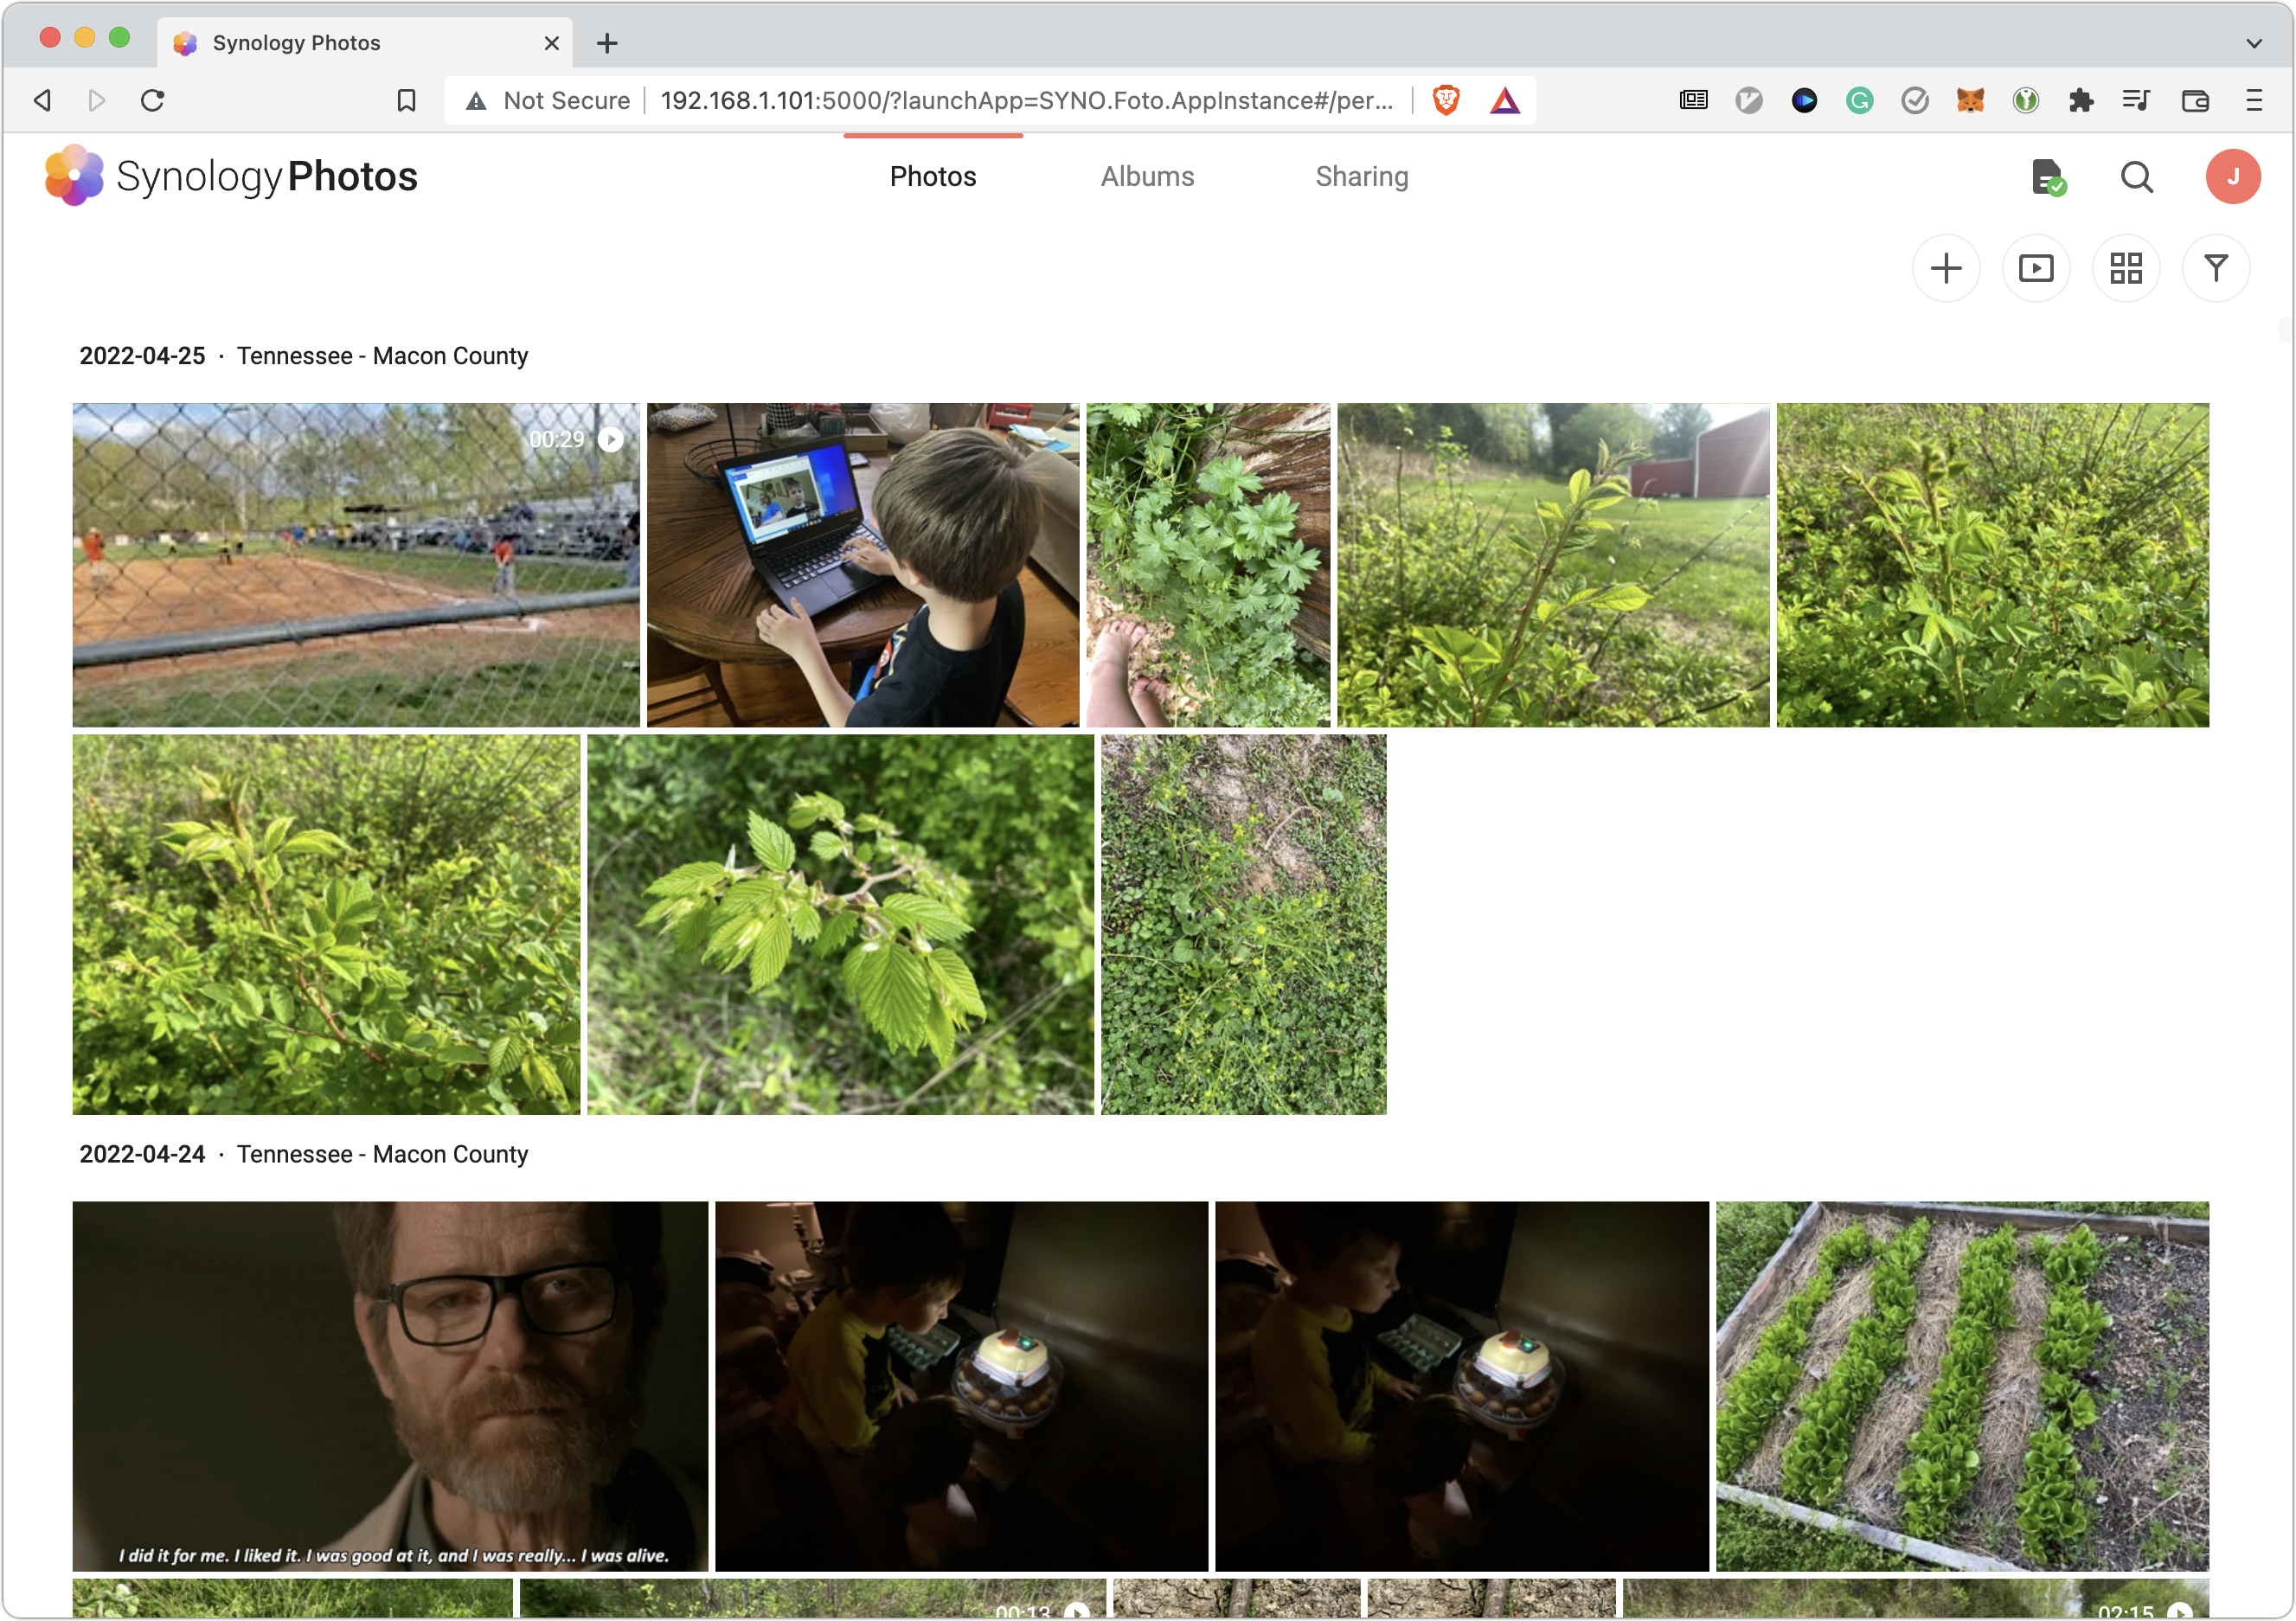
The major limitation of Synology Photos is that it doesn’t offer photo editing beyond a basic rotate function. That’s mostly what I need since I frequently end up with photos in the wrong orientation, but if you want more editing capabilities, look to something like Lightroom.
The hardest thing about using Synology Photos has been transferring my older photos out of Photos. I’ve been discussing the issue on TidBITS Talk, and I think I have a solution. However, the Synology Photos app for the iPhone and iPad does a great job of syncing newly taken photos over to the DS 920+.
Synology Cloud Sync
Another key app for those interested in disengaging from public cloud services is Synology’s Cloud Sync. It lets you log into cloud storage services like Dropbox, Google Drive, or Microsoft OneDrive and download your content from those cloud services to a folder on your NAS. It can be just a one-way download or a two-way sync, and you can set it up to be continuous so new files are swapped between your NAS and the cloud service as you create and edit them.
Cloud Sync has a neat feature that converts Google Workspace files—like those from Google Docs and Google Sheets—into standard Microsoft Office formats. However, if you do that, I strongly suggest that you make it a download-only sync. At one point I thought something had gone wrong with my sync configuration, so I set it up again, only to discover that it had added DOCX and XLSX versions of all my documents to Google Drive folders, even shared ones. Thankfully, I was able to clean up the mess by deleting those files on the DS 920+ with the two-way sync enabled.
Unfortunately, Cloud Sync doesn’t work with iCloud. To get those files onto your NAS, you must copy them over manually in the Finder. That doesn’t seem like it should be problematic, but I ran into a problem where iCloud wouldn’t download remote-only files to transfer them over. For some reason, it wouldn’t work on my iMac, but I was able to copy everything over using my MacBook Pro. I recommend starting such a transfer from a Mac that has Optimize Mac Storage disabled (such that all files should be mirrored locally) in System Preferences > Apple ID > iCloud.
Synology Remote Access and Security
You probably want to be able to access your NAS data while away from your local network, and Synology offers many ways to do this. You could forward ports on your router to desired services on the NAS. The main port for DSM is 5000. Synology provides a tool that automatically configures port forwarding for common routers, but it unfortunately doesn’t work with mine.
If you have a typical consumer Internet connection, your public IP address can change every so often. Fortunately, Synology offers a built-in dynamic DNS service, so you can choose a Synology domain name for your NAS and it will update your public IP address automatically as needed.
However, I do not want to expose my DS 920+’s admin panel to the Internet. Thankfully, Synology has some alternative remote access solutions. The easiest one is QuickConnect, which routes your connection through Synology’s servers to access services running on your NAS with no port forwarding required. It works well, but I strongly encourage you to set up two-factor authentication before using it. I tend to leave it off for security reasons, but may turn it back on in the future to make file and photo sharing easier.
My main method of accessing my Synology remotely is through a VPN. Synology’s Package Center includes a VPN Server app that makes this incredibly easy. A VPN lets you connect to your home network while away and access other computers on that network just as if you were home. I like how using a VPN gives me full access to services running on my DS 920+ but doesn’t require that I open many ports to the Internet.
Unfortunately, I experienced a lot of headaches setting up VPN connections, and it was difficult to test configurations because I don’t have cellular service at home to simulate a remote connection. Connecting to the VPN over my Wi-Fi network worked fine, but I couldn’t make a connection when I was actually away from home.
I eventually discovered that VPN Server lets you set up VPNs using different protocols. For some reason, I could connect to an OpenVPN server from iOS but not from a Mac. Conversely, my MacBook Pro worked with an L2TP/IPSec server, but my iPhone and iPad couldn’t make a connection. I have no idea why this is, but I was eventually able to work around it by setting up two separate VPN connections to my DS 920+, one for Macs and another for iOS devices. I’m not sure if this oddity is due to Synology’s software, Apple’s software, or my own bumbling.
While we’re talking about security, what if your Synology NAS were stolen? Synology enables you to create encrypted shares, much like turning on FileVault on your Mac’s internal drive. Unlike FileVault running on an M1-based Mac or Intel-based Mac with a T2 chip, there is a performance hit, so I have encrypted only one share, where I store my most sensitive documents.
Unfortunately, there are a few annoying quirks. you can’t encrypt a home folder because you have to encrypt a whole share, but you can’t encrypt the home share. I would prefer to encrypt all of my photos because some are sensitive (like pictures of my wife nursing), but Synology Photos reads photos only from the Photos directory of the home folder. I might try creating a symlink to an encrypted share in my Photos directory, but that’s a project for another time.
Backing Up a Synology NAS
You can use a NAS for backup—it can even be a Time Machine destination (see “Network Time Machine Backups: Moving on from the Time Capsule,” 14 January 2022)—but you must also back up the NAS itself, with both local and remote backups.
Local backup is simple. I found a 14 TB Western Digital drive on sale for around $200, and I use Synology’s Hyper Backup app to create a nightly backup. It also lets you encrypt your backup for extra security.
As for remote backup, backing up a lot of data to the cloud isn’t cheap. I eventually settled on IDrive, which had an offer for 5 TB of backup for $8 for the first year. That won’t back up everything I store on the DS 920+—I skip large, easy-to-replace files like movies—but it gives me cheap remote backup for my most important data. Plus, IDrive has an app in Synology’s Package Center that performs the backups automatically.
As an aside, I’ve connected both the DS 920+ and its backup drive to a UPS so they’ll work for a while after a power outage. Unfortunately, since I originally bought this UPS just for my router, I didn’t get one with a USB connection that would enable it to shut down the Synology NAS automatically during a power outage.
If you want to use it to back up your Mac to a NAS, Synology provides instructions for creating a Time Machine share. I prefer to use a USB drive for this, so I have not tested it.
Media Playback
Many people buy a NAS to store and view DRM-free movies and TV shows they’ve downloaded or ripped from discs. You have two options for playback:
- Access them over SMB and play them with an app like VLC or IINA on the Mac. On an Apple TV, you could again use VLC or something similar.
- Install a media library app on the Synology NAS like Plex, which organizes your media, slathers on a nice user interface, and helps with processing video files. Plex offers apps for the Apple TV and pretty much every TV platform.
I’ve only dabbled with media serving because we don’t watch much TV. For most things, Plex is fine. I pay for Plex Pass, which—among other things—enables transcoding, which means Plex uses the DS 920+’s CPU to help with video processing. I have one 4K movie that it struggles with, and I should probably re-encode it into a better format for streaming. However, if I play the same movie with IINA on my Mac over an SMB connection, it plays fine.
I also installed a second media library app called Jellyfin, which is an open source alternative to Plex. I did this using the Docker app from Synology’s Package Center, which takes us to some of the geekier things DS 920+ can do.
More Than Just a File Server
In some ways, DSM is similar to macOS in that it applies a user-friendly veneer on top of complex features for power users, such as:
- Docker, which is available from the Package Center. It lets you install third-party apps like Jellyfin as containers. There are dozens of services you can install this way, and you can even install Docker Compose from the Package Center to tweak and customize settings for those containers.
- SSH, which lets you log in to your NAS’s command line from the Mac’s Terminal app. I don’t recommend using this unless you have to, since it would be all too easy to break things this way. It’s also a bit of a security risk.
- Synology Virtual Machine Manager, which lets you create virtual machines that let you run other operating systems like a full-fledged Linux server or even Windows.
I’ve dabbled with virtual machines on the DS 920+, setting up a virtual Linux server to try Nextcloud. Once you set up a virtual machine, you can click the Connect button in Virtual Machine Manager, which launches a virtual monitor in another Web browser tab. From there, you can interact with your virtual machine in the browser, whether it’s a graphical interface or via the command line.
I haven’t tested Windows on the DS 920+, largely because I hate Windows, but if you switched to an M1-based Mac and miss Boot Camp or a virtualization app like VMware Fusion (Parallels Desktop has instructions for installing Windows 11 for ARM), it might be a compelling option for the occasional Windows app. As a plus, you can access that virtual machine from any computer on your network. I wouldn’t run anything heavy on it given the limitation of the hardware, but I’m tempted to try running some games on there to see how far I can push the DS 920+.
If you want to run virtual machines, I recommend that you upgrade the RAM, since you must dedicate a certain amount of RAM to each virtual machine.
Who Is This For?
Who should consider investing in a NAS like the Synology DS920+?
- Techies who frequently swap between machines and don’t want to store everything in the cloud
- Anyone who wants to make themselves less dependent on cloud providers due to network availability issues or to avoid recurring charges
- Small businesses that need a central, local place to store files for collaboration
For me, the DS 920+ has been an invaluable addition to my home, and I’m kicking myself for not getting one sooner. I can access all of my documents, photos, music, and videos without having to worry about cloud storage quotas or network speed. And I also have a central platform to experiment with hosting my own services.
The key to it all is that Synology’s software saves time. You don’t have to worry about which Linux distro to install, deal with dependencies, or wonder if your hardware is supported. Plug in the drives, fire it up, and Synology holds your hand through the rest of the process.