#1630: Apple Books changes in iOS 16, simplified USB branding, recovering a lost Google Workspace account
Apple overhauled the Books app in iOS 16 to be more compact, but at the expense of clarity. Josh Centers explores how Books has changed and explains how to take advantage of its new customization options. The complexity of USB standards released by the USB Implementers Forum has become a running gag, but that may be changing. Glenn Fleishman explains how the USB-IF is simplifying and streamlining its product labels. Finally, consultant Ivan Drucker joins us this week with the tale of how he overcame numerous obstacles to recover a client’s Google Workspace account. Notable Mac app releases this week include Techtool Pro 16.0.2, Zoom 5.12, and Default Folder X 5.7.
How Apple’s Books App Has Changed in iOS 16
Most app changes in iOS 16 are subtle, but Apple completely overhauled the EPUB reading interface in the Books app (PDF reading remains unchanged). I found it bewildering at first and figured that you might too. So here’s a quick guide to finding your way around Books in iOS 16.
To be clear, this is all about reading in Books—the app’s library interface for finding and organizing books is largely unchanged from iOS 15, likely because much of it is online content from Apple Books laid out in Web-like scrolling views.
The Reading Menu and Settings
First off, when you’re reading an EPUB (again, as opposed to a PDF), Apple eliminated the toolbar at the top of the screen that could be summoned or dismissed with a tap of the screen. Books now hides most of its controls in the reading menu, accessed by tapping a button that lives by default in the lower-right corner.
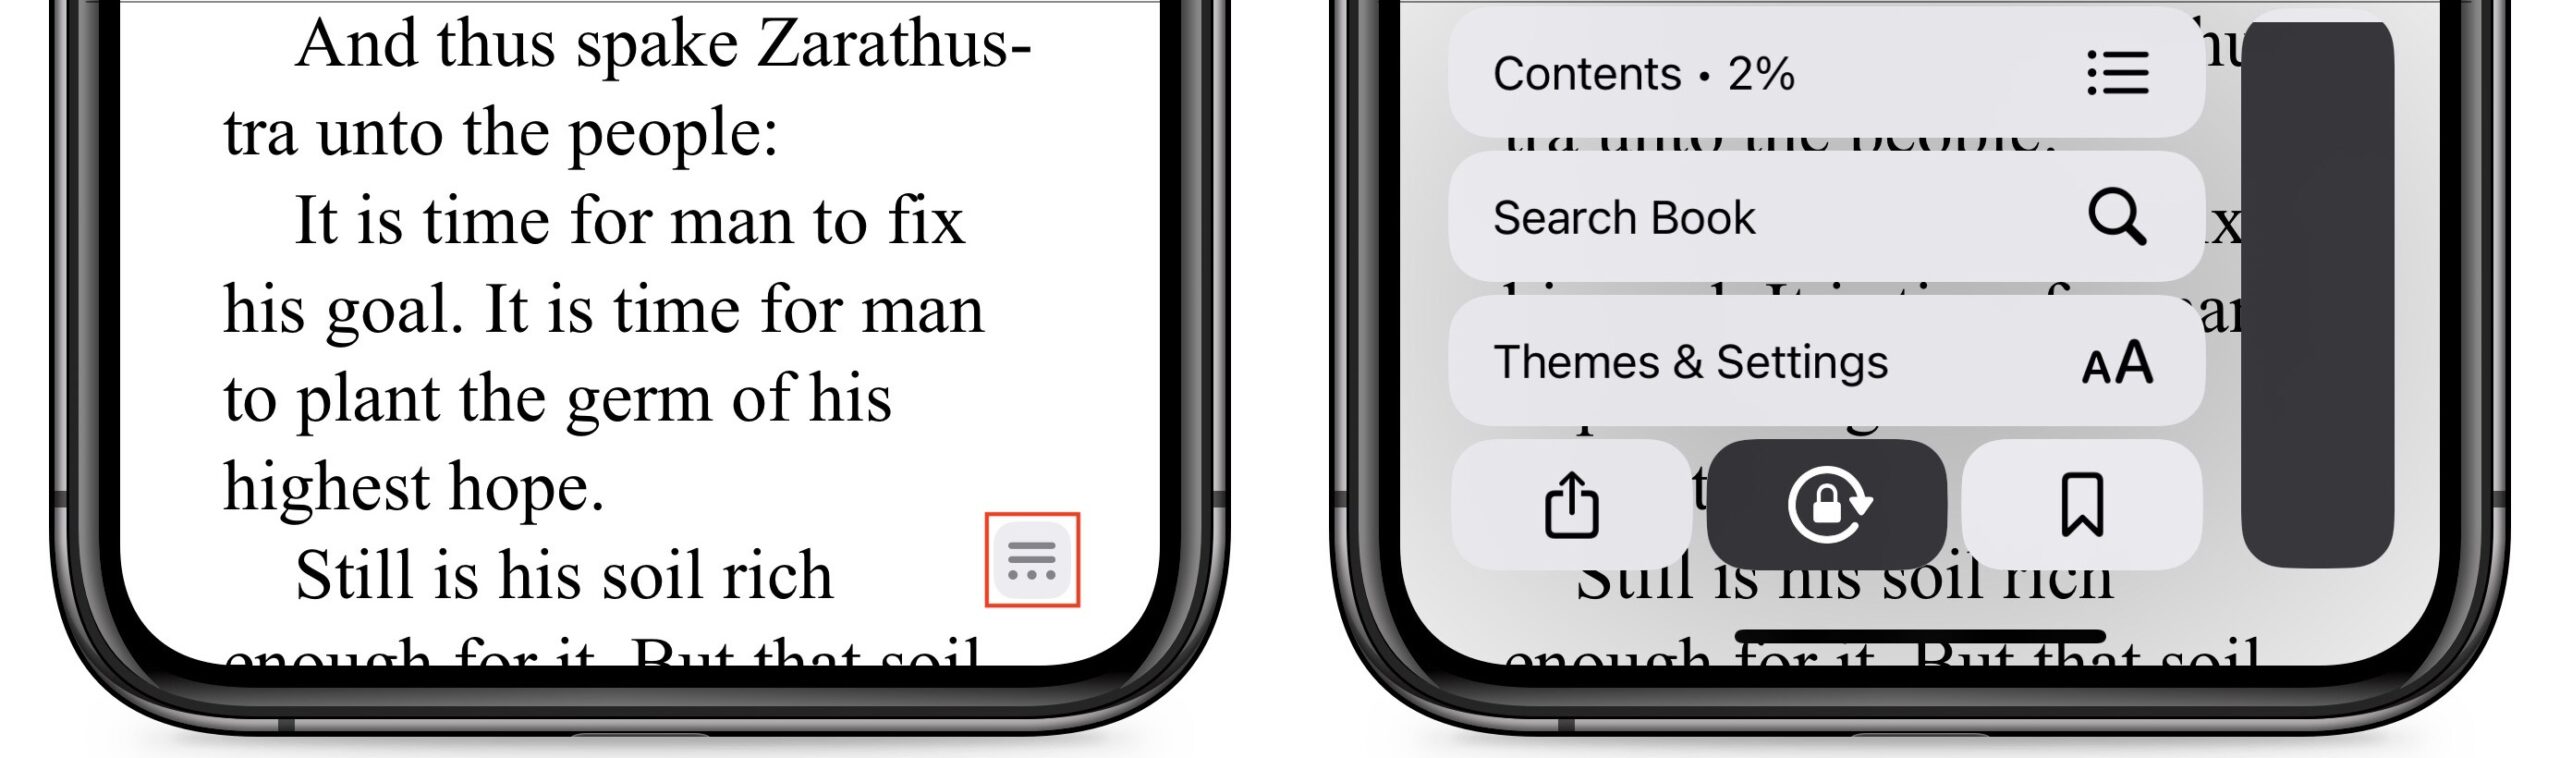
Here’s what you’ll find:
- Contents: Shows your current progress in the book and displays the table of contents when tapped
- Search Book: Brings up the search panel
- Themes & Settings: Provides access to preset themes and customization options
- Share: Displays the Share sheet
- Lock Orientation: Locks the orientation of the Books app to portrait, independent of how you’re holding the iPhone or your iPhone’s system setting
- Bookmark: Adds or removes a bookmark on the current virtual page
- Position Indicator: In scrolling mode, the position slider on the right displays your current progress, and you can drag it to navigate within the book quickly.
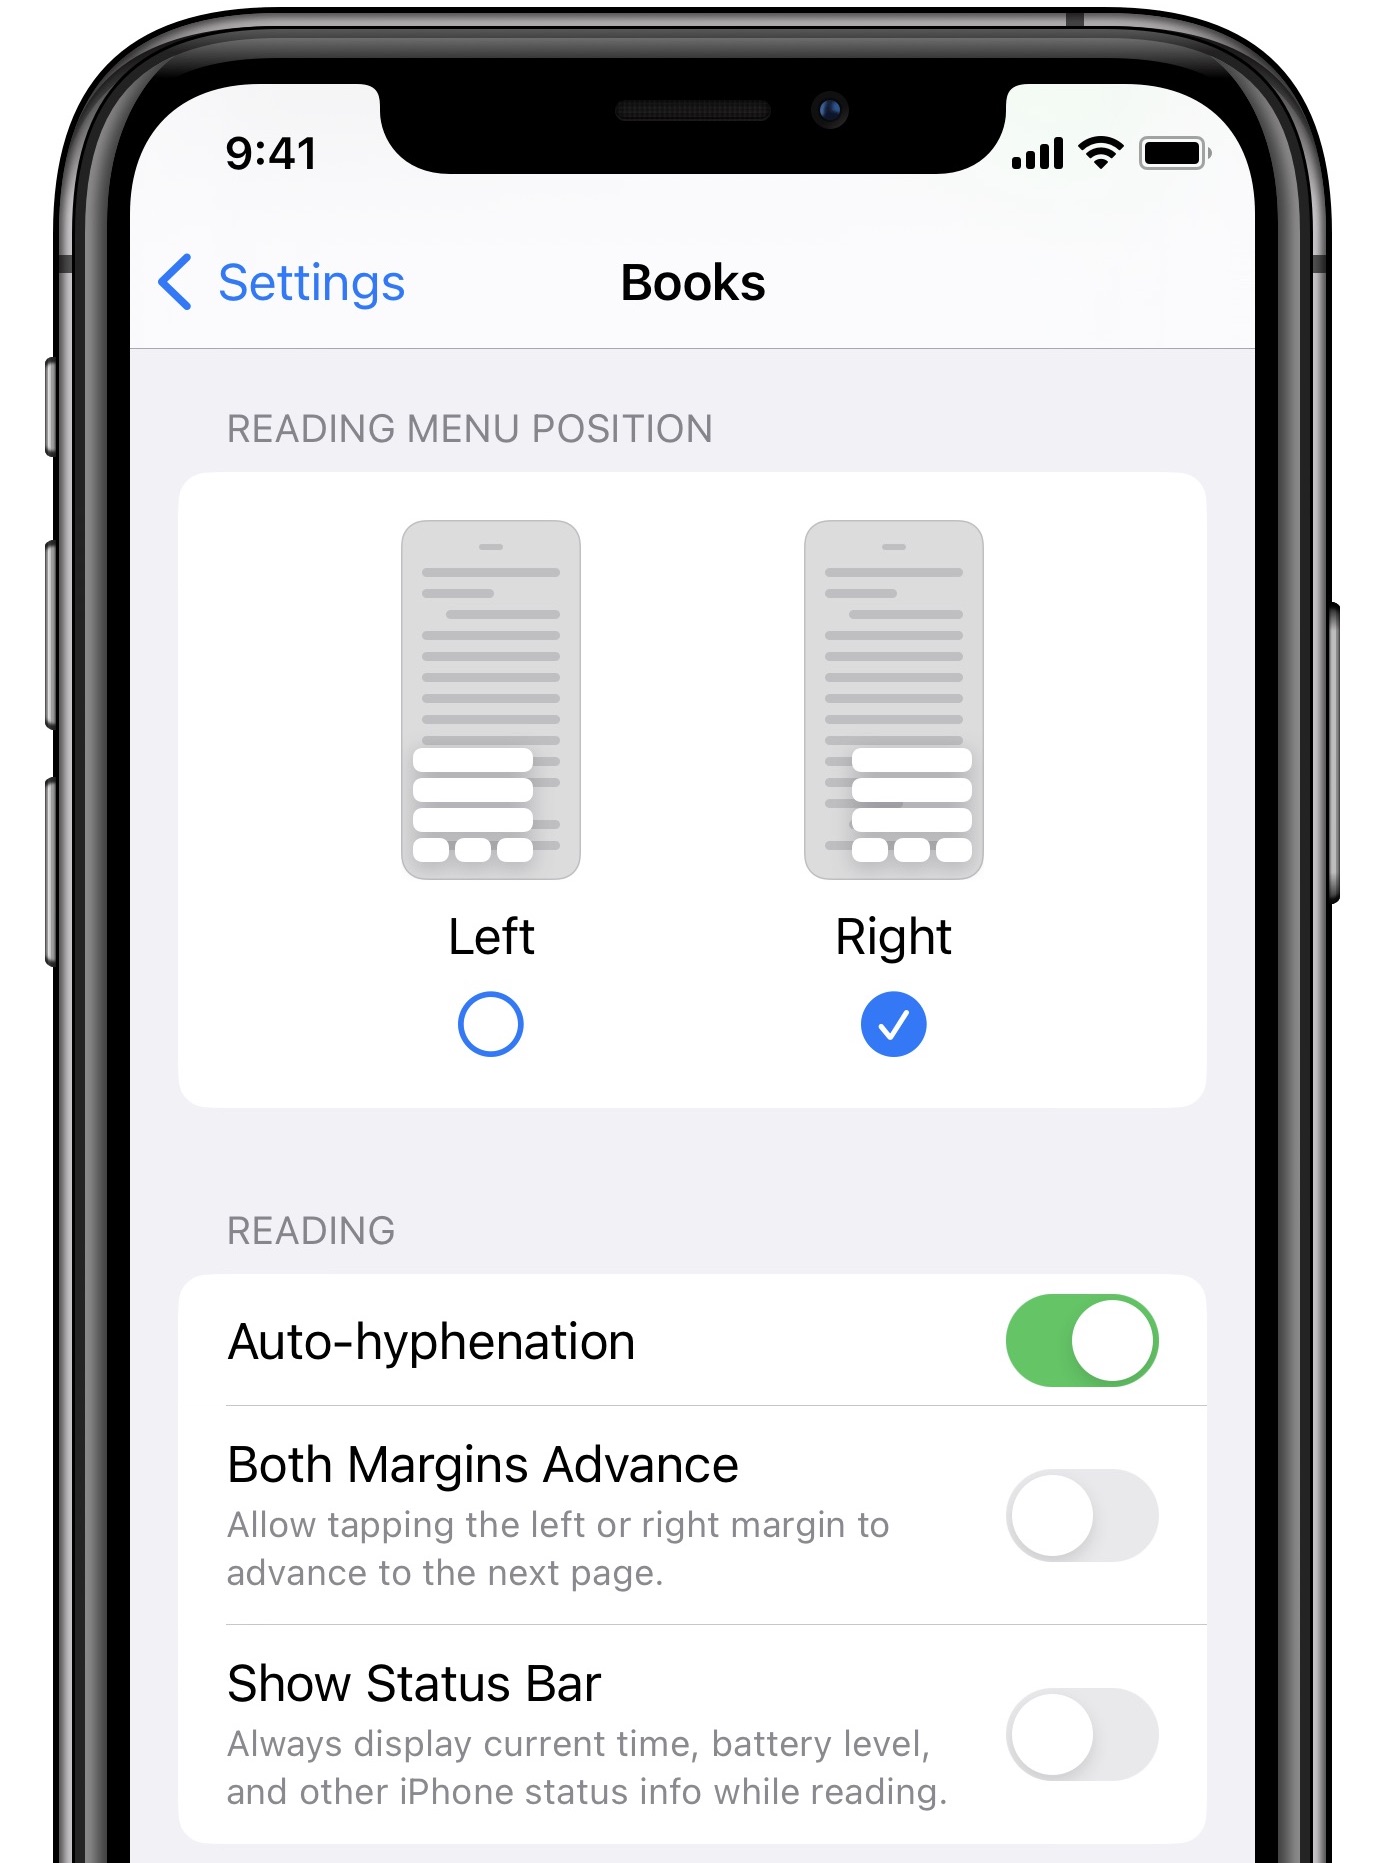
If you don’t like having the reading menu button on the right, you can switch it to the left in Settings > Books. While you’re there, peruse the other settings, especially Show Status Bar, which keeps the iOS status bar showing at all times while reading, instead of just temporarily when you tap the screen. On Face ID-equipped iPhones, keeping the status bar showing at all times avoids the awkwardness of text disappearing under the notch or Dynamic Island.
Bringing up the reading menu also displays a subtle progress indicator at the top of the screen that tells you how many pages you have left in the current chapter. That progress indicator—plus another one at the bottom that tells you you’re on page X of Y—also appears with a tap on the screen. It’s all the same information that the iOS 15 version of Books kept at the bottom of the screen when the toolbar was showing, but it can be harder to parse due to sitting on top of the book text in a darkish gray-on-lightish gray bubble.

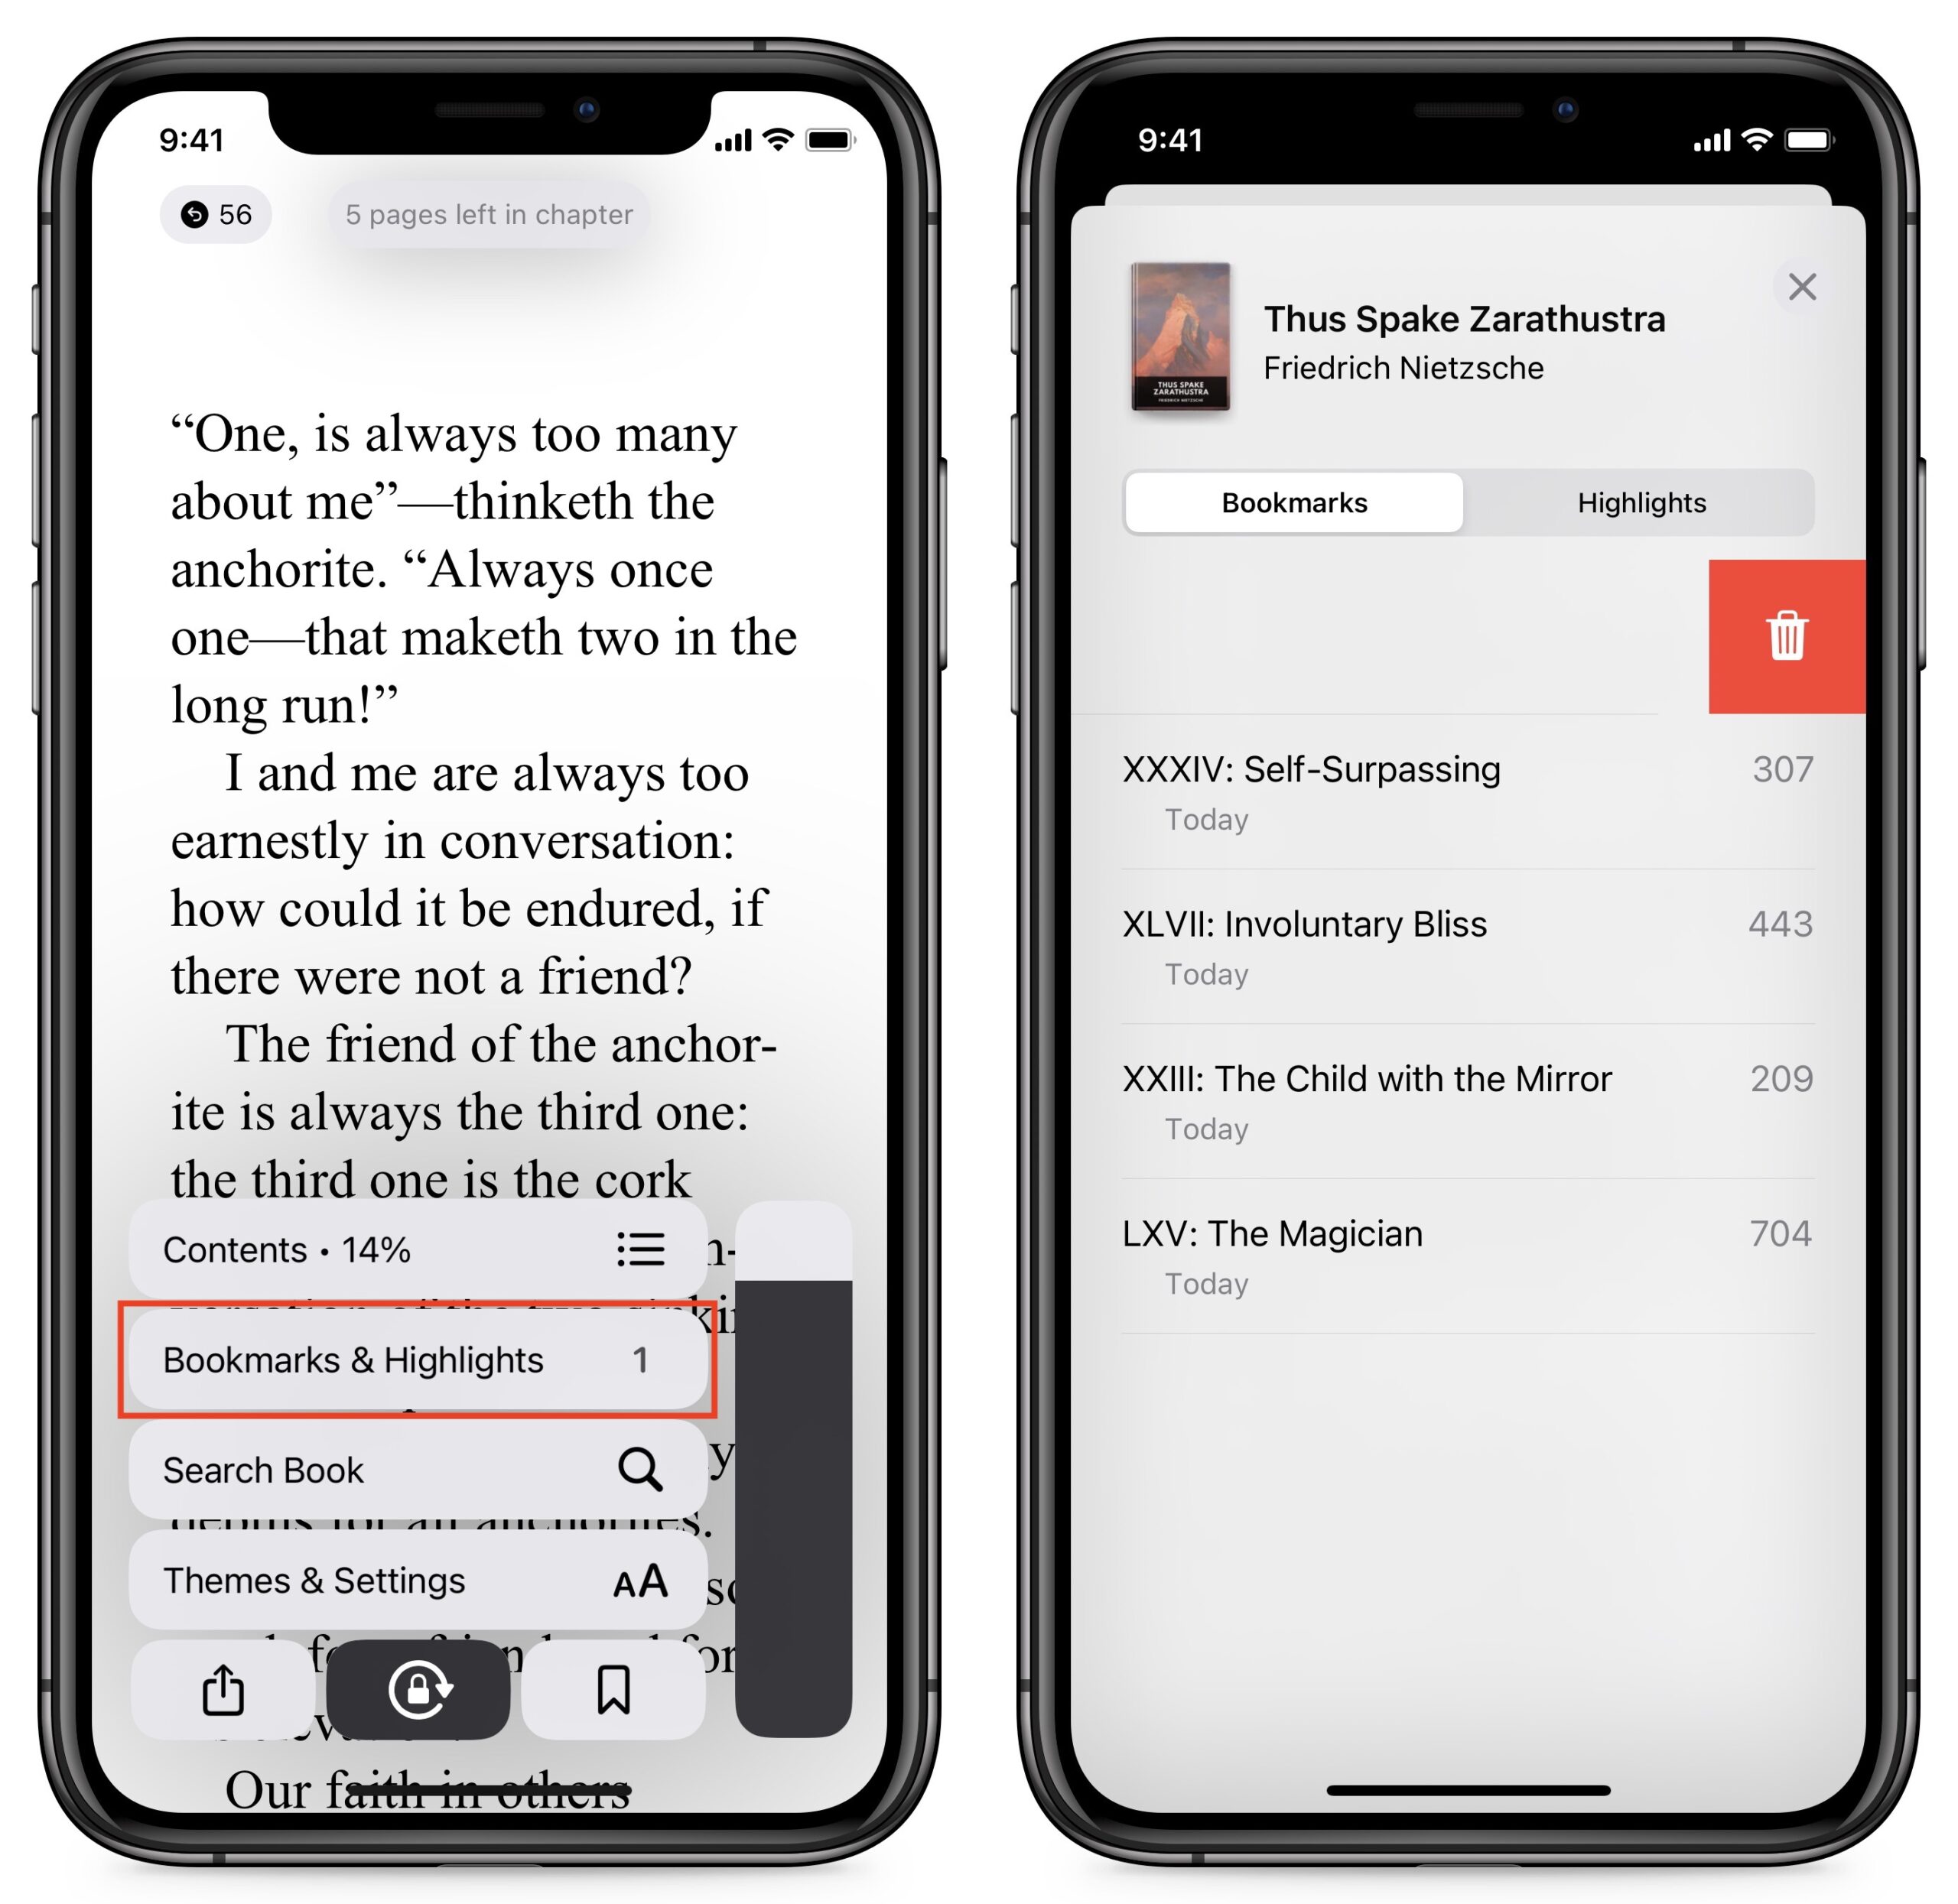
Creating and Deleting Bookmarks
When I first started using Books in iOS 16, I found myself accidentally creating bookmarks. I eventually realized that Books now creates a bookmark when you double-tap the screen, which is easy to do inadvertently. Fortunately, another double-tap removes the bookmark from a page.
When you create a bookmark, a new entry appears in the reading menu: Bookmarks & Highlights, which you can tap to see your bookmarks and highlights. Tap one to navigate to it. When you’re done with a bookmark, swipe right-to-left to reveal a delete icon.
Navigation within a Book
Books now defaults to vertical scrolling instead of horizontal page flips (but that can be reversed in the Themes & Settings panel), and the skeuomorphic page flip animation is gone. You can jump to the start of any chapter using the table of contents or scroll quickly through the book using the position slider.
However, once you start scrolling, even though a line marks your previous location, the slider doesn’t snap to it, making it nearly impossible to scroll back to your previous location. Plus, how would you return to your previous location after navigating using the table of contents or a bookmark?
Fortunately, there’s a solution.
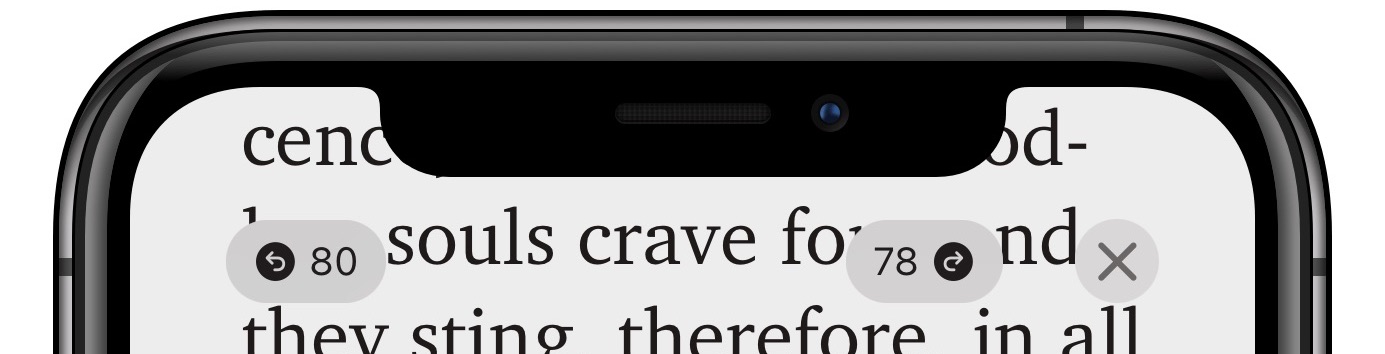
When you jump around in a book using the table of contents, a bookmark, or the position slider, a button appears in the upper left, showing the previous page location and giving you the option to jump back to your previous location. Once you return to a previous location, that left-hand button changes to let you jump back another step, and another button appears on the right to enable you to jump forward to your spot before the jump back. It’s just like the back and forward buttons in a Web browser, but with page numbers.
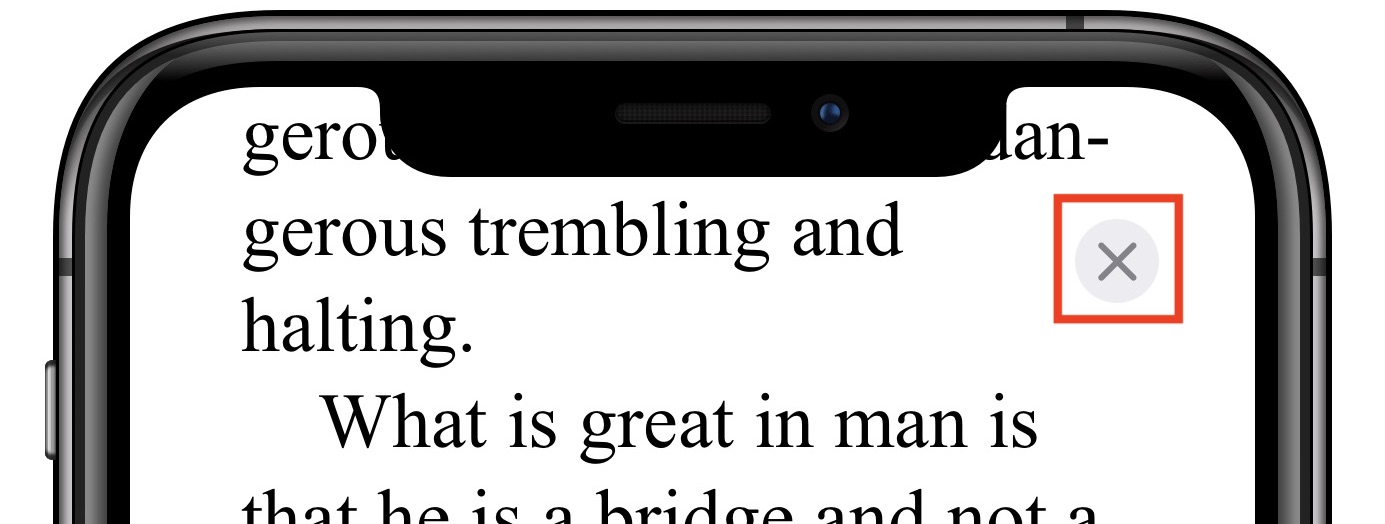
Finally, in another change associated with the loss of the toolbar from the previous version of Books, there’s no longer a Back button to return to the main Books screen. Instead, tap the ever-present X button at the top right of the screen to return to your library.
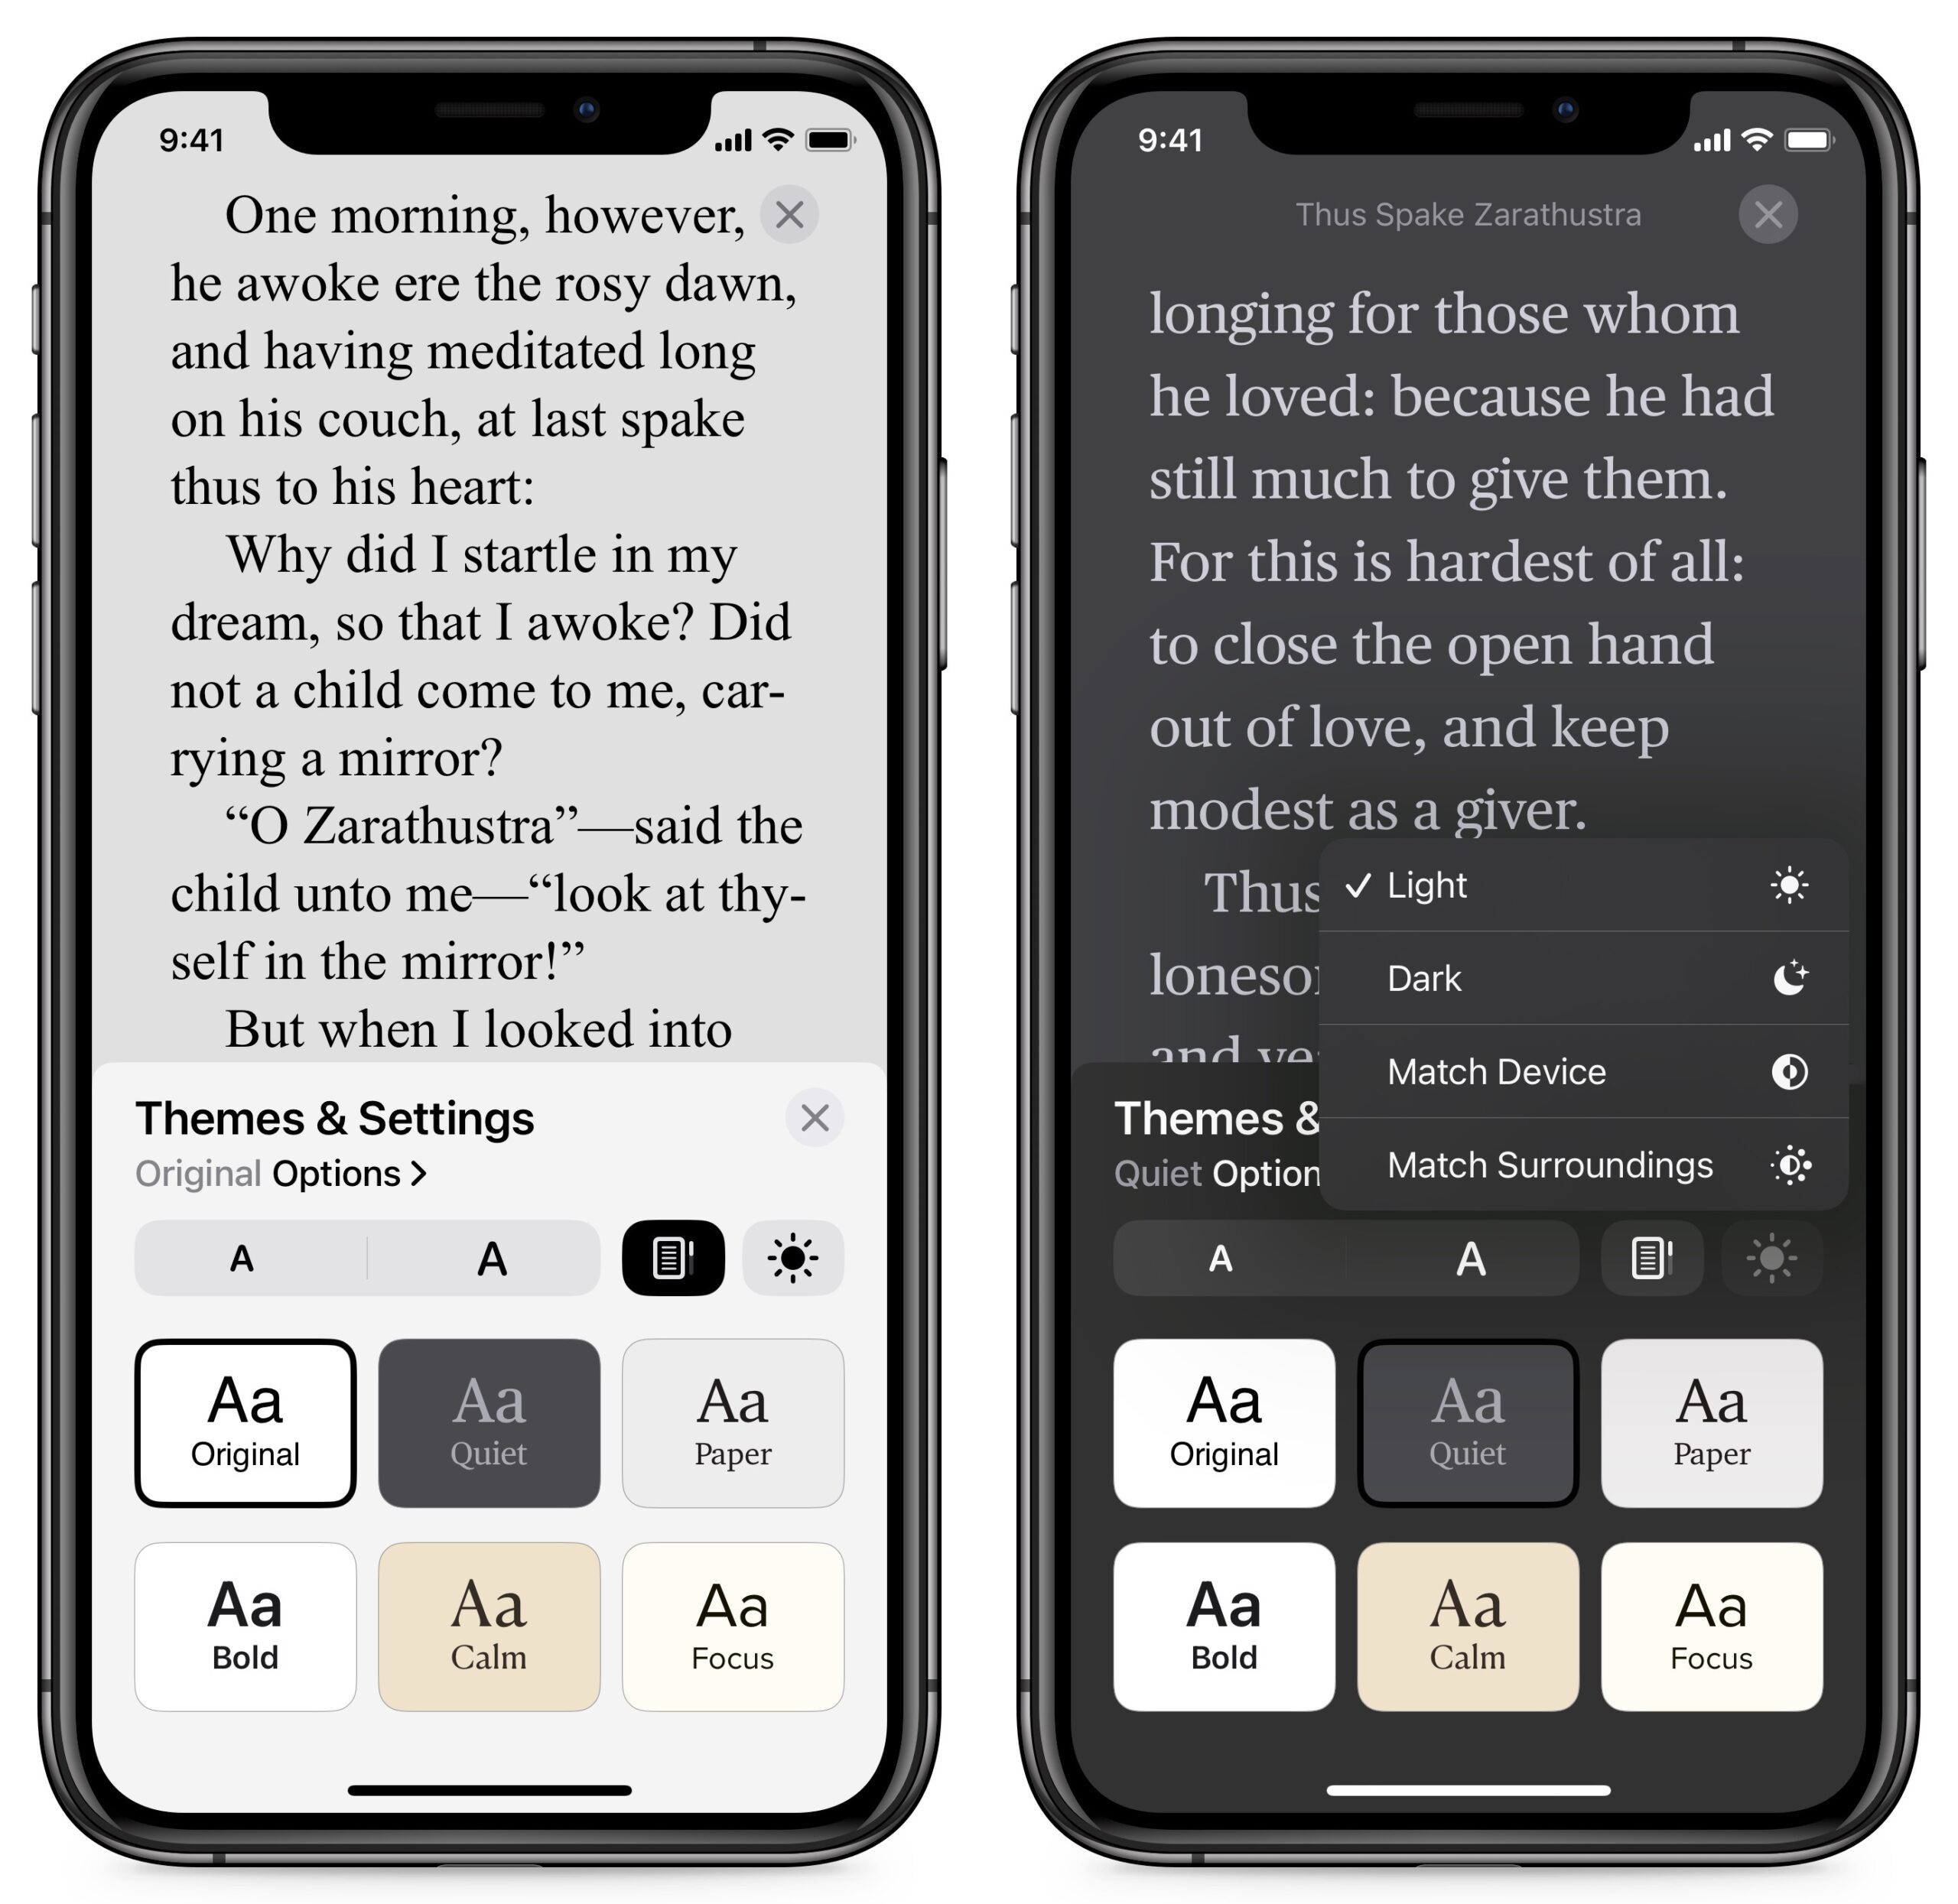
Customizing Book Looks
Finally, let’s look at the Themes and Settings panel, which lets you adjust how a particular book looks and works. Most prominent are six preconfigured themes that combine font, size, color, and background settings. They’re the only way to change the background color, but you can change the other settings independently:
- Along the top, tapping the small and large A buttons reduces or increases the text size.
- The next button (a tiny page with a position slider, if you look closely) toggles the book between vertical scrolling and horizontal page flips.
- The far-right button lets you manually choose between Light Mode and Dark Mode. Alternatively, Match Device matches whatever your system setting is, and Match Surroundings uses the sensors in your iPhone to adjust the light mode automatically.
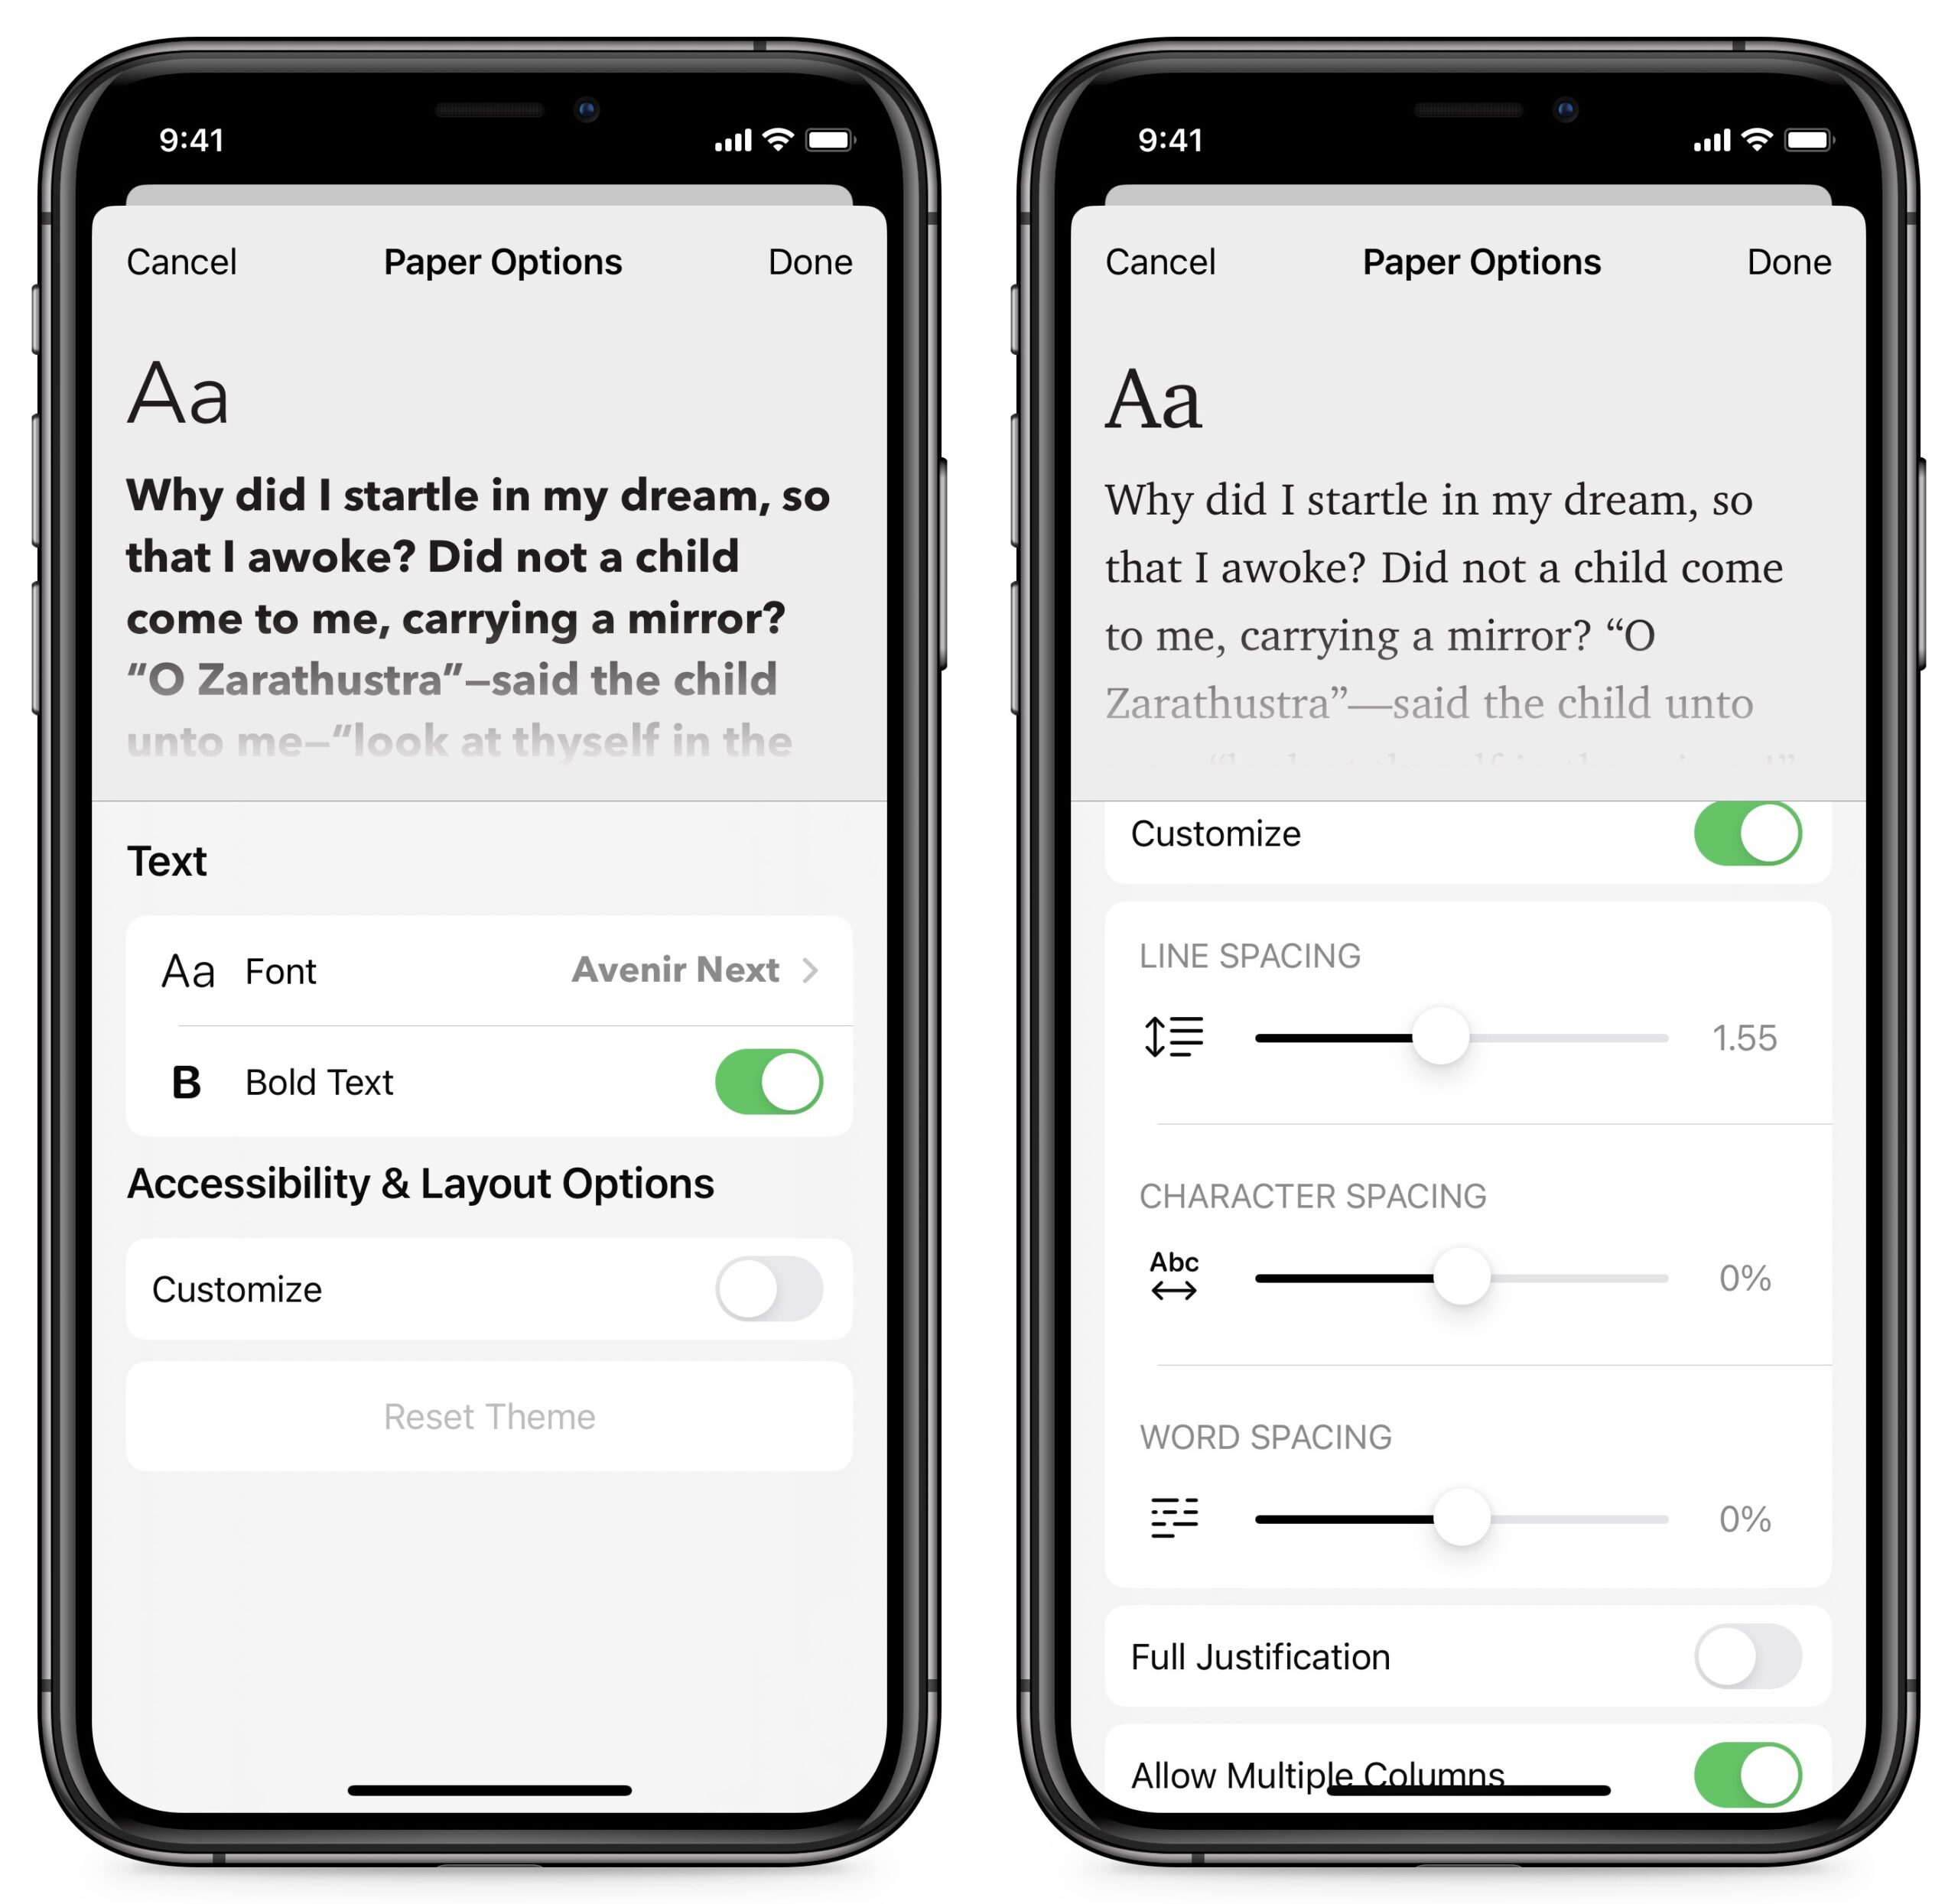
Tap Options to select a particular font (with a few more choices than in the past) or turn bold text on or off. Even more welcome than the new fonts and bold option are the new Accessibility & Layout options. If you turn on Customize, you can adjust line spacing, character spacing, and word spacing; toggle full justification; and allow multiple columns.
If you do a lot of reading in Books, do you find these changes helpful or just different? And have you noticed any other changes from the previous version?
USB Simplifies Branding but Reintroduces Active Cables
Every time the USB Implementers Forum posted a new set of logos describing ever more USB speeds, electrical power possibilities, and display parameters, it resulted in an outpouring of confusion, ridicule, and anger—yes, anger. See, for instance, “USBefuddled: Untangling the Rat’s Nest of USB-C Standards and Cables” (3 December 2021). But at long last, the USB-IF has finally made things better, with a simplified set of USB logos!
At the same time, however, a somewhat hidden aspect of USB4 cables comes to the fore with the announcement of an upcoming 80 Gbps version of USB4. Yes, it’s the return of having to worry about the distinction between passive and active cables—or is it? I explore below.
A Fresh, Simple Look Focused on Data Rates
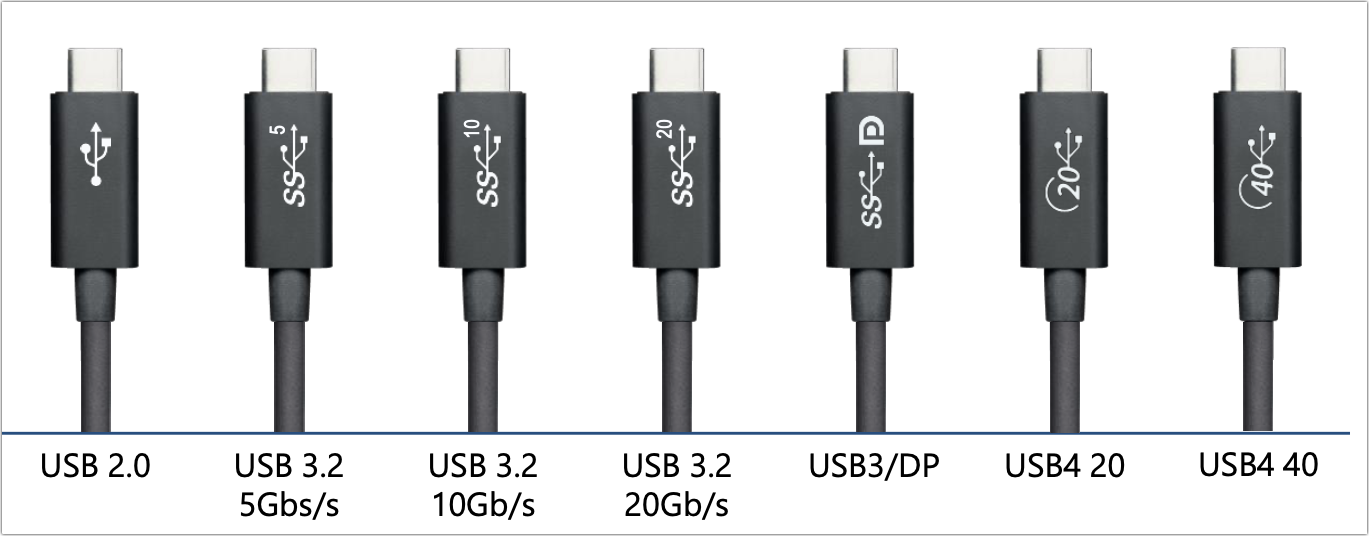
Years of multiplying USB standards led to a proliferation of labels and combinations of marks like those shown below.

Intel’s competing Thunderbolt group even poked fun at USB’s labeling profusion on USB-C cables.
Now, at least for future products, we can move on. With little fanfare, the USB-IF has updated its USB Enabling Connections site with a new approach.
Instead of forcing consumers to use versioning terminology such as USB 3.2 Gen 2×2 or messing around with marketing terms like “SuperSpeed+,” the USB-IF has simplified things so you can now write something like“USB 20Gbps.” The version details still exist and have meaning for developers and engineers, but most of the consumer-level branding now boils down to just the following four packaging labels, indicating the maximum supported data rate.
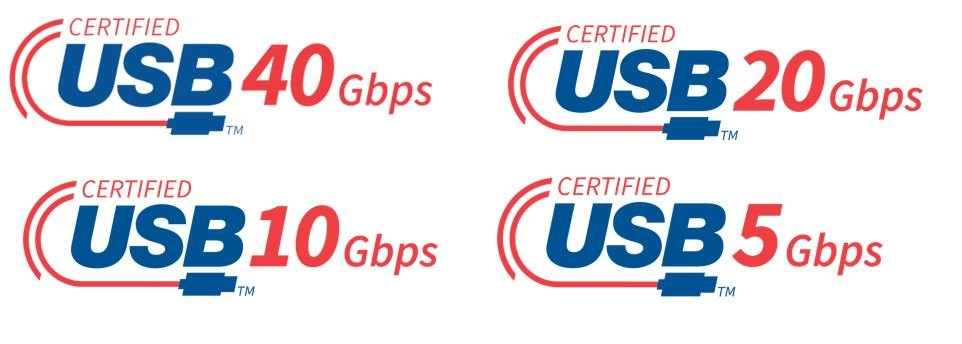
Behind the scenes, here’s what those labels correspond to:
- USB 5Gbps: USB 3.0 and 3.1 Gen 1
- USB 10Gbps: USB 3.1 Gen 2, 3.2 Gen 2×1, and 3.2 Gen 1×2
- USB 20Gbps: USB 3.2 Gen 2×2
- USB 40Gbps: USB4’s initial version as currently shipping
A future update to USB4, announced by the technical part of the USB-IF as “USB4 2.0,” will almost certainly be publicly labeled “USB 80Gbps.”
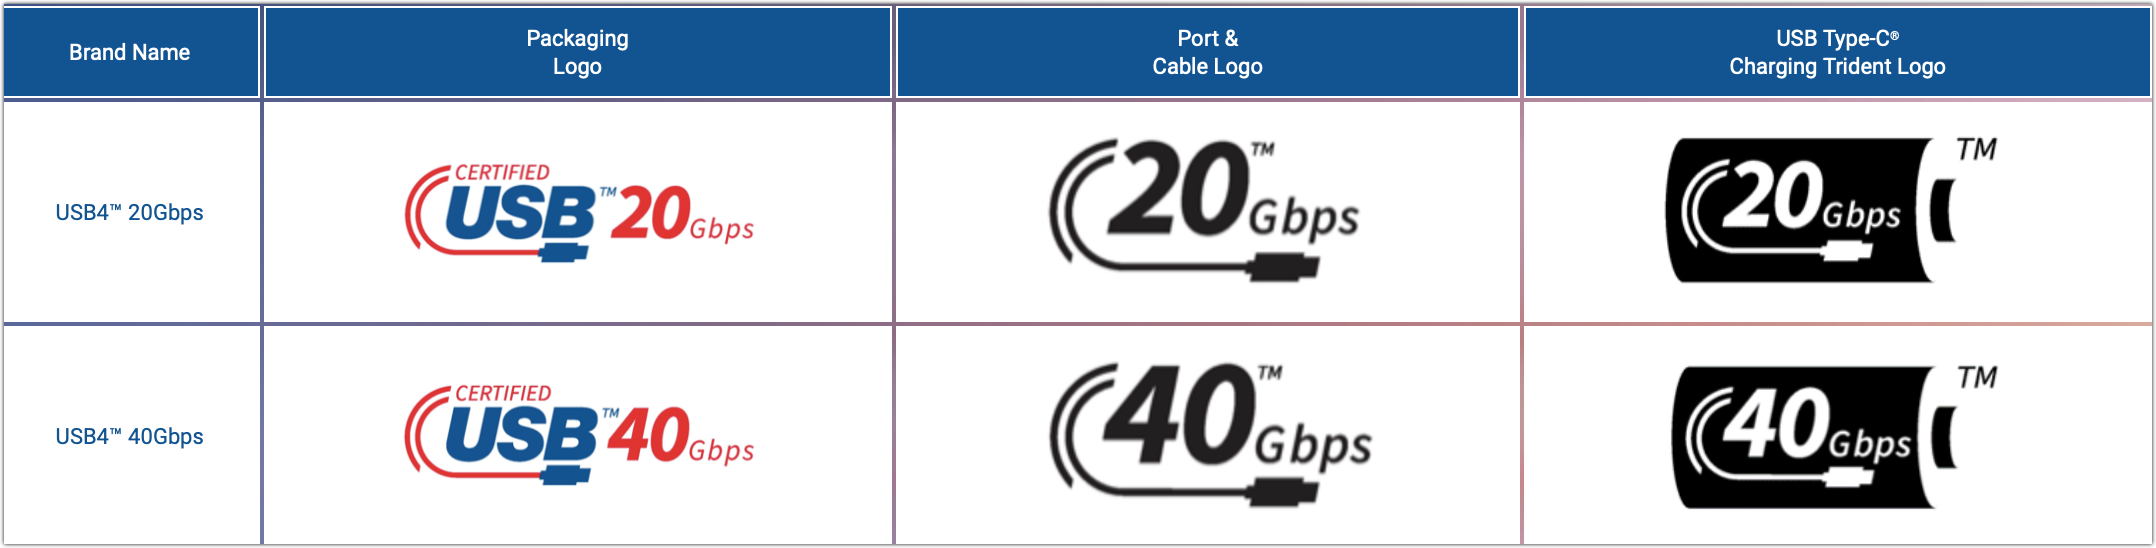
A similar set of logos will appear on cable plugs. For the two fastest current USB4 flavors, the USB-IF created a grid to show how they would appear on packaging (left column) and on ports, cables, and chargers (right two columns).
As USB data rates and standards’ names became more complicated, the options for charging wattage have been distilled down to just two: 60 watts and 240 watts, with future USB chargers using the logos below.

Not listed is the 100W charging rate that’s also the minimum wattage for a Thunderbolt 3- or 4-compatible cable. Apparently, a cable needs only a very minor upgrade to handle 240W, and it makes sense to support that new maximum performance for upcoming USB-C–connected gear. 100W cables will continue to be recognized and offer up to that wattage; less-expensive cables generally not intended for laptop charging can instead opt for 60W.
A spokesperson for the USB-IF, Joe Balich, wrote via email that the group had just recently pushed out these updates after years of changing and expanding branding and labeling. With these changes, USB-IF drops its now-obsolete SuperSpeed label.
Balich said, “We encourage our members and manufacturers overall to follow our updated Language Usage Guidelines when describing and marketing their Certified USB solutions to general consumers.” The membership group itself doesn’t enforce branding because it doesn’t have any big sticks it can wave: the group is run by a collection of nearly all the major computer, mobile, cable, charger, and peripheral manufacturers, and they don’t impose those sorts of rules on themselves. The value of simple, consistent marketing is supposed to be its own reward.
You can see the old labeling in action on the Mac Studio. Apple describes the desktop machine as having “four Thunderbolt 4 ports,” which it then defines as supporting “Thunderbolt 4 (up to 40Gb/s), DisplayPort, USB 4 (up to 40Gb/s), USB 3.1 Gen 2 (up to 10Gb/s),” plus “two USB-A ports (up to 5Gb/s).” (The reason for that very specific language? Those ports support USB 3.1 Gen 2, which offers a maximum of 10 Gbps, not 3.2 Gen 2×2, which would allow 20 Gbps. A slightly different controller would have been required for the 20 Gbps variant of USB 3.x.)
If Apple adopted the new USB guidelines, it could trim these definitions and say the Mac Studio had four USB-C ports that support Thunderbolt 4, USB 40Gbps, USB 10Gbps, and DisplayPort, plus two USB-A ports with USB 5Gbps. That seems simpler to me! Apple could leave the “40 Gbps” parenthetical on Thunderbolt 4 or footnote the rate. (The fact that Apple supports either 10 Gbps over USB 3.1 Gen 2 or 40 Gbps over USB4, which is backward-compatible to 20 Gbps rates over USB4, is a whole other bit of confusing circuitry in the Thunderbolt/USB controller chips.)
After writing an entire book about cable and standards complexity, Take Control of Untangling Connections, I can’t express how glad I am to see a straightforward story: a single number, simplified logos, and less frustration for users.
Active Cables Make a Return, Along with Improvements
There’s one remaining nit with USB standards surrounding passive and active cables, with changes that appeared with USB4 and another upcoming change in the recently announced USB 80Gbps. Compared to passive cables, active cables have additional circuitry that makes it possible to maintain the cable’s maximum possible throughput over longer distances. In the past, you could purchase either passive or (more expensive) active Thunderbolt 3 cables, but you would be hard-pressed to look at the two kinds side by side and know which was which—and thus which could perform better.
Thunderbolt 3 was the first version of that standard to introduce the distinction of active and passive cables; USB had avoided it by having a single cable definition for USB 1.0 through 3.2. In Thunderbolt 3, passive cables supported the full 40 Gbps over cables of no more than 0.5 meters (20 inches); longer passive Thunderbolt 3 cables dropped to a maximum of 20 Gbps. A more expensive active cable could maintain Thunderbolt 3’s full 40 Gbps over distances greater than 0.5 meters. (The passive/active difference could also cause significant confusion if you connected two USB 3.x devices with a Thunderbolt 3 cable. A passive Thunderbolt 3 cable supported USB 3.1 at up to 10 Gbps, but an active Thunderbolt 3 cable shunted USB to separate wires in the port and cable, limiting the data rate to USB 2.0’s measly 480 Mbps.)
All Thunderbolt 4 cables are required by spec to carry the maximum 40 Gbps data rate: shorter ones are passive and longer ones are active, but they aren’t labeled that way—there’s only a “Thunderbolt 4” cable type. They also all implicitly support USB4 because USB4’s 20 Gbps and 40 Gbps flavors are effectively a version of Thunderbolt 3. (USB-IF used Thunderbolt as the basis for most of USB4.) A Thunderbolt 4 cable can carry both Thunderbolt 3 and 4 at 40 Gbps and USB4 at 40 Gbps.
However, the existing flavors of USB4 can’t access the “active” benefits: you can get 40 Gbps only using cables up to 0.8 meters (31.5 inches) in length. That’s a small improvement over Thunderbolt 3’s 0.5 meters. (Some makers claim they have 1-meter active USB4 cables, but I haven’t tested any yet.) Beyond that length, what we should properly call a Thunderbolt 4/USB4 cable remains limited to the same 20 Gbps as Thunderbolt 3. If you knew that, pat yourself on the back—I had missed that distinction partly because there aren’t many USB4 40 Gbps devices on the market, and I own none.
When we start getting USB4 80 Gbps controllers—the hardware in computers and peripherals that handles communication—they come with a magic upgrade: your existing Thunderbolt 4/USB4 cables will suddenly carry 40 Gbps between two 80 Gbps controllers as long as they’re 2 meters (6.6 feet) or shorter. The new controllers are more efficient at carrying data over longer distances without having to tap into the active circuitry in long Thunderbolt 4 cables. You get a cable upgrade without changing your cable. This kind of free improvement to existing hardware is unusual.
If you want USB4’s full 80 Gbps over cable runs longer than 0.8 meters, you will have to purchase new active USB4 cables for that updated standard. These new cables will be compatible with Thunderbolt 4.
Cable Matters announced a 3-meter (9.8 feet) active USB4 cable in January 2022 that’s supposedly fully Thunderbolt 4-compatible, but as of now, the $69.99 cable is marked out of stock, and I can’t find any evidence it ever shipped. Possibly, the cable will be retooled or relabeled for USB4 at 80 Gbps.
At the moment, the gold standard for the greatest compatibility and least fuss remains the Thunderbolt 4/USB4 cable, which is technically active for Thunderbolt 4 and passive for USB4 (see “OWC Releases Affordable Thunderbolt 4 Cables,” 17 March 2022). You’ll get the highest throughput with that cable compared to any other in nearly every case. A standard Thunderbolt 4 cable will carry Thunderbolt 4 at 40 Gbps at any length, USB4 at 40 Gbps if up to 0.8m, and USB4 at 20 Gbps at longer runs. If you need 80 Gbps over USB4 in the future, you’ll have to budget for more expensive cables when it arrives.
Recovering Google Workspace: A Detective Story
For the uninitiated, Google Workspace is the paid version of Google’s suite of products, such as Gmail (with your own domain, not a gmail.com address), Google Calendar, and Google Docs. It was previously called G Suite, and before that, Google Apps. When it launched in 2006, Google Apps was free, and those who got in early got to keep it at no cost even after Google started charging new customers. This year, after backing down from a deeply unpopular plan of forcing everyone to pay, Google required that free Google Workspace users assert they don’t use the product for business purposes (see “Google Lets Legacy G Suite Users Keep Their Email for Free,” 18 May 2022).
Well, what would happen if you failed to make that assertion, or, worse, didn’t even realize it was required because you’re not the super administrator of your Google Workspace account and the person in that role is long gone? A new client of mine found out the hard way: Google converts the account to a paid version and then, after a grace period for adding payment information, suspends the whole account, preventing access to any of its mailboxes.
This is my tale of obsessively venturing down a deep rabbit hole to recover that account. It is also a cautionary tale about how if an account is important to you, you must be its maximum-level administrator, even if someone else sets things up for you. (For this reason, I also caution against resold “white label” services, rather than having an account directly at the source. What if your reseller disappears?)
Who’s the Super Admin?
My client—let’s call her Connie—had the email for her one-person business hosted at Google Workspace since the early, free days. (Human and domain names in this story have been changed to protect the innocent.) She woke up one day to discover that her email was no longer coming in on any device. Connie accessed her email using Gmail’s Web app, so Mail on her Mac did not have a history of existing email, either. When she tried to load Gmail, Connie was informed her account had been suspended and that she needed to contact her administrator. What administrator? It was my job to figure that out.
Google provides no simple way to contact an account’s administrator or even identify the administrator’s email address. There might be a certain amount of sense to this policy in an organization with a large IT department, but it was a liability in a situation such as this.
I asked Connie if someone else had set up the account for her. She thought so, but the only person she could bring to mind was a long-departed employee we’ll call John, with whom she was still in touch. Unfortunately, neither of them remembered John’s password for his Google account. Worse still, our attempts to reset his password were met only with a directive to contact the administrator… which was theoretically John himself. That made me suspect there was another administrator in play with a different account, but Connie couldn’t remember who that might have been.
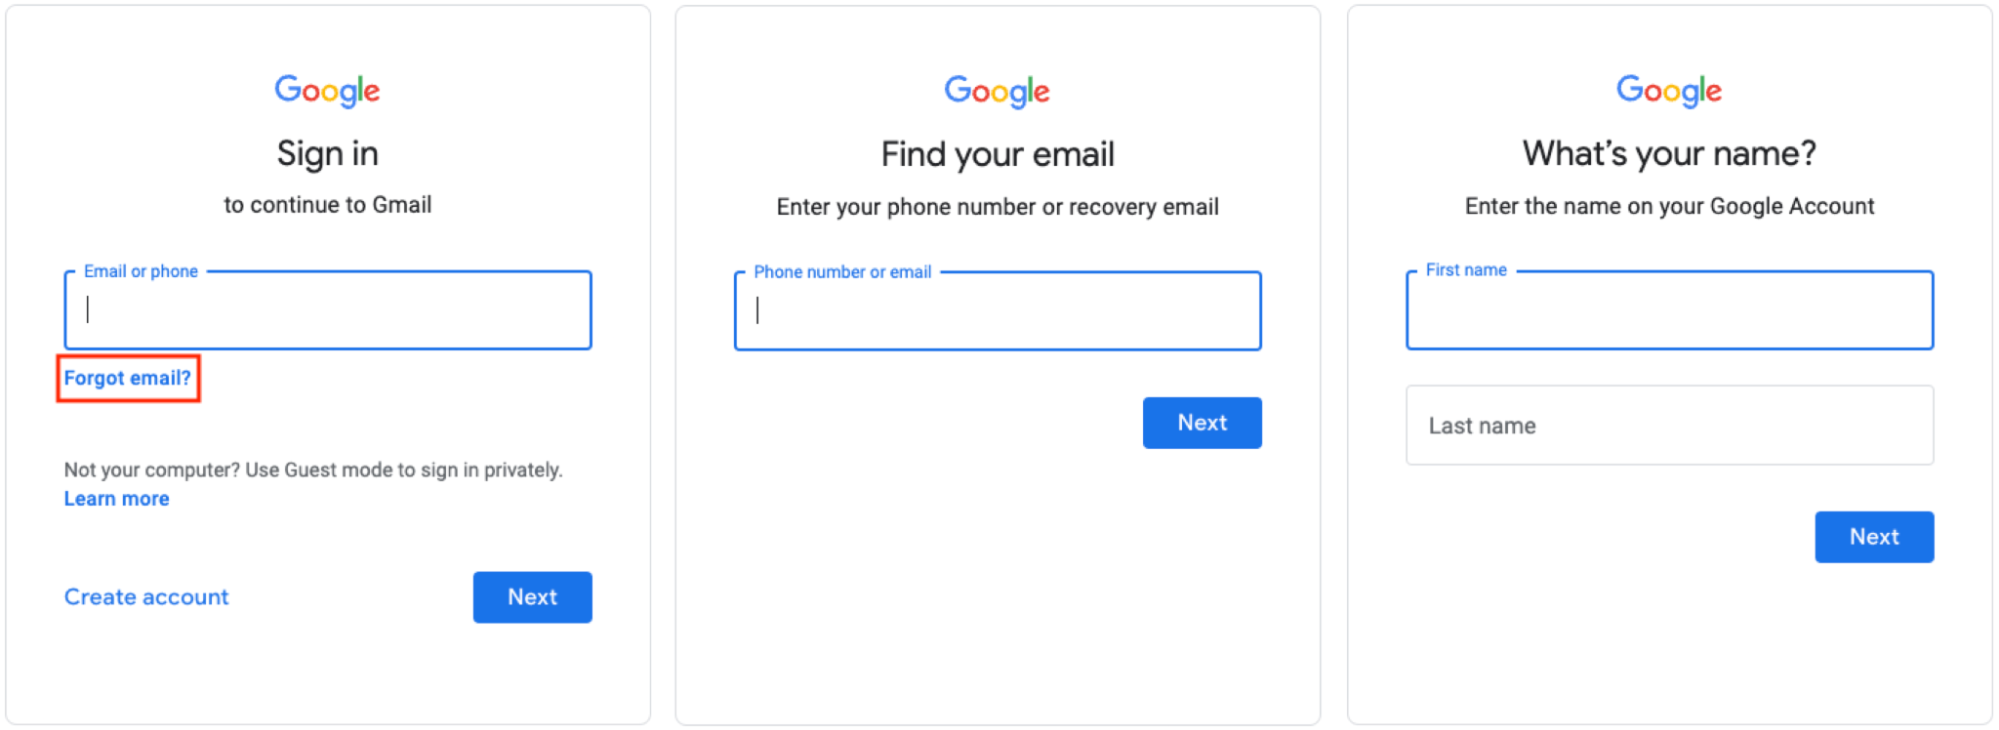
Next, I tried Google’s “Forgot email?” option, which allows you to find a Google account’s email address using a recovery email address or phone number, plus first and last name. That turned up personal (non-Workspace) Google accounts for both Connie and John, but no one else.
What next? Google’s Admin Toolbox has a somewhat obscure form that lets you request a user be promoted to Super Administrator (or contact the administrator, but that wouldn’t help us). To submit this form, you must be able to edit the DNS zone records for the domain to prove that you own it. So I did that, but, alas, to no benefit.
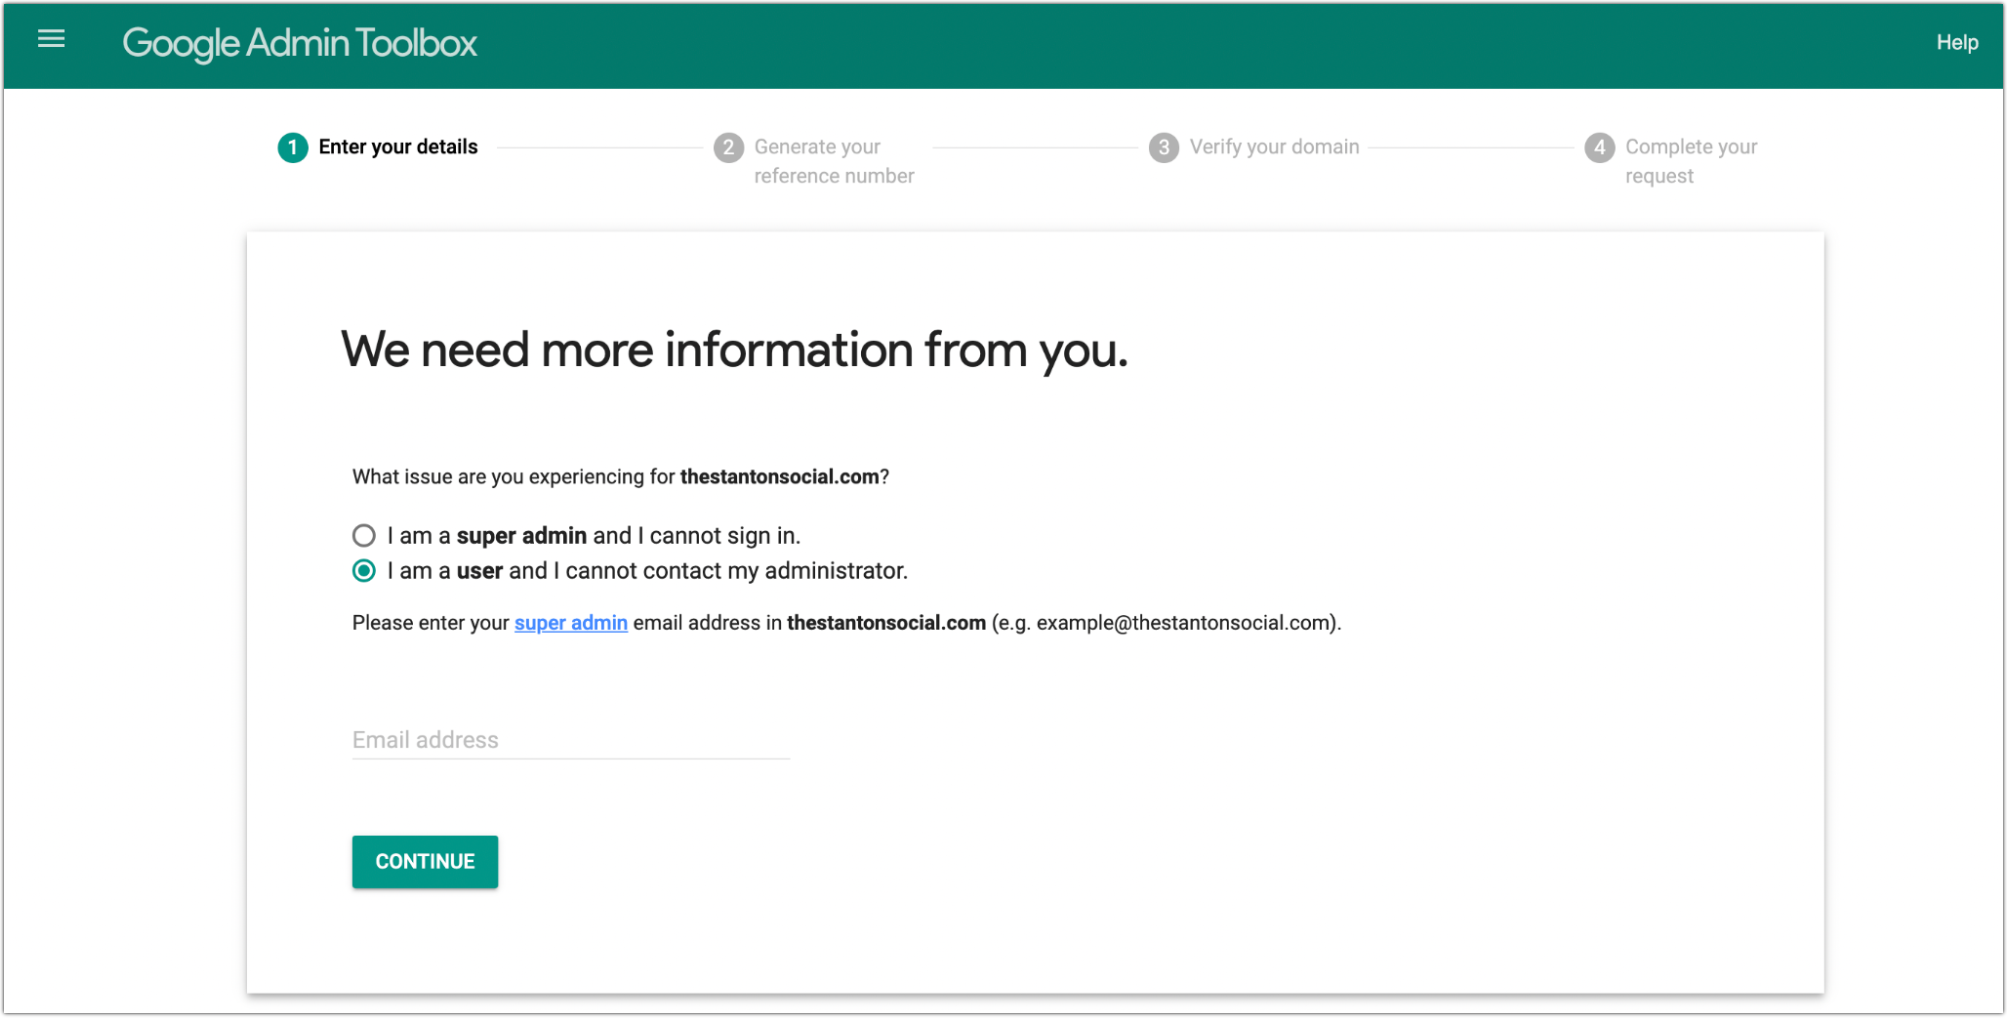
The form results said that Google would contact the existing Super Admin, and if not disputed, Connie’s promotion to Super Admin would happen automatically after 72 hours. Except it didn’t. Ominously, the form also said that the request would be manually reviewed, and any further information needed would be requested by email… which is hard to respond to when your email account has been suspended. It’s a chicken-and-egg scenario. Google clearly hadn’t considered this situation.
Worried that the suspended account would soon be deleted, and with my client already having been without her email for five days, I had to speak with someone at Google; the only way to do that is to have an active, paid Google Workspace account. So I used my account, and fortunately, the support agent helped me despite my issue being about a different account. He directed me to a different form that lets you specify a non-domain email address for contact. That form provided instructions for more DNS zone editing, which I performed, with no great optimism but apparently no other options. My doubt turned out to be well-founded when I received an auto-reply saying that Google support’s caseload was overwhelmed, they were closing the case, and I needed to use the Admin Toolbox form. Which I’d already tried. Another hour burned.
But I’m a tenacious guy. And this is when it gets interesting.
Poking around, I was surprised to discover that a suspended Google Workspace account still lets you access a user’s Google Contacts. Within there, I could see the company directory—which revealed the name and Google Workspace email address of that third email account I thought likely to both exist and be the Super Admin. Let’s call that person Rachel Kole. This was a partial victory all by itself!
I’m the Super Admin!
It was the middle of the night, and I probably could have just waited until the morning to ask Connie whether she had any contact info for Rachel, and perhaps I could have found Rachel on the Web, but I was hot on the trail. Also, I really didn’t want to go to all this effort only to discover that Google had deleted the suspended account while I waited for more information.
I attempted password recovery for Rachel’s account, and this time I was given some different options, suggesting that she was indeed the Super Admin. Specifically, I had to identify her recovery email address, with this as the clue: ••@daw•••••••••.com.
I searched for Rachel by her full name and turned up, on a LinkedIn page, a business whose name might fit the email pattern: Dawson & Kole. Then I searched for Dawson & Kole and found a few references to dawson-kole.com. Bingo. (Though the minimal search results made it hard to tell what the company did.)
The dawson-kole.com domain had no website, so I next turned to the ever-remarkable and invaluable Wayback Machine, which revealed that a website for dawson-kole.com had existed between 2008 and 2016, though its contents couldn’t be displayed at all, regardless of the snapshot date.
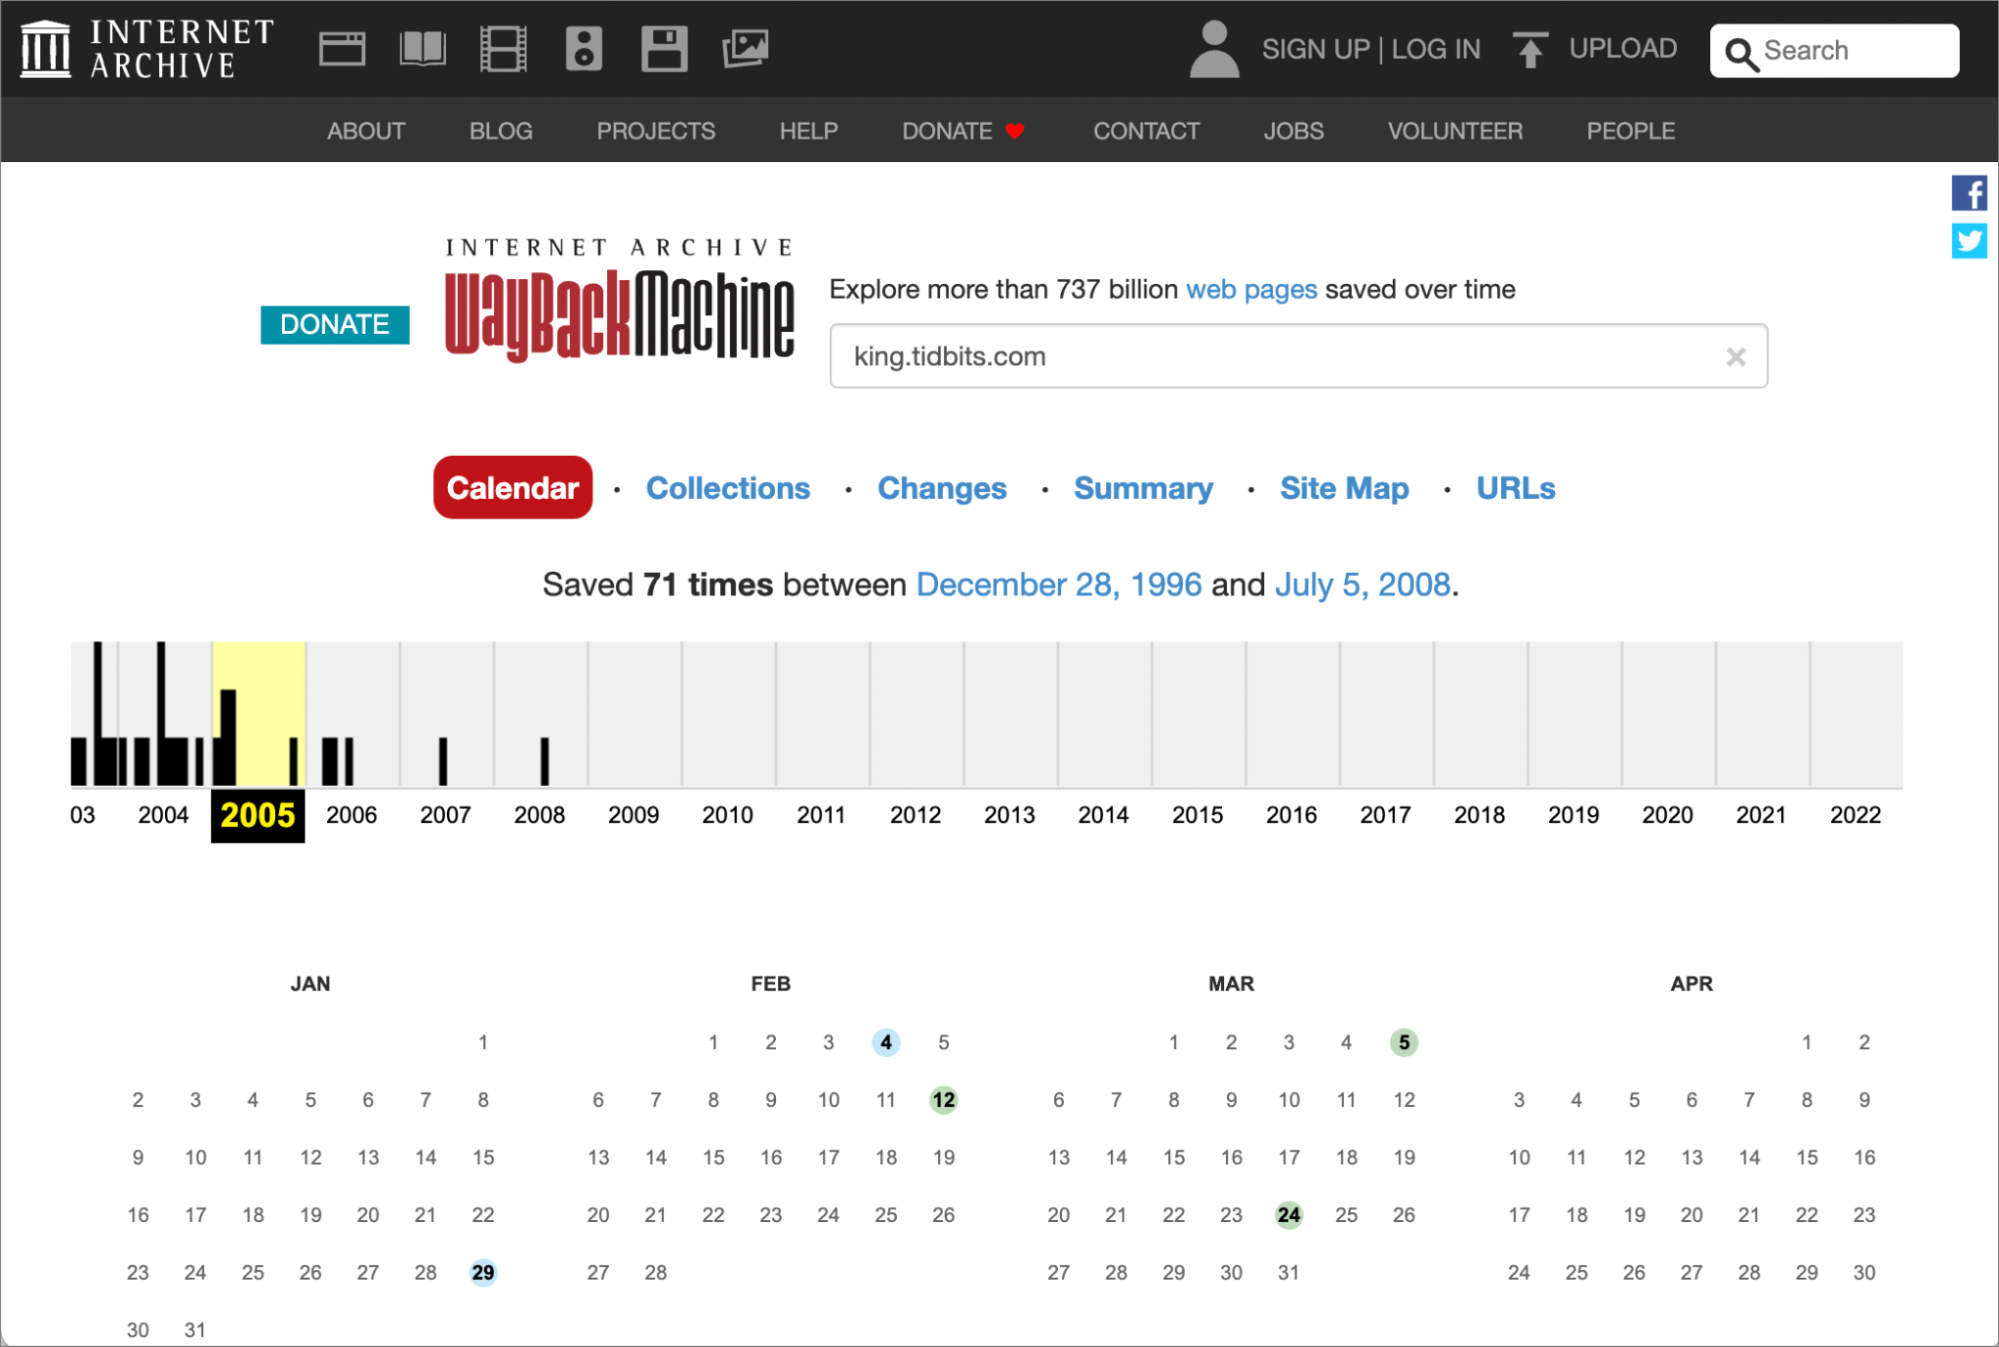
There was also a more significant hurdle: if dawson-kole.com was indeed the correct domain, and I could correctly guess the full recovery email address, how would I get the two-factor code Google would email to that address? On a hunch, I checked to see whether dawson-kole.com was still registered… and it wasn’t! And fortunately, it had not been re-registered by a domain squatter. So I registered it in my own GoDaddy account. Now I owned dawson-kole.com. Oh yeah.
GoDaddy no longer provides free email with domain registration, so I figured I’d create a new trial Google Workspace account for dawson-kole.com. But Google wouldn’t let me do that, apparently because that domain was never removed from Google’s world, despite there no longer being a registered domain behind it. This seemed like an excellent opportunity to try out the relatively new Custom Email Domain feature of iCloud+ (“How to Set Up Custom Email Domains with iCloud Mail,” 27 August 2021).
I was pleased to discover that process was a breeze—I signed into iCloud.com, punched in the domain, signed into GoDaddy when prompted, and iCloud took care of the necessary zone record setup. I elected not to create an email address, since I didn’t yet know what it should be, and what I ended up with was a catch-all, with any mail sent to any address at dawson-kole.com arriving in my iCloud Mail. Huzzah!
After sending some test emails to confirm that I could indeed receive dawson-kole.com mail, I went back to Google Workspace and tried to guess the recovery email address: [email protected], [email protected], [email protected]. After the third try shook me off, I was blocked from trying again for a few hours. Much like anyone who has tried to remember an iPhone passcode, I decided to research my next guess carefully.
I tried further Internet searching but couldn’t find Rachel’s email address (for dawson-kole.com, anyway). So, I took another crack at the Wayback Machine. But all of its snapshots returned the same thing—a single frame with a broken image.
Jumping Back Flash
I had an idea of what was happening: the late 2000s were still the era of Adobe Flash-based websites, and some sites would not render at all if you didn’t have Flash Player installed. In 2022, Flash is blocked by every major browser and Adobe itself. I looked at the source code of the Wayback Machine page snapshot and found the telltale reference to a file ending in .SWF. (It was a bad flashback.)

I happened to have an unused 2012 MacBook Pro around, so I started it up into macOS Recovery with Command-Shift-Option-R, which enables installation of whichever version of macOS originally came with that model. Soon I was running macOS 10.8.5 Mountain Lion. Unfortunately, versions of Safari that old are largely incompatible with modern websites due to certificate expiration and lack of current HTML/CSS support. So I tried to download Waterfox Classic, a fork of Firefox that runs on old versions of macOS, but Safari wouldn’t let me, so I first downloaded Firefox 48, which is nearly as useless as Mountain Lion’s Safari in its Web compatibility but does better with HTTPS issues. Then I used that 2016 version of Firefox to get Waterfox Classic, into which I intended to install Flash Player.
(It turns out none of these elderly Mac heroics were necessary. I later figured out that Firefox 84 still supports Flash Player on Intel-based Macs running macOS 12.6 Monterey. Another option would have been to download the SWF file and open it in Elmedia Player, set to run in Rosetta mode if on a Mac with Apple silicon.)
Adobe no longer distributes any version of Flash Player, and the final versions of it intentionally ceased to operate after 12 January 2021. So I found, via the Internet Archive, the last version of Flash Player (32.0.0.371) that does not self-destruct after that date. Obviously, getting software from an unknown source carries risks, but this was an empty computer.
I forged ahead. I installed Flash Player, headed back to the Internet Archive, et voilà, I was looking at the website of dawson-kole.com, circa 2016. Boom! Holding my breath, I clicked the About link, and there it was, in all its glory: [email protected]. Jackpot!
Recovering Rachel
Back to Google Workspace I went, and by this time, I’d been let out of try-again jail. I typed in Rachel’s correct recovery email address. A few seconds later, it was in my iCloud mailbox: six glorious digits delivered to [email protected]. I fed them back to Google, hoping the password reset process would not make me jump through additional hoops, like demanding the account creation date or other obscurata, which I’ve seen its security algorithm require. But, happily, I was simply prompted for a shiny new password, which I was more than happy to provide.
Once I had changed Rachel’s password and logged in as her, I was immediately required to provide payment information, which I did. I then promoted Connie to Super Admin, designated her as the primary administrator, and ensured that she could access all recovery information for all her accounts.
There was one final check to make, the most important one. I clicked over to Connie’s Gmail, and there it was! All her email back from the dead, or at least purgatory.
Then I deleted dawson-kole.com from my GoDaddy account, asked for a refund, and went to bed.
Epilogue
Connie was overjoyed to have her email returned to her. It’s not every day that, as a consultant, I get to be a detective hero, but when it happens, it reminds me why I do what I do. Connie did tell me she remembered Rachel Kole, and it would have made perfect sense that Rachel would have set up Connie’s email long ago, but it had been 15 years since their last contact!
And, just to say it again, let me preach: always be your own administrator. And if you’re a professional or friend setting something up for someone, give that person agency to solve problems without being dependent on you. No one wants to end up where Connie was—a few of the key steps in my recovery process depended on good luck, such as being able to claim the domain and seeing a historical version of a defunct website, so there’s no guarantee such an approach could ever be duplicated.
Ivan Drucker is the founder and CEO of IvanExpert Mac Support in New York City and Santa Barbara. He is a former software quality engineer for Apple and began using his first Apple II in 1978, at the age of eight.