#1424: Apple OS updates, Compare edits in Photos, Velop Wi-Fi mesh, Google PhotoScan, Resetting lost admin passwords
Apple pushed out updates to macOS 10.13.6, iOS 11.4.1, tvOS 11.4.1, and watchOS 4.3.2 today, bringing AirPlay 2 to the Mac and fixing bugs and security vulnerabilities. Also this week, Adam Engst shares a tip on how to compare edited photos in Photos to their originals, Josh Centers looks into the Google PhotoScan app and documents how to reset your admin password in macOS 10.13 High Sierra, and Julio Ojeda-Zapata reviews the Velop Wi-Fi mesh networking system from Linksys. Notable Mac app releases this week include Fission 2.4.2 and BusyContacts 1.2.14.
Apple Releases macOS 10.13.6, iOS 11.4.1, tvOS 11.4.1, and watchOS 4.3.2
Apple has released macOS 10.13.6, iOS 11.4.1, tvOS 11.4.1, and watchOS 4.3.2. Apart from the addition of AirPlay 2 support in macOS 10.13.6 High Sierra, all the releases focus on minor bug fixes and blocking security vulnerabilities.
macOS 10.13.6
A few hours after releasing the other updates, Apple pulled the curtains back on macOS 10.13.6, which finally brings full AirPlay 2 support to the Mac in conjunction with iTunes 12.8, joining iOS and tvOS (see “iOS 11.4, tvOS 11.4, HomePod 11.4, and watchOS 4.3.1 Finally Debut AirPlay 2 and Messages in iCloud,” 29 May 2018). We don’t have details yet (the update isn’t even showing for all of us), but Apple says that you’ll be able to use your Mac to control your AirPlay 2 speakers and play the same music on multiple AirPlay 2 speakers simultaneously.
macOS 10.13.6 also fixes a problem Photos had in recognizing AVCHD media from some cameras and a bug that could prevent Mail users from moving a message from Gmail to another account.

As always, the update includes a variety of security fixes throughout the operating system, addressing 11 separate vulnerabilities.
iOS 11.4.1
The iOS 11.4.1 update fixes an issue that prevented some users from viewing their AirPods’ location in Find My iPhone and improves the reliability of syncing mail, contacts, and notes with Exchange accounts. It weighs in at 190.6 MB on the 10.5-inch iPad Pro and 225.2 MB on the iPhone X, and you can obtain it in Settings > General > Software Update or install it through iTunes.
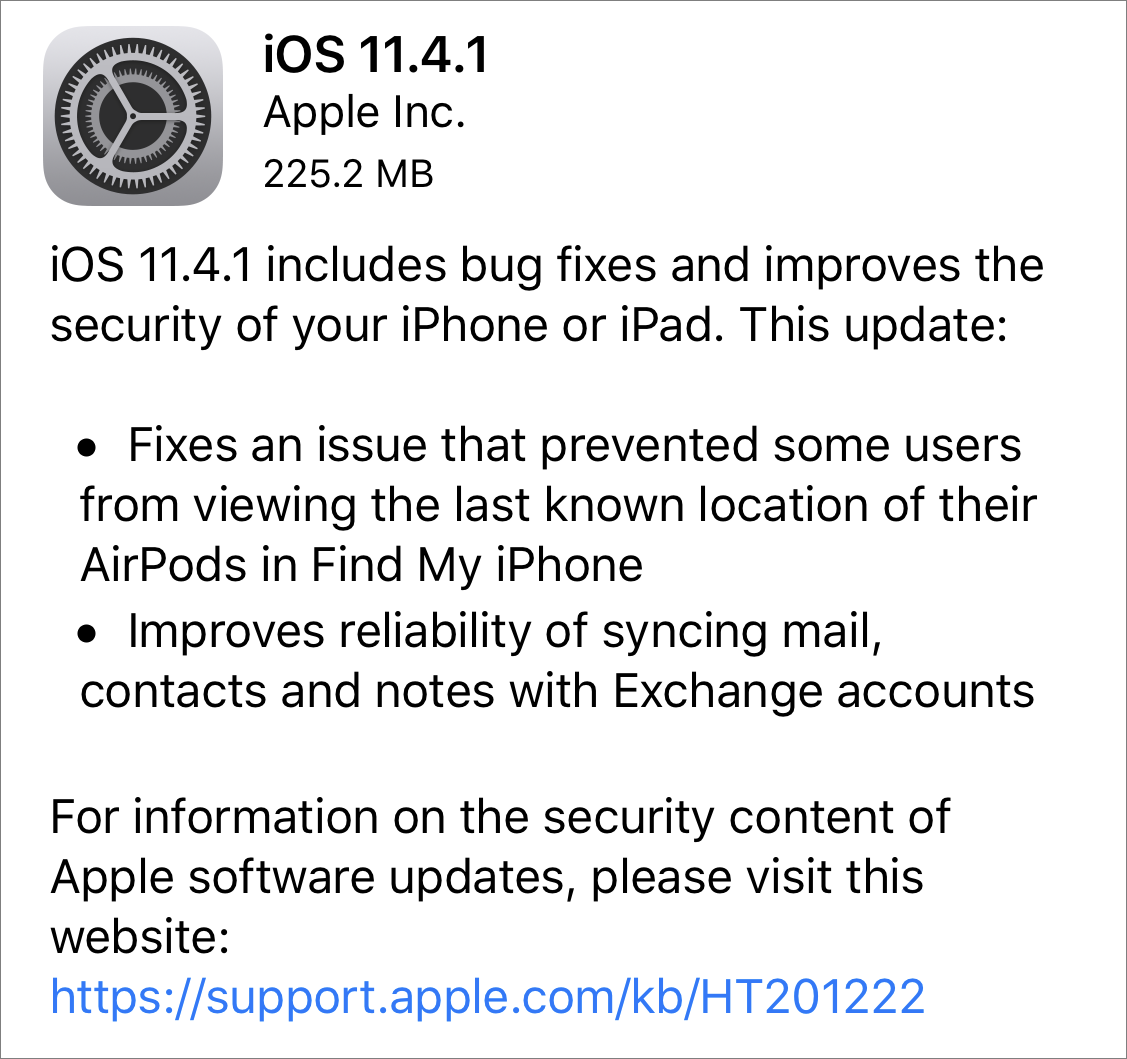
iOS 11.4.1 also apparently includes the new USB Restricted Mode, which makes iOS devices harder to crack. Apple has been hinting at this functionality in betas for a while, most recently in the betas of iOS 11.4 (see “iOS 11.4 to Make iPhones Harder to Crack,” 10 May 2018), though it did not arrive with iOS 11.4.
The iOS 11.4.1 update features 15 security fixes.
tvOS 11.4.1
The tvOS 11.4.1 update merely offers “general performance and stability improvements.” If automatic updates aren’t on, you can update your fourth-generation Apple TV or Apple TV 4K by going to Settings > System > Software Updates.
tvOS 11.4.1 includes 11 security fixes.
watchOS 4.3.2
Similarly, watchOS 4.3.2 just “includes improvements and bug fixes.” You can install the 54 MB watchOS 4.3.2 update using the Watch app on your iPhone (in Watch > General > Software Update).
As always, we recommend waiting a few days to install these updates unless you want to get started with AirPlay 2 on your mac, expect to need Find My iPhone to locate your AirPods, or are having trouble with Exchange syncing on your iPhone or iPad.
watchOS 4.3.2 includes 11 security fixes.
TipBITS: Compare Before/After Edits in Photos
For many of us, one of the difficulties in editing photos is determining whether a minor change is better or worse. Does clicking the Enhance button in Photos improve the photo in a real way? Is applying one of the built-in filters helpful, or just a gimmick? When you bump up the saturation, are the colors too garish?
These questions are difficult to answer in isolation because it’s hard to remember precisely what the image looked like before you applied the adjustment. In iPhoto 2, way back when, Apple introduced a hidden feature that would simulate the Revert to Original command temporarily, undoing all your edit changes while you held down the Control key. In iPhoto ‘08, Apple changed that keyboard shortcut to Shift, for no apparent reason.
When Apple replaced iPhoto with Photos, that feature seemingly disappeared, and I have long missed it, to the point where I often instinctively press Shift when I’m editing a photo, to no effect. So I was quite embarrassed to discover only recently that the feature has been in Photos all along, but assigned to yet another keyboard shortcut: the M key, which, I’m informed by a reader, was the shortcut in Aperture. And, showing just how icon-blind I am, another reader pointed out that there’s a Show Original ![]() button in the upper-left corner, next to the window controls. Happily, Apple brought the feature to the iOS version of Photos too, albeit with a different interface.
button in the upper-left corner, next to the window controls. Happily, Apple brought the feature to the iOS version of Photos too, albeit with a different interface.
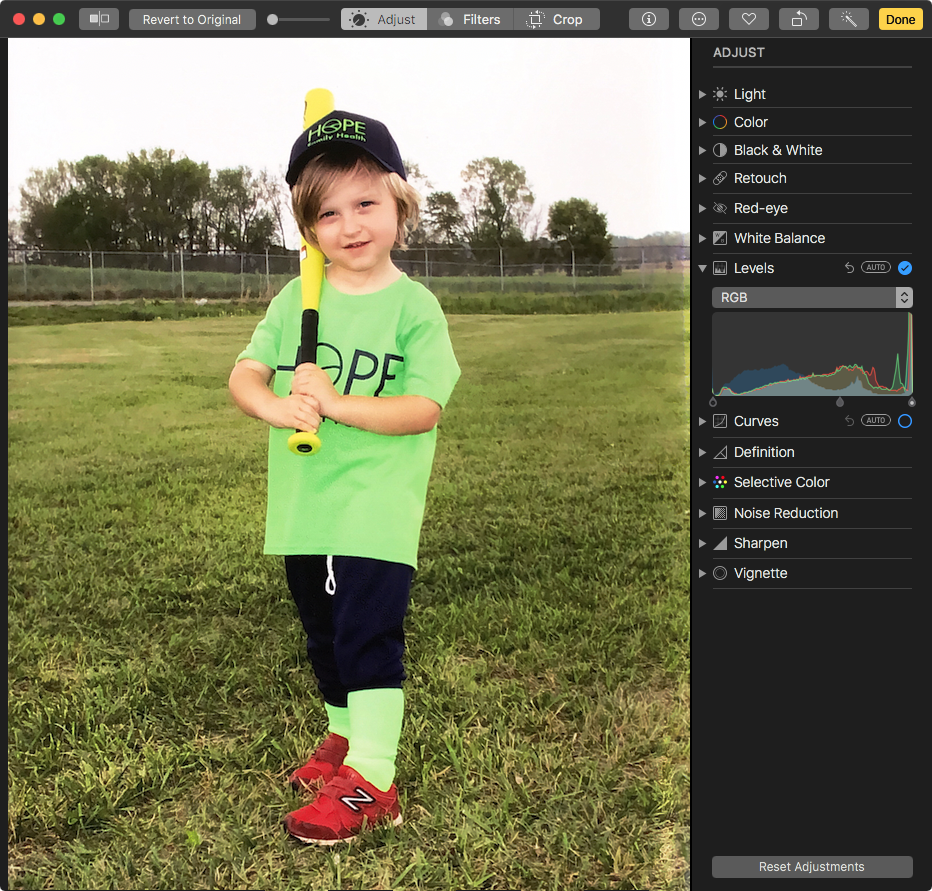
Regardless, the before/after comparison in Photos on the Mac works much the same way as it did in iPhoto. Double-click a photo in Photos and then click the Edit button in the upper-right corner (or press Return) to edit it. Make a change by clicking the Enhance button, tweaking sliders in the Adjust panels, or applying a filter. Then, while you’re still in edit mode, press the M key to see the original image. It sticks around only while the key is down; let go to see the edited image again. You can repeat the action as often as you want and even if you stop editing a photo and return to it later, but remember, it works only in edit mode.

The M key doesn’t let you compare the before and after results of any cropping you’ve done, unlike iPhoto. That’s too bad because sometimes all the editing a photo needs is some judicious cropping to remove extraneous detail on the edges and focus on the subject. However, there’s another even more hidden keyboard shortcut that toggles between the original image and the cropped image: Control-M. It’s odd enough that it’s a separate shortcut, but even stranger is the fact that it works only when you’re in either Adjust or Filter views, not in the Crop view. Control-clicking the Show Original button has no effect.

These shortcuts are for quick checks of what the original image looked like, so they aren’t helpful for seeing if one particular adjustment is better or worse while leaving all the others active. For that, click the blue checkmark next to each set of adjustment controls that you’ve used to turn just that adjustment off. Or, use Undo (Command-Z) and Redo (Command-Shift-Z), both of which offer multiple levels so you can step back and forth through your changes. Finally, Image > Revert to Original (or click its button) remains the ultimate undo, and yes, you can even use Undo on Revert to Original if you decide you don’t want to lose all your edits.
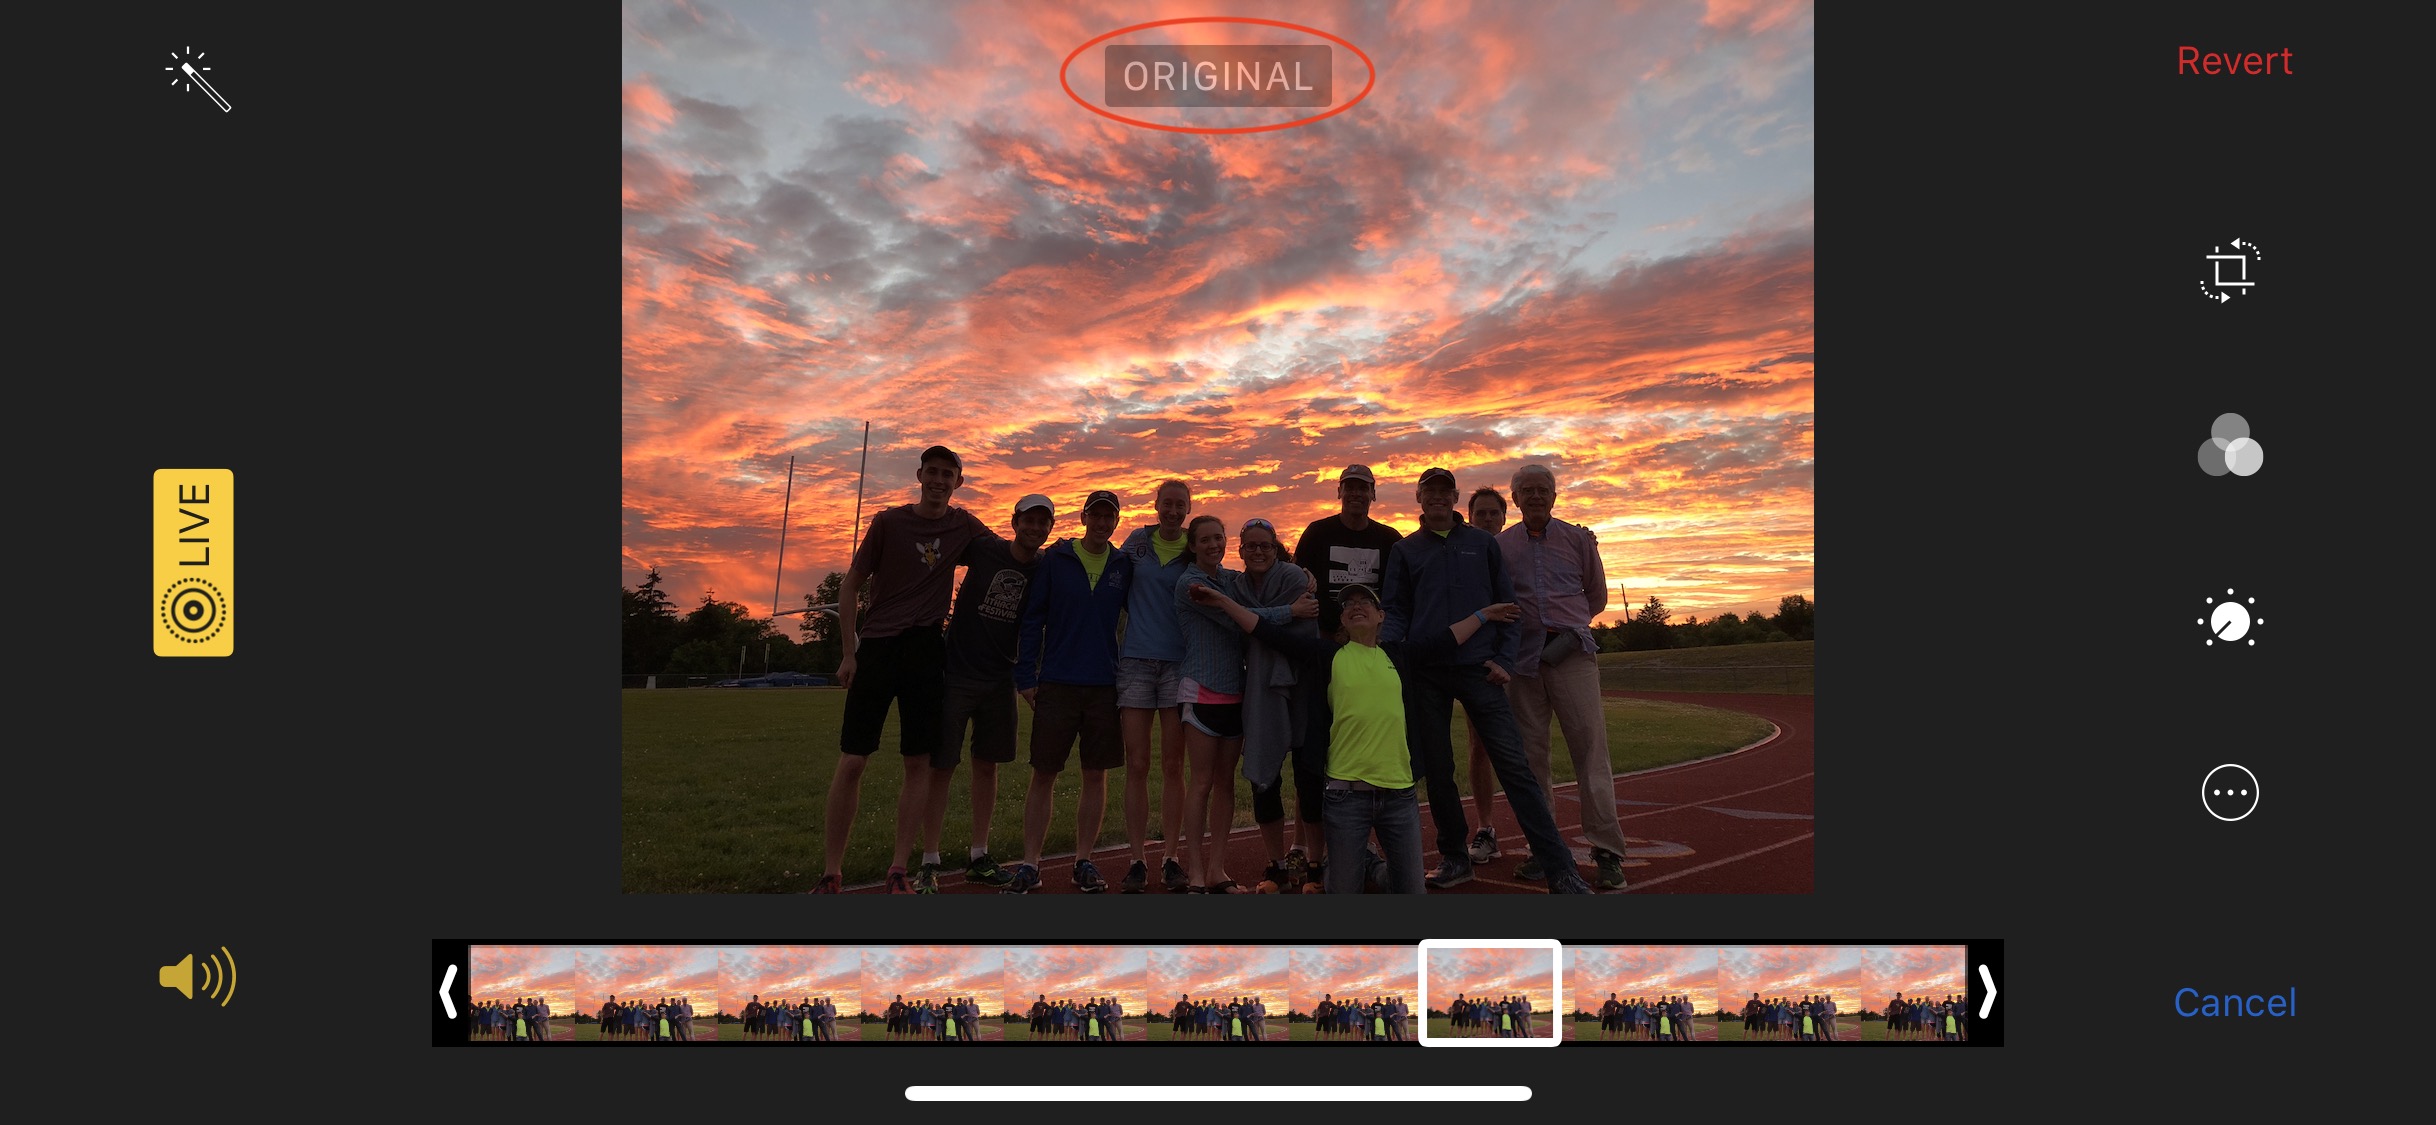
What about the iOS version of Photos? Start editing an image and then tap the image once, which causes it to show the original for about 2 seconds. During that time, Photos displays an ORIGINAL badge on the top of the image. If you’ve cropped the image as well, the badge reads CROPPED ORIGINAL and shows you just the cropped portion of the image, not the uncropped original as Control-M does on the Mac.
Google PhotoScan Is a Handy Pocket Photo Scanner
It may seem as though all photos are digital these days, but, amazingly, I still come across the occasional physical photo. School photos, my son’s sports photos, and tourist-trap attraction photos still come into our lives on paper, even if they started out digital. Needless to say, that’s annoying because they’re segregated from the bulk of my photo collection and are difficult to share with family and friends. The obvious solution is to scan them, but like many people, I don’t deal with enough physical photos to invest in a quality scanner.
Here’s an alternative. Google’s free PhotoScan app for the iPhone is a quick and easy way to digitize photos while automatically removing glare. PhotoScan doesn’t require you to log in to a Google account, reducing the privacy concerns often associated with Google services. And unlike a dedicated photo scanner, it’s always in your pocket, so you can scan a photo no matter where you are.
There are lots of scanning apps for the iPhone, such as the excellent Scanbot, but most are tailored toward documents rather than photos. The main alternatives to PhotoScan that I’m aware of are Photomyne’s PhotoScanner and PhotoScanner Plus, but both push you toward a subscription, which seems like overkill for this purpose.
Using PhotoScan
An introductory video explains how to use PhotoScan. Lay your photo on a flat surface in a well-lit room. Open PhotoScan, position the photo in the viewfinder, and tap the shutter button.
Here’s where the process becomes unusual. Four white dots appear around the photo—they won’t necessarily appear on the photo itself, so don’t worry if the placement seems weird. (It is.) You then move your iPhone so that the hollow circle in the center of the viewfinder aligns with each dot—when they’re aligned, the circle and the dot turn blue. Be sure to keep the iPhone level as you move from dot to dot because PhotoScan captures an image at each corner. Turn all four dots blue, and PhotoScan saves the combined image as a JPEG, in the PhotoScan album in Photos. (If you use Google Photos, you can find photos captured by PhotoScan by searching for “photoscan.”)
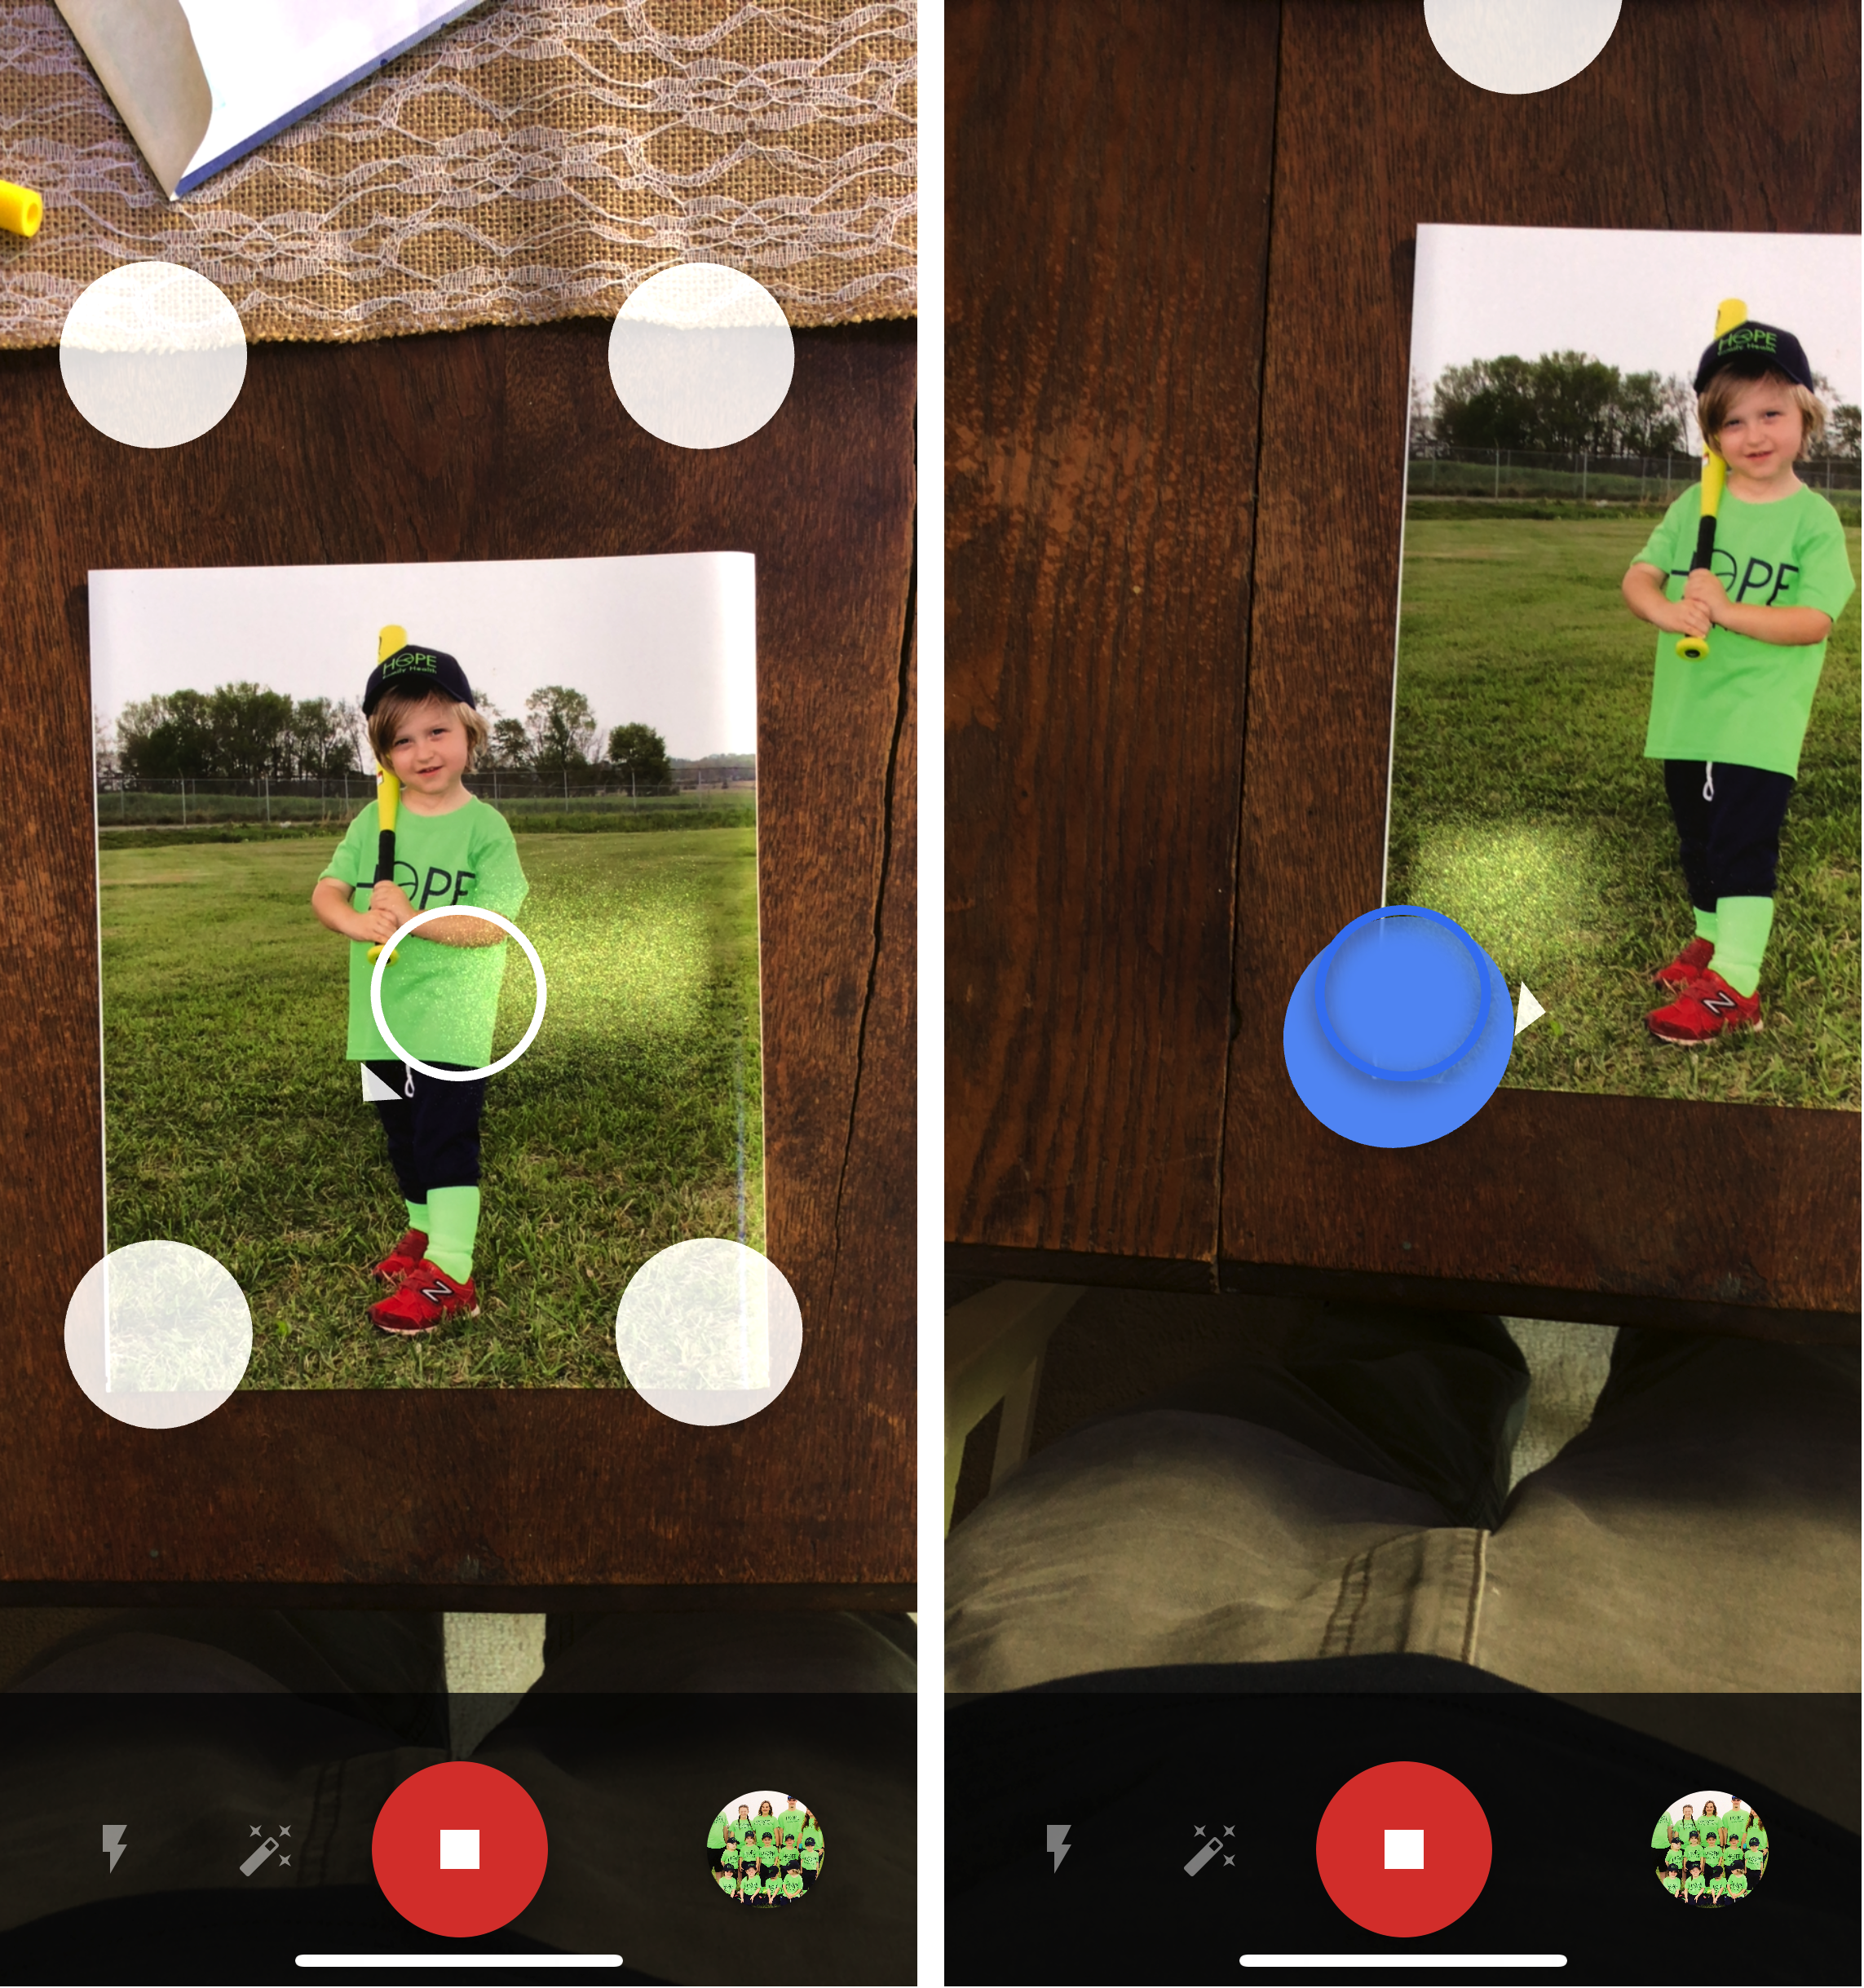
Once captured, you can adjust the scans slightly in PhotoScan. Tap the photo thumbnail to edit the image—if you’d like to edit a previously captured photo, tap the back button to see all the photos you’ve scanned with PhotoScan. From the edit screen, you can adjust the corners, rotate the image, or delete it.
The edit you’ll probably have to make the most often is adjusting the corners. While PhotoScan is pretty good about distinguishing the corners of your photo from the background, it sometimes needs a little help. Grab one of the white dots and begin dragging it. A circle appears above, with a magnified view of the corner and a crosshair, making it easy to get the corner exactly right.

How do the scanned photos look? As promised, PhotoScan eliminates glare, but captured photos are often a bit washed out. You can correct that in various ways, but the easiest way I’ve found is in Photos on the Mac:
- Double-click the photo in Photos.
- Click Edit in the upper-right corner.
- Under Levels, look at the dots below the histogram. Drag the dots to the right until the picture looks the way you want. I’ve found that the leftmost and middle dots usually provide the best results.

- When you’re finished, click Done in the upper-right corner.
(To learn how you can compare your edits to the original image easily, see “TipBITS: Compare Before/After Edits in Photos,” 5 July 2018.)
The Right Tool for the Job
If you have oodles of physical photos in albums or shoeboxes (why is it always shoeboxes?), Google PhotoScan won’t solve your digitization problems. It’s just not designed for scanning hundreds or thousands of photos. For that task, you’d likely want a dedicated photo scanner like the Epson FastFoto, but such devices are a significant investment and still require lots of your time.
A better approach might be to send your photos to a scanning service, such as Memories Renewed or DigMyPic, both of which were well-liked by Wirecutter. They can be expensive ($0.39 to $0.60 per photo), and it can be stressful to entrust irreplaceable photos to a service. Also, be careful about which service you pick, because some don’t return your originals.
But for quick, one-off scans, PhotoScan is a reliable and useful tool that’s always available. To paraphrase the old adage, “the best scanner is the one you have with you.” It works well for the handful of physical photos that creep into my life, and I’ve found it especially handy when an elderly relative shows me an old photo I’d both like to have in my collection and share with other family members.
Three Ways to Reset a Lost Admin Password in High Sierra
More than four years ago, Alicia Katz Pollock wrote “Five Ways to Reset a Lost Administrator Password” (17 January 2014), and through the vagaries of Google’s search algorithm, it remains our most popular article to this day. Apparently, lots of people forget their macOS passwords or need to help friends or clients who have lost their passwords.
Unfortunately, that article is long past its shelf life, so here’s a current guide to resetting an admin password in macOS 10.13 High Sierra. As before, you can accomplish this task in a variety of ways, depending on how the Mac in question was set up and what information you know.
Reset the Password from Another Admin Account
The best-case scenario is that there is another admin account on the Mac for which the password is available. If that’s true, you can log into that account and change the password for the locked account:
- Open System Preferences > Users & Groups.
- Select the locked account in the list at the left. (If necessary, click the lock at the bottom of the window and provide your admin credentials.)
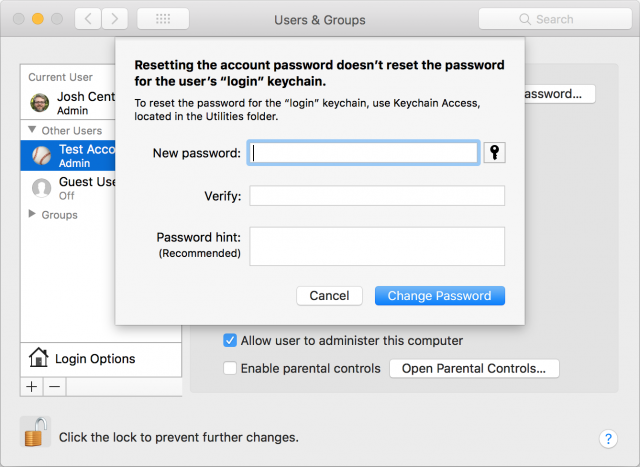
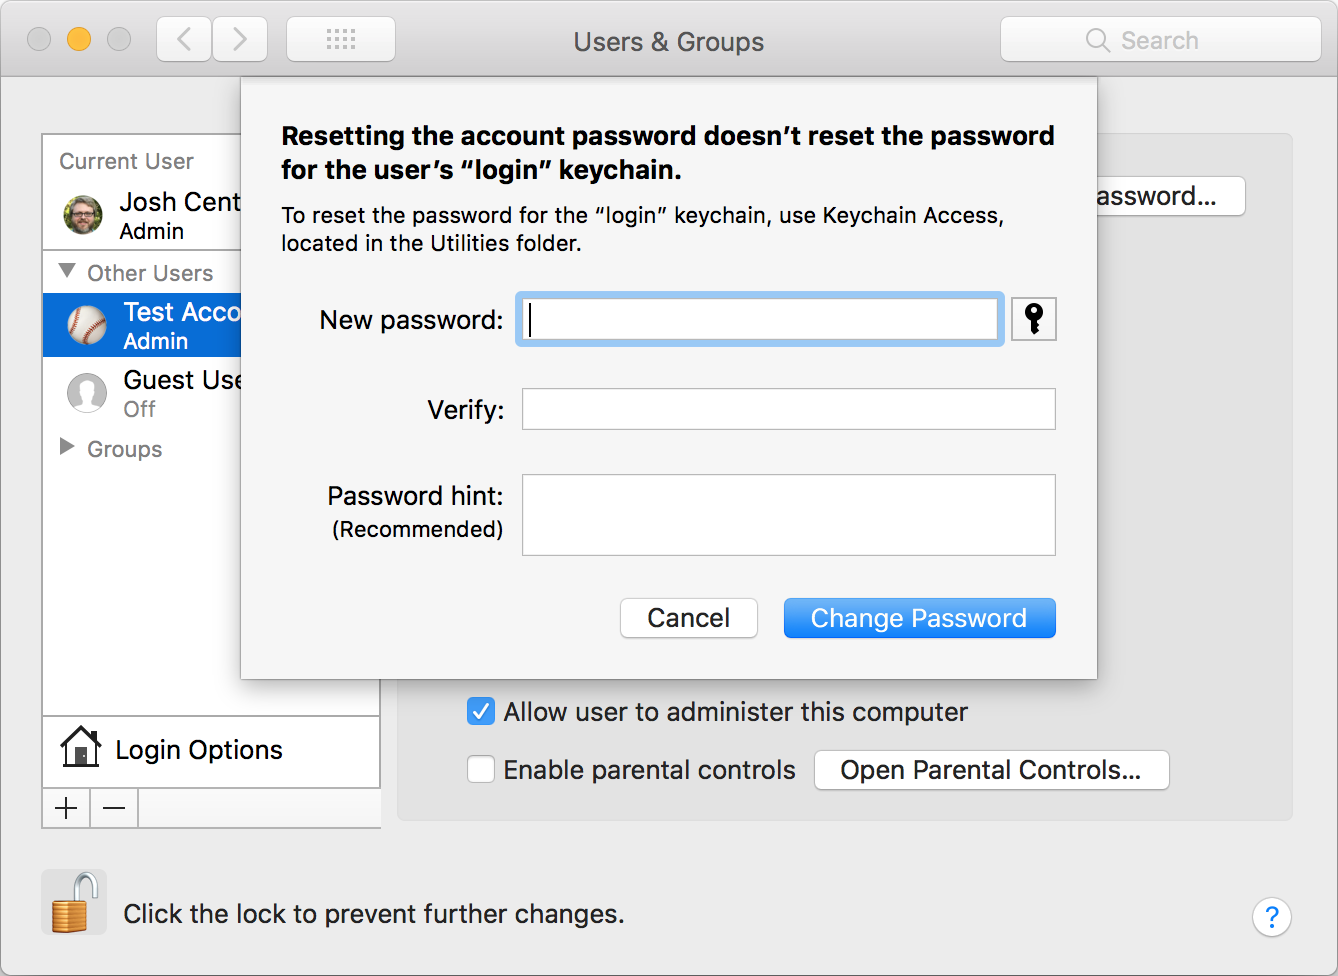
- Click Reset Password.
- Enter the new password, verify it, and (optionally) include a password hint.
- Click Change Password.
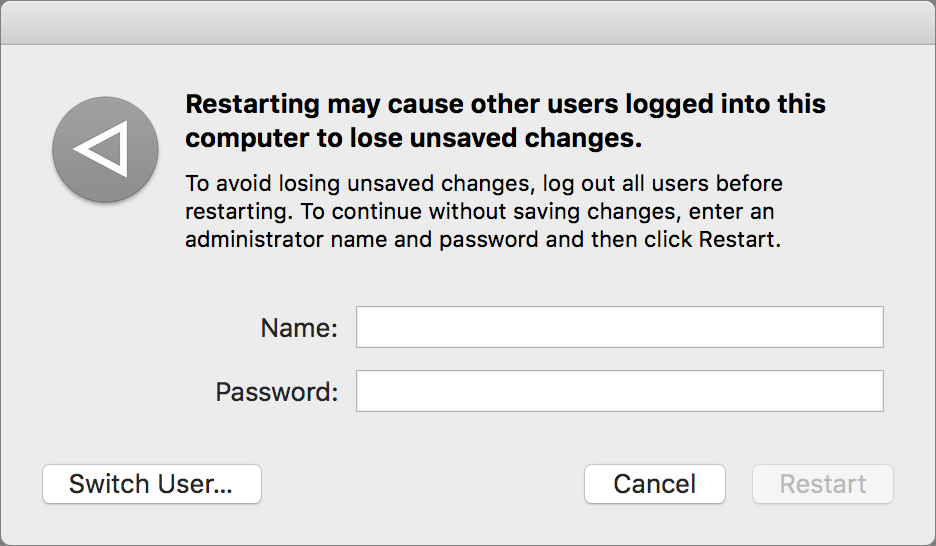
The only problem with this method is if the locked-out account is logged in, you can’t modify it. The easy solution is to restart the Mac, log in with the admin account whose password you do know, and carry on from there. To forcibly log out the other user while rebooting, you have to enter an admin username and password.
If you don’t currently have an extra admin account on the Macs you take care of, it’s a good idea to create one. Just make sure it has a strong password that you’ll remember.
Reset the Password Using an Apple ID
What if there is no other admin account available? You can use the Apple ID associated with the account in question to reset the admin password, but only if these conditions are true:
- You know the Apple ID’s email address and password. If you don’t know the password, but you have access to the email address, you can reset the password at Apple’s Apple ID page.
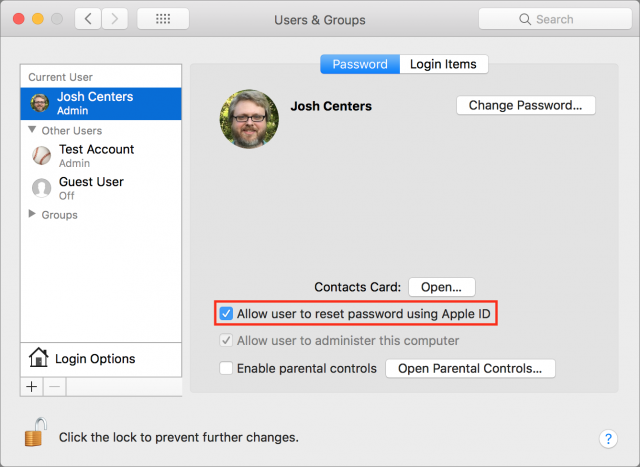
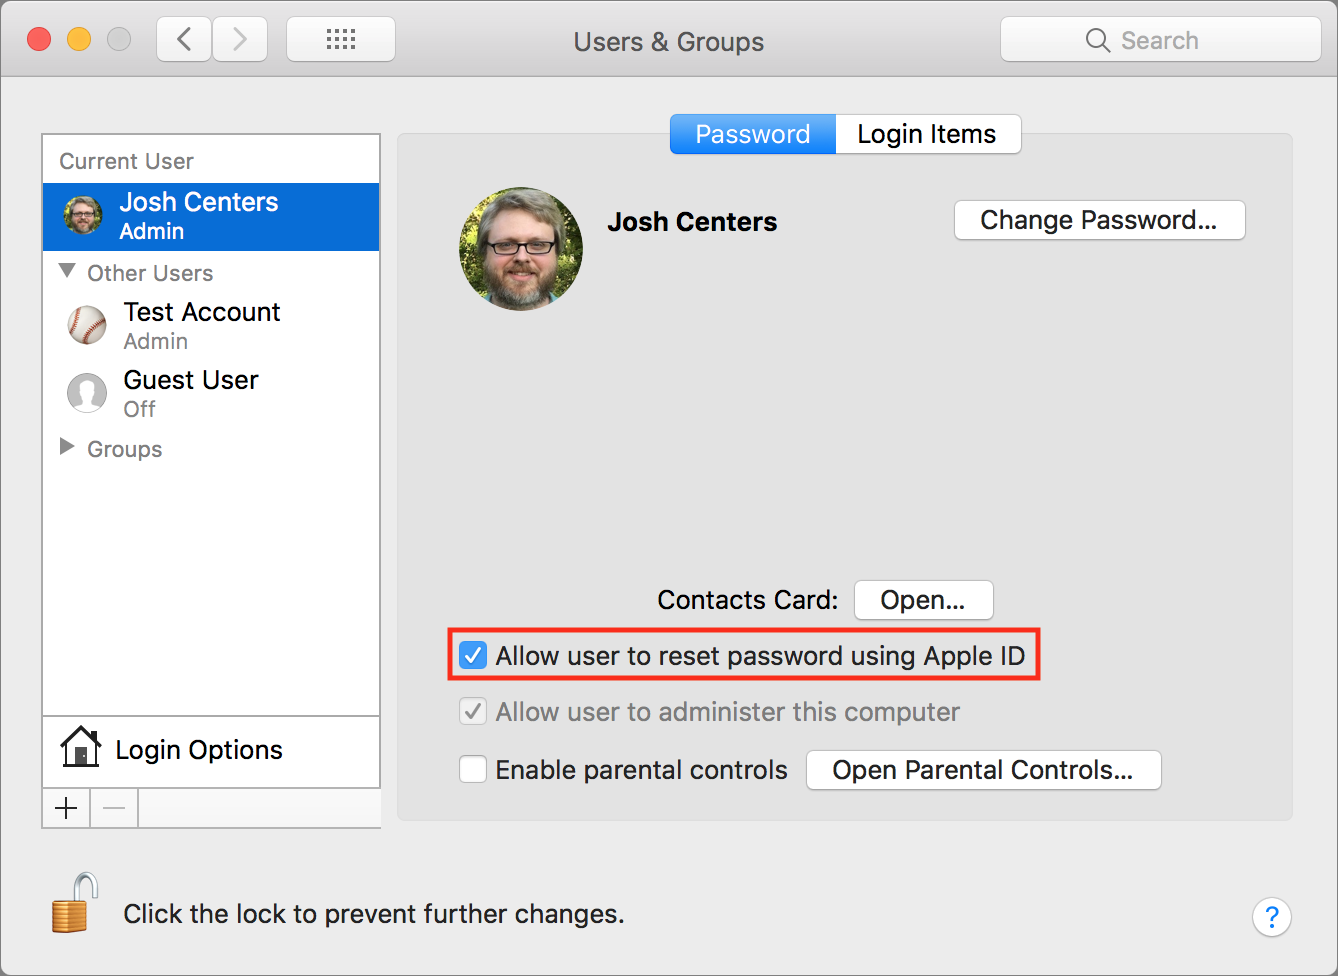
- The “Allow user to reset password using Apple ID” checkbox in System Preferences > Users & Groups must be selected. This setting won’t appear if FileVault is enabled.
To get to the point in the login process where you can reset the password, click the question mark that appears on the right side of the password field or just try to log in three times. After the third failed login attempt, the Mac will prompt you with the password reminder, if one is set, and give you the option of resetting the password using your Apple ID.

Then enter the Apple ID email address and password and follow the onscreen instructions.
Reset the Password Using the Reset Password Assistant
If the “Allow user to reset password using Apple ID” option isn’t enabled, or the previous method doesn’t work, there’s still a way to use Apple ID credentials to reset the admin password. You’ll need to use Apple’s Reset Password assistant, which requires that you reboot into macOS Recovery and use Terminal:
- To enter macOS Recovery, restart the Mac. As it’s starting up, press and hold Command-R until you see the Apple logo, at which point you can let go.
- Once in macOS Recovery, ignore the main window and choose Utilities > Terminal, which opens a Terminal window.
- In that window, type
resetpasswordand press Return to open the Reset Password assistant.
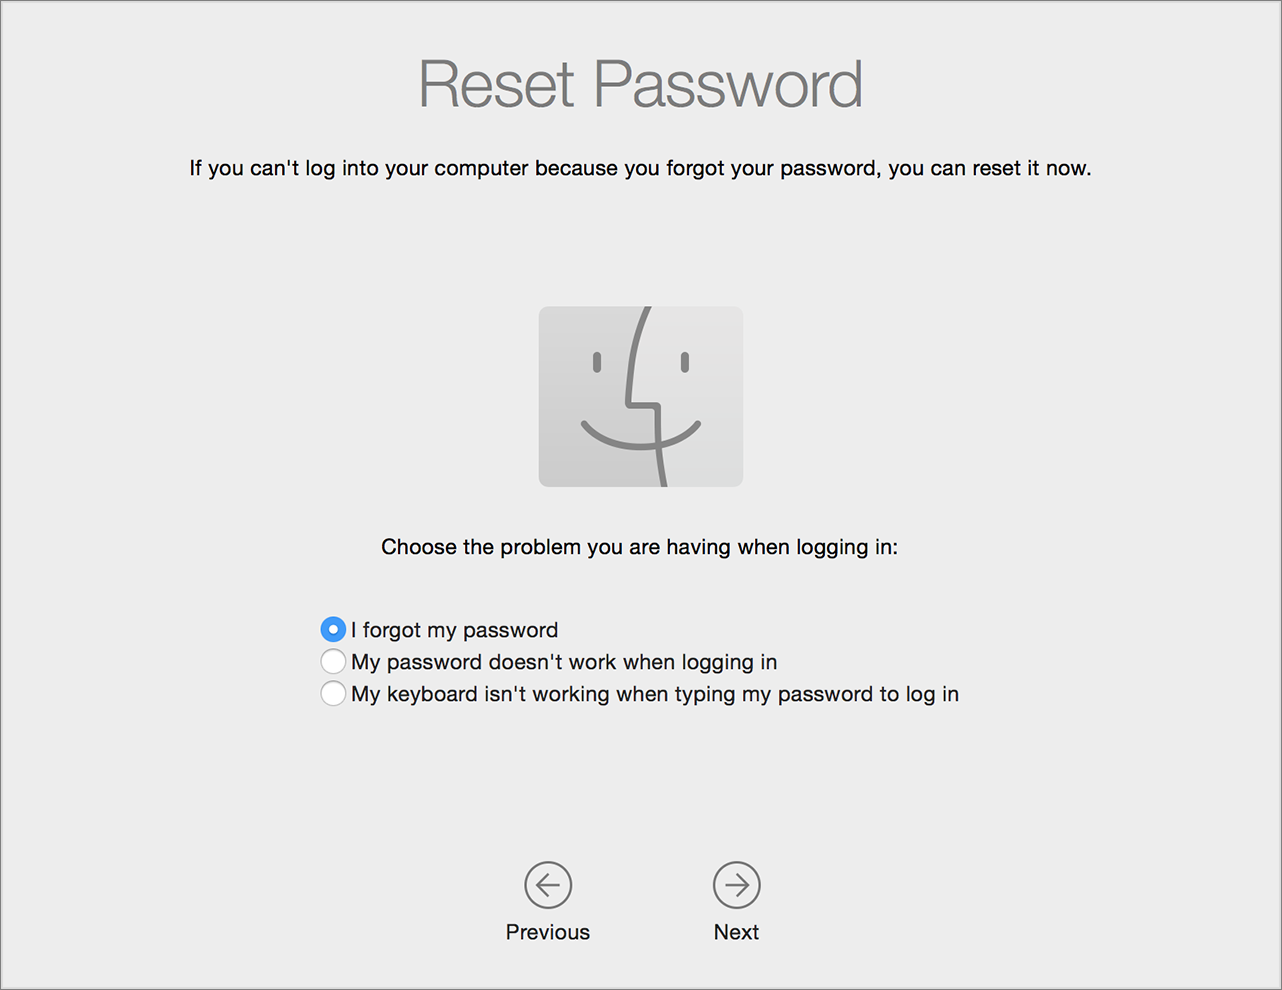
Either way, once you’re in the Reset Password assistant, select “I Forgot My Password” and click Next.
If the account for which you wish to reset the password is a standard account, rather than an admin account, all you have to do is enter a new password.
For an admin account, you’ll instead have to enter the password for the account’s associated Apple ID. (If you don’t know it, you can click “Forgot Apple ID or password?” to move on to the Apple ID recovery process, which may require your trusted phone numbers.) Once you have entered the necessary password, you may be prompted for a two-factor authentication verification code, which will arrive on another device connected to that Apple ID. (If the Mac is your only Apple device, you should be able to receive the code from a phone call or SMS text message.) Finally, you’ll get to a screen where you can enter a new password and password hint.
What If You Use FileVault?
FileVault encrypts the Mac’s boot volume, making it readable only after the appropriate login credentials are entered, typically those of the primary admin account. The process for resetting the admin password changes a bit if FileVault is turned on because FileVault eliminates the option to reset the password with Apple ID credentials.
Fortunately, the method remains simple: enter a random password three times at the login screen, after which you’ll be prompted to reset the password using your Apple ID or recovery key.
Apple notes that you may still have trouble logging in with the new password after all this, and if so, suggests that you use the Reset Password assistant to reset the password again, using the “My password doesn’t work when logging in” option and following the subsequent instructions.
I hope your FileVault recovery key is stored in a safe place, like 1Password or LastPass! If it wasn’t saved or you can’t access it, you may want to turn off FileVault before you get into a situation where you can’t log into the Mac. In my experience, it’s easier to back up the drive, erase it, and then restore it, than it is to turn off FileVault.
Dealing with the Keychain
The keychain is an encrypted container associated with each user account that stores login credentials for apps, network servers, AirPort base stations, and Web sites accessed in Safari. It’s easy to forget about the keychain because it is typically protected by the same password used to log in to the account. As a result, resetting the password for an admin account means that you can no longer access the keychain for that account. Sorry, but there’s no way to recover that information.
After resetting the admin password and logging in again, you will likely receive an alert that macOS was unable to unlock your login keychain. Click Create New Keychain to start fresh. If you don’t receive the alert and have problems with the keychain, follow these steps to reset it:
- Open Keychain Access from
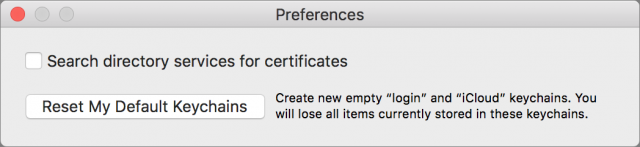
/Applications/Utilities. - Choose Keychain Access > Preferences and click Reset My Default Keychains, which creates a new keychain with no password.
- Log out of the account by choosing Apple > Log Out Username.
- Log back into the account to tie the account password to the new keychain.

Don’t Reset Passwords Willy-Nilly
As you can see, there are a variety of ways that you can reset a lost or forgotten admin password and regain access to a Mac, although they all depend on knowing either another admin password or an Apple ID password.
However, don’t reset an admin password unless doing so is absolutely necessary because the login keychain will be lost in the process, and that will likely cause future annoyance.
If you’re not yet in this situation, take precautionary measures now! Be sure that your Macs’ passwords and any FileVault recovery keys are stored in secure locations that you—and other trusted users—can access easily. And of course, make sure to keep regular backups, which can help you recover from a multitude of sins.
Velop Provides First-Rate but Expensive Wi-Fi Mesh Networking
The recent demise of the long-stagnant AirPort line of wireless base stations (see “RIP: Apple AirPort, 1999-2018,” 27 April 2018) made official what had long been understood: It’s time to move on.
Fortunately, solid Wi-Fi router alternatives abound. Some of the latest are of the “mesh” variety, where multiple devices work in unison to create a larger and better Wi-Fi network than any single access point could typically pull off.
I’ve had a good, if not perfect, experience with Eero’s first-generation mesh hardware (see “Eero Provides Good Wi-Fi Coverage in a Handsome Package,” 25 June 2016). But I was curious about Velop, a mesh system from Linksys, one of the best-known names in networking.
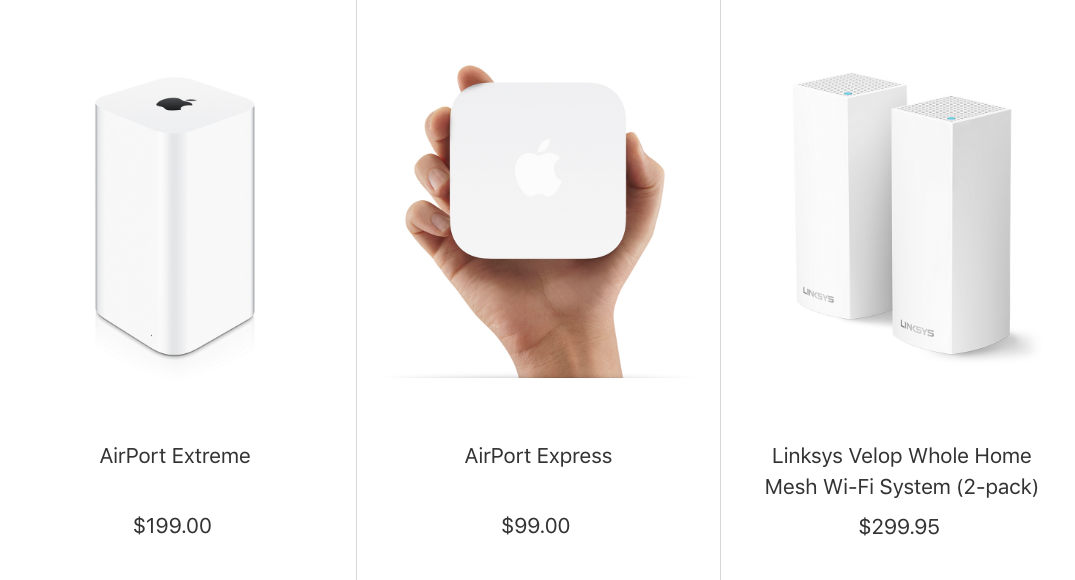
In part, that’s because Velop kits are the only mesh products sold in Apple’s brick-and-mortar stores and the company’s online storefront. The white, tower-like Velop devices even resemble the AirPort Extreme hardware. Although it’s overreaching to assume that Apple is anointing Velop as the official successor to the AirPort line, it does suggest that AirPort refugees have a high probability of entering the Velop fold.
But should they?
Specs: Tri-band Versus Dual-band
I tested the $179.99 tri-band Velop routers. They’re called “tri-band” because each has a 2.4 GHz radio and two 5 GHz radios. The 2.4 GHz radio provides throughput in the neighborhood of 400 Mbps at a greater range, and the 5 GHz radios offer twice that—apiece—but at a lesser range. Tri-band essentially means a third lane of wireless traffic in homes like mine where many gadgets are vying for online access.
Linksys recently released lower-cost “dual-band” Velop nodes for $129.99, each with a radio in both the 2.4 GHz and 5 GHz bands. I didn’t test these nodes because conversations with my contacts at Linksys lead me to believe that they might have struggled a bit in terms of range and performance with my demanding circumstances: a huge house, many devices tapping into the Wi-Fi, and a need for speed. I also had a bit of trouble with the dual-band Eero gear I recently tested—mostly in terms of achieving flawless coverage.
If you are looking to cover a large space, you can save money with bundles. Tri-band Velop two-packs cost $349.99, and three-packs are $499.99. By comparison, dual-band Velop two-packs are only $199.99, and three-packs run $299.99. A bundle is the way to go, typically, since having multiple Wi-Fi nodes is the whole point of mesh systems.
You can add a dual-band Velop node to a Wi-Fi network of tri-band nodes, by the way, to save some money while extending coverage.
Conveniently, a Velop-based network broadcasts a single SSID, unlike some devices that announce a network name for each band. Coverage is good, too; according to Linksys, each tri-band Velop node covers 2000 square feet (185 square meters).
For my testing, I used a tri-band three-pack, with one node plugged into the Xfinity cable modem in my second-floor home office, and the other two modules placed on the first floor—one in the living room, where my wife typically uses her MacBook Air and needs flawless Wi-Fi service lest marital tension ensue, and the other in the kitchen where I’m often on my iPad.
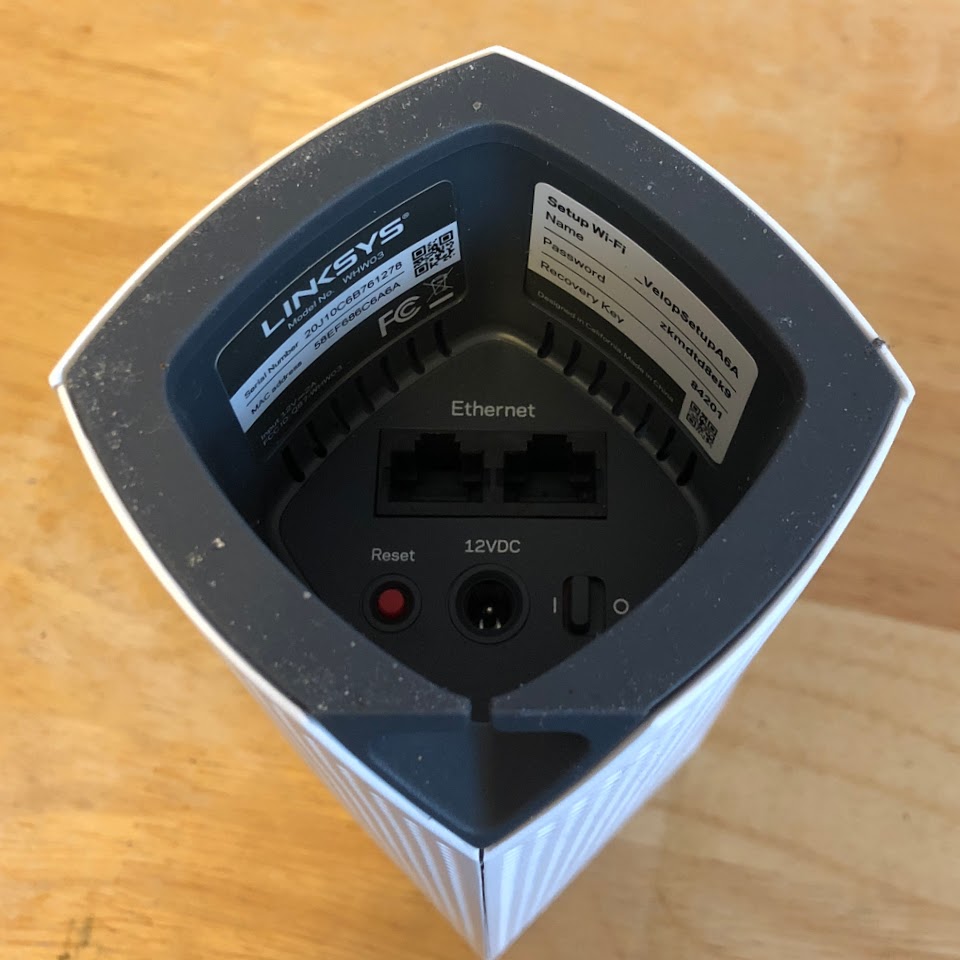
As with other mesh products, Velop routers are somewhat simple. On the bottom, hidden from view, are two Ethernet ports (for connecting to a modem as well as hooking up printers and gaming consoles), a reset button, an on/off switch, and a power jack. There are no USB ports for plugging in external gear, like network drives, as was possible with some AirPort base stations. A single light on top provides at-a-glance status reports based on color.
As is typically the case with other mesh Wi-Fi gear, you mostly adjust and control Velop hardware using a mobile app, and the Linksys app is available for both iOS and Android. There’s also a browser-based interface, but it isn’t easy to find, and Linksys clearly doesn’t want most people using it.
Velop Setup and Use
Setting up mesh systems tends not to be overly challenging since they are intended for the often tech-clueless masses, and Velop mostly fits that mold—although I did run into a few minor issues.
A Linksys account is required for setup, and I had no difficulty creating one. When I started on the hardware configuration, however, I got into a weird loop: The Linksys app would not let me initiate setup without logging in to my account, but every login attempt dumped me back to the first setup screen. In desperation, I deleted and reinstalled the app, which resolved my issue.
Setting up the first of my three Velop devices (the one connected to my cable modem to tap into its Internet connection) had one overly geeky moment. I had to flip the device over, find a device ID and password (each a lengthy string of characters) and painstakingly tap each into the app for a temporary Wi-Fi link to the device. I’m not sure why this came up because it isn’t supposed to be part of standard installations.
These modest difficulties aside, setup was a breeze. My iPhone detected the other two Velop nodes automatically. For each of the three, the app guided me through screen after screen to complete the setup. The Velop nodes were able to detect each other just fine. This eliminated the need to futz with gear placement for optimal coverage, unlike my earlier spotty experience with Eero.
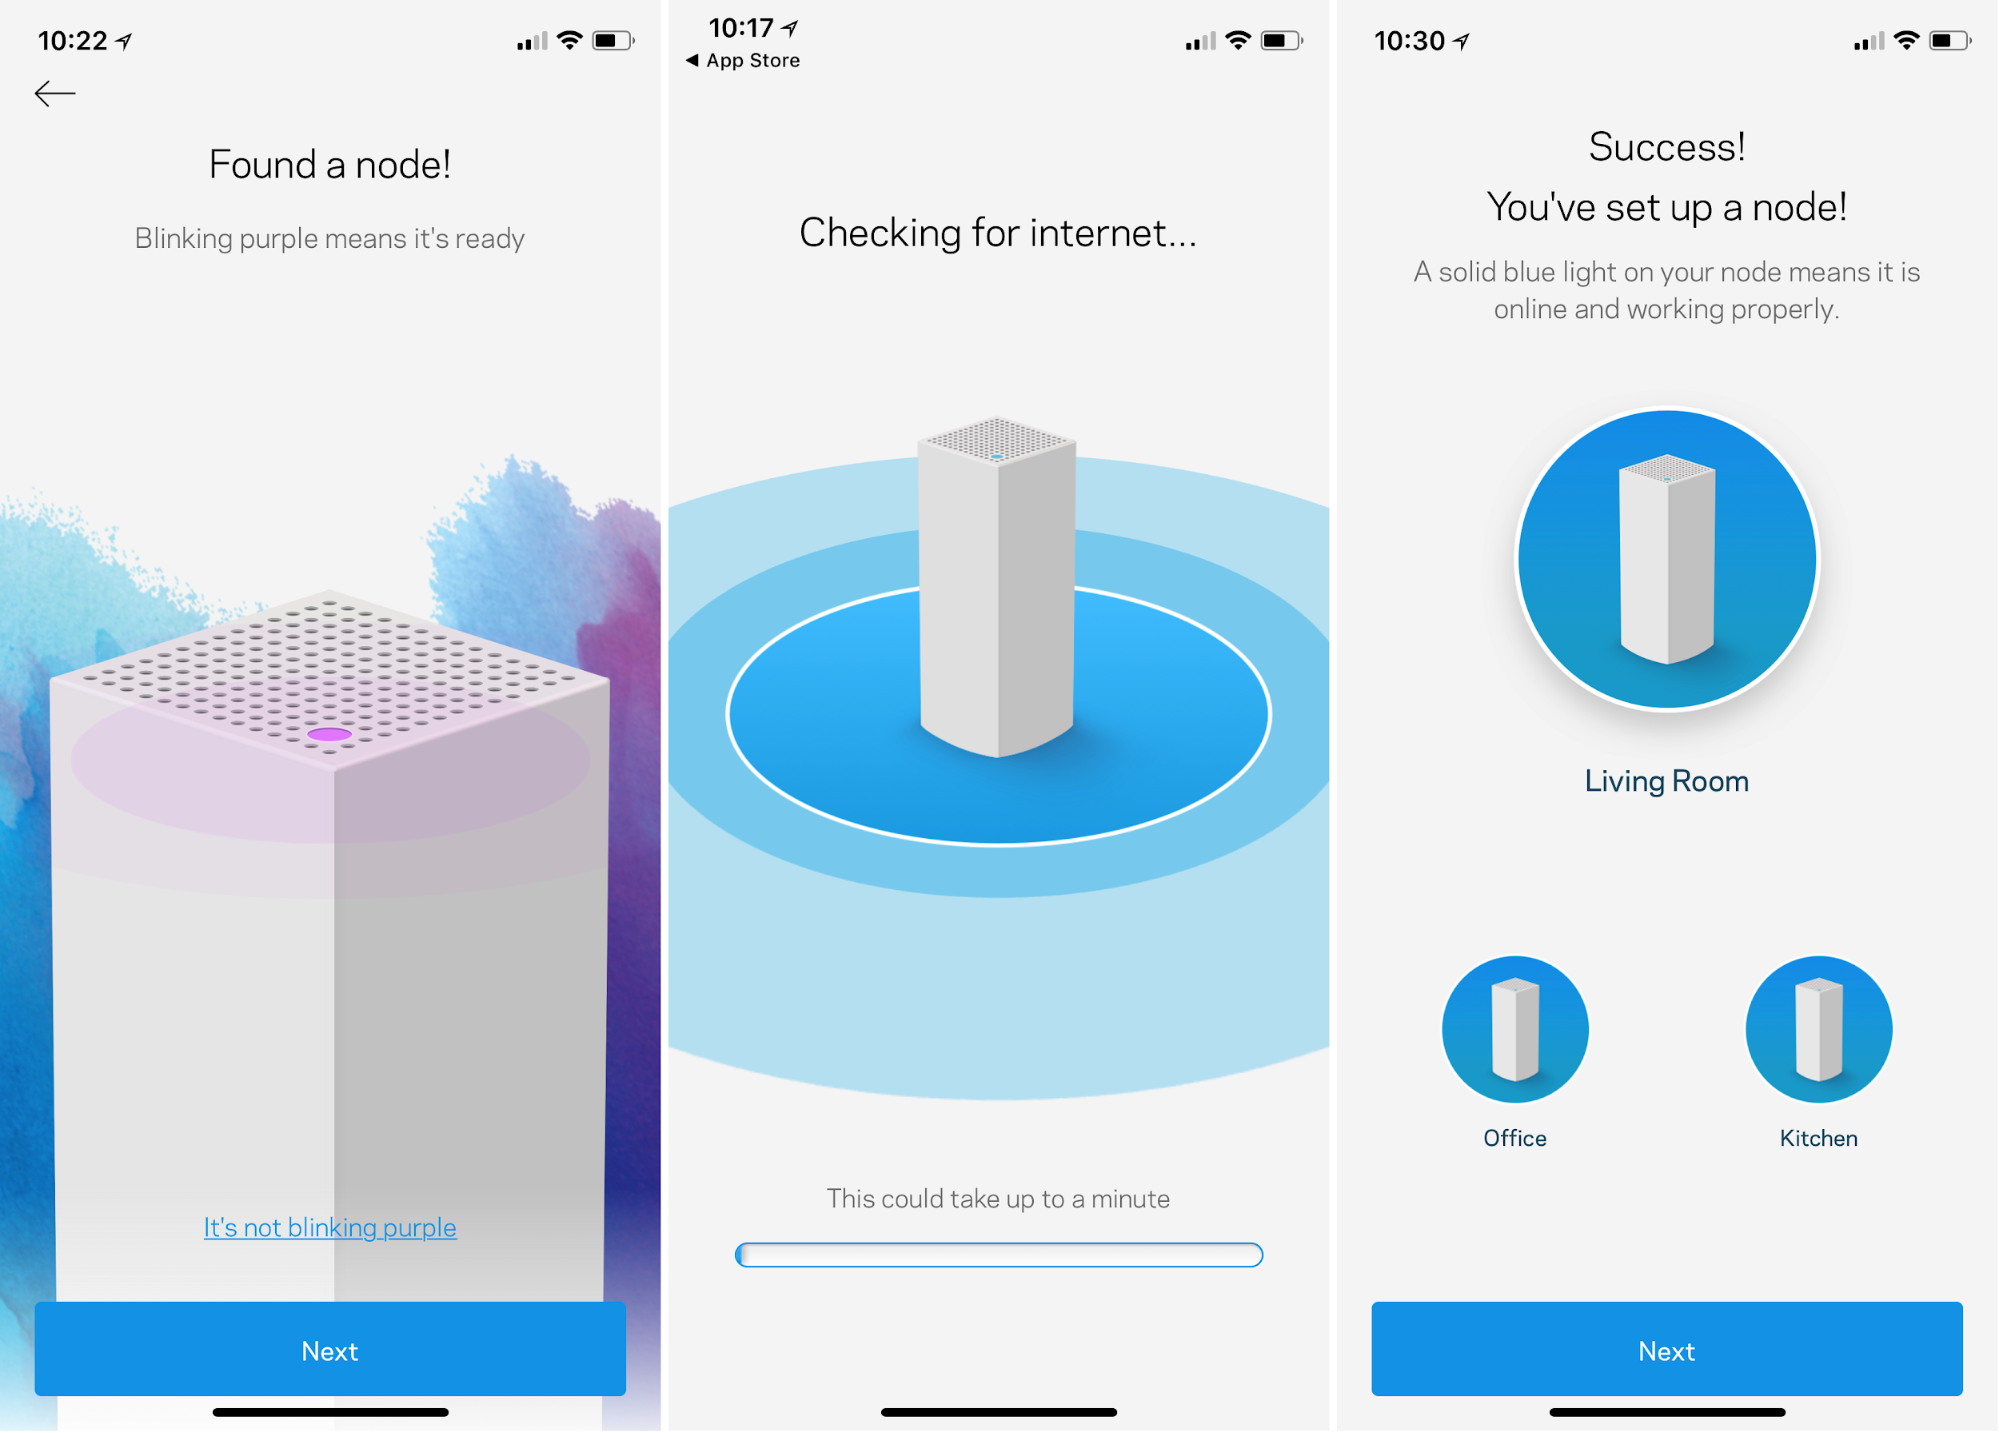
Sometimes mesh gear needs time to adjust itself to achieve optimal performance, but Velop worked pretty well right out of the gate.
My broadband connection provides about 100 megabits per second (Mbps) for downloads (uploads are only in the single digits), and the Velop gear handled that with ease. Just about anywhere in my house, I had unfettered Internet access.
What if you have faster broadband? Residential 1 Gbps service is increasingly common—Comcast, CenturyLink, and U.S. Internet provide this level of service near me in the Minneapolis/St. Paul metro area, albeit at a high cost.
To see whether my Velop devices could handle such higher speeds, I used TotuSoft’s LAN Speed Test utility to see how fast the bits were zipping among the Velop nodes within my house. In other words, I was testing throughput across my LAN—the local area network—instead of going out to the WAN, or wide area network. LAN throughput is also important if you copy files from one computer to another in your house, or back up across your network to a Mac acting as a Time Machine server.
I saw decent results. Wandering throughout my residence with a laptop running LAN Speed Test, I easily managed uploads in the 1 Gbps range and downloads in the 1.5 Gbps range. In other words, the Velop equipment seems to work nicely for those with extra-fast broadband or who need fast networking between local computers.
Keep in mind that physical obstructions such as walls affect performance to varying degrees, depending on the building’s materials. My Velop performance degraded a bit when I went outside onto my porch even though a Velop node was almost within arm’s reach in my living room. But that is the beauty of mesh systems! If I needed more throughput on the porch, I could just add a node—even temporarily.
Tapping into the Linksys App
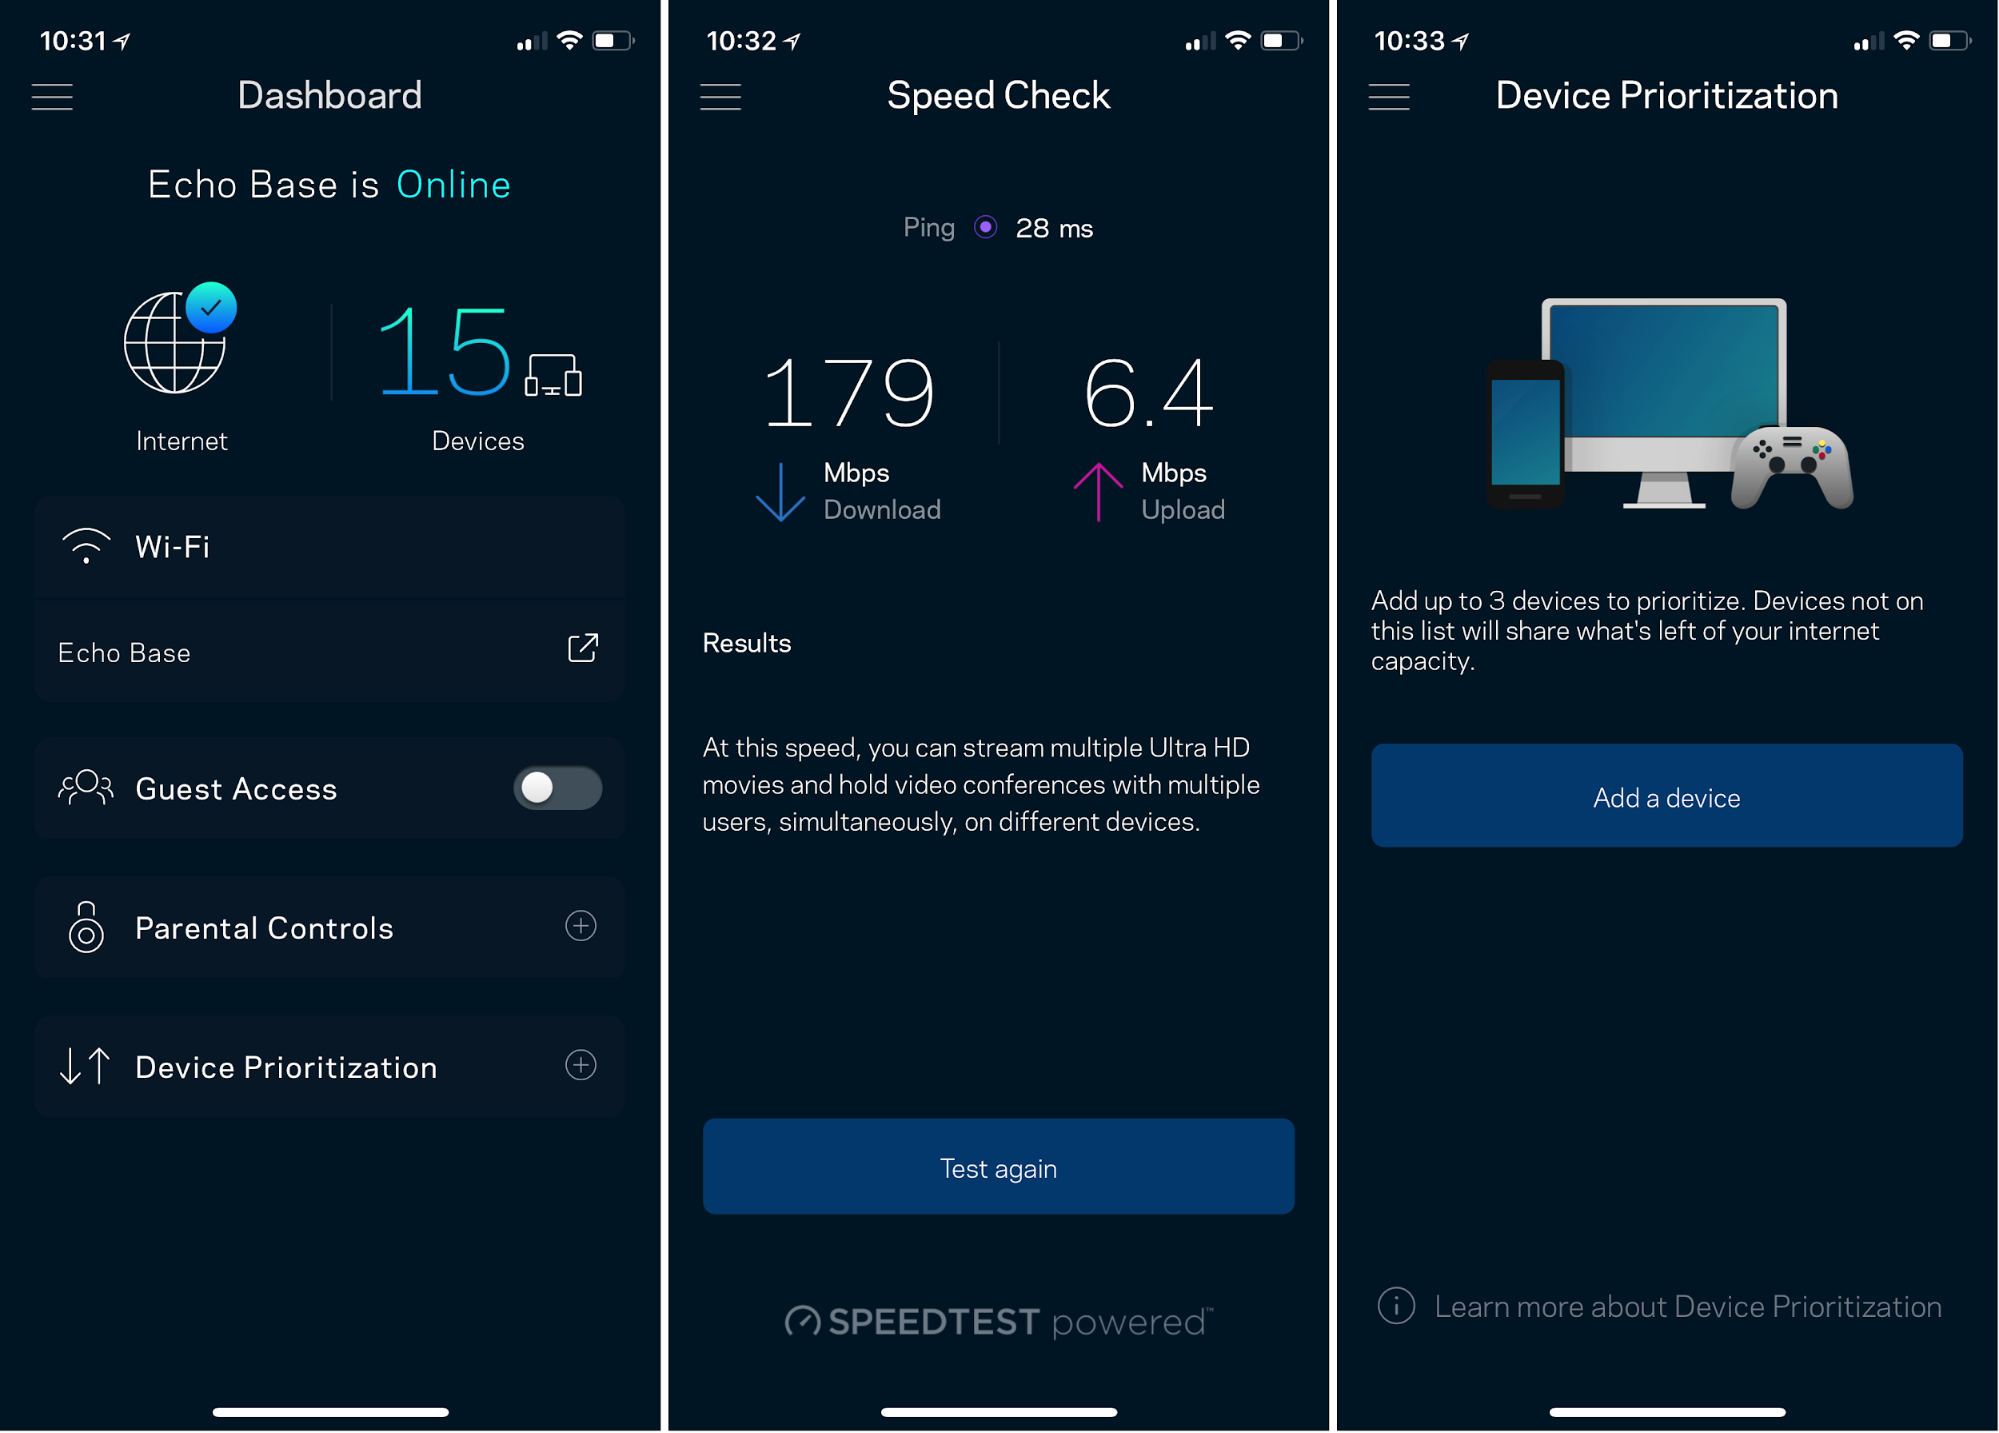
No decent mesh system is complete without a reasonably well-designed and full-featured app, and the Linksys app doesn’t disappoint. App features include:
- Guest Access, for setting up a separate wireless network for use by visitors.
- Parental Controls for limiting kids to particular Internet hours, blocking specific Web sites, or keeping kids entirely offline and, in Linksys’ words, “on task.” These controls can be set up on a per-device basis.
- Speed Check for doing download and upload speed tests. This feature is essentially the same as the popular standalone Ookla app with the same underpinnings. I was puzzled that the two sometimes provided widely divergent results, though, with the built-in Velop speed tester typically logging better results than the standalone Ookla one. Hmm…
- Device Prioritization, with the option to prioritize up to three household computers or mobile devices for fastest wireless access.
- Advanced settings for changing connection type, adjusting port configurations, tweaking IP addresses, altering the Wi-Fi security level, and the like. Typical users should almost never have to worry about these settings, but they could come in handy when doing network troubleshooting with tech support.
- Assorted other features, such as an at-a-glance “Is the Internet working” screen, alerts if a node goes offline, the option to automate firmware updates, and an option to share login info with others by text message, email, or cut-and-pasted text. (This latter option shouldn’t be necessary among Apple devices running iOS 11 and High Sierra or later, given the built-in Wi-Fi password sharing built into those operating systems.)
Velop Alternatives
My Velop testing went well. My testing did not unearth any notable red flags, with the possible exception of those seemingly suspect speed-test results. However, the setup I tested has one big issue: it’s on the pricey side. You should consider multiple options with varying price levels, and I have suggestions.
Eero has released second-generation, tri-band gear that can potentially save buyers a bundle. For instance, Eero provides a three-pack for $399 (a recent drop from $499, and $100 cheaper than the Velop three-pack). One caveat to keep in mind: the kit includes one regular node—the rough equivalent of a Velop node—plus two “beacon” devices with fewer features (a lack of Ethernet ports, for instance).

On the plus side, Eero’s beacons plug directly into outlets for a more elegant mesh deployment. They also illuminate the space immediately around them, thus doubling as nightlights, which could be good or bad.
![]()
The Eero gear I received for review performed nicely with its tri-band capability roughly equal to that of my Velop network for rock-solid Wi-Fi. As with Velop, you can mix and match first- and second-generation Eero devices.
Also, for the many Comcast users out there, Comcast recently added a mesh option to its line of Xfinity xFi routers. Like Eero beacons, the xFi Pods plug directly into wall outlets to extend the primary router’s wireless coverage. I can attest to the urgent need for this since my Comcast-issued Wi-Fi router (which is also my broadband modem) can’t begin to cover my house in bandwidth.

When I deployed the xFi Pods in my 3-unit loaner kit, though, I was in business… up to a point. The farther I got from the central Xfinity router, the more my download speeds decreased. Comcast acknowledges this in a FAQ, noting that the xFi Pods “are not intended to provide the maximum speed of your Internet tier throughout your home.”
This is forgivable given the cost: a three-pod kit is only $119, and a six-pod bundle is just $199. That is dynamite pricing for those who need widespread coverage but don’t require maximum performance. The xFi Pods, of course, work only with an Xfinity router, and only with certain xFi models at that.
Interoperability, in fact, is a problem in the mesh realm—you cannot mix-and-match devices from different makers. There are indications, though, that a solution for that problem is on the way thanks to an EasyMesh standard that’s reportedly in the works.
What Should You Buy?
For now, you must commit to one brand or another, and Velop is a full-featured option for those who aren’t on a tight budget. Its setup was easy, and both performance and coverage were very good. I have no complaints with how my test gear operated.
However, the Velop nodes are hardly inconspicuous. Those who don’t like the styling might grow annoyed by the rectangular obelisks sitting on shelves or tables with their cords snaking towards wall outlets. (My wife did, in fact, tire of their prominent presence.)
That’s why the Eero and Xfinity products are so appealing. Both the Eero beacons and xFi Pods are more understated and elegant since they plug directly into wall outlets.
In addition, the Eero and Xfinity gear can be significantly cheaper than the Velop nodes—although with some compromises. With Eero, you get comparable performance at a lesser cost but sacrifice some hardware features. With the xFi Pods—available only to Comcast subscribers—you give up performance but get reliable residence-wide Wi-Fi.
For tech geeks who want the most features, don’t mind paying more, and aren’t concerned about looking at their networking hardware, I can heartily recommend Velop. For those who are less concerned about technical capabilities and don’t want to decorate with white pillars, Eero makes a lot more sense since it’s more elegant and inconspicuous with no performance hit. If you use Comcast and are happy to trade performance for a lower price, the xFi Pods are a fine, low-cost solution.