#1426: APFS explained, TwelveSouth’s AirFly for AirPods, Internet services for researching used cars
Fresh from writing Take Control of Your Digital Storage, Jeff Carlson joins us to explain APFS, the new file system that Apple brought to the Mac with macOS 10.13 High Sierra. Also this week, Josh Centers reviews AirFly, an accessory from TwelveSouth that lets you use AirPods with 3.5mm headphone jacks. Josh also steps outside the Apple world briefly to look at Internet services that help you avoid lemons while buying a used car. Notable Mac app releases this week include OmniOutliner Essentials and Pro 5.3.2, Slack for Mac 3.2, and Fantastical 2.5.1.
Twelve South’s AirFly Helps You Use AirPods Everywhere
The AirPods are probably my favorite Apple product in years. They’re easy to connect to Apple devices, they hold a charge well and have good battery life in use, they sound pretty good, and the case is small enough to keep in my pocket. And because they’re built on the Bluetooth wireless standard, they work with non-Apple devices. But it’s still easy to run into a gadget—or an airplane seat!—that doesn’t support Bluetooth audio and instead has a 3.5mm headphone jack.
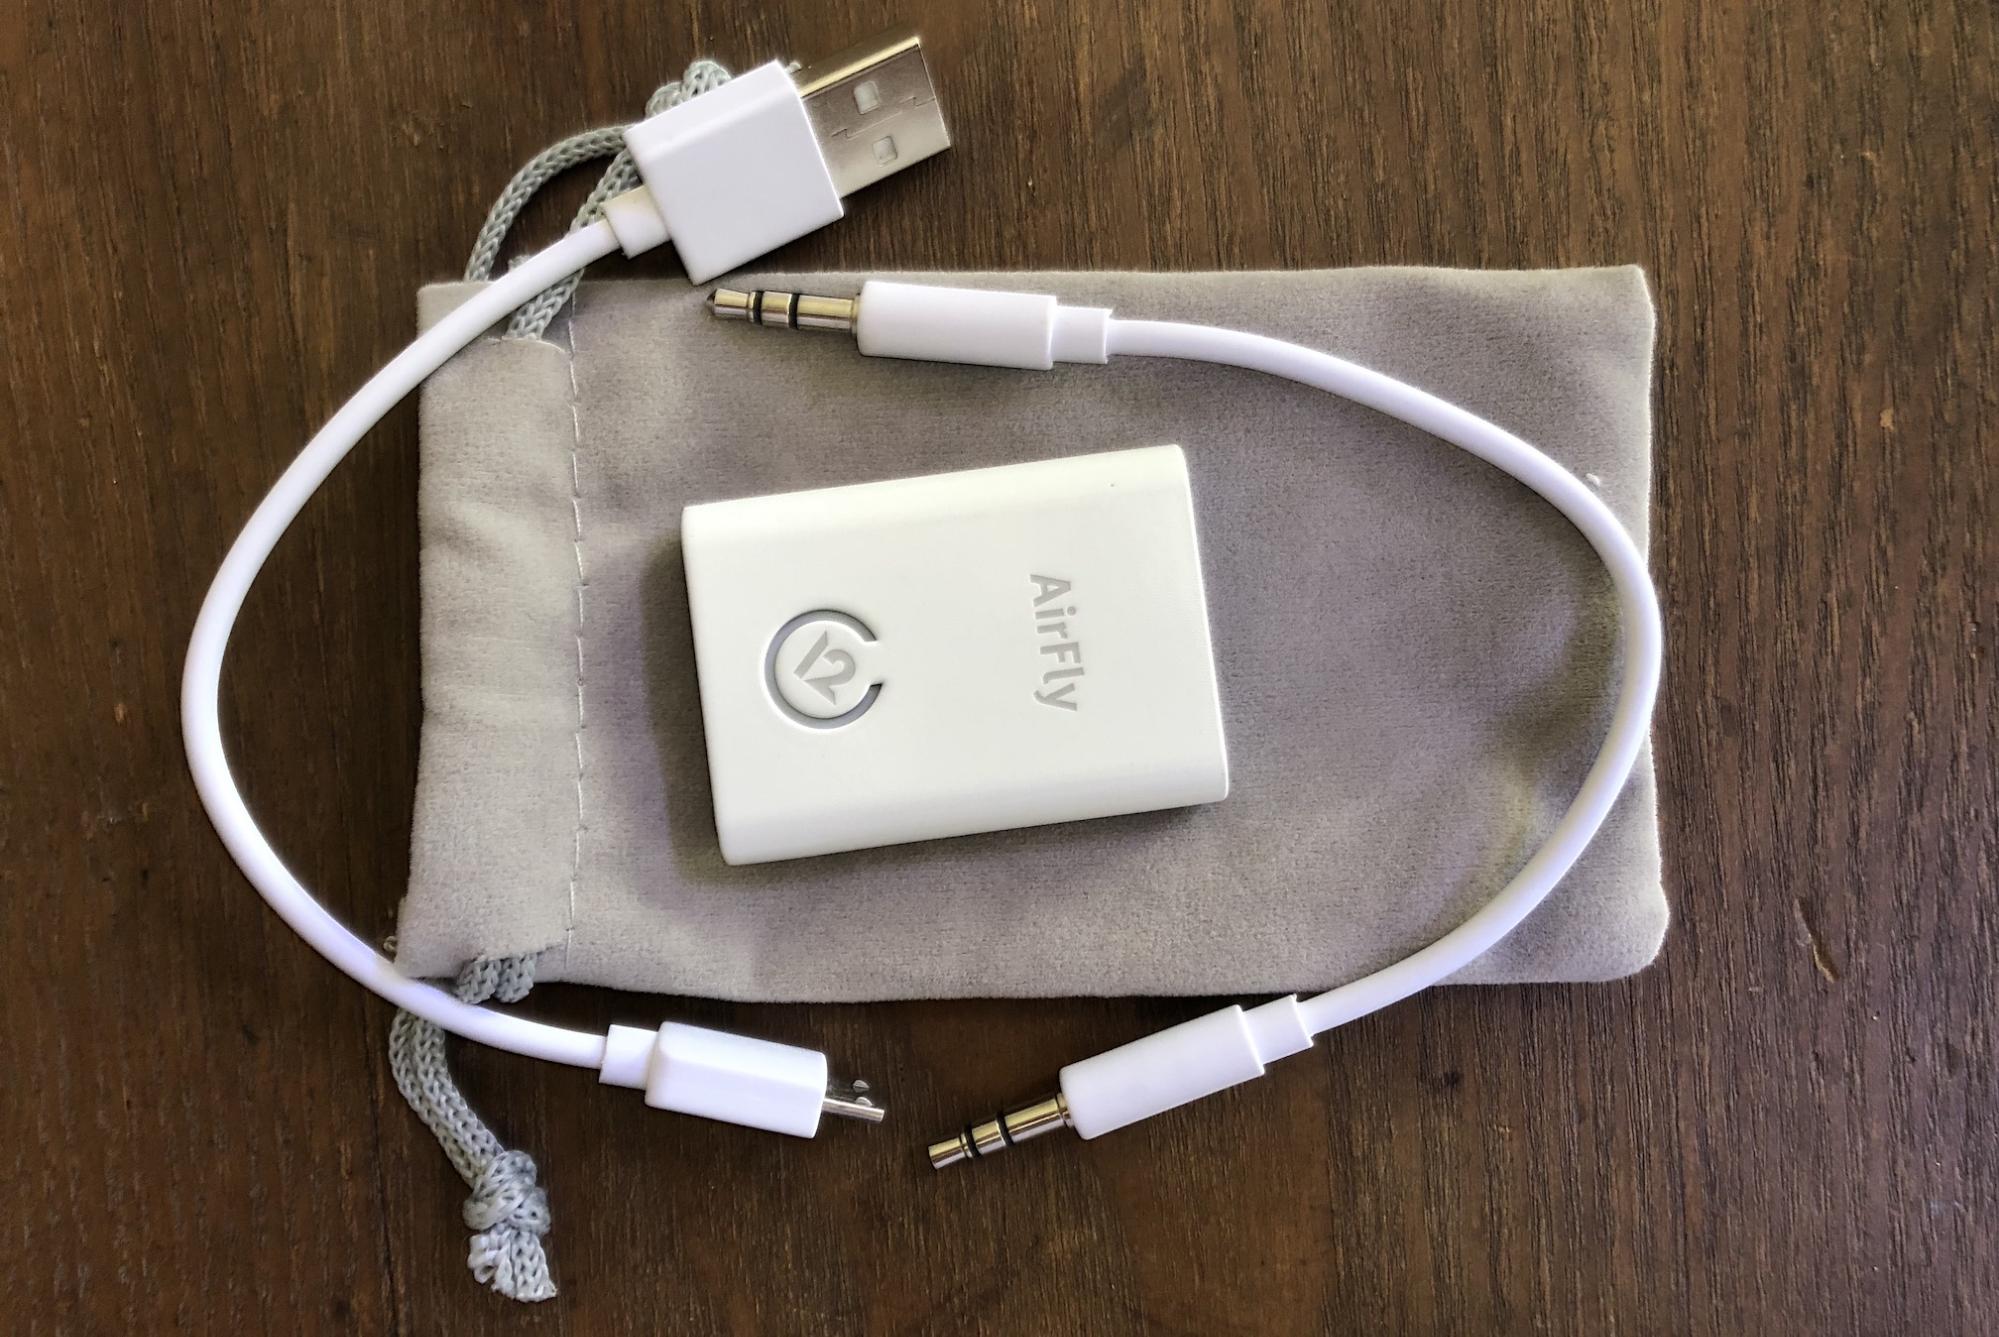
Twelve South has a solution to that problem in the form of the AirFly, a Bluetooth transmitter aimed squarely at users of the AirPods, though it works with any Bluetooth headphones. For $39.99 you get the base unit, a short 3.5mm cable, a short Micro-USB cable, and a small gray drawstring bag to hold it all. The AirFly measures 1.8 inches (46 mm) tall, 1.3 inches (33 mm) wide, and .39 inches (10 mm) deep, and it weighs .55 ounces (15.6 grams). In other words, it’s very much in the same size and weight category as the AirPods.
Using the AirFly is simple, as it only has one button. Press and hold the button until the light starts flashing to put it in pairing mode. Then put your AirPods in pairing mode by pressing and holding the button on the back of their case. Once the AirFly light turns solid white, you’re good to go: plug the AirFly into a 3.5mm audio outlet to transmit the audio from that device to your AirPods. After pairing, hold the button down to turn the AirFly on and off. (Twelve South has a video demonstrating how this works.)
The AirFly works as advertised. I used it with a few devices, and sound quality was good across the board. Twelve South touts 8 hours of battery life, and that seems like a fair estimate. The battery holds its charge well even in hot vehicles.
However, there are some quirks. For one, the AirFly can interfere with the AirPods’ automatic pairing, so make sure to turn it off before trying to switch the AirPods back to your iPhone or other Apple device. This is more of a pro than a con because if everything is working right, merely turning on the AirFly makes the AirPods switch to it. However, that assumes everything works correctly—I often find myself repairing the AirPods to the AirFly.
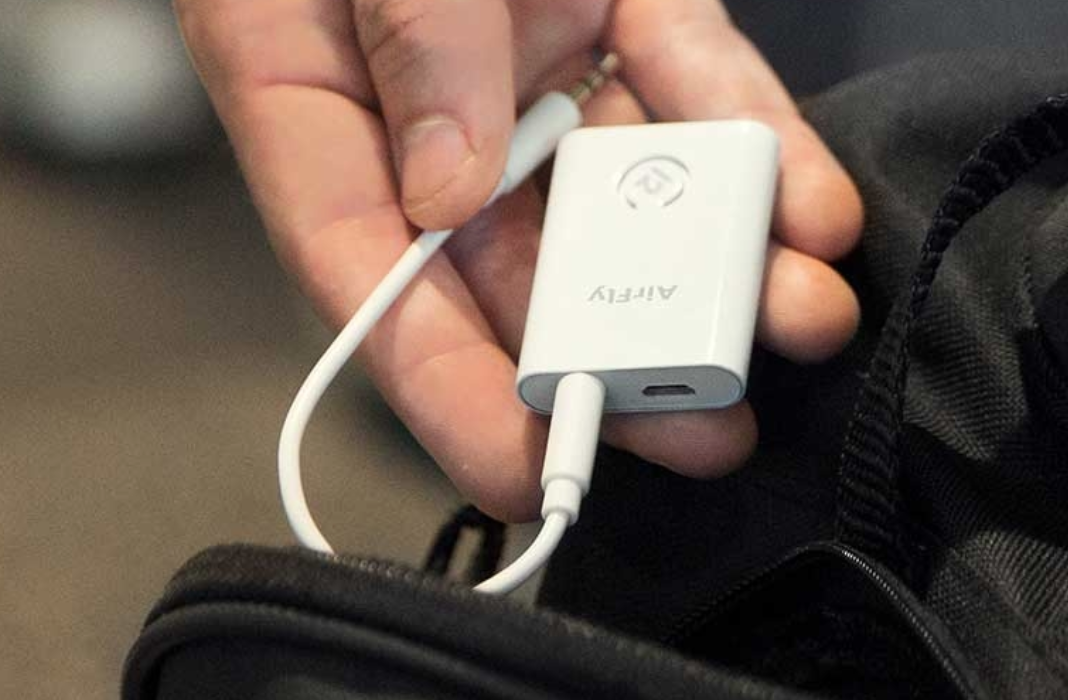
Another quirk is the design of the AirFly itself, which hangs off whatever it’s plugged into. If you’re using it with an airplane entertainment system—a primary use case—that’s not a big deal, but it’s annoying when I’m playing my Nintendo Switch and the dongle keeps bouncing off my hand. Twelve South recommends using a velcro sticker to attach the AirFly to whatever gizmo you have. But then you have a scratchy piece of velcro semi-permanently attached.

(As a side note, the most enjoyment I got from my AirFly was connecting it to my docked Nintendo Switch while my wife and son were sleeping in the same room. I was able to play Zelda with full sound and not disturb them.)
Another potentially awkward fact about the AirFly is that it features a Micro-USB port for charging, not USB-C. Given that it’s targeted at Apple users (who likely have other devices that charge with USB-C, like MacBook Pro laptops) and Nintendo Switch players (the console is mentioned on the AirFly’s home page and also charges through USB-C), you’d think that USB-C would be a more natural fit. Also, USB-C connectivity would help distinguish the AirFly from less expensive (and seemingly more capable) competitors like this 2-in-1 transmitter and receiver from TaoTronics. Given how Twelve South is usually great at making Apple-focused accessories, the genericness of the AirFly is a bit disappointing.
But if you’re a fan of the AirPods, stashing a device like the AirFly in your travel bag isn’t a bad idea. It’s easy to use, provides good battery life, and works well. Just like the AirPods.
Buying a Used Car? Try These Three Free Vehicle History Services
You don’t want to buy a used car without checking out its history, which can let you know if it’s been in an accident or suffered major damage. Often, the vehicle history report can even give you important clues about how well it was maintained. I once made the mistake of forgoing a vehicle history when buying a cheap truck from a neighbor and wound up with a rebuilt rust bucket that ran for just 3000 miles before dying.
CarFax is the gold standard for vehicle history reports, and while almost every dealership will give you a copy for free, it can get expensive if you have to pay for the reports—as much as $39.99 each! (You can also buy three reports for $79.99 or five for $99.99.) That’s money well spent before making a big investment, but it’s a lot to pay if you’re just trying to weed out bad cars before you waste much time with them. Experian’s AutoCheck is significantly cheaper than CarFax at $24.99 for a single report or $49.99 for 25 reports, but Edmunds reports that CarFax is worth the extra money.
I recently replaced our SUV, and I found a few free vehicle history tools that saved me a small fortune in CarFax fees by letting me eliminate lemons before I got too far into the process. There are a lot of scammy Web sites that claim to help with car buying, but here are three that are legitimate and useful.
Free Vehicle History Services
First, to use any of these services, you must know the car’s vehicle identification number (VIN). Unfortunately, there is no single standard for this, but in the United States, it’s a 17-digit number found on the driver-side dash near the windshield. Auto dealers should provide the VIN in the vehicle’s online listing (and offer a free CarFax or AutoCheck report as well). If a private listing doesn’t feature the VIN, ask the seller.
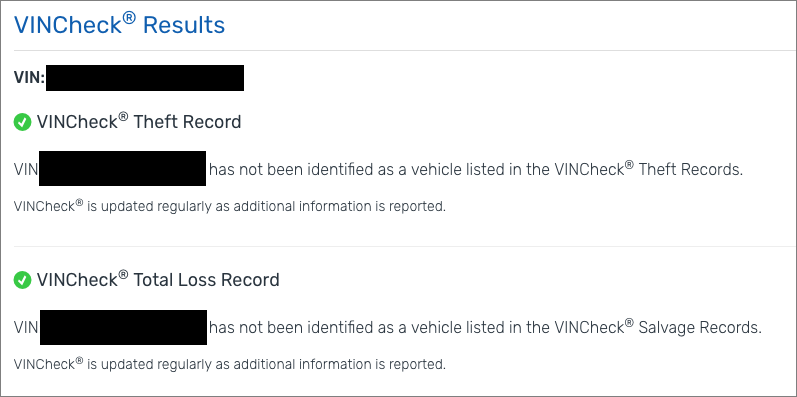
I’ll start with the most basic: the National Insurance Crime Bureau’s free VINCheck, which is limited to telling you if the vehicle is stolen or has a salvage title, which implies that it was in an accident so severe that it’s not worth repairing. Simply enter the VIN to receive the simple report.
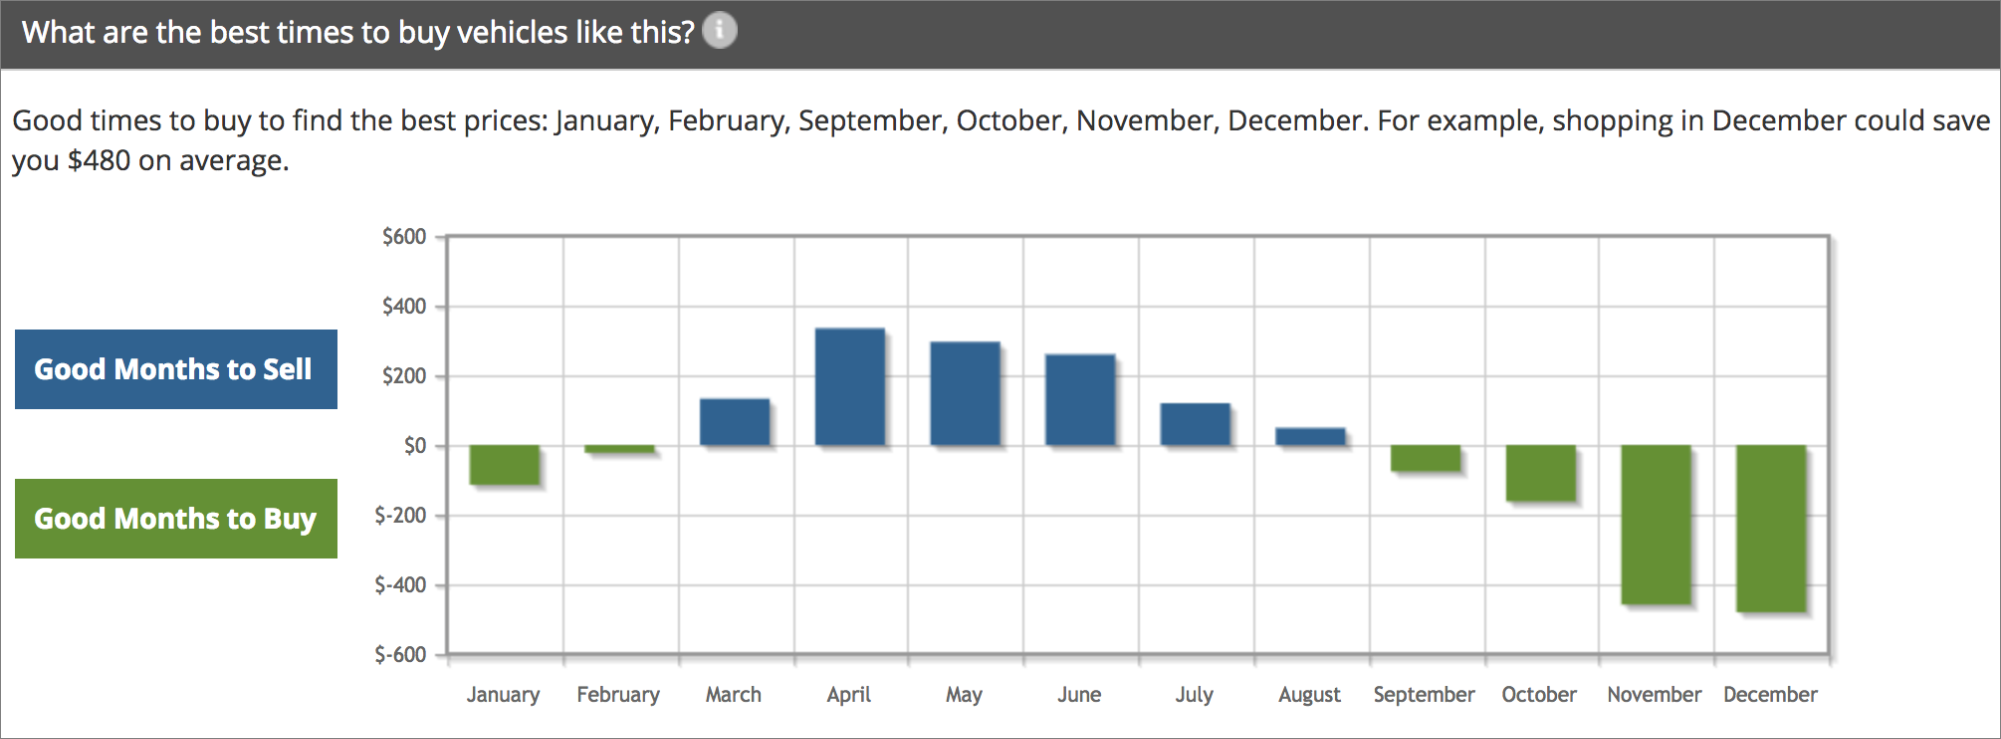
A more full-featured vehicle report comes from iSeeCars, which focuses on pricing information—enter the VIN, and it’ll figure out the make, model, and year. At the top of the report, it shows the estimated market value of the car and how long vehicles like it take to sell. Scroll down to see comparisons with similar vehicles for sale, depreciation, and even the best times to buy.


My favorite of these free services is Vehicle History because it’s the most like CarFax and AutoCheck. You have to click through a few screens before receiving results, but the results are quite detailed. For instance, Vehicle History was able to tell me that a minivan I was looking at had been in a minor accident. I didn’t end up buying that minivan, but the report helped me lower the price (not enough, though).
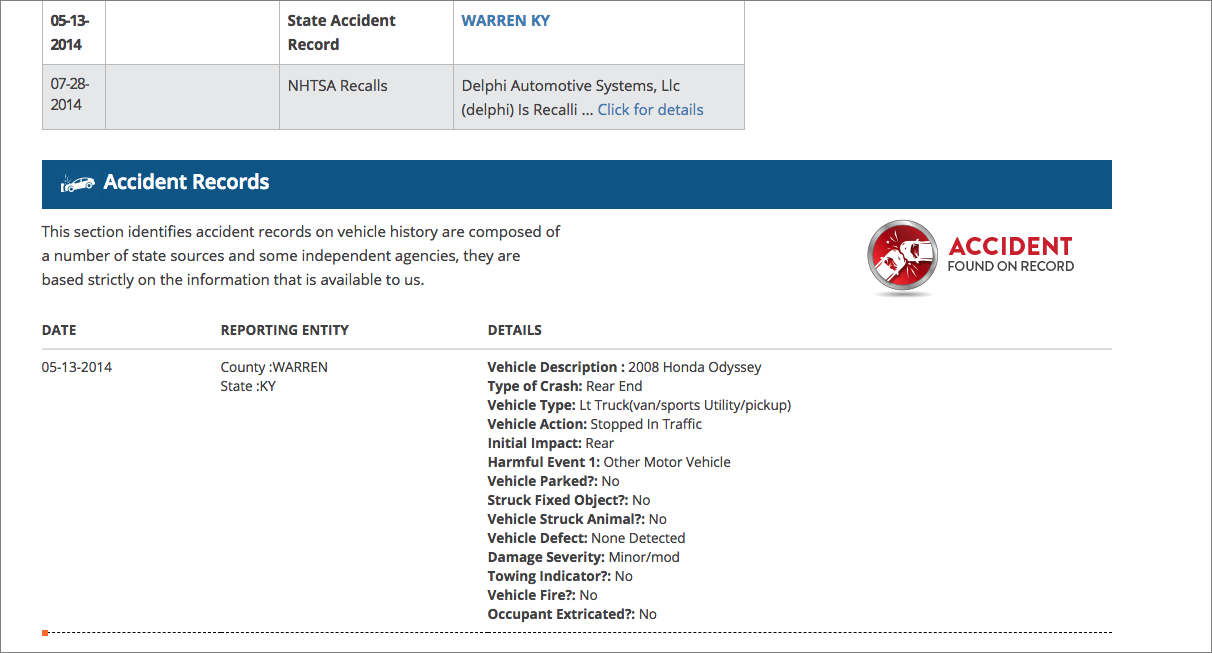
However, after comparing Vehicle History’s reports to those produced by CarFax, I’ve found that Vehicle History’s reports have a lot of gaps. For instance, the above report doesn’t include buyer history, which I’ve found to be valuable. As much as Vehicle History’s reports are useful for weeding out obvious lemons, you’ll want to use CarFax for cars that pass these early tests.
How to Shop for Used Cars Online
If you or someone you know needs to buy a used car, here’s my suggested workflow for sorting them out online:
- Pick a handful of models in the category that you want. I wanted a reliable family hauler, so I winnowed my search down to a handful of models: the Honda Odyssey and Toyota Sienna minivans and the Honda Pilot and Toyota Highlander SUVs. There’s nothing wrong with being particular, but the more flexible you are, the more likely that you’ll find a good deal.
- Search for vehicles on Craigslist, Facebook Marketplace, and Cars.com. We ended up finding our car through a Facebook group—most areas have local trading groups on Facebook, which can be a great resource.
- Gather a number of potential vehicles. An orderly approach would involve a spreadsheet or an app like DEVONthink, but I’ll confess to just having a browser window full of tabs.
- Look over the pictures and details carefully, and eliminate any that seem substandard. When you look at a bunch at a time, you get a good feel for the market prices in your area, but you can always check Kelley Blue Book if you’re unsure.
- Once you narrow your list of candidates, it’s time to start looking at vehicle histories. I usually start with Vehicle History, and if that all looks good, I’ll look at VINCheck to make sure it’s not stolen, and then iSeeCars to see how well it’s priced.
- Finally, it’s time to move on to CarFax.
When to pay for a CarFax report is a tricky question. If the car is being sold by a dealer that offers a free CarFax or AutoCheck report on their Web site, I’ll look at that at the same time as the others. Private sellers often don’t offer such amenities, so you have to choose whether to pay for a report before or after you take a test drive. I prefer to hold off until after, because I want time to mull it over anyway, and I often find deal-breakers when I inspect a car in person that no amount of Internet research could reveal, like damaged upholstery, bad smells, and rust.
Doing this, I found that one report can often reveal something not shown in others, so it’s worth checking all of them before you take the plunge.
What to Look For in Vehicle History Reports
I’m not a mechanic, nor do I play one on TV, and there are no hard and fast rules here, but here are a few things I always look for in these reports:
- Accidents, obviously. An accident won’t necessarily be a deal-killer, but it’s definitely a negotiating tool.
- Salvage or rebuilt titles (a rebuilt title denotes a car that was totaled and then repaired). I avoid both, but some people swear by salvage title cars.
- Number of previous owners. Some people will tell you to pass on any car with more than two owners. I tend to focus instead on the length of ownership. If the car has had four owners, and the last two each owned it for less than a year, that’s a sign that there’s something seriously wrong with the car.
- Cross-country moves. In the north, older cars tend to have rust problems, but in hotter southern parts of the country, rubber gaskets and seals may have dried out. Neither is necessarily an issue, but both are worth checking if the car has moved from a different part of the country.
Tred suggests a few more things to look for, but you shouldn’t be overly reliant on any vehicle history report, since they don’t reveal all the problems that an experienced mechanic can spot.
Finishing Your Research in the Real World
After checking the vehicle’s history, you’re ready for a test drive and, ideally, some mechanical advice. Automotive Web sites will always tell you to pay for a mechanic’s inspection. That’s good advice, but not always possible, especially if you found a particularly good deal that people will be fighting over. I used to write for an automotive Web site and would advise people to walk away from such high-pressure situations, but if I’d followed my own advice, I wouldn’t have been able to buy our most recent car.
Regardless, one of the smartest moves you can make is developing a good relationship with a mechanic in advance so you can get their advice or have them inspect the car before purchase. I’m lucky enough to know three, and when we were looking at the car we finally bought, they all told me to go buy it before someone else snapped it up. That turned out to be good advice because by the time we got to the dealership another family was trying to buy the car out from under us.
Finally, the most important step is test-driving the car. I could talk a lot more about that, and many already have, so I’ll leave it to them (Scotty Kilmer is always fun to watch). I’ll say this much: you want to test every feature of the car, drive it at highway speed, check under the car before and after for leaks (understand that the air conditioner drains water under the car—that probably isn’t a leak), and check for major rust. You don’t usually have to be a trained mechanic to tell if a car is a lemon.
But keep in mind that every used car comes with a set of trade-offs, and you need to be honest with yourself about what you’re willing to put up with. And never forget that entropy is real. There will always be some existing problems—our car needed new dome lights, a cabin filter, floor mats, and some headrests—but there are almost always more expenditures around the corner.
Thanks to this process, we skipped a lot of potential headaches and wound up with a reasonably priced Honda Pilot with a single owner and a thorough service history. I quickly fixed all the minor problems, and we’ve had several thousand trouble-free miles since.
What APFS Does for You, and What You Can Do with APFS
When Apple released macOS 10.13 High Sierra in 2017, one of its most notable features was nearly invisible. Installing the update on a Mac with a solid-state drive (SSD)—but not a Fusion drive—automatically switched the underlying file system from Mac OS Extended (also known as HFS+) to APFS (Apple File System).
The file system is the bedrock-level technology that specifies where data is stored—not just in terms of how files and folders are represented in the operating system, but where individual bits are physically stored in the cells of an SSD chip or on the magnetic surfaces of the spinning platters in a mechanical hard disk drive.
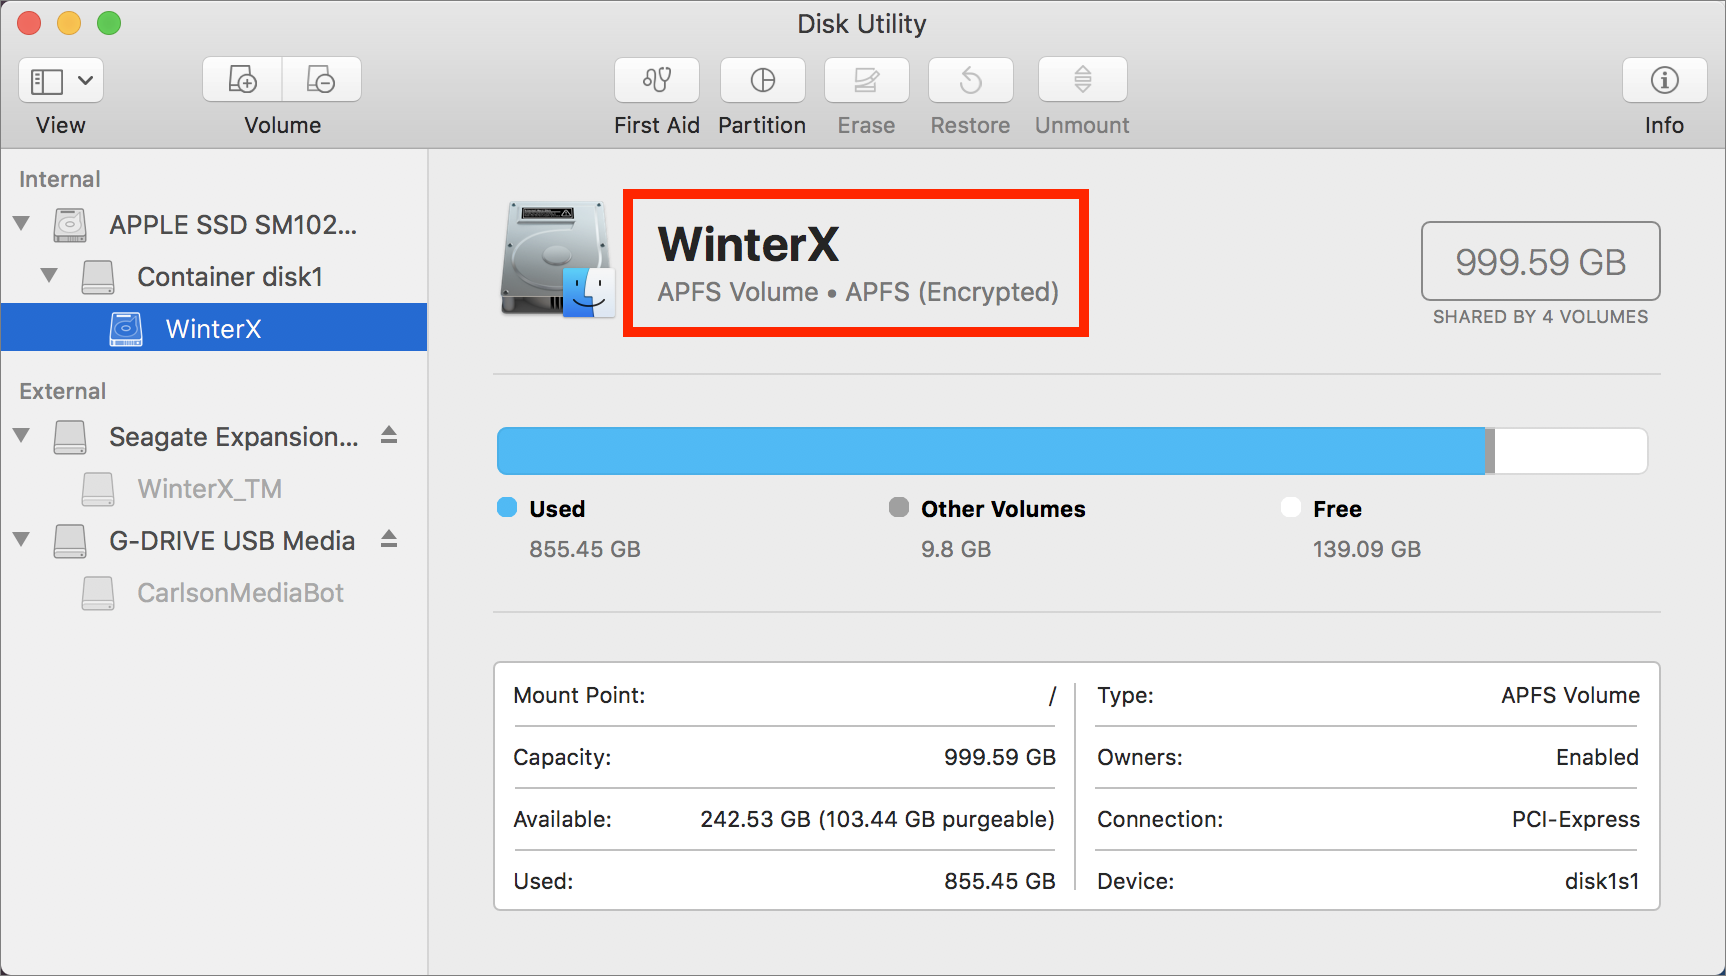
There are any number of ways the switch to APFS could have gone wrong, but for most people the shift was seamless—if a bit more time consuming than most macOS upgrades. You may not even have noticed that your Mac is now running APFS. To find out, open Disk Utility, click your startup disk in the sidebar, and look under the disk name.
High Sierra converted my 2016 MacBook Pro when I upgraded and, since nothing blew up, I filed APFS away as another technology shift that Apple managed efficiently. But in the process of writing my just-released book Take Control of Your Digital Storage, I learned why Apple went to all the trouble. APFS offers a few notable automatic benefits and some useful things you can do directly.
What Does APFS Do for Me?
Let’s start with why Apple made the switch from Mac OS Extended to APFS in the first place. Although mechanical hard disk drives are still widely used and offer the best price per gigabyte, solid-state storage media is the future. (In fact, APFS is the file system used by iOS devices, Apple Watches, and Apple TVs—all of which store data in solid-state memory.) An SSD provides much faster performance because it doesn’t suffer from the lag between macOS asking for data and a mechanical disk’s armature skipping to the correct positions on the platters to read it. An SSD also has no moving parts, so the likelihood of mechanical failure is extremely low.
However, the file system in use before APFS, Mac OS Extended, isn’t as efficient when working with SSDs. It was designed—many years ago—with magnetic disks in mind, where a file is preferably written in a long stretch across the surface. In reality, most files are split up into many tiny pieces, which is why we used to optimize performance by “defragmenting” disks, a practice largely unneeded these days except in rare circumstances.
On an SSD, data is written to cells regardless of where they are located in relation to one another. But there’s a catch: data can be written to the cells only a finite number of times, so APFS efficiently shuffles data around to manage SSD wear. Also, if you duplicate a file on an SSD, APFS uses the stored data of the original file and writes just the changes rather than writing an entirely new file. In terms of performance that you can see, duplicating that file—or folder, or hundreds of files—happens nearly instantaneously because APFS makes metadata links to the originals.
So, underneath the surface, APFS handles data more efficiently. That said, Apple is still working on APFS, making it a moving target for developers of backup and disk utility software and limiting the compatibility of the file system. APFS currently works only with SSDs, although Apple says that full support for mechanical hard disks and Fusion drives is coming in macOS 10.14 Mojave. It’s possible to format a hard disk drive as APFS, but you’re likely to experience a performance hit compared to it formatted with Mac OS Extended. It will be interesting to see how Apple addresses that in Mojave.
APFS also isn’t supported on Time Machine drives. Even if your startup disk is an SSD, your Time Machine drive needs to remain in Mac OS Extended format for the time being.
What Can I Do with APFS?
That’s all behind-the-scenes stuff, but what does APFS enable you to do? One of its most powerful user-facing features is how it enables you to create multiple, resizable volumes on your drive. Sometimes people want to split a drive into multiple virtual volumes to separate data such as files for work and files for home or to encrypt one for storing sensitive data and leave the other unencrypted.
To explain how Mac OS Extended and APFS each handle that task, imagine the drive is a factory that builds rockets. I could instead use an office building as a metaphor, but wouldn’t you rather visualize spaceships?
On a drive formatted as Mac OS Extended, the factory is a giant open space where the rockets can be assembled and parts can be stacked. The factory floor is the free space on the drive.
(There’s also a secret door to a hidden room of emergency equipment that nobody pays attention to unless something goes wrong on the factory floor. That room represents macOS Recovery, the invisible startup partition that runs a scaled-down version of the operating system when you need to repair your main macOS installation.)
Now, let’s say you want to partition the drive into two volumes or, in our example, to split the factory into two sections to build two rockets simultaneously. Under Mac OS Extended, you’d erect a permanent wall between the sections, creating two separate rooms. (The hidden macOS Recovery room is still there, too. Safety first, people.)
Soon your rocket business is growing quickly, and you realize you need to build a larger rocket that will get a spacecraft to Mars. The problem is, this new rocket won’t fit into either of the two rooms. So, to make way for it, you have to take everything out of the factory (back up all the data and erase the volume), smash the wall (reformat the drive), build a brand-new wall that allocates enough space for the large rocket and leaves a smaller second room for the first rocket design and components (repartition the drive), and put everything back (restore the data from backup).
(Technically, there’s another option. If one of the rooms (partitions) is empty, Mac OS Extended enables engineers to move the wall, resizing the partition non-destructively. But when there’s equipment (data) in each room, the wall has to come down first.)
If, instead, you decide to go back to the one-room layout, you need to take everything out of both rooms and start over (back up all the data, erase the entire drive, and restore the data).
Now, let’s look at an APFS-powered rocket factory.
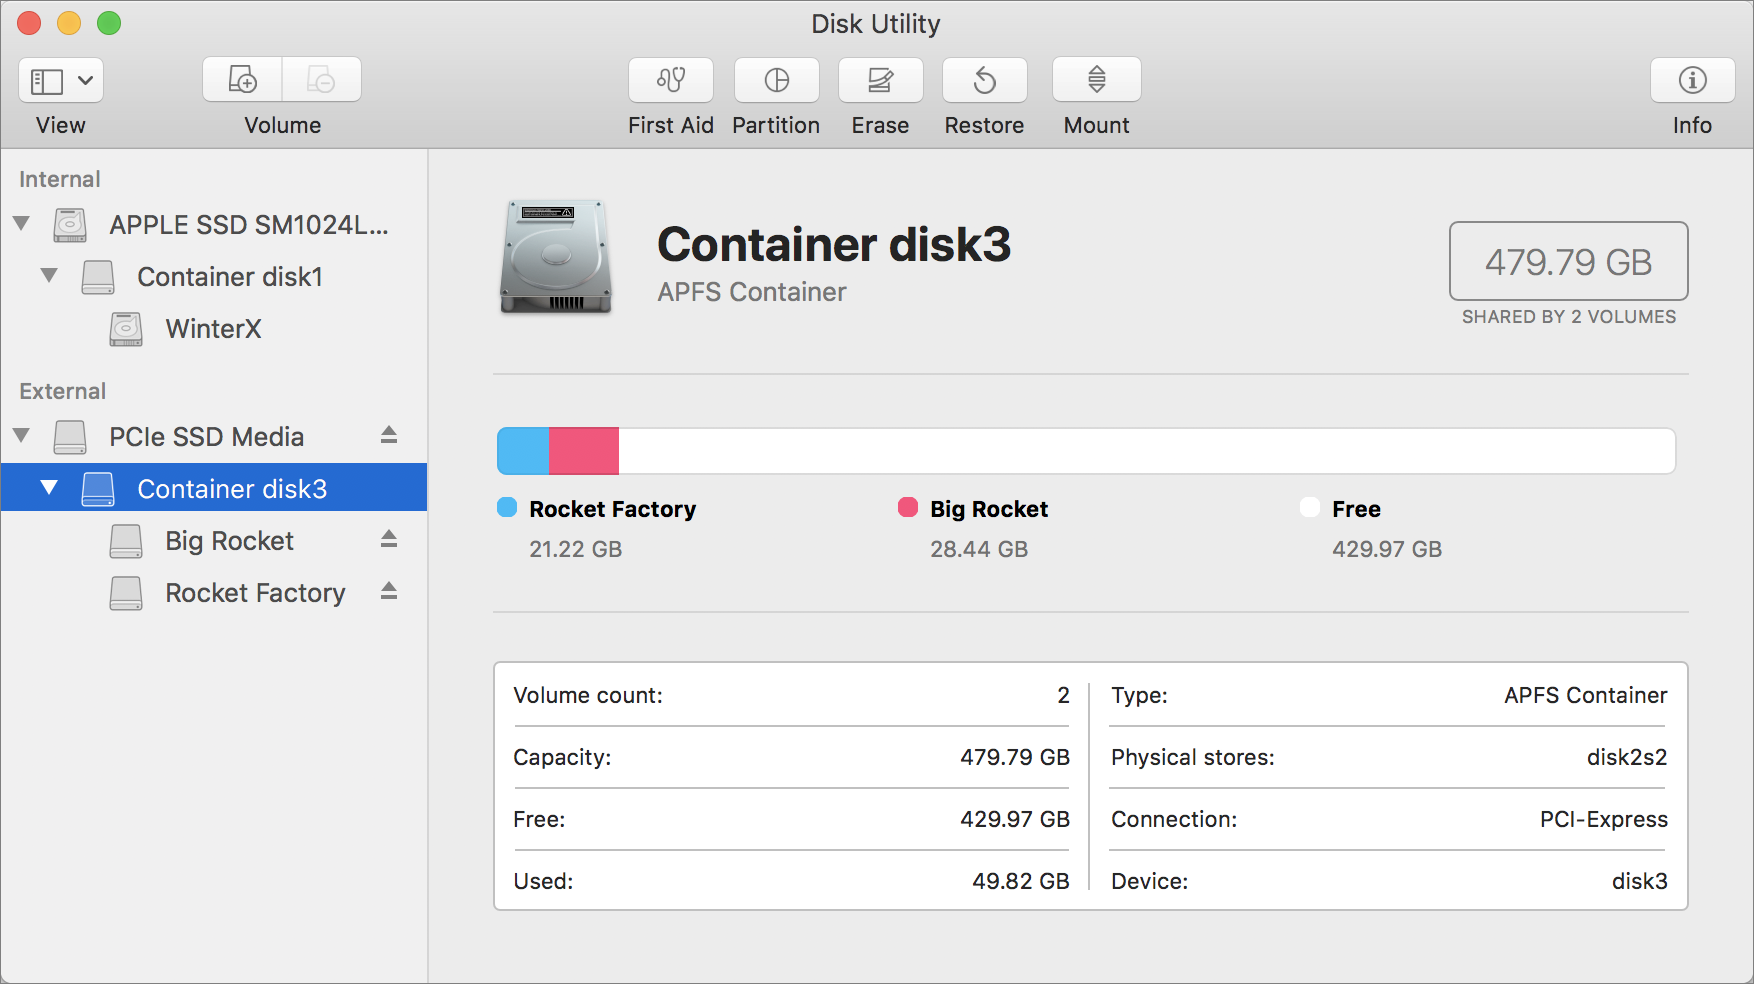
In terms of how space is allocated when formatting or partitioning a drive, APFS creates containers that include volumes, which can be dynamically adjusted as needed.
In our rocket factory analogy, APFS starts as a large open building, but even before a single piece of machinery is installed, a border of bright yellow-and-black tape is put onto the floor to indicate the active work area. That’s the container, and it encompasses nearly all of the factory area. That large area is also a single volume.
(If the drive is a startup disk, there are two other small areas taped off, one for the macOS Recovery room, and one for virtual memory, basically a small spot to store equipment—data—for short periods of time to make it easier to access.)
In this scheme, all the space in the volume is available for use, just as in the Mac OS Extended factory, but the factory manager is better about positioning tools and equipment near each other for a more efficient workflow.
As production ramps up and the factory floor needs to split into two sections, the APFS factory doesn’t build a physical wall. Instead, the manager merely moves the tape to indicate that there are now two work areas: adding a new volume and making the original volume smaller. The equipment in the area that becomes the second work area moves as needed—rather than being removed (erased) to create the volume. (You can also set minimum and maximum size limits for a container when you create it.) In the Finder, you see two volumes.
When the order comes in to start manufacturing bigger rockets, the volume that needs the extra space automatically grows as needed: redrawing the taped area and taking space from the second volume dynamically. No walls need to be torn down; no volumes need to be erased and then restored.
(Note that it is possible to partition an APFS drive, which gives you multiple immovable containers, but then they have the same limitations as Mac OS Extended partitions. So there isn’t much point.)
APFS Snapshots
Another major benefit to APFS is its support for snapshots, which are a record of a drive’s state at a point in time. When you apply a system update, macOS automatically creates a new snapshot, so if anything goes wrong, you can roll the Mac back to the exact state it was in before the update. A snapshot is also created once every hour. These snapshots also enable you to retrieve deleted files or to go back to an earlier version of a file.
Sound familiar? Except for the automatic pre-update backup, that’s how Time Machine works. In fact, to access snapshots, you use the Time Machine interface (even if you haven’t yet set up Time Machine). But two separate things are going on behind the scenes.
When a Time Machine drive is connected, macOS makes regular Time Machine backups, not APFS snapshots, to that drive. Since a Time Machine drive must be formatted as Mac OS Extended, macOS copies to the drive any files that were changed since the last backup.
If the Time Machine drive is not connected—let’s say you’re traveling with your MacBook Pro—macOS creates APFS snapshots every hour and stores them on the startup disk or any APFS-formatted SSD directly connected to the Mac. The snapshots don’t take up much extra space, because they only contain metadata describing the states and locations of every file, plus data that’s been removed or replaced. Snapshots also age out after 24 hours and are automatically deleted.
On Macs running macOS versions earlier than High Sierra or those with hard disk drives or Fusion drives still formatted as Mac OS Extended, Time Machine creates similar local “mobile Time Machine” snapshots when the Time Machine drive is disconnected. But because the drive isn’t formatted as APFS, those local snapshots are not the same as APFS snapshots.
On a drive formatted as APFS, you can see how many snapshots are present by opening the Terminal app and typing:
tmutil listlocalsnapshots /
You can also create a snapshot at any time by typing:
tmutil snapshot
If you need to restore deleted files or go back to an earlier version of a file, you use the Time Machine interface to do it. Click the Time Machine icon in the Dock or choose Enter Time Machine from the Time Machine menu bar icon, and then use the timeline on the right to navigate to the version of the file you want.

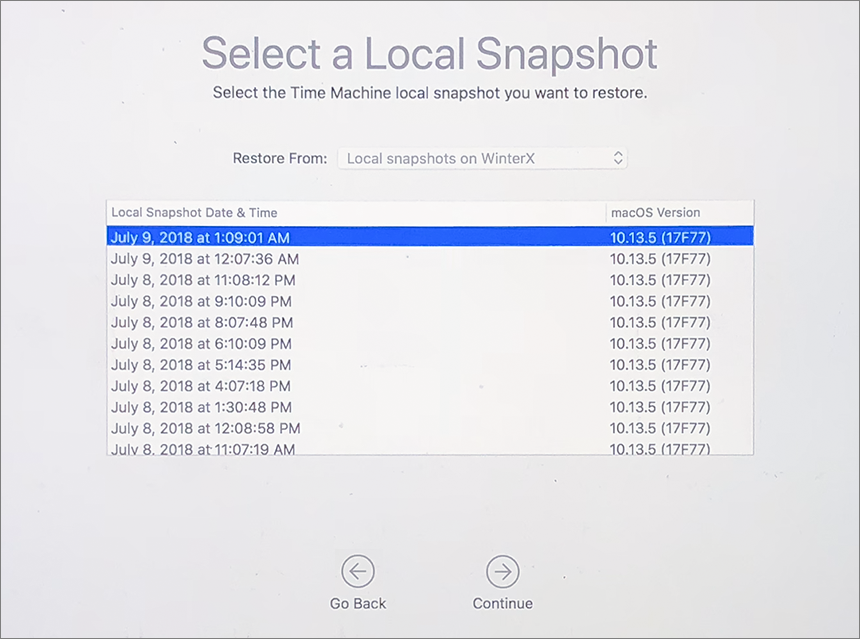
Should you need to restore the entire startup disk to a previous state, restart into macOS Recovery (hold Command-R at startup until you see the macOS Utilities screen), and choose Restore from Time Machine. You’ll be given the option to select one of the local snapshots.
(Speaking of macOS Recovery, if you open Disk Utility and run First Aid on the startup disk, it also checks all the snapshots. So if you have a lot, be prepared to wait quite some time for First Aid to complete.)
You may never need to take advantage of snapshots, but it’s comforting to know that macOS has a built-in data protection mechanism in place at the file-system level.
Take Control of Your Digital Storage
APFS is just one part of our modern storage picture. In Take Control of Your Digital Storage, I also investigate the other acronyms that bedevil us when contemplating adding capacity: what to look for when buying a NAS (Network-Attached Storage), understanding the difference between HDDs (hard disk drives) and SSDs (solid-state drives), and explaining RAID (Redundant Array of Independent Disks) and, related to RAID, possibly my favorite acronym ever, JBOD (just a bunch of disks). You’ll also learn more about creating partitions and volumes, using Disk Utility and First Aid, encrypting drives and data, and more.
The book is available now for $12.99 at the Take Control bookstore.


