#1436: What’s new in iOS 12’s Photos, Mojave’s Dark Mode and Continuity Camera, Safari 12 crashes Sierra’s Spotlight
Explore the new features of macOS 10.14 Mojave and iOS 12 with TidBITS this week! But first, for those still running macOS 10.12 Sierra, Safari 12 is causing Spotlight to crash—we have the fix. Back in Mojave, we look first at Dark mode, which may or may not be compelling for your eyes, and then examine the new Continuity Camera feature that lets you scan documents or take photos with an iOS 12 device straight to your Mac. Finally, Jeff Carlson reviews the new features of Photos in iOS 12, which are designed to encourage you to engage with and share your photos more. Notable Mac app releases this week include SoundSource 3.1.1, Transmit 5.2, Ulysses 14, Live Home 3D 3.4, VMware Fusion 11, 1Password 7.2, Agenda 2.4, Apple Configurator 2.8.1, ScreenFlow 8.1, SuperDuper 3.2, Banktivity 7.0.1, and Logic Pro X 10.4.2.
Safari 12 Crashes Spotlight in Sierra—Here’s the Fix
If you’re still running macOS 10.12 Sierra and have upgraded to Safari 12, you may have noticed Spotlight crashing when you invoke it with Command-Space and start typing a search term. Thanks to TidBITS reader Christopher Stone for alerting us to the problem, which other readers have since confirmed and which has been discussed in the Apple Support Communities. The crashes may not occur on every use of Spotlight, perhaps due to the specifics of individual searches. The problem is limited to those using Sierra and Safari 12; it doesn’t occur with any other version of macOS or Safari.
Our friend Matt Neuburg shared one way to avoid the crashes if you’re only searching for files—use the Search field in Finder windows instead. But there’s another workaround that eliminates the crashes entirely with only a small hit to Spotlight’s capabilities. Open System Preferences > Spotlight > Search Results, and deselect the Bookmarks & History category.
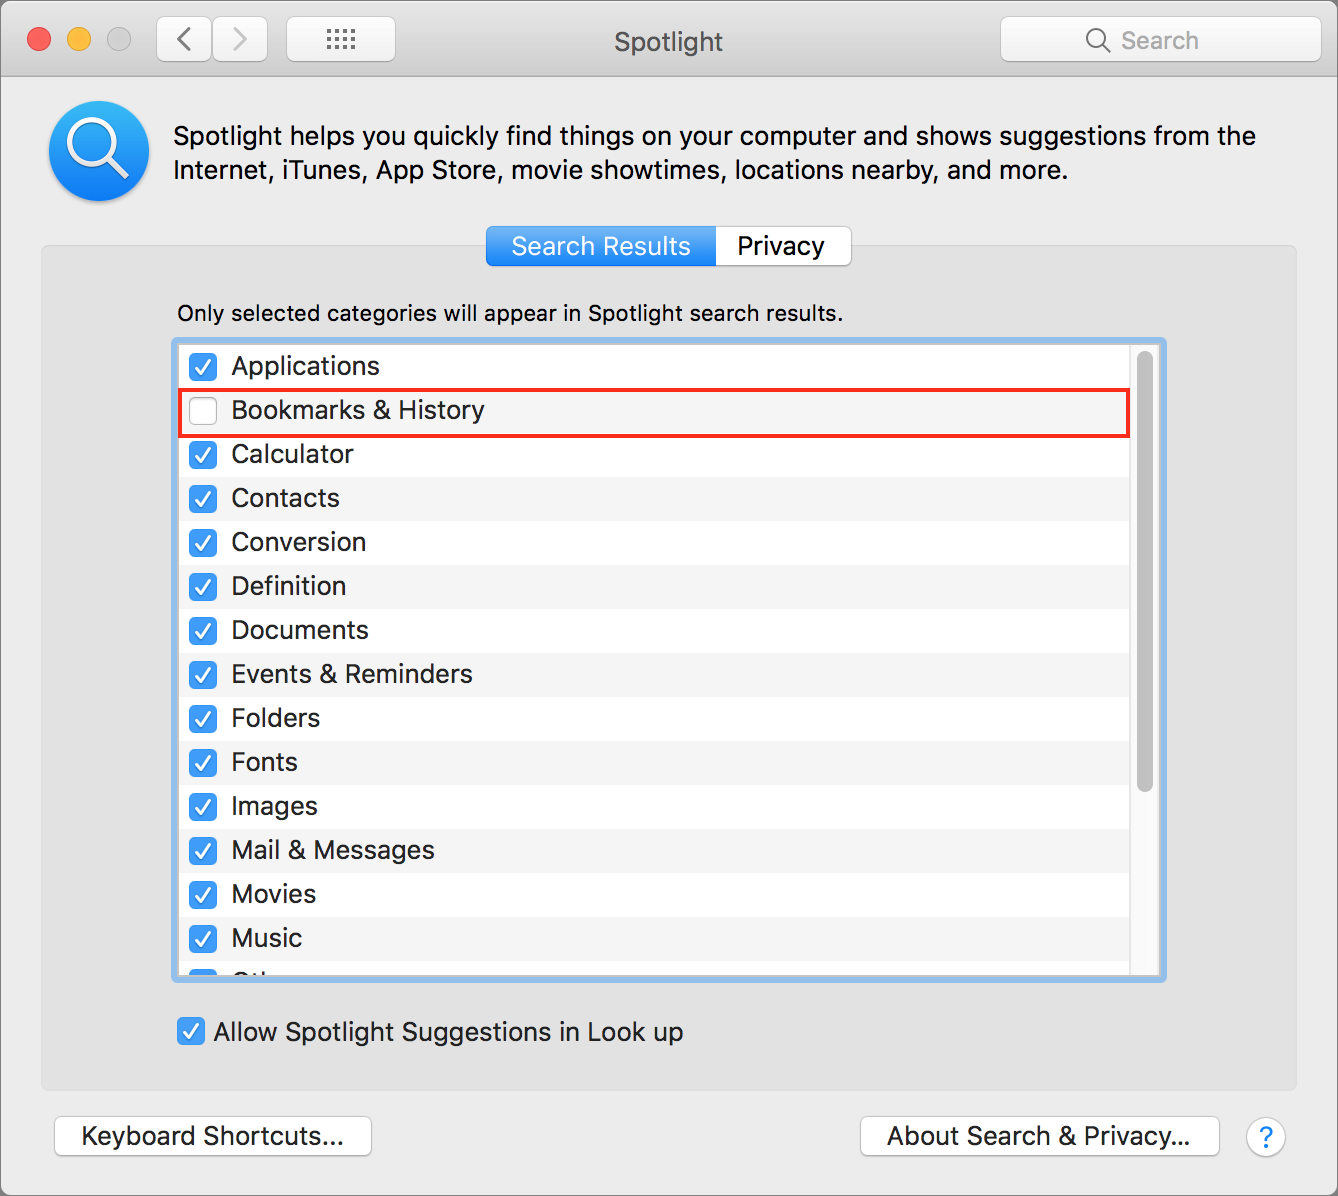
Presumably, doing that prevents Spotlight from searching through Safari 12’s bookmarks and history, and something in that data is causing Spotlight in Sierra to choke. We anticipate that Apple will fix this in the next update to Safari.
Explore the Dark Side of Mojave: Understanding, Enabling, and Customizing Dark Mode
Do you find your Mac’s screen too bright for comfort, even after you’ve dropped the brightness setting in System Preferences > Displays? Apple has been sensitive to lighting issues for years, enabling the Mac to adjust screen brightness automatically to match ambient light and adding Night Shift to shift the colors of the display after dark. On the MacBook Pro, even the keyboard is backlit for easier typing in the dark, and it too can adjust its brightness in low light. And in previous versions of macOS, there was an option to make the menu bar and Dock dark.
More significant than these options, though, is macOS 10.14 Mojave’s Dark mode, the first major visual change in macOS in a long time. Apple promotes it generally, saying:
Dark Mode is a dramatic new look that helps you focus on your work. The subtle colors and fine points of your content take center screen as toolbars and menus recede into the background. Switch it on in the General pane in System Preferences to create a beautiful, distraction-free working environment that’s easy on the eyes — in every way.
It’s not clear that Dark mode is a win for everyone, but light-sensitive people such as Josh are thrilled by Dark mode because it radically reduces the amount of light coming from the screen.
Dark mode is easy to turn on and off in System Preferences > General, where you can click Dark or switch back to the traditional look with a click on Light. There’s no shortcut for switching, but developer Benjamin Kramser has just released NightOwl, a menu bar utility that makes switching easy and also provides a schedule for automated switching, much like Night Shift. That might be helpful if your work environment is light during the day, but dark at night, when a bright screen may be less comfortable.
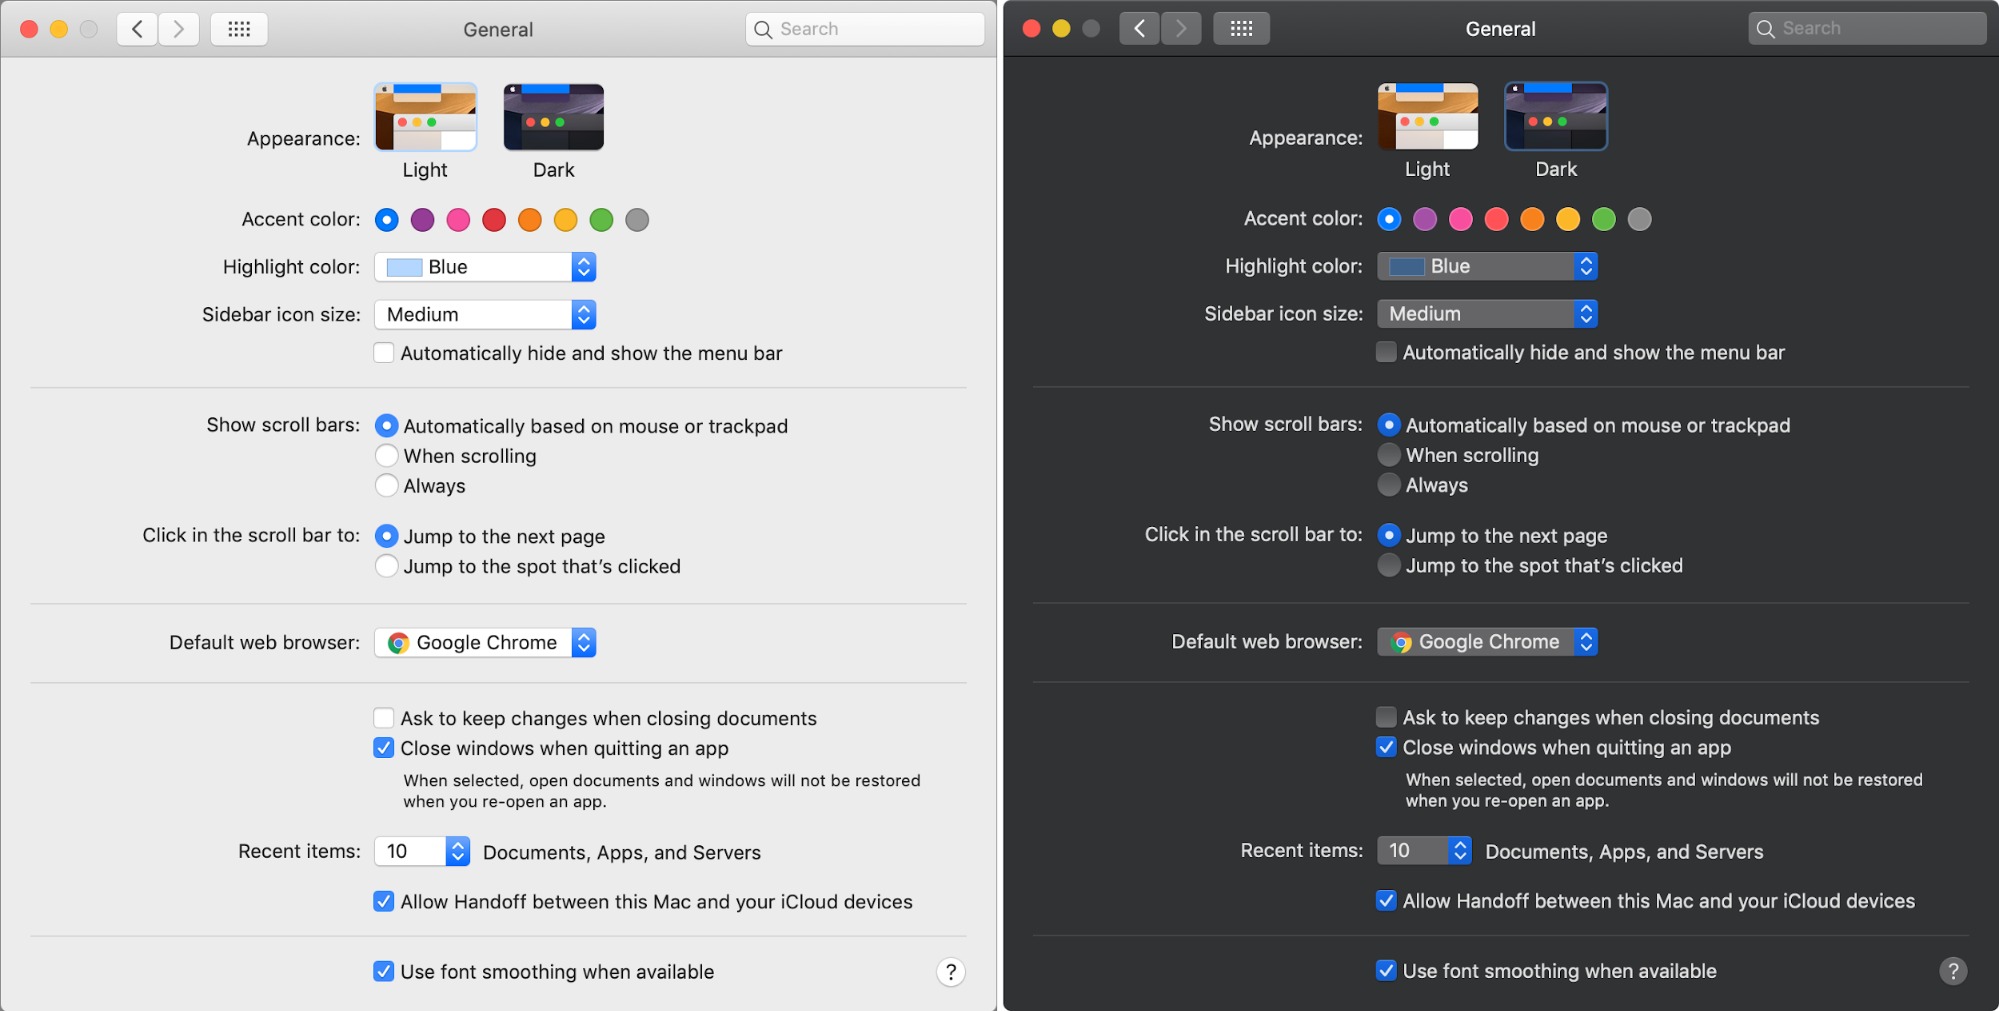
When you switch into Dark mode, macOS immediately swaps dark text on light backgrounds for light text on dark backgrounds, changing the menu bar, windows, interface elements, and more in the Finder and supported apps. As you can tell by the increased number of releases in our Software Watchlist, developers have jumped on Dark mode with enthusiasm, so nearly every app that claims Mojave compatibility is specifying support for Dark mode. Older apps won’t gain Dark mode support without an update.
Josh has made a video showing how to turn it on, and offering some examples of how it looks. Even though not every app supports it, it still makes a big difference!
Precisely what aspects of an app get dark is another question, however, and this is one of Dark mode’s challenges. Open a new document in TextEdit or Pages while in Dark mode, and while the toolbar and controls will all be dark, the content area will be the same bright white that it always was before. Same with Safari and many Web sites. Worse, the contrast between a bright content area and dark controls is more jarring than when the controls were on a light background. Help may be available from Denk Alexandru’s Dark Mode for Safari, a $1.99 extension for Safari that gives you control over Web site themes.
Some apps have their own internal settings specific to Dark mode that let you pull back on how dark it is. For instance, when you’re in Dark mode, Mail displays a new “Use dark backgrounds for messages” checkbox in Settings > General that lets you choose between dark and light backgrounds when reading and composing messages. Similarly, when running Maps in Dark mode, you can choose View > Use Dark Map to switch the map style between the standard light style and a dark style. You’ll have to poke around in your favorite apps in Dark mode to see if they offer such adjustments.

Another challenge for Dark mode is that light text on a dark background doesn’t have nearly as much contrast, so it’s harder to see, particularly for the majority of the population that isn’t light-sensitive. If you find reading text in Dark mode difficult because it seems blurry, but you prefer the dark look otherwise, you may be able to make it more to your liking by changing the font or style to make it bigger or bolder, such as in Mail’s Settings > Fonts & Colors settings. For system-wide improvements, though, visit System Preferences > Accessibility > Display.

The Display Contrast slider here lets you make text whiter and backgrounds dark, which goes a long way to improving the readability of text. Select Reduce Transparency to make items like the Dock and menus solid, rather than allowing the background to show through slightly. And to separate dark and light even more, select Increase Contrast—it turns up the brightness on divider lines as well, which can make windows easier to interpret.
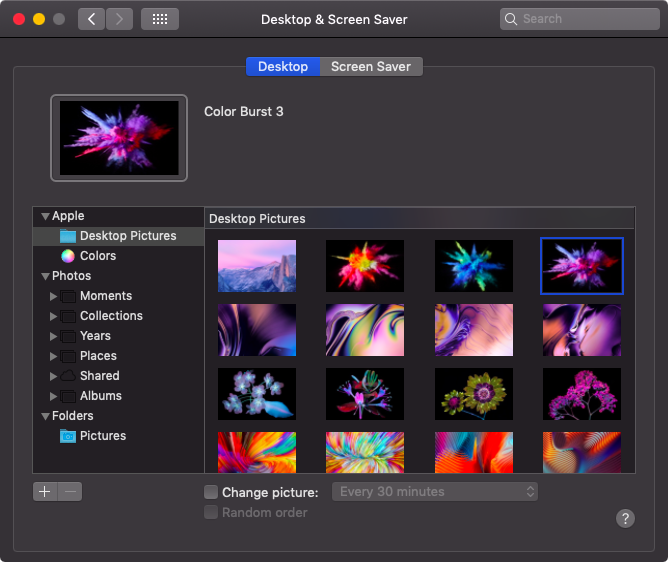
Finally, if you’re using Dark mode, you’ll probably want a dark desktop picture to keep the overall screen brightness down and avoid too much contrast with the dark windows and controls. If you look in System Preferences > Desktop & Screen Saver, you’ll find new wallpapers that won’t blow out your eyes.
Should you give Dark mode a try? Absolutely! It’s trivial to turn on and off again and has no lasting effect on anything apart from your retinas. Most people aren’t light-sensitive, and for them, especially during the day when room lighting is generally quite bright, the traditional look will likely be the most comfortable and easiest to read. However, if you recoil in pain from too-bright screens, particularly in dimly lit rooms, Dark mode may be a boon for your eyes. And if you have no issues with either the light or dark look of macOS, feel free to pick whichever you prefer aesthetically.
What’s your opinion of Dark mode? Let us know in this single-question survey.
How to Take Photos and Scan Documents with Continuity Camera in Mojave
One of the cool things about living in the Apple ecosystem is how your various Apple devices can interact with each other through Continuity, which includes features like auto-unlocking your Mac by wearing your Apple Watch, automatically moving copied text across devices, sharing files via AirDrop, and taking calls anywhere with Wi-Fi Calling.
In macOS 10.14 Mojave, Apple has expanded these capabilities with Continuity Camera, a new feature that lets you take pictures or scan documents with an iOS 12 device and have them immediately show up on your Mac—either on the Desktop or in a document. If you’ve ever been working on your Mac and needed to email someone a scan of a receipt that’s sitting on your desk, you’re going to love Continuity Camera.
Requirements and Controls
As with many system-level features, Continuity Camera requires explicit support in apps. Unsurprisingly, many of Apple’s apps offer Continuity Camera in Mojave, including the Finder, Mail, Messages, Notes, TextEdit, Pages, Keynote, and Numbers. I haven’t yet heard of any third-party apps that have added support, but let us know in the comments if you run across any.
Continuity Camera has a few basic requirements: the Mac and iOS device need to be on the same Wi-Fi network, have Bluetooth turned on, and they must be logged in to the same Apple ID, which must be set up with two-factor authentication. Check the Apple ID on your Mac in System Preferences > iCloud and in iOS under Settings > Your Name.
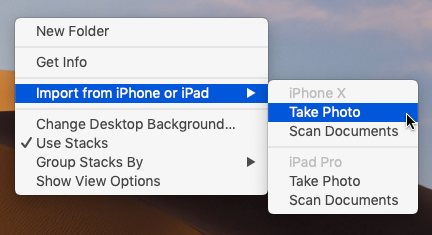
How you access Continuity Camera varies somewhat by app, but the most common way is to Control- or right-click where you want the photo or scanned document to appear. If you have only one device, you will see a subhead for the device, like iPhone X, above commands for Take Photo and Scan Documents. If you have multiple devices, you’ll see an “Import from iPhone or iPad” submenu, under which those commands will be replicated for each device.
In many of Apple’s apps, you’ll also see Import from iPhone as a submenu in the File menu, although that submenu moves to the Insert menu in Pages, Keynote, and Numbers. Plus, in Mail composition windows, there’s a drop-down menu on the right side of the toolbar that includes the Take Photo and Scan Documents commands.
For simplicity’s sake, I’m going to focus on importing images to the Desktop, but the process is the same regardless of whether you’re in the Finder or some other app. If you’d like to watch a quick visual guide to Continuity Camera, check out my short video that explains how to use it.
Take Photos with Continuity Camera
Here’s how to take a photo with Continuity Camera:
- Control-click the Desktop, and in the contextual menu, choose Import from iPhone > Take Photo.
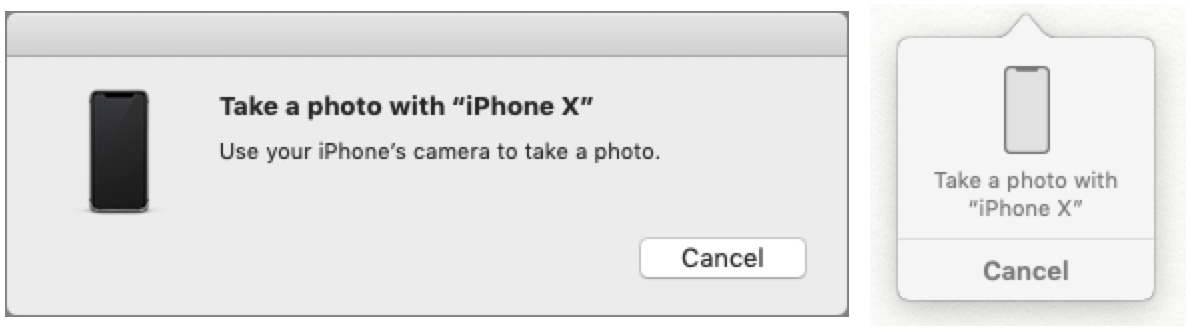
- A dialog or popover (the latter in apps) appears on the Mac screen, and a simplified version of the Camera app opens on your iPhone. You don’t get many options, but you can switch between the front- and rear-facing cameras, and tap the flash
 icon to turn the flash on or off, or set it to auto (the default). You can also pinch out to zoom or tap the 2x button on an iPhone with two rear-facing cameras.
- Frame your subject in the viewfinder, and tap the shutter button.
- Tap Use Photo to save the photo to the Mac’s Desktop as a JPEG. Or if the photo isn’t to your liking, tap Retake to try again. Note that the photo won’t appear in Photos on your iPhone.
Scan Documents with Continuity Camera
For most people, document scanning with Continuity Camera is more useful than taking photos, since you’re unlikely to need a one-off photo that you can take while sitting near a Mac. Be sure to have your document ready on a well-lit surface, and then follow these steps:
-
- Control-click the Desktop, and in the contextual menu, choose Import from iPhone > Scan Documents.
- You see a dialog or popover, and a Camera app variant opens on your iPhone. This one offers a few more options than Take Photo:
- Flash: Tapping the flash icon lets you lock the flash on or off. The default is auto.
- Filters: Tap the Filters
 icon to choose which sort of scan to take: color, grayscale, black-and-white, or photo. The default is color.
 - Auto: By default, the scanner will snap a picture automatically when it detects a document, but tapping Auto lets you change that to manual.
- Flash: Tapping the flash
- Once your options are set, center the document in the viewfinder, and if Auto is enabled, the iPhone will capture the image automatically.
- If you’re capturing the document manually, tap the shutter button. Drag the four circles to adjust the corners if necessary.
- If the scanner captured an image you didn’t want (as happened in my video), tap Retake to go back.
- Tap Keep Scan to add the scan to your queue.
- For a multi-page document, you can continue scanning subsequent pages. Each additional scan is added as an extra page to the document. When you’re done, tap Save to transfer your scans to your Mac as a PDF. The scanned document is not saved on the iPhone.
It’s tempting to import directly into apps, and for a quick photo or single-page scan, that should work well. However, you might prefer to import photos and scans to the Desktop first, and then drag them to their eventual destination. That approach gives you another copy of the file, which may provide more flexibility or security—you never know when you’ll need a photo or scan again.
As with many Continuity features, Continuity Camera can be fussy. Its contextual menu commands sometimes disappear, presumably due to communication lapses. Once when I was scanning, tapping the Save button did nothing—this might have been an indication of a communication failure. And another time, it just threw up its hands.

Nonetheless, we’ve found Continuity Camera to be among the most useful features of Mojave. Although we’re still recommending that most people hold off on upgrading to Mojave, once you take the leap, be sure to give Continuity Camera a try!
Inside iOS 12: Photos Encourages More Engagement
The iPhone has become the primary camera for many people because it’s so convenient and it takes high-quality photos. But an often overlooked factor in its popularity is the social aspect: you can share photos immediately to Instagram or Facebook, or directly with friends and family members, without first having to offload them to a computer.
Apple’s improvements to the Photos app in iOS 12 focus on the social side of modern photography, encouraging you to revisit, discover, and share images from your library. There are also a few importing and editing changes worth mentioning.
Photos For You (Yes You)
Apple has leveraged its For You feature in iTunes successfully—even though I see a lot of repetition, I still turn to it often to see what music it suggests. In iOS 12, the Photos app’s new For You screen incorporates more than just Memories, the button it replaces on the toolbar.
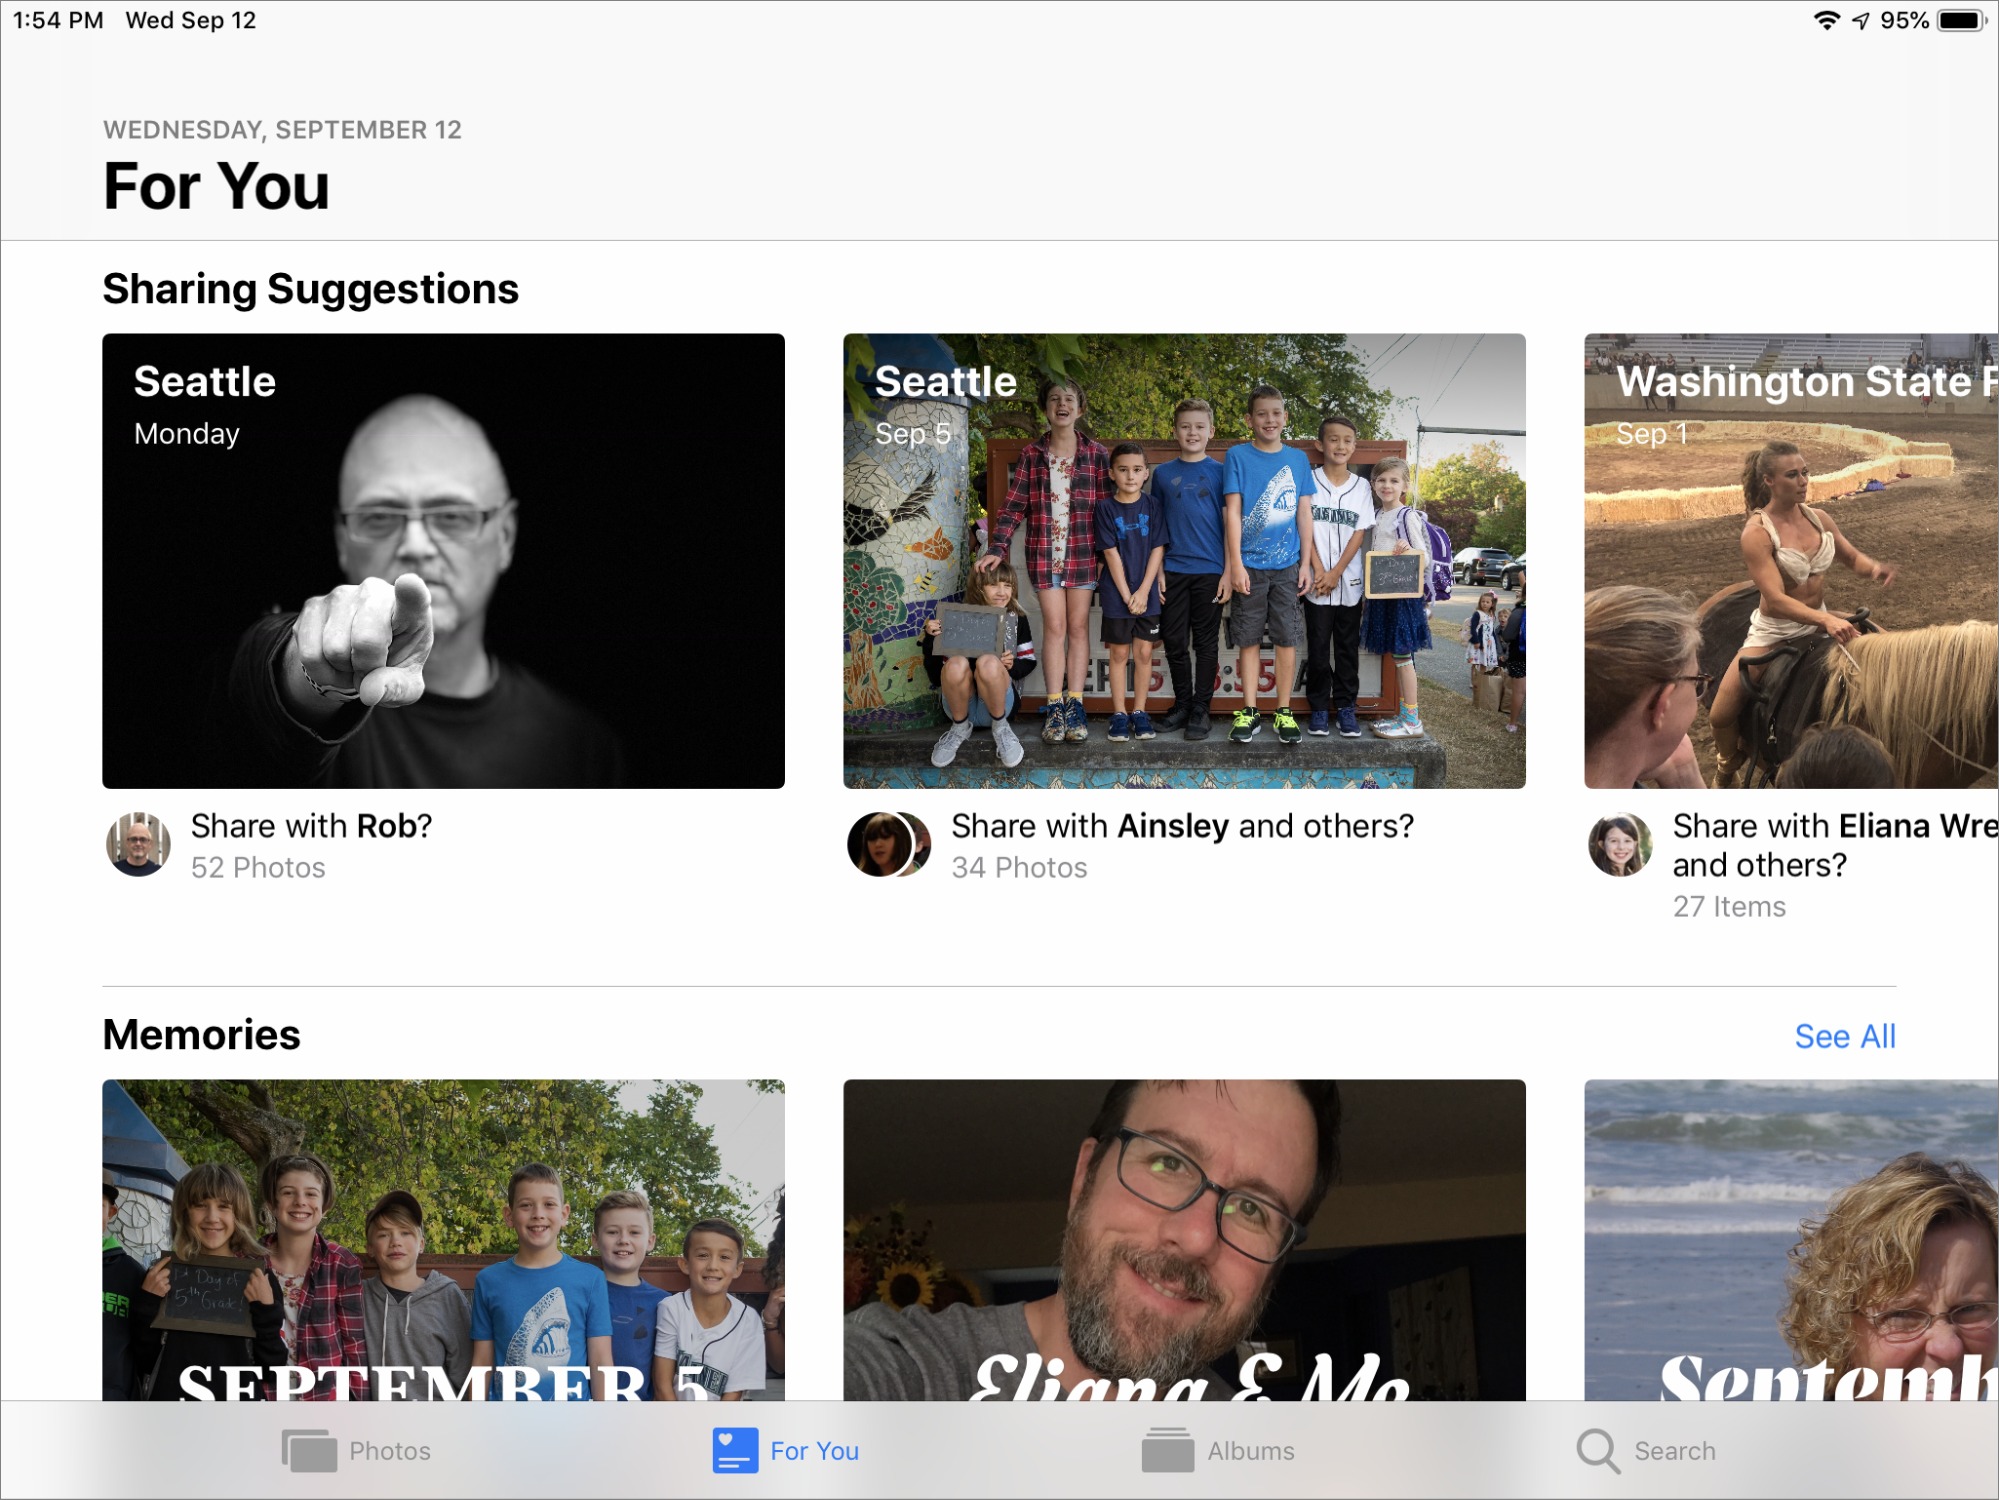
Memories—those collections of photos and videos turned into an automatically generated movie—share space in For You with the following additions, which may show up in various orders:
- Featured Photos: Photos mostly pulls these images from the pool of photos you’ve marked as Favorites, although some recently edited shots that aren’t favorited also pop up in my feed. The idea seems to be to expose you to images you liked, perhaps to bring a smile to your face or encourage you to share them. A dozen images appear in this category every day; there’s no mechanism to change or display others other than waiting to see what shows up the next day.
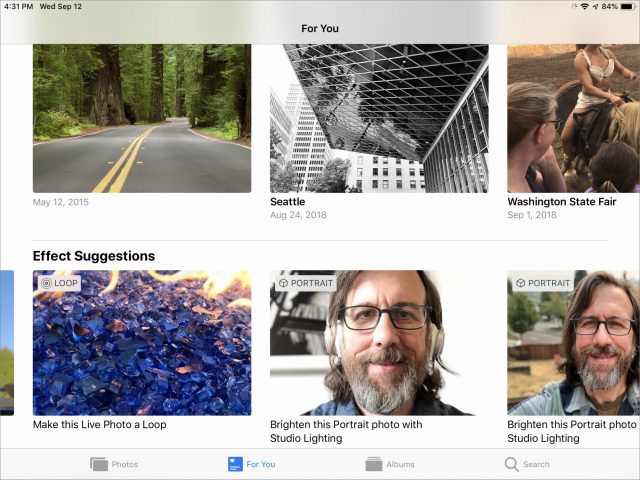
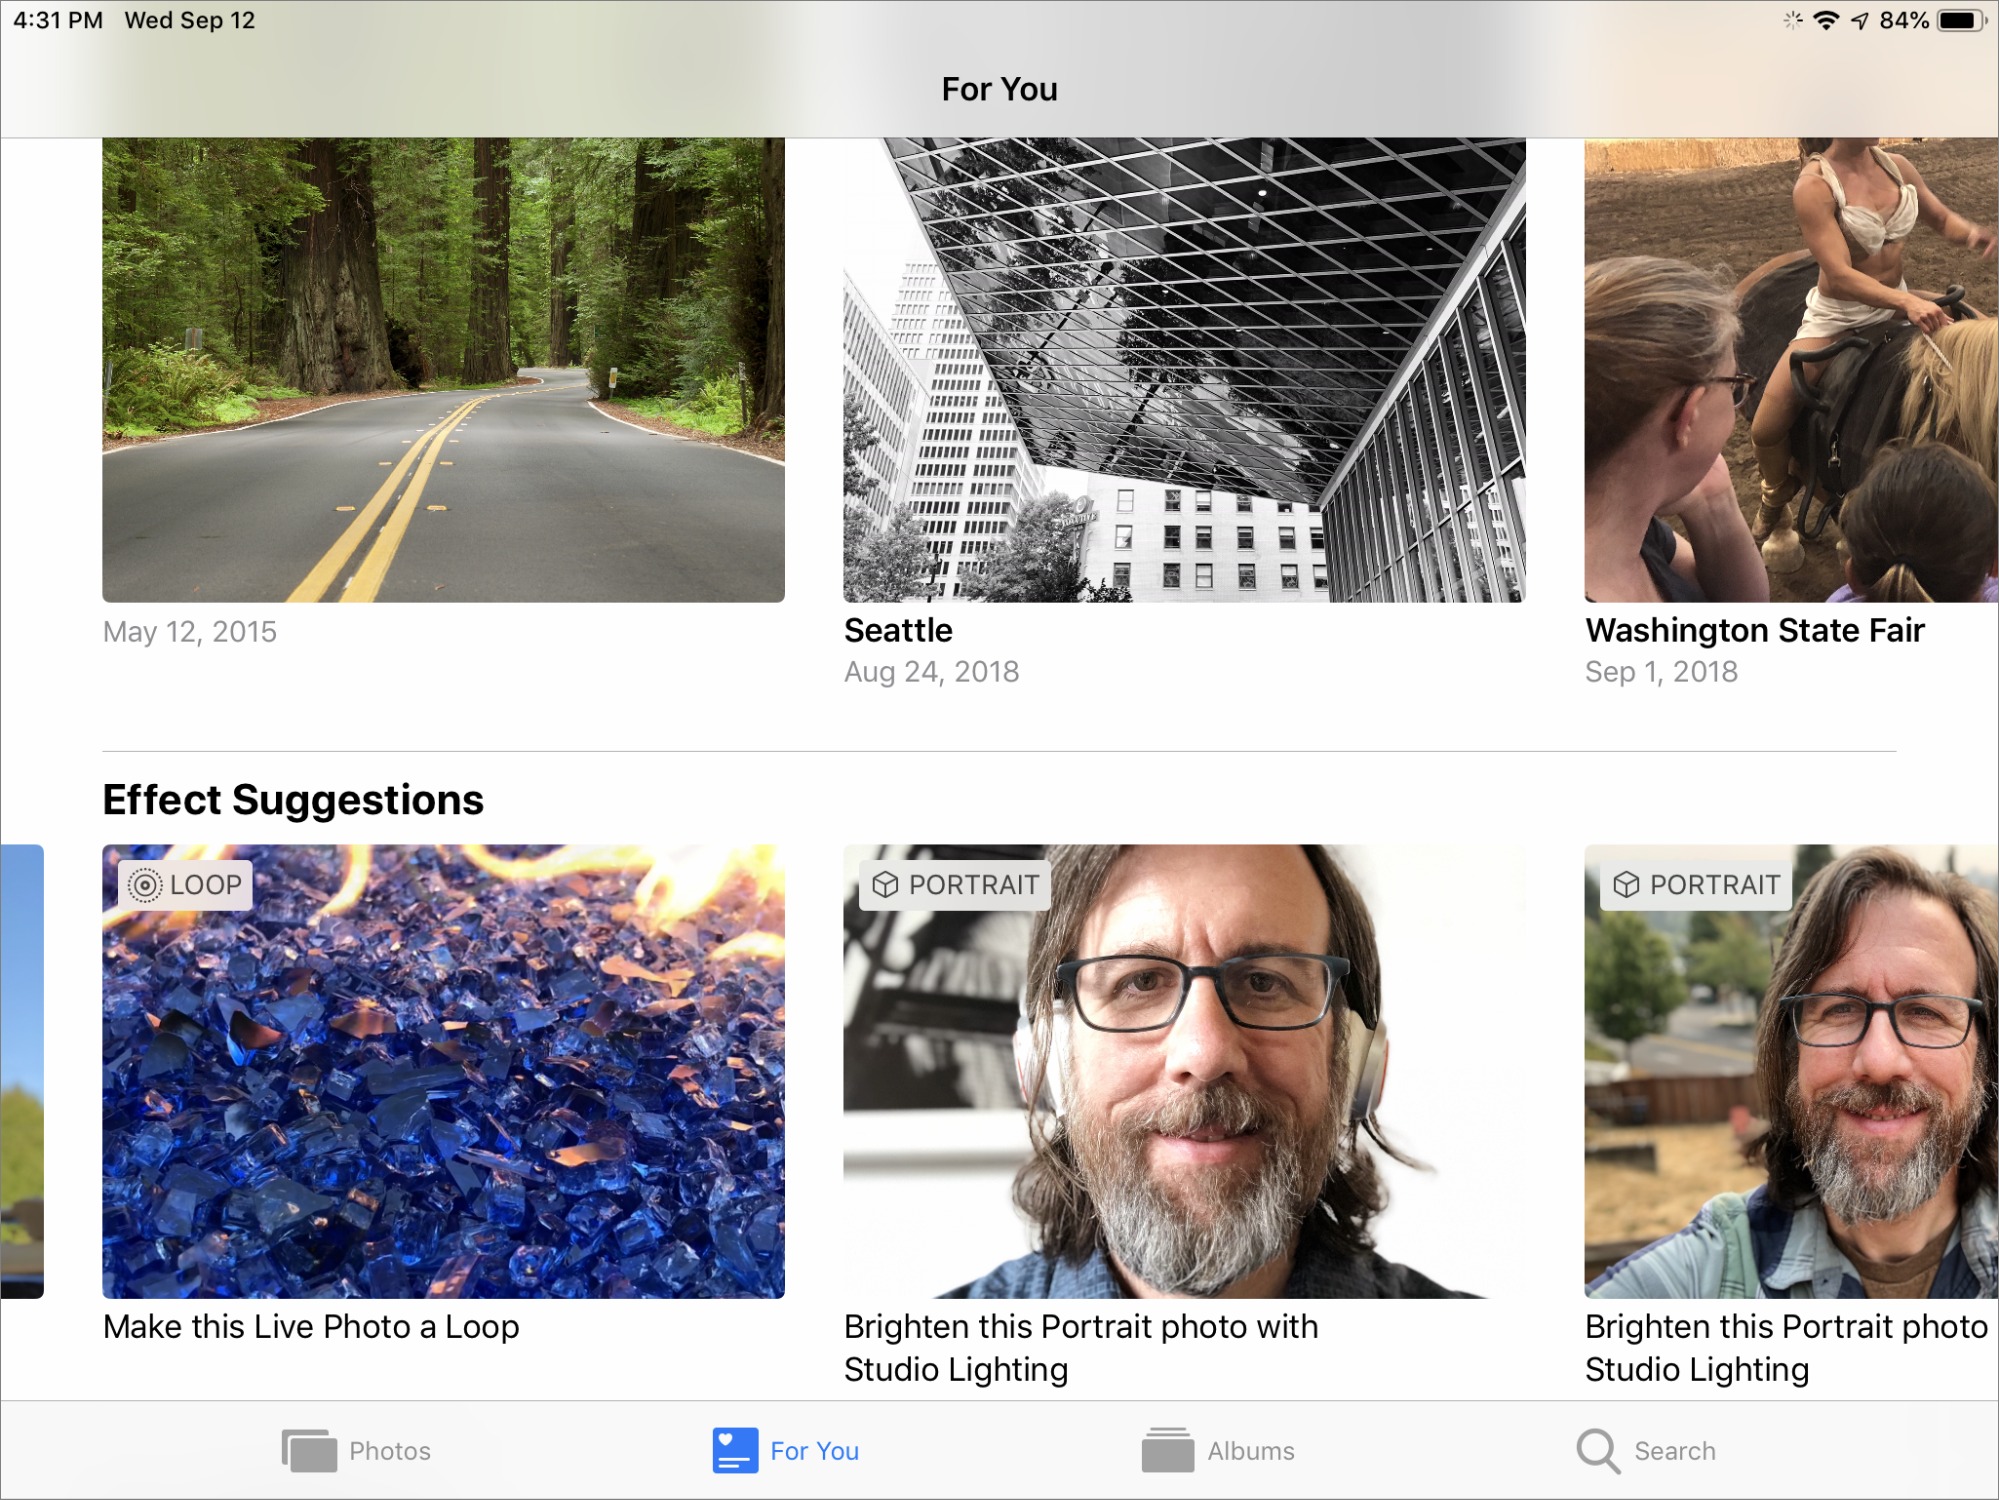
- Effect Suggestions: This category takes advantage of the lighting effects in Portrait Mode photos and animation options in Live Photos (such as looping, bouncing, or smoothing the video), suggesting that you might try applying those effects for the displayed images. When you view one of the suggestions, you can jump to the photo in your library, or tap Apply to Original to add the effect without going through the editing interface. So far I’ve seen only those two types of effects, but in theory, Photos could suggest applying filters or other edits as well. Curiously, even after you apply an effect, the image stays in the Effect Suggestions row until the next day, (with an option to revert the edit if you change your mind).
- Shared Album Activity: The Shared category used to have its own button at the bottom of the Photos screen, but now Apple groups it in with Albums. But since For You is all about staying on top of what has happened recently, the new Shared Album Activity category reveals photos you or members of group shared albums in iCloud Photo Library have contributed recently, as well as likes or comments on those photos.
- Sharing Suggestions and Recently Shared: Photos that include contacts you’ve identified using the People feature can show up in these two categories. More on new sharing features shortly.
It’s worth pointing out that the items in the For You screen are identical on my iPhone X and iPad Pro. Earlier versions of Photos could bring up different Memories suggestions, and facial recognition was done independently on each device. Now they’re synced through iCloud. Alas, the Photos apps in macOS 10.14 Mojave and tvOS 12 lack these For You features.
Albums
Apple shuffled the Albums screen a bit, putting My Albums and Shared Albums up top, followed by People & Places. Photos in iOS 12 more prominently lists the Media Types—videos, selfies, Portrait mode shots, and the like. A new Animated type includes Live Photos to which you’ve applied effects, along with any animated GIFs that you’ve saved to your library.
Under the Other Albums category, the app breaks out the Imports, Hidden, and Recently Deleted albums.
Sharing Suggestions and Pooling Photos
Sharing photos goes beyond just texting a selfie to a friend or posting a snapshot on social media. Have you attended an event with friends or family and wished you could see everyone else’s photos? (Apart from everyone posting them to long Facebook comment chains, that is.)
Apple has offered iCloud Shared Albums for a while, but those are more permanent and structured, requiring that you set up the album and invite people to subscribe to it. If you create several one-off shared albums, they start to clutter up the list.
Photos in iOS 12 introduces the option to share photos by sending someone a link, versus sending image files outright, but it may not work the way you expect.
You have several paths to get to this feature. The easiest is to select one or more photos, tap the Share button, and tap Copy iCloud Link. Photos generates a URL and copies it to the clipboard, after which you can paste it into any text field, such as an email message or text. Following that link takes the recipient to a Web page containing thumbnails and the option to download or add the images to their iCloud Photo Library.
The more clever version of this feature is called Sharing Suggestions, and it’s triggered when people you know—more specifically, folks you’ve identified in the People feature—appear in your photos. The app also looks at the location data embedded in the images to guess events. For example, when my family and I went to the state fair a couple of weeks ago, Photos listed the location as “Washington State Fair,” not the city of Puyallup where it’s located.
When these two criteria intersect, you may see prompts to share the images under Sharing Suggestions on the For You screen. Or, in the Photos screen, you can tap the > button to the right of the date or location heading, tap the More button (•••), and choose Share Photos. If an identified person appears in any of the photos, you’re asked if you want to share with them; otherwise Photos asks if you want to share “with friends.”

Time for a Rant: Why Does Photos Have to Be Such a Black Box?
Before I get into the mechanics of how this works, I need to rant briefly about the opaque inner workings of the Photos app.
To test the Sharing Suggestions feature, I invited a friend who was also running iOS 12 on his iPhone to go photograph a spot in the Fremont neighborhood of Seattle. Then we’d share the shots we captured, making sure we each took pictures of the other so facial recognition could kick in.
First lesson: don’t expect quick results. In the 10 or 15 minutes it took for us to walk to a nearby coffee shop, get drinks, and set up at a table, Photos didn’t recognize that there was a person in my images. Perhaps I was expecting too much, too soon; Photos puts off computationally expensive tasks like facial recognition until the device is plugged into power, so as not to drain the iPhone’s battery in the background. I understand that.
However, there’s no way in iOS to scan and identify a person manually, even just for one image. My friend Rob didn’t appear in the People album, even though other photos that include him exist in my library. If he had appeared, I could have tapped his name and hoped that Photos would find the new photos as possible matches.

In fact, Photos in iOS and on the Mac (in this case, in 10.13 High Sierra) only wants to deal with people on its own schedule, when the device is connected to power, and preferably overnight. The Mac version of Photos is even more frustrating, telling me, “To finish updating your people, quit Photos, and make sure your Mac is connected to power.”
This is yet another example of one of my biggest gripes with the Photos app. It’s so intent on doing everything for you that it provides no way to intervene and force it to do something specific. How many times have I wanted Photos to sync with iCloud Photo Library so new images appear on my iPhone, iPad, and Mac? More than I can count. It doesn’t matter whether I’m using a cellular Internet connection, a janky coffee shop Wi-Fi network connection, or my relatively speedy home router. Photos sometimes syncs right away, and other times delays syncing until it feels like it. Impatient users can go pound sand.
In this case, I thought I could perhaps cheat the process and identify Rob in Photos on my Mac, since a mechanism exists for manually doing that (choose Window > Info with an image selected, and click the Add Faces button). The images themselves had synced, so I identified Rob in two of the images—maybe that would prime the pump?
No. Even with the Photos apps running on the iPhone and my MacBook Pro, and the iPhone plugged into a portable battery charger to eliminate battery life savings as a holdup, it took Photos more than an hour at the coffee shop before the app recognized Rob as a person. Oddly, it did so based on other photos in which Rob appeared in my library, and he didn’t show up in the People album until much later.
In short, don’t expect to pool your photos with your friends right after an event ends. This is an instance when the 3D Touch feature would come in handy: press on a face to bring up a circle to define where a person’s face is, and assign an identity. I know it’s Rob in my photo, and I should be able to tell Photos that, instead of waiting for the app to get around to asking.
Meanwhile, Back at Sharing Suggestions
With that rant out of the way, the Sharing Suggestions feature is actually pretty neat. In the For You screen, if a collection of photos includes a person and a similar timestamp and location, Photos assumes you were with that person and asks if you want to share your images with them. You can also view the option in the Photos screen by tapping the (>) button to the right of a date or location heading, tapping the blue More (•••) button, and choosing Share Photos. You can share with anyone, not just the people identified in the photos.

Instead of sending image files, Photos generates an iCloud link and sends it using Messages. If the recipient is also running iOS 12, they can add your pictures—at full resolution—to their Photos library; if not, they have the option of downloading the files. When someone uses the latter option, Photos converts the HEIC originals to JPEG files.
Furthermore, if you appear in their photos, Photos asks them if they want to share their images back to you using the same Messages mechanism. Everyone involved in the conversation ends up with all of the photos from the get-together that they choose to add or download.
Note that these shared groups are active for only one month, after which the link expires, so don’t put off snagging shared photos that you want to keep.
As I said, this new sharing approach is a neat idea, but there are some problems:
- Most annoying, even beyond the lag in identifying people mentioned above, is that there’s no attribution for who took each photo in the pool. By blending my shots with Rob’s, we ended up with a collection of photos where many of them could have been taken by him or me, and I don’t know which is which. It’s just as important to include authorship as it is to be able to combine shots. I’m amazed Apple didn’t include some owner metadata and a tag denoting it.
- The iCloud link that’s generated applies only to the state of the photos at that time. When I edited some images (such as converting a few to black and white), those changes weren’t reflected on Rob’s iPhone. In other words, this is not an active pool of photos on an Apple server somewhere; Messages provides only the conveyance. If I click the original link that was created, in fact, none of the edits appear there either.
- The Photos app doesn’t know that I’ve already shared those images with Rob. The following day, they appeared once again as a Sharing Suggestion, asking me if I wanted to share them with Rob.
Speaking of Messages, in iOS 12, you now share image files from your Photos library using a new Photos mini-app available under the text field. Previously, you’d tap the camera button to either take a snapshot with the camera or browse recent photos.
Search Suggestions
I’ve written several editions of Take Control of Your Digital Photos, which, at its core, is all about finding the photos we’ve put so much time and effort into capturing and storing. If we’re just stuffing images into a virtual shoebox, then what’s the point in using anything beyond Finder folders?
To that end, Apple has expanded the search capabilities in Photos for iOS. Search is now a prominent category button in the toolbar, and tapping it displays suggestions for Moments, People, Places, and Categories. The Moments and Categories options are all generated using machine learning, resulting in options such as (in my case) Summer, Dining, Sporting Events, Museum Visits, Trips, and the like. Tapping Museum Visits, for example, displays more specific options, such as names, keywords, and locations. A new Groups row reveals photos where two or more named people appear together in the same photo.
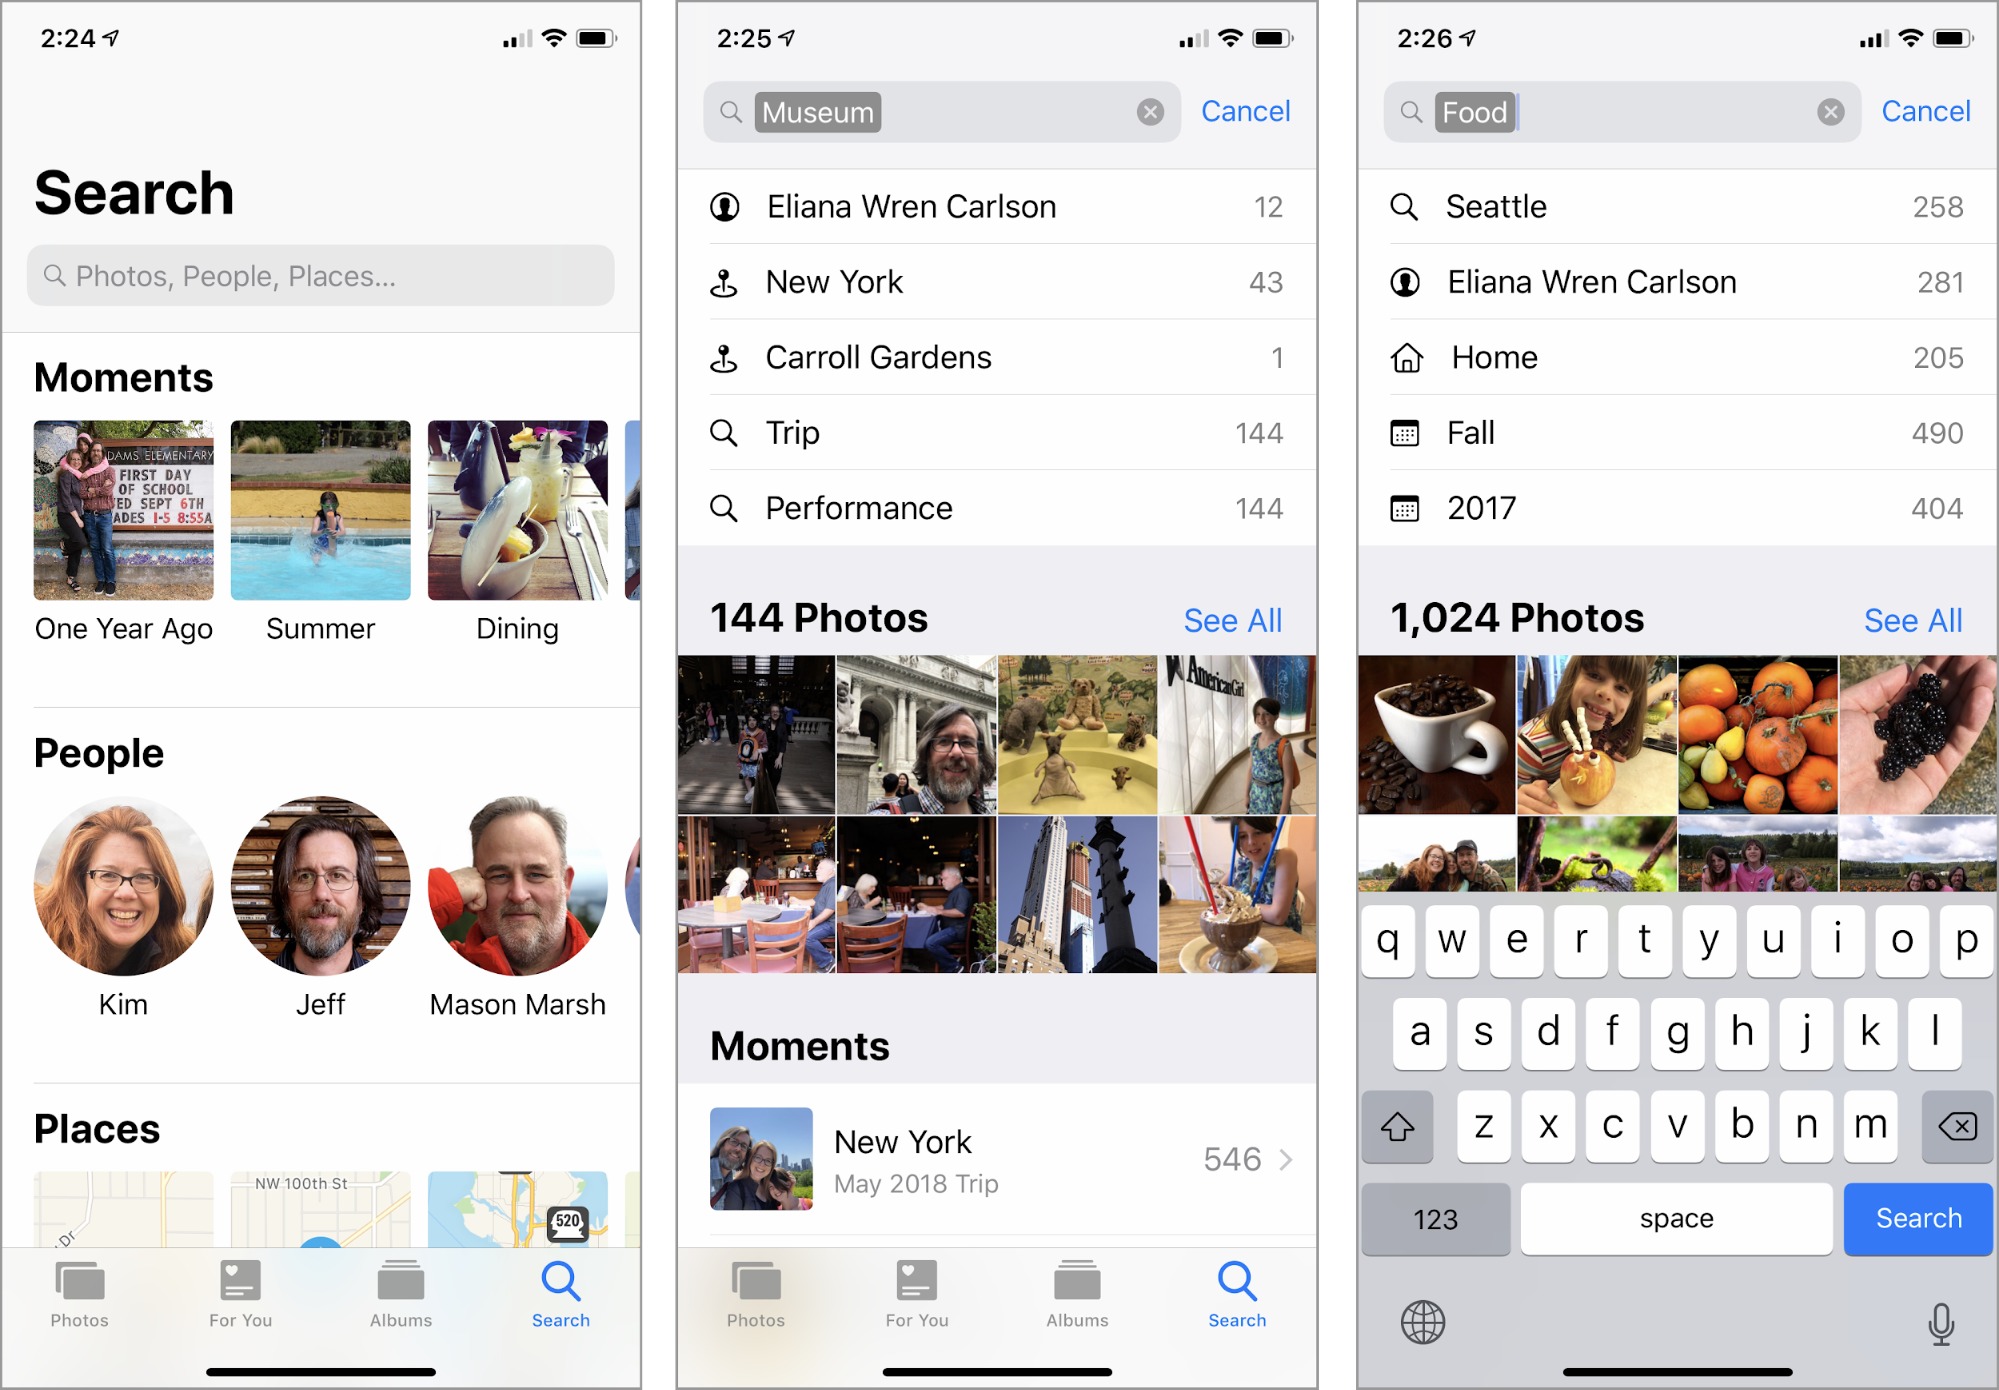
Photos’ search is quick to display related photos and other metadata, which you can tap to refine the search. Apple says you can “combine keywords in searches… for even better results,” though this seems to be limited to choosing multiple suggested terms. Typing “California sunset” netted me nothing, but searching for “California,” tapping the first result, and then typing “sunset” did work.
Unfortunately, Photos still ignores some basic metadata included in every image file, such as camera model; if I type “Fuji” in the Search field to reveal all the photos taken with my Fujifilm X-T1, Photos comes up empty.
Import(ant) Improvements
For people who import photos from traditional digital cameras into an iPad or iPhone, this release of Photos will be a relief.
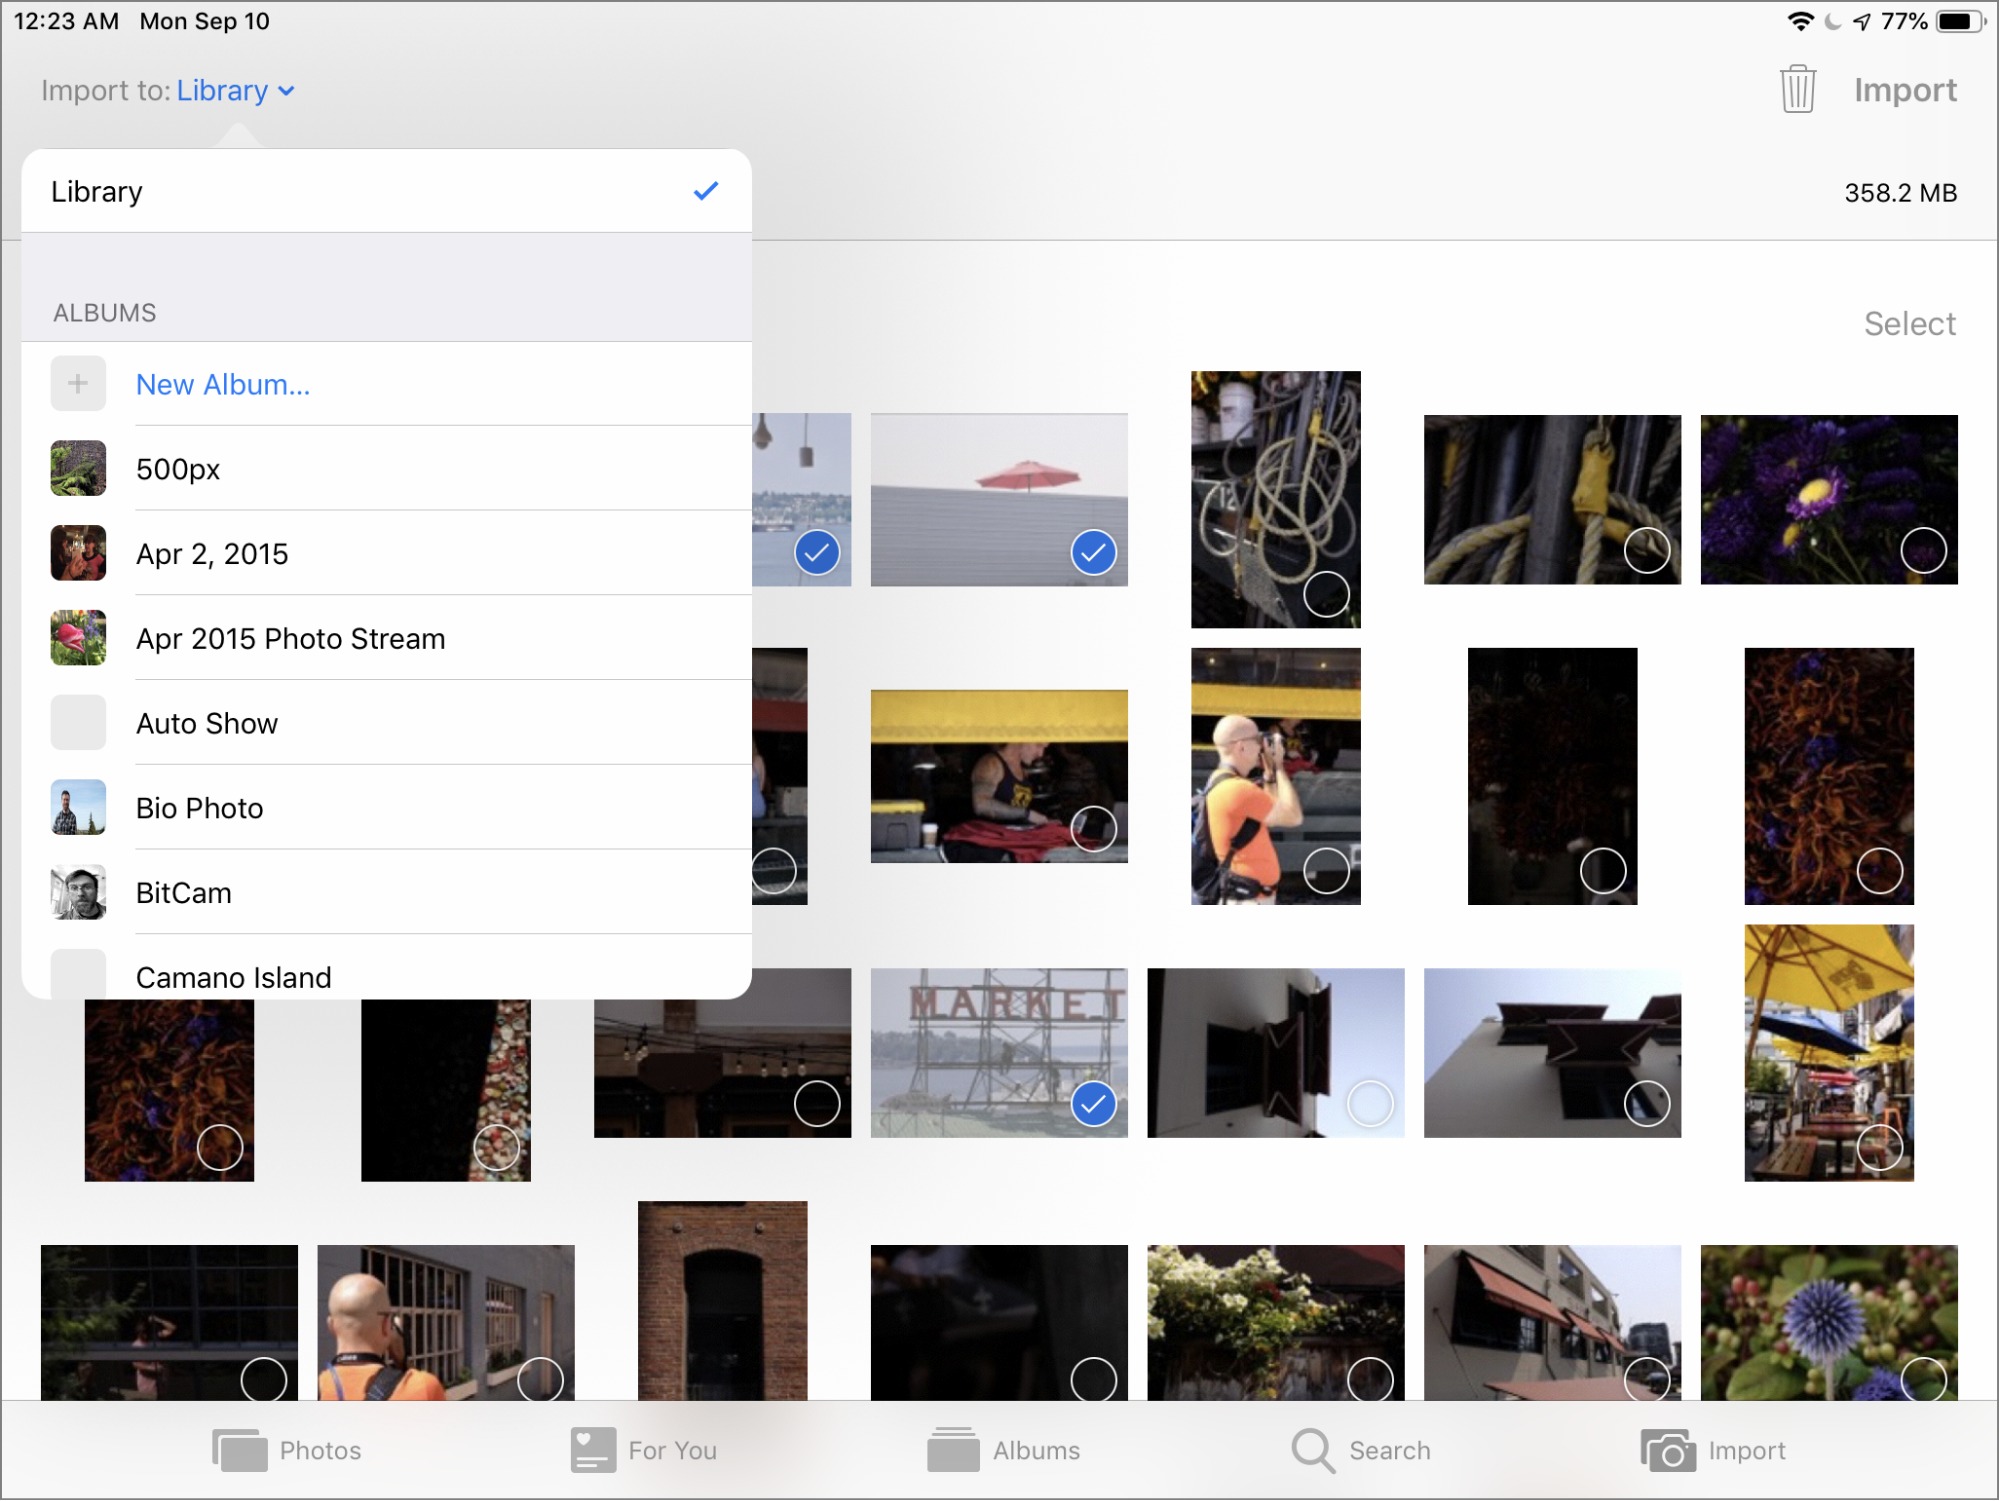
When you connect a memory card using Apple’s Lightning to SD Card Reader, Photos displays thumbnail previews in the Import screen much faster than in the past. I had pretty much stopped doing large imports to my iPad Pro because of the painful pace of just drawing those images.
You can also now specify a destination album for the images, and see how many images are selected for import, how many are on the card, and how much storage space they occupy.
Editing Raw Images
Lastly, Apple says you can edit raw images on iPhone or iPad models with an A9 chip or later, although this claim has generated some confusion because raw support in iOS isn’t new.
Quick background: iOS has included native raw image support at the operating system level since iOS 10 appeared in 2016. Before that, if you imported a raw file directly onto an iPad or iPhone, editing it would affect only the small JPEG preview your camera creates to display a preview on its LCD.
Editing raw images in iOS 10 and later produced better results due to that raw support, but there was a twist. The Photos app in iOS 10 and iOS 11 doesn’t edit the raw image directly. Instead, the app generates a high-quality JPEG from the raw data and edits that copy.
In the Photos interface, it looks like you’re working with just a single image. And, because the edits are non-destructive, adjustment data is stored separately, such as noting that exposure is at 0.13. When Photos syncs the raw image to the Mac, the same settings apply to the actual raw image, since Photos in macOS does edit raw files directly. (See “How Raw Works on iOS,” by Nik Bhatt, formerly a lead on Apple’s Aperture and iPhoto teams and now the creator of the utility RAW Power.)

Back to iOS 12: Since the A9, A10, and A11 processors are much more powerful than the generations before them, the Photos app can now work directly with the raw files. If my experience using an iPhone X and a 9.7-inch iPad Pro is representative, you’ll notice a short delay as Photos loads the raw file into memory, but you shouldn’t notice any other difference in editing. Photos doesn’t include any raw-specific editing tools, for instance.
There is a catch, if you shoot and import Raw+JPEG pairs (where the camera captures the raw file and also a separate JPEG image). In iOS, the Photos app edits only the JPEG portion, which may not be what you want. In Photos on the Mac, when editing a Raw+JPEG image, you can choose Image > Use RAW as Original to ensure that you’re working with the raw version.
Editing iPhone Xs Portrait Images
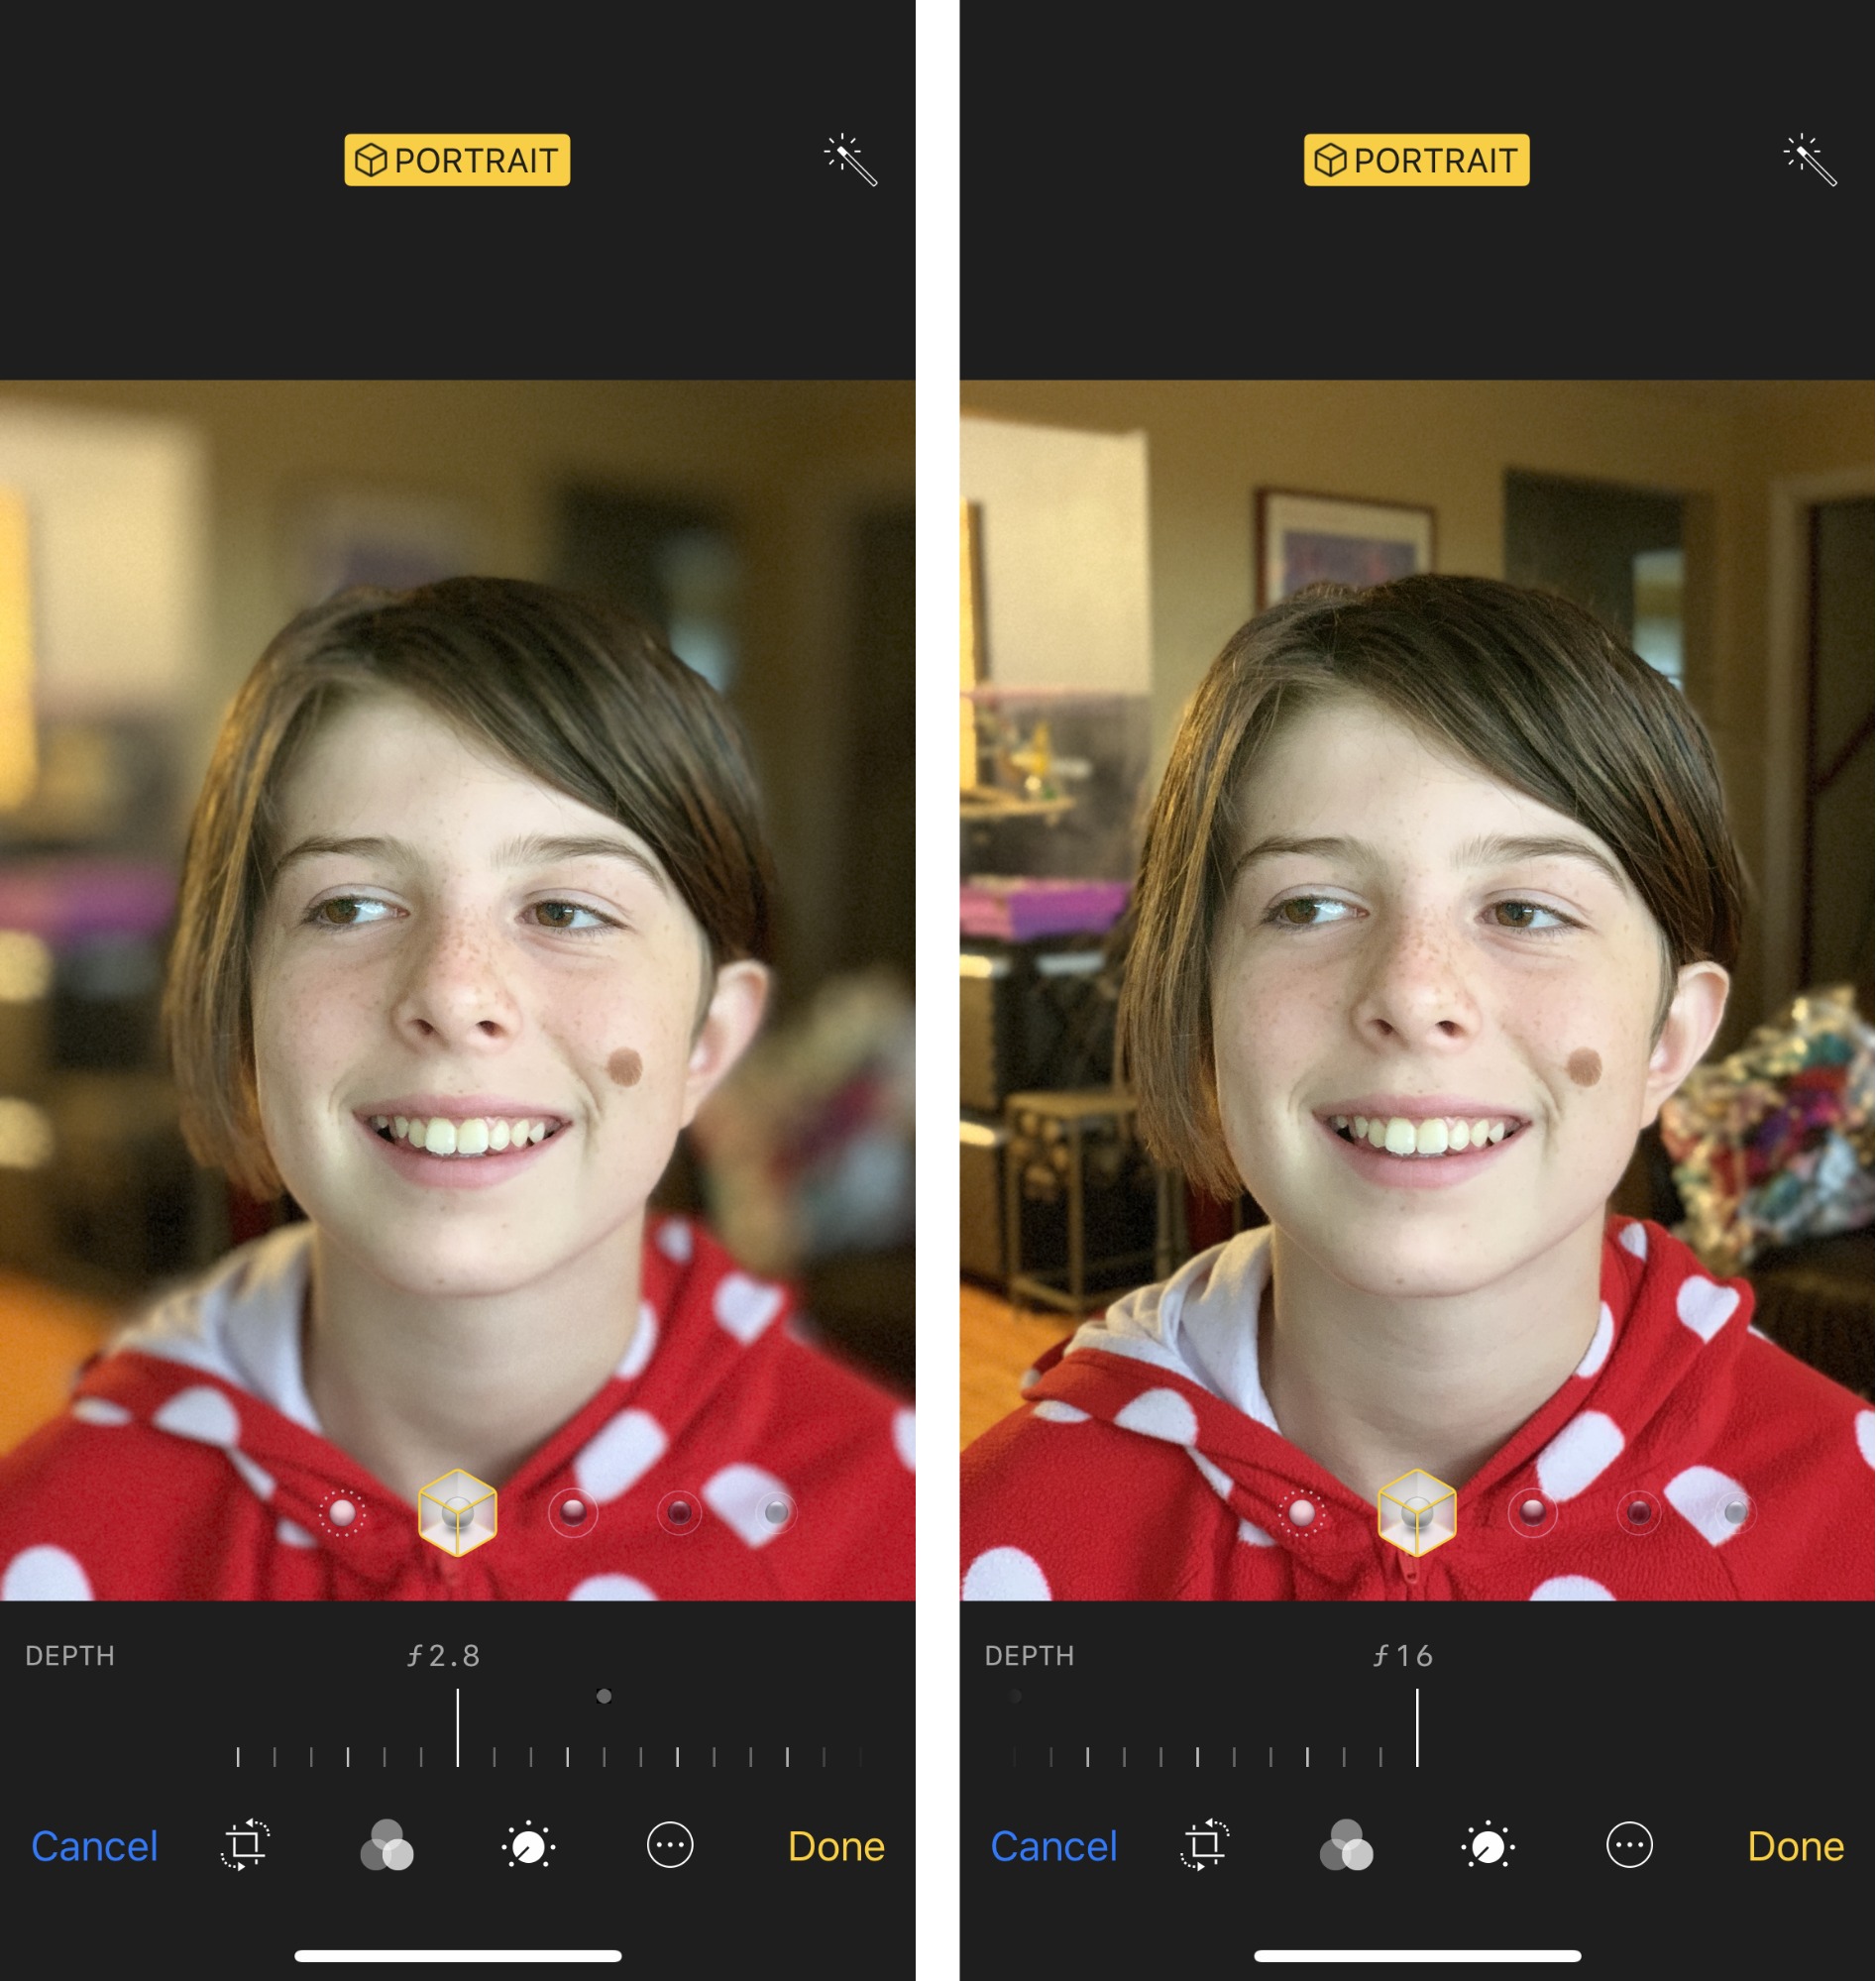
The only other notable change in the editing features is support for the adjustable aperture feature for Portrait mode photos in the iPhone XS and iPhone XS Max. When editing a Portrait shot, a control appears below the image that makes the background more or less blurry, simulating the effect you’d see when shooting at wider or narrower apertures. Turned all the way to f/16, backgrounds are mostly crisp and in focus. When set to f/1.4, the widest setting, the background becomes more blurry to enhance the separation between it and the subject.
Only the iPhone XS models currently create the type of depth mask that this feature requires. However, the control does appear on some other iOS devices when editing a Portrait mode image captured with an iPhone XS or iPhone XS Max. I tested this with my iPhone X and 9.7-inch iPad Pro, and the control showed up; I don’t have an iPhone 7 Plus or iPhone 8 Plus at hand, but I suspect it might work. It did not appear on my wife’s iPhone SE.
A Parting Shot
Setting aside my criticisms, what I like about Photos in iOS 12 is Apple’s acknowledgment that our digital photos shouldn’t be stored away and forgotten as we chase the next image. Surfacing images in new ways and improving the search features keep us in touch with the reasons we took those photos in the first place. As our libraries increase in size, it’s going to be more important to capture those moments, moods, and memories.
How much—and in what ways—do you use Photos? Let us know in our quick five-question survey.


