#1438: Siri Shortcuts, SMS 2FA autofill, make your own Dynamic Desktops, Apple News anywhere
Lots of practical how-tos this week! Want to make your own Siri commands with the new Siri Shortcuts feature of iOS 12? Josh Centers explains it. Prefer a faster way to enter two-factor authentication codes sent via SMS message? Glenn Fleishman covers how to do that in iOS 12 and macOS 10.14 Mojave. Annoyed that you can’t use Apple News in your country? Adam Engst provides a partial workaround. And if you’ve wanted to make your own dynamic desktops for Mojave, Adam also shows you how to do so with GraphicConverter 10.6.5. Notable Mac app releases this week include CleanMyMac X 4.0.4, Quicken 2018 5.8.1, LaunchBar 6.1.0, Airfoil 5.8.3, OmniFocus 3.1, and Bookends 13.1.4.
How to Use Apple News in Mojave Regardless of Where You Live
Every time I’ve written about Apple News recently, I’ve received comments from readers outside of the US, UK, and Australia expressing annoyance that Apple restricts Apple News to just those three English-speaking countries. Even Canada is left out!
Why should this be? Part of the problem could be technical—Apple News does a lot of text parsing to recommend articles, and it would be understandable if that was currently too difficult for Apple to expand beyond English. But again, why not Canada? Could the issue be wound up in French language requirements in Quebec?
The point is now partially moot for anyone running macOS 10.14 Mojave because there’s an easy workaround for people in unsupported countries—kudos to TidBITS reader fahirsch for alerting me to this trick. Regardless of where you live, 30 seconds of work will let you run the News app and read TidBITS and many other news sources, albeit only in English.
Unfortunately, several international readers say that the News app won’t allow them to access Apple’s special channels or certain other publications. I suspect that News is using IP address sniffing or another method of geolocation since I haven’t experienced any restrictions while using it in the US while the region is set to Canada. It would be interesting to see if using a VPN to acquire a US-based IP address made a difference.
Hacking Apple News Region Tracking
It turns out that News.app exists in all versions of Mojave; it’s just invisible if your region isn’t set to United States, United Kingdom, or Australia in System Preferences > Language & Region. If you change your region to one of those countries, the News app appears in the Applications folder and you can launch and use it normally. That works in iOS as well; just change the region in Settings > General > Language & Region and you’ll be able to use News there too. Unfortunately, setting a different region may have a variety of undesirable side effects.
Here’s where Mojave has one up on iOS. Once the News app is active, if you move it in your Dock so it takes over a permanent spot (or Control-click it and choose Options > Keep in Dock), you can change the region back to your original country, and you’ll still be able to launch the News app from the Dock and use it. I tried simulating this approach with the Shortcuts app in iOS 12, but the shortcut I created to launch the News app there worked only as long as the region was set to a supported country.
For some people, changing regions causes the News app to disappear from the Dock. However, you can instead launch News with a simple Terminal command without changing regions:
open /Applications/News.app
If you don’t want to keep the News app in your Dock or keep returning to Terminal, you could build that command into a Keyboard Maestro macro or an AppleScript. Or, in another simple bit of Terminal hackery, here’s how to make a symlink that gives you a News icon in the Finder:
ln -s /Applications/News.app "/Applications/Apple News.app"
You can name the symlink however you want and you can locate it wherever you like—just change the second pathname inside the quotes.
Needless to say, I can’t test this trick as thoroughly as someone who lives in another country, so let me know in the comments if there are other unexpected downsides to this method of opening Apple News to the rest of the world.
How to Create Mojave’s True Dynamic Desktops with GraphicConverter
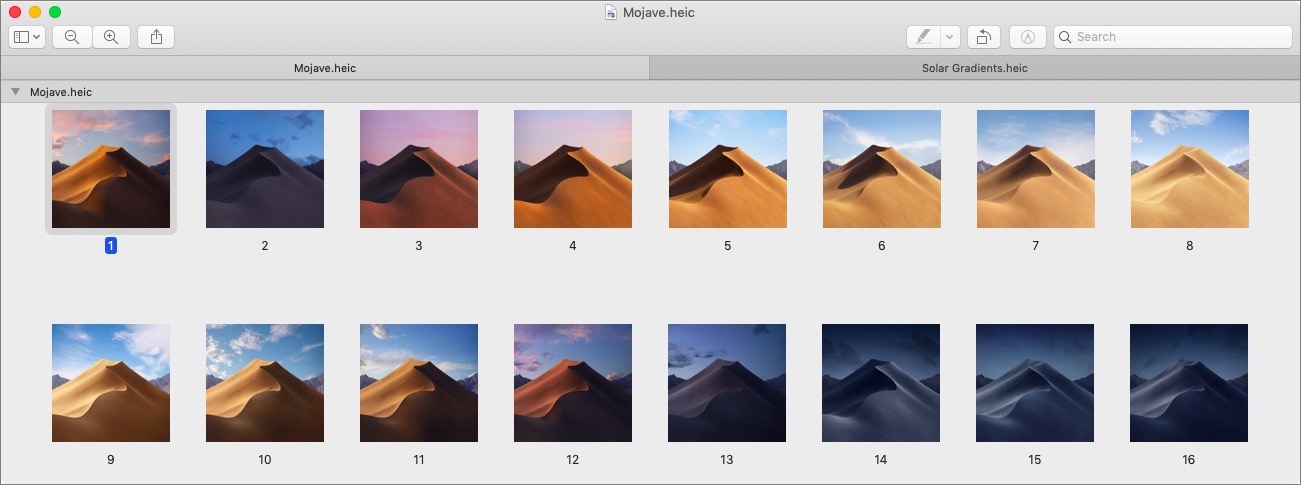
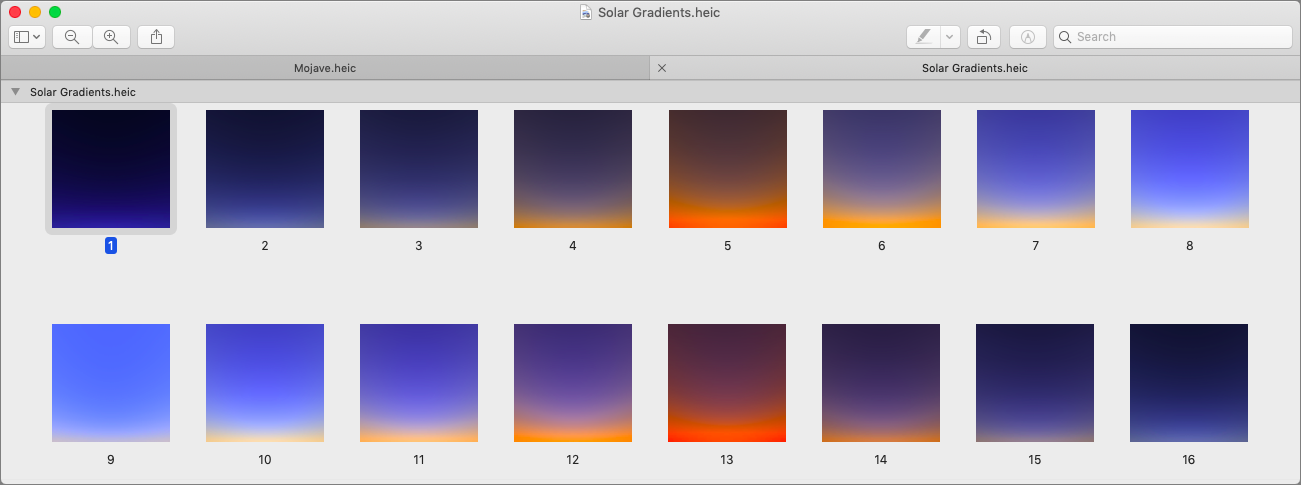
At some point during the betas of macOS 10.14 Mojave, I became curious about what was behind Mojave’s new Dynamic Desktop feature that slowly changes the desktop picture throughout the day. A quick trip to /Library/Desktop Pictures revealed that Mojave’s two dynamic desktops—called “Mojave” and “Solar Gradients”—were HEIC files instead of JPEGs. I double-clicked one and it opened in Preview, showing that the main HEIC file was, in fact, a container for 16 individual HEIC images.
HEIC is the filename extension for High Efficiency Image File Format, which is an image container format—for more details, see Glenn Fleishman’s “HEVC and HEIF Will Make Video and Photos More Efficient” (30 June 2017). I played briefly with trying to duplicate Apple’s file and replace the images, but those experiments proved fruitless, so I turned to an expert. Not just any expert, but the guru of image conversions and author of GraphicConverter, Thorsten Lemke.
When I pointed out that the Dynamic Desktop feature seemed to be a relatively simple collection of images, Thorsten promised to look into it more. A beta of GraphicConverter arrived soon after, and we went back and forth a few times before he figured out both the image requirements and the necessary metadata to make it all work. GraphicConverter 10.6.5 is now available with this feature when running in Mojave.
(You may see tutorials for making dynamic desktops merely by putting photos in a folder, selecting that folder in System Preferences > Desktop & Screen Saver > Desktop > Folders, and then enabling the Change Picture checkbox and choosing an interval. This approach may provide much the same effect, but it has been available for many years—feel free to give it a try if you’re not yet running Mojave.)
Building and Testing a Dynamic Desktop
The first step in making your dynamic desktop is acquiring the necessary images. You’ll need 16 separate images. At one point in the betas, GraphicConverter wanted them all to have a resolution of exactly 5120 by 2880 pixels, but that doesn’t seem to be necessary anymore. Just make sure they’ll look good at the full size of the screen. The file format of those images also isn’t important but put them all in a folder for easy access. Regardless, collecting your images will be the hardest part of creating a dynamic desktop.
As you can see in the screenshots of Apple’s dynamic desktop files above, you’ll want to name your images so their order starts at the beginning and continues through to the end—whatever beginning and end mean to you. Both of Apple’s examples map to hours in the day, but I could easily imagine a dynamic desktop image of a sunflower tracking the sun across the sky or a construction project progressing over many months.
Once you have your 16 images, open GraphicConverter 10.6.5, choose File > Browse, and navigate to the folder that contains your images.
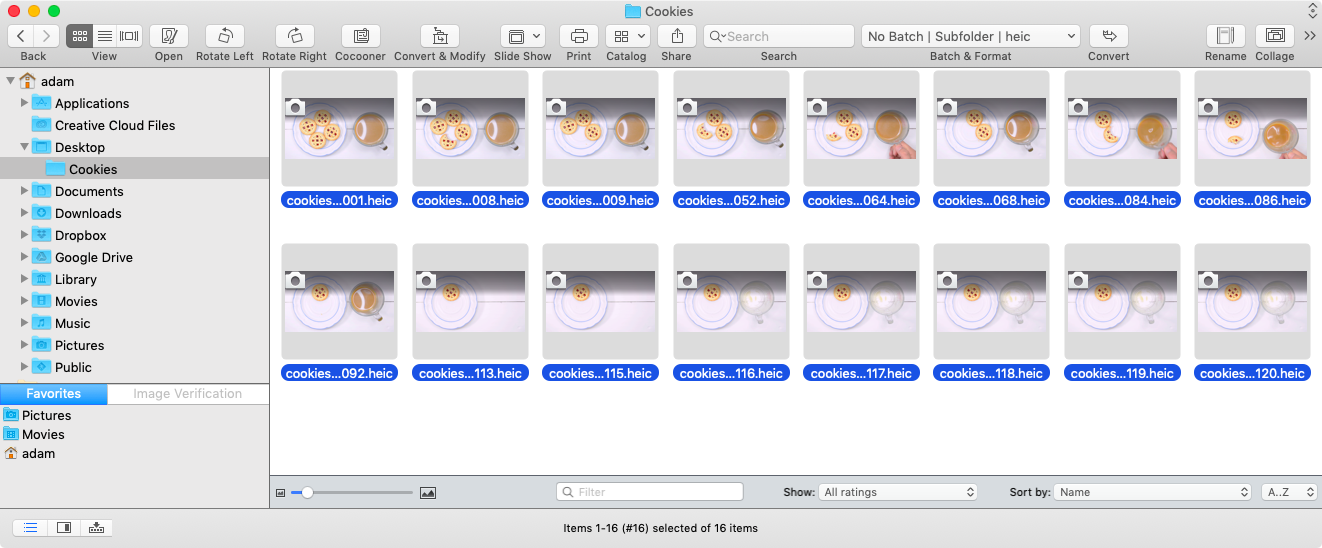
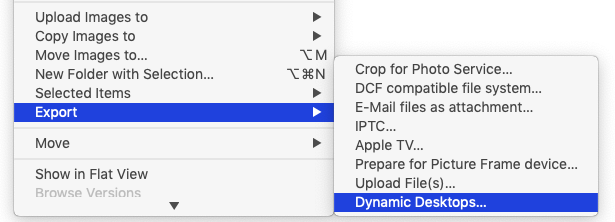
Select all the images, Control- or right-click one of them, and in the large contextual menu that appears, scroll way down and choose Export > Dynamic Desktops. Name your file, navigate to /Library/Desktop Pictures as the destination folder, click OK, and wait a bit, since it takes GraphicConverter some time to convert all the images to HEIC and assemble them into the container file.
After GraphicConverter finishes saving the HEIC file in /Library/Desktop Pictures, open System Preferences > Desktop & Screen Saver > Desktop. You’ll notice an additional Mojave icon in the Dynamic Desktop section; select it and you’ll see the name of your file above. Apple told Thorsten that the API needed to set the icon and preview aren’t yet public, so he doesn’t know what’s necessary to get them to display properly.

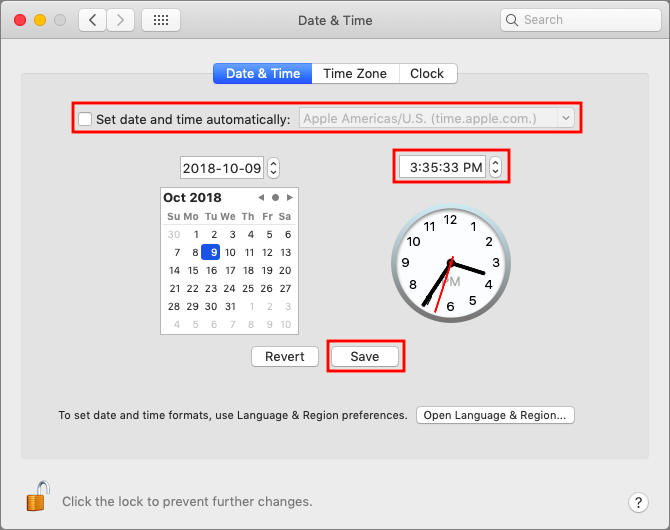
Despite this cosmetic confusion, Mojave will display one of the images from your file on the Desktop itself. To confirm that your file is truly dynamic, open System Preferences > Date & Time > Date & Time, disable “Set date and time automatically,” set the time back a few hours, and click the Save button. Keep changing the time by a few hours and saving to see different images appear on the Desktop. When you’re done, make sure to turn on “Set date and time automatically” again.
That’s all there is to making a true dynamic desktop with GraphicConverter. If you’re interested in learning more, Marcin Czachurski has written a two-part article about his explorations into the Dynamic Desktop file format as well.
SMS Text Message Login Codes Autofill in iOS 12 and Mojave, but Remain Insecure
Many Web sites and apps now offer two-factor authentication (2FA), which requires you to enter a short numeric code—the so-called second factor—in addition to your username and password. These temporary codes are either sent to you via text message or are generated by an authentication app. In iOS 12 and macOS 10.14 Mojave, Apple has streamlined entering such codes when sent via an SMS text message, reducing multiple steps and keyboard entry to a single tap or click.
I explain just below how this new feature works, but I also want to raise a caution flag. SMS is no longer a reliable way to send a second factor because it’s too easy for even small-time attackers to intercept those messages (see “Facebook Shows Why SMS Isn’t Ideal for Two-Factor Authentication,” 19 February 2018). It’s time for Web sites that use 2FA to move away from SMS.
Passthrough SMS Codes in iOS 12 and Mojave
When you log in to a site with 2FA enabled that offers SMS-based codes, the sequence usually goes like this:
- You complete the standard password-based login and are prompted for a code.
- A text message with a code, typically six digits long, arrives in Messages.
- If you use notifications to show incoming texts and you’re fast enough, you enter the code as you see it into the Web form and submit it. Otherwise, you switch to Messages, either memorize the code or select and copy it, and return to the site to enter it. (In iOS, you can’t easily select part of a message, making that additionally frustrating.)
- Submit the form to login.
In iOS 12, Safari, Messages, and the QuickType bar above the keyboard work together, in a process that looks like this:

- Enter your username and password as in step 1 above.
- Tap in the second factor field.
- When the text message arrives, iOS 12 extracts the code and displays it in the QuickType bar. Tap it to enter the code in the field.
- Submit the form to log in.
Here’s a quick video demonstration.
Mojave works almost identically. Instead of the QuickType bar in step 3 above, however, the autofill entry appears below the code field when you click in the field. It’s labeled From Messages and reads Fill Code followed by the short code. Click it to enter it in the field.
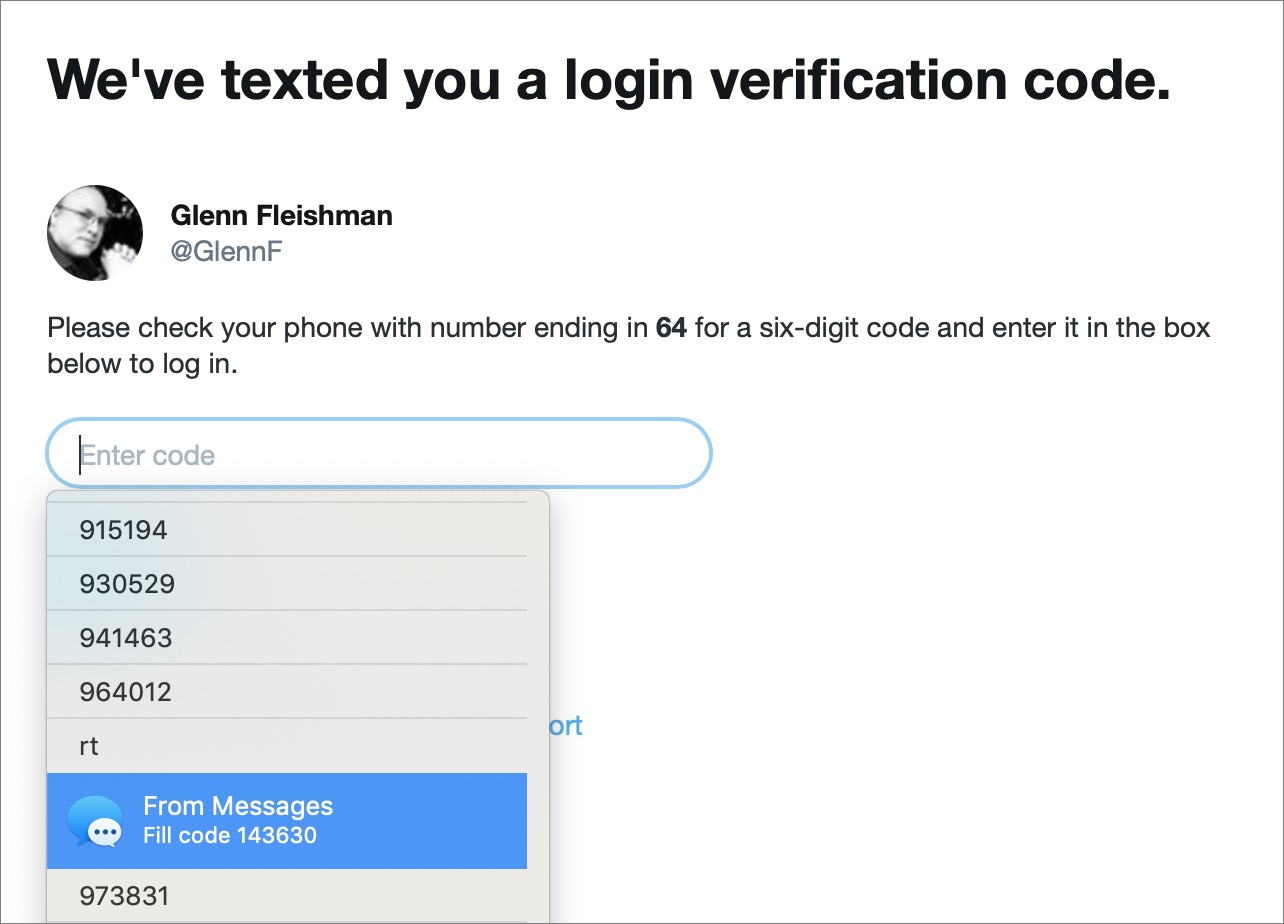
Annoyingly, I found that Mojave listed all previous codes texted—in this case, for my Twitter login—and I had to scroll way down in the dropdown list to find the From Messages item. Selecting that item also proved difficult unless I clicked it and then quickly clicked away from the form field. Otherwise, macOS interpreted pointer movement that hovered over the dropdown list as scrolling and selection! Apple needs to refine this user experience and flush previous entries.
These shortcuts shave a few seconds and a little aggravation off the process, so they’re not a major productivity win, but they do make 2FA less of a roadblock for more people. By reducing friction and making it a simple workflow that feels nearly the same as entering a password from the iCloud Keychain, Apple hopes to encourage more of its customers to enable 2FA at more sites.
Unfortunately, there’s a cloud hanging over Apple’s optimism: SMS-based codes aren’t a reliable security method and should have been eliminated over the last few years.
It’s Easy to Hijack SMS Codes
You have probably seen headlines along the lines of, “Cryptocoin investor has entire holdings stolen with account hack!” Such thefts start with an attacker gaining control of a phone number. This is unfortunately surprisingly easy. Mobile phone numbers are portable, which means they can be easily moved from one physical phone to another, and even transferred among carriers. The basic approach works like this:
Step 1: Obtain personal information. “Background check” sites and stolen information floating around the Internet make it trivial to obtain someone’s phone number, Social Security number, bank account number, and other personally identifying details.
Step 2: Hijack a phone number. To take over a phone number, the attacker then generally uses social engineering, another term for scamming someone with words. They call a phone carrier and explain how they need the number transferred, provide the identity information required to verify themselves, and give the technical details for the new receiving phone.
Although major carriers have started letting customers set an additional PIN for account changes, news stories have revealed that hackers have sometimes managed to talk their way around not having the PIN. And since that additional PIN isn’t required, it’s unclear how many subscribers use one.
(Some hijackers have also shown they can insert themselves into the public switched telephone network to sniff information or hijack a phone number. If a lone attacker can do that, governments obviously can as well.)
Step 3: Take over an account with a password reset. Once the attacker can receive text messages for someone’s hijacked number, they can visit a site at which they expect someone has an account and take it over. Many sites that offer 2FA also allow password resets via SMS, making the assumption that physical possession of a phone is sufficient security.
For instance, it’s common to see text like this on a password reset page:
If you don’t have access to the email address on file for your account and need to reset your password, you can use your verified phone number to update the email address that receives the password reset email.
At many sites, the attacker would also need to know the original email address, which is trivial for someone who has hijacked a phone number.
Thus, an attacker requests an email address change and receives a link via SMS to complete it. On that page, they provide the new, illegitimate address, and verify its receipt to finish associating the account with the new email address. Then they can complete a password change, which sends a link via email to the new address, and with the new password set, they can log in—using the SMS code for 2FA.
Each of these steps is benign, but it all adds up to effectively requiring just one credential—the phone number—instead of two.
With full access to an account, the attacker can drain cryptocurrency, send out email, and carry out other financially or reputationally damaging attacks.
It’s Time to Stop Using SMS for 2FA
Sites originally chose to use SMS-based code validation for 2FA to lower the barriers to 2FA—more people understand SMS than authentication apps. And, regardless of the vulnerabilities of SMS, it’s far better to use a second factor than not, because it deters wholesale attacks against accounts. Even if an attacker gained access to all the decrypted passwords for a service, every account with 2FA enabled would still be able to resist unauthorized logins. But SMS-based 2FA is vulnerable to targeted attacks and identity theft.
Apple’s proprietary 2FA system for macOS and iOS remains extremely robust, but it still allows the use of SMS and voice calls as a backup when trusted devices aren’t available. Many other systems rely on authentication apps that generate time-based one-time passwords (TOTPs), including 1Password, Authy, Google Authenticator, and LastPass, among others. When you use this app-based approach, a service typically also issues you emergency one-time use backup codes that are static—they don’t expire over time, like TOTPs.
Despite Facebook’s routine hiding of new policies that are invasive of people’s privacy and personal information, the company does allow you to use 2FA without a phone number. (This is more significant now that researchers have discovered Facebook has been exploiting people’s 2FA-associated phone numbers for marketing purposes.) Google doesn’t make this fact explicit, but after setting up 2FA, you can remove phone numbers, too, and rely on a combination of other second factors.
While it’s admirable Apple has streamlined SMS code entry, it would be even more so if the company would kickstart the move away from SMS. Such a move doesn’t have to be forced: it could begin with Apple and others providing education and offering a switch to disable SMS codes as backups. It’s inevitable that we’ll have to stop using SMS-based 2FA codes, and it would be better to work toward that before a wide-scale hack makes it a crisis.
If you’d like to learn more about managing security features in iOS 12, as well as understanding and configuring networking and privacy, check out my new book, “A Practical Guide to Networking, Privacy, and Security in iOS 12.” TidBITS readers get 25% off with the coupon code TIDBITS.
Inside iOS 12: How to Create Siri Shortcuts
Have you ever wanted to create your own commands for Siri to extend its capabilities? In iOS 12, that’s now possible, thanks to the addition of “shortcuts,” which Apple describes as providing “a quick way to get things done with your apps.” You can assign spoken phrases to these shortcuts, enabling you to invoke them with Siri.
Unfortunately, Apple has caused some level of confusion with its terminology surrounding shortcuts. The terms include:
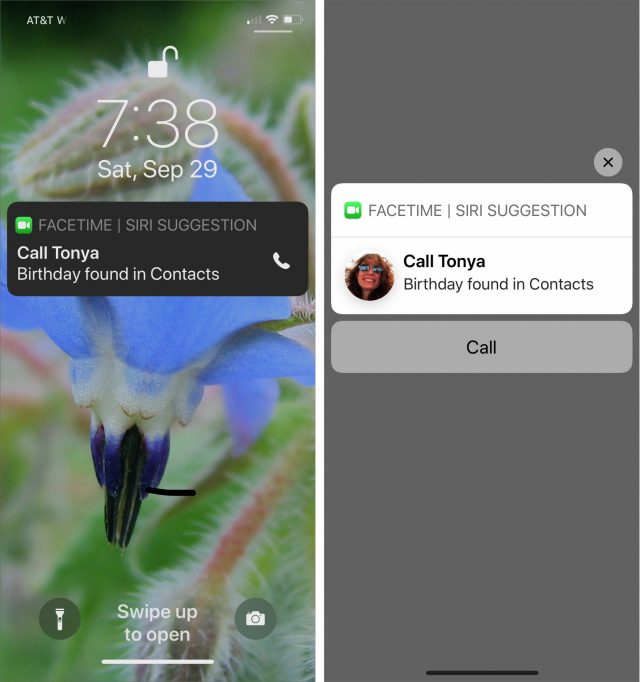
- Siri Suggestion: When Siri notices that you perform the same action repeatedly or can base a suggestion on other data it knows, it puts a notification on the Lock or Search screen. Tap it to run the associated shortcut and perform that action. You can’t do anything else with these shortcuts.
- Siri Shortcuts: If you navigate to Settings > Siri & Search, there’s a Suggested Shortcuts section that lists three shortcuts that Siri thinks you might want to create. If you tap All Shortcuts, you’ll see a lot more suggestions. You can also create this sort of shortcut in apps that support shortcuts, either by tapping an Add to Siri button or using the app’s custom interface. You invoke these shortcuts with a custom spoken phrase.
- Shortcuts: This standalone app, which was called Workflow when Apple acquired it in 2017, lets you make shortcuts that are significantly more complex than Siri Shortcuts. They can include multiple actions (the building blocks of shortcuts) and control multiple apps, and they support variables, flow control, and other programming language concepts. You can launch these shortcuts with Siri as well.

For this article, I’m going on focus on Siri Shortcuts, which offer the most bang for your time invested. You have little or no control over Siri Suggestions, and creating shortcuts with the Shortcuts app is much more involved (check out the Police shortcut, which sends your location to a contact and starts recording video).
Although Siri Shortcuts lets you create new commands for capabilities that are in iOS or built into Apple’s apps, you’ll most appreciate its power once you see it work with third-party apps. Unfortunately, it’s not easy to figure out which apps support Siri Shortcuts. Try the following to figure out if an app supports Siri Shortcuts:
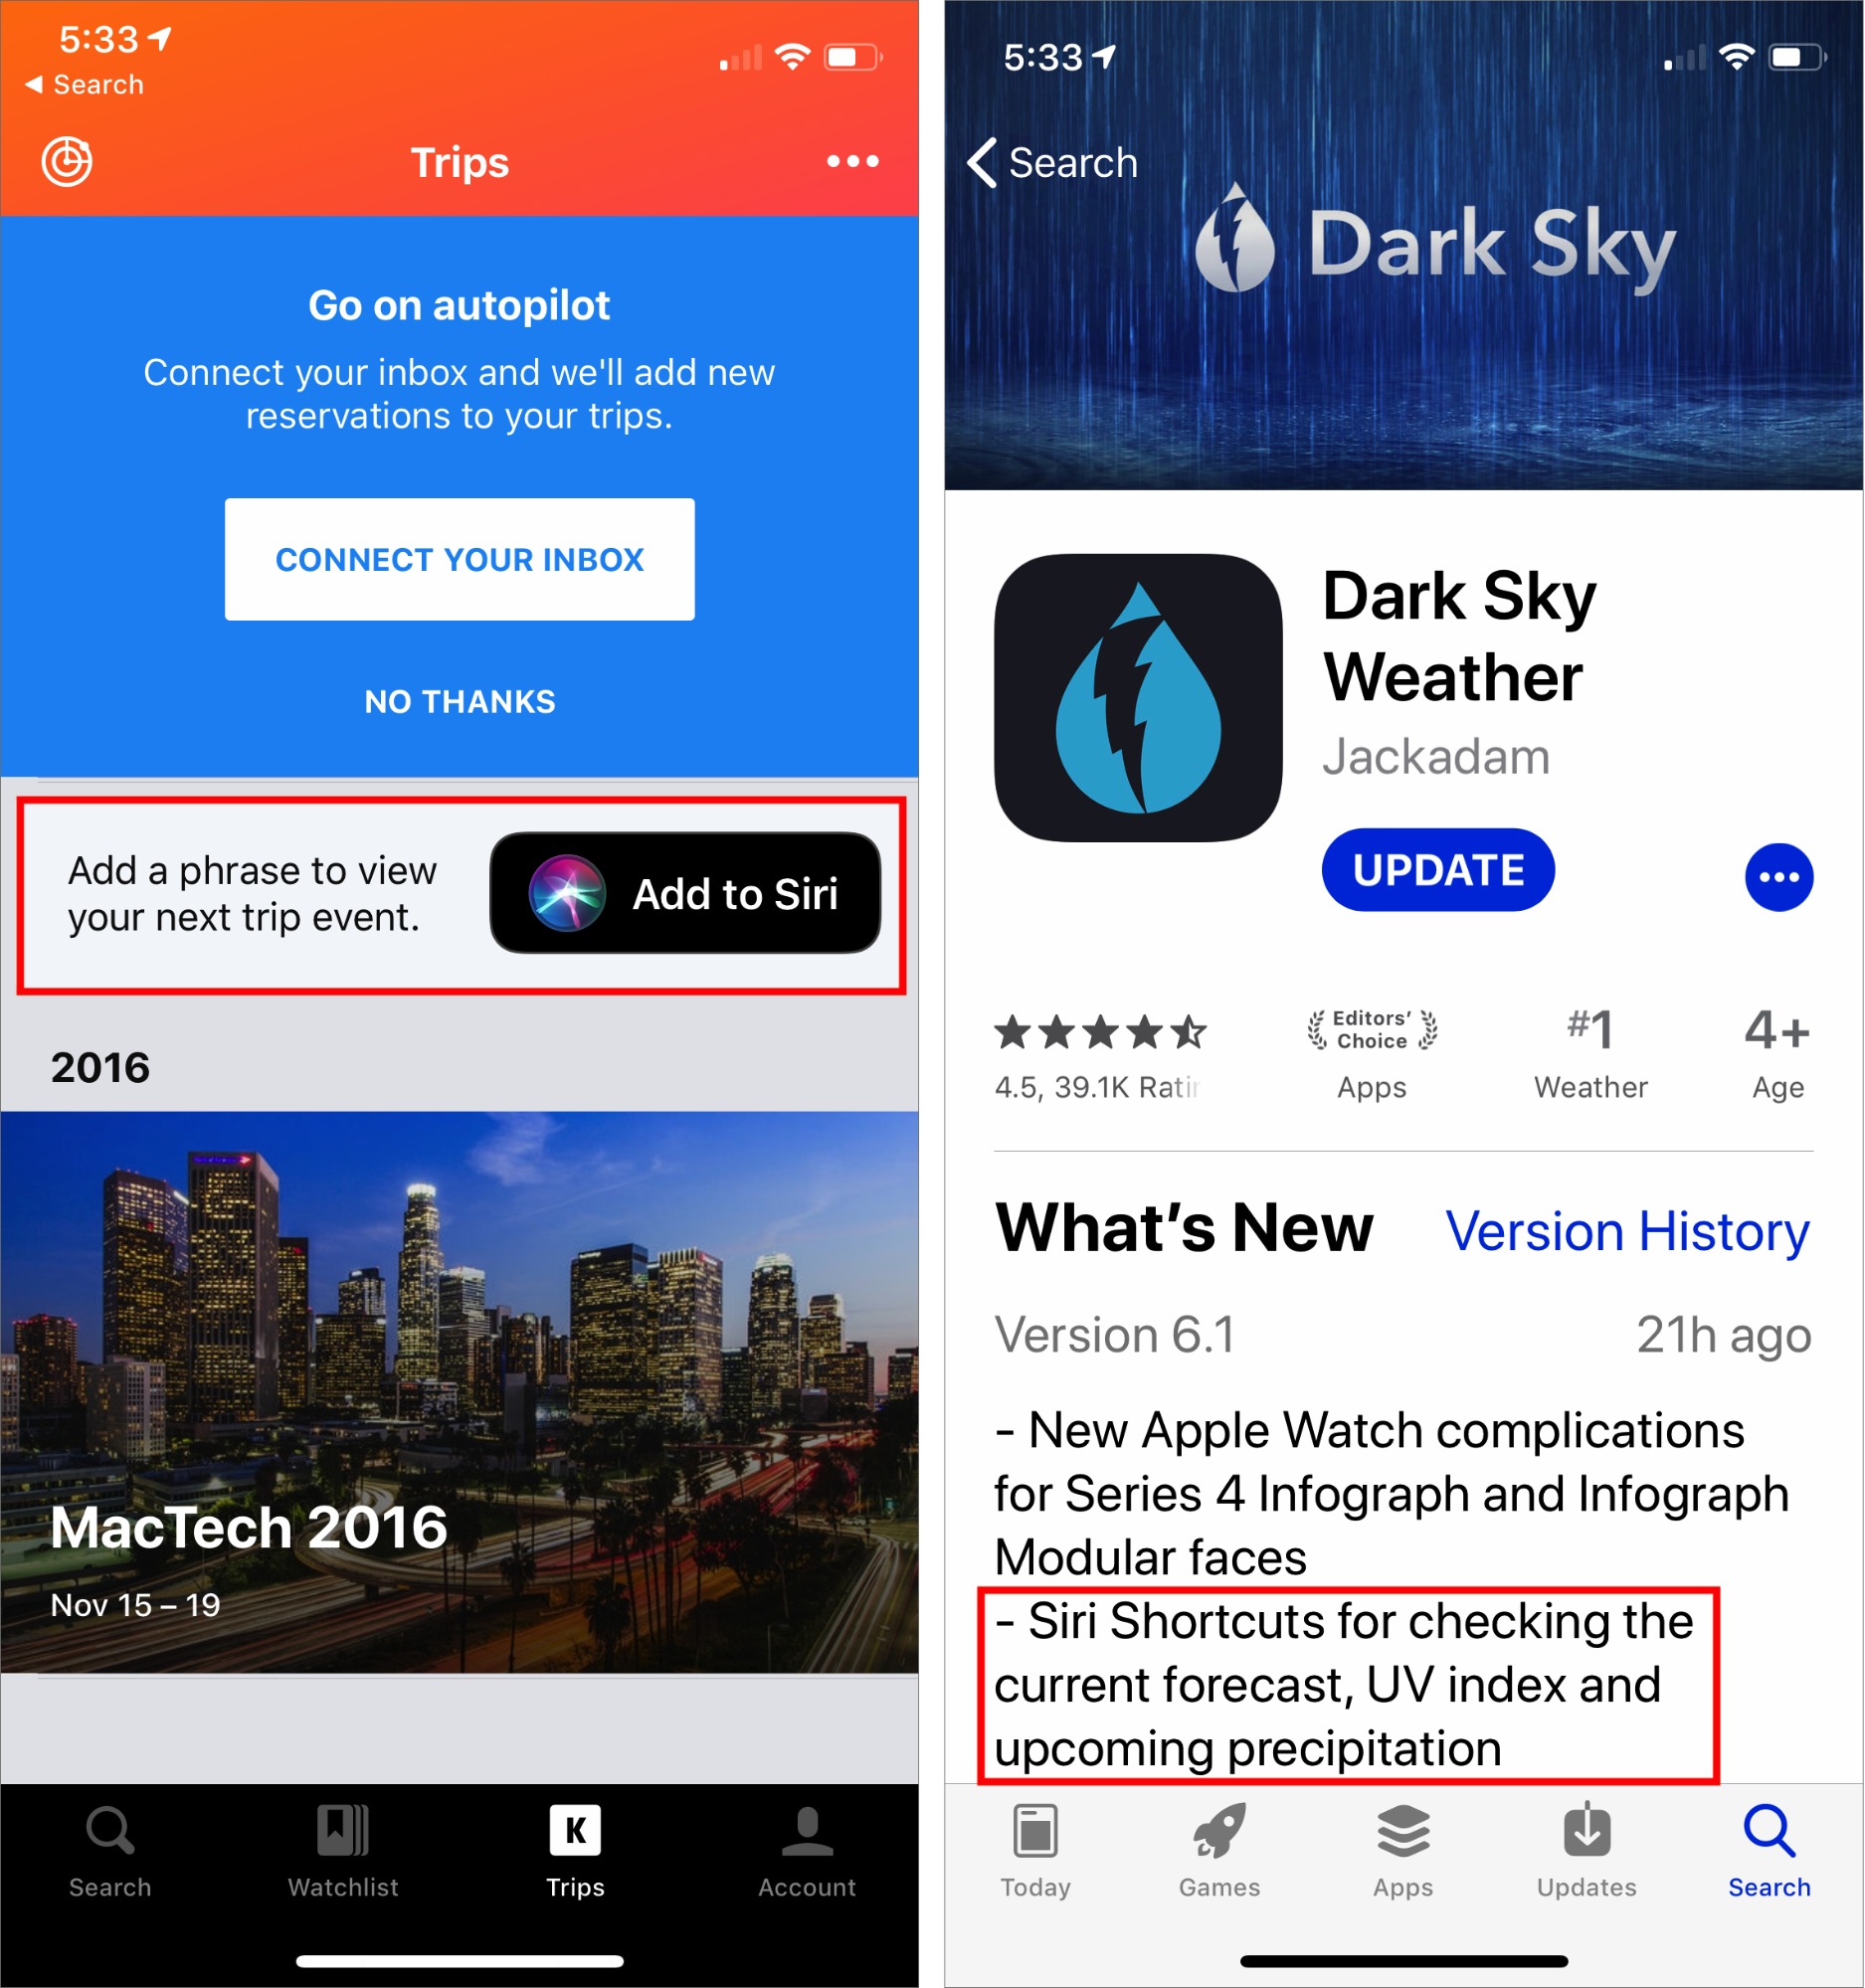
- Add to Siri button: Look for an Add to Siri button somewhere in the app’s interface. The travel planning app Kayak sports such a button, but the weather app Dark Sky doesn’t.
- App Store: Look in the app’s description or version history in the App Store. Dark Sky mentions the addition of Siri Shortcuts, but there’s no requirement that an app must do this. And who’s going to scroll through older entries in the version history to see if the feature might have been added in the past?

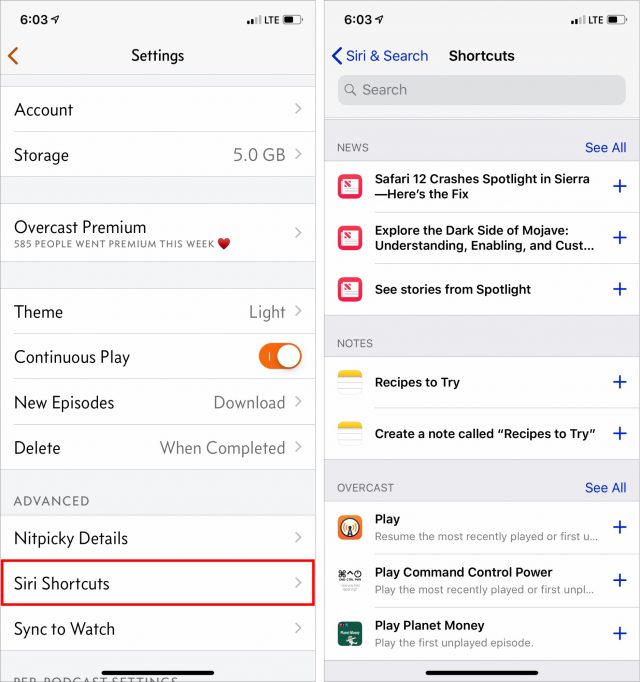
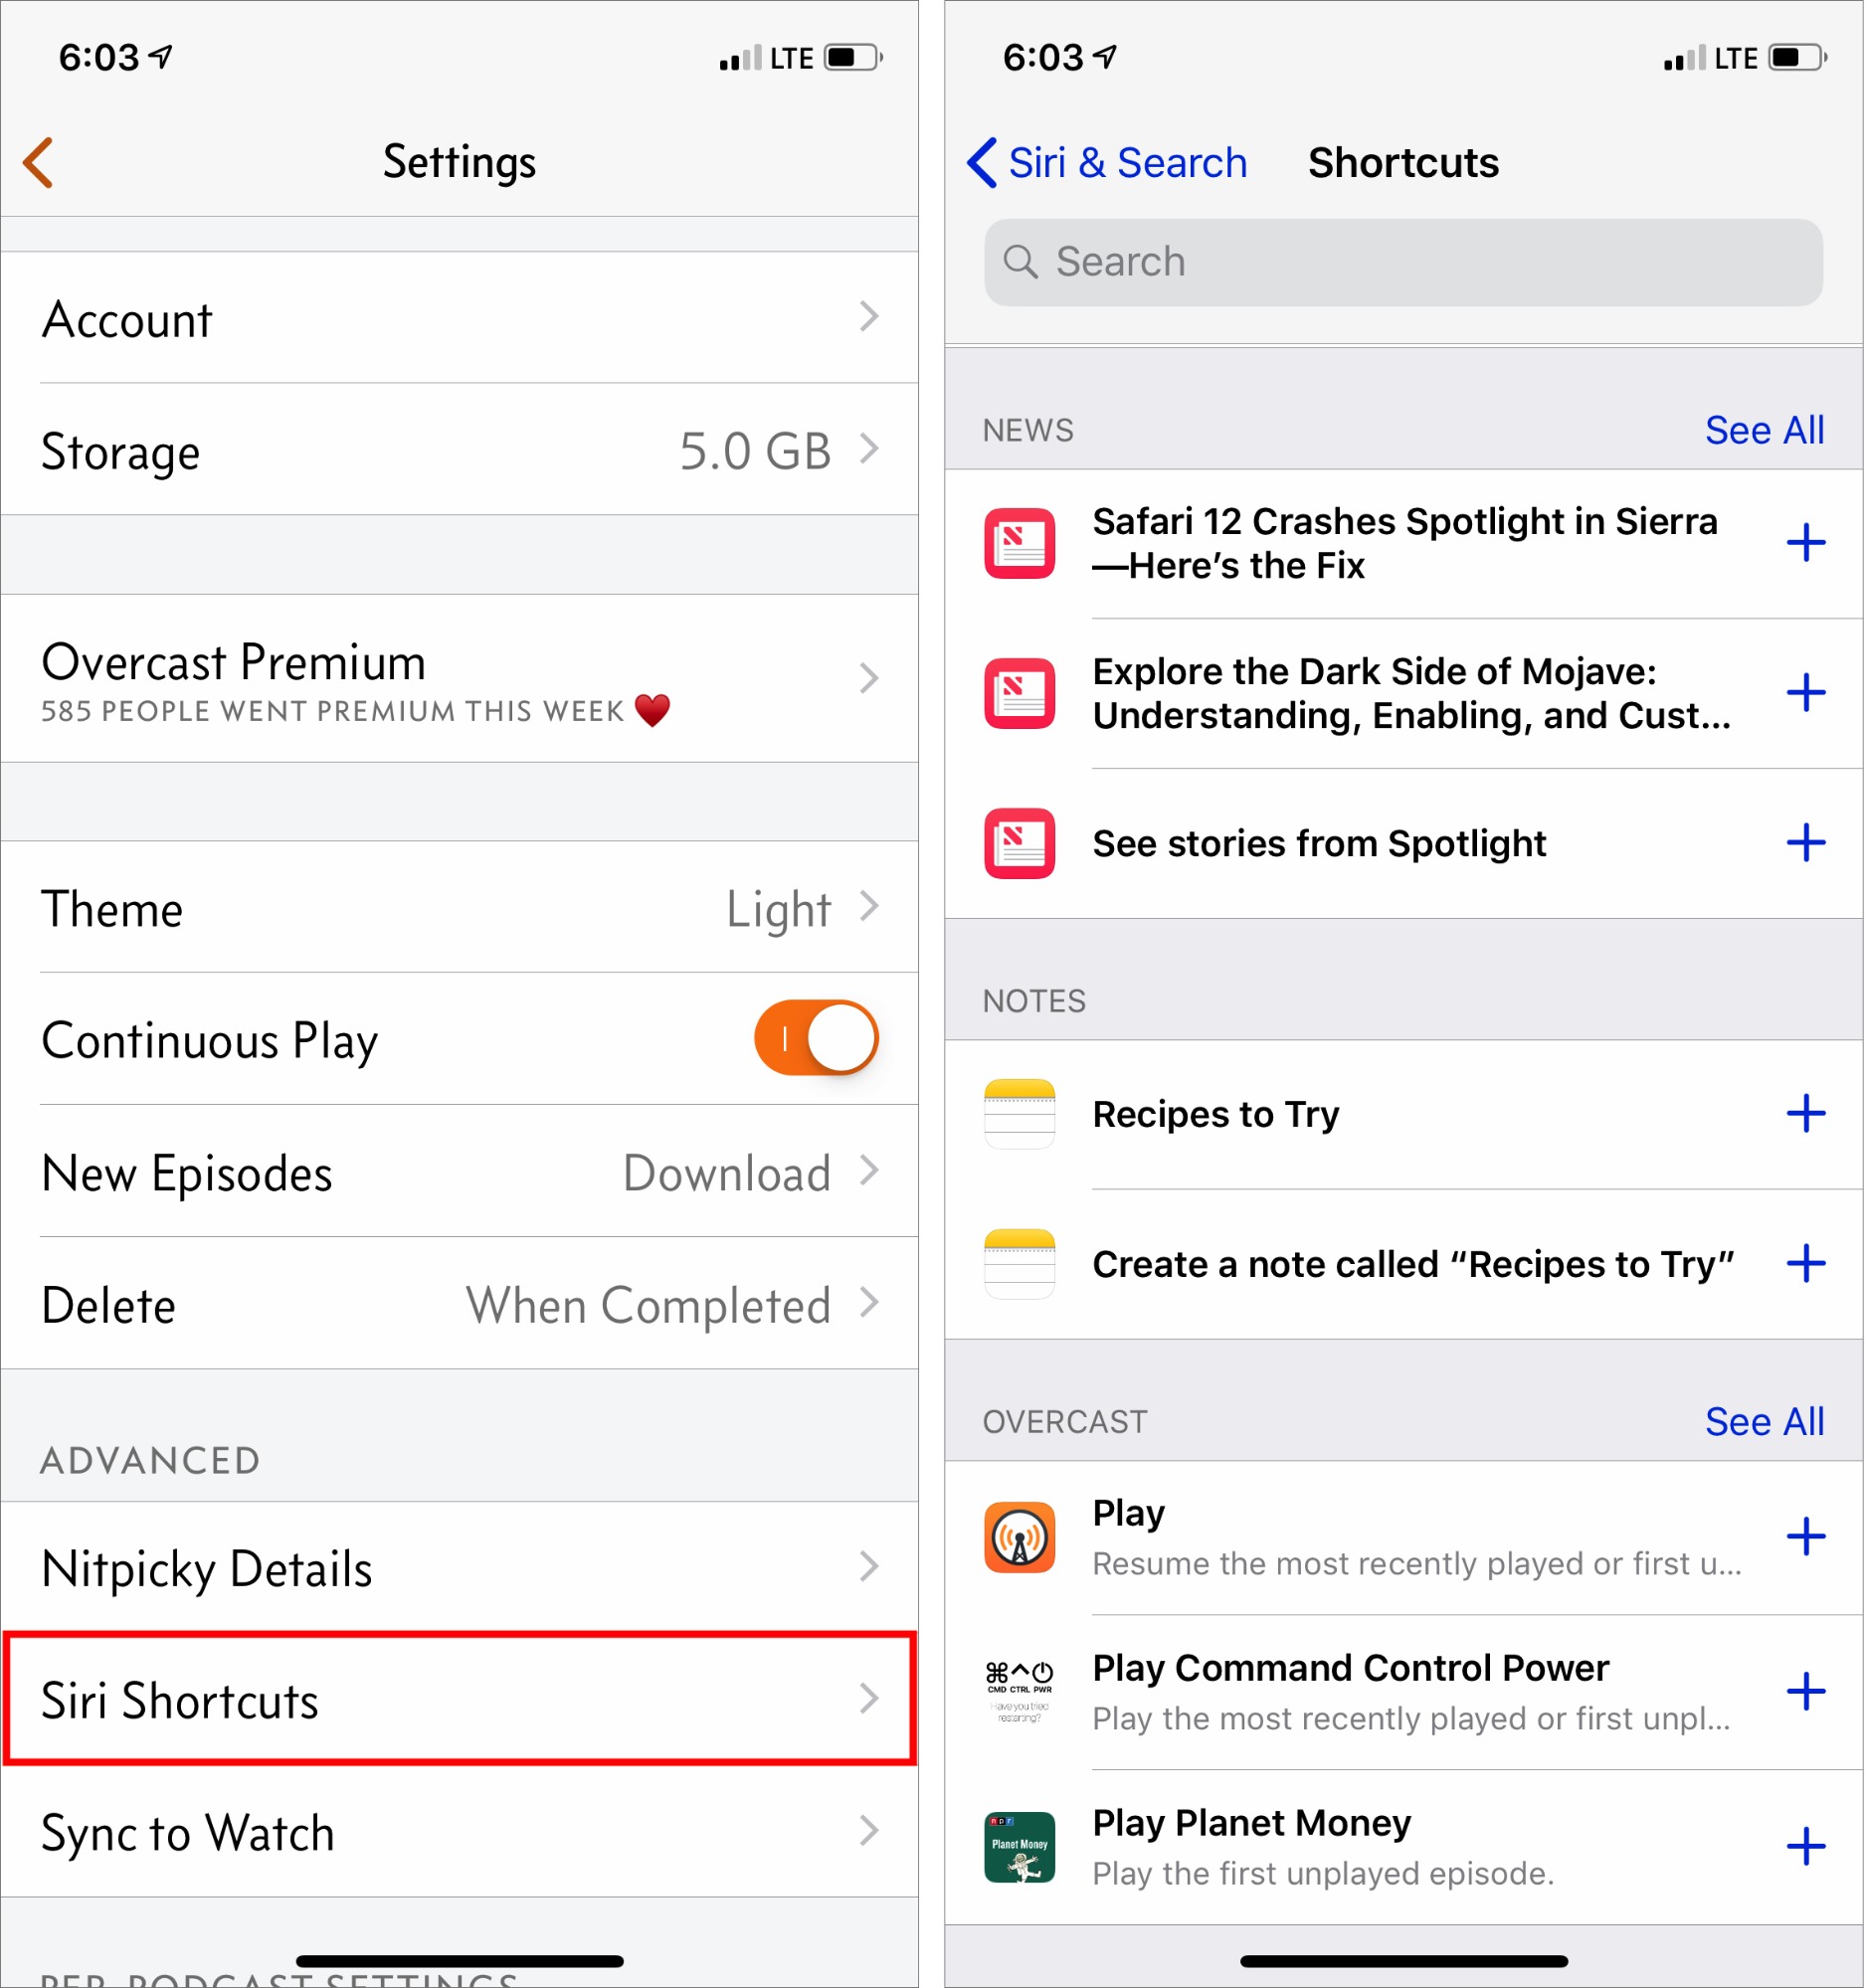
- App interface: Look in the app’s interface, especially in a settings screen. The podcast player Overcast offers such an interface.
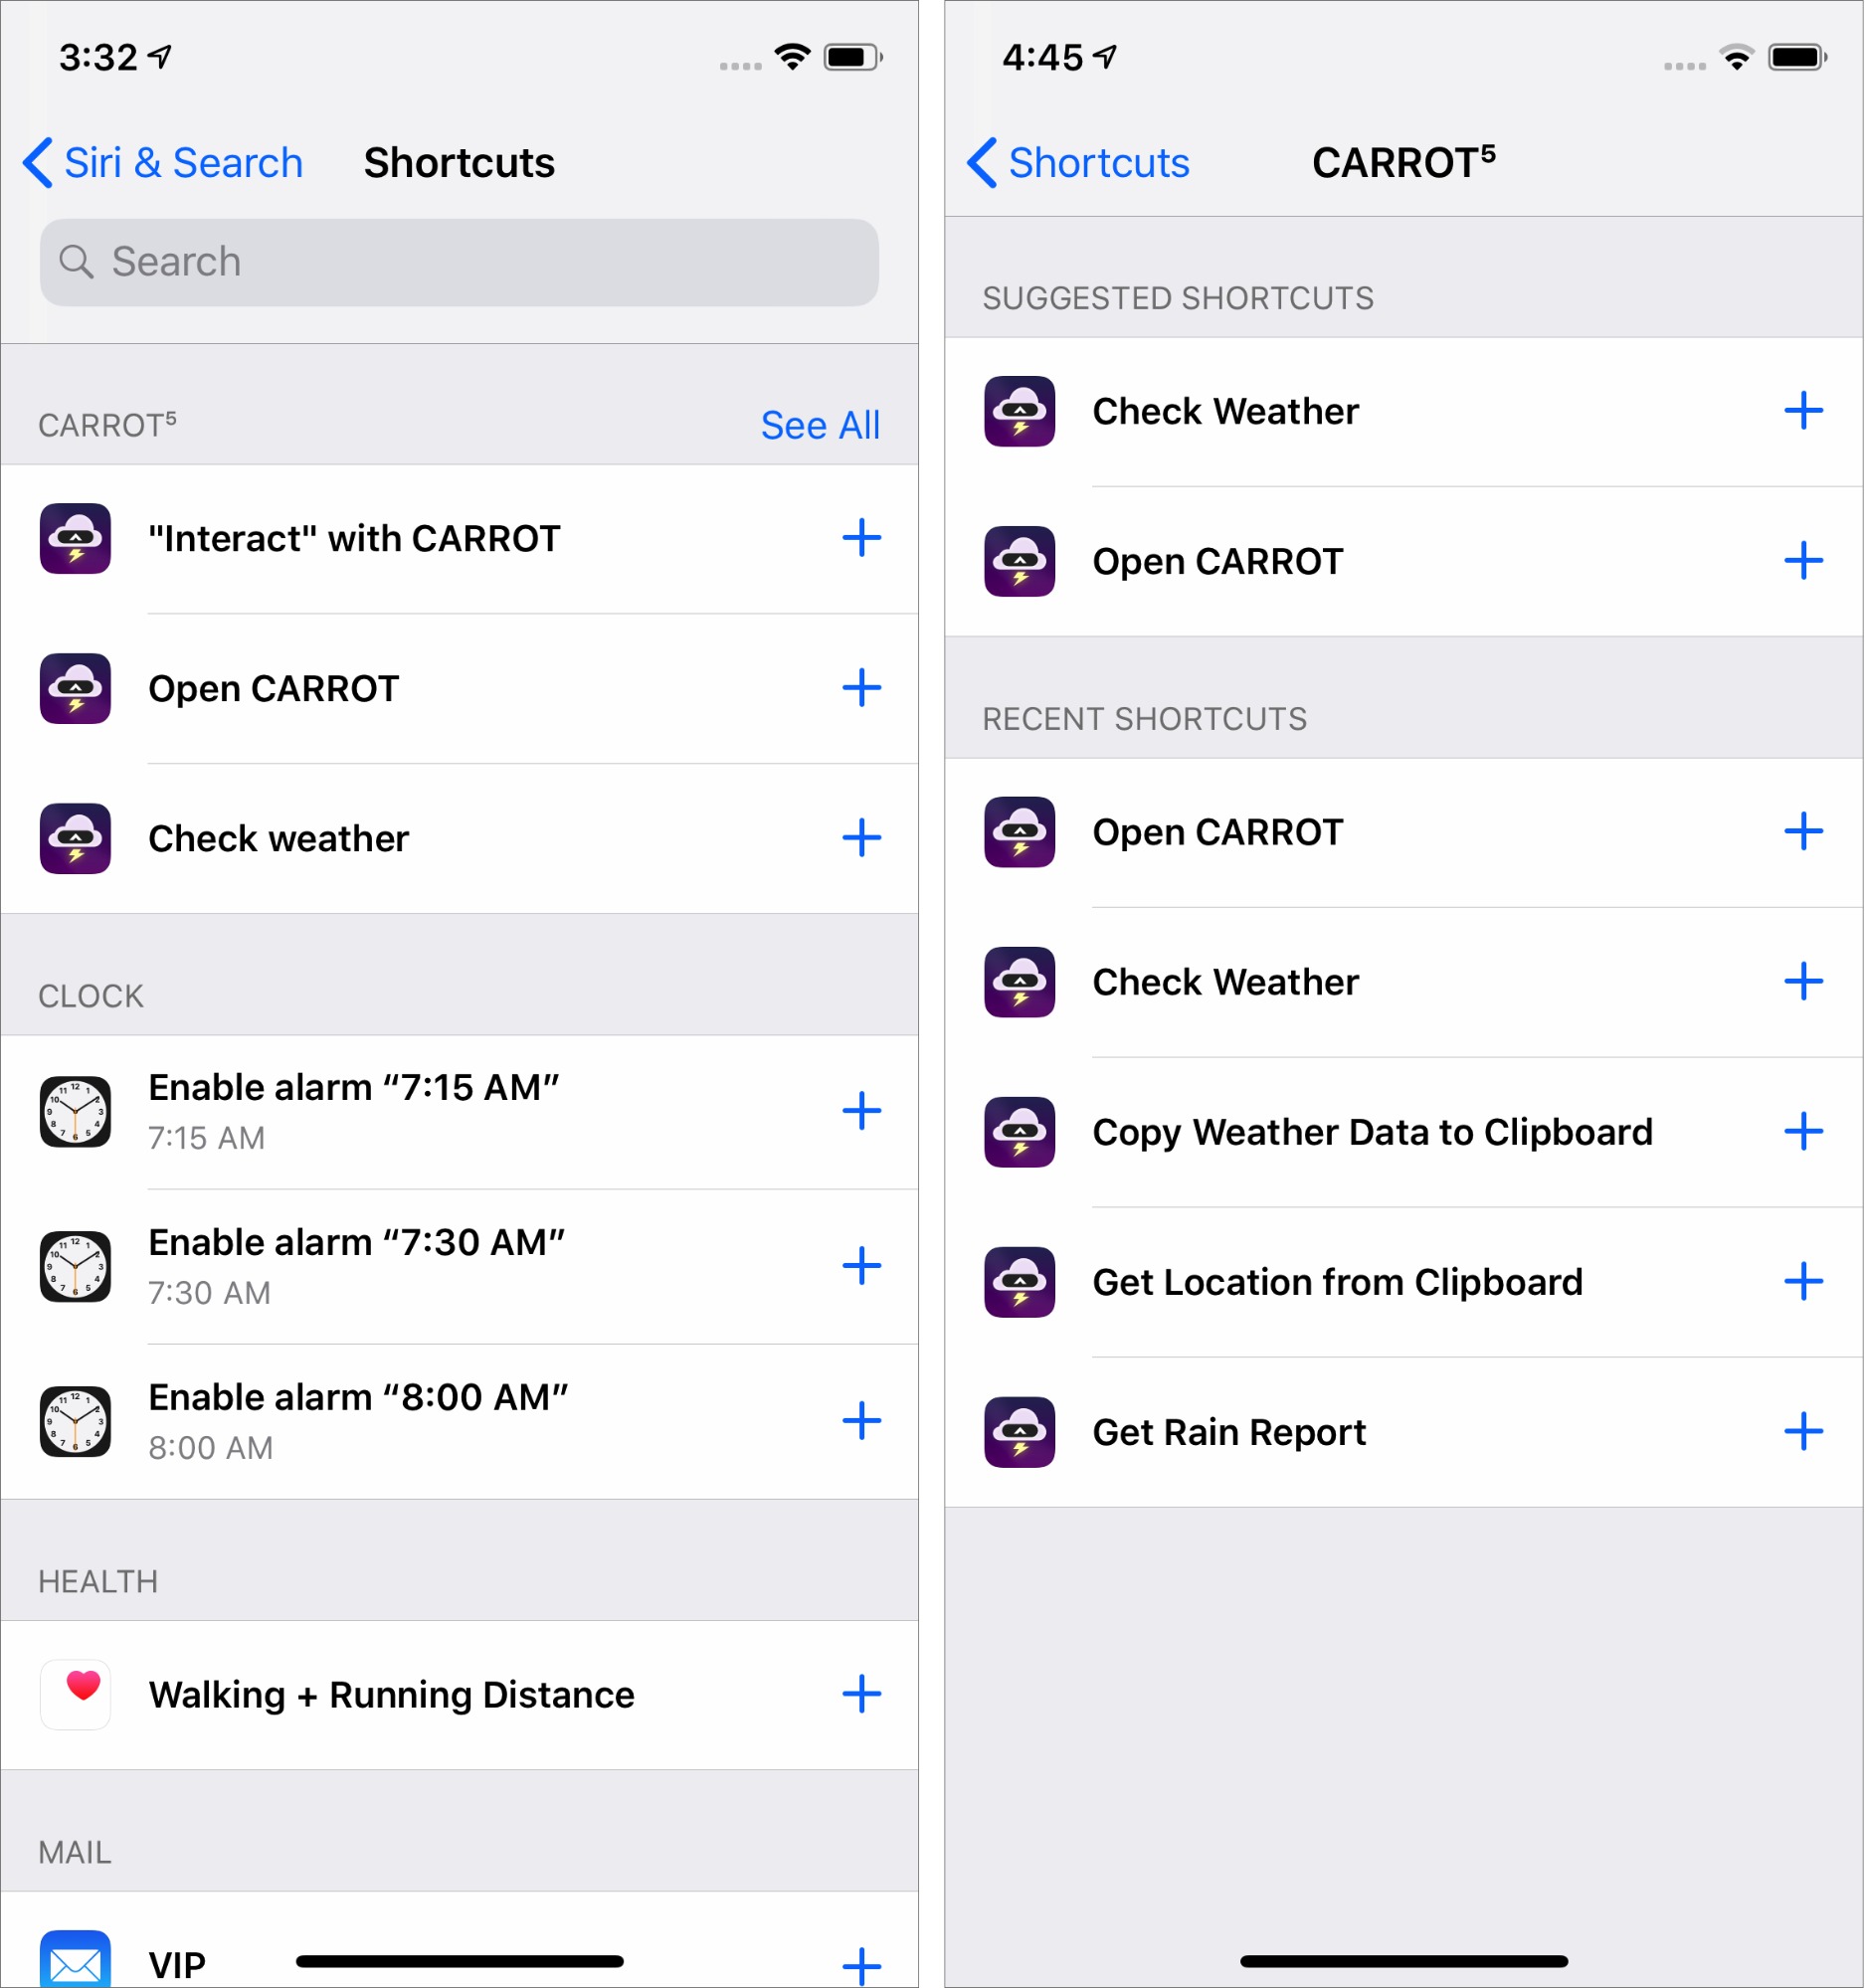
- Siri & Search: Go to Settings > Siri & Search > All Shortcuts and scan through the list. It won’t necessarily list all apps—Kayak didn’t appear here initially—but it may list apps that you didn’t realize could have Siri Shortcuts.
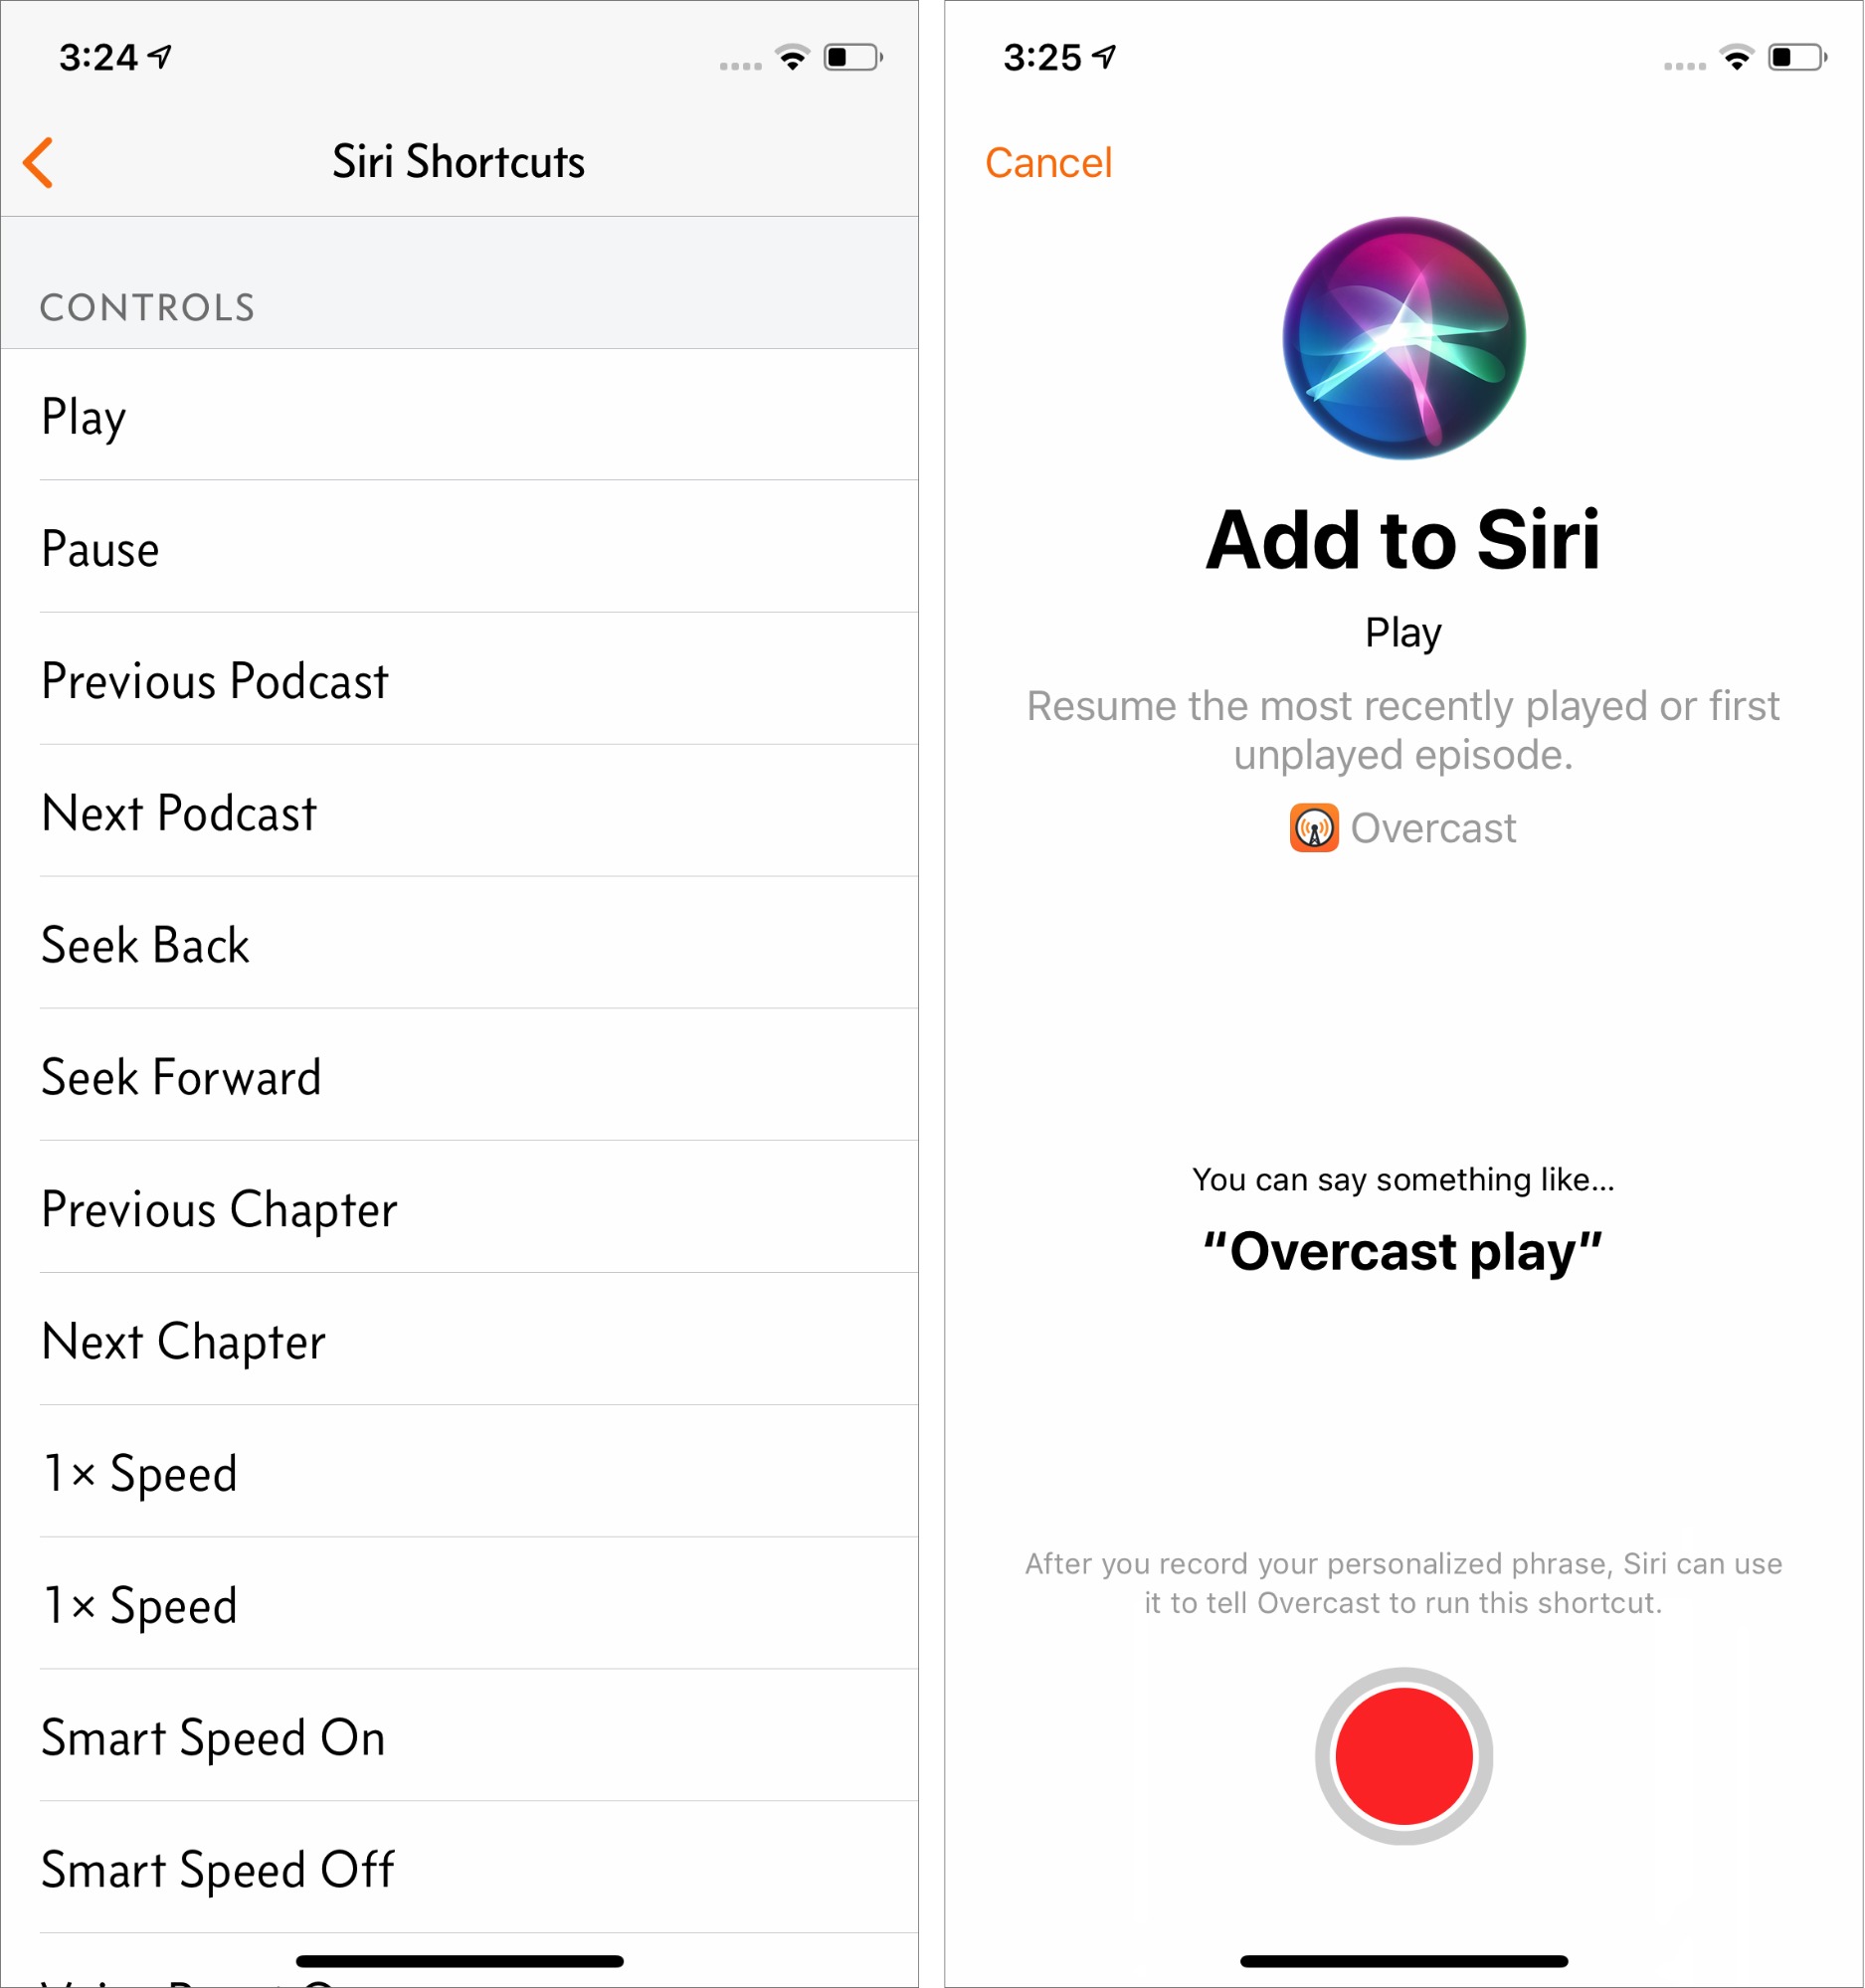
Unsurprisingly, given developer Marco Arment’s predilections, his podcast player Overcast offers deep support for Siri Shortcuts (I still think Overcast is the best podcast player for iOS despite some fierce competition—see “Overcast Refines the iPhone Podcast Experience,” 16 July 2014). In Overcast, tap the button in the upper-left corner to open the Settings screen, and then tap Siri Shortcuts to see a full list of supported actions. With them, you can use Siri to play, pause, seek back or forward, set a sleep timer, get URLs, access specific podcasts, and much more.
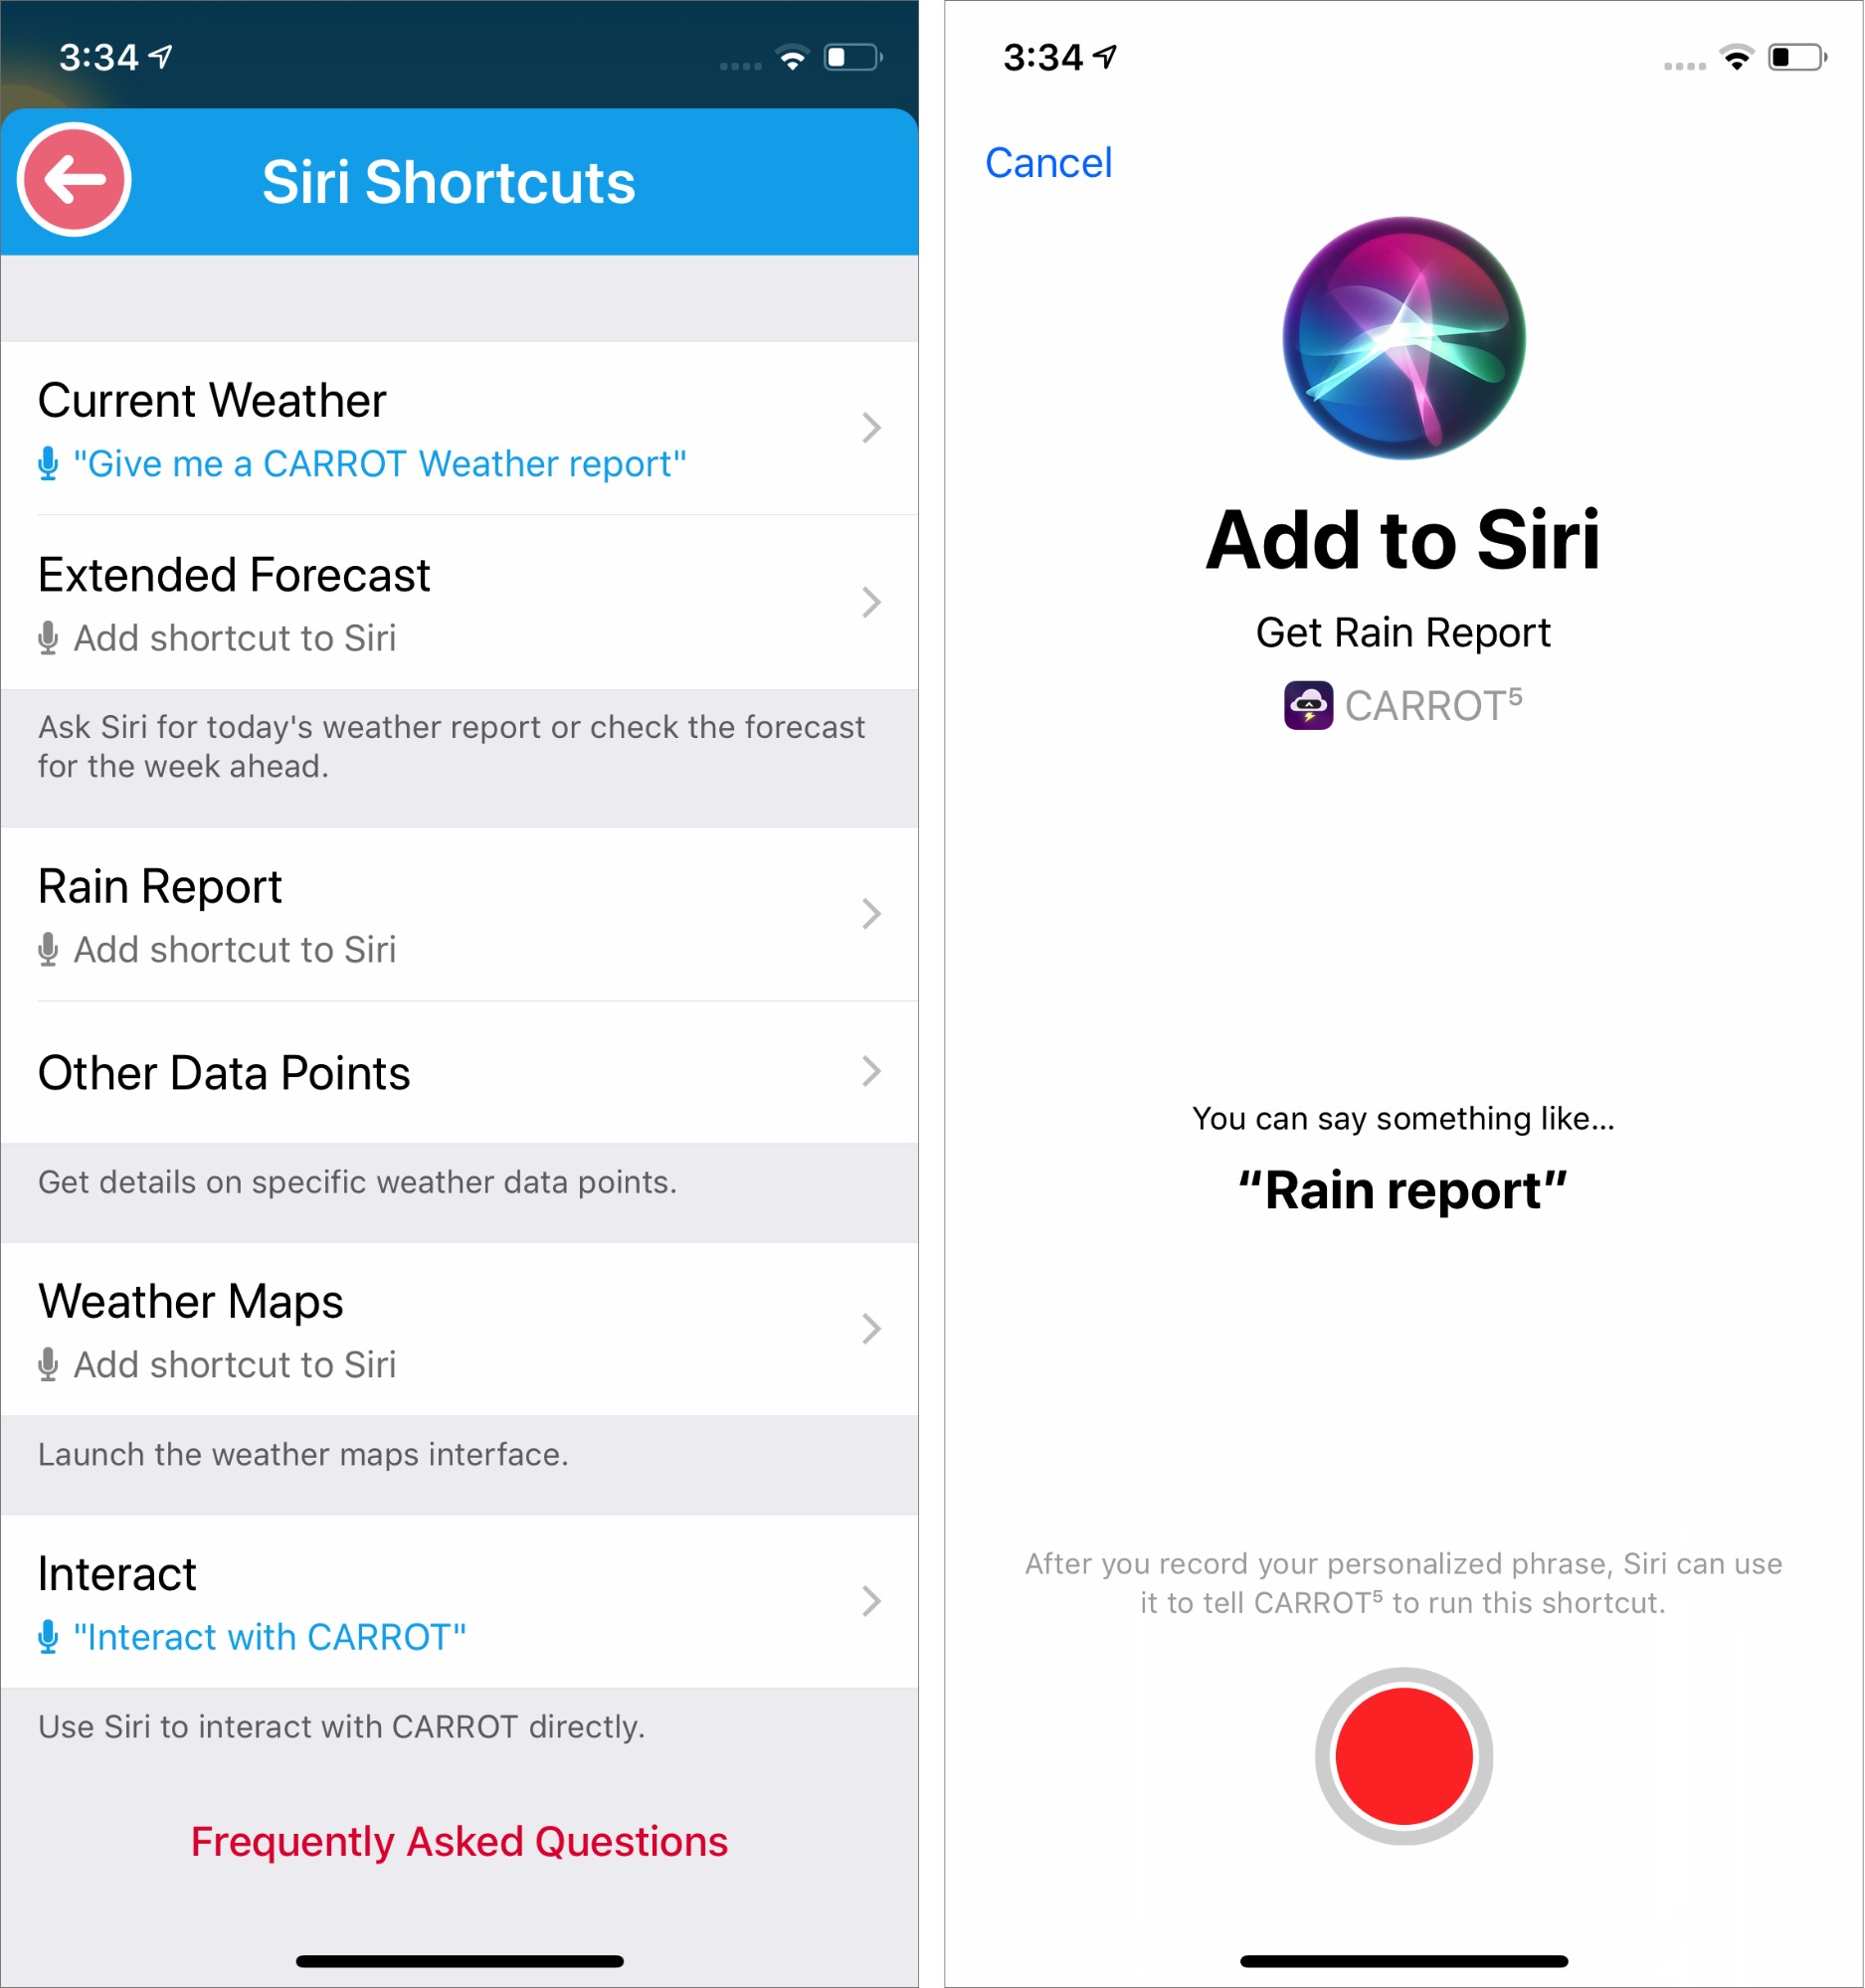
Another app that supports Siri Shortcuts is CARROT Weather, which is still my favorite weather app (see “CARROT Weather Predicts Cloudy with a Chance of Snark,” 22 January 2018). Again, go into Settings and tap Siri Shortcuts to make shortcuts for actions like getting the current weather, an extended forecast, or a weather map. You can also choose Interact, which lets you talk with CARROT directly through Siri.
To create Siri Shortcuts for apps that don’t expose their shortcuts or for Apple’s apps, go to Settings > Siri & Search > All Shortcuts. There you’ll see suggested shortcuts for apps like Health, Mail, Maps, and Messages, as well as some third-party apps. Tap See All next to an app name to see more shortcuts for that app, separated into Suggested Shortcuts and Recent Shortcuts.
Unfortunately, there’s no way to predict what you’ll find here either. Some apps, like Fantastical, Overcast, and Twitter, show general command-and-control shortcuts you can create in Suggested Shortcuts—such as “Check weather” in CARROT Weather or Play in Overcast, whereas others, like Google Maps, Messages, and Phone, only offer content-specific shortcuts—like directions to a specific place or sending a message to a contact. You may be able to get a shortcut to appear here by performing the task you want in the app several times and then coming back to this screen.
No matter how you discover a particular shortcut, the process of adding your own voice command is the same:
- Tap the shortcut in the list.
- Tap the big red record button.
- When you hear the ding, record the phrase you want to use to trigger that shortcut.
- Tap the stop button.
- Review your phrase. If Siri didn’t get it right, tap Re-Record Phrase to try it again. (You may also see Edit here, which lets you edit the phrase as text.)
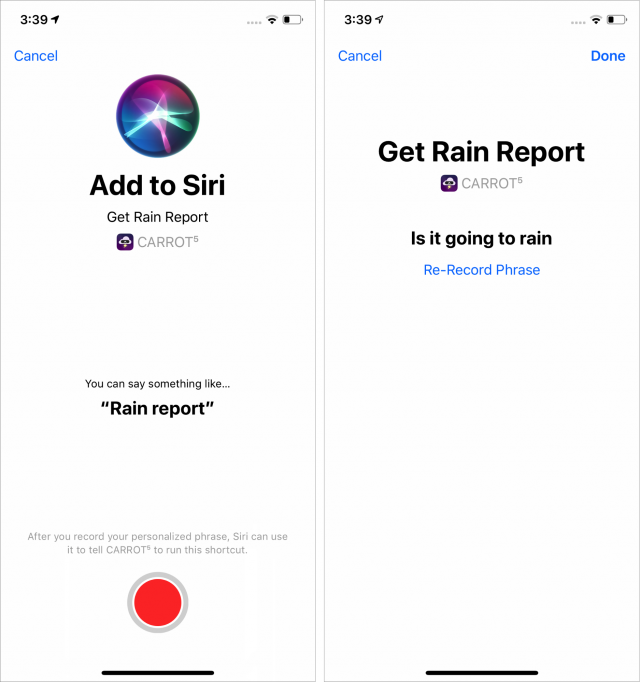
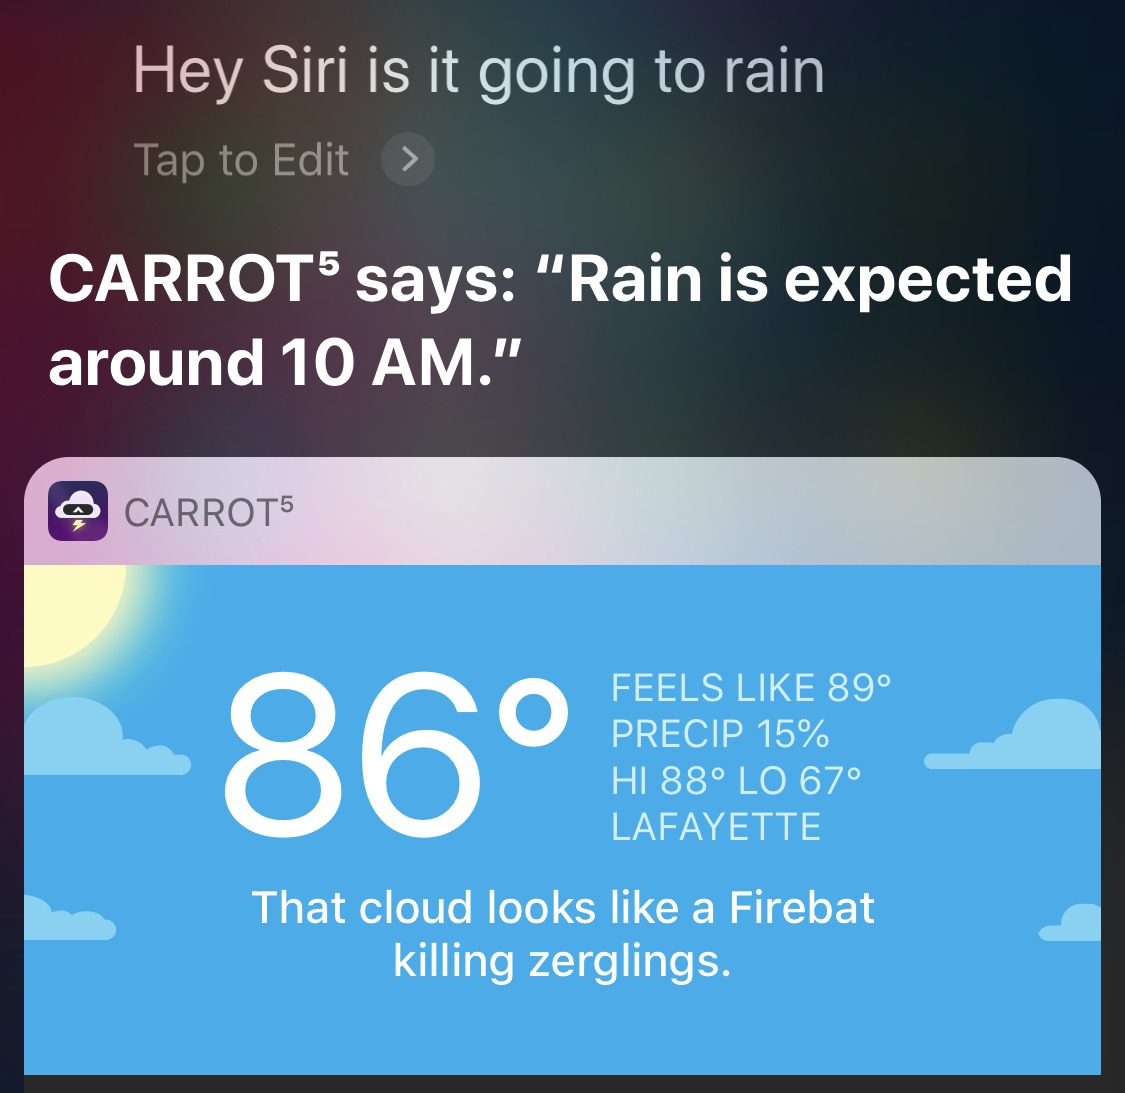
I found the suggested “Rain report” cold and impersonal, so I changed it to a question: “Is it going to rain?” - Tap Done when you’re finished.
Now you can use your new phrase just like any other Siri command. Two of my favorites are “Play the Menu Bar on Overcast,” which plays the latest episode of the Menu Bar podcast in Overcast, and “Give me a CARROT Weather report,” which gives me a weather report from CARROT right in the Siri interface. I’m also digging the aforementioned “Is it going to rain,” because it gives me a quick and accurate rain forecast.
 To see all the Siri Shortcuts you’ve set up, go to Settings > Siri & Search > My Shortcuts. (This list also includes any shortcuts you’ve created in the Shortcuts app and assigned a spoken phrase.) Tap a shortcut to re-record its command phrase or delete the shortcut. You can also swipe from right to left on a shortcut to delete it.
I’ve published a video demonstrating how to create and use Siri Shortcuts.
We’re just starting to see the potential of Siri Shortcuts. Beyond what I’ve already shown with Overcast and CARROT Weather, Philips Hue has added Siri Shortcuts support to its app. This support initially seemed redundant because HomeKit already lets you control Hue lights with Siri, but it turns out that the Hue app supports actions that HomeKit does not, like scenes that change throughout the day. Also, the Apple Store app lets iPhone Upgrade Program members create a Siri Shortcut to complete iPhone XR preorders—the option appears during the preapproval process. We’ll all have to keep checking back with our favorite apps to see what they provide—Adam Engst is hoping for Siri Shortcuts support in the Libby ebook reader, so he can tell Siri to play his current audiobook for 15 minutes while going to sleep.
As potentially useful as these built-in Siri Shortcuts are, the Shortcuts app is where the real power is. We’ll be covering it here in TidBITS later on, but if you’re impatient, you can read the chapter that I dedicated to it in Take Control of iOS 12.
