#1558: Apple opens up Find My service, fix Apple Watch Series 3 updates, extend Mac life with an external SSD, explaining emulation, virtualization, and Rosetta 2
Apple has finally officially opened up its Find My app to third-party device makers, but those devices still appear to be months away. If you can’t update your Apple Watch Series 3 to watchOS 7 because of a lack of storage space, Adam Engst suggests several workarounds. Glenn Fleishman has two articles for us this week: how he extended the productive life of his 2017 iMac with an external SSD and an explainer on the differences between emulation and virtualization, and how they apply to Rosetta 2 in Apple silicon Macs. Notable Mac app releases this week include BusyCal 3.12.5 and BusyContacts 1.5.2, Acorn 7.0.2, Bookends 13.5.3, and Pixelmator Pro 2.0.6.
Apple Opens “Find My” Crowdsourcing to Third-Party Accessories (For Real This Time!)
Last July, Glenn Fleishman reported that Apple was officially opening up its Find My service to third-party accessory makers, with the capability expected in late 2020 (see “Apple Opens “Find My” Crowdsourcing to Third-Party Accessories,” 9 July 2020). In Apple’s now-typical stylishly late fashion, Find My is finally available to third-party developers.
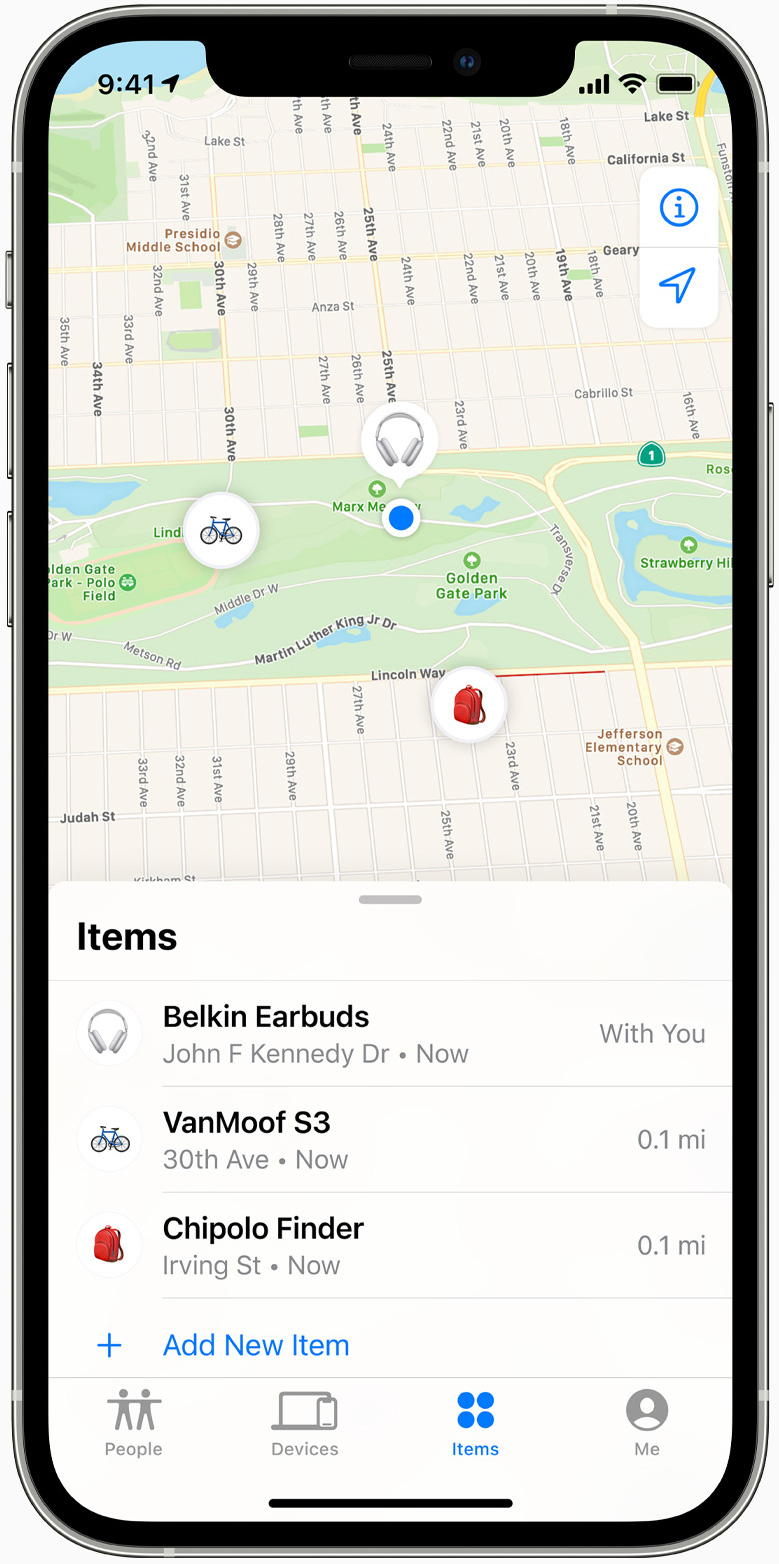 The first devices in the new program are Vanmoof’s S3 and X3 e-bikes, Belkin’s Soundform Freedom wireless earbuds, and the Chipolo One item finder. Being part of the Find My network is an extension of Apple’s Made for iPhone program, and each approved device must meet Apple’s standards for privacy. None are shipping yet, however.
This announcement means that you will be able to track more than just iPhones, iPads, Apple Watches, and AirPods (plus your Apple-using friends) with the Find My app. Any compatible device can be tracked, like your e-bike or earbuds. The Chipolo One addition is especially interesting since you could attach one to pretty much anything, like backpacks, keys, remote controls, your car, etc.
Apple also announced that it will be releasing a draft specification in the coming weeks that will let chipset makers tap into the U1 Ultra Wideband chips in newer iPhones, which will allow for more precise and directionally aware location data.
No mention was made of the long-rumored AirTags, a wireless tracker like Tile that Apple has reportedly been working on for years. We wouldn’t be surprised to learn that Apple opening up Find My crowdsourcing is laying the groundwork for such a product. We also hope the rumored next-generation Apple TV remote includes this technology because Apple remotes are notoriously slippery and easy to lose.
Would the addition of Find My compatibility make you more likely to consider buying a device that supported it? Are there any devices in particular that you hope incorporate Find My compatibility?
Apple Watch Series 3 Update Workarounds
The GPS-only model of the Apple Watch Series 3 has just 8 GB of onboard storage. Even for people who install relatively few apps, that limited storage can cause problems when installing updates to watchOS 7. Users report getting errors in the Watch app, telling them that there isn’t enough free space to install the update. The problem appears to be specific to the Apple Watch Series 3—I haven’t seen reports of it bedeviling owners of newer Apple Watch models.
There appear to be at least two possible workarounds for the problem: updating directly on the watch itself and unpairing and re-pairing the watch. (See the comments for a third that we haven’t had a chance to confirm.)
Update Directly on the Apple Watch
The standard way to update watchOS is to start in your iPhone’s Watch app, navigate to My Watch > General > Software Update, and install the update from there.
However, if that approach fails due to a lack of space, try this alternative method, which several users have used successfully. Thanks to David Weintraub on TidBITS Talk for tipping me off to this technique, which I was then able to use successfully on my mother’s watch.
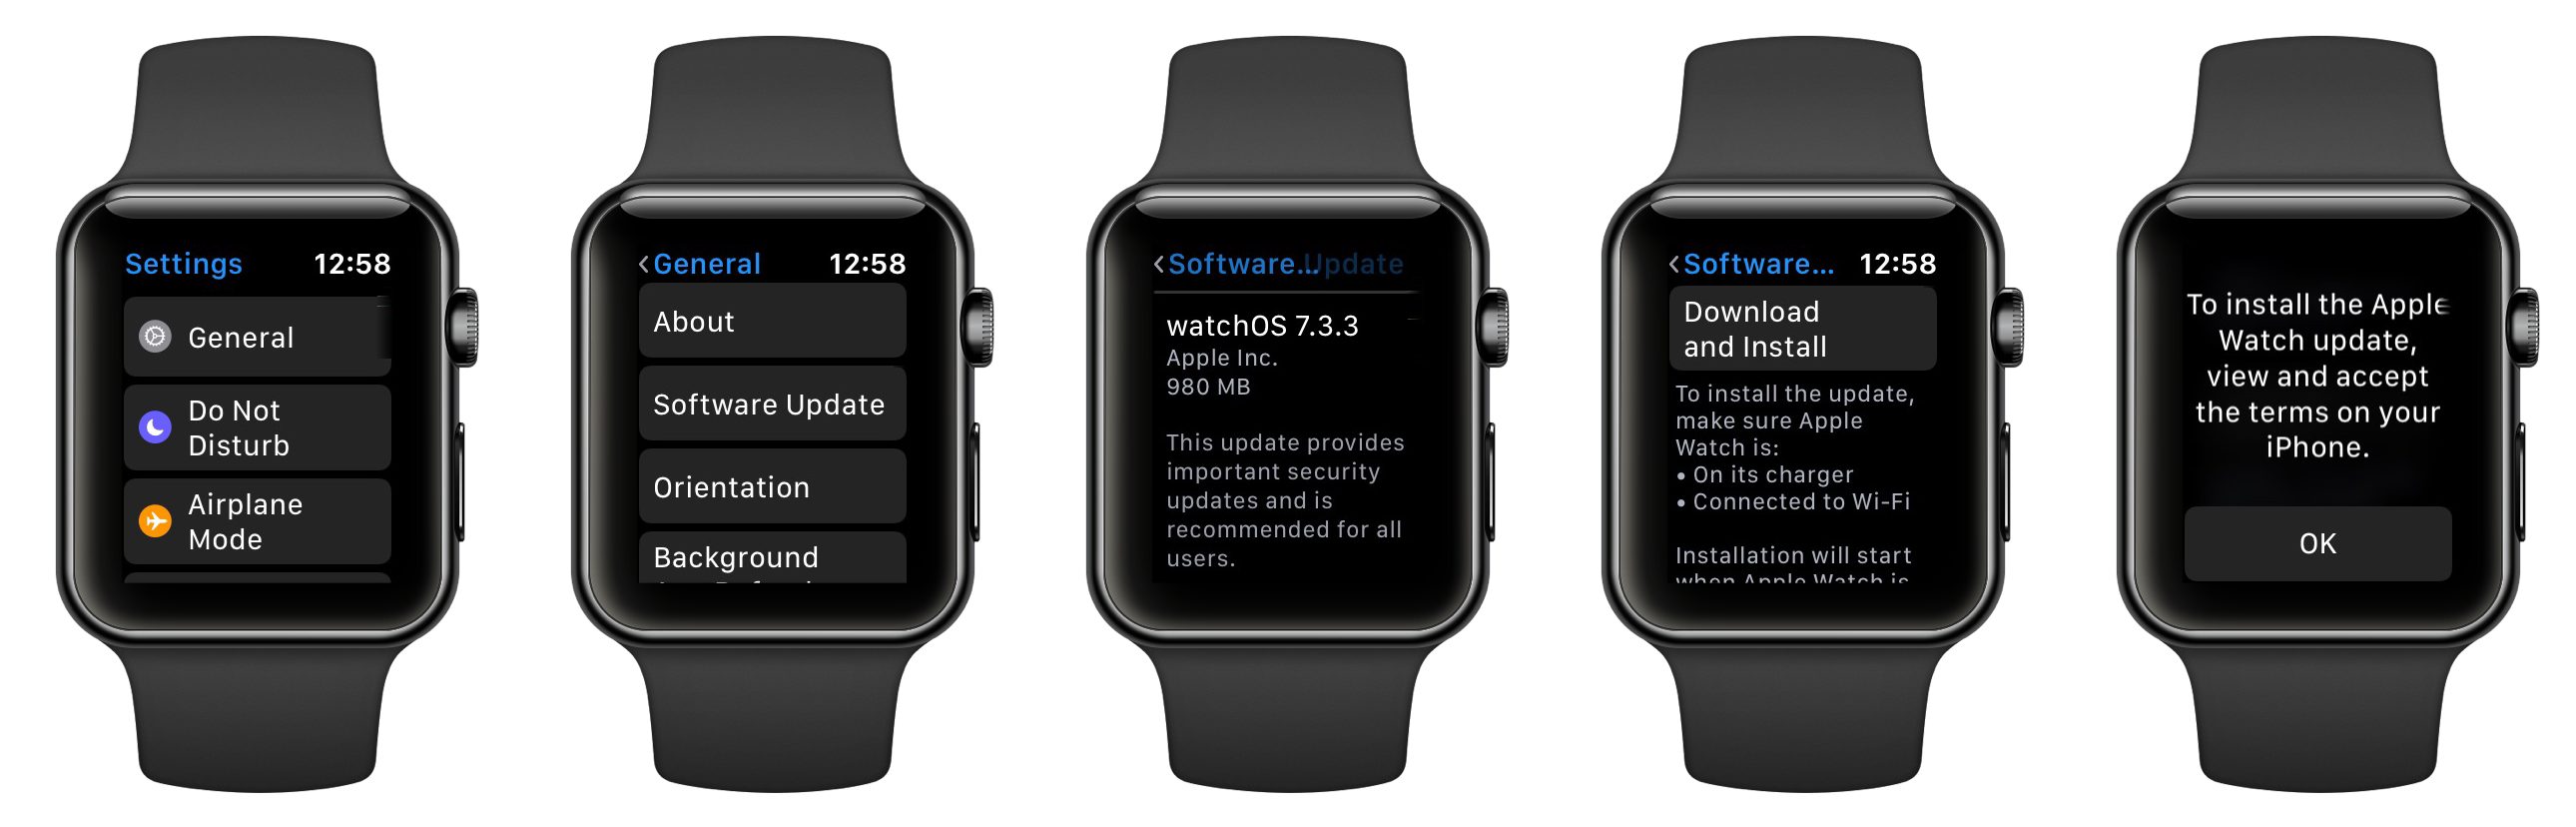
- Press the Digital Crown on the Apple Watch to display your apps.
- Scroll down and tap the Settings app. (If you see the nearly unusable grid view, switch to the list view by opening the Watch app on your iPhone and going to My Watch > App View > List View.)
- Tap General, then Software Update to see details about the update.
- Scroll down in the Software Update screen and tap Download and Install.
- If prompted to accept terms and conditions, tap OK and accept the terms on your iPhone.
- The update won’t install until you’ve put the Apple Watch on its charger, it’s charged to at least 50%, and Wi-Fi is available. It’s easiest to start the process whenever you usually charge the Apple Watch.
Unpair and Re-pair the Apple Watch
Although several users have reported success with the previous method, if it doesn’t work for you, there’s another option. It’s annoying and time-consuming, and is thus best left for when you have plenty of time. In essence, you need to unpair the watch, which has the effect of erasing it and clearing space for the update, and then pair it again, restoring from backup. Follow these steps while keeping your iPhone and Apple Watch close together:
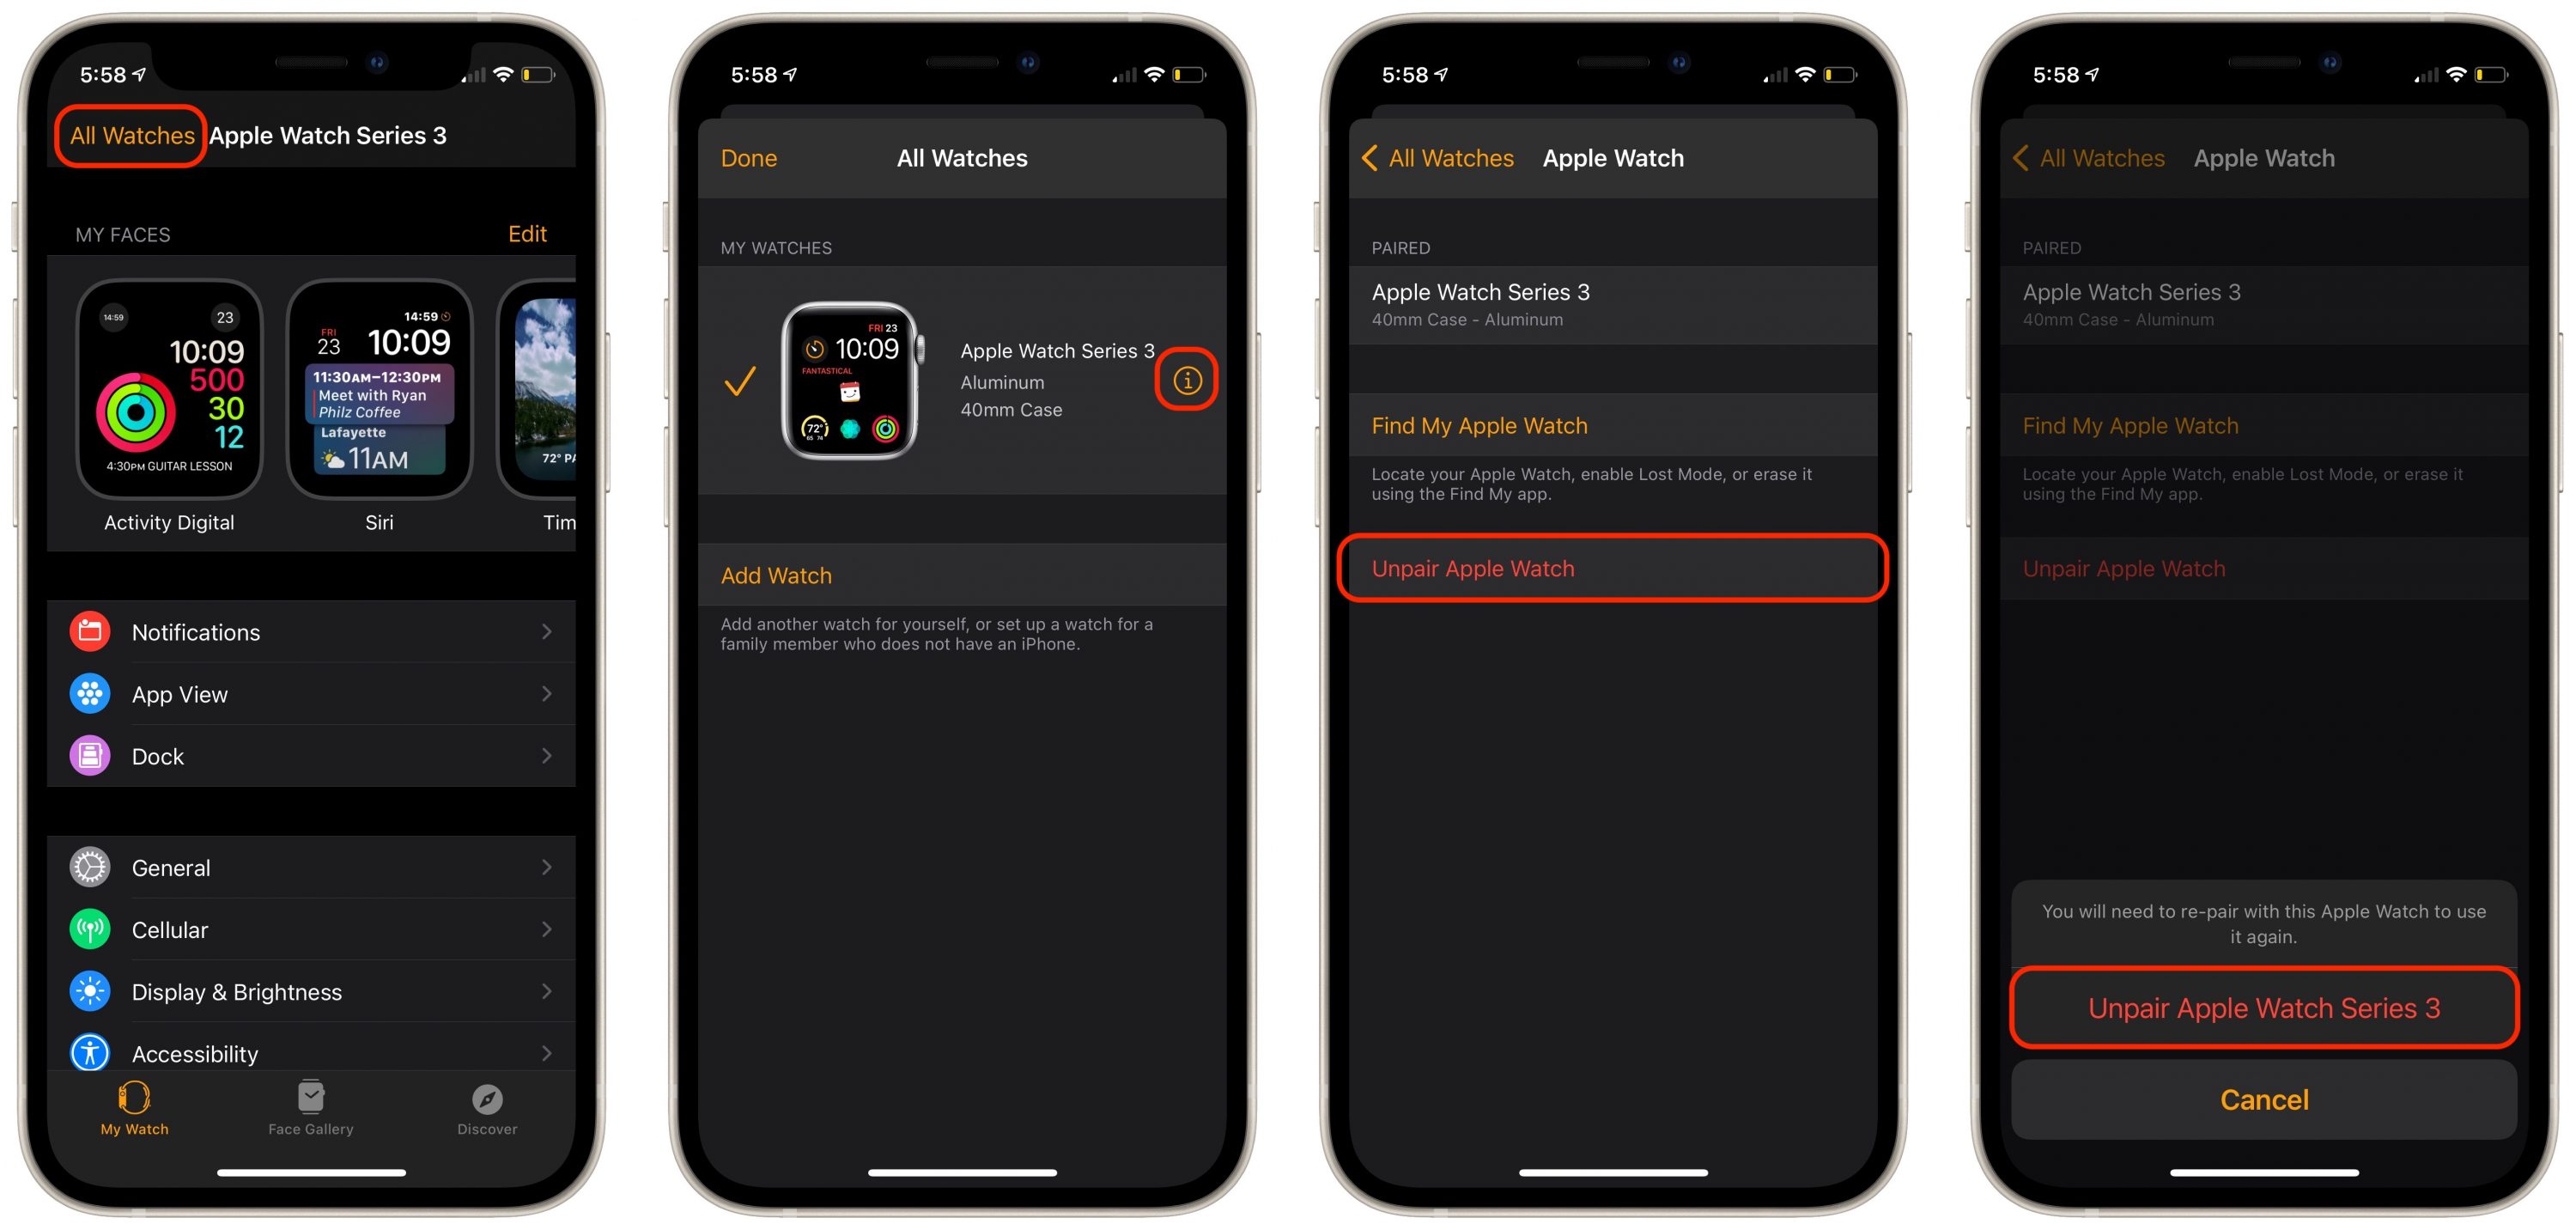
- In the Watch app’s My Watch tab, tap All Watches.
- Tap the info button next to the watch you want to unpair.
- Tap Unpair Apple Watch. If you’re prompted to keep or remove your cellular plan, keep it—you’d want to remove it only if you were selling or giving away the watch.
- Tap Unpair Apple Watch again to confirm. Another backup is made, and then the erase process starts.
When the Apple Watch has been reset to factory defaults, you can pair it again by holding it close to your iPhone, tapping Continue when asked to set up the Apple Watch, and scanning the pairing animation. When prompted, choose Restore from Backup and if you’re asked, let it update to the latest version of watchOS (since that’s the goal).
Let us know how these approaches work for you!
An External SSD Gave My iMac a New Lease on Life
My work life centers around my Macs. With a few delightful exceptions that involve printing history and letterpress, I spend most of my day looking at a screen, tapping away on a keyboard, and manipulating a mouse. When I purchased a quad-core 21.5-inch iMac with Retina display in 2017 and added a secondary 4K display, I felt that I had spent the right amount of money relative to my needs. But it took me until two weeks ago to truly unleash its power.
When I bought the iMac, I unfortunately cheaped out in one important regard. While I had configured it with 32 GB of memory, I opted for a 1 TB Fusion Drive, Apple’s combination of a fast, low-capacity SSD with a slow 5400 rpm, high-capacity hard drive. At the time, spending $300 for a 512 GB SSD didn’t make sense because I needed more storage, and $700 for the 1 TB SSD upgrade was too dear for my budget. However, Apple had just shifted to including substantially smaller SSDs in Fusion Drives, which I believe ultimately became a huge liability. (See “iMac 1 TB Fusion Drives Have Smaller SSDs,” 7 August 2017.)
I didn’t notice the performance tradeoff most of the time. The Fusion Drive initially suited me well with macOS 10.12 Sierra and seemed to sail through 10.13 High Sierra without causing me grief. It was only once I upgraded to 10.14 Mojave that I found myself waiting seemingly forever for apps to launch and disk-intensive tasks to finish.
As I grew increasingly frustrated, 10.15 Catalina appeared in late 2019, and I had two critical 32-bit apps I wanted to keep using indefinitely. A shift to Catalina would require additional resources to run a virtual machine effectively so I could keep Mojave available for those two apps (see “Moving to Catalina: Keep Your 32-Bit Mac Apps Running with Parallels,” 18 September 2019). I chose the cheapest path again, which was upgrading to 64 GB of memory and selling my previous 32 GB to a friend.
The extra RAM helped, but not enough. Parallels Desktop requires heavy disk usage, and it was a slug alongside other apps, even with so much memory available. I soldiered on for another 18 months, through the Catalina release and then macOS 11 Big Sur, upgrading my Mac laptop to each in turn for researching and writing.
Purchasing an M1-based MacBook Air finally pushed me over the edge. Do you remember first seeing a Retina display? I remember glancing at one and thinking, “Oh, no, I must not get used to this, or my current screen will seem like it’s composed of giant blocky pixels.” Eventually, my budget let me move to Retina.
The M1 chip had the same effect. Despite having just 16 GB of memory, the M1 MacBook Air runs measurably far faster than my iMac. Worse, even when using Rosetta 2 emulation for Adobe Creative Cloud apps like Photoshop (before the recent release of an M1-native version), the MacBook Air swept the floor with my iMac. I began using screen sharing to avoid waiting several minutes for Adobe InDesign or Photoshop to launch; they launched in about 10 seconds on my MacBook Air.
The solution was obvious—I needed faster storage on the iMac. With a couple of previous Mac minis, I had switched to an affordable 512 GB external startup drive that used an external SSD in a SATA III format and connected via USB 3. Such SSDs package flash memory in a 2.5-inch drive case but are limited by the SATA III throughput rates. SATA III SSDs top out just below 600 MBps (around 5 Gbps, USB 3’s base-level speed), which is a few times faster than even a 7200 rpm hard drive.
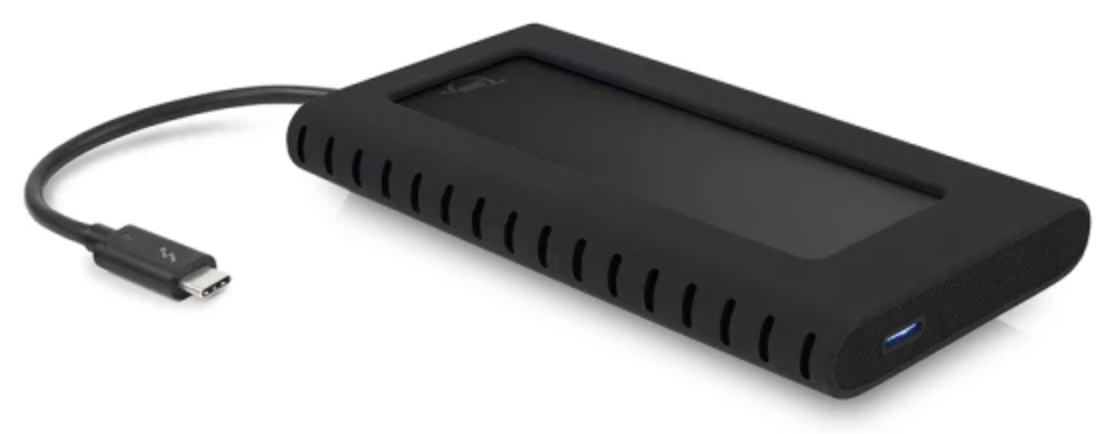
Since then, however, technology and pricing have improved by leaps. SSDs these days rely on NVM Express, a standard built on top of PCI Express, which can offer up to 10 times the rate, challenging the top rates offered by Thunderbolt 3. I purchased a Thunderbolt 3 external SSD from Other World Computing, the 1 TB model of the Envoy Pro EX, for just under $300, which is rated at 2800 MBps. (As a gauge of SSD price drops, you can buy a SATA III-packaged 8 TB SSD for under $800, or nearly what I would have paid for a 1 TB SSD upgrade option in 2017. The step up is an 8 TB NVMe SSD blade is $1349 from OWC that fits into a $79 Envoy Express Thunderbolt 3 enclosure.)
Here’s how I upgraded:
- Using a Thunderbolt 3 port, I connected the SSD and formatted it as APFS, without encryption.
- With Carbon Copy Cloner, I made a complete copy of my Mojave startup volume to the SSD.
- I set System Preferences > Startup Disk to boot from the cloned SSD.
- I restarted into macOS Recovery (hold down Command-R at startup) and installed Big Sur onto the SSD. I wanted to leave my internal Fusion Drive on Mojave as a backup position.
- When installation was complete, I restarted into Big Sur using the external SSD.
- I launched the latest version of Parallels Desktop and tested its performance virtualizing Mojave. It worked as I had hoped—everything worked essentially as fast as comparable actions on the host Big Sur operating system managing my Mac.
In my interactions with the iMac, it now feels like I had a major hardware update, particularly with Big Sur as the startup system, which makes it seem like a different machine altogether.
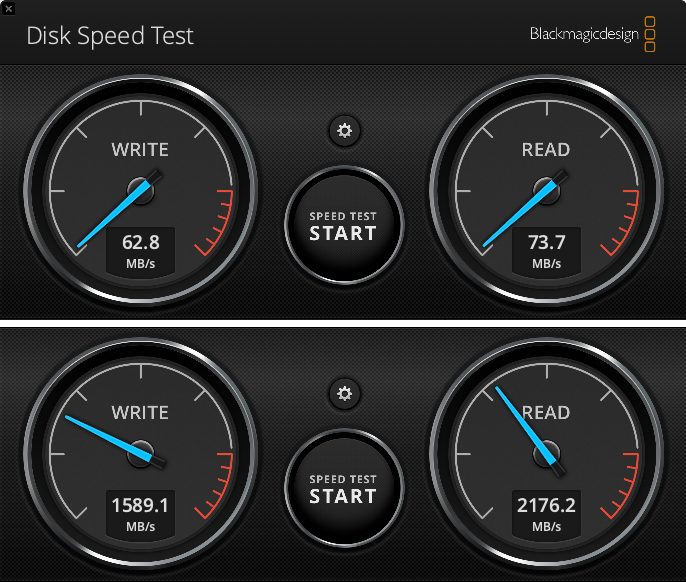
In testing with Blackmagic Disk Speed Test, my Fusion Drive initially showed hundreds of MBps for read and write, but after a few tests clearly shifted operations from the SSD to the hard drive, rates dropped to just above 60 MBps for writes and a bit above 70 MBps for reads. On the external Thunderbolt 3 SSD, I consistently measured nearly 1600 MBps on writing and almost 2200 MBps on reading.
This performance improvement made a huge difference with drive-intensive apps. In particular, I found that my love of audio editing for podcasts returned. I had standardized on Adobe Audition years ago, and Audition hits the drive hard. It used to take minutes to launch and load a project, editing performance was often poor, and exporting mixed-down files was sluggish at best. Now it runs like butter. I was able to edit a 90-minute recording session with five other people into six episodes of a show I host, Pants in the Boot, in a few hours, compared with at least twice that time and a lot of irritation for a previous similar batch a year ago. It was delightful.
None of us are made of money, and when I purchased this iMac in 2017, I had just suffered a second Mac mini failure in as many years. I was desperate to get back to work without breaking the bank. The decision to skimp on a Fusion Drive instead of an SSD didn’t seem regrettable initially, though it was eventually painful.
But the wait was worthwhile. The performance of a Thunderbolt 3 SSD is effectively as good as if I’d paid Apple for an internal SSD. If anything goes south with this volume, I can simply replace it, instead of cutting open the iMac. Or, in a year or two, I could upgrade it to 2 TB or maybe even 8 TB—SSD prices continue to fall. For now, I’m happy about having earned myself a few more years of satisfaction with one of my favorite Macs, now that I’m no longer unintentionally throttling its true performance.
Emulation, Virtualization, and Rosetta 2: A Blend of Old, New, and Yet To Come
Over the decades, Apple has managed several successful processor and operating system migrations with a combination of emulation and virtualization. Emulation lets a computer run code intended for a different CPU, like a Mac with an Intel processor running code written for a Motorola chip. Virtualization lets Apple (and other companies) keep older operating systems alive for a while, or even indefinitely, by creating a bubble in which older code can run natively, without realizing it’s not controlling a hardware computer.
Apple’s latest entrant in the emulation field is Rosetta 2, which enables Intel-based apps to run on Apple’s M1 chips. But there’s more to come that could improve the transition from Intel to Apple silicon for Mac users—like a virtualization app that would let us launch 10.15 Catalina or previous Intel-only versions of macOS, or Intel flavors of Windows, Linux, and other operating systems. What stands in the way?
Though they may seem to carry out a very similar function, there’s a wide gulf between emulation and virtualization. Apple’s limited Rosetta 2 emulator provides one of those Indiana Jones rope bridges across the chasm. Will someone build a trestle highway? Let’s explore the concepts first.
Crossing the Chasm: Emulation and Virtualization
Both emulation and virtualization let you run one or more apps or entire operating systems within a distinctly separate operating system from the one that manages the host computer—the actual computing hardware. Such an approach can give you the best of both worlds, where you can use the latest hardware and operating system while still having access to previously purchased apps that run only in unavailable machine configurations. It’s also incredibly useful for app developers and technical support staff, who often need an array of operating system versions for testing and troubleshooting.
Emulation generally works at an instruction level. Emulators usually simulate most or all of the functions of a computer processor, although they may handle only a subset of all possible instructions the real CPU can execute. When an app or operating system loads within an emulator, the emulator transforms its instructions into a version that works natively on the processor on which the emulator is running. (There are even emulators nested inside other emulators, notably in the telephone network and other long-running systems. And there are hardware emulators, including chips that can be programmed to reconfigure themselves to emulate other chips!)
Because emulation works at such a fundamental level, it can be quite slow if its host processor isn’t significantly faster than the one it imitates. Rosetta 2 has the advantage of converting Intel processor code to Apple silicon instructions on the M1 chip, which is both optimized to macOS’s needs and substantially faster than previous Intel CPUs.
Emulation can be used for serious purposes, such as allowing vital business software to keep running even as the hardware it requires becomes obsolete and unavailable. It can preserve an investment in software for individuals or globe-spanning corporations that continues to meet a need, especially when nothing newer is available at all or for a reasonable upgrade fee. It’s also a boon for computer archivists and people who love historic machines and games. The Internet Archive has early Mac emulators that let you, for example, launch the Mac version of the Oregon Trail game, and even emulators that keep Adobe Flash alive for preserved animations and interactive games. All of these emulators run in a Web browser, remarkably.
In contrast, virtualization works at a higher level. A virtualization app creates virtual machines that provide a framework to execute app or operating system code natively with the same processor that runs the host computer’s operating system. These apps or operating systems believe they are running on a bare-metal processor—they’re the proverbial “brain in a jar”—and there’s only a modest bit of overhead that makes them run more slowly in that environment.
Parallels Desktop and VMware Fusion for Intel-based Macs, for instance, are virtualization apps that rely on a hypervisor to run other Intel-based operating systems inside their virtual machines. (Parallels even offers a choice of its own hypervisor or one built by Apple, and recommends Apple’s with Big Sur.) Virtualization allows you to keep old versions of macOS alive, as well as versions of Windows, Linux, and other operating systems that use Intel x86 code, and 32-bit applications that predates the Catalina requirement for 64-bit apps in macOS. You can set up multiple virtual machines with a single app and run them side by side.
(Boot Camp, by the way, is not virtualization. Instead, it’s a way to install and boot natively into Windows on an Intel-based Mac, where Windows is the host computer’s controlling operating system.)
Hypervisors are also used in data centers and by businesses to extract the maximum value from hardware by running multiple virtual machines simultaneously in a single high-performance server. I run a virtual private server, a slice of a machine running under a hypervisor, that is nearly the same as—but far cheaper than—having my own server in a rack somewhere. If the host hardware were to die, my provider could migrate a disk-image backup onto a new host in minutes. And, realistically, many data center hardware components are designed to be hot-swappable, reducing the likelihood of downtime even further.
Apple’s solution for the transition from Intel processors to Apple silicon is to leverage emulation, albeit in a way that doesn’t offer virtualization on top. Rosetta 2 is a 64-bit Intel x86 emulator for Apple’s M-series Macs, but it’s not a full emulation environment and doesn’t support 32-bit apps. Virtualization app makers will eventually offer their apps for Apple silicon to run operating systems designed for ARM chips that are compatible with Apple’s ARM-based M1 (and putative later M-series chips). Parallels already has a Parallels Desktop beta out for M1-based Macs that allows Microsoft’s ARM-native Windows preview to run natively, as it’s compatible with Apple’s ARM implementation. (You can sign up for both the Parallels Desktop beta and the Windows Insider program that lets you download the Windows preview for free.)
To make your head explode slightly, if you run Windows for ARM within Parallels Desktop for M1, Microsoft provides an Intel emulator that can run both 32-bit and 64-bit apps written for Intel versions of Windows! (Microsoft released the 64-bit update in December 2020; the 32-bit version has been around since 2017.)
With those differences between emulation and virtualization in mind, let’s look at Apple’s path to the present and where the future might still lead in its transition to Apple silicon for all Macs.
Apple’s Emulation and Virtualization Journey
I’ve long been impressed by how effectively Apple has provided transitions across generations of its hardware and operating systems. Under Michael Spindler, Steve Jobs, and Tim Cook, Apple has been unsentimental and forward-thinking.
Apple’s timeline of emulation and virtualization looks like this, although there are a few tiny steps and extra nuances that could (and do) fill Wikipedia pages:
- Motorola 68040 to PowerPC: Apple built a “68K” emulator to allow software written for the late-generation 68040 processor to run on PowerPC-based Macs starting in 1994 and lasting through Mac OS 9.2 in 2001.
- Mac OS 9 to Mac OS X: Classic Mac software from Mac OS 9.04 and later ran within a virtual machine provided with Mac OS X. The “Classic environment” was available from the public beta of Mac OS X around 2000 through 10.4.11 Tiger in 2007.
- PowerPC to Intel: The original Rosetta emulator allowed most PowerPC software to function on Intel-based Macs. It was available from 10.4.4 Tiger through 10.6.8 Snow Leopard.
- Intel to M-series: The Rosetta 2 emulator allows most 64-bit Intel software to work on the M-series processors. Its end date hasn’t been announced, although it will likely be available for at least 3–5 years.
- iOS/iPadOS within M-series: Arguably, the ability to run iOS and iPadOS apps within macOS on an M1-based Mac is a kind of virtualization, even though these apps seemingly run like regular macOS apps. But because they don’t use the same operating system, it’s fair to label it that way.
Rosetta 2 launches automatically behind the scenes whenever you run a 64-bit Intel Mac app. (The very first time you run such an app, you may be prompted to download and install Rosetta 2, though some people say they didn’t see that prompt.) The first time an app launches, the emulator performs a one-time translation process and caches native converted code. Subsequent launches happen faster, though the translation caching occurs again whenever you update an Intel app.
Developers can also release universal apps that contain both Intel and M1-native code in one bundle, and you can use Get Info in the Finder to force a universal app to launch with Rosetta 2. That option is useful because some developers have released universal apps that lack feature parity with their Intel versions. For instance, Adobe’s initial Photoshop for M1 release omits a few features found in the Intel implementation. You might also have apps with an extensible architecture, and plug-ins you own for those apps may not yet be M1-native.
Some companies are releasing separate Intel and M1-native versions of their apps; I noticed Zoom and Cisco WebEx automatically downloaded M1 versions of their apps on my M1-based MacBook Air, while Google Chrome lets you pick.
Parallels Desktop, and ostensibly VMware Fusion in the future, will be able to run other ARM-based operating systems natively, just as they can run Intel-based operating systems on Intel-based Macs now. That includes variants of Unix and Linux and Windows. But you won’t be able to virtualize Catalina or earlier versions of macOS because there’s no way yet to both emulate and virtualize Intel operating systems on M1-based Macs. That might change.
Beyond Rosetta 2 to Full Emulation?
By Apple’s design, Rosetta 2 doesn’t handle every feature and operation on an Intel processor: it supports only those tasks that Mac software executes within macOS. Because Apple controls the entire environment in which Mac software is designed and compiled, the company built Rosetta 2 to emulate just what it allows developers to do within that environment, which relies on a limited set of Intel CPU instructions.
In order to emulate versions of macOS prior to Big Sur, any Intel version of Windows, or other operating systems designed to run on Intel x86 chips, some group or company will have to build a processor emulator that’s resilient and complete.
That appears to be the rub. There’s no technical reason a company couldn’t create a full x86 emulator for an ARM chip. Both Apple and Microsoft have created partial ones for their respective operating systems already. Ironically, once one has created a general x86 emulator, it wouldn’t be much harder to allow pre-Catalina versions of macOS so you could run 32-bit apps, letting you carry on using these older apps in a combination of emulation and virtualization on an M-series Mac.
We don’t know Apple’s exact motivation for not creating a full processor emulator. We can surmise that Apple chose to cut off 32-bit compatibility with Catalina, likely because of the performance and testing burden it would add to Rosetta 2 running on M-series Macs, all without providing a significant benefit to most of its customers. Apple has spent years trying to wean developers and Mac users off 32-bit apps. Plus, the company’s transitions usually aim to shift everyone to the latest technologies as quickly as possible.
There could also be legal concerns. Intel made some digs at Microsoft and Qualcomm in 2017 that seemed to imply that any ARM-based version of Windows for Qualcomm chips that emulated some x86 instructions could face legal action. Because Intel has developed instruction sets over many decades and generations of chips, some x86 instructions remain under patent protection, while others are no longer covered. The particulars would have to be litigated in what would undoubtedly be extremely tedious and drawn-out civil suits. (As an example, Oracle recently lost an 11-year-long intellectual property lawsuit against Google over Google’s use of a compatible version of Java in Android. It went all the way to the Supreme Court.)
But no lawsuit followed Intel’s throat-clearing. Microsoft released its 32-bit x86 emulator with Windows for ARM and then added a 64-bit x86 emulator in December 2020. Intel’s implied threats might deter smaller companies or open-source efforts that don’t want to run afoul of a multibillion-dollar firm, but there’s no evidence of that, either. Open-source developers are not shy about sounding alarms if they face these kinds of threats, so I expect we will hear about them if they arise.
For now, if you need an Intel-only operating system, you have to keep Intel hardware running, which might include virtualization software that powers operating systems other than the host operating system. In the past, wherever there’s been an interest in reviving older hardware, there has been sufficient will to make an emulator happen, whether commercial, open-source, or both. We’ll see if that happens again.
Glenn recently wrote a book specifically about Apple silicon Macs, Take Control of Your M-Series Mac, to explain the substantial differences in macOS, recovery mode, and running non-Mac apps within macOS.