#1421: 1Password 7 review, UK travel tips, iPhone video recording
Do you ever think you’re recording video with your iPhone, only to discover after the fact that you missed a perfect moment? In this week’s issue, Josh Centers offers some tips to avoid this all-too-common problem. Josh also reviews the redesigned 1Password 7 for the Mac, and Adam Engst is back from the United Kingdom with travel tips that may make iPhone use cheaper and public transit in London easier. Notable Mac app releases this week include Typinator 7.6, ChronoSync 4.8.7, Microsoft Office 2016 16.14.1, MarsEdit 4.1.1, Pages 7.1, Numbers 5.1, and Keynote 8.1.
TipBITS: Make Sure Your iPhone Is Capturing Video
It’s surprisingly easy to think you’re recording a video on your iPhone, only to realize later that you didn’t tap the record button and totally missed that great moment. Adam Engst and I have both flubbed recordings in this way on multiple occasions, and we know from helping our families that we’re not alone. Here’s how to make sure your iPhone is recording, so you don’t fail to capture a special video.
You probably know how to record a video on an iPhone, but just in case:
- Open the Camera app.
- Enter Video mode by tapping the Video label or swiping the viewfinder.
- Tap the red record button to begin recording.

It’s simple, to be sure, but the problem is that if you fail to tap just the right spot, you may think you’re recording, but nothing is actually happening. (You can also press one of the physical volume buttons to start and stop recording, but that’s a different tip!)
There are three changes to be aware of as you think you’ve started recording to make sure it’s working, along with one other piece of minimal feedback:

- The record button changes from a large red circle inside a white ring to a stop button, a smaller red square inside a white ring. Particularly for those whose eyesight isn’t what it once was, it can be difficult to see the difference between the record and stop buttons. A more significant change in shape or color would be welcome.
- The bar at the top of the screen that displays flash status, recording time, and resolution and frame rate shrinks down to show just the timer, which begins counting how long you’ve been recording and adds a flashing red dot. This change can also be hard to notice because you have to see the disappearance of interface elements, and the rightmost digit in the timer takes a full second to change.
- The labels for different types of video and photo modes disappear, as does the button for switching between the front and back cameras. Plus, the well containing the last photo or video is replaced by a white circle you can tap to take a still photo during video recording. Again, these changes are sufficiently minimal that they can be easy to miss as you look from your screen to the scene in front of you and back.
- If you’re using an iPhone that supports 3D Touch, you’ll feel a very light simulated click when you tap the record or stop buttons.
Train yourself to watch for these changes and you’ll be a lot more likely to know when the iPhone is (or isn’t) actually recording.
1Password 7 for Mac Offers a Fresh Look… for an Upgrade Price
In 2011, I bought 1Password from the Mac App Store, and ever since I’ve been using the Mac version without being prompted to pay a penny more. That changed with 1Password 7, the first paid upgrade from AgileBits in years.
The good news is that you can pay a flat fee for the upgrade. Yes, you are somewhat encouraged to sign up for one of AgileBits’ subscription plans—which bundle app access for all platforms, sync, and other features—but you also have the option to purchase a single-user, single-platform license for $49.99 when you first launch 1Password 7. So if you’re a fan of 1Password but dislike subscriptions, I recommend paying up. And soon—$49.99 is a launch special that will eventually rise to $64.99.
(AgileBits gave me a free subscription to a 1Password family plan so I could review 1Password 7. But as I said above, I’ve been a paying customer for years and would be using the app even if I had to pay for it.)
A Fresh Look
It’s interesting that AgileBits chose 1Password 7 as its first paid update in years since the most notable change is aesthetic. AgileBits has finally completed its slow pivot away from 1Password’s earlier metallic, almost industrial look, leading to a fresh design that is both flat yet bright.

That careful evolution has paid off since 1Password 7 avoids many of the missteps associated with flat design—thin, wispy type, vague interface elements, and a lack of contrast (think back to the transition from iOS 6 to iOS 7).
1Password’s readability is helped by the new Courier Prime Bits typeface used to display passwords; it’s a custom offshoot of the free Courier Prime typeface. Font nerdery is often superfluous, but it matters in an app where you have to be able to accurately transcribe each letter in a password.

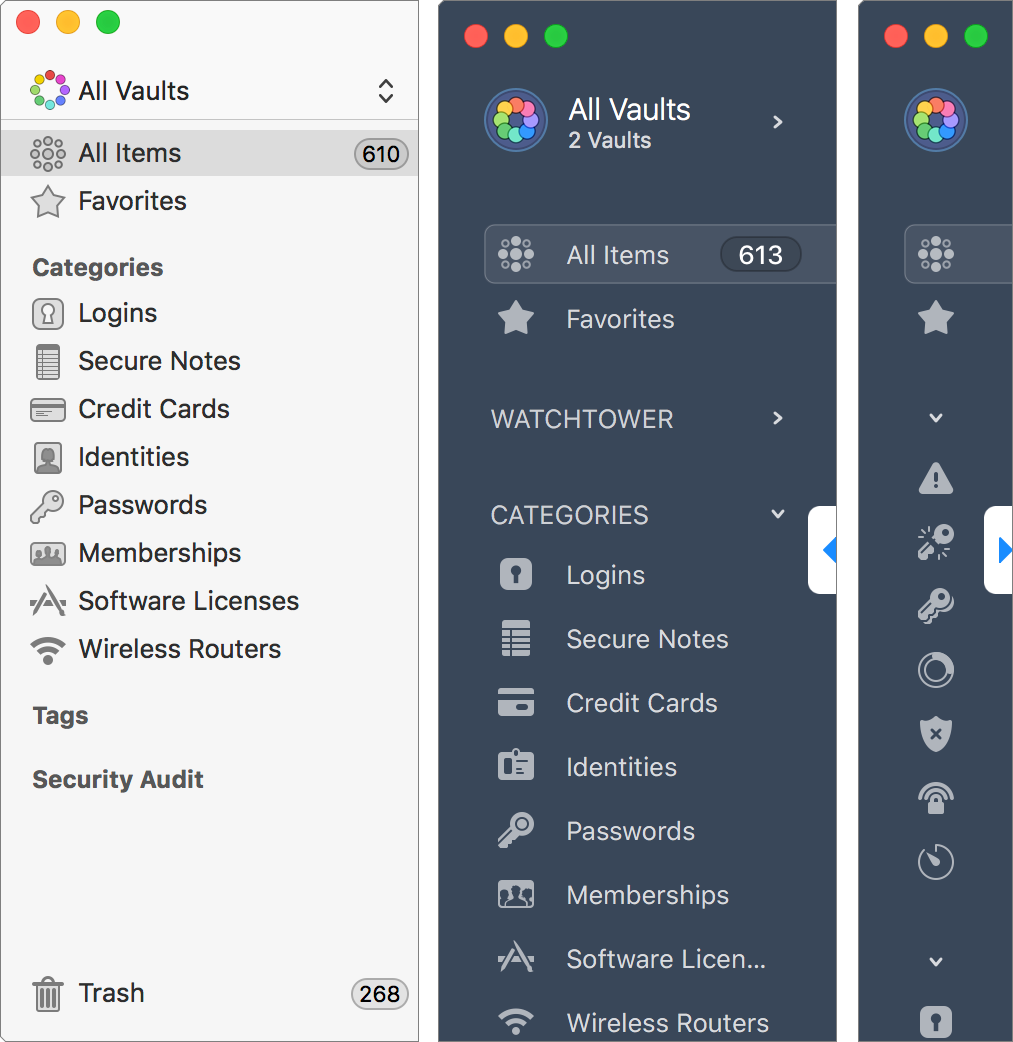
One significant design change is the new sidebar, which is easier to read. For example, it makes it much more obvious that you can show and hide sections, since arrows replace the vanishing Show and Hide text labels. You can also shrink the entire sidebar down into an icon-only view.
But perhaps the most significant overhaul is the refreshed 1Password mini.
New 1Password mini
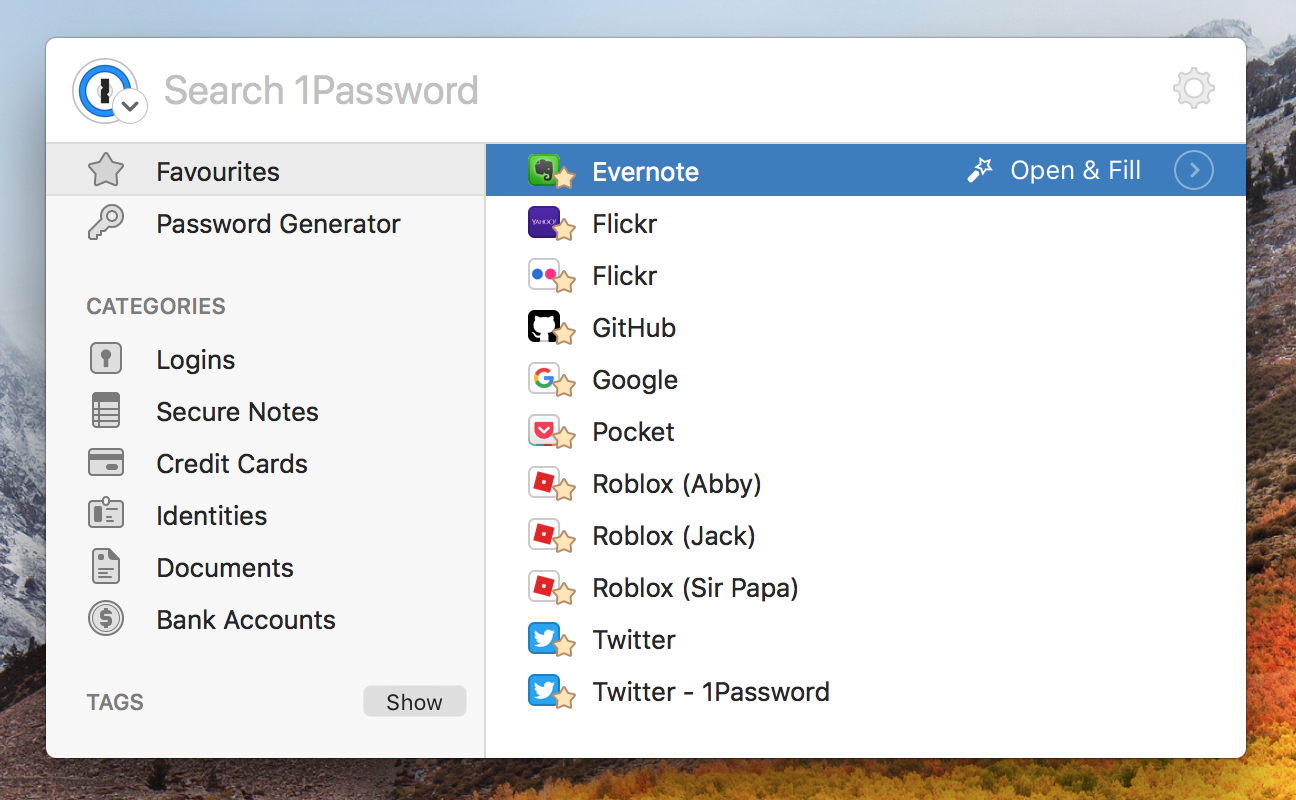
1Password mini, launched all the way back in 1Password 4 (see “1Password 4 for Mac Better Than Ever,” 3 October 2013) has received a significant makeover. Instead of being a somewhat-awkward set of drop-down menus, it’s a Spotlight-esque access panel that makes it far easier for you to navigate all your 1Password content.
The new 1Password mini is also a lot more powerful than in the past. It can recommend logins not just for Web sites you’re visiting, but for the current app. You no longer have to copy and paste from 1Password mini to the password field since AgileBits added support for dragging content. You can also drag logins inside the app to move them between vaults.
Markdown in Secure Notes
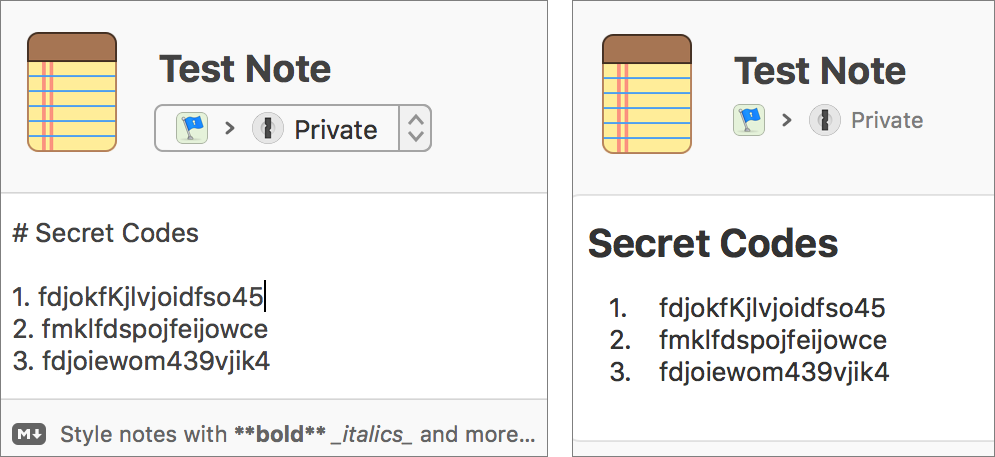
I’ve long used 1Password’s Secure Notes feature to store freeform secure data like recovery keys, HomeKit codes, and serial numbers. But 1Password’s notes were always bare bones, with no formatting options. That has changed with the addition of support for the Markdown plain-text formatting language in 1Password 7.
While editing a note, you can click a link below the input field to view a Markdown reference. As you can see, using Markdown formatting can make your notes much more readable.
Nested Tags and the Death of Folders
Another new feature is nested tags. Tags are nothing new to 1Password, but now you can nest 1Password tags just like folders in the Finder by separating the tags with a forward slash instead of a comma. For instance, I can create a TidBITS/WordPress tag, which shows up like this in the new sidebar:
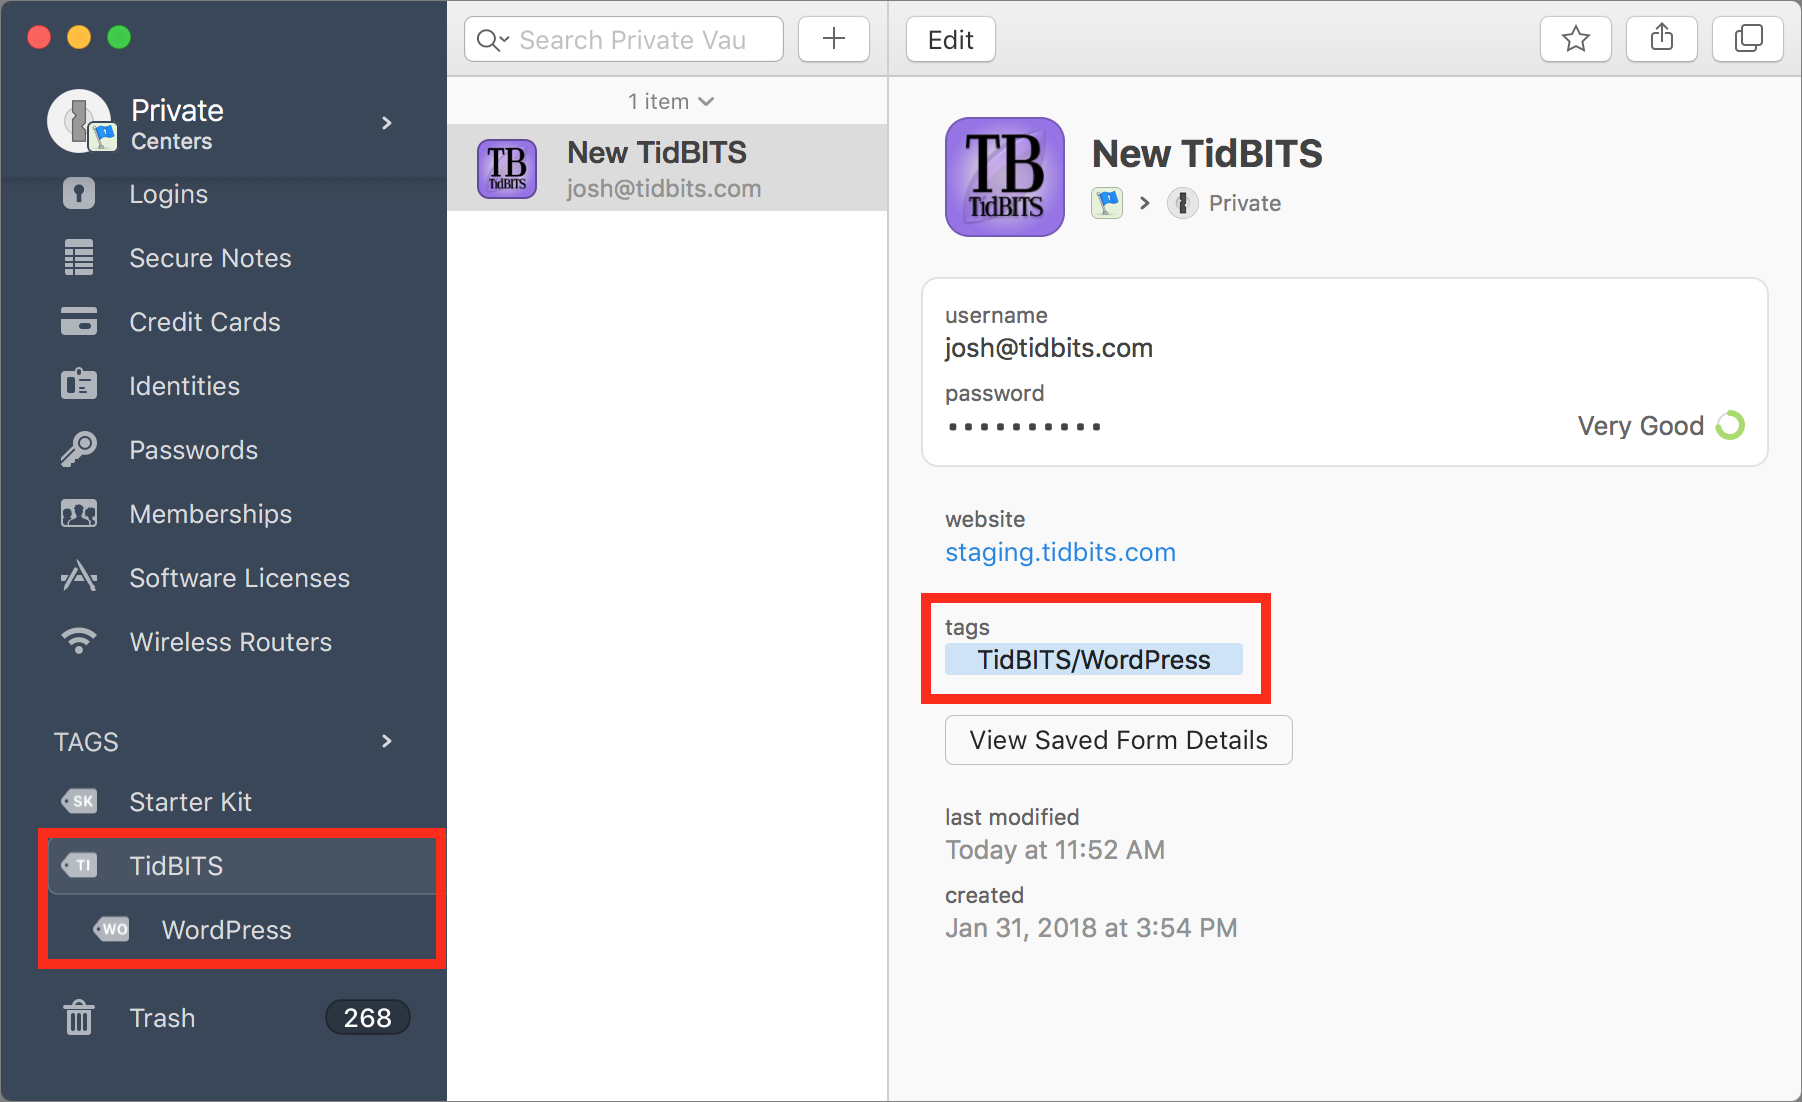
Nested tags seem aimed at larger organizations that need help categorizing their logins, but they will also be appreciated by anyone who prefers to organize their data hierarchically.
As currently implemented, nested tags could use a little refinement. For example, TidBITS/WordPress is treated as a single tag, so if I wanted to delete the WordPress part, I’d have to delete the entire TidBITS/WordPress tag and replace it with a TidBITS tag.
Upgraded Watchtower
Watchtower debuted in 1Password in response to the Heartbleed vulnerability (see “1Password 4.4 Updated with Watchtower Service,” 2 May 2014), and AgileBits has given the password monitoring service a boost with 1Password 7. It now integrates with haveibeenpwned.com to check for compromised logins and twofactorauth.org to see which of your logins support two-factor authentication but don’t have it enabled. Of course, if you use a different app to manage your two-factor authentication tokens, that warning won’t do much good. Watchtower also warns you about logins that use unencrypted HTTP connections and about items that can expire, like credit cards.
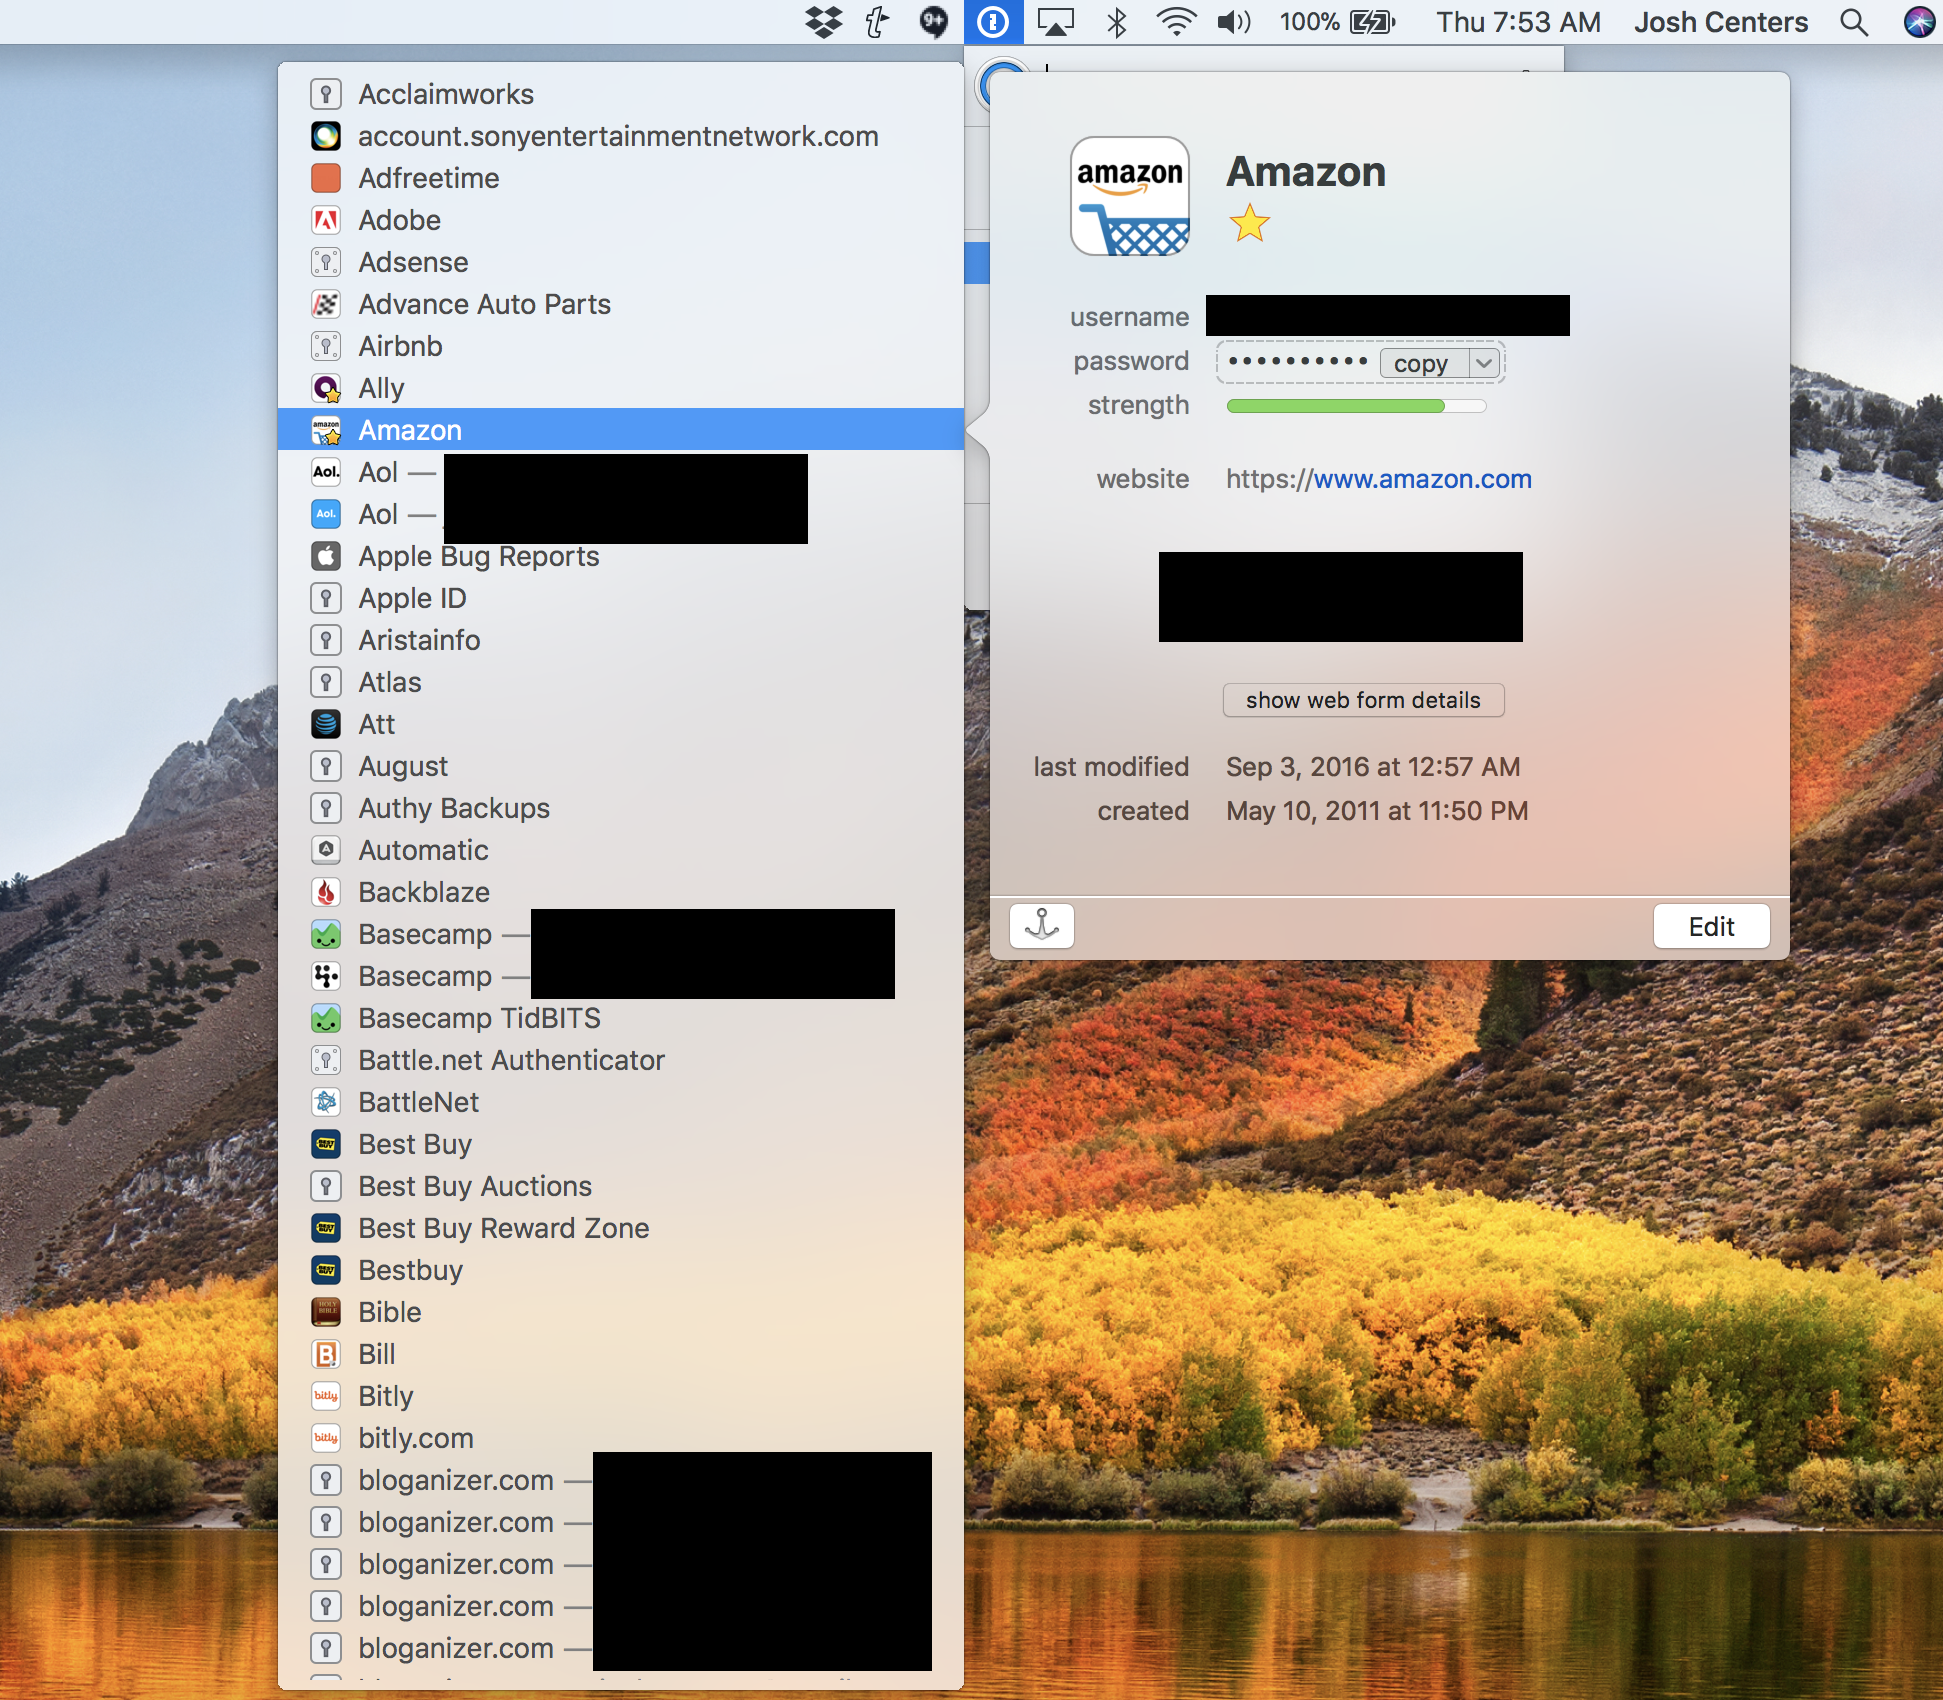
As in prior versions of 1Password, you can review your Watchtower items in the sidebar. However, 1Password 7 also includes warnings and indicators while viewing the login details—previous versions of 1Password only warned about known Web site vulnerabilities.

Another nice touch is the redesigned password strength indicator, which gives you feedback about how strong your passwords are (Fantastic in the screenshot above).
Updates Since 7.0
AgileBits has been busy updating 1Password 7 since its release in late May. The 7.0.1 update, released on 24 May 2018, improved the initial setup steps, let you use Command-L to bring up the vault list in 1Password mini, helped you convert HTTP URLs to secure HTTPS ones in Watchtower’s Web site warnings, and improved the speed of keyboard navigation. Version 7.0.2, released on 29 May 2018, improved unlocking performance on large data sets, added Amazon Workspaces as a supported app, adjusted the vault list width according to its contents, improved setup for users who already have a 1Password license, and made some cosmetic changes. 7.0.3, released 31 May 2018, added nested tag support to 1Password mini, along with support for the ExpressVPN app. Finally, 1Password 7.0.4, released 4 June 2018, improved the speed of checking for vulnerable passwords and fixed a few bugs.
Is the Upgrade Worth It?
As you can tell, many of the changes in 1Password 7 are aimed at improving the user experience or are largely cosmetic. Is it worth the upgrade? I’ll break it down into three audiences:
- You subscribe to 1Password Teams, 1Password Families, or 1Password Business: Yes, install 1Password 7 already, because you’re already paying for it. There’s no reason to wait since 1Password 7 removes no features and is a step forward.
- You use a previous version of 1Password: There’s no need to rush, but given that 1Password is probably one of your most important apps, you should upgrade at some point to ensure continued support and to encourage future development. If you’re annoyed by software subscriptions, vote with your wallet and buy a license.
- You do not currently use a password manager: You should, and it may as well be 1Password. A password manager is the best way to keep yourself from depending on lousy passwords or forgetting good passwords. Many Mac users prefer 1Password because of its excellent Mac integration, superior security record, and cross-platform flexibility with iOS and other operating systems.
Overall, the changes to 1Password 7 are both positive and welcome, and while only you can decide if the upgrade is worth the money right now, the app remains an essential tool in the Mac universe.
UK Travel Tips: Giffgaff for Cellular and Apple Pay for Transit
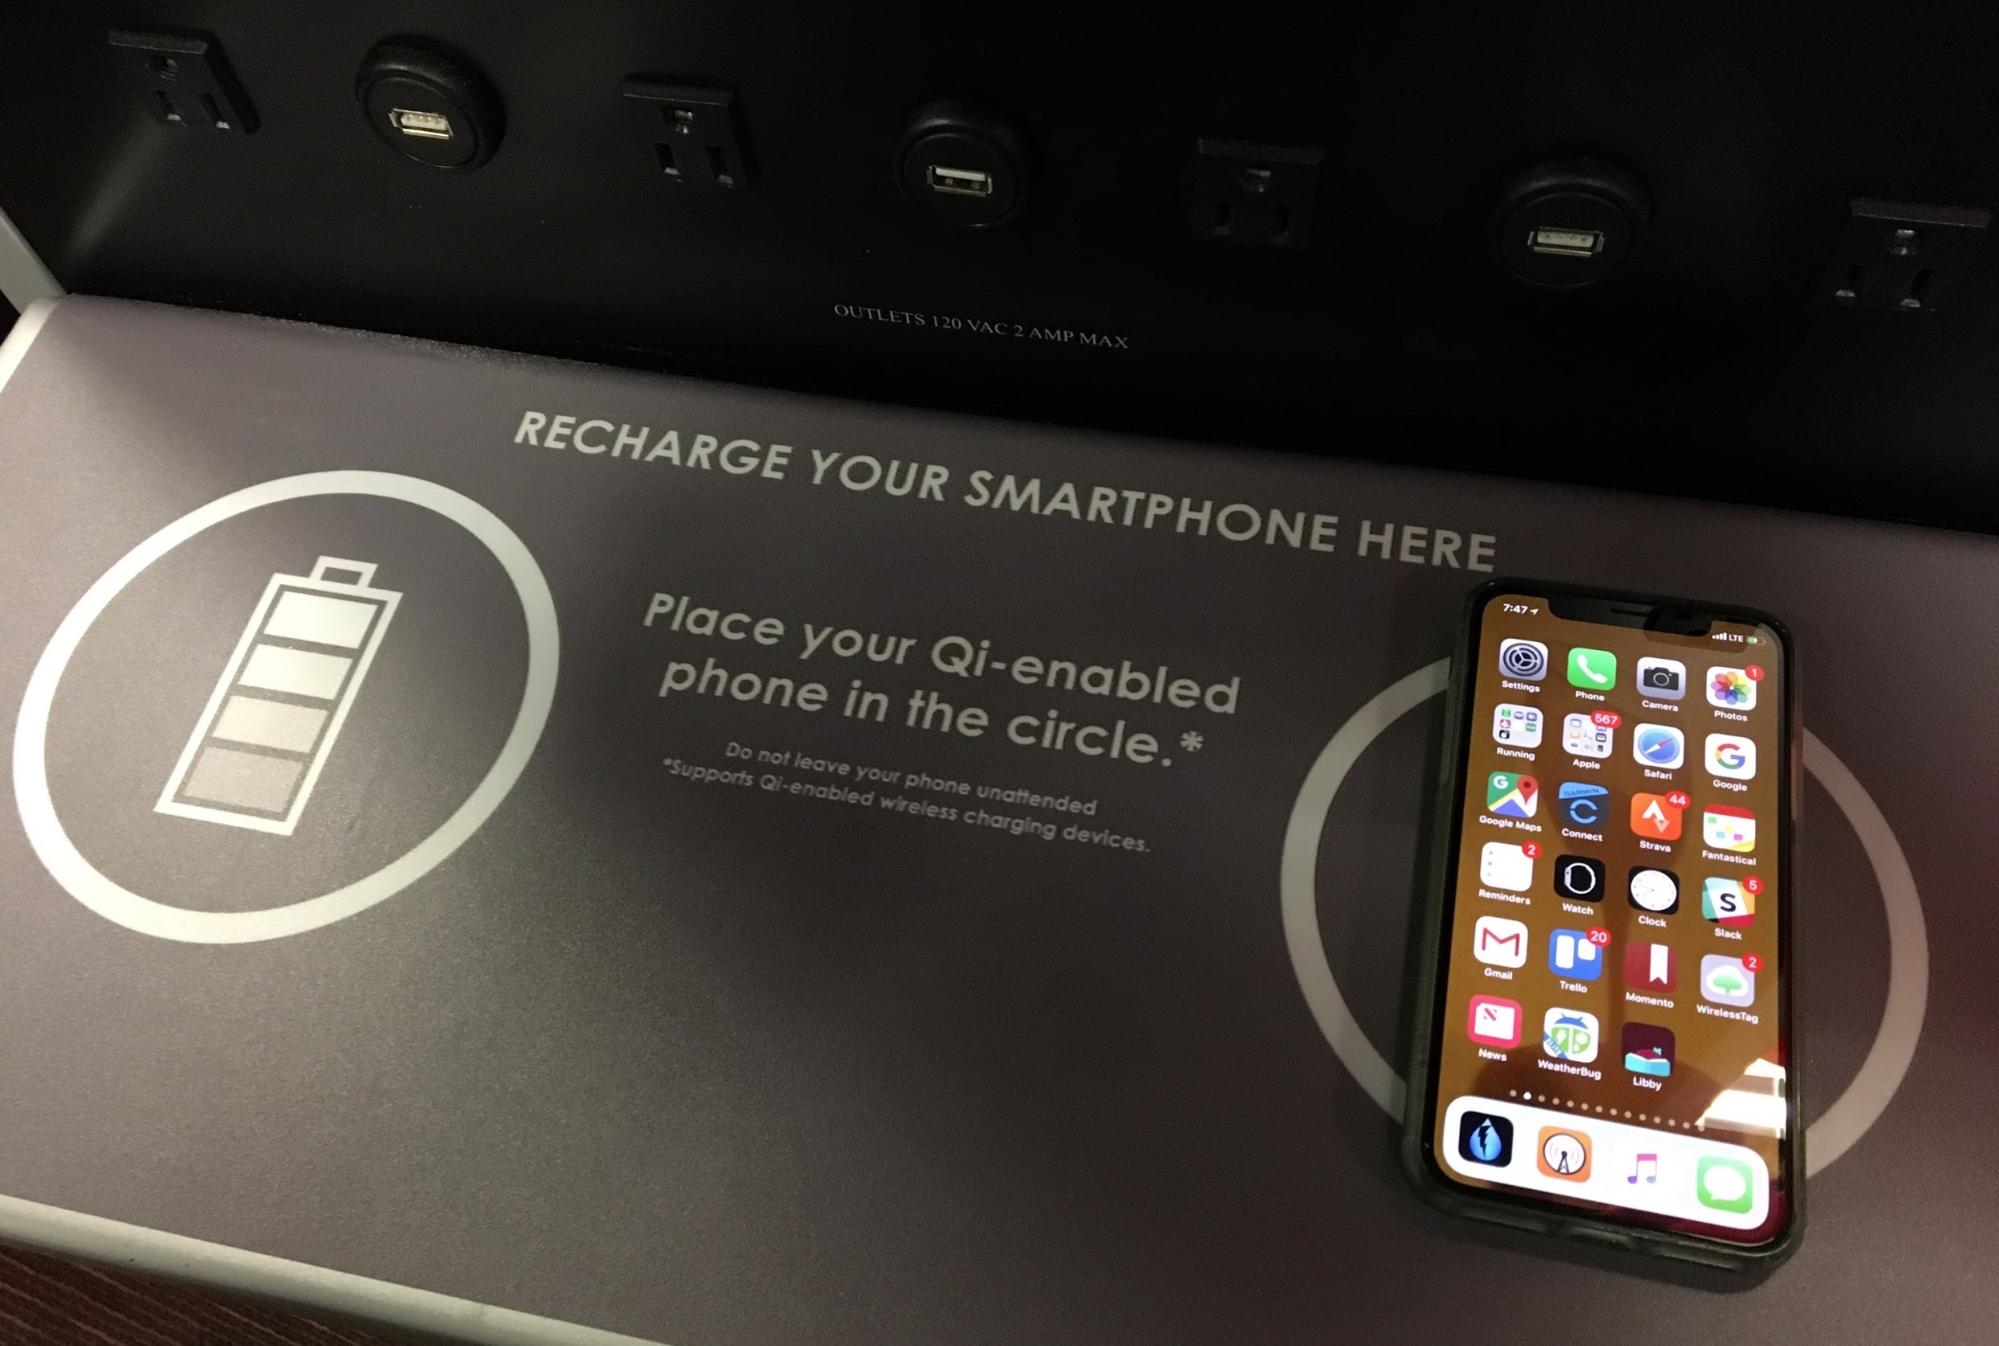
We recently spent 10 days in the UK for a friend’s wedding, starting with a visit to longtime TidBITS and Take Control author Kirk McElhearn in Stratford-Upon-Avon (yes, we saw the Royal Shakespeare Company’s King Lear while there) and then moving on to London. It was a vacation studded with and improved by technology, including a public Qi-enabled charging station in the Newark airport, a rental VW Golf that gave us our first real-world experience with CarPlay (we immediately wanted iOS 12’s promised support for third-party navigation apps like Google Maps), and renting a large shared Airbnb apartment with other wedding-bound friends from Australia. We quickly set up a huge Messages conversation that included everyone we were with, complete with shared locations, and used it for coordinating five families through the visit.
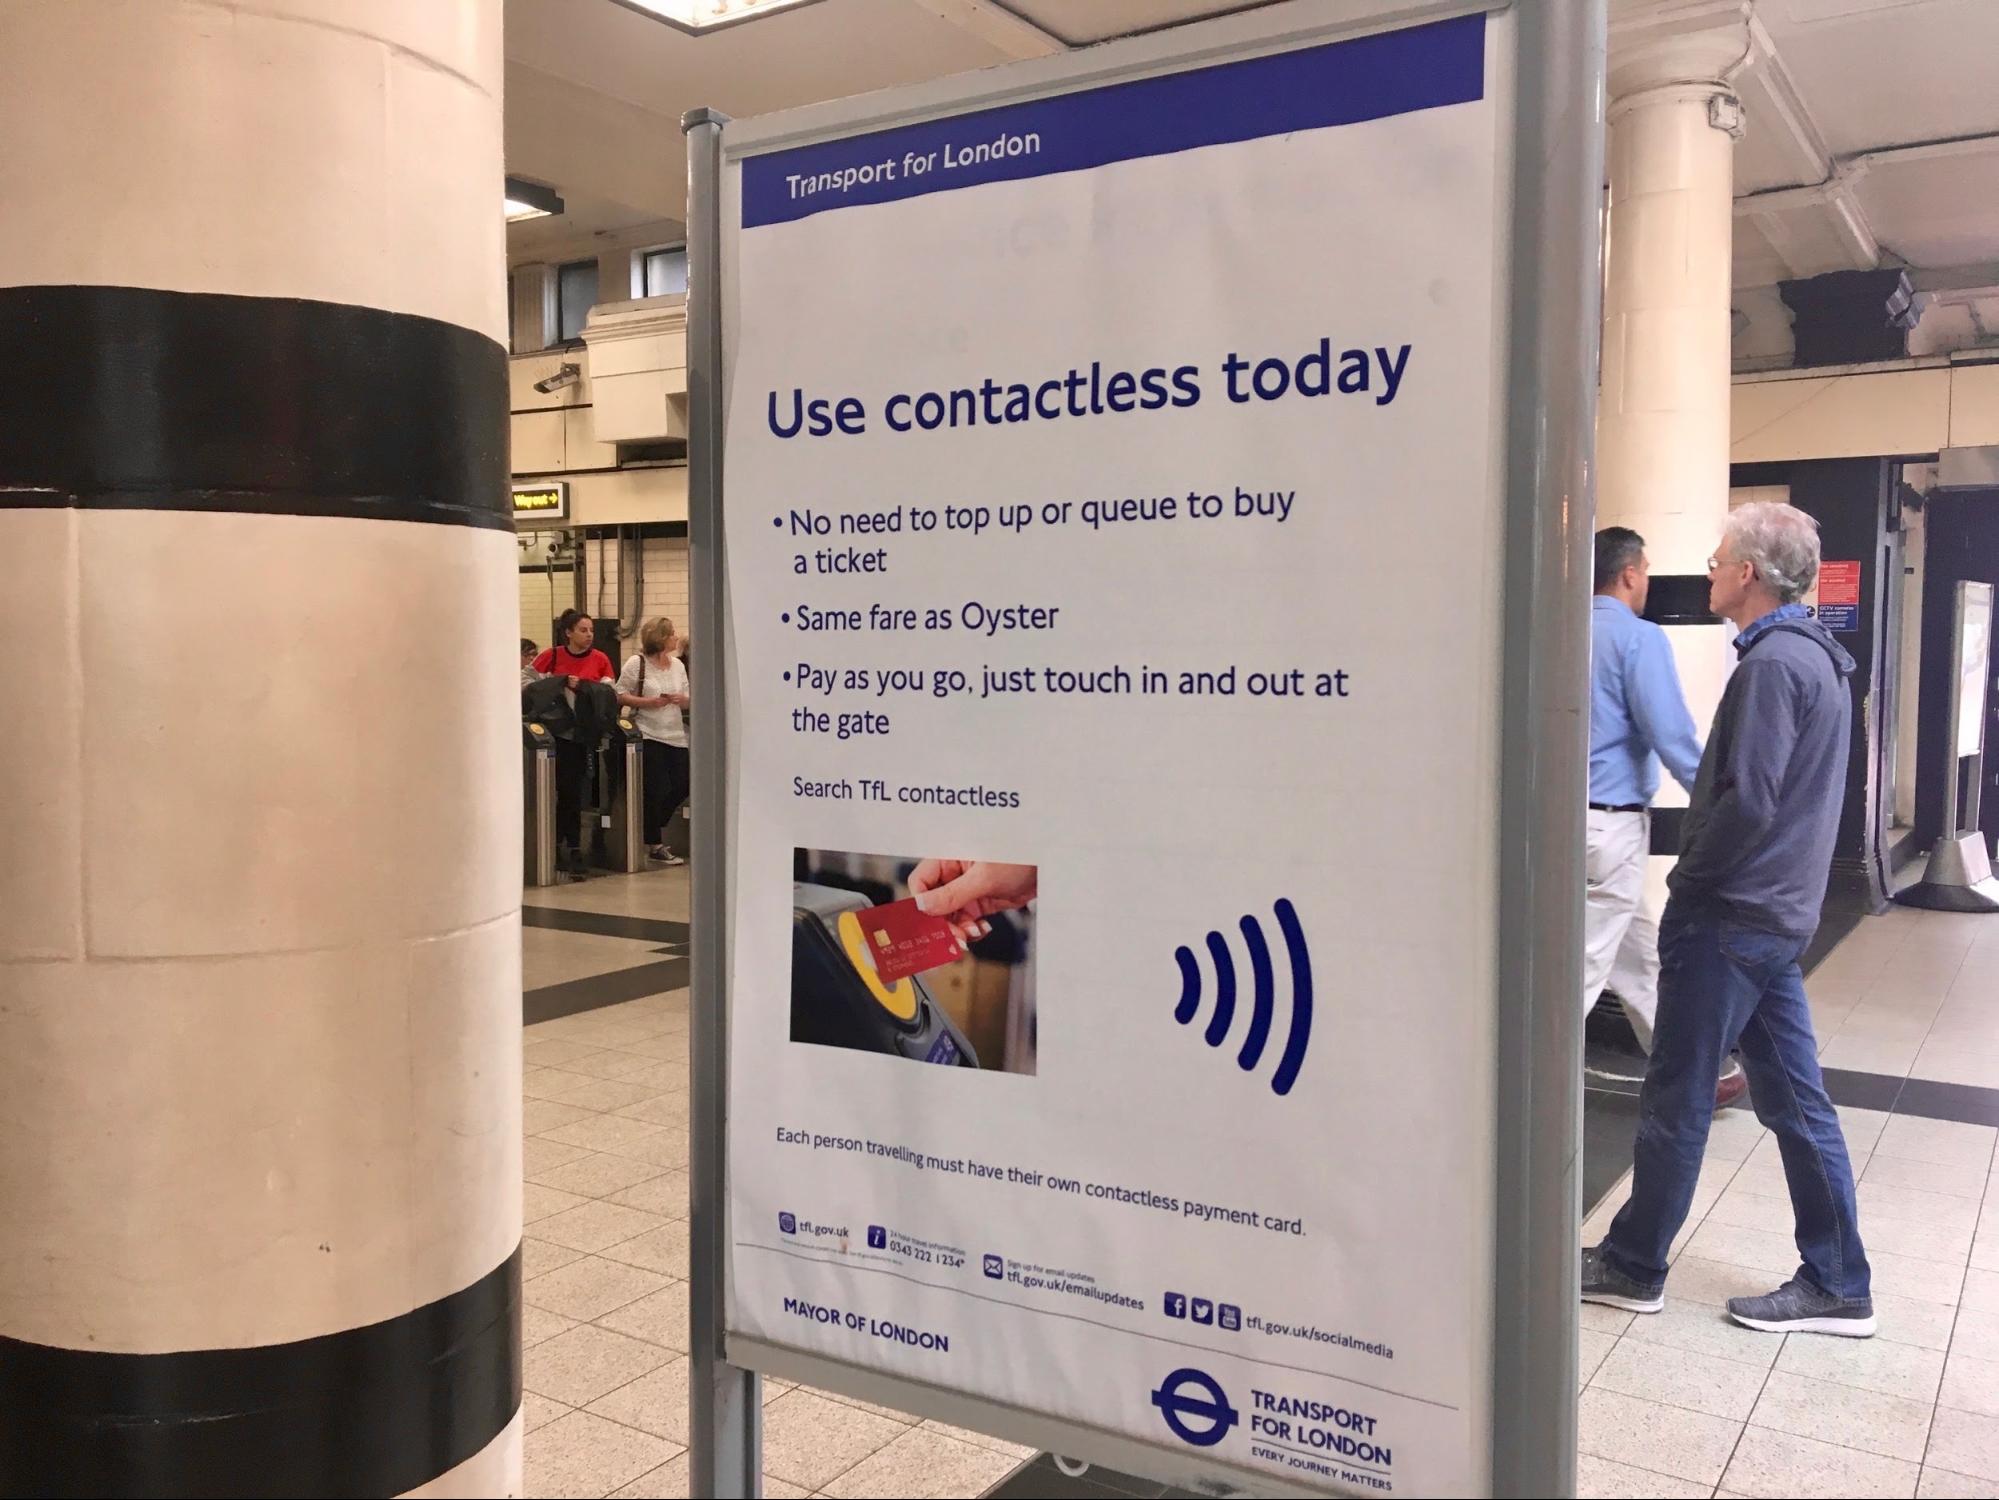
Two other bits of technology made the trip significantly easier and cheaper: Giffgaff and Apple Pay. The oddly named Giffgaff is a Mobile Virtual Network Operator, or MVNO, that uses the widespread O2 network in the UK and provides a useful way of getting inexpensive cellular data there. Apple Pay was helpful because it’s supported as a contactless payment system by Transport for London (TfL)—the authority overseeing the Tube, buses, London Overground, River Bus, and other forms of public transportation.
Giffgaff for Cellular
It’s almost hard to remember how we coped with travel in pre-iPhone days, what with paper maps, questionable guidebooks, fussy traveler’s checks, and inscrutable public transit systems. Internet services and iPhone apps have largely eliminated these problems, but for them to work, cellular data is necessary. I put some research into the best way of ensuring that our iPhones would be able to get Internet access as soon as we cleared customs.
One option was AT&T’s International Day Pass, which charges $10 per day and gives you unlimited calls and unlimited texts, and uses data from your existing plan. That might be fine for a day or two, but it would have cost us $300 for the three of us for the duration of the trip, and in retrospect, 3 GB wasn’t enough for the three of us anyway due to all the necessary mapping. Others recommended buying a SIM for a local carrier once we landed, but I disliked not knowing exactly where or how I’d do that, particularly while fuzzy after a red-eye flight. Ironically, I never saw a way of buying a SIM in the London Gatwick airport, but when we returned to the Newark airport in the US, we saw multiple SIM vending machines. And of course, if you have a carrier other than AT&T, the international options may be better.
Thanks, then, to TidBITS reader Jolin Warren, who suggested I use Giffgaff. Although Giffgaff is focused on providing service to UK residents, it has a service that works well for international visitors with unlocked iPhones. (Make sure to unlock your iPhone with your carrier well before you leave since it supposedly can take some time. AT&T’s unlocking process took just an hour or so for us.) You can order a SIM for free and receive it anywhere in the world. Then, before you leave for the UK, set up your Giffgaff account and purchase a “goodybag” that’s basically a bucket of minutes, texts, and data for a month.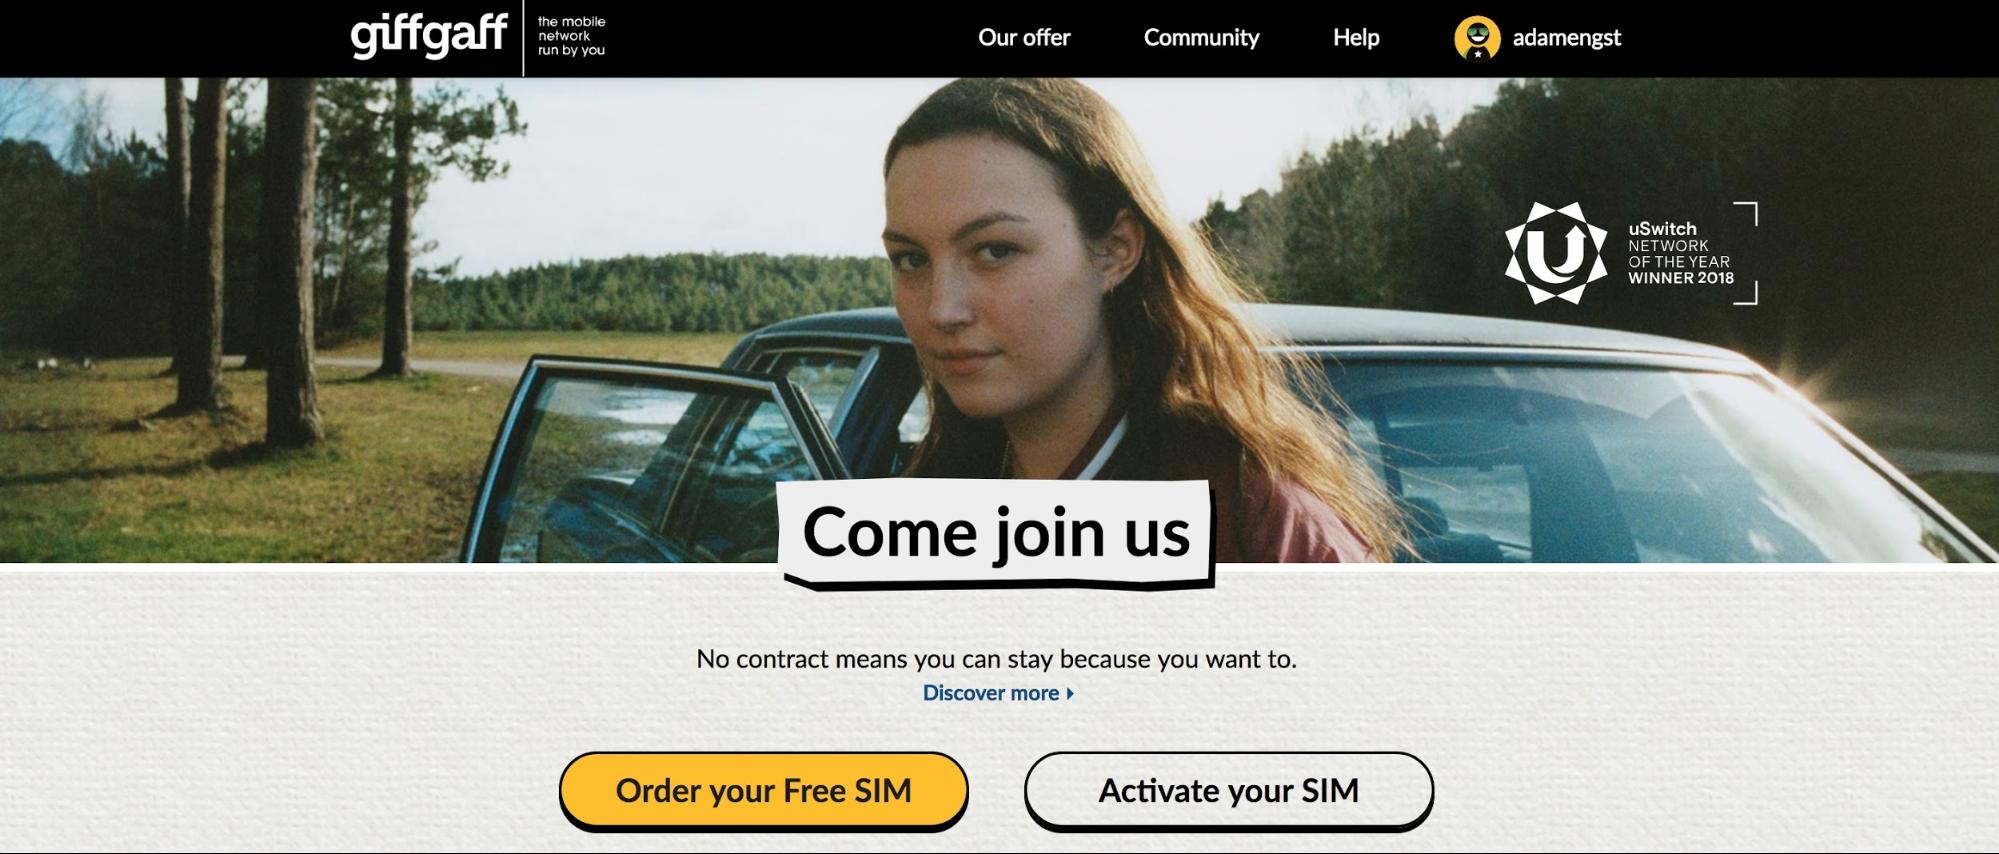
We encountered some confusion, such as the activation page’s claim that a UK address was necessary and no way of knowing which of our credit cards would work in advance. Happily, no address was actually required, and I sidestepped the credit card issue by using PayPal. We were able to activate our SIMs and get our accounts working at home, and we even tested to make sure we could install the SIMs in our iPhones. I’d encourage you to do the same.

The trickiest part turned out to be dealing with the SIMs themselves since they’re so tiny, and we had three that looked identical. We ended up marking them with a Sharpie to keep them straight and marking our original AT&T SIMs for when we returned. We ended up carrying the SIMs in a contact lens case, and I put the SIM extraction tool in my wallet. That was dumb since it disappeared under the car seat when I pulled out a credit card while getting gas on the way to the airport. Luckily, a paperclip worked and could be bent to fit in the other side of the lens case.
All that preparation was worthwhile since we were able to swap the SIMs as soon as we cleared customs, and that gave us full Internet access while picking up the rental car and navigating out of the airport.
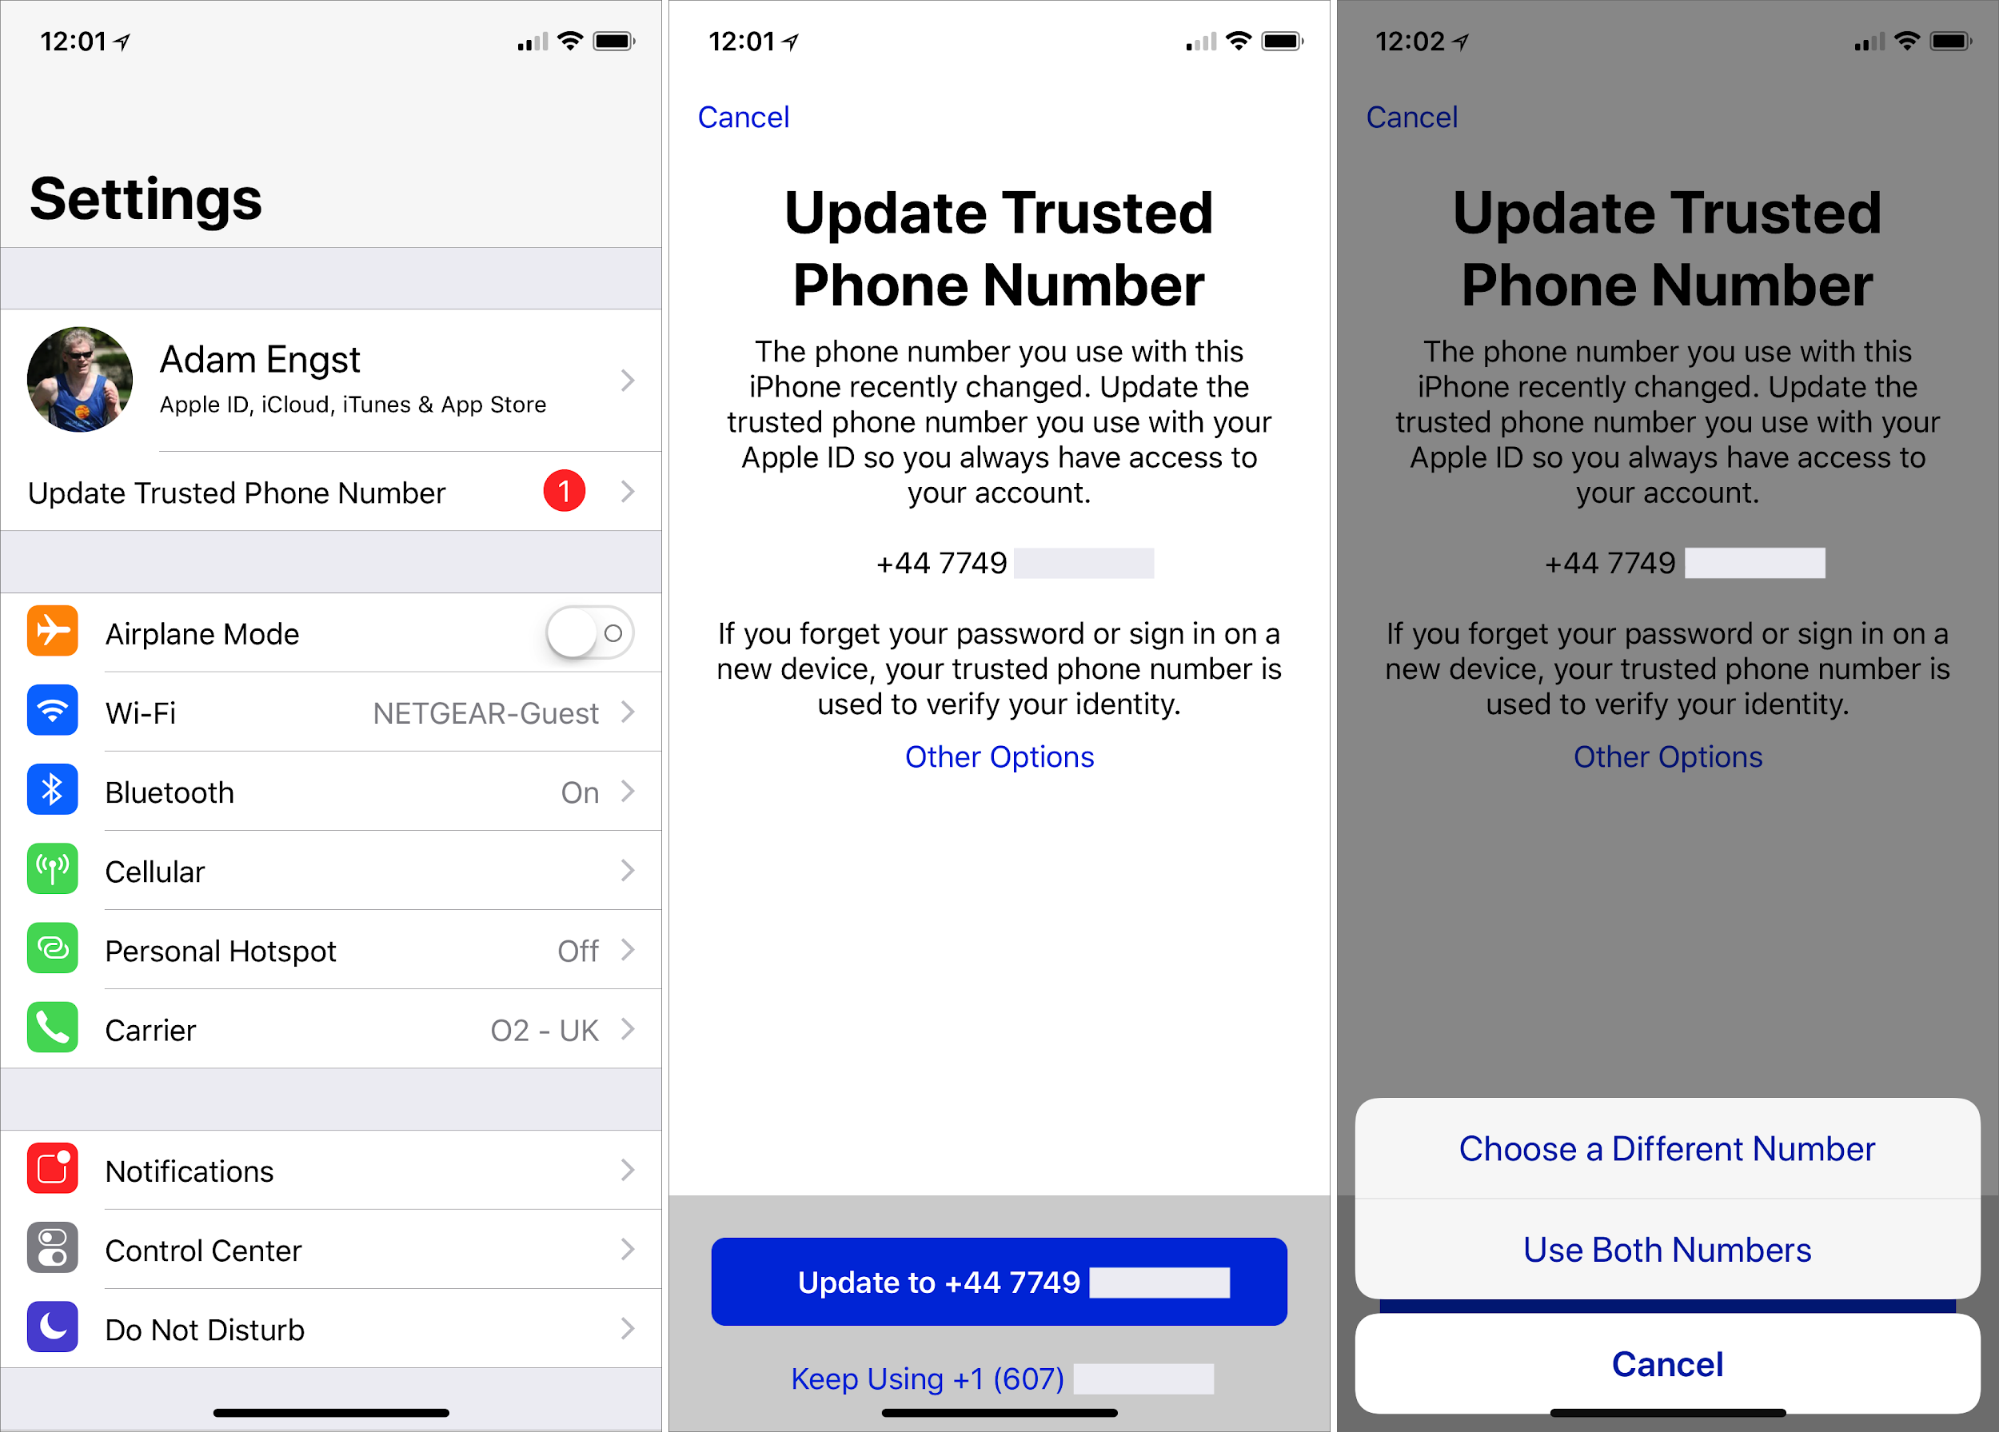
One unexpected event was that our iPhones noticed the new phone numbers and asked repeatedly if we wanted to update our “trusted numbers,” eventually settling on one of those red-badged nags at the top of the Settings app. Apparently, a “trusted number” would be used if I needed to sign in from a new device, and since the chances and consequences of damaging an iPhone while traveling are both higher, it seemed like a worthwhile thing to do. Although we were initially hesitant to switch the numbers, as the middle screen below implied would be necessary, the screen on the right gave us the choice of using both numbers, which seemed sensible.
The only mistake we made was in underestimating how much data we’d need. At home, we share an AT&T family plan with 3 GB of data with no problems. So we each purchased a £7.50 goodybag that came with 1 GB of data, and each of us ran out before the end of the trip. Had we each purchased the £10 goodybag with 3 GB of data, we would have spent £30. Because you can only get more data before the end of a month by buying another goodybag and activating it early (once you have less than 50 MB of data remaining), we spent a total of £47.50 on the initial purchase plus extra data. At about $64, that was still way cheaper than AT&T’s $300.
Our error came in failing to realize that we’d be relying on our iPhones much more often throughout the day when we weren’t on Wi-Fi, as we are at home, and when Tristan is on the Cornell campus during the school year. Much of that data usage was due to non-stop mapping, but it’s worth going into Settings > Cellular and disabling access for any apps that you think might use a lot of data.
It’s also worth remembering that any services, like Twitter, that use SMS-based two-factor authentication, won’t be able to send you a text message to your new phone number. You may be able to work around that by signing in before you leave, or by switching to an authentication app like 1Password, Authy, Google Authenticator, or LastPass.
Apple Pay for Transit
The challenge of driving on the opposite side of the road was one thing when we were out on the motorways and around Stratford-Upon-Avon, but driving in London was insane, what with the traffic, squirrely little roads, trying to match Google Maps directions with difficult to find street signs, and more. We were happy to return our rental car right after arriving and planned to use London’s famed public transit system—the London Tube!—for the rest of the trip.
Relying on public transit systems as a tourist is often quite stressful, between the confusion of trying to figure out routes and figuring out the local payment systems and policies. Luckily, both Google Maps and Apple’s Maps did a good job of providing detailed directions that included walking routes when switching from a bus to the Tube, for instance. But payments were still a worry because there are all sorts of variables based on zones, time of day, age, and more.
The advice we’d been given by tech-savvy friends who had been to London recently was to just use Apple Pay. When you do that, TfL’s system tracks your usage throughout the day and charges you the lowest appropriate fare—taking into account daily caps that make the final amounts cheaper than day or week passes. (An alternative would have been to buy one of TfL’s contactless Oyster cards, add money to it, and then get it refunded when we left the country. Our friends did that for their young children, who didn’t have iPhones. Also, we could have used contactless credit cards, which are still rare in the US, if we’d had them.)
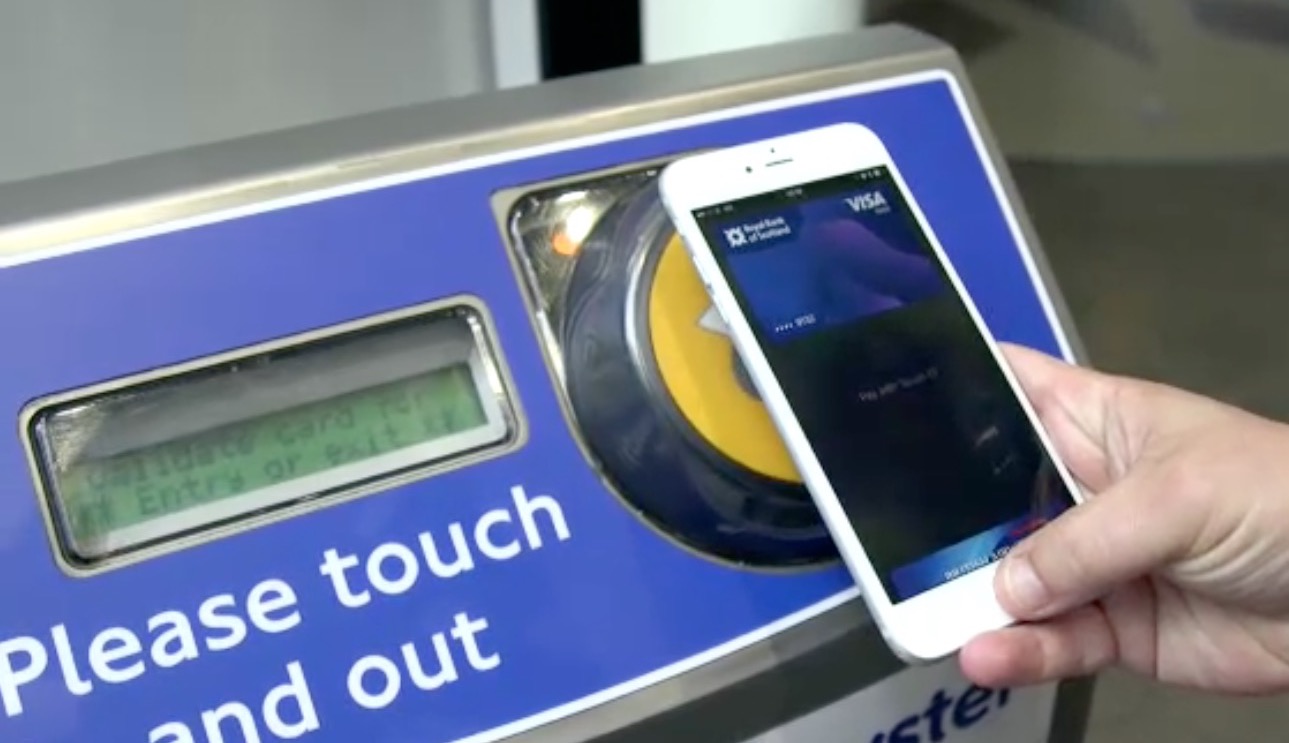
The physical process of paying with Apple Pay is brilliant—most of the time. There’s a yellow payment pad on gates in the Tube stations and at the front of buses. You invoke Apple Pay, authenticate, and then touch your device to the pad. (You’re supposed to be able to touch your device to the pad to invoke Apple Pay and then authenticate, but that didn’t work the one time I tried it.) The gates then open, or a light turns green, indicating you can proceed. For the Tube, you have to touch in when you enter the station and touch out when you leave; for buses, you just touch in when you board and don’t need to touch out.
If you want to use Apple Pay for public transit in London, there are a few quirks to keep in mind:
- Use a supported credit card. Our debit cards from our local credit union had no currency conversion fees, so we thought we’d use them with Apple Pay. However, it turned out that US debit cards generally aren’t accepted in the UK, so we had to set Apple Pay to use a different credit card. Make sure you have a few credit cards loaded into Apple Pay to be safe.
- Use the same device each time. To avoid higher fares for seemingly incomplete journeys and to take advantage of the daily capping, you have to touch in and touch out with the same device for all your trips in a day. In other words, settle on your iPhone or your Apple Watch, and don’t switch. We only used our iPhones because I’ve had more trouble in general with Apple Pay payments registering from the Apple Watch. (Although I’m sad that I didn’t try it one day when we had little travel planned.)
- Be patient and try again if necessary. We had a non-trivial number of failures, where Tristan and I would get through the gates, for instance, but the system would reject Tonya’s payment. Some of that was user error, as we all figured out how to use Apple Pay more fluidly, but other failures had no obvious cause. It might have been related to all three of us using the same credit card in too quick succession, but sometimes everything worked as expected. Apart from suffering dirty looks from other commuters who we were blocking, there was no problem with waiting briefly or trying another gate—it always worked in the end.
Saunorch International Travel Power Adapter
Finally, as international travelers, we needed a plug adapter so we could charge our various devices with US plugs in UK sockets. There are many such devices, but I wanted to share the adapter I ended up buying since it worked extremely well.
The Saunorch International Travel Power Adapter is a colorful cube that combines a single universal AC socket with four USB charging ports that can be used simultaneously. It claims to have a smart IC chip that automatically recognizes devices to provide the right current output—I can’t speak to that, but all our devices (a collection of iPhones, iPads, Apple Watches, and a Garmin Forerunner 620) charged in what seemed like reasonable times.
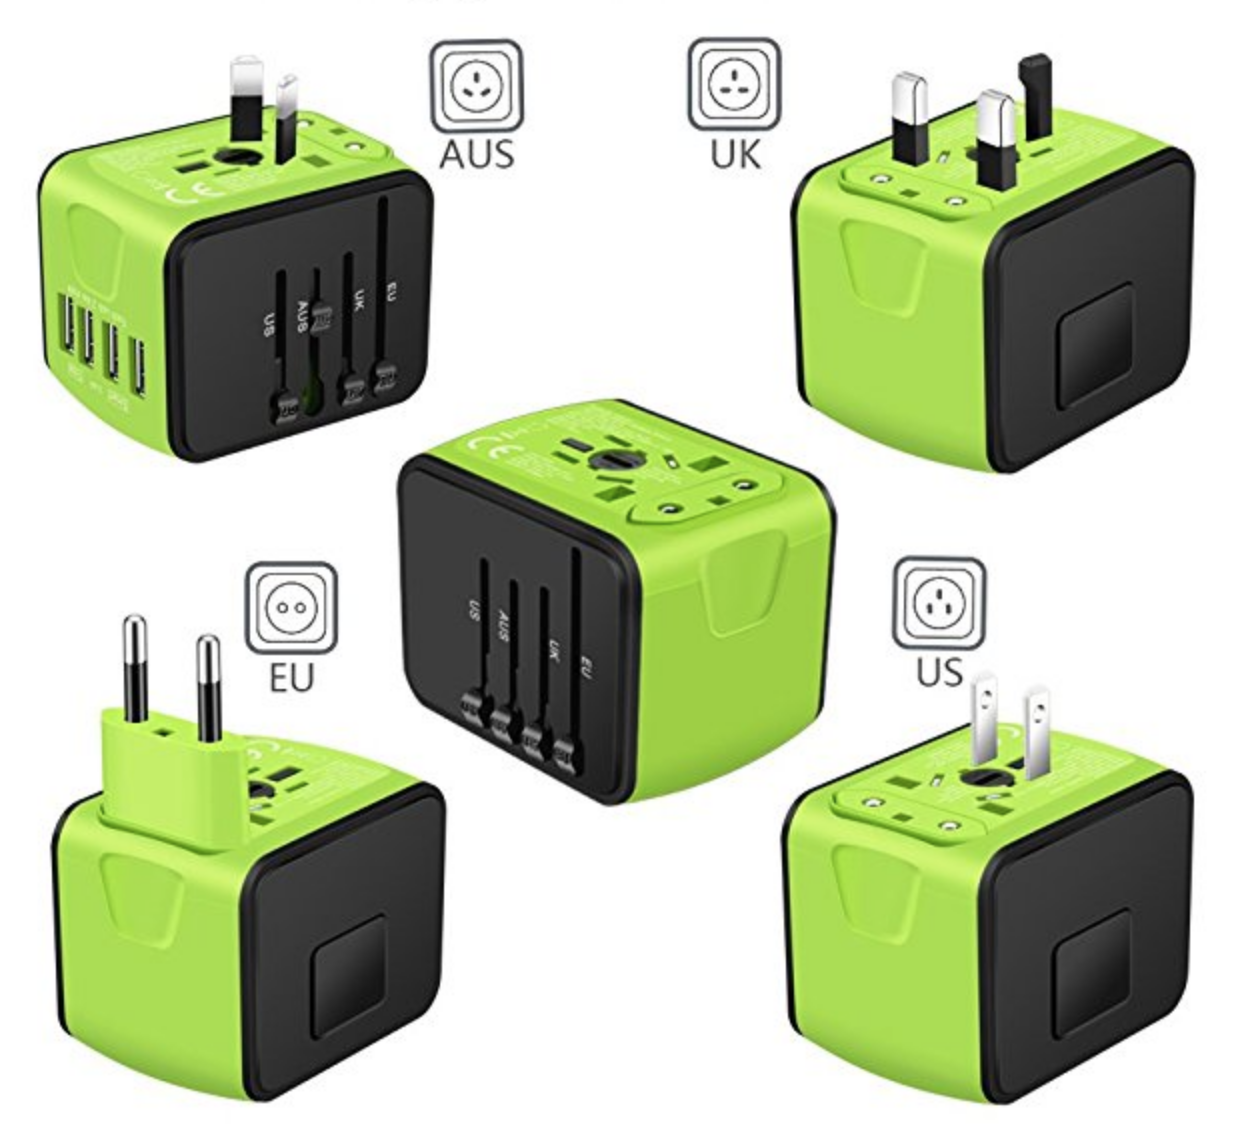
The best part is that sliders on one side of the cube let you extend plugs for four different styles (US, UK, Europe, and Australia) to provide coverage for more than 150 countries. When not in use, they retract into the cube, making it easy to toss in a laptop bag without worrying about it poking anything. And it comes in bright green, which should make it less likely that it will be forgotten in a hotel room. (A bright blue model is similar, except for swapping one of the standard USB ports for a USB-C port.)
To protect your devices against power surges, Saunorch’s power adapter has a 6.3A fuse and comes with a spare fuse, although you’ll have to keep track of that separately. Note that it’s not a power converter, so it can’t convert voltage, though that doesn’t come up much with electronics. And it’s also not intended for high-power appliances like hair dryers or tea kettles. But for ensuring that you can charge your iPhone, MacBook, and other electronics wherever you are, it’s a steal at less than $20.


