#1430: Explaining Pages linked text boxes, improving iMovie output resolution, Mailplane 4 review
Slowly but surely Pages is getting back all the features it lost when Apple relaunched it a few years back. One of those recovered features is linked text boxes, and Michael Cohen tells you how the new, improved system works. We also have a tip for getting the full resolution out of your iMovie, and we take a look at the just-released Mailplane 4, which rolls Gmail into a Mac-native client. The only notable Mac app release this week is RapidWeaver 8.0.
How to Use Linked Text Boxes in Pages 7
Text boxes rank high on the list of useful Pages features. You can use them to slap a chunk of text anywhere you like in a document. Text boxes are ideal for sidebars, captions, callouts, authorial asides, or any other kind of text you need to put on a page outside the regular text flow of your document. They’re easily created by clicking the Text button on the toolbar or by choosing Insert > Text Box.
Until 2013, you could also link text boxes in Pages. That is, if you put more text in a text box than the box could display, you could link that box to another text box, and the extra text from the first box would flow into the second. That second text box could link to a third, and so on. This approach worked well for things like newsletters, where each story could be placed in its own set of linked boxes.
But in 2013, when Apple’s rewritten-from-the-ground-up Pages 5 came out, text box linking vanished, along with many other features Pages users had come to know and love (see “Why iWork Had to Change (and What That Has to Do with Aperture),” 9 July 2014). Over time, Apple brought most of those features back—a few here, a few there—in updates to Pages. It took until mid-2017 before Pages once again provided a way to link text boxes, and when the feature returned, it looked and worked differently from the old way. And that’s a good thing.
Linked Text Boxes of Yesteryear
If you never used linked text boxes in the days before Pages 5, you can skip this section unless you are curious.
Text box linking worked something like this: every new text box you put on a page had two little widgets, one on the upper-left edge of the box and another on the lower-right edge. To make text flow from one box to another, you clicked the lower-right widget (call it the “output widget”) of the first box and then the upper-left widget (that is, the “input widget”) of the second box. Pages showed you the links between text boxes by drawing lines between the input and output widgets of the boxes so you could easily see where text was flowing.
That worked well until you had boxes spanning multiple pages, as you might in a newsletter where an article beginning in a box on page 1 might continue in a box on page 6. Following that long blue linking line across many pages was a drag.

But the linking feature worked well enough, so when it vanished in Pages 5, there was much consternation in the Pages user community.
Linked Text Boxes Today
With today’s Pages, you can link two or more text boxes in a thread, and have multiple threads of linked text boxes in a document. In a newsletter, for instance, each thread would correspond with a different article, enabling you to start multiple articles on page 1 and then continue each one on different inside page.
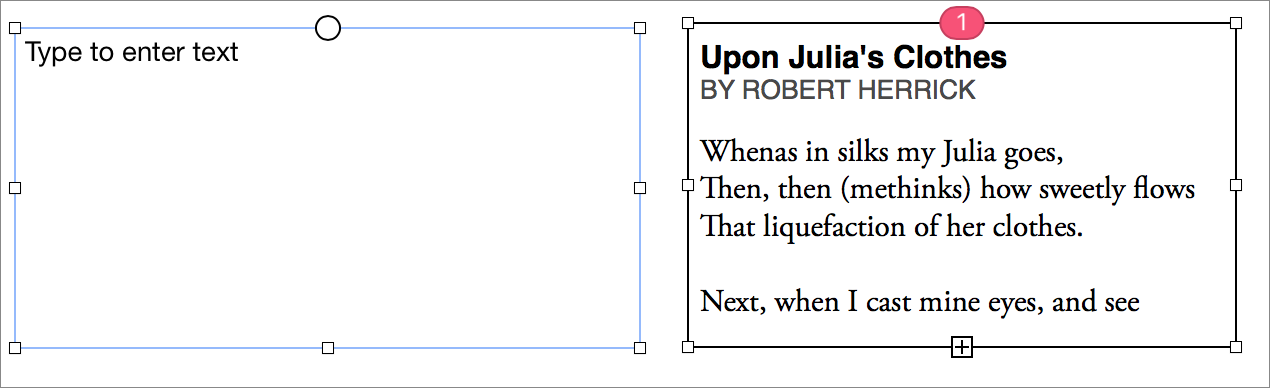
Unlike Pages before version 5, these threads aren’t represented as blue lines stretching between boxes. Instead, each text box has a thread control widget at the top that you can click to control how the box links to other boxes. (Pages for Mac, iOS, and iCloud all support linked text boxes; in this article, I describe text box linking in Pages for Mac, but it’s similar in the other versions.)
For an unlinked box, the thread control is just an empty circle that appears when the text box is selected; for a linked box, the thread control is colored and bears a number that indicates where the box sits in the thread of linked boxes.
Adding a box to a thread is simple: put another text box on the page and click its thread control. Pages assigns the new box to the most recently manipulated thread, flowing extra text into it as appropriate.
Think of the threaded text as a document embedded within your Pages document—that is, once you have selected some text or placed the insertion point within a text box, Edit > Select All selects all the text in the thread. Shift-clicking also works: you can select text within one box in a thread and then Shift-click text in another box in the same thread to select the range of text between the first click and the second.
Rearranging Links
Where a text box goes in a thread depends on the box’s location in the document. Generally, when you link a newly added box to a thread, and that box is on the same page as (or on any page following) the previous last box in the thread, Pages assigns the new box to the end of the thread.
But what if you put a new box on a page that appears before the start of a thread, and you link the new box to that thread? Smartly, the new box becomes the starting box for the thread, and Pages renumbers the boxes in the thread so that the text flows naturally between.
In other words, by default, the location of the boxes when you create them determines their order in the thread, rather than any hard-coded links.
This video explains how to work with threaded text boxes.
Using the Thread Control
You needn’t, however, play games with box positioning to create the threading order you want. You can control where the box is located in a thread, remove it from a thread, or start a new thread with it by clicking its thread control: a pop-up menu offers various choices.
As much as I dislike how Apple likes to create user interfaces where controls appear only when you’re in the right spot, this one works well for me. As soon as I select a text box, the thread control appears; as soon as I hover over the control widget, it displays a pop-up menu > indicator; and when I click the widget, I have both control over and information about how the box is linked to other boxes.

With this menu you can:
- Assign the box to any thread. The top of the menu lists the opening text of each text box thread in the document, along with an identifying color. Choose the thread to which you want to assign the box.
- Change the position of the box in the thread. Use the choices on the Layout Order submenu to assign the position of the box in a thread. This submenu is also handy for finding out how long the thread is.
- Make the box the start of a new thread. Choose Create New Thread. This removes the box from its current thread and starts a new thread, assigning a number and a color to the box’s thread control. The text in the original thread no longer appears in the box but continues to flow through any other boxes in the thread: nothing is lost.
- Take the box out of its thread. Choose Remove from Thread. This takes the box out of the thread and leaves its thread control empty. Again, no text is lost.
Making Threads Pretty
In Pages, new text boxes by default are plain creatures: they are colorless, odorless, borderless, and the filler text they contain wears the document’s default Body text style. You can change all that:
- Single text box: To change the appearance of a single threaded text box, select the box (not its contents) and then use the controls on the Style tab of the Format inspector. You can apply a new fill color or gradient, change the border to a variety of different line styles or frames, and add a shadow and a reflection.
- All linked text boxes in a thread: To change the appearance of all of the linked text boxes in a thread at once, first Control-click a threaded text box and then choose Select All Text Boxes in Thread from the menu that appears. With the boxes in the thread selected, adjust the settings on the Format inspector’s Style tab.
- Text in threaded text boxes: To change the style of the text within threaded text boxes, first select some or all of the threaded text and then use the options in the Text Format inspector. You can set styles, change sizes, and more—in short, all the things you can do with text in any Pages document.
Here’s a bonus feature: when you modify the look of a text box, such as changing its border and fill color, you can choose Format > Advanced > Set as Default Text Box Appearance. While this command won’t affect any existing text boxes in your document, any new text boxes you create in the document will have the new look.
Tying It All Up
It was a long four years between the disappearance of linked text boxes and their reappearance as threaded text boxes. Although it may have seemed as though Apple dragged its feet in bringing this capability back, text box threading in its current form is a slick, easy-to-use, and powerful replacement for the original linked text box feature. Users who felt that the introduction of Pages 5 in 2013 irreparably “dumbed down” the app might want to take a look at just how smart Pages 7 has become in 2018.
Portions of this article appeared in a slightly different form in version 2.2 of Take Control of Pages, Second Edition and are reused with permission.
TipBITS: Make iMovie Output Full-Resolution Video
We’ve been trying to incorporate screencasts into more of our articles here at TidBITS—there are times when a short video conveys some point better than any number of screenshots. As far as tools go, ScreenFlow is the gold standard, but QuickTime Player can record screen actions and iMovie is a decent video editor. And both come with all Macs for free, so that’s where we’re starting.
But I recently stumbled across an infuriating problem: no matter what I did with my original screen recordings, I couldn’t use File > Share > File in iMovie to save a video file at a resolution higher than 720p. That’s not optimal for how-to videos with a lot of text, which are best viewed when zoomed to full-screen anyway. It’s also just the principle of the thing: I put in high-resolution 4096-by-2304 video, which is what QuickTime Player captured from my 27-inch iMac with 5K Retina display, and I expect to be able to export a 4K version of the file in the end. Your eyes will thank me!

The problem is that iMovie doesn’t let you set a project’s resolution manually—for that you seemingly need the $300 Final Cut Pro X—and on the Mac, it fixes the project’s resolution based on the first clip you insert.
This problem has stymied many people, and there are numerous YouTube videos suggesting that you create a new project and drop a high-resolution photo at the beginning of the timeline to set the project to a higher resolution. That trick didn’t work for me. But I figured out a different way of convincing iMovie to allow me to export a 4K file.
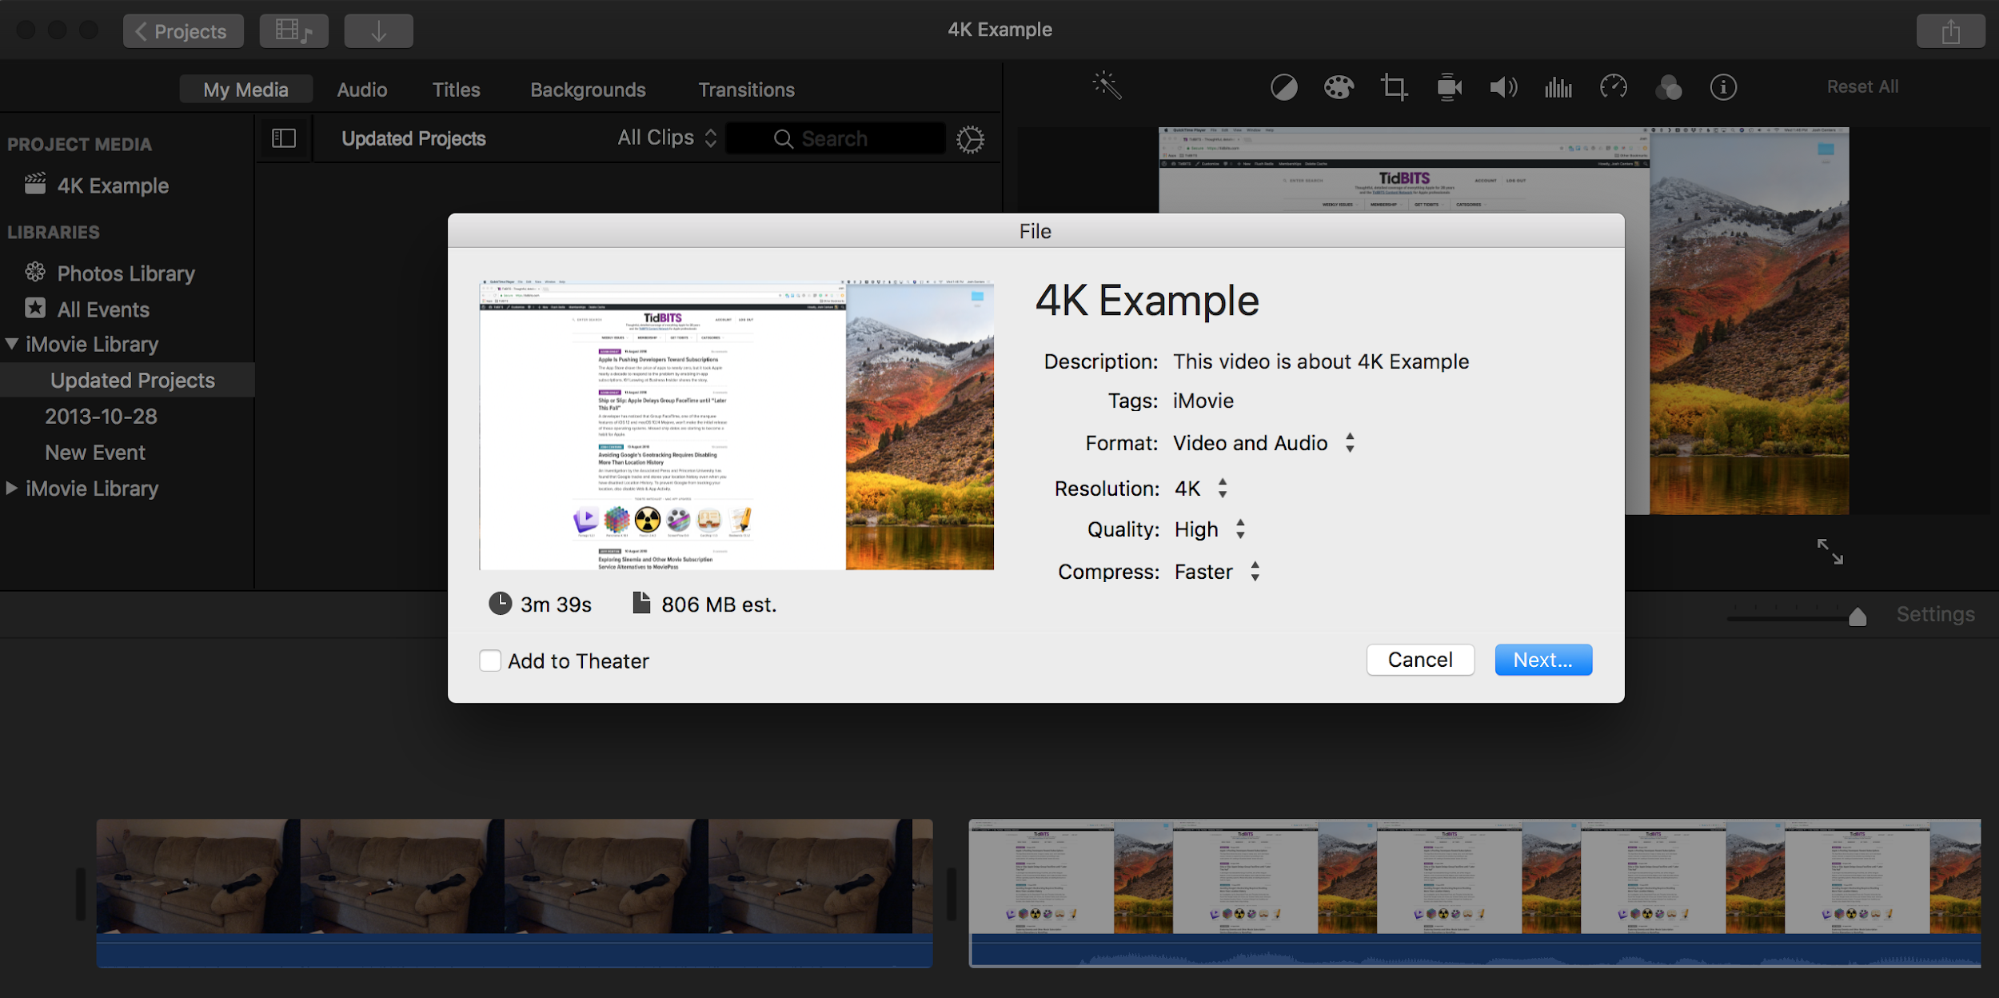
First, using your iPhone, record a video at 1080p or 4K, whichever is the max for your device. Set the resolution in Settings > Camera > Record Video.
The length and subject matter of the video are irrelevant, as long as it’s at the correct resolution, so just record a few seconds of your foot to get a small file. Transfer this seeding video to your Mac however you like, such as letting iCloud Photo Library move it to the Mac, after which it appeared in iMovie’s Photos Library.
In iMovie, click Create New to create a new project. Drag the seeding clip you recorded into the new project’s timeline. Then drag in the screencast clips you want to edit.
If you are already working on a project that’s stuck at 720p, open it, click in the timeline, and press Command-A followed by Command-C to select and copy all the clips. Then switch back to your new project and paste those clips into the timeline after the seeding clip.
If you click Settings on the right side of the window, you’ll see the resolution is 1080p or 4K, whatever your iPhone recorded. And if you choose File > Share > File, you will see those resolutions as options in the Resolution pop-up menu. Once the resolution is correct, delete your seeding clip and continue to work on the project.
After figuring this out on my own, I stumbled across Apple’s official confirmation that the resolution of the first clip determines how you can export. But here’s the weird bit. Now that I’ve made iMovie export a screen recording as 4K, when I create a new iMovie project and add a screen recording to it as the only clip, iMovie lets me export in 4K, as opposed to the 720p limit I initially saw—no seeding clip necessary. Your mileage may vary, but it’s possible this trick needs to be performed only once to convince iMovie to allow screen recordings to be exported at 4K.
I don’t want to sound ungrateful, since iMovie is an impressive tool for the price, but hacks like this shouldn’t be necessary.
Mailplane Goes Chrome and Adds Features
The Mailplane email app has long catered to Mac users who like Gmail’s Web-based interface but don’t want to forgo desktop capabilities that native mail clients provide. Mailplane is a “site-specific browser” for Gmail (see “Make Site-Specific Browsers with Google Chrome,” 6 March 2015), but it offers greater Gmail-specific functionality than a standard Web browser like Safari or Chrome. The just-released Mailplane 4 preserves these broad outlines while unveiling some significant improvements.
Mailplane 4 sports a range of usability upgrades that hook it ever more deeply into macOS, buttressing its status as an alternative to native apps such as Apple’s Mail. Simultaneously, Mailplane 4 has augmented Web capabilities that provide, among other things, better support for Google’s alternative Inbox Web mail service along with the more mainstream Gmail.
But perhaps the most significant change is that power users can now turbocharge MailPlane with supported Gmail-specific Chrome extensions, thanks to MailPlane’s switch from being built upon Safari’s WebKit rendering engine to harnessing Google’s Blink engine.
Mailplane Basics
As a site-specific browser, Mailplane lets Gmail users manage email in a window that isn’t cluttered with general browser interface elements or bogged down by unrelated Web-page tabs. Mailplane has its own toolbar, but you can hide it. Mailplane goes a bit beyond Gmail too, providing access to Google’s Inbox alternative email interface, Google Calendar, and Google Contacts, each in its own tab.
More importantly, Mailplane is in many ways a native Mac app. As Adam Engst wrote years ago, the developers have “done a truly amazing job of turning what is essentially a Web browser into a real Macintosh application” (see Zen and the Art of Gmail, Part 4: Mailplane,” 16 March 2011).
Mailplane’s longtime Mac-specific features have included Keychain support, working as your default email app, a Share menu extension, notification sounds, Quick Look previews of attachments, and more.
Usability Improvements
I have been testing Mailplane 4 for about a month, and I’ve found it to be a solid upgrade. There’s a lot to cover in terms of usability improvements, so I’ll whip through the highlights.
Tab System
The tab functionality is more flexible and user-friendly than in the past. Clicking the + button to create a new tab now opens a Load Tab page. For each configured account, the page shows buttons for Gmail, Inbox, Calendar, and Contacts. Accounts on the page are coded with user-customizable colors. You can also open multiple instances of an account’s Gmail, Inbox, Calendar, and Contacts views in separate tabs, which was not possible before.

Search
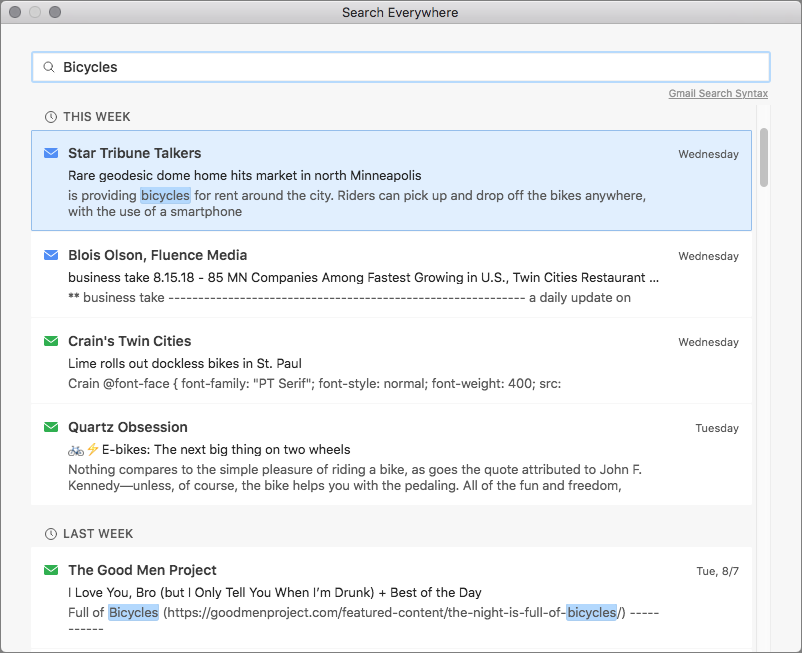
Gmail’s native search capabilities are excellent, and Mailplane 4 builds on them. Notably, you can search in multiple Gmail and Inbox accounts simultaneously. Open the app’s standalone search window, type query terms, and press Return. Each search result displays an envelope icon (closed for Gmail, open for Inbox) with a color corresponding to the message’s account. Query terms are highlighted for easier reading.
Navigation
Mailplane 4 offers a standalone Navigate window that lets you search for Gmail’s labels, which are tags that can be assigned to messages and used instead of folders, across all your accounts. Start typing in the search field and Mailplane displays labels with that text string in their names. When you find the label you want, clicking it pulls up all email messages with that label.
This feature, though not essential, is nice for those of us with lots of labels in a nested structure that can be unwieldy to navigate the traditional way.
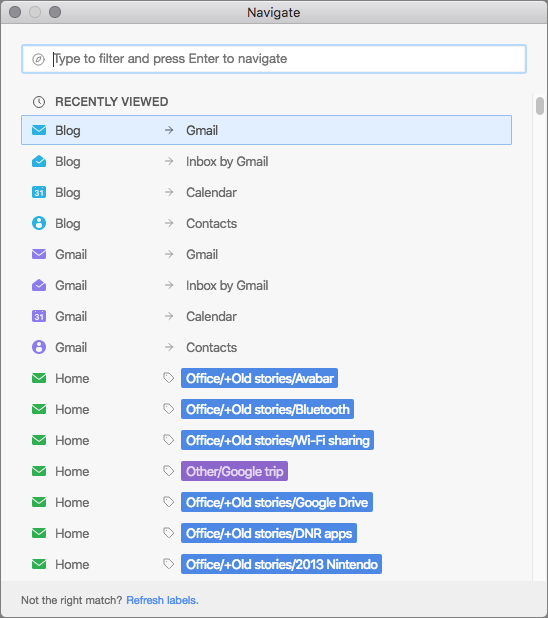
Before you filter the list, the Navigate window shows recently used labels, which may let you avoid searching. In my case, however, it didn’t accurately show which labels I had used recently.
Notifications
Mailplane has long had Mac-native notifications, but Mailplane 4 adds actions to its notifications. For example, you can click a Reply button within the notification window to open a quick-reply field for responding right there. Similarly, you can archive a message by clicking an Archive button in the notification. You can have only one button—Reply or Archive—for all incoming messages in a particular account, but not all your accounts have to be on the same setting.
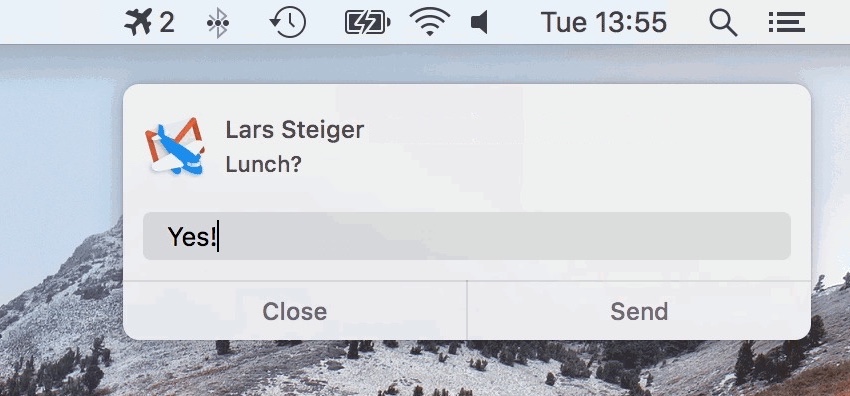
Hidden from view, there’s a nerdy way to augment this feature. At the end of a quick reply, type “/a” to reply-all, “/e” to archive the message, or “/d” to save the reply as a draft.
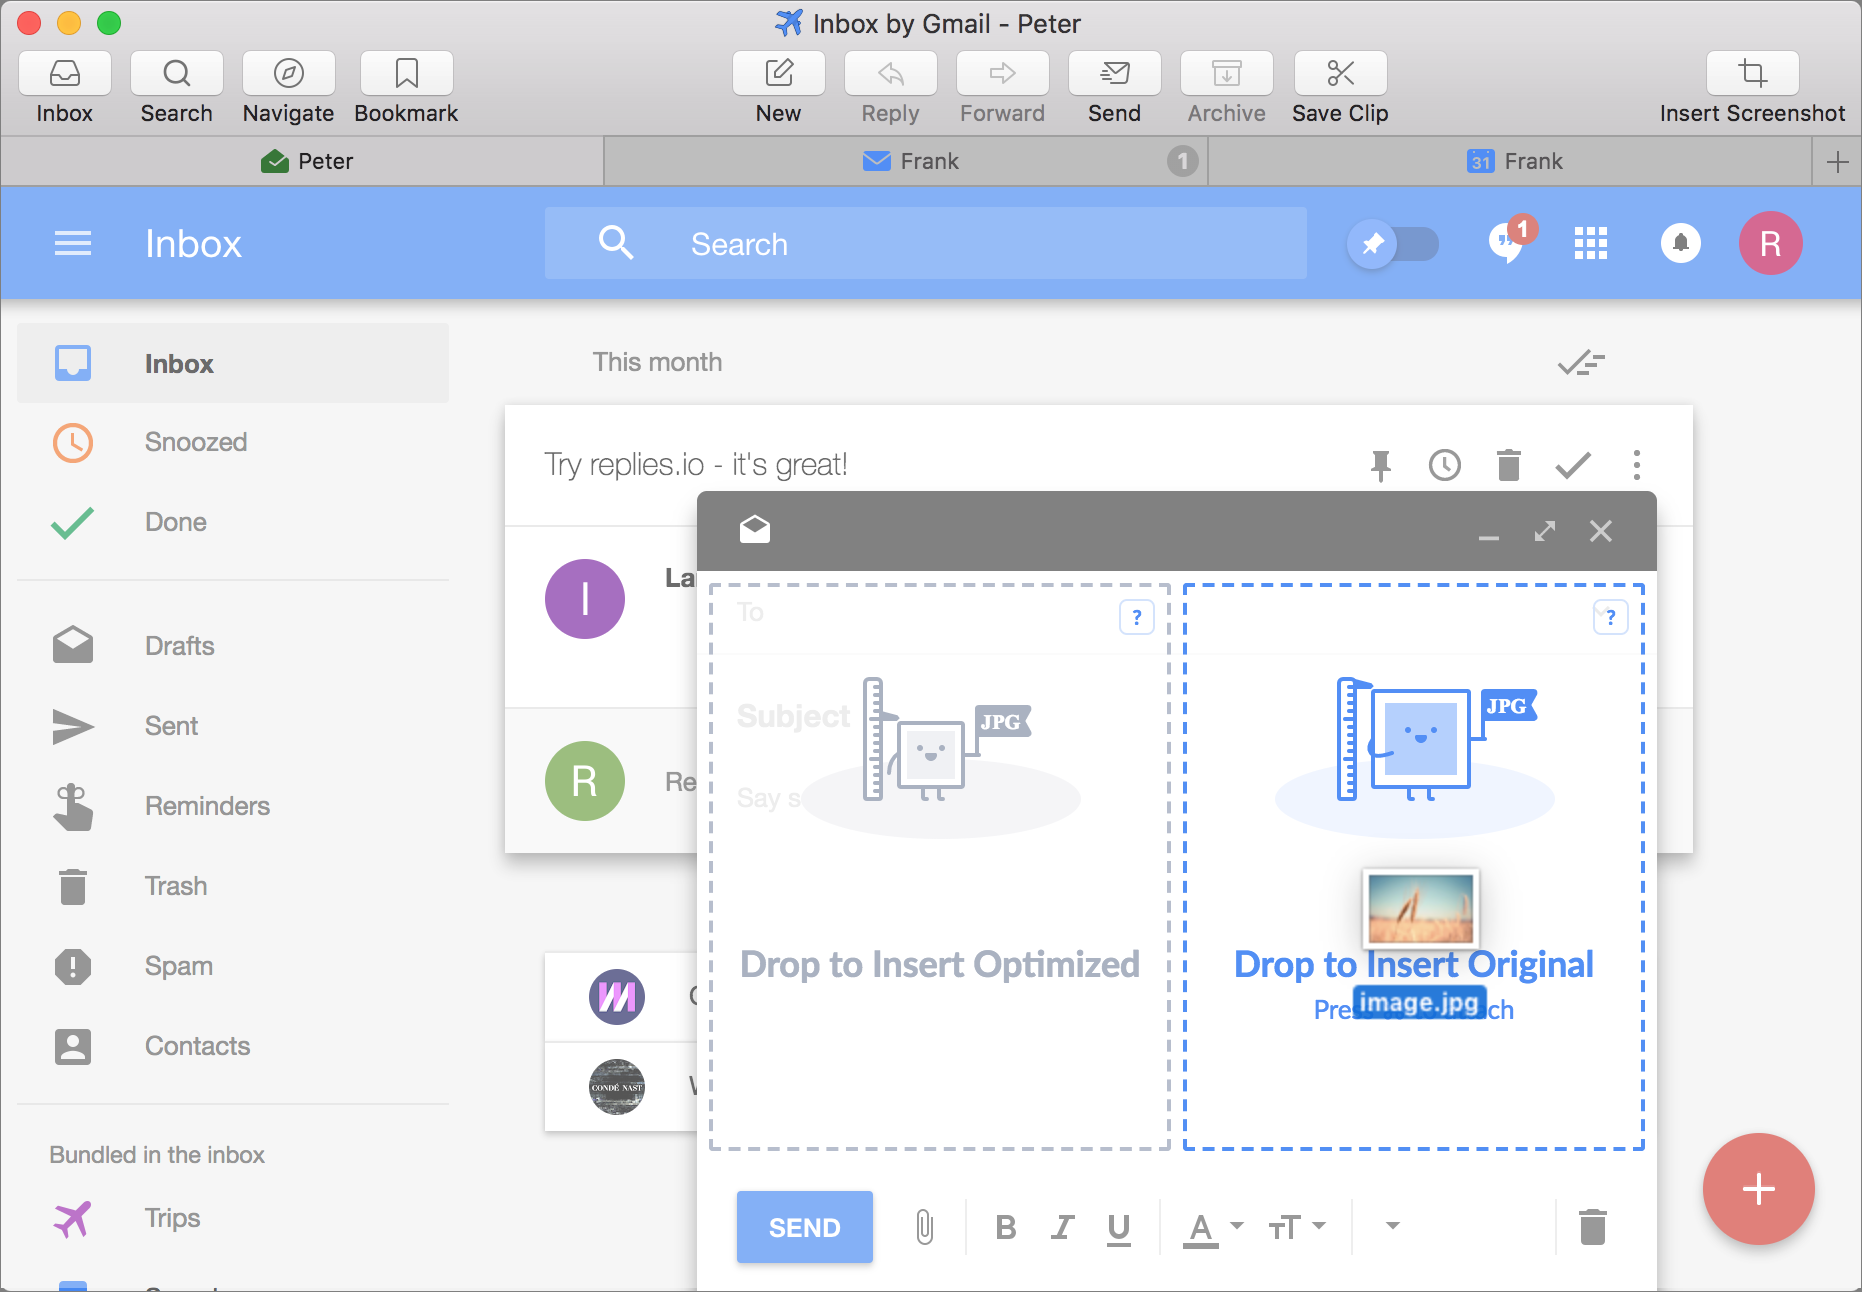
Annotations
Image attachments in outgoing messages now incorporate annotation controls—including arrows, text, and shapes—that stock Gmail and Inbox don’t provide. There’s also a handy text-blurring option for masking sensitive information. To use these features, click an image attachment in an email draft, and then click the Annotate button that appears.

Open In
Instead of downloading an attachment to the Desktop or another Mac folder, you can instead open it in a pre-designated default app. You can set Word documents to open in Pages, for instance, and have images open in Photos. You do this by clicking the middle of three buttons that appear when hovering over an attachment.

Even better, the right-hand … button opens a Show All Options window with an assortment of useful actions.
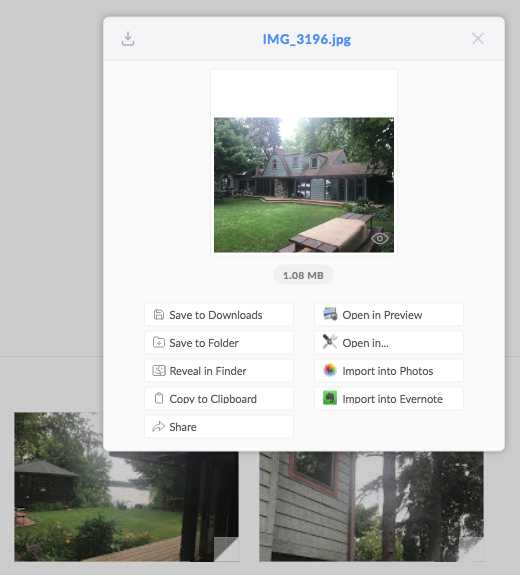
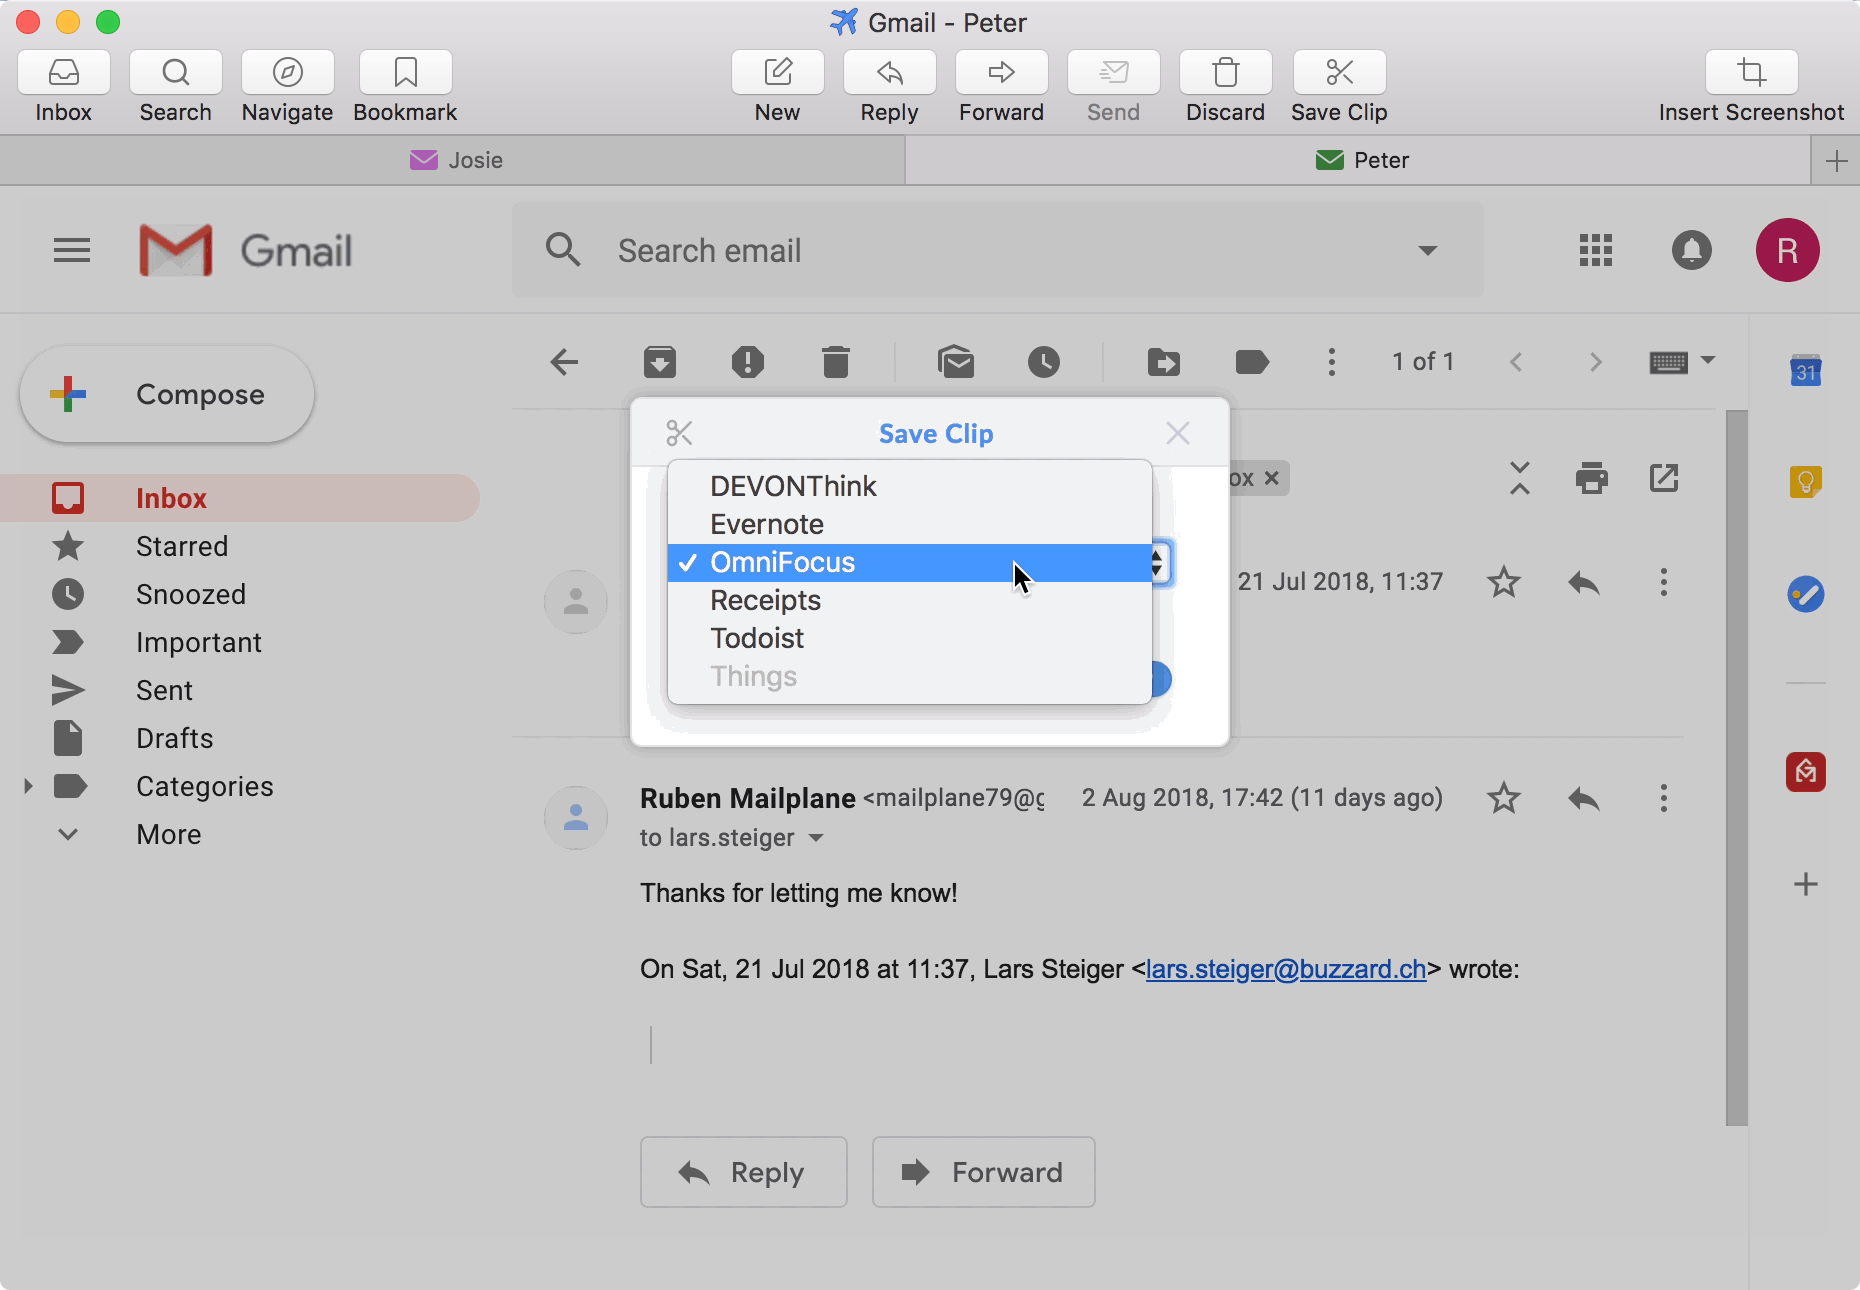
Clip Into
Similarly, you can export entire email conversations—including attachments and inline images—as PDF files directly into note-taking or task-management apps such as DEVONthink Pro and Evernote. You can also create tasks based on email conversations in OmniFocus, Todoist, and Things.
Mailplane 3 previously offered Evernote clipping, and even a toolbar button for that purpose, but there’s no such button—or similar ones for other relevant apps—in Mailplane 4, which is odd. However, the app does provide an Import into Evernote button among its attachment actions (see above).
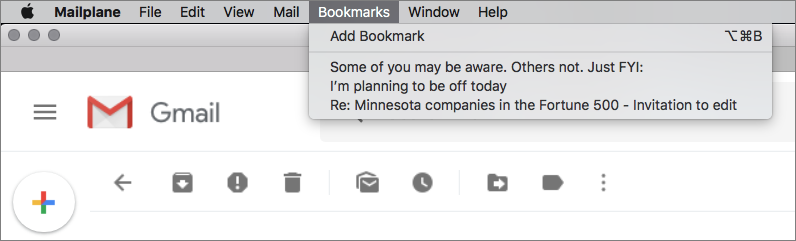
Bookmarks
This simple feature lets you bookmark any email message for future reference, and you can tweak the bookmark text. This feature is not new, but Mailplane 4 makes it more visible via a menubar menu. Previously, it was buried so deeply as to be all but useless.
Mailplane’s bookmarks are an alternative to starring messages and one that is not account-specific since all bookmarks are consolidated in the Bookmarks menu. The interface can become unwieldy if you make a lot of bookmarks, though.
Inbox Support
Mailplane has long incorporated access to Inbox along with Gmail, but until recently the two services weren’t equally supported. For instance, both Gmail and Inbox in a regular browser let users determine whether to attach an image in an original or size-optimized form, but until recently Mailplane provided this feature only in Gmail. Now, parity has been achieved. Auto-BCC is another feature now supported across the board.
Other
There are a variety of less significant features as well:
- Offline: A new offline mode allows for limited functionality—such as replying to a message—without an Internet connection. The app is still largely crippled when offline, though.
- Per-account zooming: You might like Gmail, Inbox, Calendar, and Contacts set at different zoom settings, which is now possible. Previously, they shared the same zoom setting.
- Security keys: For those who use two-factor authentication, Mailplane now supports physical security keys that plug into the Mac’s USB port for a secure login.
- Keyboard shortcuts: New keyboard combos make it possible to switch tabs without resorting to a mouse or trackpad.
- Custom Gmail CSS: A Mailplane 3 feature initially dropped from Mailplane 4 but later restored, custom CSS allows Web-savvy Mailplane users to customize Gmail’s interface.
A Chrome Finish
Mailplane has been, since its inception, built atop the WebKit rendering engine used by Safari. The developers have now abandoned this approach, rebuilding Mailplane on Google’s Blink rendering engine, essentially making it a specialized version of the Google Chrome browser.
This, the developers tell me, fixes several problems. First, it makes sense to deploy Google-based services in a variation of Google’s own browser for maximum compatibility.
More importantly, a Chrome foundation makes it easier for the developers to support extensions that have long augmented browser capabilities. When it was based on WebKit, Mailplane offered a modest library of five extensions—including Boomerang to control when messages are sent and Clearbit Connect for seeing user profiles in the right-hand sidebar—but baking these capabilities into the app was a lot of work.
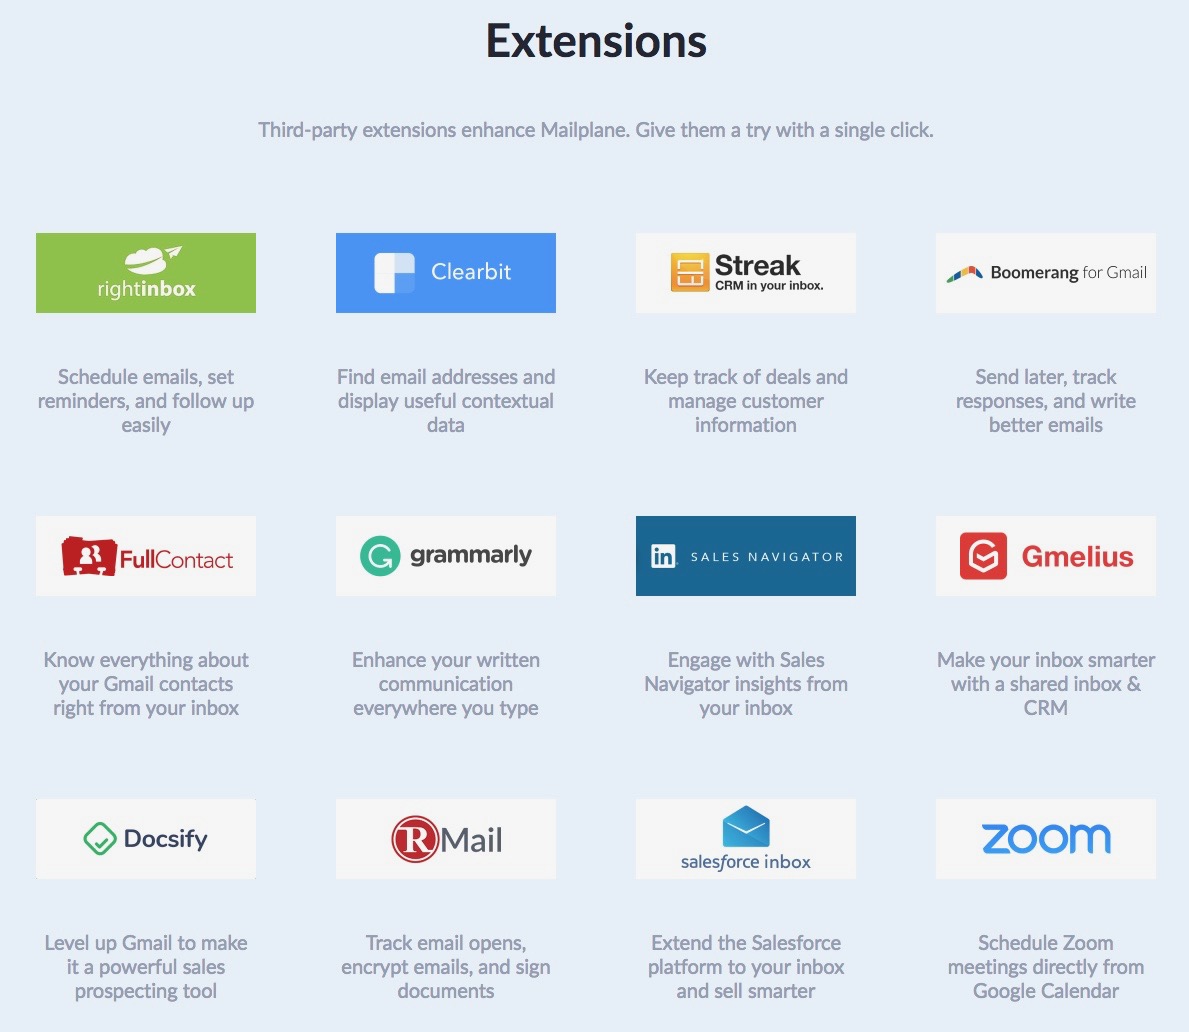
Migrating to Chrome reduces this coding overhead. Extensions require no modification, though Mailplane still must do some work to make them fully compatible.
It is partly for this reason that the Mailplane developers haven’t opened the floodgates to support the wide assortment of available Gmail-related Chrome extensions. The mail app supports only a dozen for now. The list includes Boomerang and Grammarly, as well as FullContact, an alternative to Clearbit Connect.
Even more extensions are on the way, but it may take time.
A Long Flight
I’ve used Mailplane as my default Mac email client for nearly a decade because I prefer Gmail’s Web-based interface to that of a desktop email client such as Apple’s Mail. Google’s Inbox is growing on me, too.
While I’d be fine using either Gmail or Inbox in Chrome, I appreciate the added Mailplane features that give it a Mac flair. It’s a win-win that has kept me loyal to the app even as I’ve tinkered with other Mac-based email clients over the years. Mailplane’s enhancements to Gmail’s stock Web-based features are great, too.
Mailplane isn’t for everyone or even every Gmail user. Some people don’t like the standard Gmail or Inbox Web interfaces, or prefer working in a native email client once they have plugged in the right Gmail settings. But if you’re a Mac user, and you’ve used Gmail or Inbox in a Web browser, I encourage you to give Mailplane a try— there’s a two-week free trial.
The app can also be a nice fit in companies, nonprofits, government agencies, and educational institutions that have deployed Google services—including Gmail and Google Calendar—but limited them to Web-based access rather than allowing their use in Apple’s Mail and other desktop applications. That’s true at my day job, for instance, but Mailplane works just fine.
My use of Mailplane 4 has been marred by a few minor quirks. It sometimes forgets its user-set window proportions. And certain Google features, such as setting the density of message lists, have worked inconsistently for me in Mailplane while functioning reliably in Chrome and other stock browsers.
But, overall, Mailplane 4 is a solid upgrade. As always, Mailplane straddles the Web and desktop worlds, filling a need that neither stock browsers nor native mail clients can fully satisfy.


