#1583: Ten years without Steve Jobs, iOS 15.0.2, Exif and Visual Lookup in Photos, iPadOS 15 multitasking, easier 2FA codes
Last week marked the tenth anniversary of the death of Steve Jobs, which Apple commemorated with a touching tribute video. The company also released iOS 15.0.2, iPadOS 15.0.2, and watchOS 8.0.1 to fix a few bugs and a security vulnerability that’s being exploited in the wild. Don’t get the impression that iOS 15 and iPadOS 15 are problematic—we’re enjoying them thoroughly, and we cover more new features in this issue. Josh Centers explains how to find Exif data in the Photos app and use Visual Lookup to identify plants, pets, books, art, and landmarks. iOS 15, iPadOS 15, and Safari 15 integrate two-factor authentication codes in the new built-in password manager, and Glenn Fleishman tells you how to use it to improve your online security. And Adam Engst delves into iPadOS 15’s new multitasking features, which Apple finally made discoverable for regular users. Notable Mac app releases this week include 1Password 7.8.8, Mimestream 0.29.2, and DEVONthink 3.8.![]()
Ten Years Without Steve Jobs
Has it really been a decade? 5 October 2021 marked ten years since the untimely death of Apple co-founder and CEO Steve Jobs (see “Steve Jobs Dead at 56,” 5 October 2011, and “Mourning Steve Jobs,” 10 October 2011). On that day, Apple commemorated the anniversary with a tribute on its homepage that featured a brief video about his life. The tribute page was ephemeral, but Apple has now shared the video on its YouTube channel.
Former Apple design guru Jony Ive, a close friend and collaborator of Jobs, penned his own tribute for the Wall Street Journal, offering a rare glimpse into Jobs’s thought process:
Steve was preoccupied with the nature and quality of his own thinking. He expected so much of himself and worked hard to think with a rare vitality, elegance and discipline. His rigor and tenacity set a dizzyingly high bar. When he could not think satisfactorily he would complain in the same way I would complain about my knees.
As thoughts grew into ideas, however tentative, however fragile, he recognized that this was hallowed ground. He had such a deep understanding and reverence for the creative process. He understood creating should be afforded rare respect—not only when the ideas were good or the circumstances convenient.
Ideas are fragile. If they were resolved, they would not be ideas, they would be products. It takes determined effort not to be consumed by the problems of a new idea. Problems are easy to articulate and understand, and they take the oxygen. Steve focused on the actual ideas, however partial and unlikely.
Apple CEO Tim Cook kept his remembrances more private, sharing an internal memo with Apple employees:
Steve was so many things: brilliant, funny, and wise, a husband, a father, a friend, and, of course, a visionary. He challenged us to see the world not for what it was, but for what it could be. And he helped so many people, myself included, see the same potential in ourselves. Not a day goes by that I don’t think about him.
Jobs was a rare figure, and while he was a famously imperfect human being, few people have equaled his technological impact on the modern world. Over the course of his career, Jobs touched every major milestone in personal computing: video games, home computing, graphical interfaces, local networking, digital music, smartphones, tablets, and more. Jobs himself invented very little, but his taste, insight, wisdom, and refusal to settle for anything but the best work left an indelible dent in the universe.
iOS 15.0.2, iPadOS 15.0.2, and watchOS 8.0.1 Fix Bugs, Major Security Flaw
Apple has released iOS 15.0.2, iPadOS 15.0.2, and watchOS 8.0.1 to address some bugs in the initial releases, as well as a major security vulnerability in iOS 15 and iPadOS 15.
iOS 15.0.2 and iPadOS 15.0.2
iOS 15.0.2 and iPadOS 15.0.2 fix the following problems:
- If you saved a photo to your Photos library from Messages and then deleted the original message or thread, the photo could have been deleted from your library.
- The new iPhone Leather Wallet with MagSafe may not have connected to the Find My app.
- An AirTag may not have appeared in the Items tab of Find My.
- CarPlay had trouble opening audio apps and could disconnect during playback.
- Device restores and updates may have failed when using Finder or iTunes with the new iPhone 13 or sixth-generation iPad mini.
More importantly, iOS 15.0.2 and iPadOS 15.0.2 have one security fix for a bug that could cause memory corruption and allow arbitrary code execution with kernel privileges. Security Editor Rich Mogull tells us this is a zero-day vulnerability that has already been exploited in the wild, so we recommend updating immediately.
iOS 15.0.2 is 589.4 MB on an iPhone 13 Pro, and iPadOS 15.0.2 is 409.6 MB on a 10.5-inch iPad Pro. To install these updates, go to Settings > General > Software Update.
watchOS 8.0.1
watchOS 8.0.1 fixes two bugs specific to the Apple Watch Series 3:
- Software update progress not being displayed accurately
- Accessibility settings not being available for some users
watchOS 8.0.1 has no published security fixes.
If you have an Apple Watch Series 3, you can install the watchOS 8.0.1 update (174 MB for a Series 3) in the Watch app on your iPhone under My Watch > General > Software Update. Make sure your watch is on its charger and charged to at least 50%. If you’re not using an Apple Watch Series 3, you can probably wait for the next update.
Get More Info from Photos in iOS 15 and iPadOS 15
Back in “How to Keep Facebook from Snooping on Your Photos’ Locations” (31 May 2021), I lamented the fact that Photos in iOS and iPadOS had no way to display Exif data. Little did I know that just a few days later, Apple would announce that feature in Photos for iOS 15 and iPadOS 15. However, Apple didn’t stop at displaying basic metadata, adding the Visual Lookup feature that can identify various types of objects in photos.
For more on all the new features of iOS 15 and iPadOS 15, check out my book, Take Control of iOS 15 and iPadOS 15.
Exif Metadata
Exif (short for “Exchangeable image file format”) is a standard for metadata that’s embedded in pretty much every digital photo you take. It includes information like the camera make and model, date and time, ƒ-stop, and ISO. For photos taken with an iPhone or other smartphone, the Exif data also includes the exact location the photo was taken.
To view a photo’s Exif info, open it in the Photos app and either swipe up on the image or tap the new info ![]() button in the toolbar. For pictures taken on an iPhone, Photos shows:
button in the toolbar. For pictures taken on an iPhone, Photos shows:
- The date and time the photo was taken (you can change this)
- The iPhone model, image format, and if it’s a Live Photo, an icon

- The specific camera that captured the image, along with lens size and ƒ-stop
- The megapixel count, resolution, and file size
- The ISO, lens size, exposure value, f-stop, and shutter speed
Below this information is a thumbnail of the image on a map. Tap the map to see a full-size map from which you can zoom out to see where you took the photo.
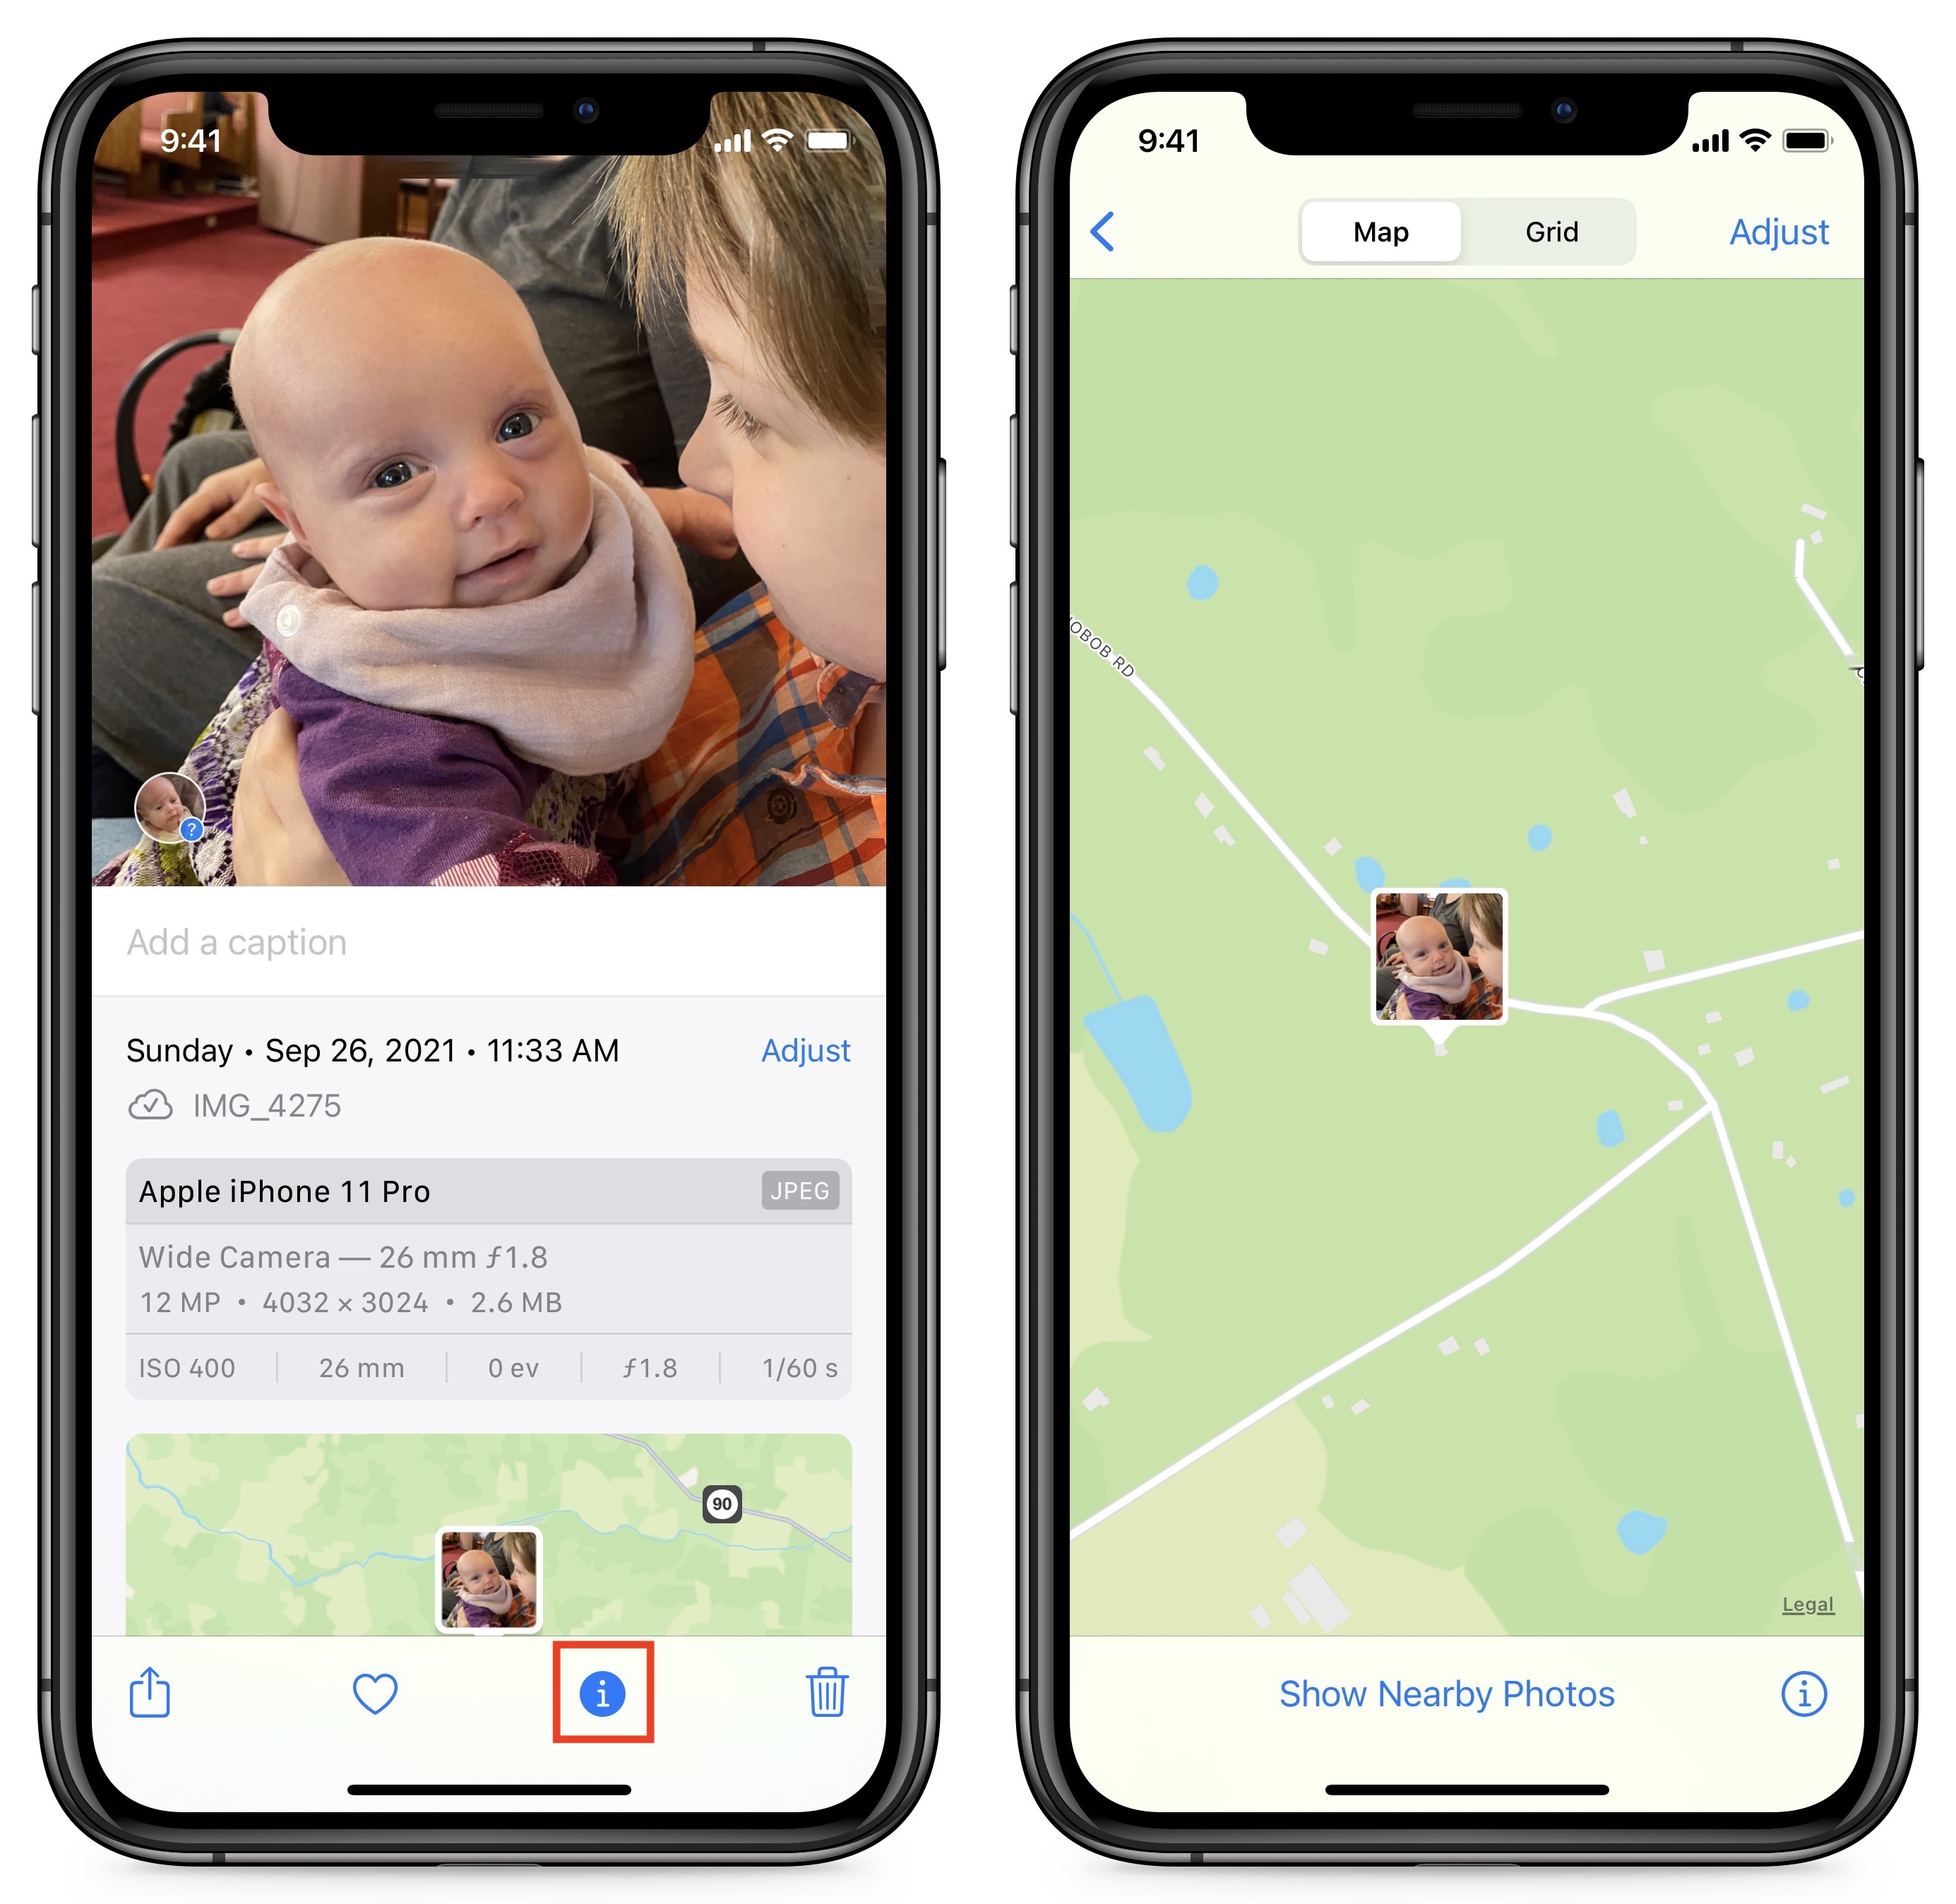
For the most part, Exif data is read-only, but you can change two values—date/time and location—by tapping Adjust next to either data point. When editing location data, you can tap No Location to strip location data from the photo, which you may want to do before sharing certain images publicly.

Of course, if you strip the location data, you won’t be able to find the image on a map anymore. It might be better to use the shortcut I created that shares photos without location data. Sadly, Apple didn’t see fit to add an option to iOS 15 and iPadOS 15 that mimics the “Include location information for published items” checkbox in Photos for macOS.
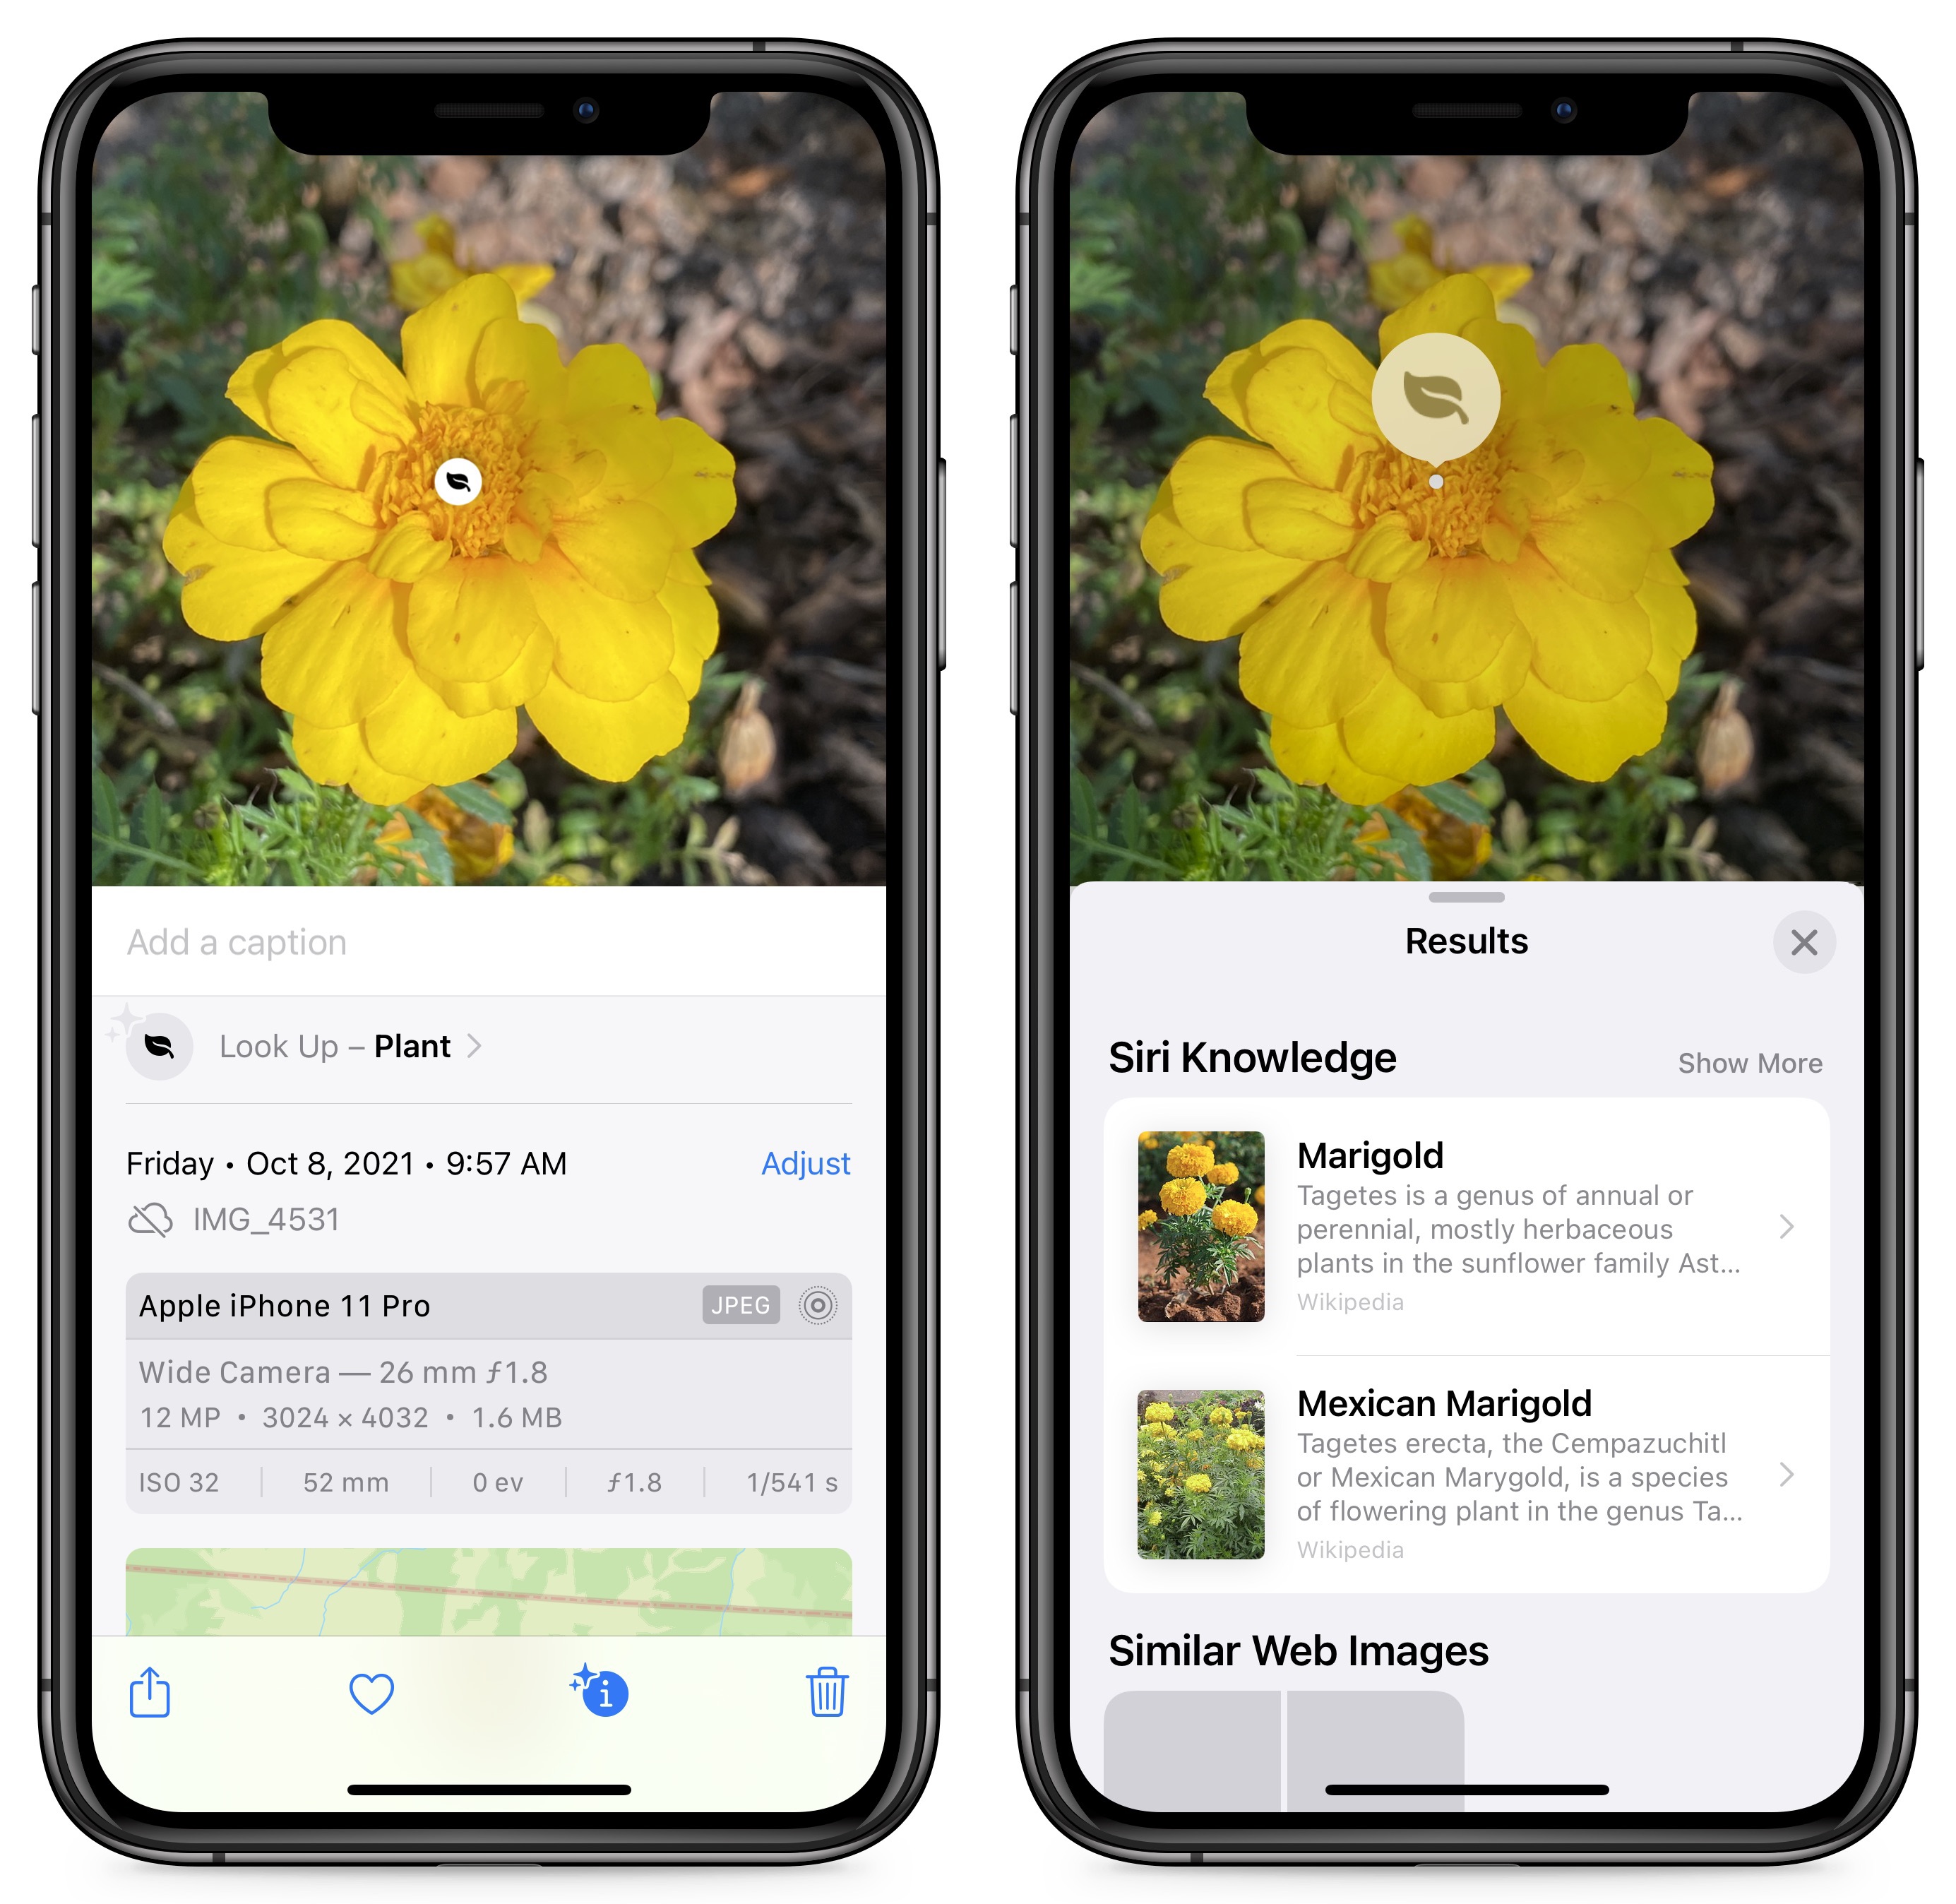
Visual Lookup
Metadata is data that describes other data. While Exif metadata is undeniably useful, Apple saw an opportunity to extend the metadata it can associate with photos to the objects pictured in the image itself. A new feature called Visual Lookup can identify:
- Popular artworks
- Landmarks
- Plants and flowers
- Books
- Pet breeds
As with some of the more computationally intensive features of iOS 15 and iPadOS 15, Visual Lookup requires an iPhone or iPad with an A12 Bionic processor or better (see “The Real System Requirements for Apple’s 2021 Operating Systems,” 11 June 2021).
If Photos detects something that Visual Lookup can identify, the info ![]() button shows a little sparkle
button shows a little sparkle ![]() . When you swipe up on the image or tap the info button to reveal the Exif panel, a new Look Up entry appears. Icons also appear over the recognized objects. Tap either Look Up or an icon to see what Photos thinks it is.
. When you swipe up on the image or tap the info button to reveal the Exif panel, a new Look Up entry appears. Icons also appear over the recognized objects. Tap either Look Up or an icon to see what Photos thinks it is.
There’s no way to predict precisely if Visual Lookup will be able to work on any given photo, but it does seem to trigger for most pictures of plants, flowers, books, and pets. And when Visual Lookup works, it works pretty well. I’ve been taking pictures of various wild plants around my house to identify them. It correctly identified broadleaf plantain, and it determined that a picture of a volunteer tomato was either a tomato or a member of the solanum family (which it is). It narrowed down an invasive Tree of Heaven as either a Tree of Heaven or a member of the ailanthus family (which, again, it is). It also correctly identified a marigold in my garden.
Visual Lookup’s AI recognition is good but not perfect. It misidentified a perfect specimen of Chinese cabbage as lettuce. Plus, as noted, Visual Lookup can recognize more than one thing at a time, putting an icon over each object it recognizes. I fed it a photo of a dog and cat together (mass hysteria!), and it placed an icon over each. However, Visual Lookup can identify only a few types of pets, ignoring pictures of rabbits and chickens.

With popular artworks, Visual Lookup does well and is welcome, since you may recognize a painting without knowing much of anything about it. What qualifies as a landmark is a little unpredictable, although the picture from the Minneapolis Sculpture Garden below counted. With books, Visual Lookup seems to need a shot of the front cover, and it works best with recent titles. It misidentified Adam’s 1994 Internet Explorer Kit for Macintosh book as the second edition of his Internet Starter Kit for Macintosh from the same year, and it completely biffed that book, identifying it as Gruber’s Essential Guide to Test Taking: Grades 3–5 (by Gary Gruber, not John Gruber). Oops.

How useful and accurate have you found Visual Lookup so far? Let us know in the comments.
Add Two-Factor Codes to Password Entries in iOS 15, iPadOS 15, and Safari 15
Raise your hand if you’ve avoided enabling two-factor authentication for websites that offer it because it’s too much of a hassle to launch an app, find the appropriate site entry, copy a six-digit code and paste it in whenever the site requires that you validate yourself beyond your password. Apple feels your pain, and the company has a new streamlined way to reduce the friction in entering these short-lived codes.
Two-factor authentication significantly increases Internet security because it prevents attackers from easily hijacking online accounts. Even if you use a password manager to create strong, unique passwords for every site, passwords are still vulnerable to theft or interception. When a website’s login process requires a second factor—something you own or control, like a smartphone, tablet, phone number, or computer—you don’t have to worry about a stolen or intercepted password being sufficient to compromise the accounts.
Many sites want to use an SMS message (or a phone call) as a second factor, either defaulting to it or offering it as a secondary option. The problem is that a texted or spoken code doesn’t provide the assurance that the recipient is the party that has access—only that they have a phone number. It’s far too easy to hijack a phone number. It can be done via social engineering (talking a rep at a telecom firm into switching the number), flaws in how telecoms manage numbers, and hardware-level exploits across the telephone system.
While text and voice calls are better than not using two-factor authentication, they are relatively weak. Even as services are increasingly also supporting authentication apps or proprietary systems—like Apple’s two-factor authentication approach—many still fall back to weak SMS and voice calls.
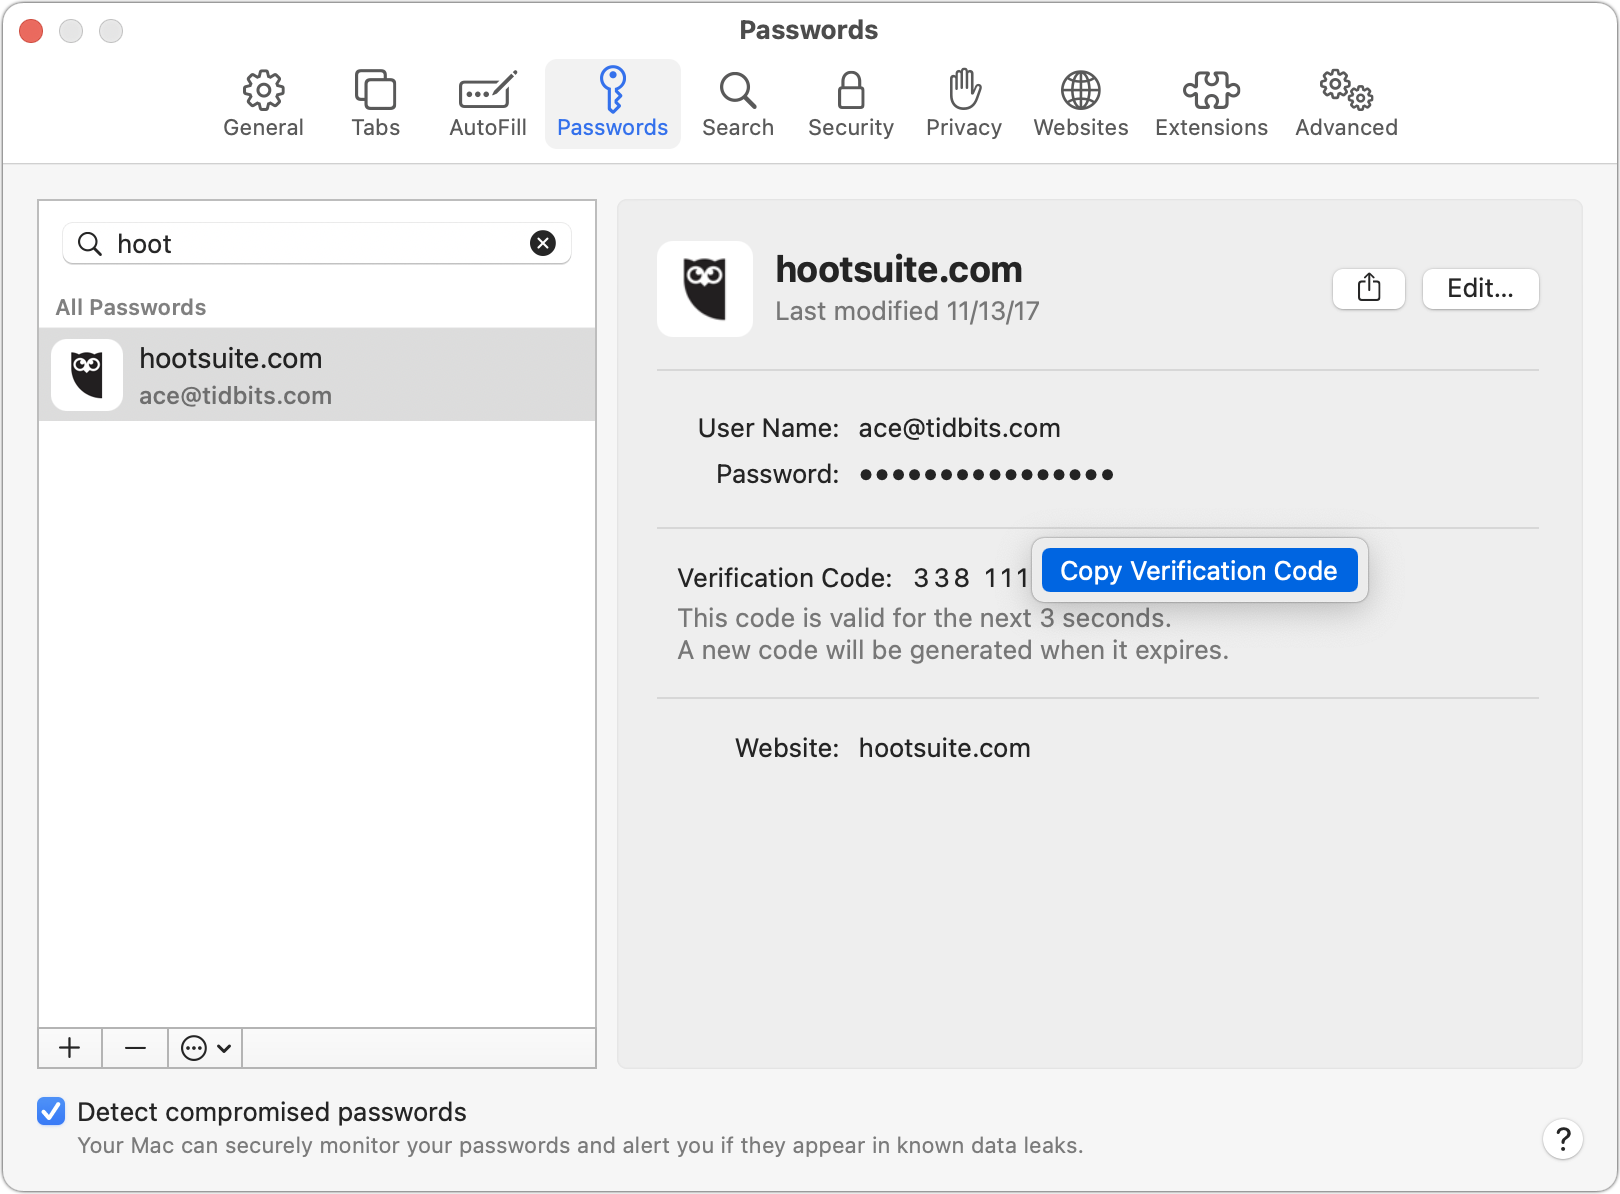
A much better form of two-factor authentication is a shared-secret method called a Time-based One-Time Password (TOTP). Most sites that support two-factor authentication don’t require a TOTP but let you add it to an existing account. During the enrollment process, the site creates a seeding secret using its TOTP software, which it stores for your account and then shares with you. This seeding secret is typically displayed as a QR code for easy scanning, though some sites also show it as a hexadecimal-encoded number.
Setting up your side of two-factor authentication via TOTP is usually harder than enrolling at a site. You can add a TOTP secret and generate TOTPs with a standalone app like Google Authenticator (which doesn’t sync between platforms) or Authy (which does, securely), or as part of a password management tool, like 1Password. But given that only a small percentage of users rely on third-party tools, built-in TOTP support in Apple’s operating systems could drive much higher usage.
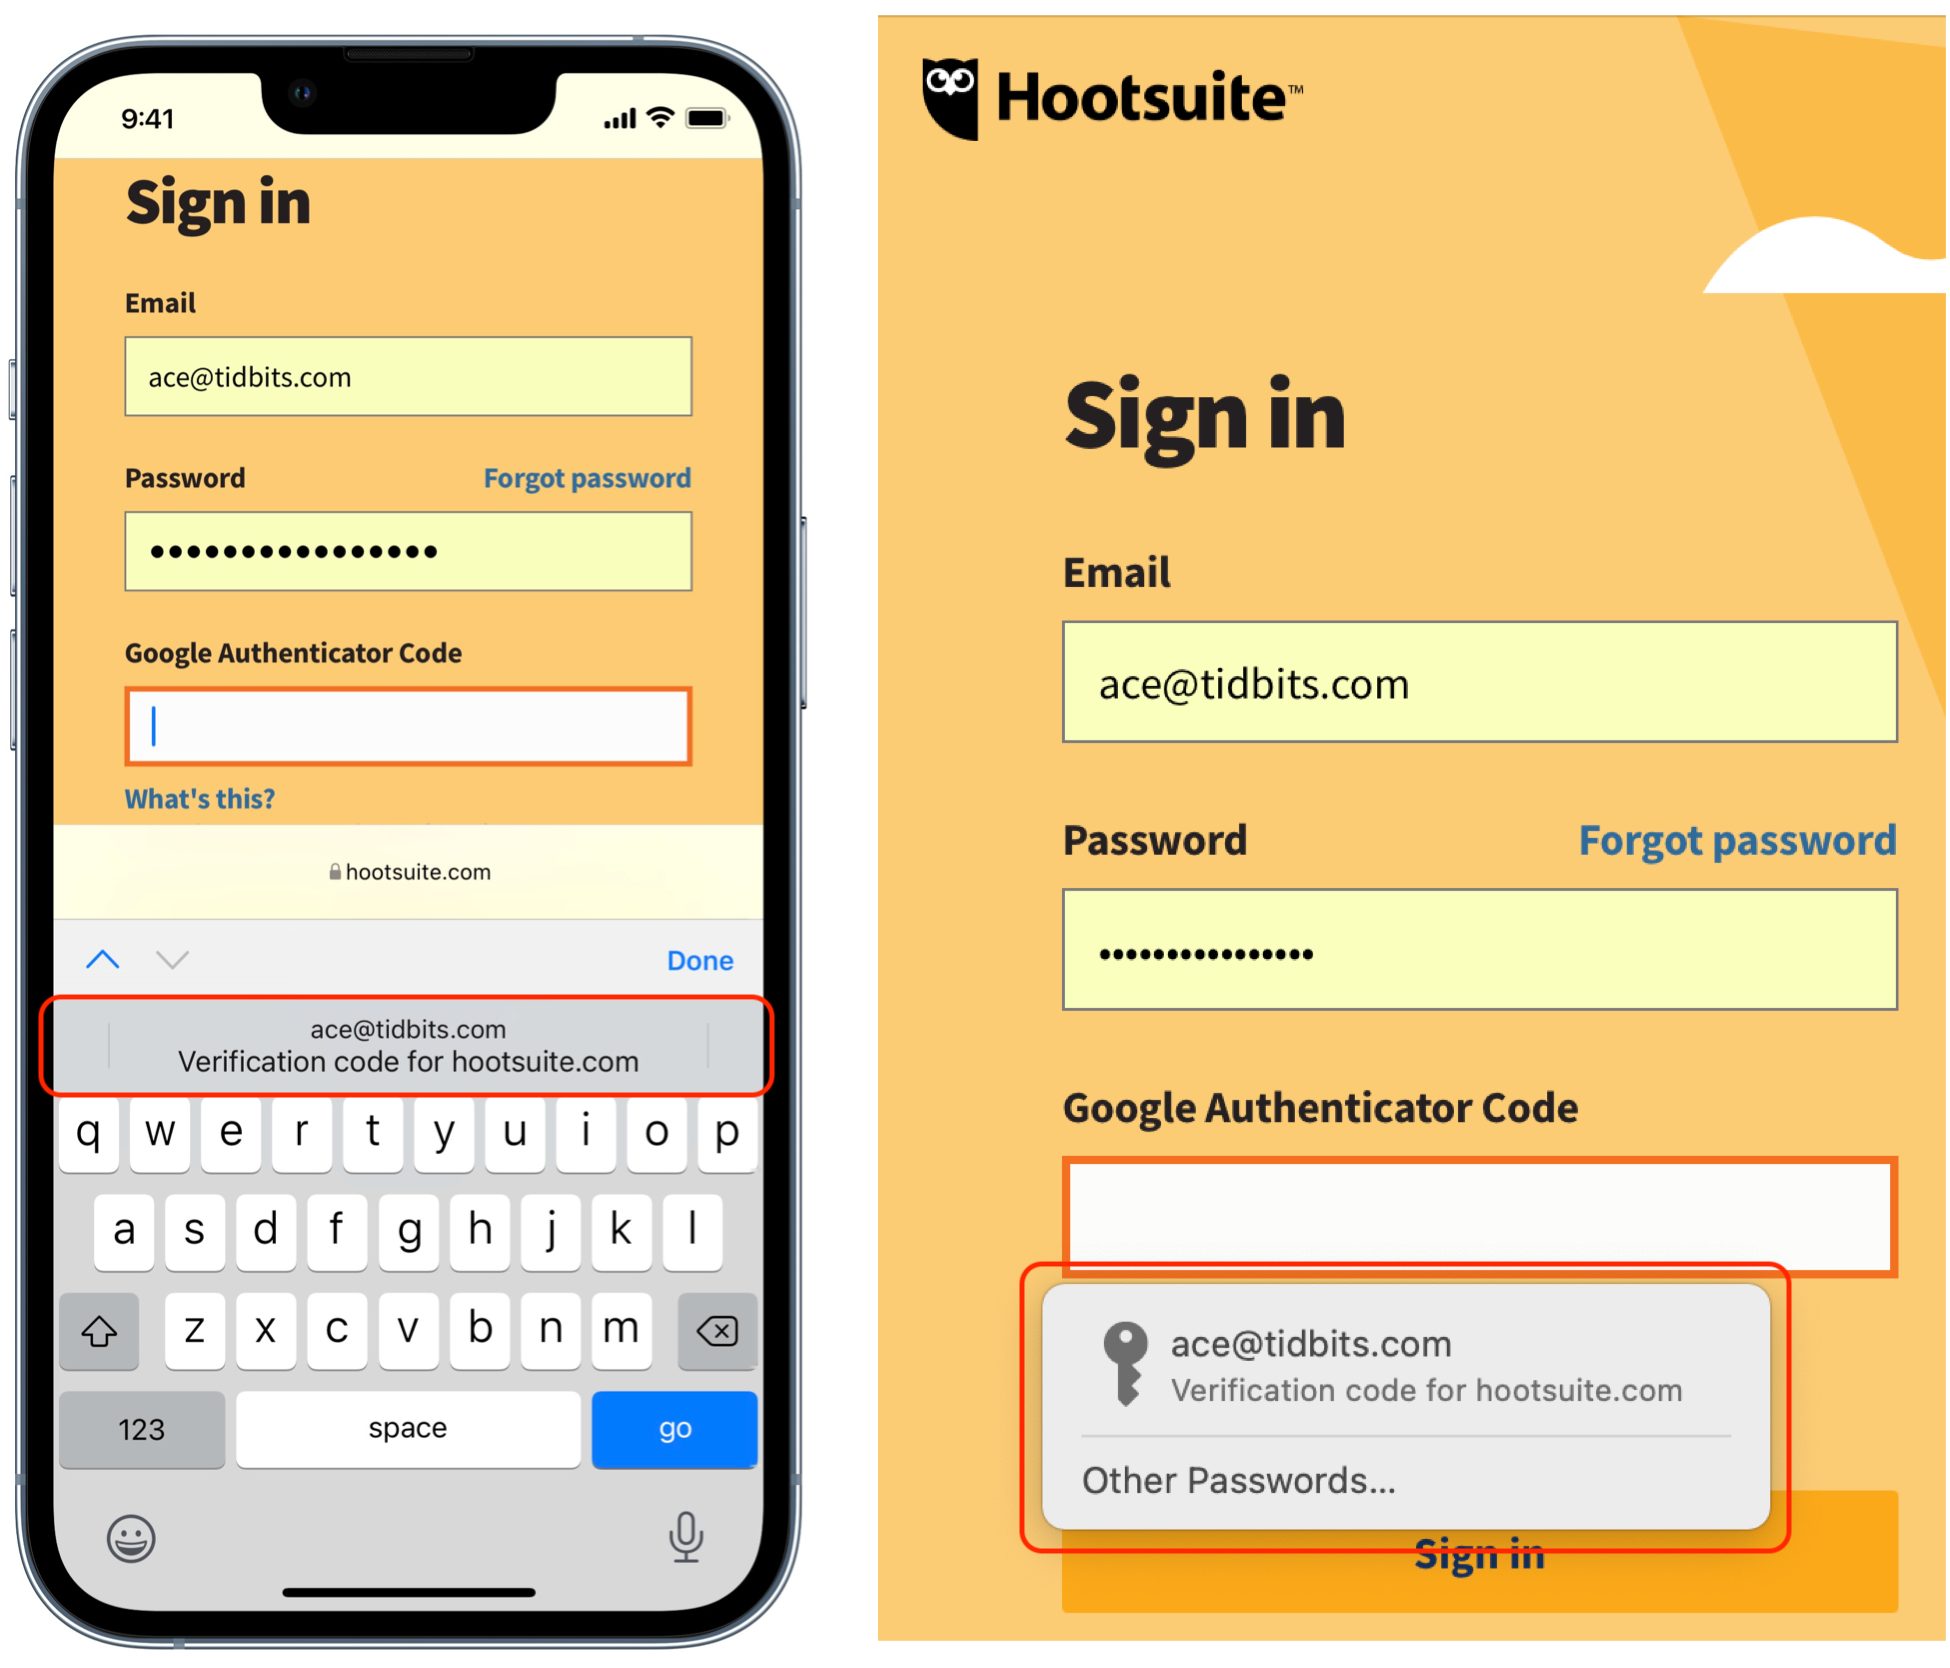
With iOS 15, iPadOS 15, and Safari 15 in macOS, that support is now in place. The updated Passwords interface bakes in the basics of password management for everyone. You work with passwords and TOTPs in Settings > Passwords in iOS 15 and iPadOS 15 and in Safari > Preferences > Passwords in Safari 15 for macOS. (Passwords won’t become a first-class macOS citizen until macOS 12 Monterey ships, at which point you’ll be able to access it in System Preferences > Passwords.) When a site or app prompts for a code later, it appears in the iOS/iPadOS QuickType bar or as an auto-fill prompt in Safari.
The ease of adding these second-factor codes and then generating them as needed should help increase usage and decrease frustration. It also makes it far easier for you to teach others how to use two-factor authentication with a minimum of fuss.
Add a TOTP
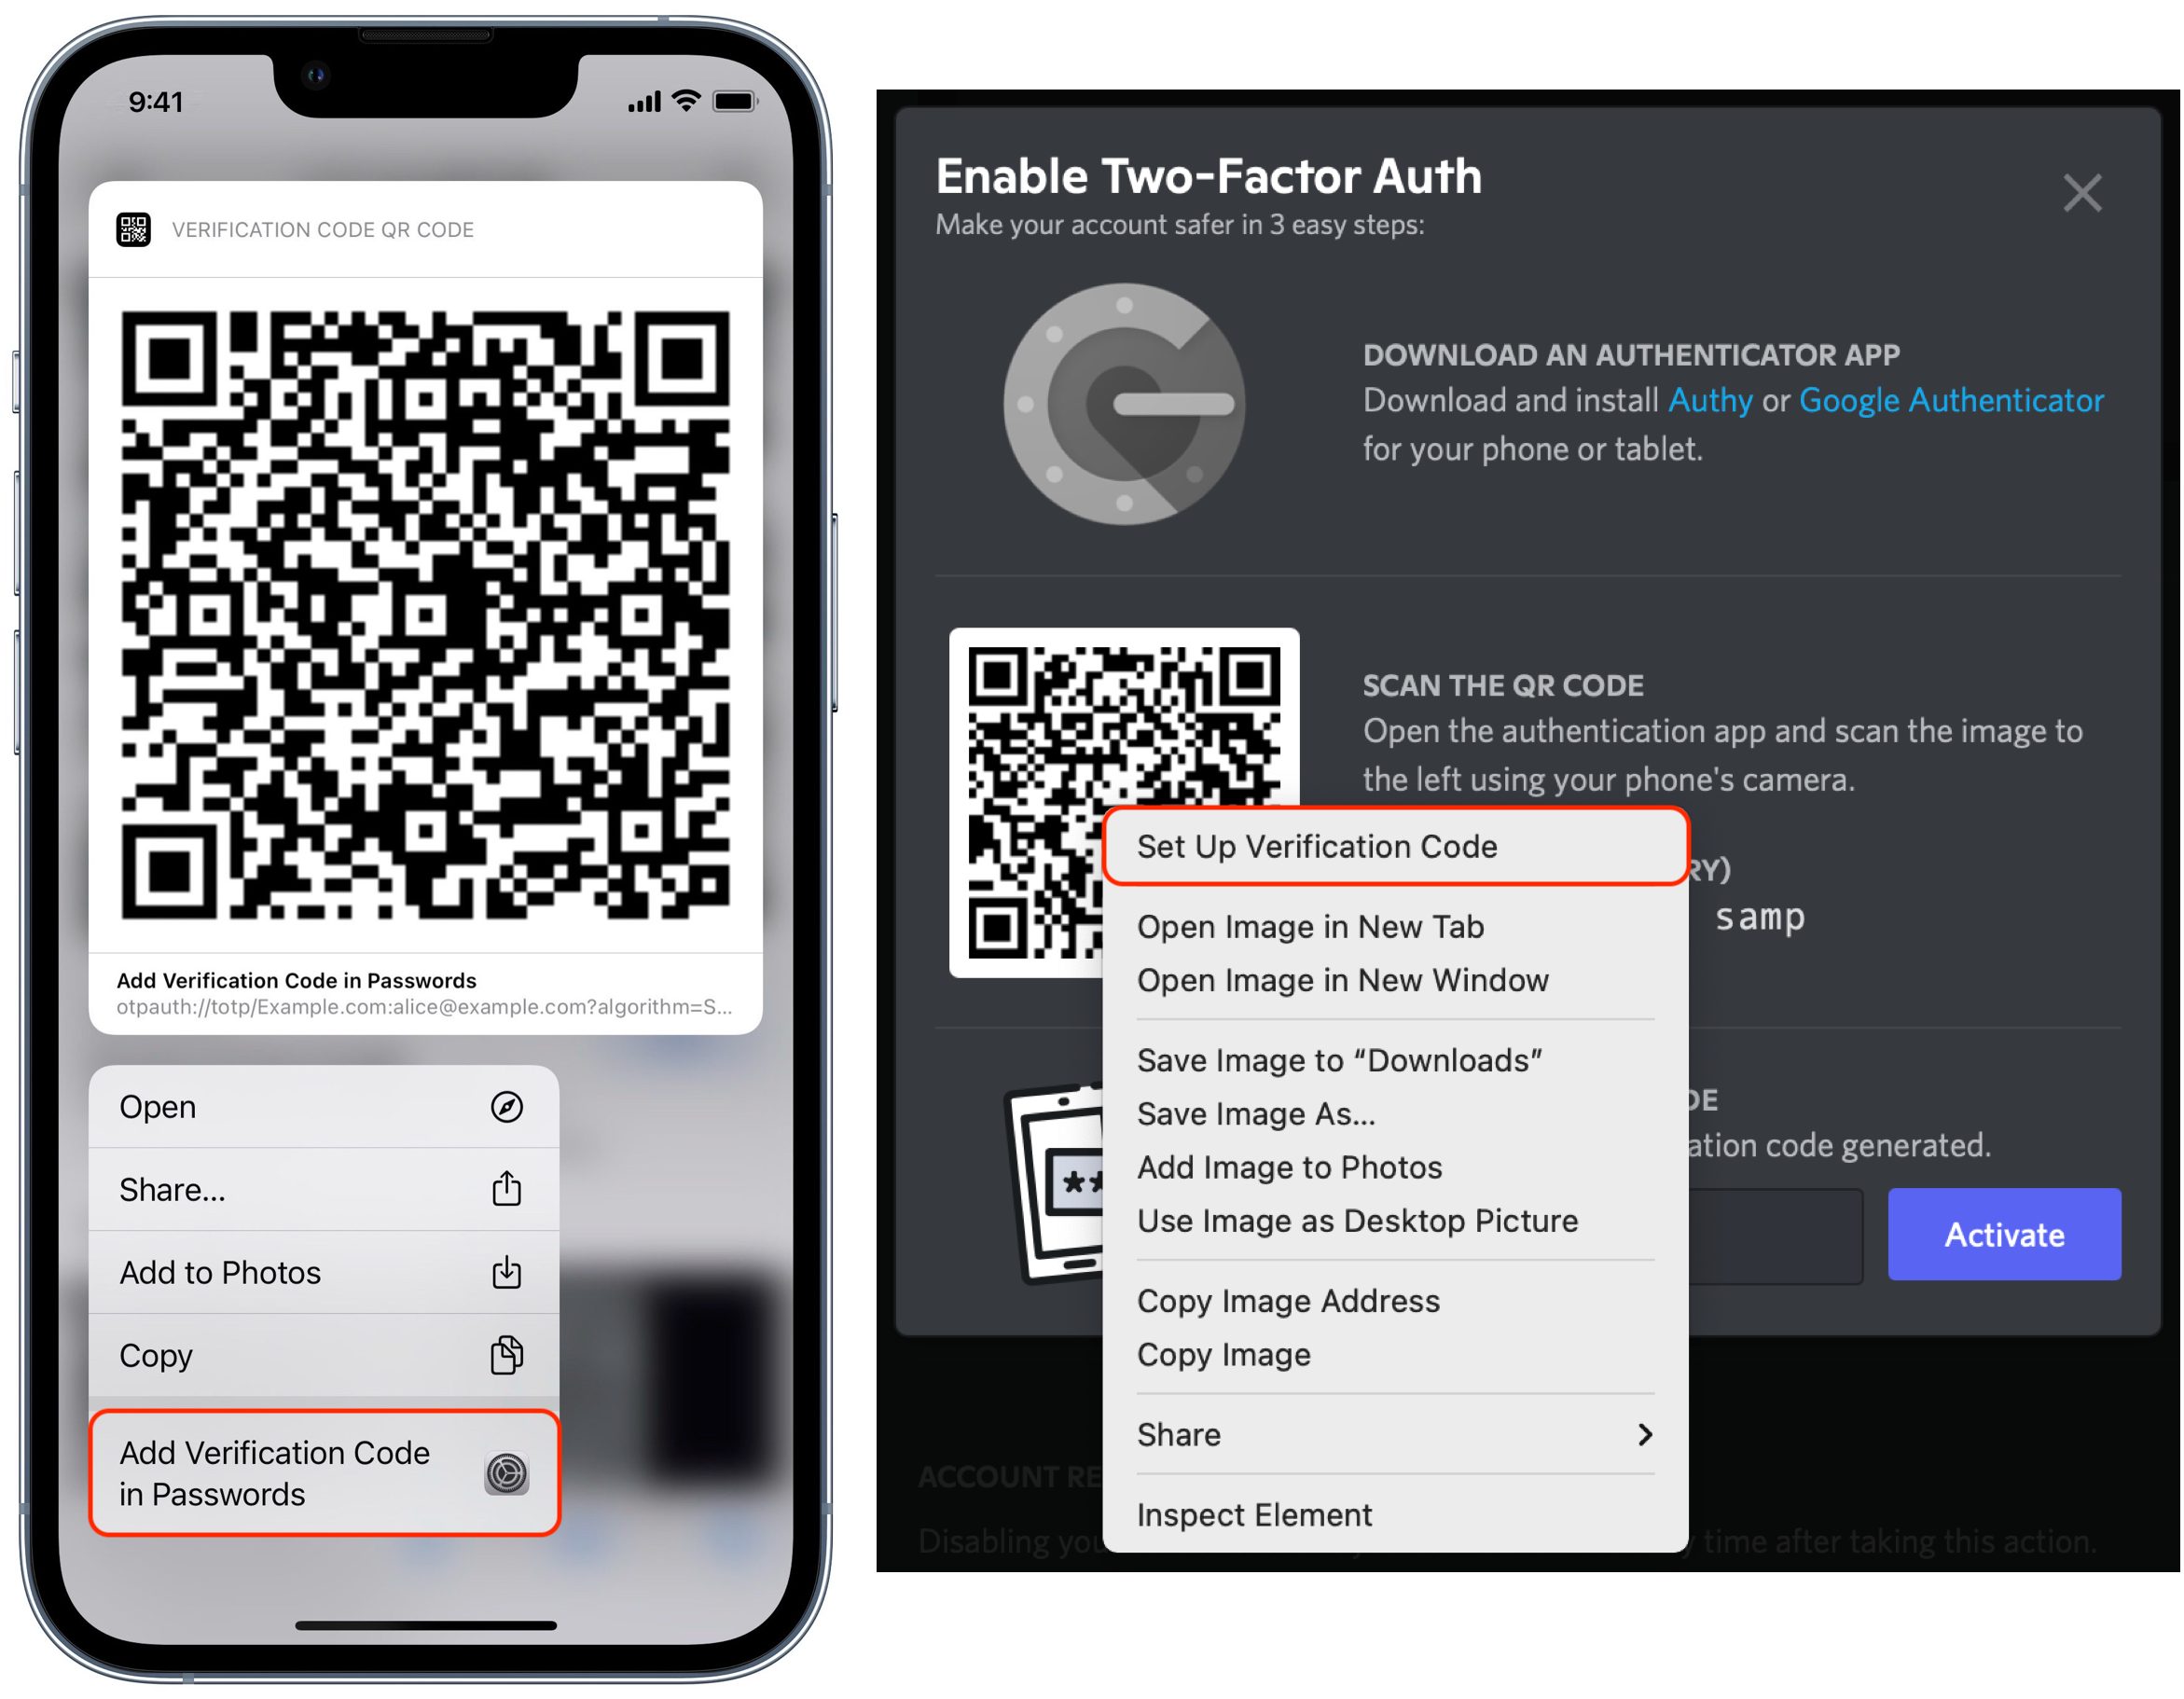
In iOS 15/iPadOS 15 and Safari 15 for macOS, once you’ve stored a password in Passwords, the easiest way to add a TOTP is with a QR code presented during enrollment:
- Go to the website or service for which you want to add TOTP verification and run through the process until you reach the QR code. (For instance, with Google, once logged in, click your image in the upper-right corner of a Web page, click Manage Your Google Account, click Security, and click 2-Step Verification. Enroll in authentication and select iPhone. You can also practice using this article, which has a non-functional but legitimate TOTP QR code.)
- In iOS or iPadOS, touch and hold the QR code to bring up a menu of options and tap Add Verification Code in Passwords. In Safari for macOS, Control-click the QR Code and choose Set Up Verification Code.
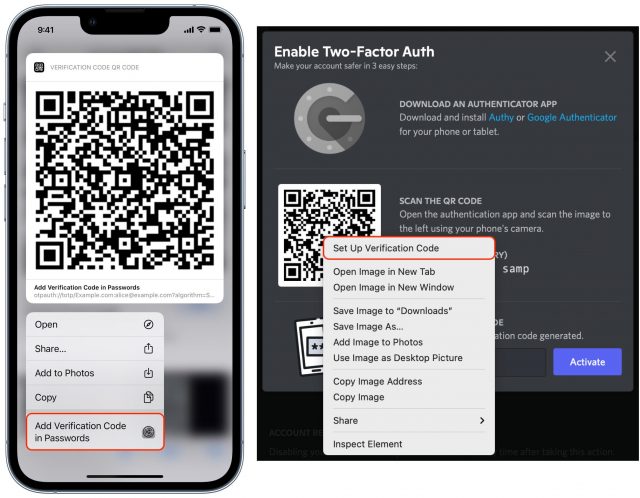
- Depending on what logins you already have stored in Passwords, you’ll be presented with one of three choices:
- A single matching account is shown, and you’re prompted to add a code to that.
- If multiple domains match, you’re asked to select or search for the correct entry.
- If no match can be found, you can search your stored passwords.
A code now appears in the Verification Code area.

If you can’t load the QR code directly within Safari in iOS/iPadOS, you can instead scan it with the Camera app, which recognizes the type of QR code and offers the same prompt as in Step 2 above.

You can also set up a TOTP through other methods. Go to Settings > Passwords in iOS/iPadOS or open Safari > Preferences > Passwords in Safari for macOS. The path bifurcates here, but in both cases, you can use a TOTP’s secret if it appears on the enrollment page.
In iOS or iPadOS:
- Select a password entry.
- Tap Set Up Verification Code.
- Choose either Enter Setup Key to enter the shared secret or Scan QR Code to point at the QR Code as above.
In Safari for macOS:
- Select a password entry.
- Click Edit.
- Click Enter Setup Key.
- Enter the key and click OK.


After adding a TOTP, you will likely have to verify that you possess the correct code to finish enrollment.
These codes sync with the rest of a password entry’s details across your devices if you have iCloud Keychain enabled.
Unfortunately, you can’t migrate TOTPs from another app or ecosystem to Apple’s: authentication apps and systems don’t allow exporting the seed codes. Authy’s support documentation says, “In order to maintain security for our users, the Authy application does not allow importing or exporting 2FA account tokens.” Most sites also don’t let you re-display the TOTP enrollment process.
Thus, to switch from whatever you’re using now to Apple’s system, you’ll have to disable and re-enable two-factor authentication for each site or, if the site supports it, regenerate the seeding secret.
What if you want to try Apple’s system but maintain whatever app you’re using now? In that case, after you disable and re-enable two-factor authentication, you can scan the QR code or enter the setup key manually in multiple systems, one after another. Just add the QR code to Apple’s system, and then, while it remains onscreen, scan it with Authy or 1Password or whatever. You could even take a screenshot of the QR code for later addition into another app, but be sure to delete it permanently afterward, as retaining it in that unprotected form may increase your security risk.
Enter Your TOTP Code
After you enter the correct username and password for an account protected by two-factor authentication using TOTP, Apple’s software automatically recognizes the field and gives you another way to enter the automatically:
- In iOS and iPadOS, Apple automatically presents a verification code option in the QuickType bar when you tap in a field requesting the TOTP code. Simply tap the item in the QuickType bar to fill the field with the six-digit code.
- In Safari for macOS, the app may automatically select the field and offer the verification code option as a button you can click, or you may need to click the field to get that auto-fill option to appear. In either case, click it to proceed.
If neither of those automated options happens, open Safari > Preferences > Passwords, find the password entry, and click the username, password, or verification code to copy them for manual pasting into the login form. Some sites make it hard to log in.
TOTPs Are Tops
TOTPs are a robust way to validate your identity as the only person who should be allowed access to an account because you’re sending a cryptographically generated code that requires possession of a secret and that doesn’t pass in a useful form through any other communication systems. The only way for an attacker to acquire a TOTP would be to hijack it from someone who can generate it and then enter the code within a minute or so—a high bar—or steal and unlock one of their devices.
Don’t make the mistake of thinking you’re not important enough to have your accounts hacked. With the seemingly constant breaches of major sites revealing millions of usernames and passwords, attackers are automating how they test which accounts they can compromise. Two-factor authentication ensures that protected accounts remain safe from this kind of wholesale attack and from many targeted ones. If you can avoid phone-based codes and rely on TOTP with Passwords in iOS 15, iPadOS 15, and Safari 15 for macOS, you’ll have the best combination of security and ease of use.
To learn more about securing your iPhone and iPad and preserving your privacy, check out the latest edition of my book, Take Control of iOS & iPadOS Privacy and Security, now updated for iOS 15 and iPadOS 15.
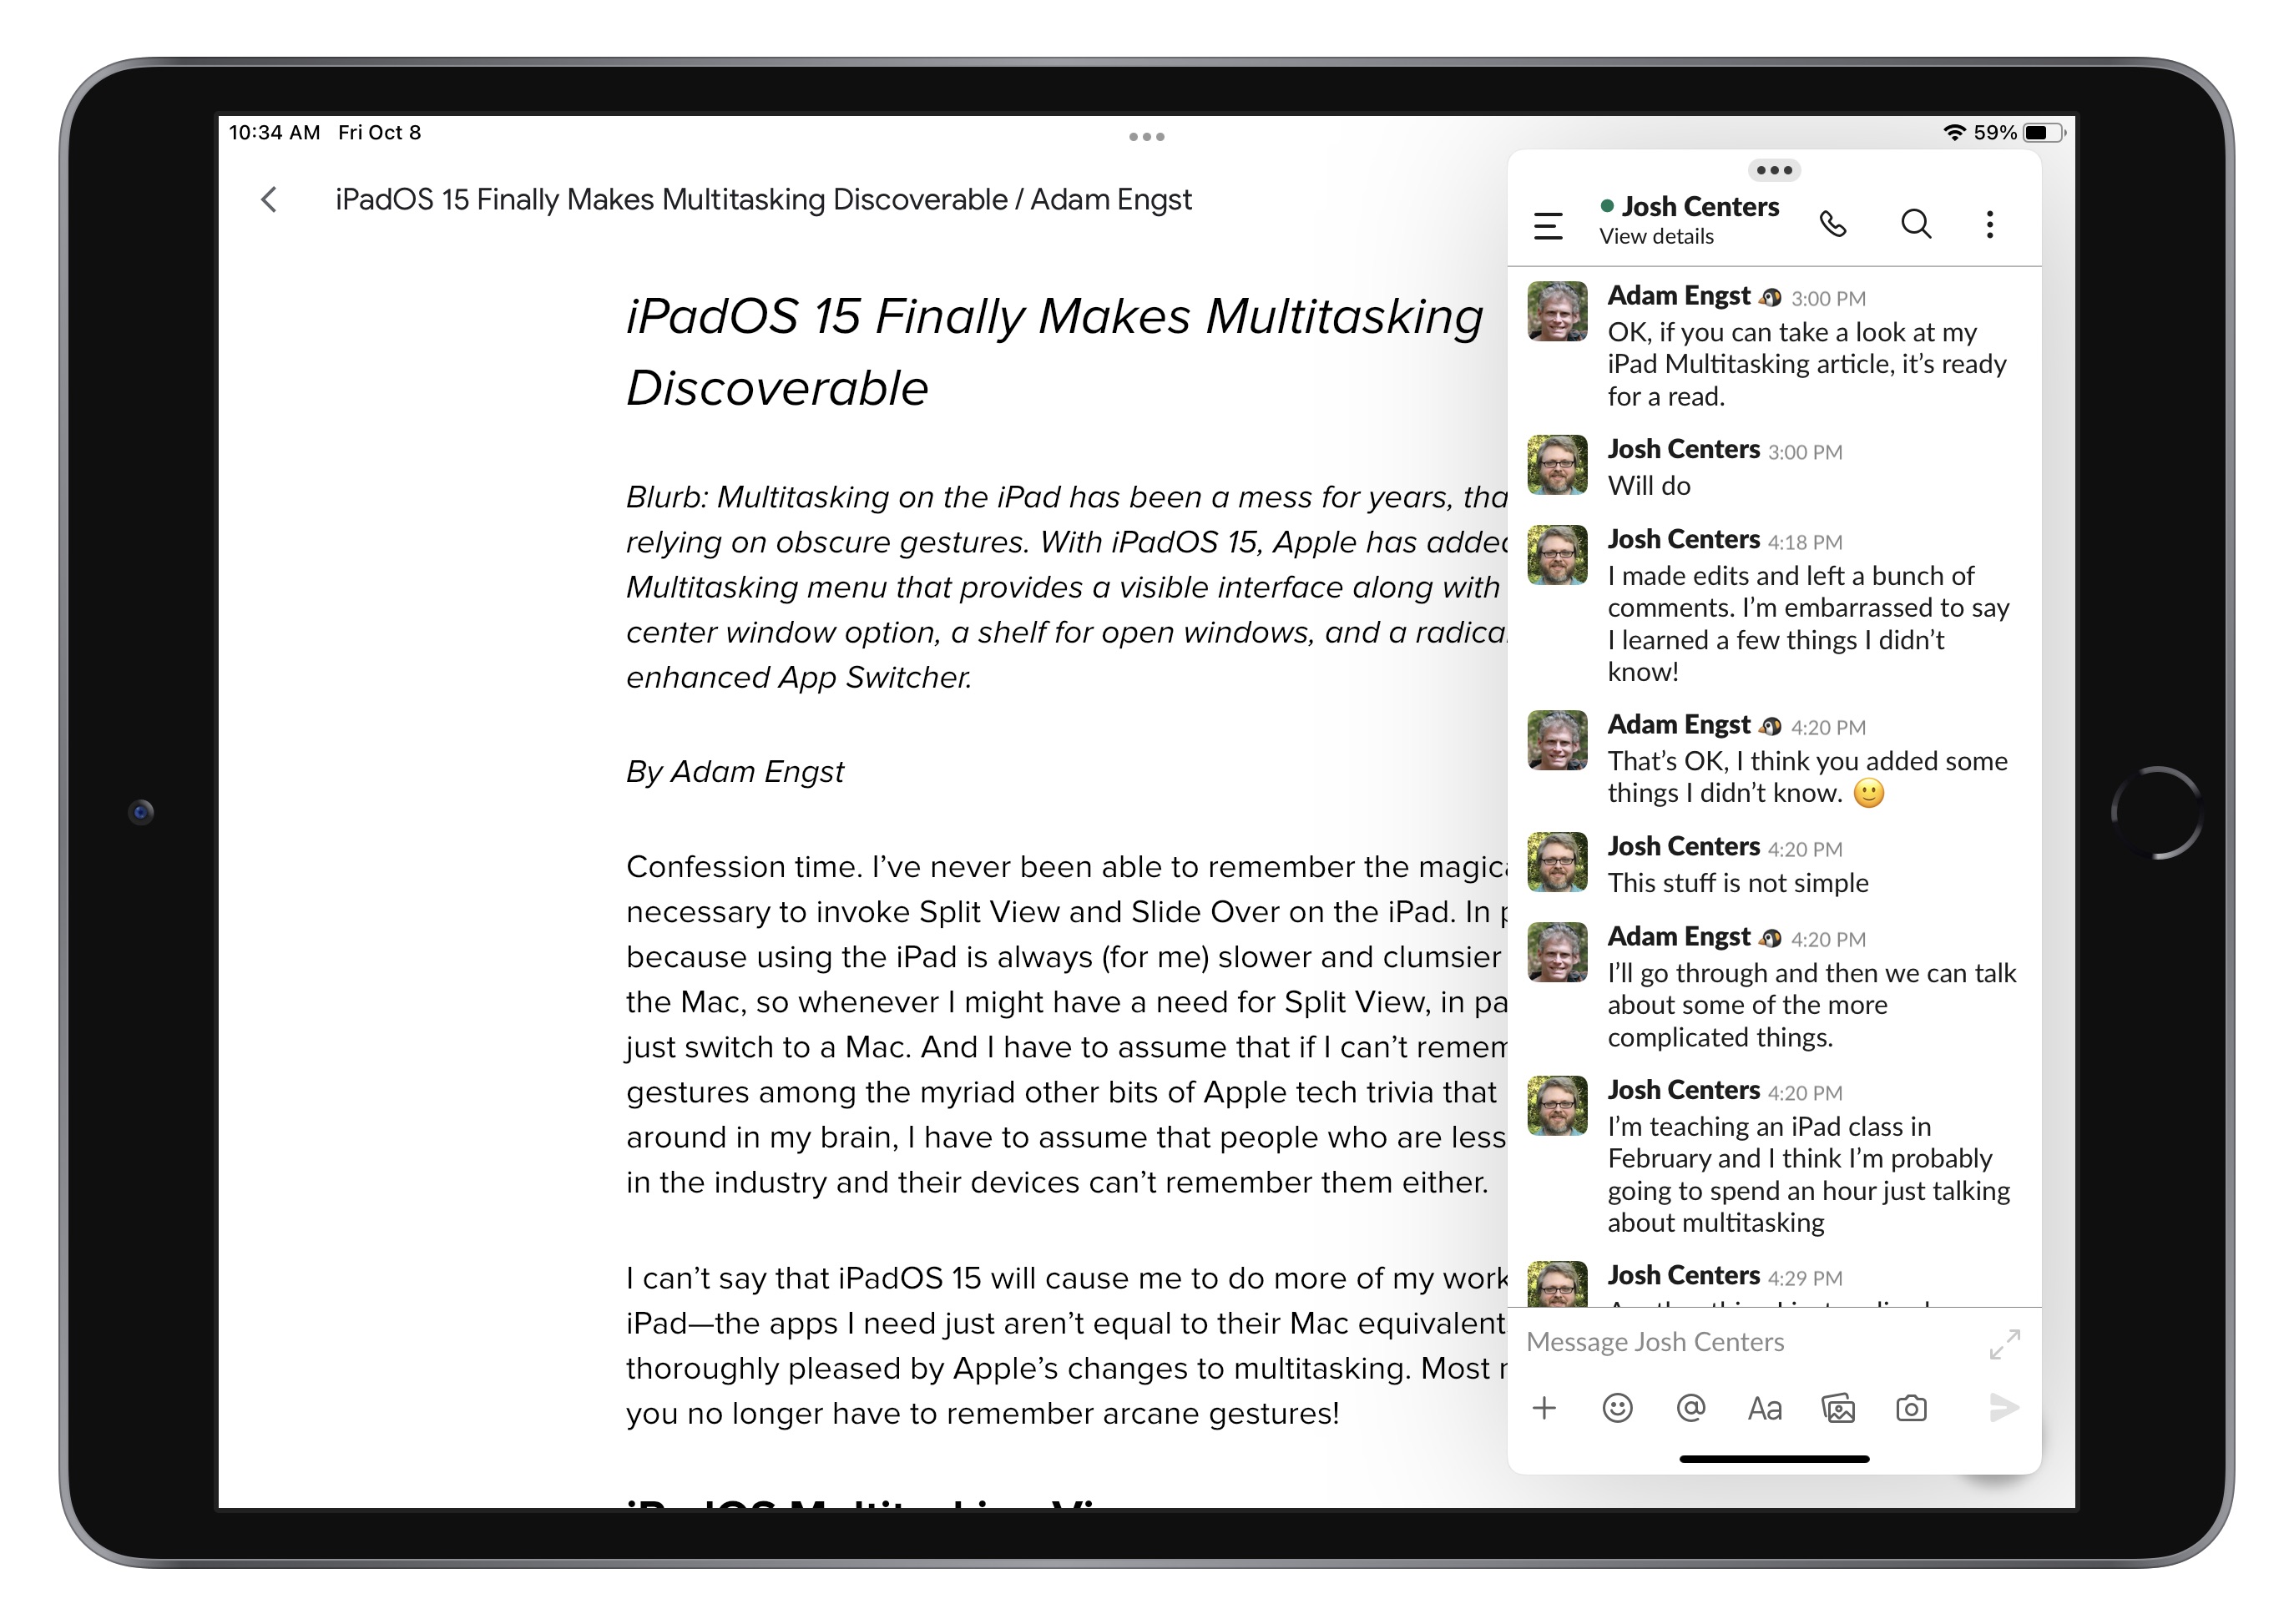
iPadOS 15 Finally Makes Multitasking Discoverable
Confession time. I’ve never been able to remember the cryptic gestures necessary to invoke Split View and Slide Over on the iPad. In part, that’s because I find using the iPad slower and clumsier than using the Mac, so whenever I might need Split View, in particular, I just switch to a Mac. If I can’t remember these gestures among the myriad other bits of Apple tech trivia that fill my brain, I have to assume that people less enmeshed in their Apple devices can’t either.
I don’t know that iPadOS 15 will cause me to do more of my work on the iPad—the apps I need just aren’t equal to their Mac equivalents—but I’m thoroughly pleased by Apple’s changes to multitasking. Most notably, you no longer have to remember arcane gestures!
iPadOS Multitasking Views
First, a quick recap: if you haven’t been able to remember the esoteric multitasking swipes, you probably don’t remember what views they enable.
- Split View lets you put two apps—or two windows from the same app—onscreen simultaneously, with a black divider bar whose handle you can drag to change the percentage of the screen devoted to each app. Split View is useful when you need to work in one app while referring to content in another or when transferring data between apps.
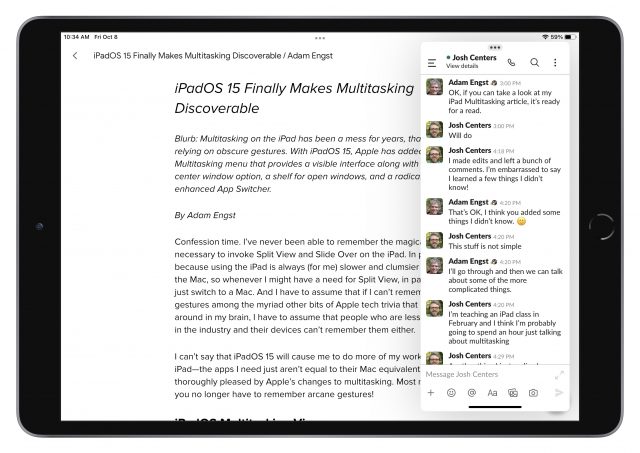
Split View showing PicSew (left) and Google Docs (right) - Slide Over positions an app—or a stack of apps you can swipe through—as a floating window on either the right or left edge of the screen. A swipe to the edge of the screen hides it, and a swipe from that edge reveals it again. You can also drag it (from an edge of the window) from one side to the other and swipe between multiple Slide Over apps using the bar at the bottom. Slide Over is helpful for a quick reference to your calendar or to-do list or for maintaining a Messages or Slack conversation while working on something else.
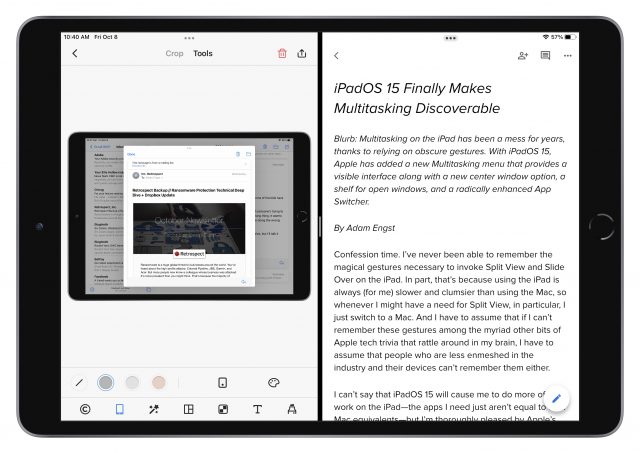
Slack in a Slide Over window above Google Docs - Center window, which is new to a few apps in iPadOS 15, centers a single app window on top of the current full-screen app. Center window can be helpful for viewing or editing a particular message in Mail or note in Notes without changing the background context. For that, it relies on the new shelf, described below.

Email message in a center window above Mail


In what we can hope is an acknowledgment that gestural interfaces suffer from discoverability and memorability problems, Apple added two new visible interface elements to expose multitasking options—the Multitasking menu and the shelf—and radically changed the App Switcher to facilitate multitasking. Here’s how you use these features.
Change Views with the Multitasking Menu
The most significant improvement to multitasking in iPadOS 15 is the new multitasking ••• control that appears in the top center of every window, whether it’s in full screen, Split View, Slide Over, or center window.
Note that when you’re in Split View, the multitasking control in one of the Split View windows features a gray border (below left) that indicates which of the two views is active—in other words, which one will receive keystrokes if you start typing.

Tap the multitasking control to reveal the Multitasking menu, which has three (or four, if you’re in a center window) icons. The icon with a gray circle around it indicates the current mode you’re in (above left, showing Split View). Tap one of the other icons to put the current app into that mode. From left, they are:
• Full Screen: The most common scenario is that you’ll tap the multitasking control when only a single app is showing. In that situation, the full screen ![]() icon is selected, and you can tap the Split View
icon is selected, and you can tap the Split View ![]() icon or Slide Over
icon or Slide Over ![]() icon to put the current app into those modes. When you have an app in Split View or Slide Over, tap the full-screen icon to make that app take over the entire screen.
icon to put the current app into those modes. When you have an app in Split View or Slide Over, tap the full-screen icon to make that app take over the entire screen.

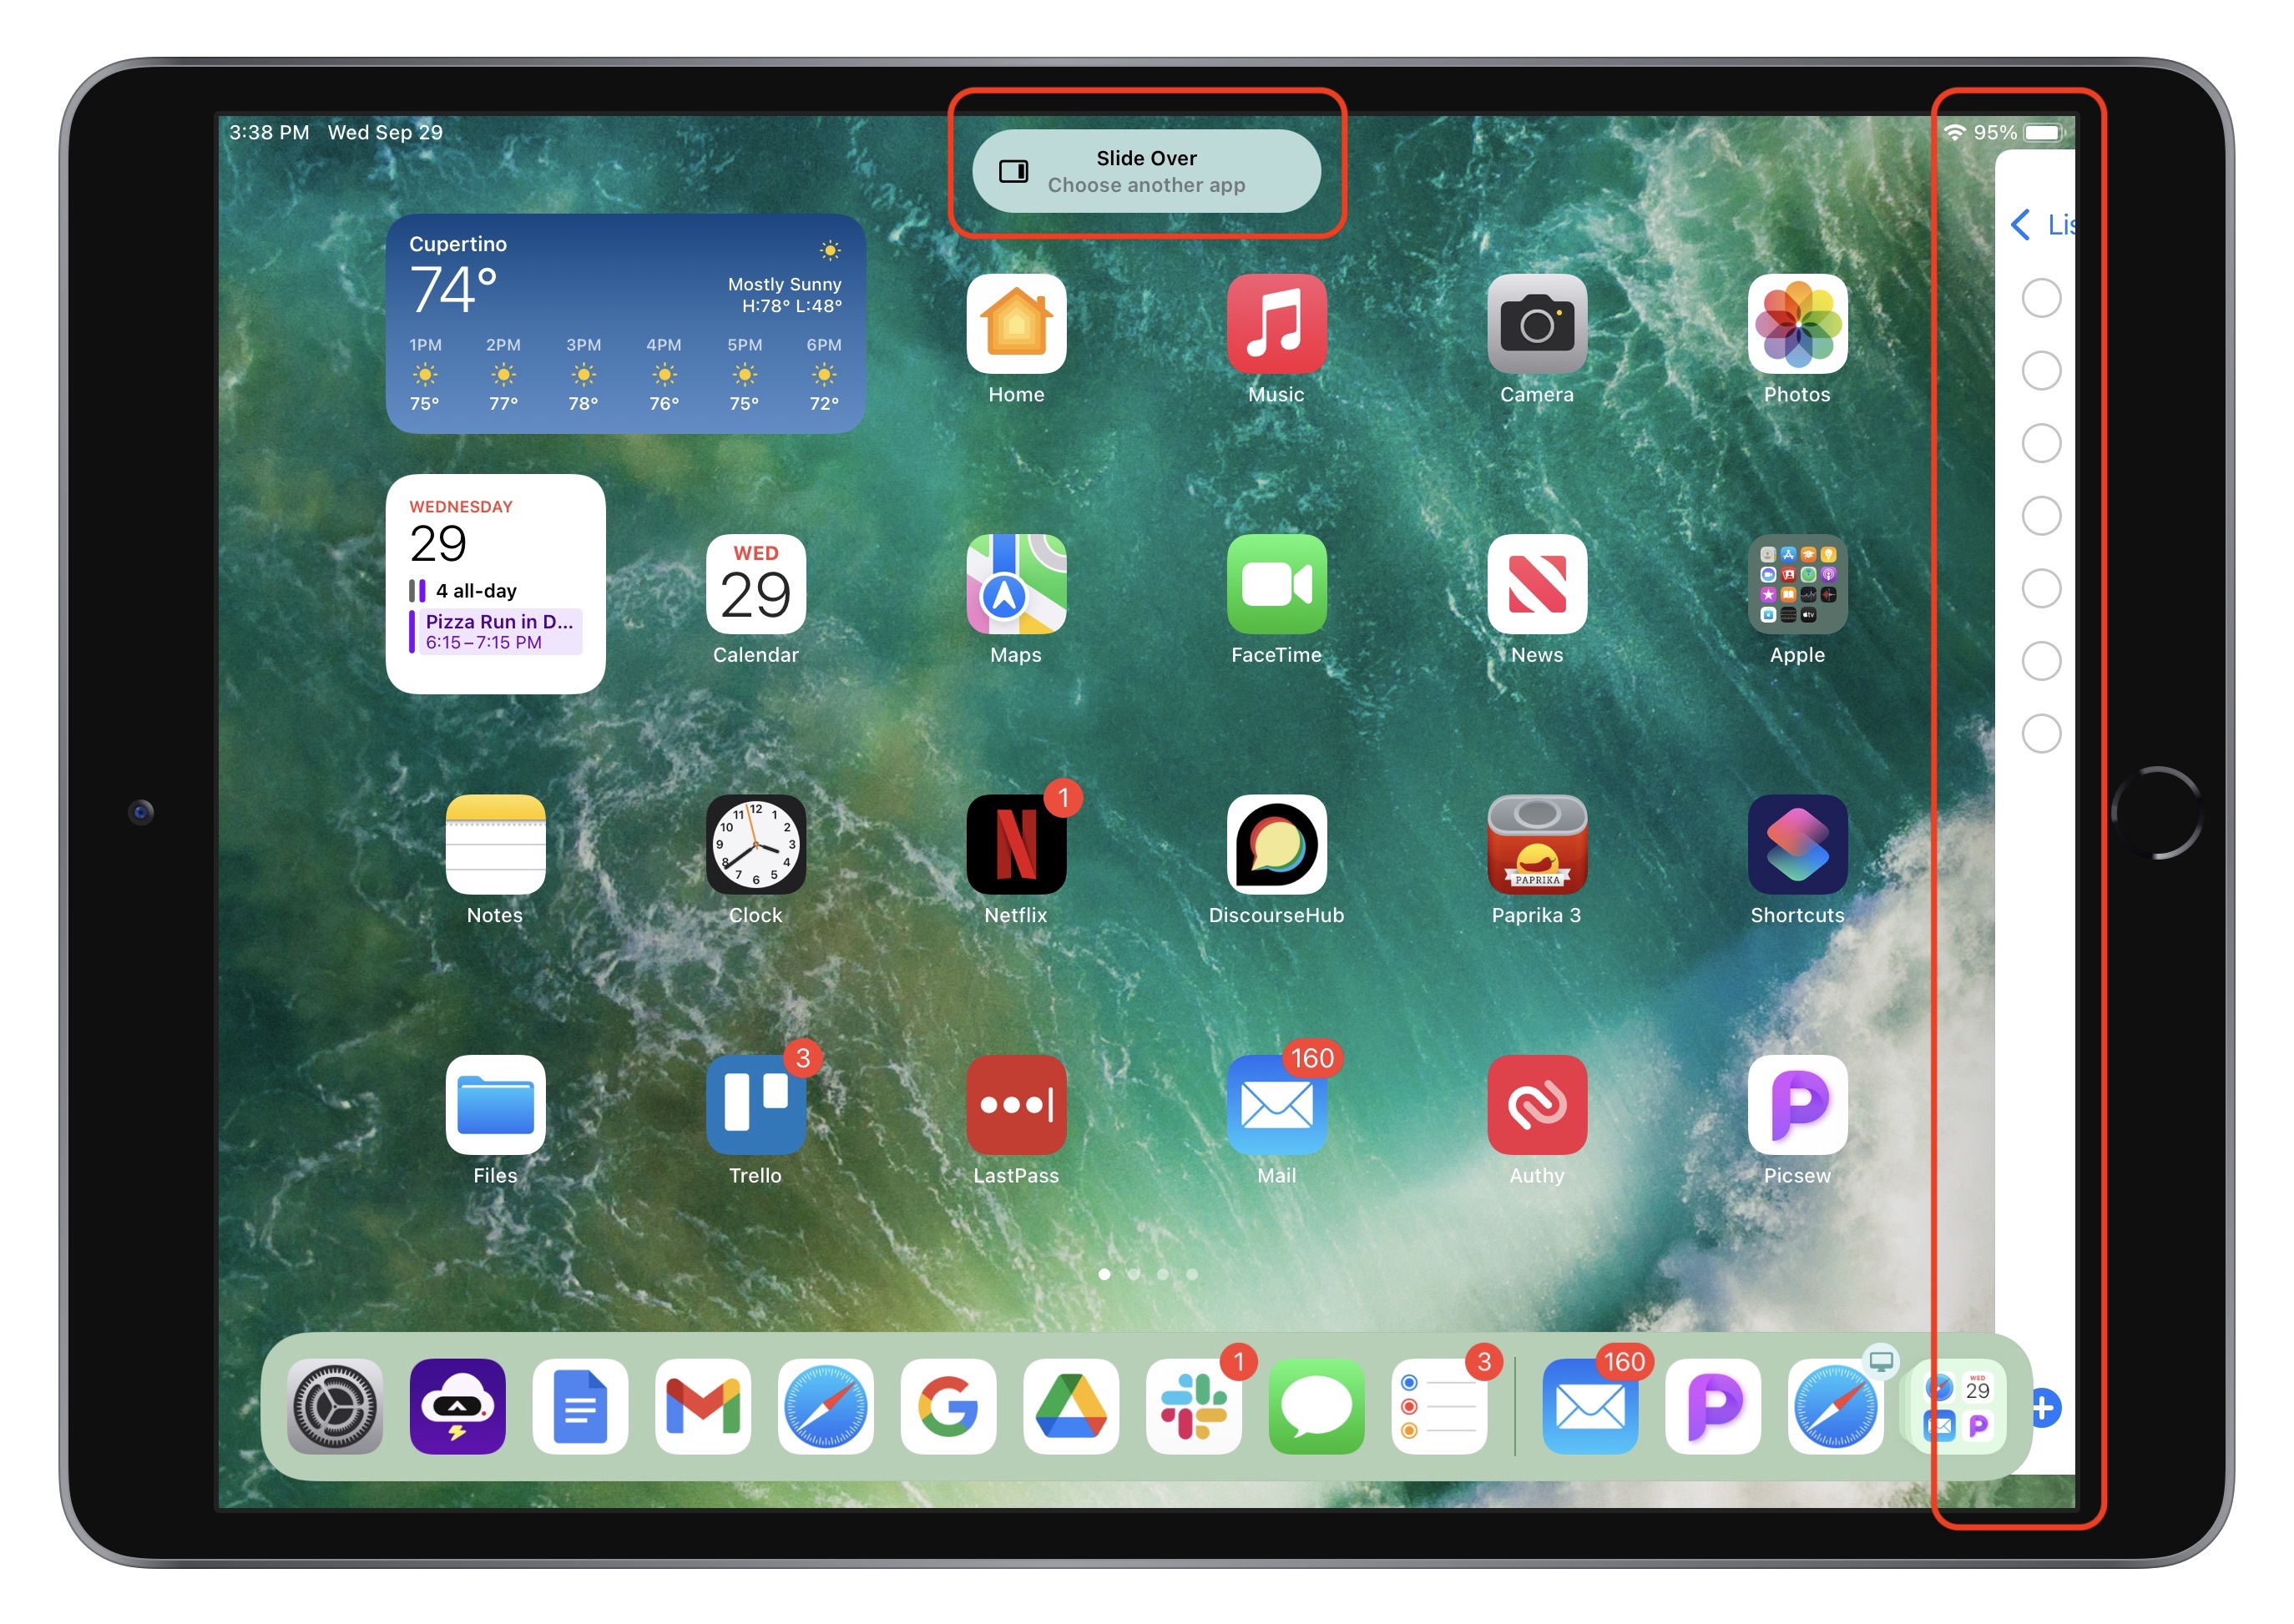
• Split View: To put the current app into Split View, tap the Split View ![]() icon to shove the current app to the left edge of the screen, revealing the Home screen and the Dock. A little lozenge replaces the Multitasking menu, telling you that you’re working with Split View and to choose another app. Tap any other app to open it (on the right side) with the current app (on the left side.
icon to shove the current app to the left edge of the screen, revealing the Home screen and the Dock. A little lozenge replaces the Multitasking menu, telling you that you’re working with Split View and to choose another app. Tap any other app to open it (on the right side) with the current app (on the left side.

• Slide Over: Tap the Slide Over ![]() icon to push the current app to the edge of the screen where you last positioned the Slide Over window. Again, iPadOS reveals the Home screen and Dock and shows a lozenge that tells you that you’re working with Slide Over and to choose another app. Tap any other app to open it full screen, with the current app floating above it in Slide Over mode.
icon to push the current app to the edge of the screen where you last positioned the Slide Over window. Again, iPadOS reveals the Home screen and Dock and shows a lozenge that tells you that you’re working with Slide Over and to choose another app. Tap any other app to open it full screen, with the current app floating above it in Slide Over mode.
Manage Split View and App Windows with the App Switcher
The next multitasking-related problem that Apple tackled was the inability to see which Split View combinations you had created and switch among them. The key word there is “switch”—to that end, Apple significantly enhanced the App Switcher, accessed by double-pressing the Home button or swiping up from the bottom of the screen. It provides a plethora of multitasking-related options:
- Switch among apps and windows: Tap any app, Split View combination, or Slide Over window (located out of sight to the right of the App Switcher) to switch to it. Note that if you open the App Switcher while viewing an app and then tap a Slide Over window, the Slide Over window displays over the current app. However, if you open the App Switcher from the Home screen and tap a Slide Over window, it opens both the Slide Over window and the last app to which it was attached.
- Make a Split View: Drag any app or window onto another one to combine them into a Split View.
- Replace a Split View app: Drag any app or window onto the left or right side of a Split View combination to replace that app or window.
- Break a Split View combination: Drag the left or right side of a Split View combination off until it displays as a full-screen thumbnail.
- Turn an app into a Slide Over window: Drag any app to the right side of the screen where the Slide Over windows live and release it once the dragged app becomes a skinny rectangle.
- Turn a Slide Over window into a Split View: Drag a Slide Over window over a full-screen app or over one half of a Split View combination. (You can’t convert a Slide Over window to a full-screen app, but you can drag it over another full-screen app to create a Split View and then drag that half of the Split View out to take it full screen.)
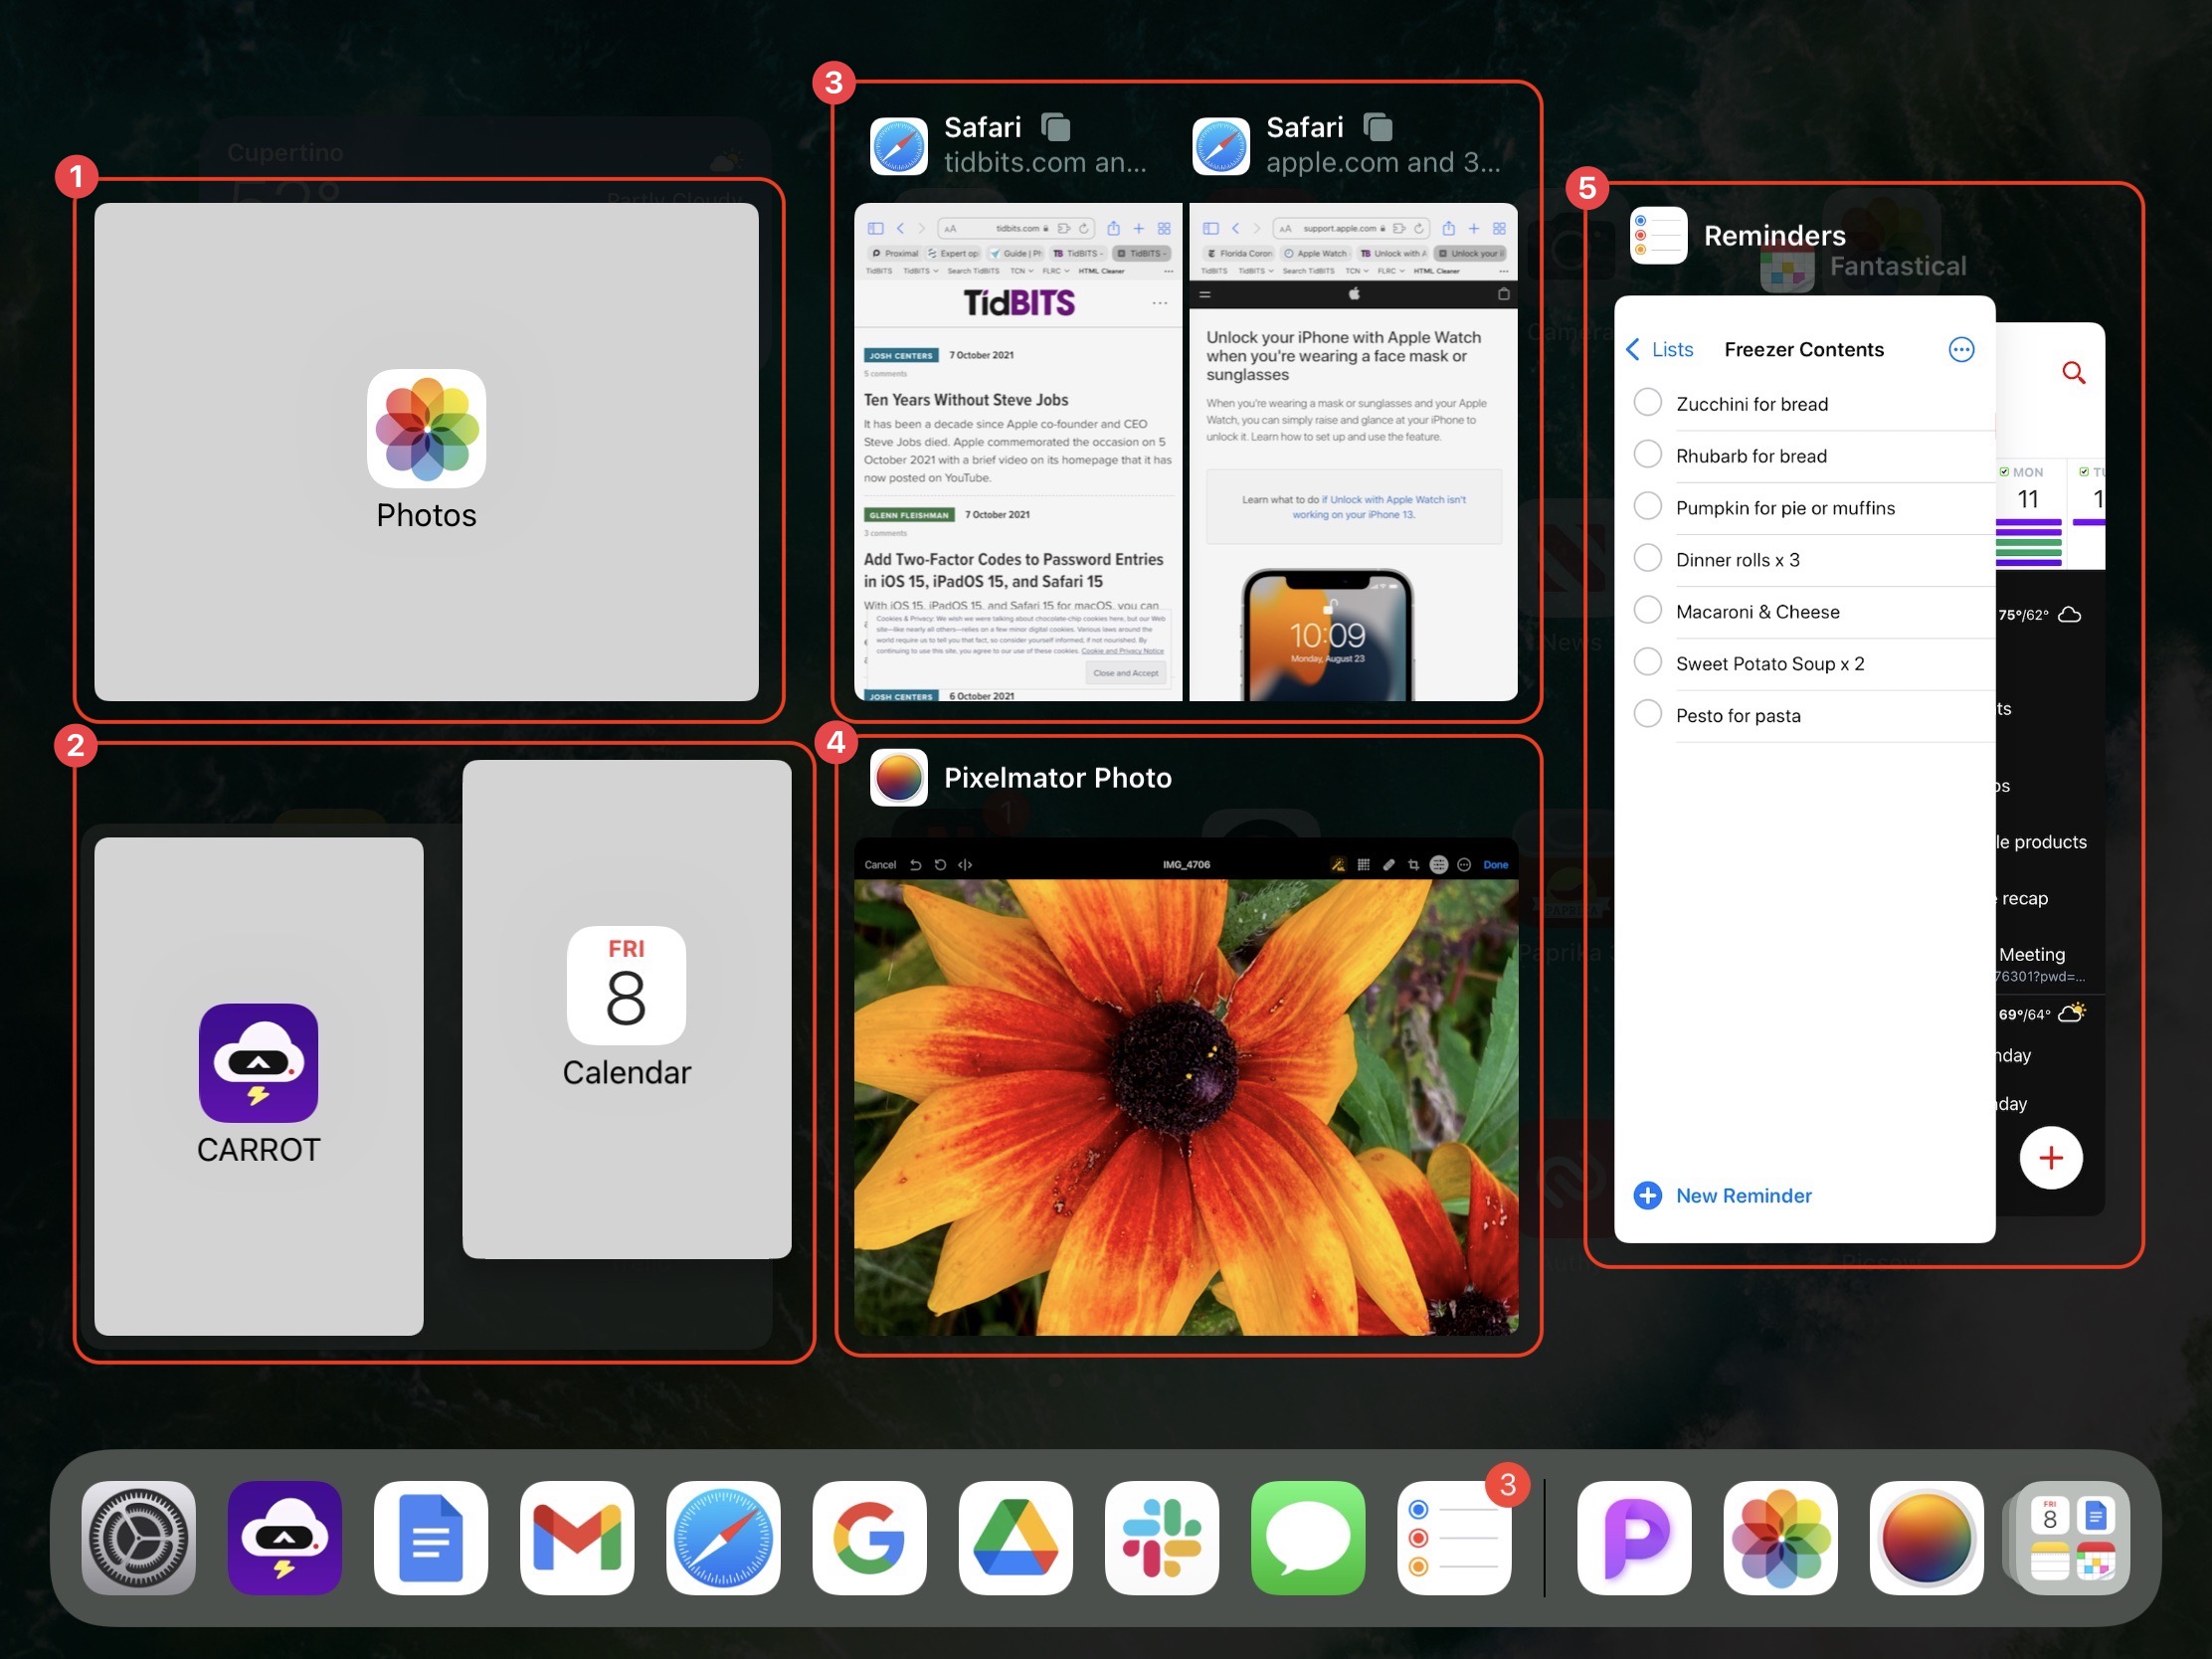
2: Creating a Carrot/Calendar Split View by dragging Calendar onto Carrot
3: A two-window Safari Split View
4: Pixelmator Photo as a simple full-screen app
5: Reminders and Fantastical in Slide Over windows
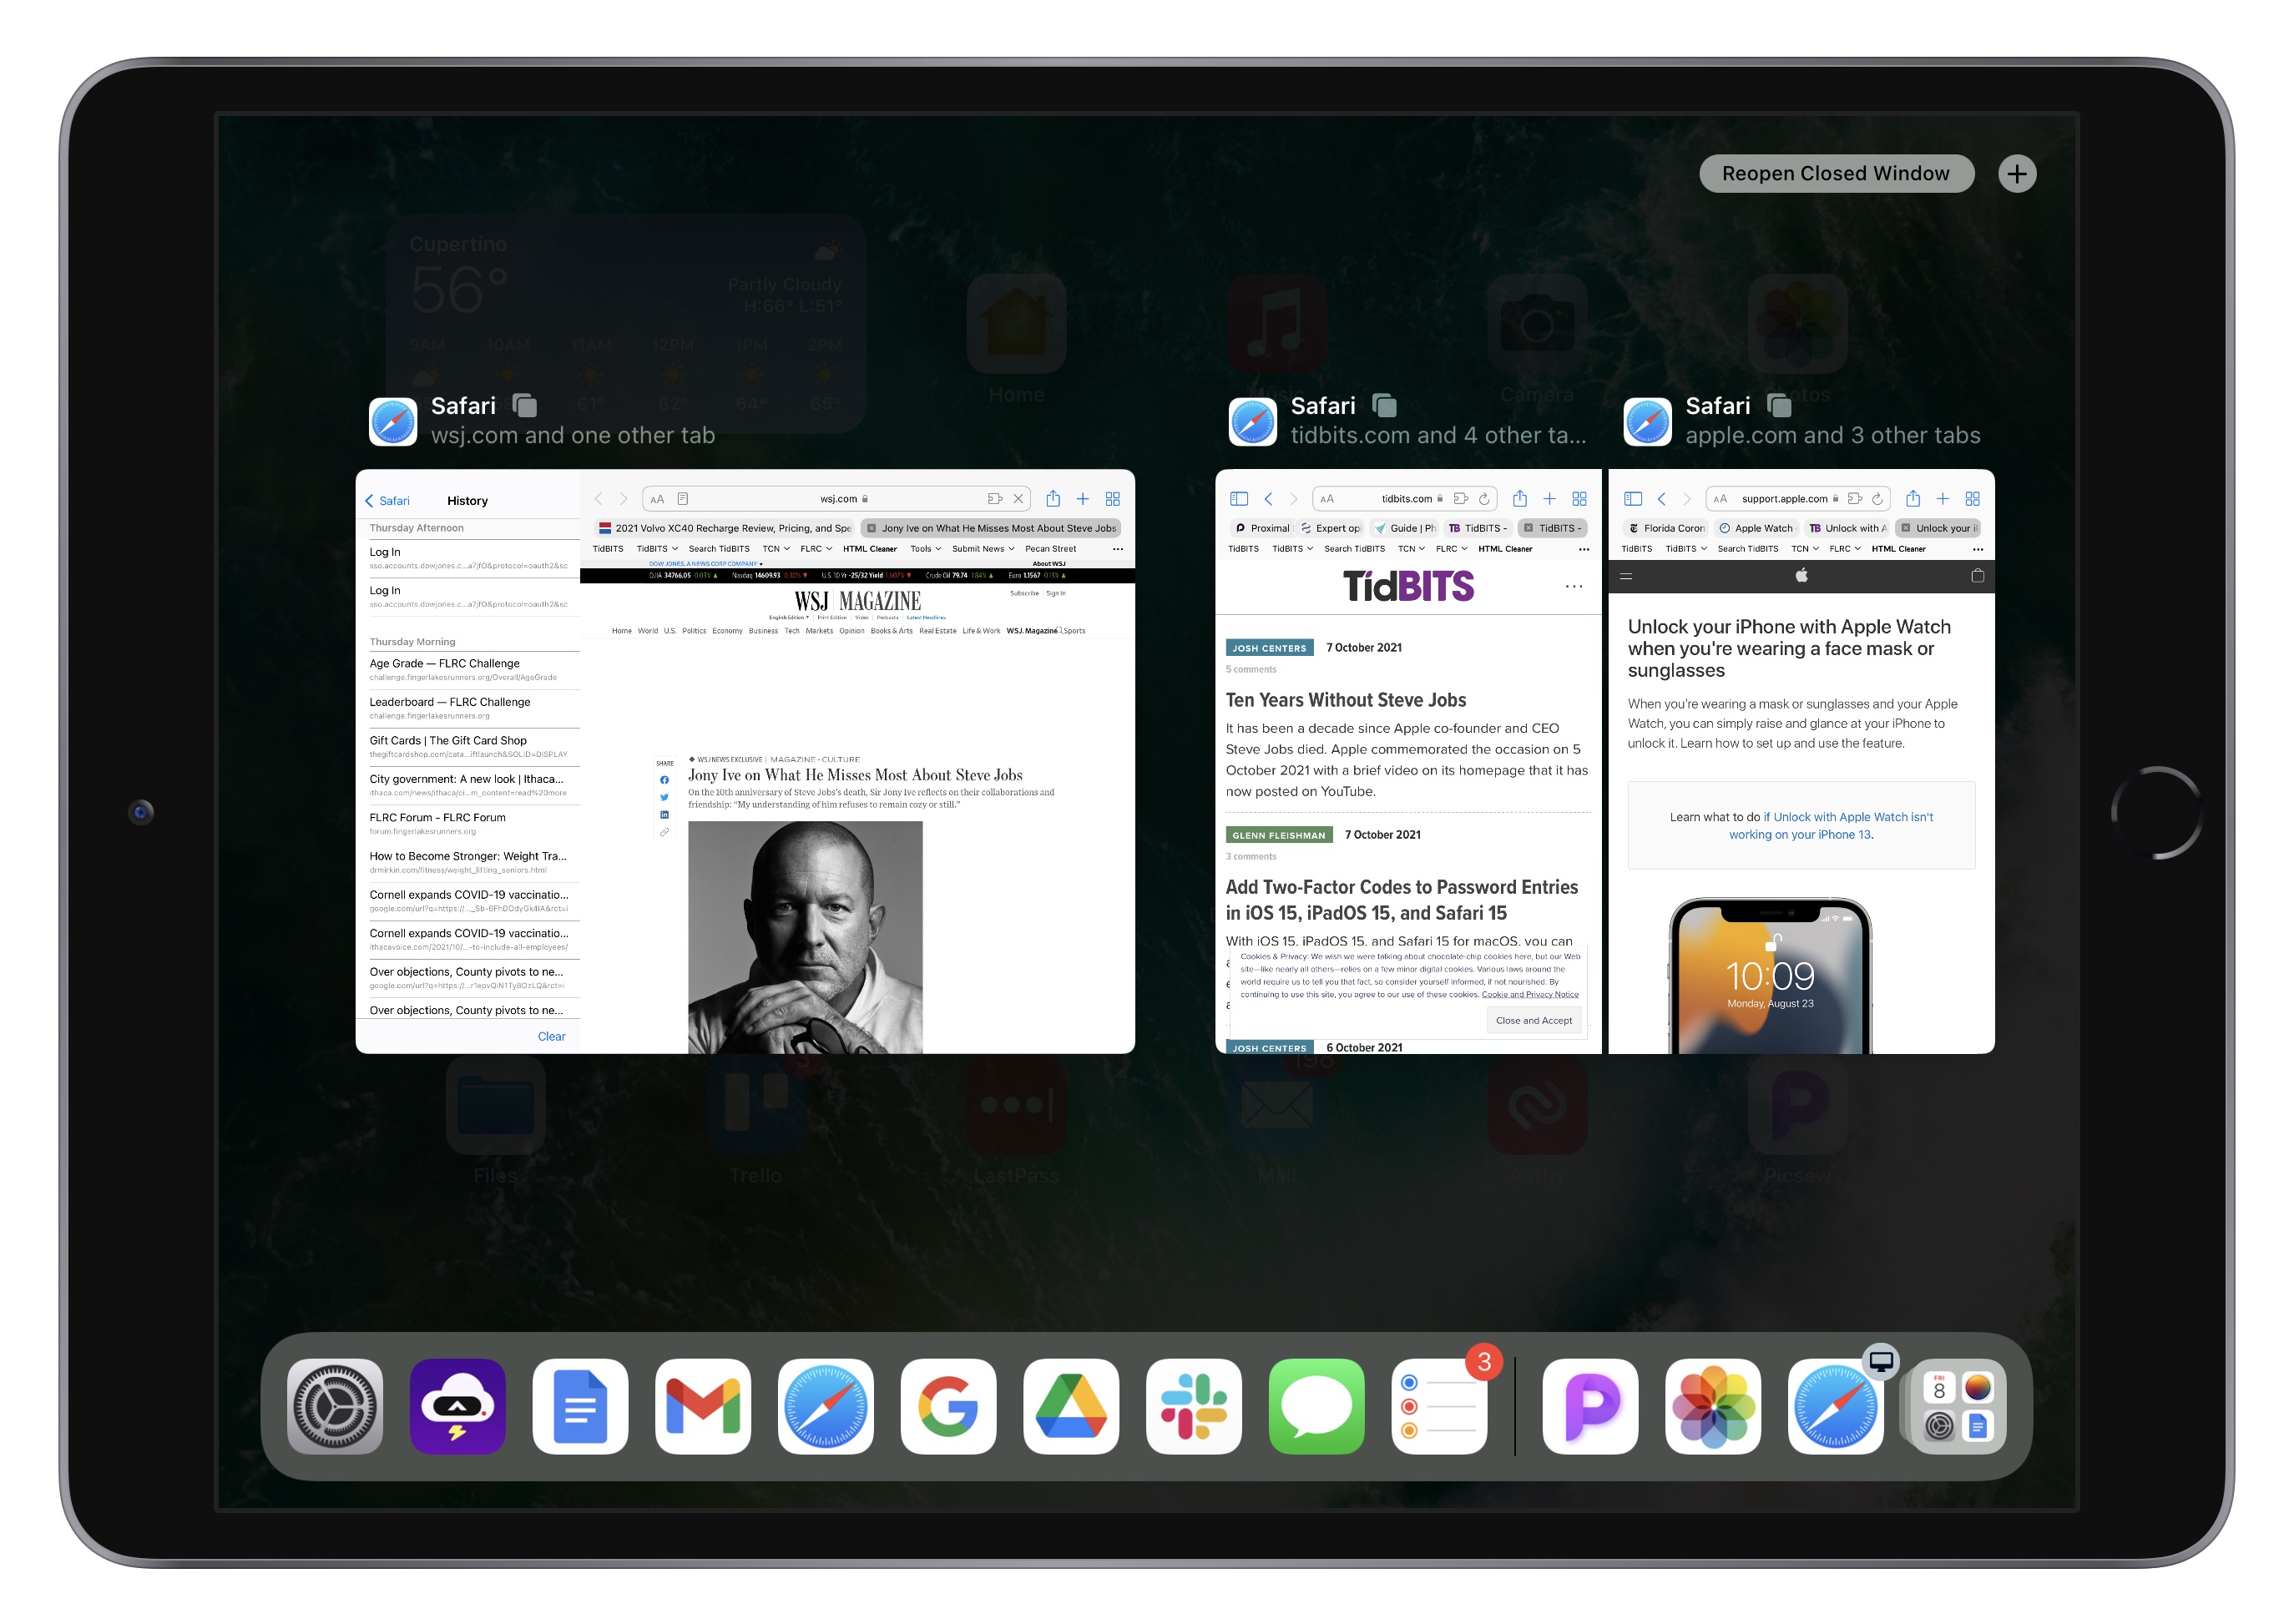
In Callout 3, note the little stacked square icons next to the Safari Split View windows. Those indicate that the app in question has multiple tabs or windows. Tap the icon to display just that app’s tabs or windows in the App Switcher.
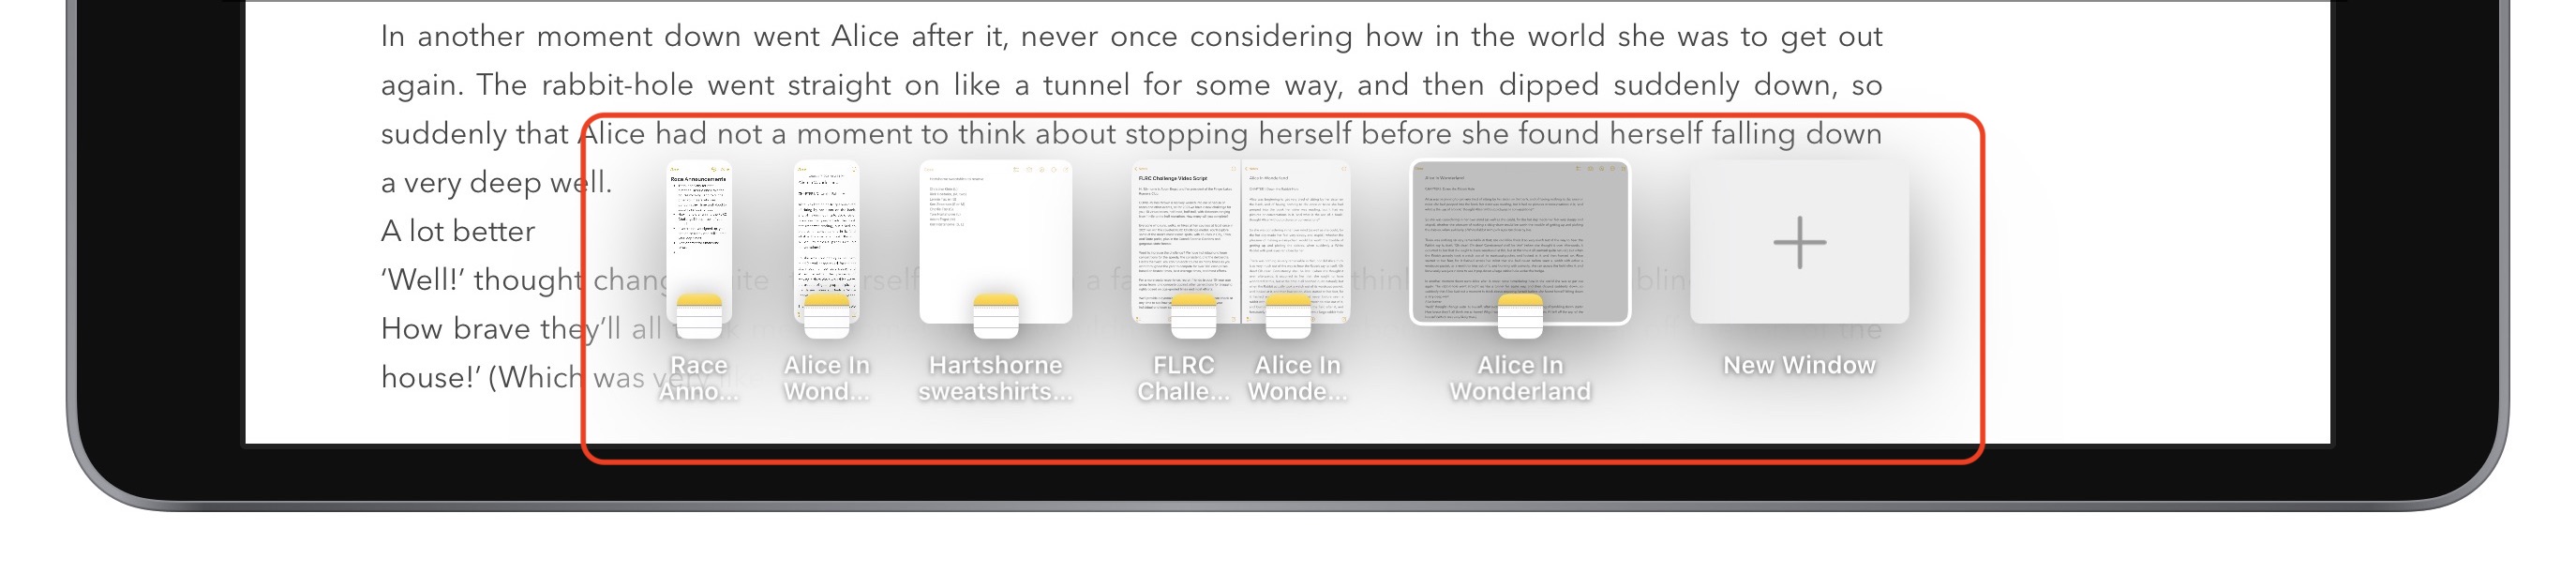
Switch Windows with the Shelf
Although the App Switcher gives you some visibility into open windows in an app, another new multitasking feature, the shelf, is more useful for managing multiple windows for a single app. When you use the Dock or a search to open an app with multiple windows available, the shelf displays them all at the bottom of the screen. The shelf doesn’t appear when you switch to an app using the App Switcher or four-finger swipe, but you can bring it up at any time by tapping the multitasking control at the top of the screen. In a Split View combination, each window gets its own shelf.
When you’re looking at windows on the shelf, tap one to switch to it. You can also swipe up on windows on the shelf to close them. As soon as you tap anywhere else in the app to start working, the shelf disappears.

You can end up with some rather odd collections of thumbnails on the shelf. While writing about center windows in Notes, I found myself with thumbnails for full-screen windows, Split View combinations, center windows, and Slide Over windows. Switching among them resulted in some non-intuitive combinations and situations. There may be bugs here, but I doubt anyone will put the necessary effort into figuring out where it’s behaving confusingly or incorrectly.
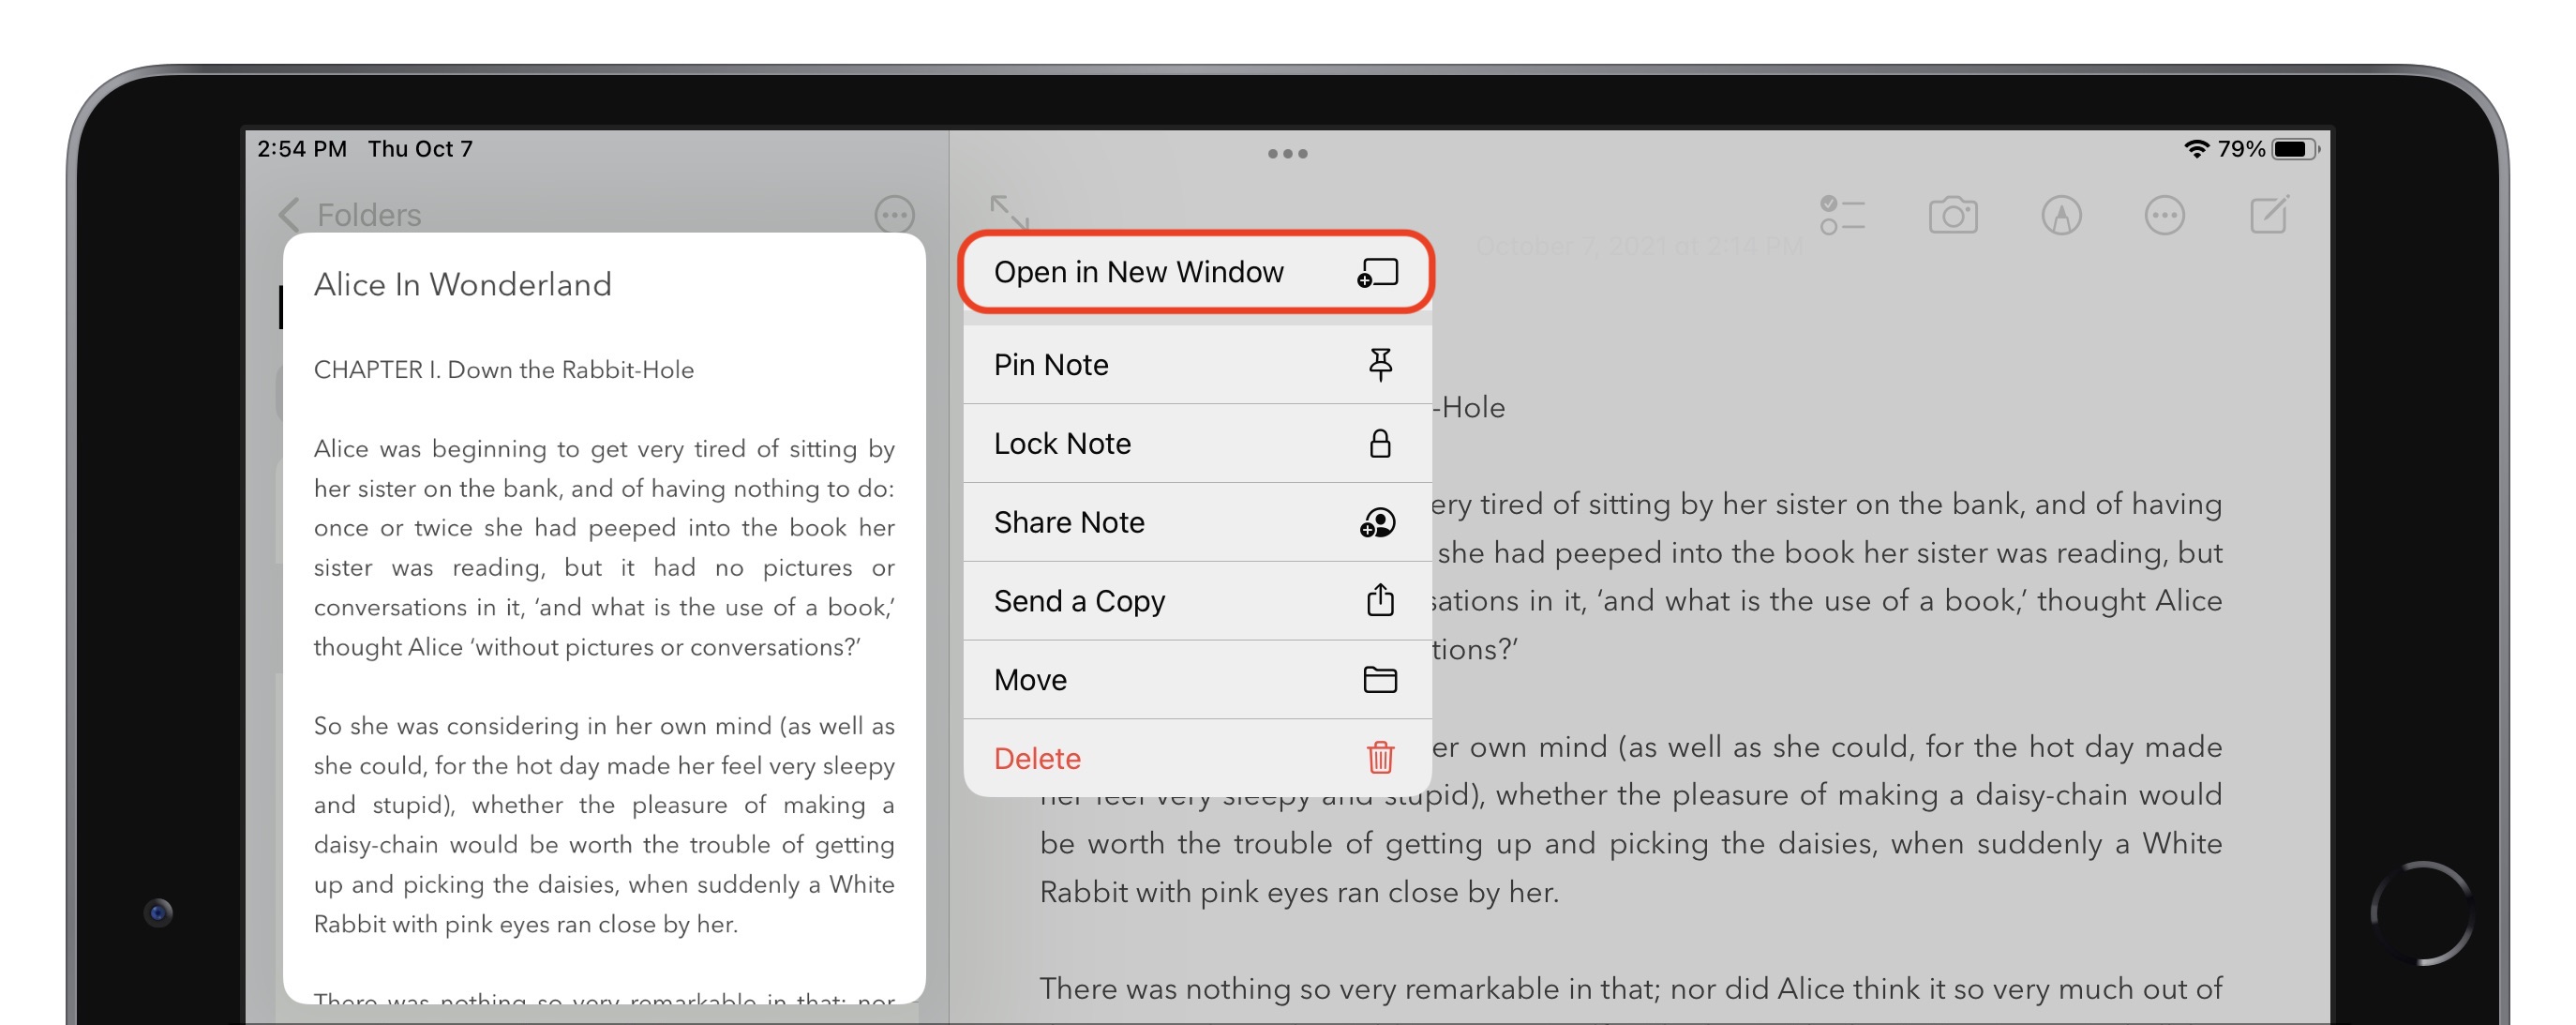
A Few More Words about Center Window
As I mentioned above, center windows are a new addition to iPadOS’s multitasking options. In apps with content-centric sidebars, such as Mail and Notes, you can now open an item like a message or a note in its own window in the center of the screen. (Those are the only apps I can find that support center window mode; there are undoubtedly others I don’t have.)
Center windows are somewhat useful for previewing the full content of the item. But the real win comes when you swipe down on the center window’s multitasking control to put the window on the shelf, thus keeping it available for quick reference. Remember that you can tap the multitasking control at the top of a normal or Split View window (not a center window) to reveal the shelf and then tap a thumbnail on the shelf to open a window.
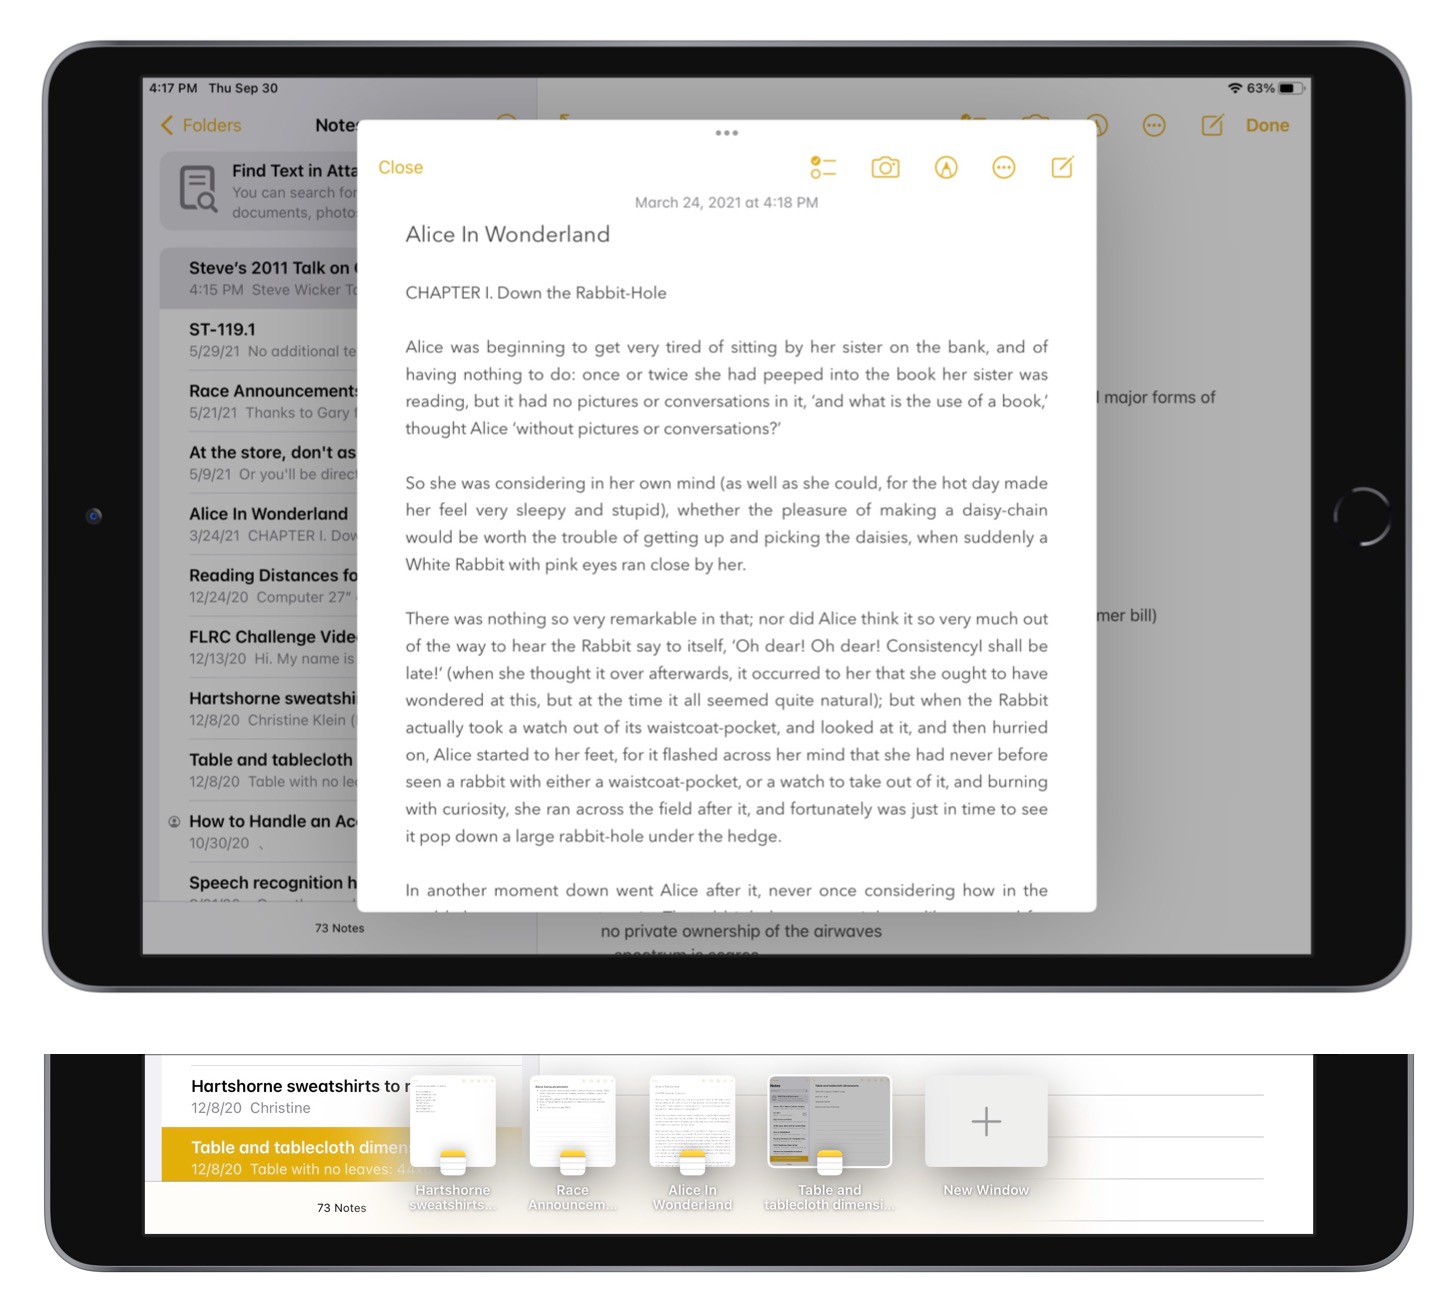
To create a center window, touch and hold the item in the sidebar and then tap Open in New Window from the menu that appears. Mail also creates center windows by default when you begin composing a new message. To close a center window, tap Close or anywhere outside the window. You might think you could swipe up on a shelf thumbnail to open it, given that swiping down adds a center window to the shelf, but swiping up on thumbnails closes the window as well.
If you tap the multitasking control in a center window, you’ll see that a new fourth icon is selected, indicating that it’s a center window: tap one of the other icons to make the window full screen, put it into a Split View, or make it a Slide Over window.

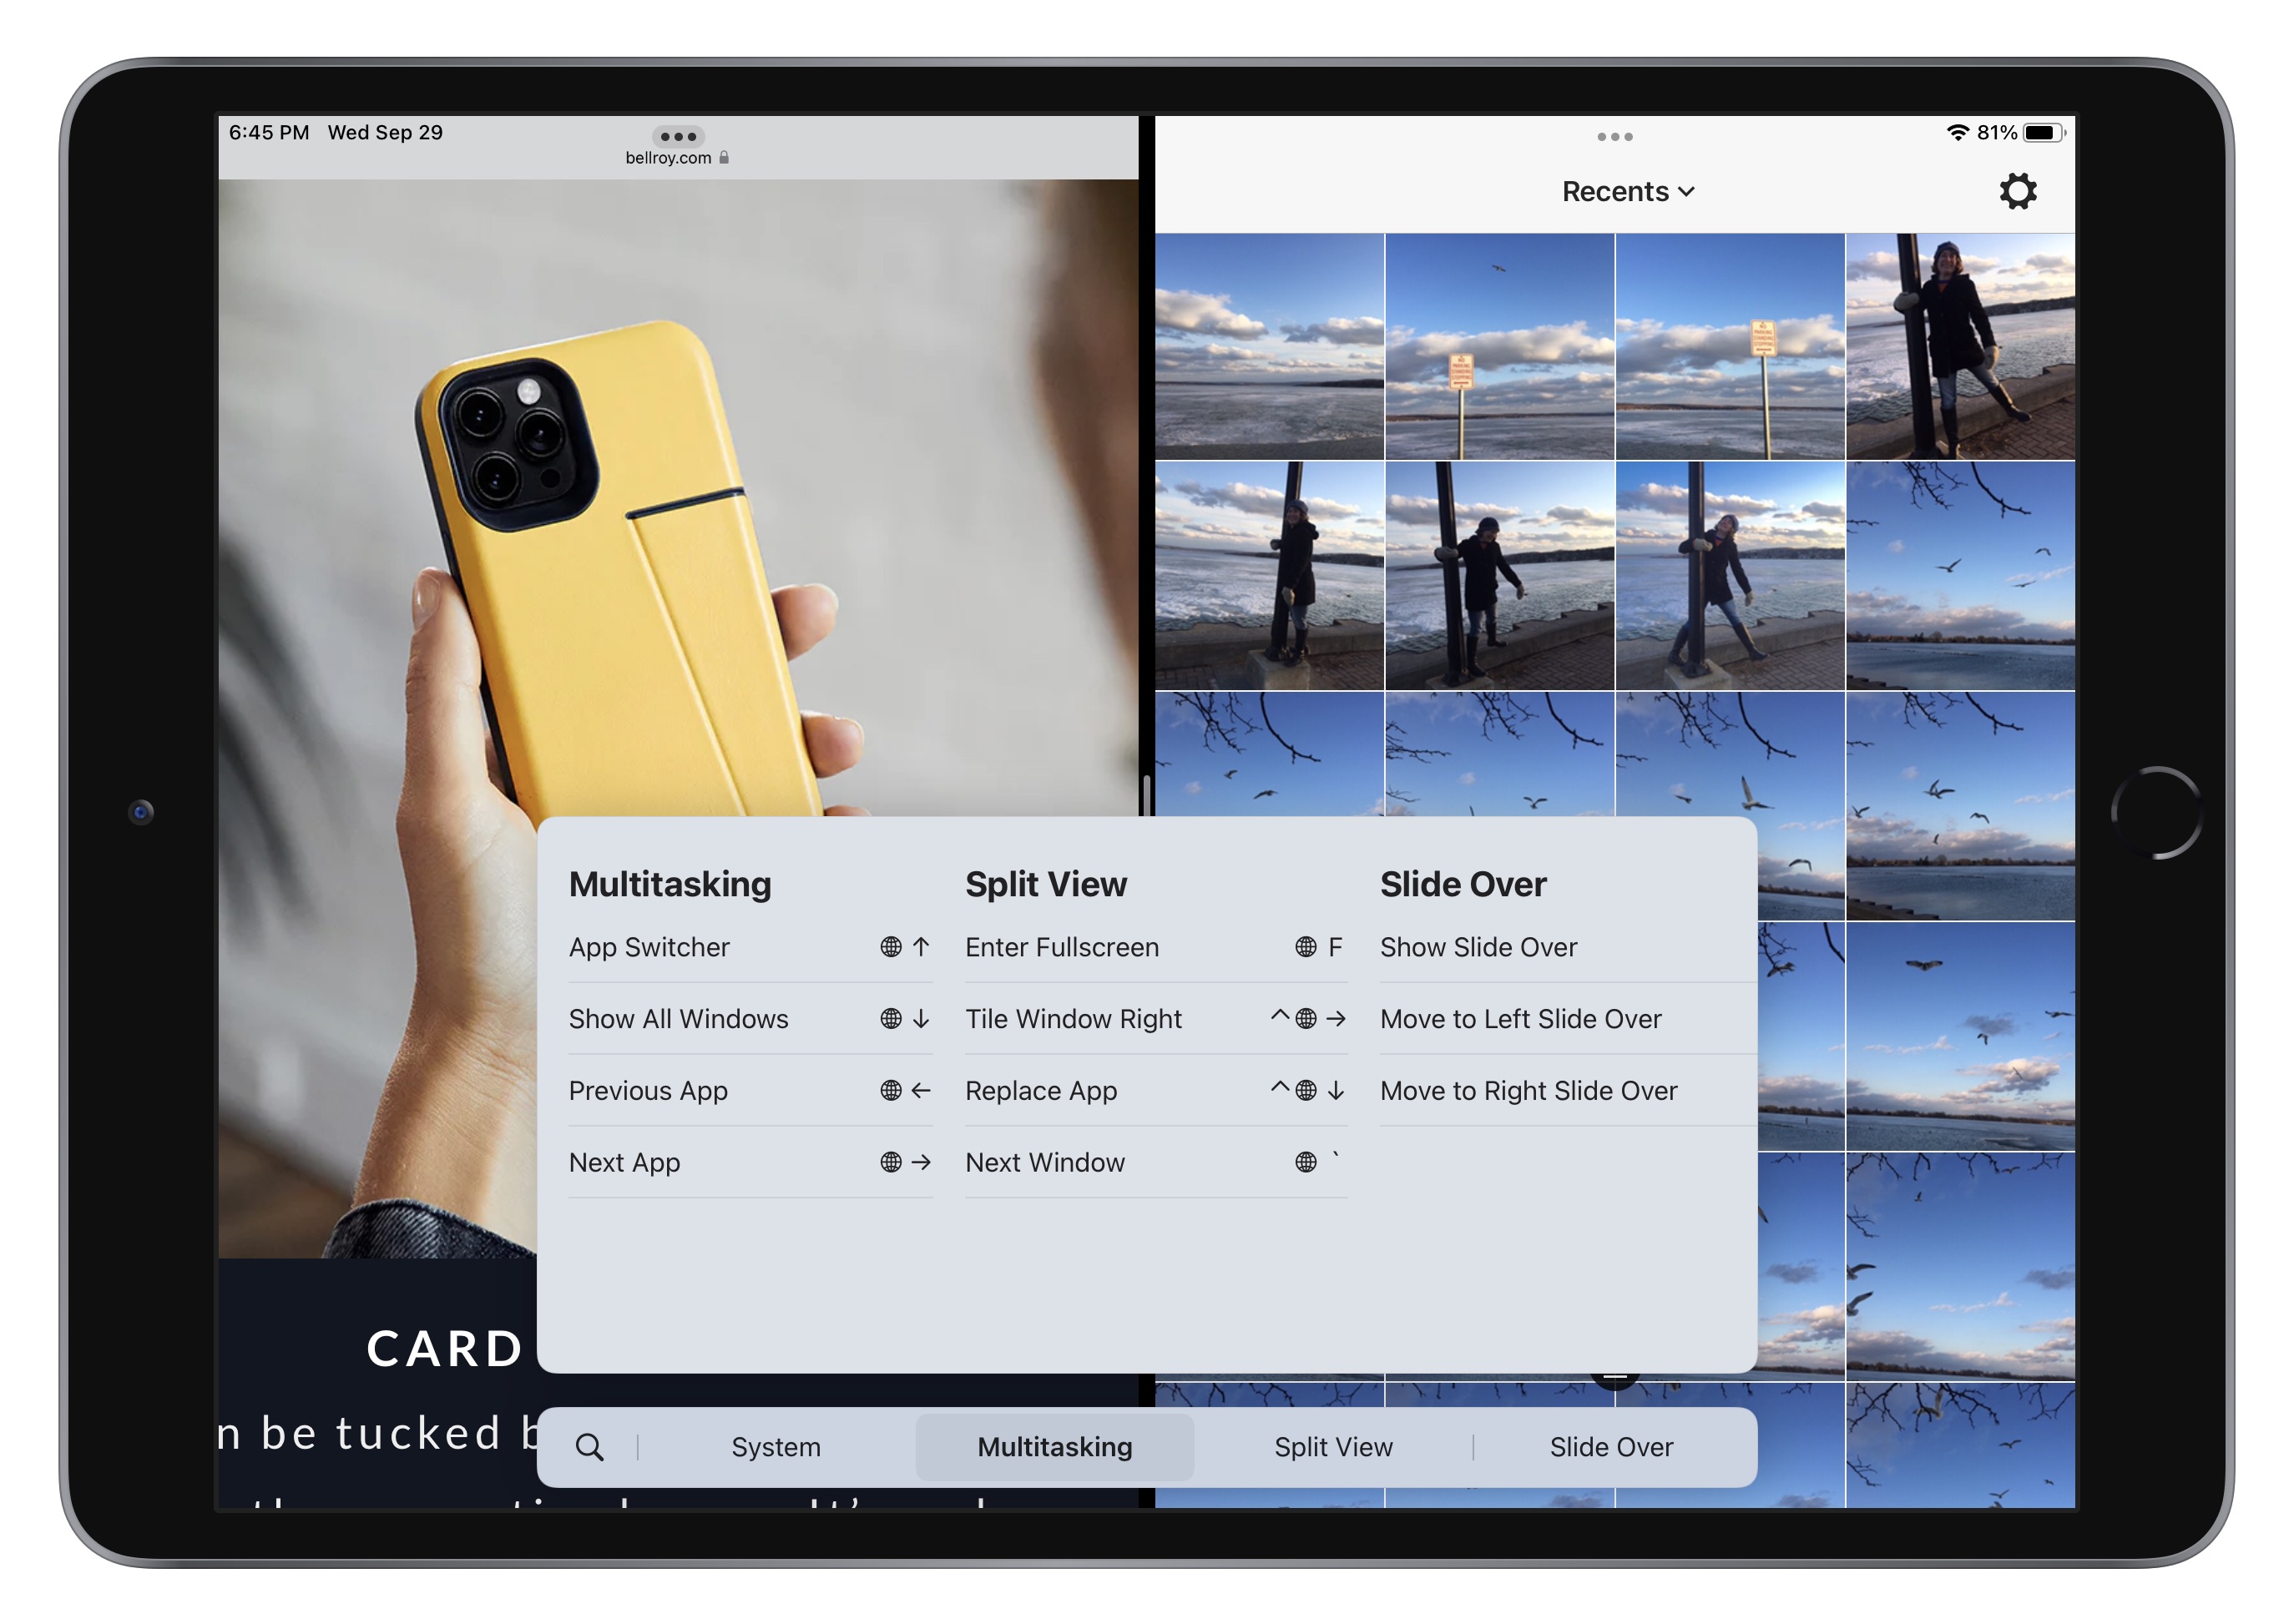
Keep Your Hands on the Keyboard with Multitasking Keyboard Shortcuts
If you’re seriously interested in using multitasking on an iPad, you’re probably also working with a physical keyboard much of the time. In iPadOS 15, Apple added a useful set of keyboard shortcuts that you can learn about by pressing and holding the Globe key and then tapping the Multitasking tab at the bottom. It may take a little while to internalize the shortcuts, but if you do most of your work on an iPad, you will probably find the effort worthwhile.
In an interesting mashup of keyboard and touch interfaces, you can also tap the keyboard shortcuts (or click them if you have a trackpad or mouse attached) to invoke them, making it functionally similar to macOS menus.
Once you’ve upgraded your iPad to iPadOS 15, I encourage you to give the new multitasking interface and features a try. Although I remain skeptical of center windows, and I doubt I’ll ever be a serious enough user of iPad multitasking to use the App Switcher heavily to manage Split View combinations, the new Multitasking menu and shelf are extremely welcome additions to the iPad experience.
