#1423: Finder batch renaming, WhenWorks scheduling app, CE Week gadgets
On the Mac side of things, Sharon Zardetto rejoins us this week with a detailed look at how to use the Finder’s little-known batch renaming capabilities. For professionals who book appointments, Adam Engst looks at the new WhenWorks iOS app and service, which provides self-service scheduling. And Jeff Porten wanders the aisles at the CE Week trade show to find the latest in consumer electronic gadgets and gizmos for you. Notable Mac app releases this week include Pixelmator 3.7.1, Audio Hijack 3.5, and Final Cut Pro X 10.4.3.
macOS Hidden Treasures: Batch-Rename Items in the Finder
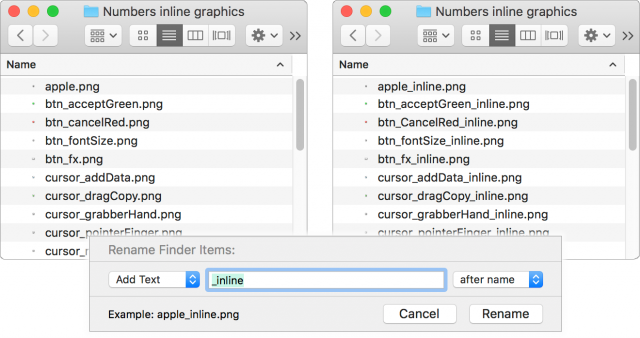
When I was preparing inline graphics—the little images embedded in a line of text—for my Take Control of Numbers book, I was almost finished when I remembered that the filenames needed to adhere to a naming convention: they must end with _inline. Nearly 50 files needed renaming. A brief mental facepalm moment was followed by the relieved realization that the Finder could do it for me with its batch-rename capability.
You didn’t know the Finder has a batch-rename capability? That’s because the option is disguised as a seemingly useless Rename command in the File menu. After all, you can rename a file by clicking and typing. So, the Rename command has no reason to exist—until you’ve selected multiple items. Then, it changes to Rename [X] Items (identifying the number of selected items). But how would you know that since you aren’t likely to peruse menus after you’ve selected a bunch of files or folders?
And that’s how you start: select multiple items in any window view (including, if you need to, a mix of files and folders) and choose File > Rename [X] Items. (For the rest of this article, I’ll refer to the command as simply Rename Items.)
The Batch-Rename Triad
When you choose Rename Items for a selection, a dialog appears. (If you’re working in a window, it slides out from the title bar; if you’ve selected items on the desktop, you get a free-floating version.)

Its pop-up menu offers three options:
- Replace Text: Change any part of the existing filename to some other text. This option also lets you delete characters from filenames by replacing the existing text with nothing.
- Add Text: Add text before or after the filename.
- Format: Append an index or counter number (the latter uses leading zeros for a fixed number of digits) or the current date and time to the filename. You can place the number before or after the filename, replace the filename with different text, or obliterate the original name completely.
We’ll take a look at each of these options in action.
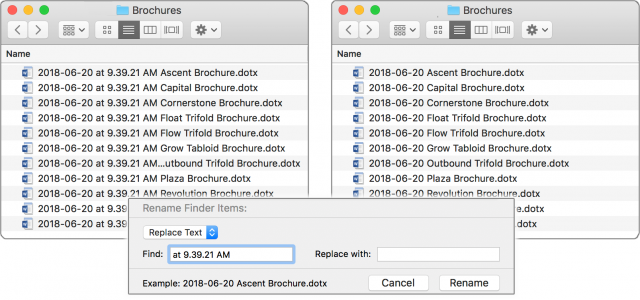
Replace or Delete Filename Text
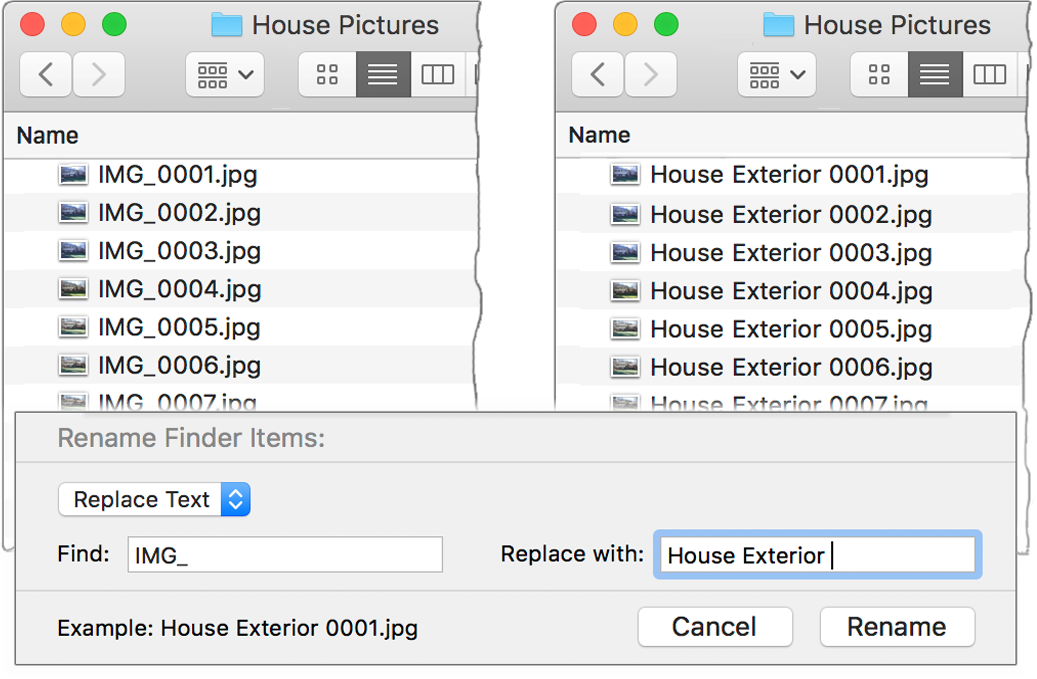
How many files do you have whose names start with IMG_? Every time you dump images from your camera to your Mac, they’re named with that prefix, followed by a 4-digit number. Replace those leading characters with a descriptor so that you’ll know what’s what:
- In the Finder window with the photo files, choose Edit > Select All, and then File > Rename Items.
- Choose Replace Text from the dialog’s pop-up menu.
- In the Find field, enter IMG_.
- For Replace With, enter a description: Pool Party, Graduation, Disney World, or whatever. Be sure to include a trailing space or some other separator after the text. (Alternatively, set only IMG to be replaced, leaving the underscore.)
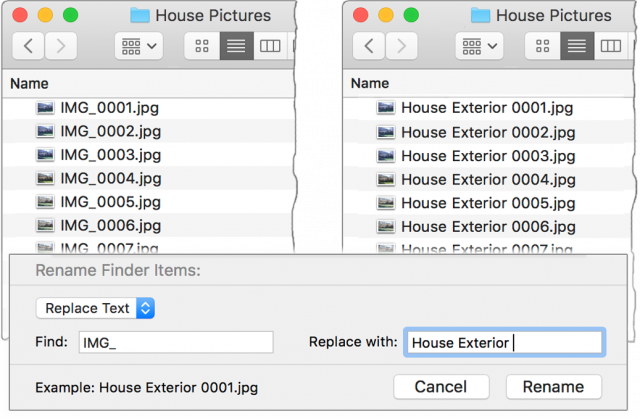
- If the example in the lower left of the dialog looks right, click Rename.
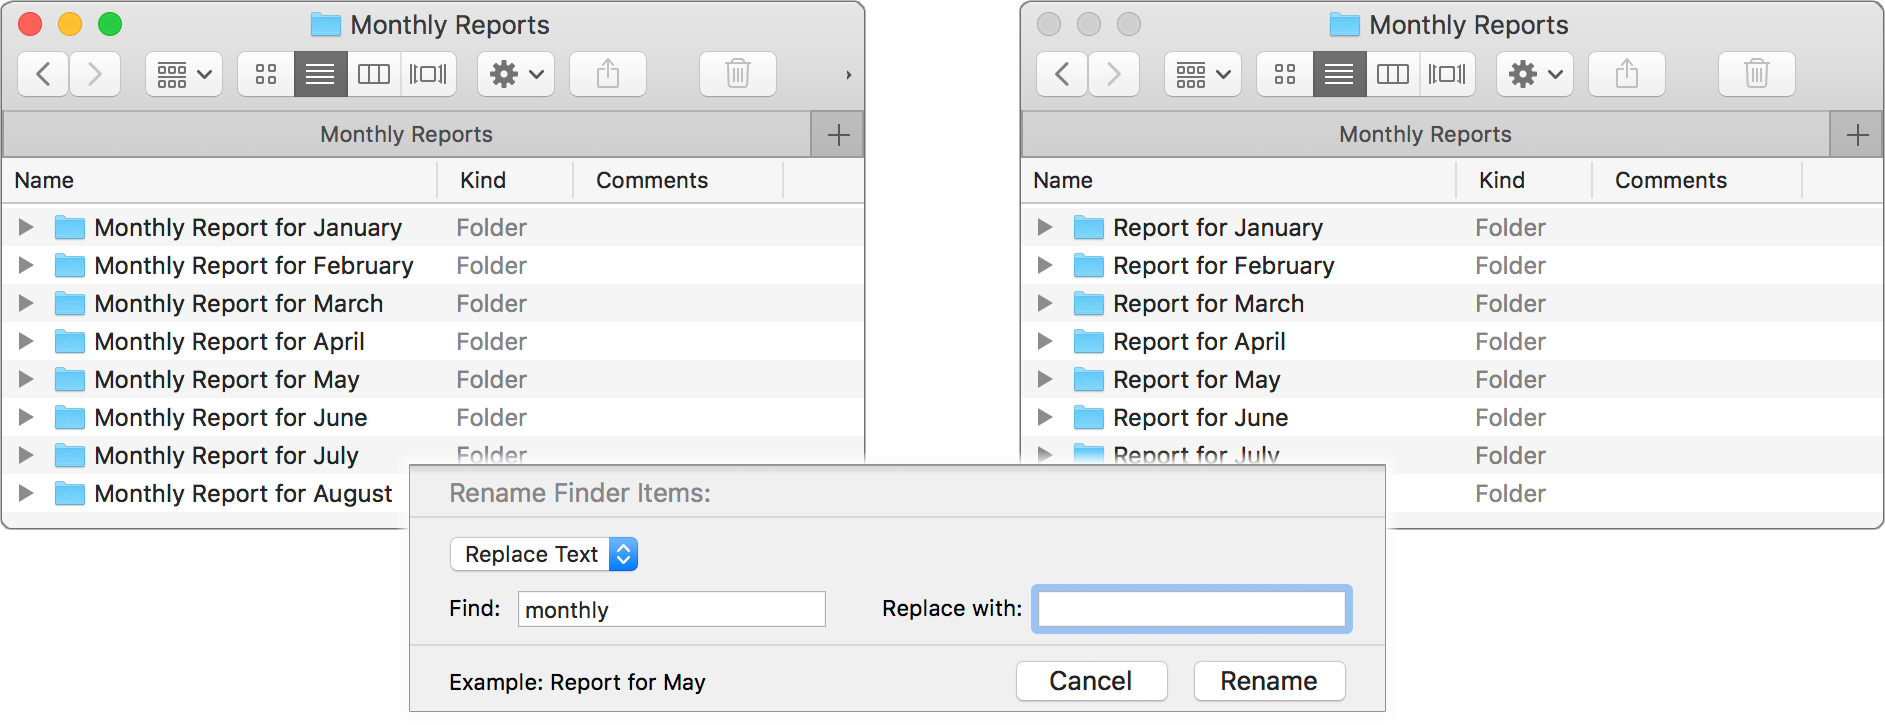
Have you ever wound up with a bunch of montly reports scattered among your monthly ones, or some similarly repeated typo? To replace montly with monthly:
- Select the target files and choose File > Rename Items.
- Choose Replace Text from the pop-up menu.
- In the Find field, type montly; in Replace With, type monthly. Or, use shorter text replacement, such as substituting tly for thly as long as it wouldn’t interfere with other text in the filenames.
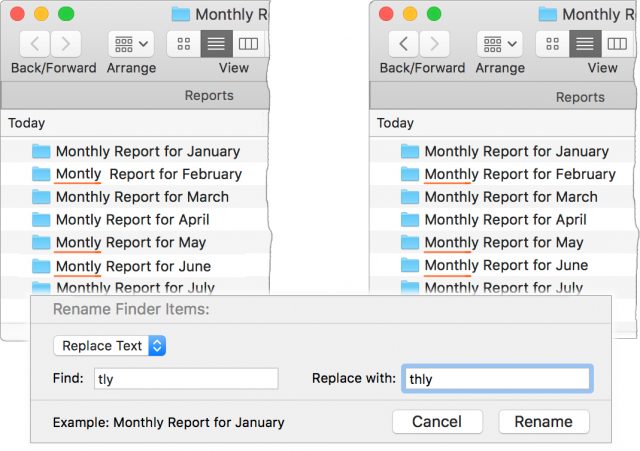
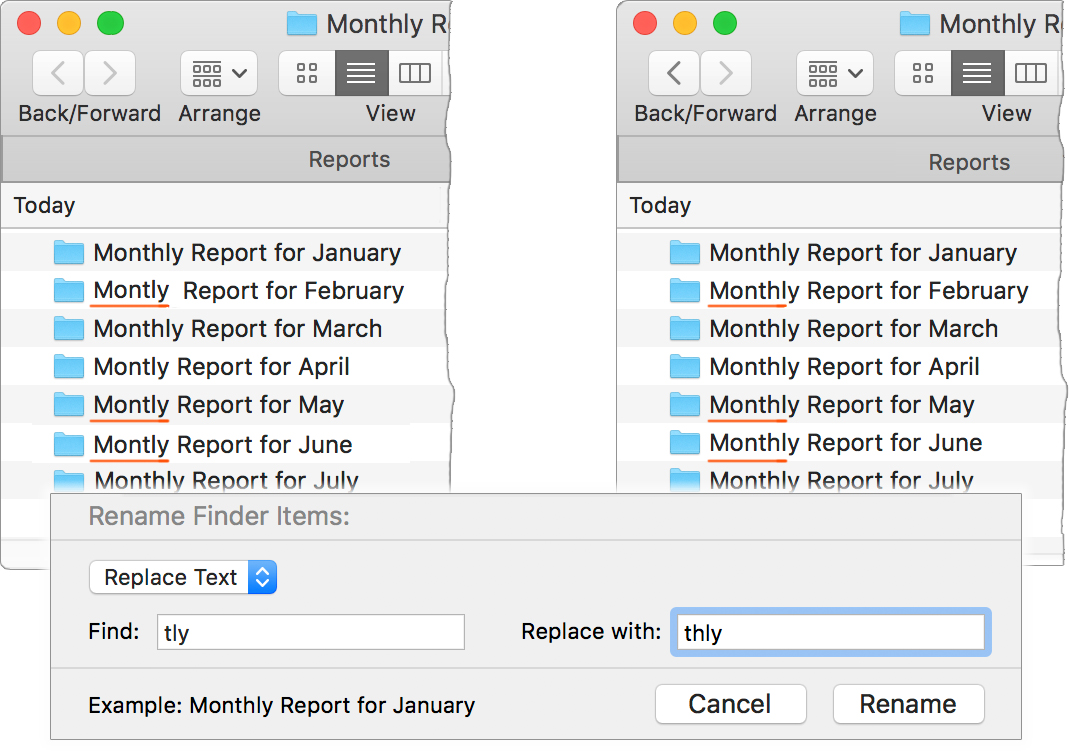
You might be tempted to use the even briefer change of ly to hly; with that approach, however, if some of the files were correctly named to begin with, they would wind up with an extra h—monthhly. I recommend using full words to avoid problems that you might not notice while they’re still easily undo-able—although I confess this is a case of “Do as I say, not as I do.” If it’s too late to undo the mistake, it’s usually a cinch to do a second, more careful, batch rename to correct the issue. (Undo details are in the “Quick Tips” list at the end of this article.)
You can also use the Replace Text option to delete text from a filename: simply enter the delete target in Find, and leave Replace With blank. So, if you’ve decided that Monthly Report for January and its subsequent files are a tad redundant, set Find to monthly—making sure to include the trailing space—and leave Replace With empty.
There’s another example of deleting filename text ahead, under “Multiple-Pass Renaming.”
Add Text to Filenames
The Add text option in the Rename dialog lets you—you guessed it!—add text to the beginning or end of the filename: choose Add Text from the menu, type the additional text, and specify whether it goes before or after the name.
This is what I used to append _inline to my graphics, the issue I mentioned at the beginning of this article. You might find that you need to add a project name to a group of files, or that you forgot to append your initials to revisions of shared documents. Here’s how to make a simple adjustment like this:
- Select the target files.
- Choose File > Rename Items.
- In the dialog, choose Add Text from the pop-up menu, type the text, and choose Before Name or After Name from the second pop-up.
- Click Rename.

As you can see in the screenshot above, an “after name” addition ignores the file extension (.png) because it’s not considered part of the file’s name.
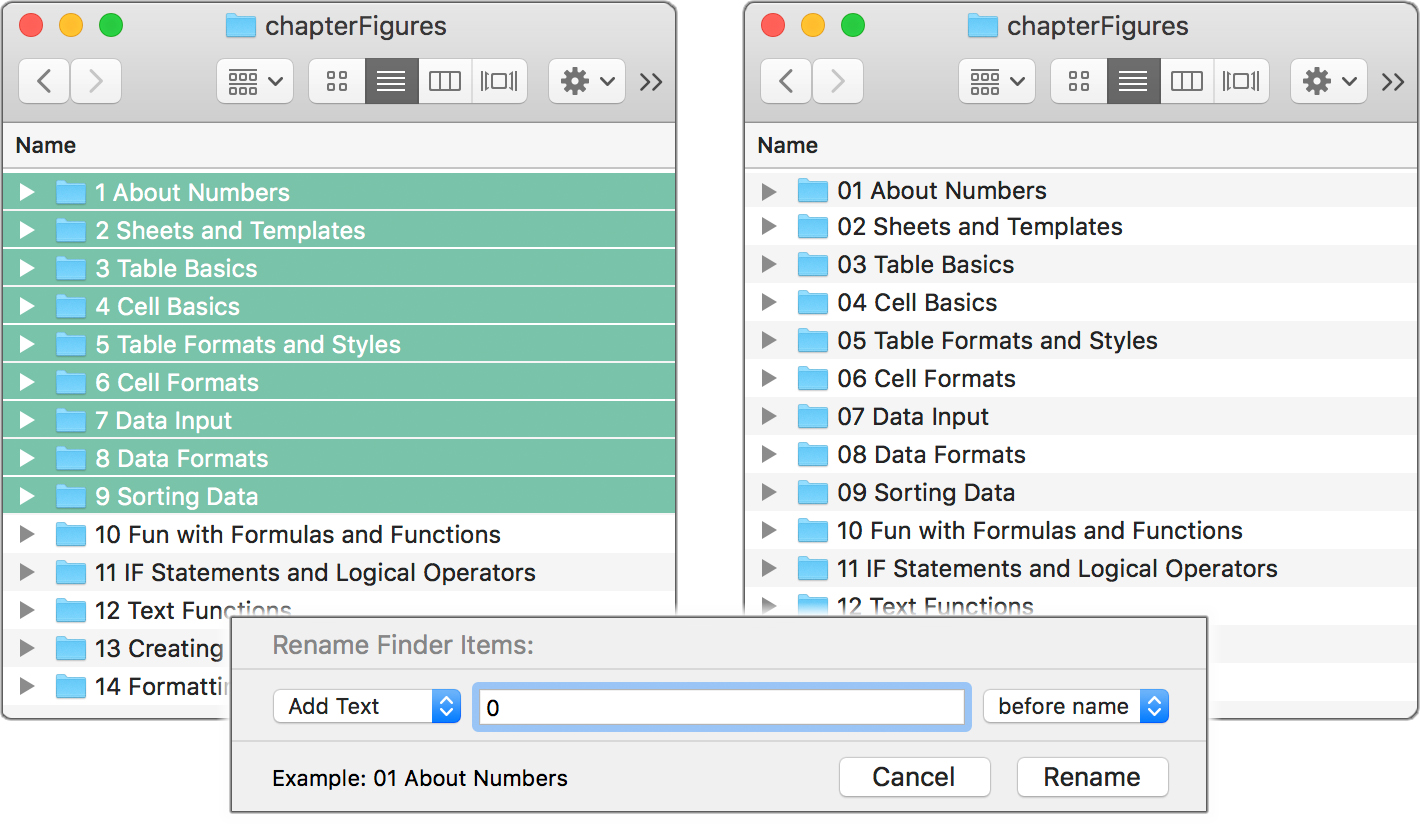
I frequently use this method to add leading zeroes to the beginning of single-digit numbers so I can more easily scan the then-even text in a list of numbered filenames. With just the single-digit files selected, I set the Rename option to Add Text, type a zero in the text field, and choose Before Name from the second menu.
Format Filenames with Numbers or Dates
The Format menu choice in the Rename dialog is not a shining example of nomenclature, for either its title or its contents. Your formatting options are:
- Name and Index: Adds consecutive numbers, starting at 1 or a number you specify.
- Name and Counter: Adds consecutive numbers, also starting at 1 or a specified number, but creates five-digit numbers by padding with leading zeroes where necessary: 00001 and 00237, for example.
- Name and Date: Adds the current date, as well as the time, down to the nearest second, in the format 2018-05-23 at 9.27.55 AM.
With each of these options, you can keep or replace the original filename, using the awkwardly named Custom Format field. Oddly, it usually starts with File as the default suggestion (without even the courtesy of a leading space, as you can see in the dialog’s Example line in this picture).
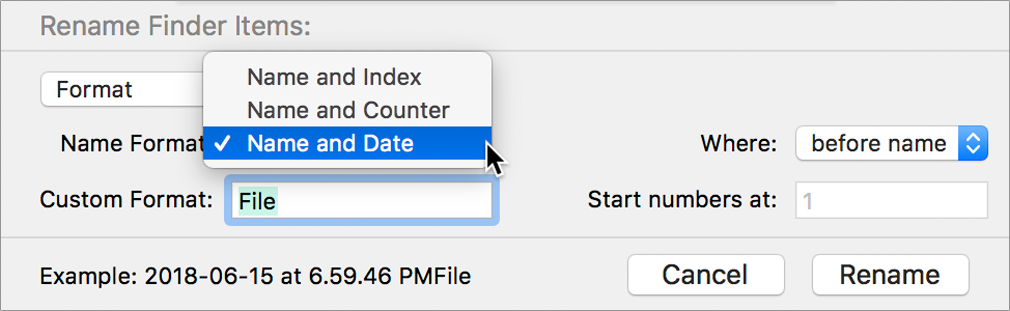
To replace the current filenames with a common name—so, for instance, only an index or counter number differentiates them (Field Test 1, Field Test 2)—enter that name in the Custom Format field. If you want the original name left intact, the Custom Format field must be blank, as shown in this picture.
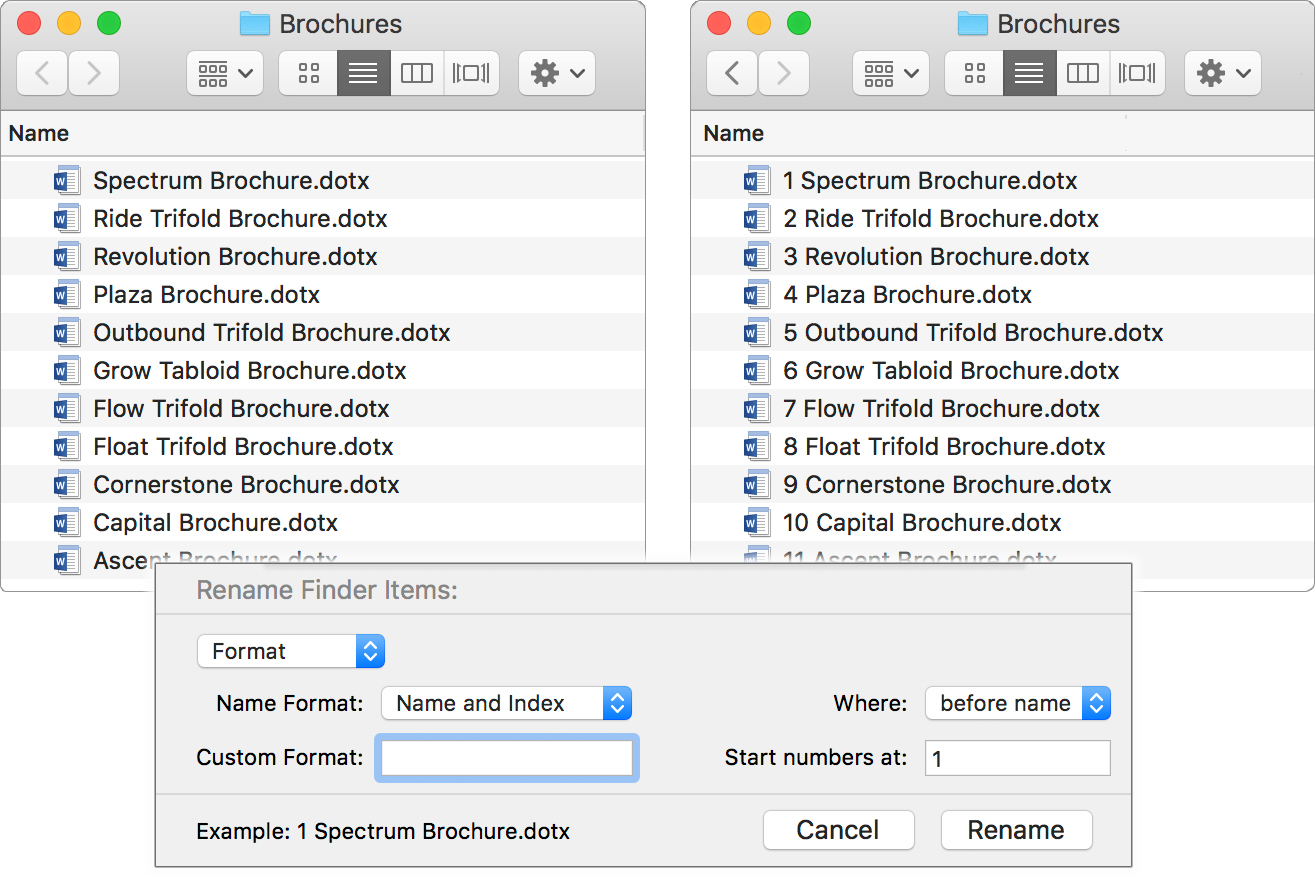
It’s not immediately apparent how either of the numbering options is applied to selected files. Here’s the trick: when you’re working in a List view that has the names in the first column, as is nearly always the case, the numbers are applied, in order, to those names. No surprise there, but the controlling factor is actually the window’s sort order—Dated Created, say, or Size—which, of course, affects the order of the names. So make sure to get your files in the right order before renaming them.
Multiple-Pass Renaming
Sometimes renaming requires more than one pass: altering the name, then adding a date, and finally deleting the timestamp that accompanies the date, for instance. But edits are simple to set up and take only seconds to run, so multiple passes are not time-consuming procedures.
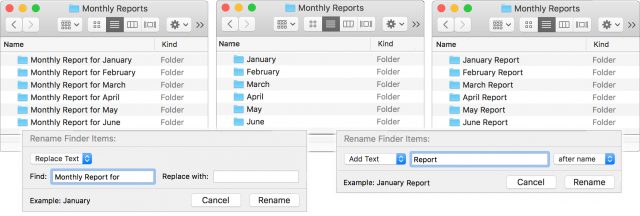
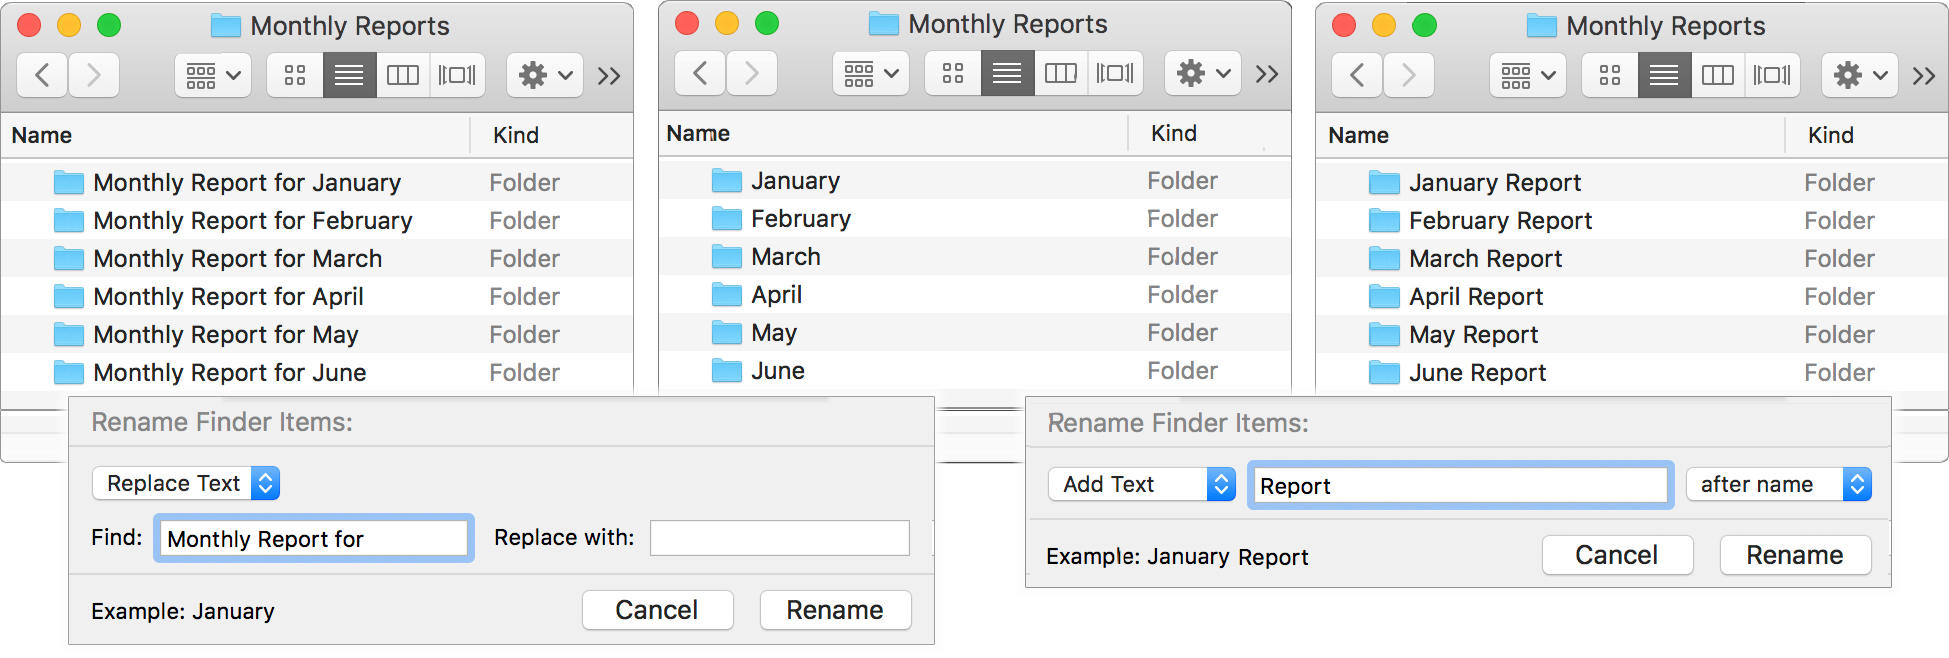
Reword Filenames
If your files are named Monthly Report for [Month], and you’d prefer them to be [Month] Report, run them through the rename mill twice, first stripping Monthly Report for, and then adding Report to the end of the filenames:
- Select the target files and choose File > Rename Items.
- Choose Replace Text from the pop-up menu and type Monthly Report for (including a trailing space) in the Find field. Leave Replace With blank, and click Rename. The files are now named with only the month.
- With the files still selected, choose File > Rename Items again. Choose Add Text from the pop-up menu and type Report in the text field; choose After Name from the second pop-up, and click Rename.
Strip the Time from Date & Time
I firmly believe that the application of a date stamp should be separate from a timestamp, but Apple failed to consult me on the matter. Luckily, it’s easy to strip out the time:
- Get the exact wording of the timestamp portion of the renamed files by copying it from one of the filenames: select one of the files, activate its name by clicking it or pressing Return, and drag across the timestamp portion, including the “at” but leaving the leading or trailing space.
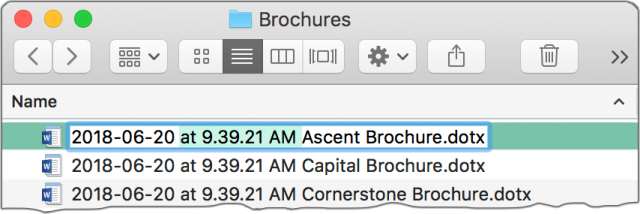
- Select all the target files and choose File > Rename Items.
- Choose Replace Text from the pop-up menu.
- Paste the copied timestamp into the Find field, and leave the Replace With field blank.
- Click Rename.

Quick Tips
Here are a few more things you should know:
- Quick access to the Rename command: Tired of heading way up to the File menu for the Rename Items command? I have three solutions for you. Control-click any one of the selected files for a contextual menu that includes the Rename command, use the Action menu (the gear
 icon) in the window’s toolbar, or… the third gets its own tip, next.
 - Keyboard shortcut for the Rename command: If you use the Rename command frequently and are the type of person who prefers keyboard commands, then you’ll be disappointed when you realize that you can’t set up a keyboard shortcut for a command whose wording constantly changes (Rename 4 Items, Rename 12 Items…). Except that you can—in a roundabout sort of way: set up shortcuts for many different versions of the command and assign all of them the same shortcut. (Who knew? I didn’t, until I decided to try it for this because I prefer keyboard shortcuts for almost everything.) The method is no different from setting up other keyboard shortcuts:
- Go to System Preferences > Keyboard > Shortcuts and click App Shortcuts in the app list.
- Click the + button beneath the shortcut list and choose Finder from the pop-up menu in the dialog box. (If Finder is not in the shortcut list already, this procedure adds it; if it’s already listed, you still need to select it as the target.)
- In the Menu Title field, type Rename 6 Items…. (You don’t have to use the ellipsis character—typed with Option-semicolon—you can simply type three periods.)
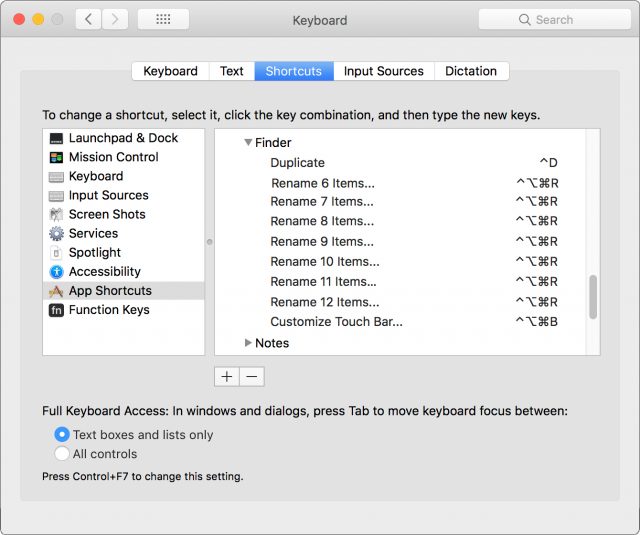
- Go to the Keyboard Shortcut field and press the key combination you want to use.
- Repeat this process for other numbers of files in the command name, using the same key combination.

I’ve found that System Preferences occasionally objects to the use of the same shortcut for multiple commands, but only mildly: sometimes not all the commands are listed correctly in its window, showing only an ellipsis (…) in place of the command name. But the shortcut keys remain displayed, the command names return on a subsequent opening of System Preferences, and all the shortcuts work in the meantime, so it’s only a minor glitch.
- Case insensitivity: In the Rename dialog box, the text you enter that is going to be replaced or erased is case insensitive—that is, upper- and lowercase letters are considered the same. But any replacement text will be used exactly as you type it.
- Undo a rename mistake: Whether you inadvertently introduced a typo while renaming files, chose the wrong option (counters instead of serial numbers, say), or realized the renaming just isn’t what you want, you can use the Edit > Undo command to reverse the changes. If you change your mind about that, there’s Edit > Redo to the rescue. You can even go through several undo levels: if you added a serial number to the beginning of the file, and then a corrected project name to the end, you can undo each in turn to get back to the original filenames. Even if you’ve closed the window and opened others, you can go back to the folder of renamed files and undo the changes. There are some restrictions, of course, such as not having done anything undoable someplace else in the Finder.
WhenWorks Offers Self-Service Scheduling for Appointments or Office Hours
Are you in a job where people need to make appointments to see you? Perhaps you’re a Mac consultant who provides guaranteed phone support during certain hours of the day. Maybe you’re a college professor who has office hours for students. Or perhaps you’re a massage therapist who sees clients throughout the day.
Regardless, how do you book your time without dealing with each person individually? Wouldn’t it be nice if you could simply specify when you were available and let people schedule themselves online, without requiring a back-and-forth negotiation about what time is best?
A variety of Web-based services have taken a swing at this problem, such as Calendly, but iOS 11 users have a new app and service, called WhenWorks, that provides a fresh approach. Created by John Chaffee, co-founder of BusyMac and co-creator of the popular but now-defunct Now Up-to-Date, WhenWorks leverages his decades of experience in the calendaring space to simplify the process of making time available and booking appointments.
With WhenWorks, you can let people sign up for appointments with you, on days and times you set, and for amounts of time you specify. WhenWorks also tracks your personal calendars (on iCloud, Google Calendar, and Exchange—whatever you have configured on your iOS device), so if you add an event for a lunch meeting or doctor appointment of your own, that time automatically becomes unavailable for booking.
Anyone can use WhenWorks for free for up to five appointments per month. If you want to extend that to an unlimited number of appointments, there’s a $5-per-month or $50-per-year WhenWorks Pro subscription.
To get started, download the WhenWorks iOS app from the App Store. You’ll need to set up an account to enable your personal Web-based scheduling page, in the app’s Settings screen. From there, you choose which of your calendars it should consult when determining your availability. Also, you can set whether guests should just receive confirmation email from WhenWorks after booking or also be added to the event as an attendee, which will cause the Calendar app to send email asking them to confirm their attendance.
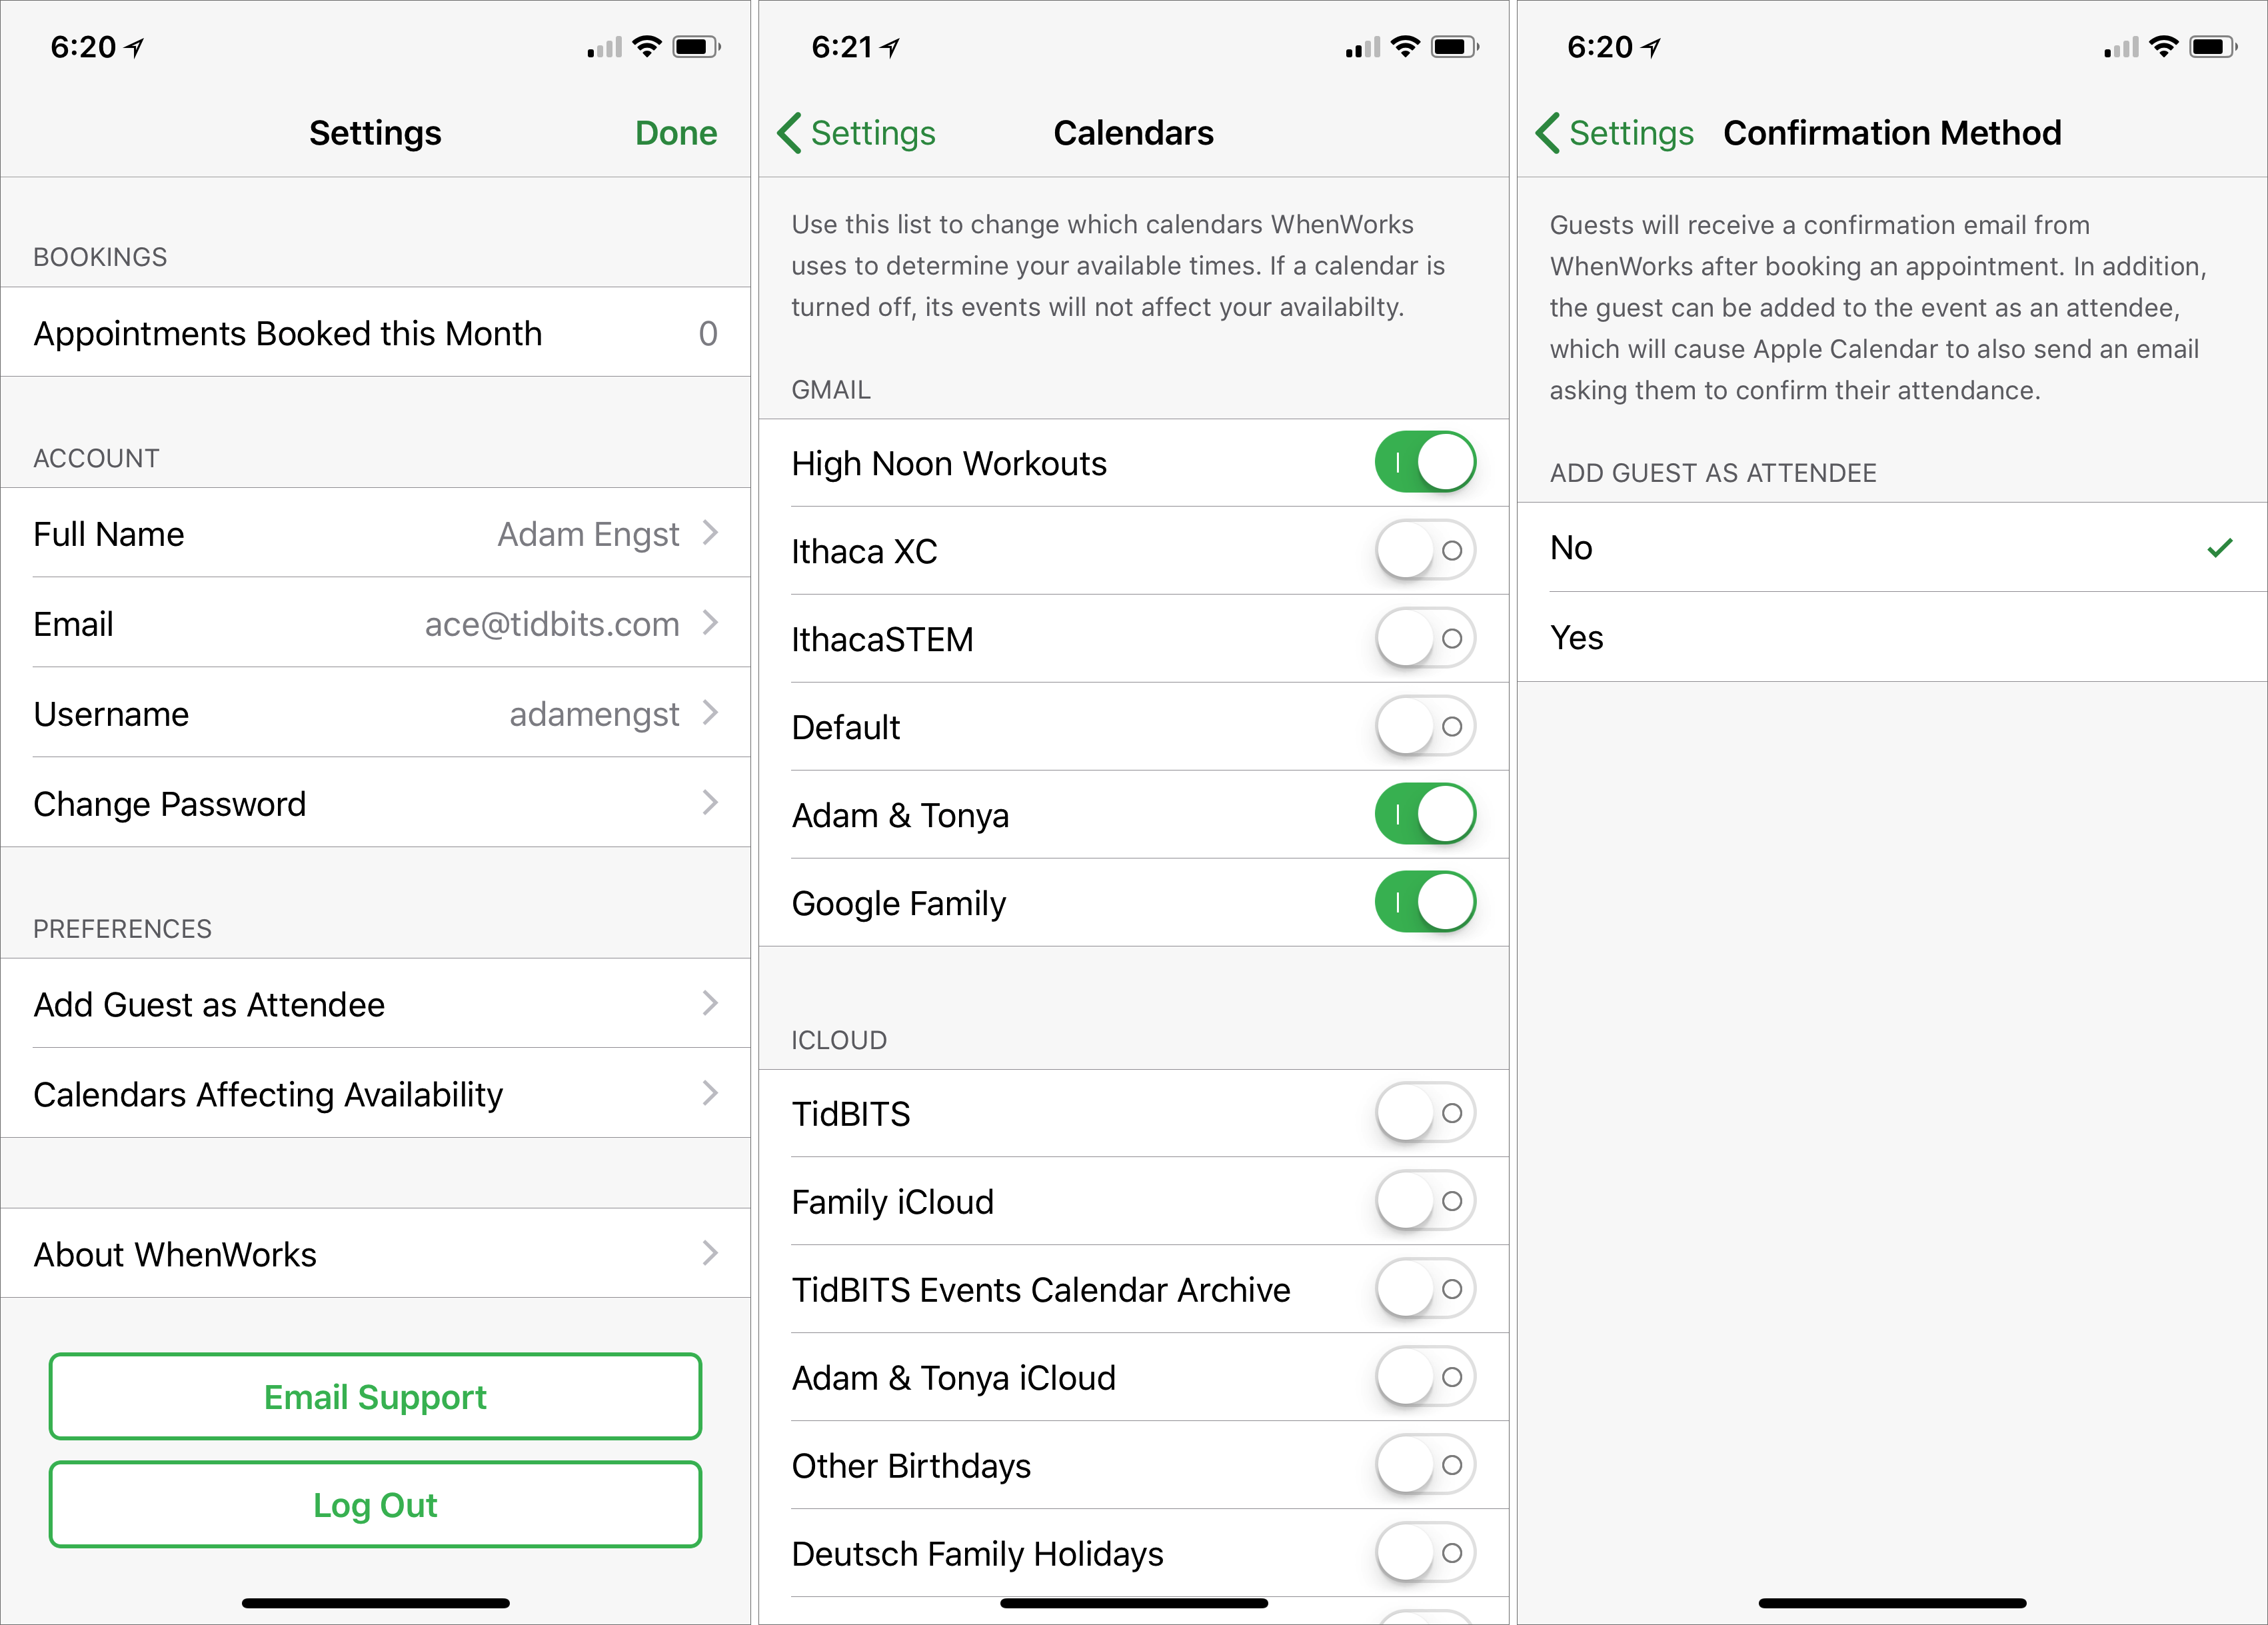
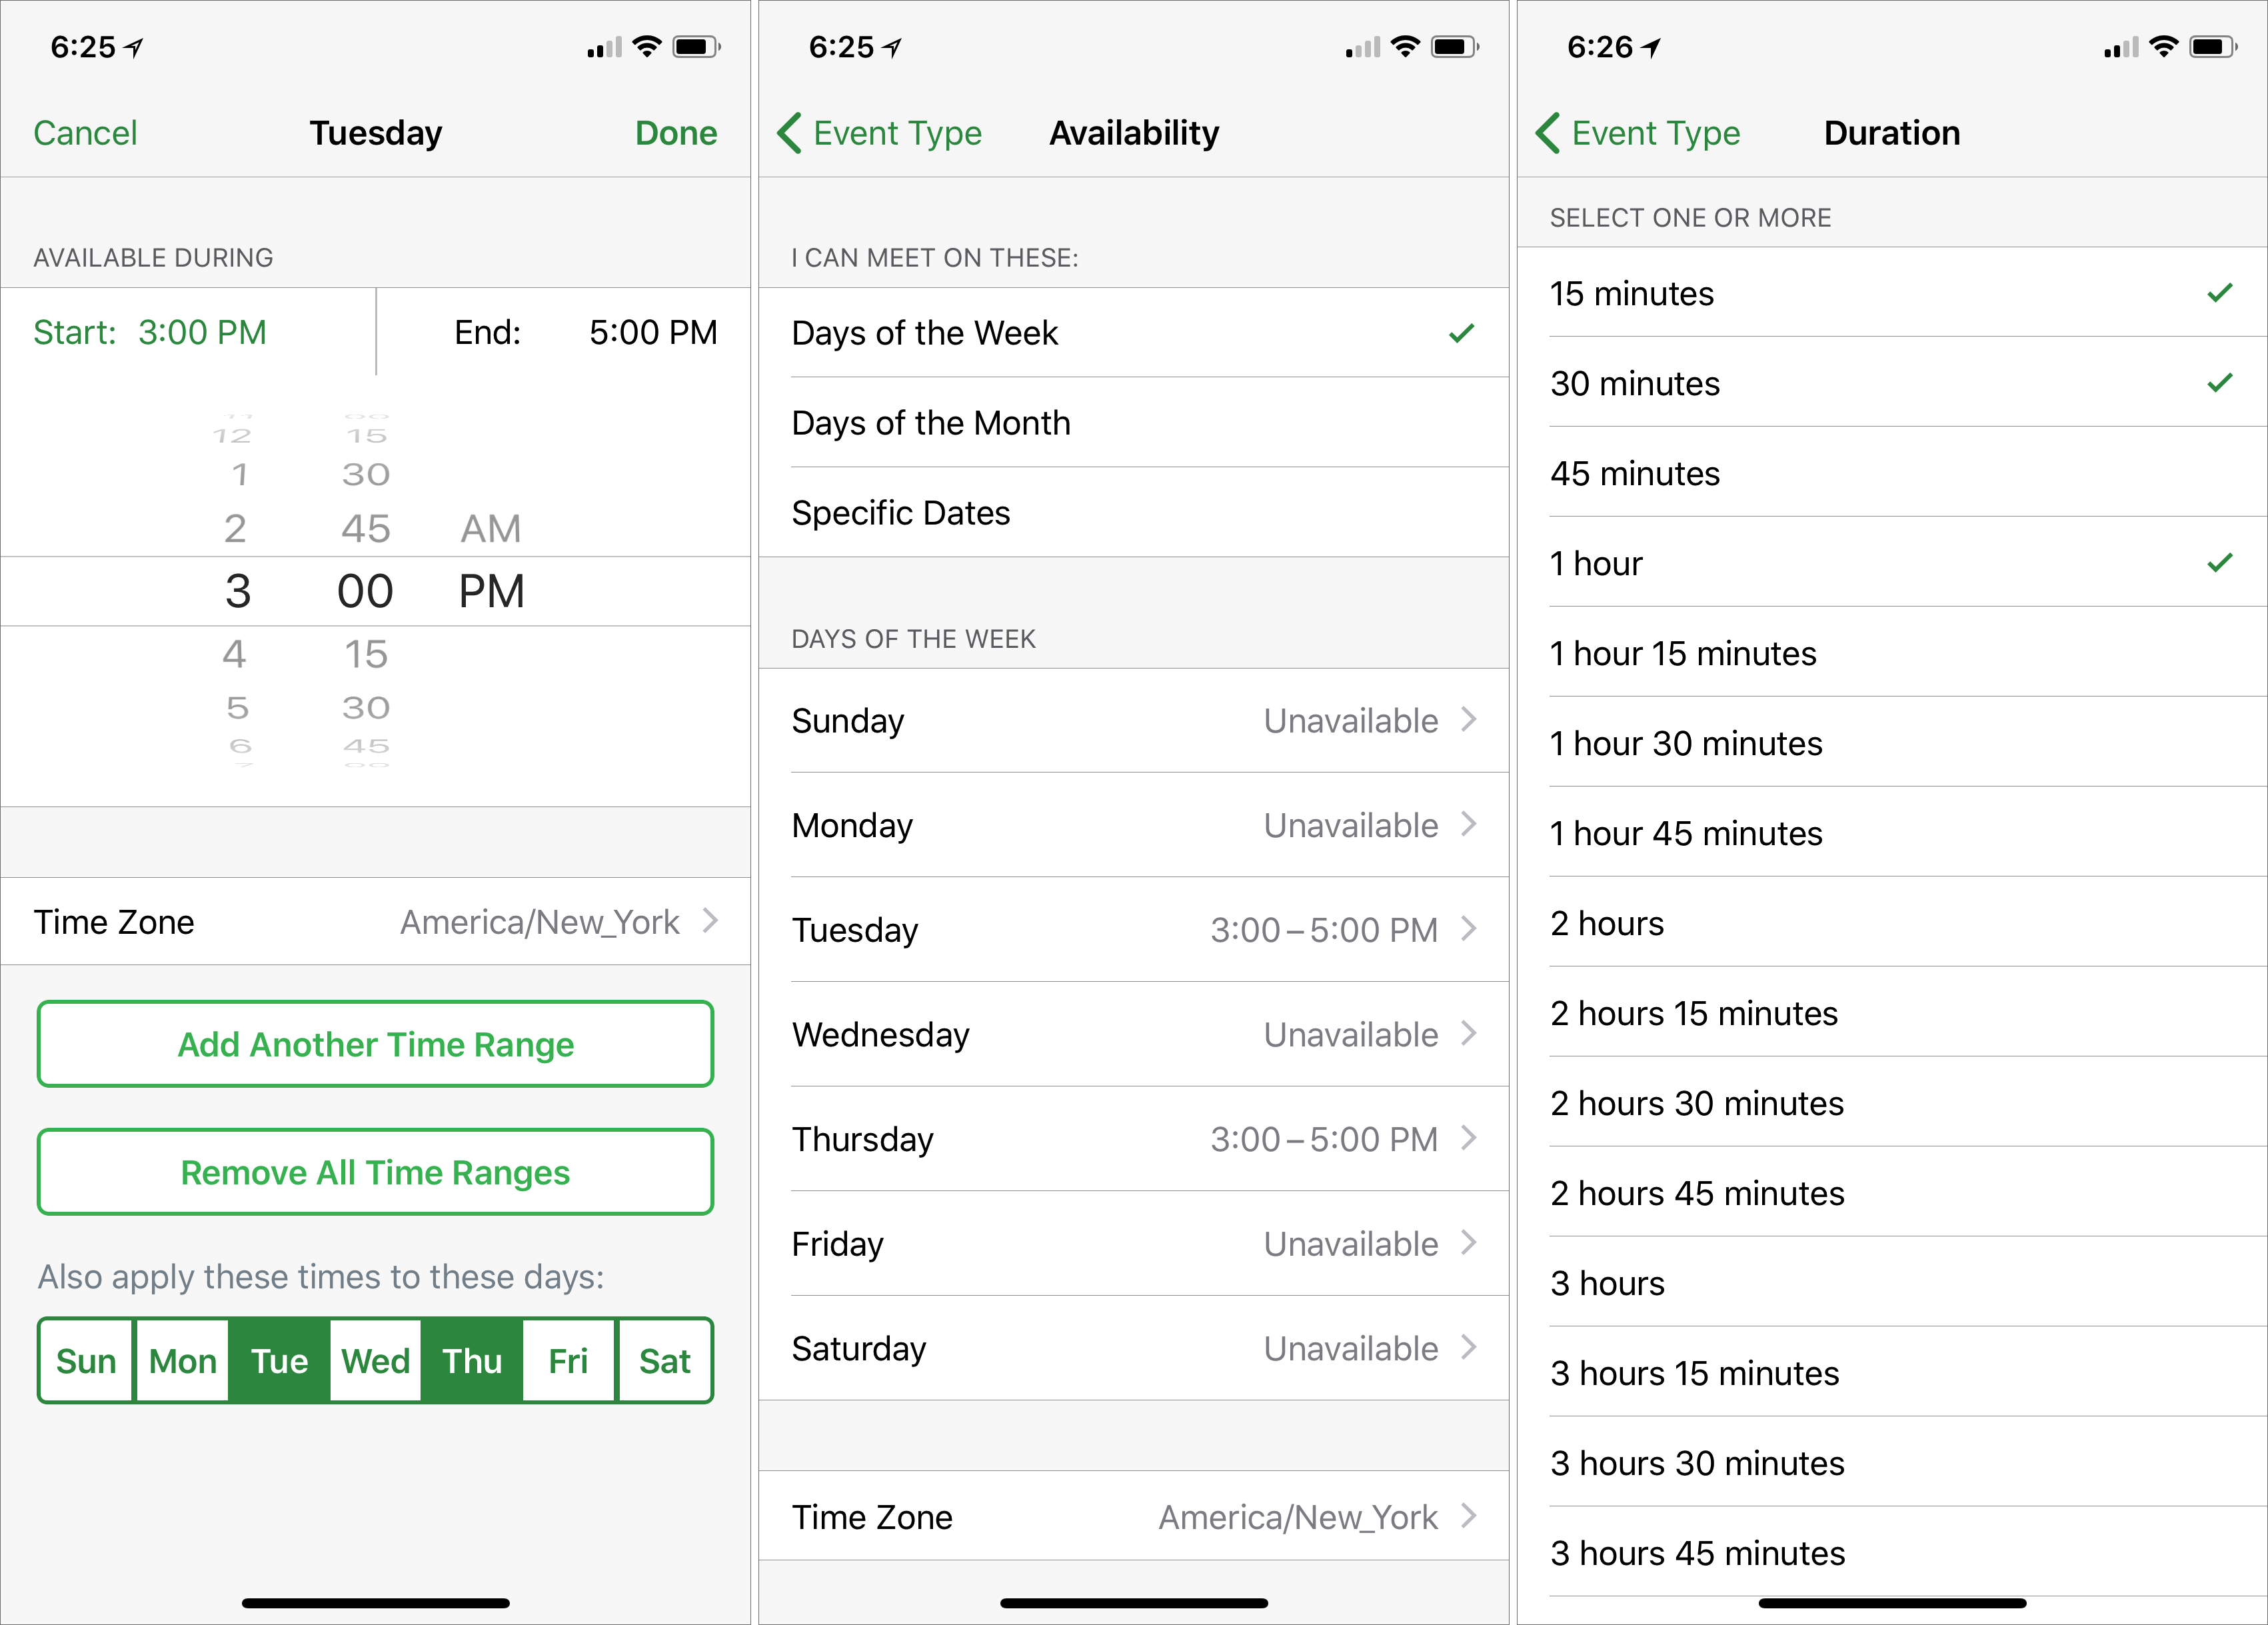
Next, you’ll want to set up your event type. Let’s assume you’re a professor, and you have regular 15-, 30-, and 60-minute slots for office hours every Tuesday and Thursday from 3–5 PM. For the event type, you specify the name, icon, optional location, time, and duration. When picking times, you can choose particular days of the week, days of the month, or specific dates, and for each day, it’s easy to add multiple time ranges. That would let you, for instance, book morning and afternoon appointments while ensuring that you always get a lunch break. Events can even have multiple durations, so guests can pick the length of their appointment.
Any event type can be public—at which point it appears on your personal WhenWorks Web page—or private, which lets you send a link to someone directly so they can pick the best time to get together for coffee, say.
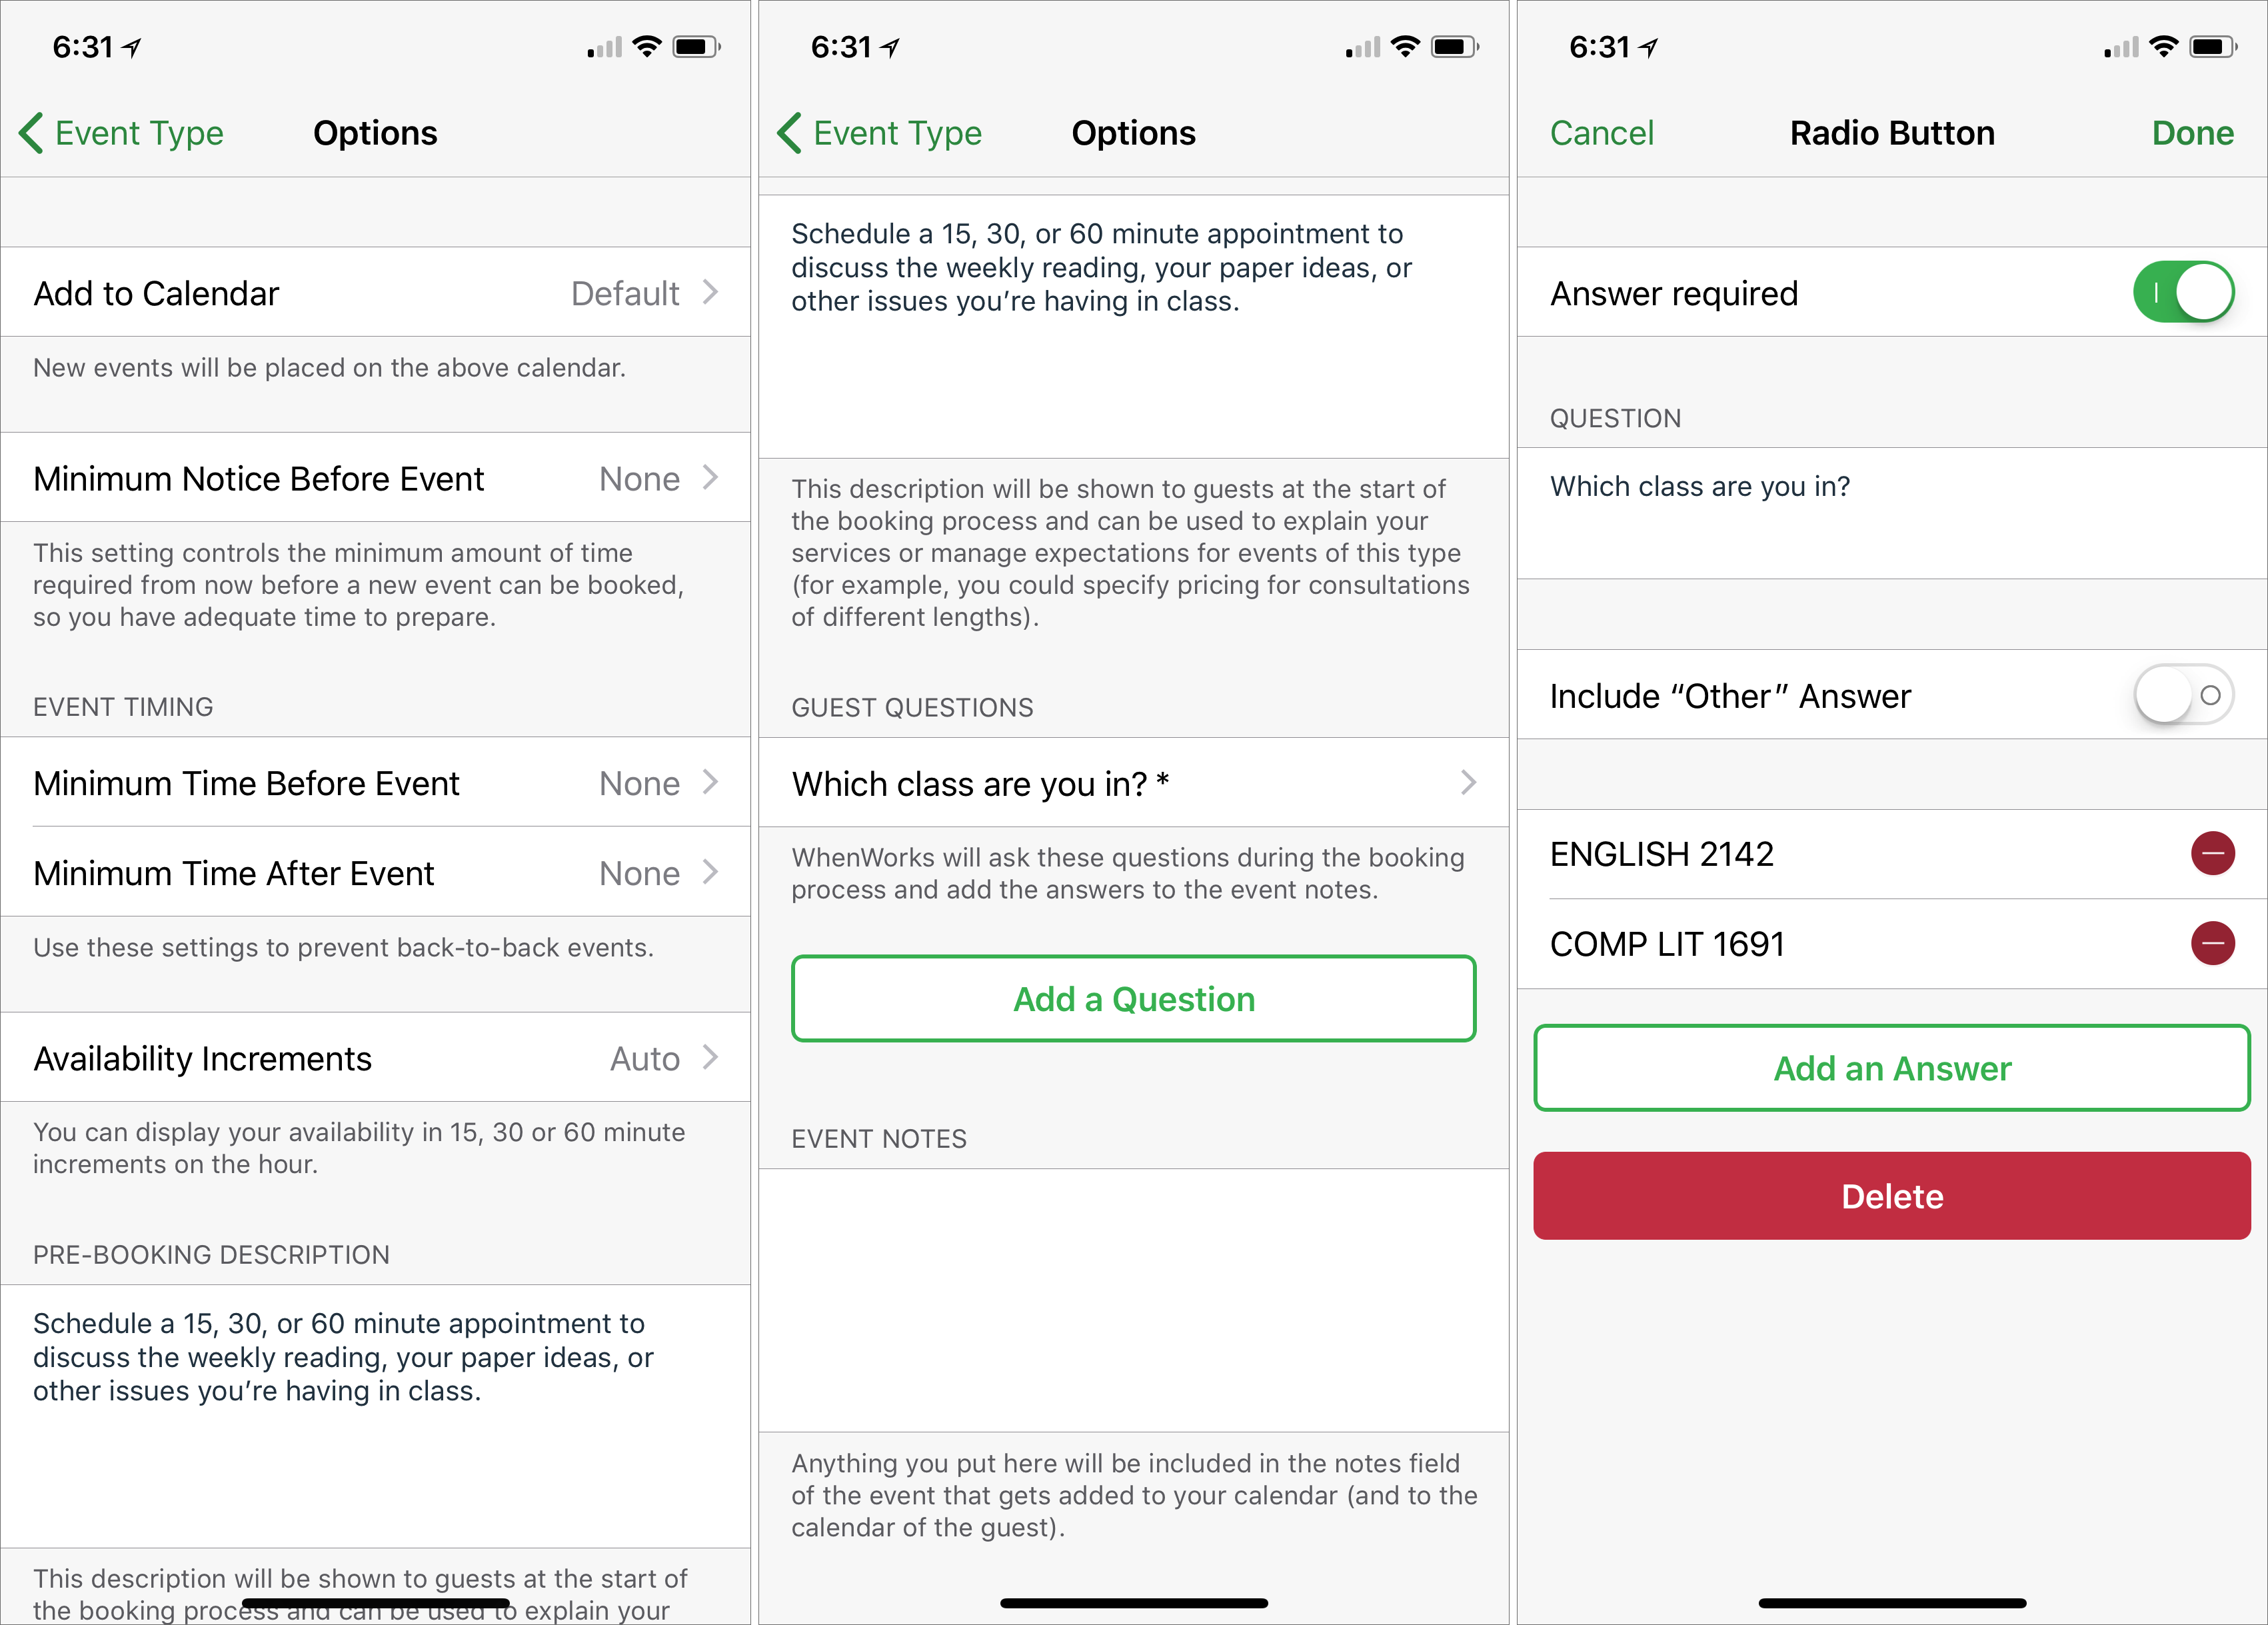
Options abound. You can make sure you have enough time before and after each event to prep and to avoid back-to-back events. You can add a description if the event will be public so people know what to expect. And you can even ask optional or required questions, with the answer types of phone number, text, checkbox (to allow multiple choices), and radio button (to limit to a single choice). Finally, you can add notes to the event that will appear in both the event that’s added to your calendar and the event added to your guest’s calendar.
When you’re done configuring the event, you can preview it in the app, which is worthwhile, since it helps you make sure you’ve done everything correctly. Other buttons let you copy the link or email the link, and if you’ve made the event type public, it also shows up on your custom WhenWorks page, which can be viewed equally as well on a computer or mobile device.
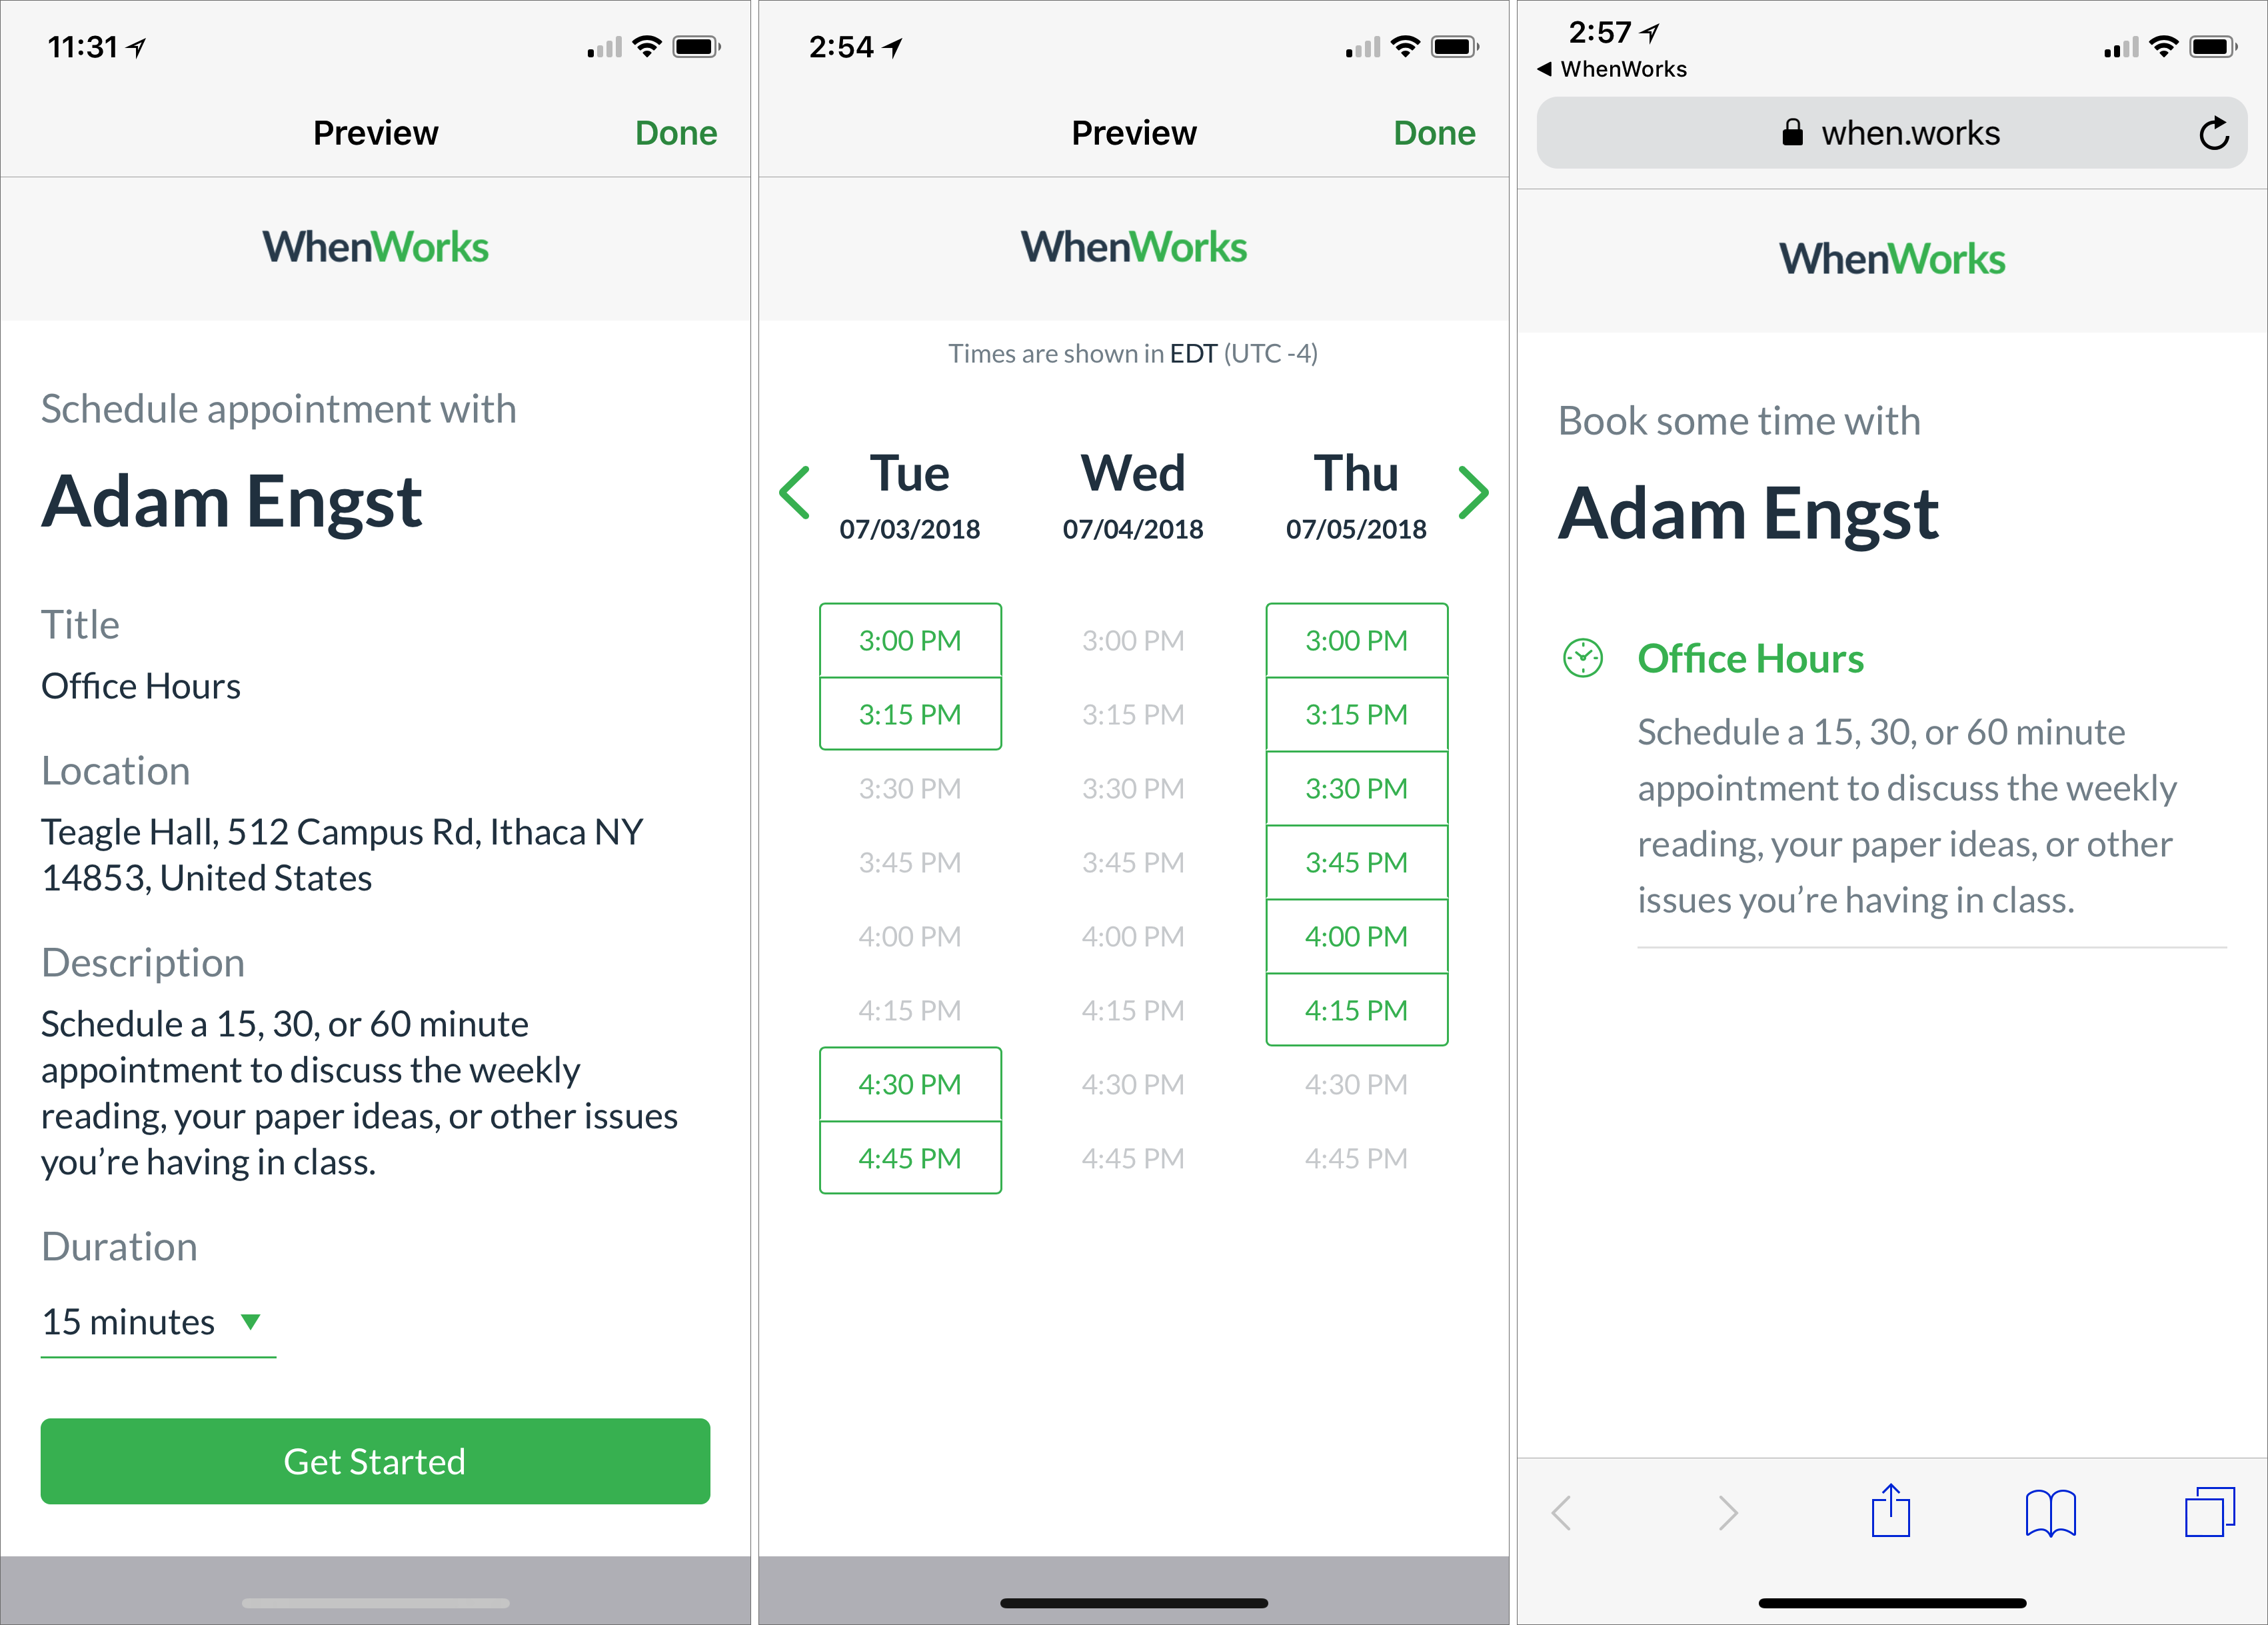
From the guest perspective, all that’s necessary is a Web browser. Booking an appointment is a matter of picking a duration, if that’s an option, and then choosing a time from the grid. To finalize the process, the guest enters their name and email address, and answers any necessary questions. When that’s done, WhenWorks sends email to both you and the guest, and an Add To Calendar button makes it easy for the guest to put the event on their calendar.
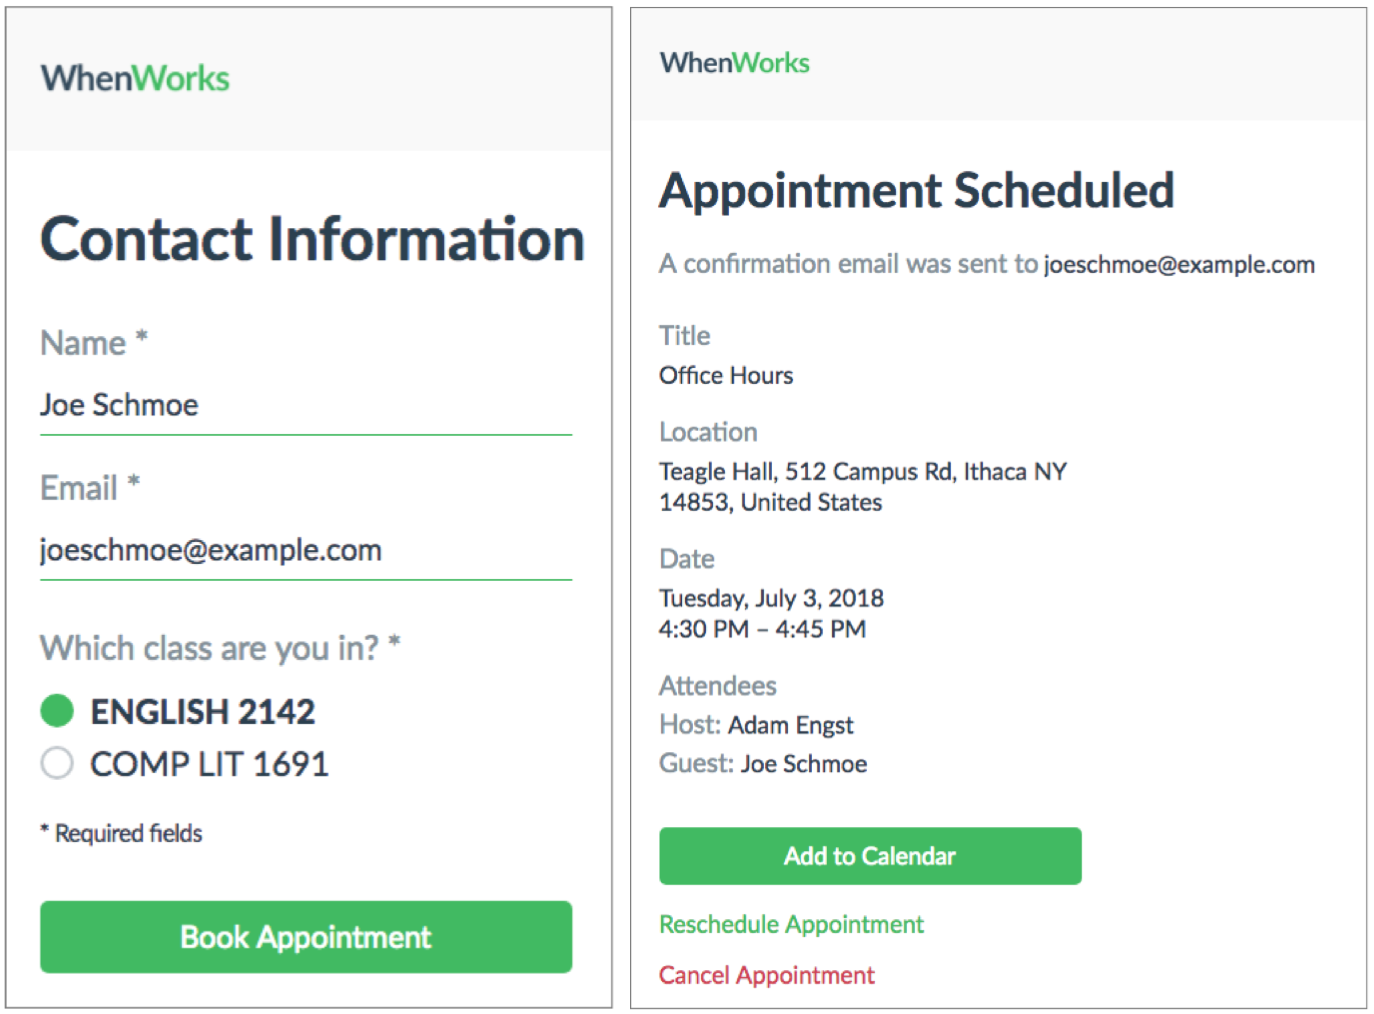
Note the Reschedule Appointment link in the confirmation message. It appears in the email as well, and in the calendar event, and clicking it runs the guest through the booking process again, with an added Reason For Rescheduling field. There’s also a Cancel Appointment link that does what you’d expect. The practical upshot is that in an ideal world, guests can not only book time with you, they can also reschedule or cancel without bothering you.
What most impresses me about WhenWorks is that it’s so lightweight—it’s just a simple iOS app and seamless back end. There’s no need to set up and manage a completely separate Web service that likely has no insight into the rest of your schedule. This approach also makes it trivially easy to test WhenWorks; you could try it out with a couple of clients privately without committing to a big system.
I haven’t had an excuse to use WhenWorks in the real world since people don’t generally make appointments with me. But it has worked well in my testing, and I’ve been encouraging various professionals I know—a computer science professor, a plumber, and a massage therapist—to give it a try. They haven’t jumped on it yet, but I think they’d like it. And from a purely selfish standpoint, I’d prefer to book my own appointments through WhenWorks rather than having to call, play voicemail tag, and eventually negotiate a mutually convenient time.
CE Week 2018: New Tech at “CES East”
Every January brings the insanely huge CES, formerly known as the International Consumer Electronics Show—see this year’s coverage in our CES 2018 series. Halfway through the year, the Consumer Technology Association runs a much smaller East Coast show in New York City called “CE Week.” (It used to be an entire week; now it’s more like CE Thirty-Two Hour Roadtrip.) I attended the main show at the Javits Center, followed by a similar but unaffiliated show called PEPCOM Digital Experience held at the Metropolitan Pavilion elsewhere in NYC.
The usual disclosures: PEPCOM offers a pretty good buffet and an open bar to journalists who attend—I recommend the lemon mousse—which may lead to somewhat more upbeat coverage, so I always disclose. The gizmos below are in the order I saw them, with the PEPCOM entries starting with Monoprice and Anker. Anyone I cover who gave me anything more than a T-shirt—not necessarily the item I’m covering—is marked with a ?.
AirSelfie Camera Drone

I’m normally not interested in drones, but the AirSelfie caught my eye because it’s the size of a deck of cards and weighs less than that. I’m a sucker for gadgets I can throw into a pocket or backpack and forget about until I need them. The AirSelfie features a 1080p camera and 16 GB of unswappable onboard storage, and it sends a live feed to your iPhone (or Android smartphone), which you also use to steer. Your phone connects to the drone’s onboard Wi-Fi in order to control it, which limits the range to 65 feet (and takes your phone off any other Wi-Fi network you’re using). A 30-minute charge gets you 5 minutes of flight time that you start by tossing it flat up in the air. If the battery dies mid-flight, it’ll automatically descend, but it’s up to you to keep it out of a river or canyon. $199 or $249 with a Powerbank that recharges and doubles as a storage case. In theory, the drone is shipping now while the Powerbank is still to come; in practice, the AirSelfie is out of stock at the moment.
Udoq Multiple Device Dock

If your daily recharge dance involves plugging five gadgets into five cables, you might be interested in a Udoq. It’s an attractive and heavy metal shelf in varying sizes that can take up to five interchangeable inserts in the base that charge various devices with universal adapters. The iPhone X and Apple Watch each have an available mount that provides wireless Qi charging. The Udoq is slated to ship in December 2018—the CEO said everything was ready now except the iPhone X stand. The “Ultimate Apple bundle” is currently half off for $99 at Indiegogo, which includes two Lightning docks, the Qi iPhone X charger, and the Apple Watch charger stand.
myFlipShade
 In the “surprised no one’s thought of this before” category, myFlipShade ? is a hinged plastic cover for your iPhone. Flipped down, it’s a screen protector. Flipped upwards, it’s a sunshade. Flip out the wings, it’s a privacy guard against sidelong glances. Flipped over, it’s a stand. It’s one size fits all for every iPhone from the 6 to the X (not the smaller iPhone SE), but the design is such that it’ll work with any phone in that size range so long as you don’t mind blocking your camera. Shipping now for $9.99, it’s also available at Target stores.
Pred Tokk Smart Assistant

If your reaction to the HomePod was, “that’s great, but I want one for my body,” the Tokk Smart Assistant might be up your alley. It’s a 2-inch round speaker/mic combination that clips magnetically to your shirt collar or neckline with a button for activating Siri, and useful in situations when you don’t want buds in your ears. $49.99, available in black, red, and white.
Monoprice True Wireless and Anker Liberty Lite Bluetooth Earbuds

Since the debut of the AirPods, I’ve grown a bit jaded about the number of nearly identical wireless earbuds I’ve seen at CES—which is why when the Monoprice rep told me their True Wireless earbuds sold for $50, I made the poor woman repeat herself three times to make sure she wasn’t saying $150. Then Anker told me about their Liberty Lite model for $70, so I guess sub-$100 is now a thing. (A search on Amazon reveals other models in this price range from companies I’ve never heard of.) Otherwise, both are what you’d expect: Bluetooth earbuds with 2.5 hours (Monoprice) or 3.5 hours (Anker) listening time, with a carrying case doubling as a charger. Monoprice is shipping now (pictured); Anker is coming out in mid-July. (Googling for the Anker earbuds now takes you to a similarly-named older model priced at $100.)
Neurovalens Modius Weight Loss Headset
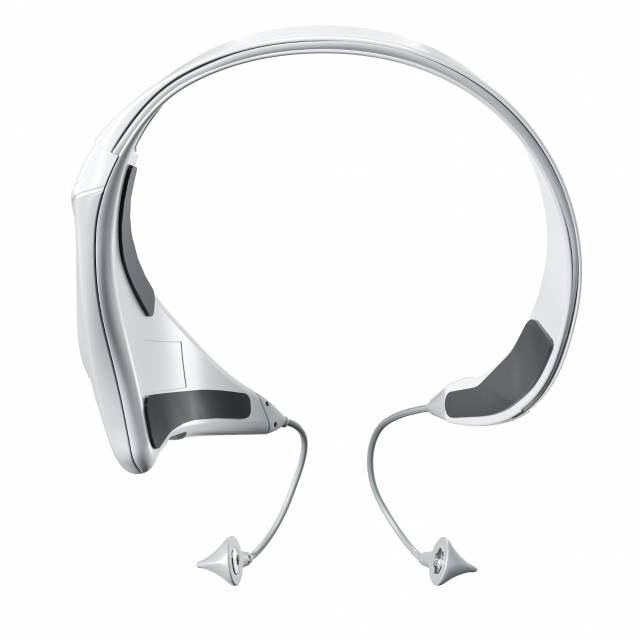
“Revolutionary” e-health gadgets are a dime a dozen at CES, and I have a healthy exaggeration detector to filter such claims before they get to you. My detector was pinging madly while discussing the Modius headset with the PR rep, who claimed “self-reported” weight loss from their users when combined with diet and exercise—to which I replied that anything is effective for weight loss with enough diet and exercise. But after talking to their CEO, it could be the real deal. (That link is unrelated to research done by the company.) [Editor’s Note: In fact, that link goes to an abstract for a poster presentation given by the founder of Modius.] Apparently, the headset works by stimulating your vestibular nerves while you exercise, which somehow retrains your brain so you get a similar metabolism to people who are naturally lean. They currently have hush-hush clinical trials underway—they won’t reveal with whom, apparently because they’re not allowed to—and the CEO came right out and said that they’re selling now because brain-stimulant headsets aren’t regulated by the FDA. So if you don’t want to wait for proof it works—or a review I might do someday, as I could stand to lose a pound (or thirty)—the Modius headset is available now for $499.
Cortica AI
On the other hand, my exaggeration detector remains in high dudgeon over the claims of Cortica, an Israeli AI research company. I’ll quote their press release: “Cortica’s technology enables machines to mimic human level cognitive function outside the confines of the brain. This AI liberates machines from the confines of their programming allowing them to grow and learn on their own in the way that people do.” They claim to have done this with extensive research into the mammalian cortex, which I buy, but as for the results? We’re not there yet. Maybe I’ll end up eating these words with a light vinaigrette; if I do, Cortica’s first push is to have their artificial ferret brains driving your cars.
ThinOptics Reading Glasses

I’ve written before about the ThinOptics line of reading glasses ?. Most of these have unbreakable rubber frames that attach to the bridge of your nose and fold up into a slim carrying case suitable for attaching to the back of your phone or on a keychain. But keep an eye out—hopefully at a middle distance that’s not blurry for you—for their upcoming Frontpage Collection model that manages to get glasses with ear stems into a case the width of a few credit cards: 1.3 ounces total in the case, and 0.3 ounces on your face. They come in various styles and will be available after 9 July 2018 for $49. Their other models are in the $20–$30 range. Lens strengths start at +1.0, which unfortunately doesn’t do much good for my 48-year-old eyes that need a +0.5.
Rocketbook Everlast Mini

I loved the idea of the Rocketbook ? at CES last January (see “CES 2018: ShowStoppers Prepares for the Collapse of Civilization,” 12 January 2018): a reusable paper notebook with icons at the bottom of every page, and an app that routes pictures of those pages to various cloud services based on which icons you mark. But I haven’t yet taken my promotional freebie out of its packaging since January, as I never need a full-sized notebook. Enter the Everlast Mini, a handheld notebook from the company based on the same idea. Unlike other Rocketbooks that are erasable with a dry-erase cloth (or, weirdly, by putting the whole thing in a microwave), the Everlast Mini uses a damp cloth—so don’t let it get caught in the rain. It ships with the Pilot Frixion pen necessary to make the ink erasable, but works with any pen in that line. Available at Indiegogo starting at $16, shipping in July 2018.
Chefling Kitchen Assistant App
Chefling is a great idea that makes me a bit nervous. It’s a free app, currently available for iOS or Android, which you use to scan either the barcodes on your groceries or your entire receipt. It can then track what ingredients you use and what you have left, and suggest recipes to use it in time. Great so far. But when I asked how the company intends to make money, they said “user data.” Due to a bit of PR rep hesitation, I didn’t quite buy their assurances that they meant aggregate data and not what you, personally, are putting on your dining room table. Sure, it’s not a great deal more invasive than what any store with a loyalty card has on your buying habits—except Chefling will know about all your groceries from any store. I’ll give it a try, because I’m an idiot in the kitchen and I don’t care much about this data getting out—but you should make that decision for yourself before you fire it up.
Republic Wireless Relay

You want your kids to have a phone so you can reach them or find them, but you don’t want them to stare at a screen all day or break something expensive. Consider a Relay, a ruggedized plastic one-button speaker/mic combination with the guts of a cell phone but no screen. A press of the button activates a walkie-talkie or sends a voice message to you (in an iPhone or Android app) or other paired Relays. Meanwhile, you can track your kids with GPS, and yell through the speaker that playtime is over. The Relay works with Wi-Fi or Republic Wireless 4G (which, in turn, relies on T-Mobile and Sprint networks). There may not be a distracting screen, but Republic Wireless promises music, audio-based games, and upcoming access to Google Assistant. Available in packs of one, two, or three for $99, $149, and $199 respectively (you only need one per kid if you’re using the app); each Relay requires a $7/month all-you-can-eat service plan.


