#1435: Exploring iOS 12’s Do Not Disturb and Apple Books, new HomePod features with iOS 12, easyDNS sponsoring TidBITS
With iOS 12 out for a week, we’ve started our in-depth exploration into Apple’s latest mobile operating system. If you’ve ever been burned by forgetting to turn Do Not Disturb off after invoking it manually, you’ll like iOS 12’s new implementation. Also, those who read ebooks or listen to audiobooks in iBooks will want to check out Michael Cohen’s look into iOS 12’s new Apple Books. Adam Engst delves into the iOS 12 for HomePod update, explaining how to use Siri on the HomePod for phone calls, multiple named timers, finding misplaced Apple devices, and more. Last, but certainly not least, we’re pleased to welcome the Canadian Internet company easyDNS as our latest long-term sponsor. Notable Mac app releases this week include <deep breath> Pages 7.2, Numbers 5.2, and Keynote 8.2, BBEdit 12.1.6, Pixelmator 3.7.5, Safari 12, Default Folder X 5.3, Carbon Copy Cloner 5.1.5, Mellel 4.1.3, Tinderbox 7.5.6, KeyCue 9.1, PopChar X 8.4, Typinator 7.7, Simon 4.3, Nisus Writer Pro 2.1.9, SpamSieve 2.9.33, and Evernote 7.5. You’d think Apple just released macOS 10.14 Mojave or something.
easyDNS Sponsoring TidBITS
We’re pleased to welcome back as a long-term sponsor easyDNS, the Canadian DNS registration and hosting company that we’ve relied on for over 15 years. Although easyDNS started out in 1998 as a reaction to the horrific DNS service provided by Network Solutions, the company has long been expanding its set of services beyond DNS, all with an eye toward providing options that are fast, reliable, and well-supported.
(Technically, we’re using Cloudflare for DNS now to take advantage of its caching capabilities, but I mirror all DNS changes in easyDNS as well, so I can switch back at a moment’s notice if I have to.)
easyDNS’s DNS plans now include its easyMail and easyOutbound SMTP services. easyMail is a hosted IMAP service that provides IMAP accounts, mail forwarding, backup mail spooling and backup MX records, SMTP port forwarding, and outbound SMTP. And if your ISP has blocked port 25 for outbound mail, the easyOutbound SMTP service lets you send all your mail through easyDNS instead. For each, you can choose how many mailboxes and how many outgoing messages per day you want to pay for.
When we switched our Internet infrastructure away from having a virtual private server at Linode, we lost our SMTP server. Our users have accounts on other email services so all tidbits.com addresses forward elsewhere. With easyMail’s forwarding and outbound SMTP features, we were able to outsource all email handling to easyDNS. With the insane amount of spam any email server takes, I was extremely happy to let experts take care of our email, and we haven’t experienced so much as a hiccup since making the transition 5 months ago.
easyDNS has also gotten into the Web hosting world, with easyWeb and easyPress. easyWeb is cPanel-powered hosting that provides access to over 300 Web apps and an interface for managing them. It’s a good middle ground between running your own virtual server and easyPress, which is a managed WordPress service. easyDNS is offering TidBITS readers 2 months of free easyWeb hosting, and I’d encourage you to keep an eye on their ad banners in the future for additional offers.
A few facts about easyDNS are worth calling out:
- They’re almost never the cheapest option. That’s intentional, since their goal is to provide excellent service and free support for the foreseeable future, and that requires revenue. I’m happy to pay easyDNS more for essential services because outages and misconfigurations are damaging to my business.
- easyDNS is located in Canada, which has stricter privacy laws than the United States, more on par with the UK and EU. That may not be a big deal, but if you’re concerned about the privacy of your email or data on your Web site, easyDNS is a good place to be. (Not the least because easyDNS’s CEO, Mark Jeftovic, comes down hard on the side of privacy.)
- I was surprised to see recently that easyDNS offers registration for 501 top-level domains. I had no idea there were that many now. Many have special requirements or are limited to members of certain communities, but you can now register domain names ranging from .actor to .zone.
- If you’re not entirely satisfied with easyDNS’s services, they say “you can cancel and leave with a 100% refund—no ‘conditions,’ no fine print.” I can’t say such a guarantee is unique, but it’s certainly not standard.
So if you’re looking for domain registration and hosting, email services, or Web hosting, I encourage you to check out easyDNS. I’ve worked with a lot of Internet companies over the years, but few for so long as easyDNS.
Apple Updates HomePod with iOS 12 for Phone Calls, Multiple Timers, and More
Along with iOS 12, watchOS 5, and tvOS 12, Apple released a major software update for the HomePod on 17 September 2018. The update, which is somewhat confusingly also called “iOS 12” will eventually install on its own by default if you don’t take matters into your own hands and install it manually first. There is no reason to avoid or delay the update—it’s entirely positive as far as I’ve seen.
The Home app in iOS (or macOS 10.14 Mojave) will alert you that updates are available and will show them to you when you tap the Details link, but you can also check manually. In the Home app, tap the house button in the upper-left corner, and under Speakers, tap Software Update. However you get there, on the final screen, tap Install. 1.5 GB is a large download, but it was a reasonably quick installation.
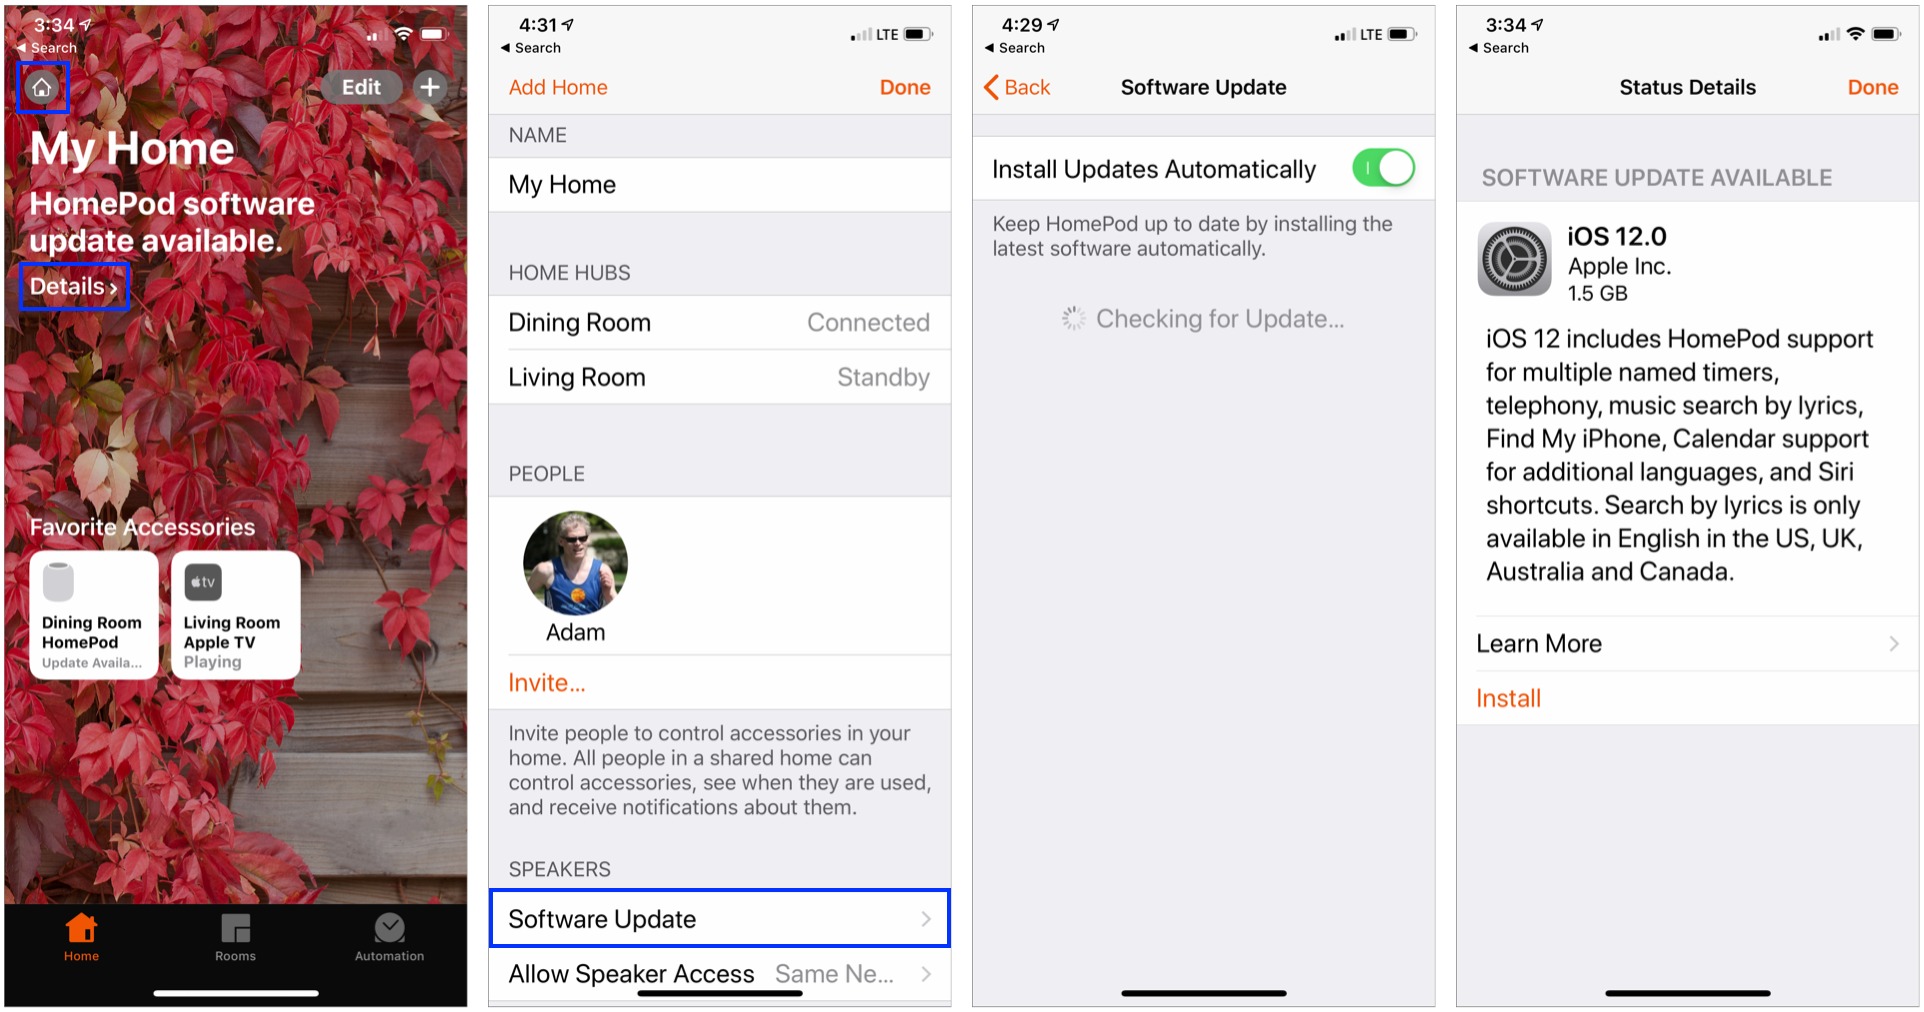
So what’s new in iOS 12 on the HomePod? Apple called out four main features, along with a couple of minor tweaks.
Make, Identify, and Receive Phone Calls
For my money, the most significant new feature of iOS 12 for the HomePod is the added capability to make and receive phone calls directly on the HomePod. You can also now ask Siri who is calling. Previously, you were limited to initiating (or receiving) a call on your iPhone and then transferring it to the HomePod by tapping the audio button and then the HomePod in the list of audio output devices. Since the HomePod makes for a highly credible speakerphone, being able to say, “Hey Siri, call my mother” (particularly while you’re otherwise occupied with cooking dinner) is a big win. If you prefer, you can instead say, “Hey Siri, FaceTime Audio with my mother” to route the call through FaceTime.
In a few quick tests of initiating calls, Siri on the HomePod was less effective than on the iPhone itself. In one, I asked Siri to call NYSEG Power Outage, a company-only contact in my iPhone I use to report a loss of power. Siri on my iPhone had no trouble looking up the number and calling it, but Siri on the HomePod couldn’t find the contact until I changed my pronunciation to match the way Siri said “NYSEG.”
Luckily, the HomePod worked better with more easily pronounceable names, and Siri also checks with you to make sure it has picked the right person. If necessary, you can always start a call on your iPhone and transfer it via the Audio button.
When a call comes into your iPhone, it rings, of course, but the HomePod doesn’t react. It’s up to you realize the call is coming in and say “Hey Siri, who’s calling?” If the caller is in Contacts, the HomePod announces their name and asks if you want to take the call. This is a conversation—you can simply reply “Yes” or “No” without invoking Siri again. I don’t know what happens if the caller isn’t in Contacts; I haven’t received a phone call from an unknown number since updating.
If you want to accept the call, the HomePod starts it immediately. However, if you say “No,” the call continues to ring on your other devices—there seems to be no way to get Siri on the HomePod to decline the call.
If you want to answer a call without checking who it is via Siri (perhaps you glanced at your iPhone or Apple Watch instead), just say “Hey Siri, answer the call.” And when you’re done talking, you can either tap the top center button on the HomePod or say “Hey Siri, hang up.”
Set Multiple Named Timers
Anyone who cooks regularly knows that timers are key, and being able to set them via Siri on iOS devices, the Apple Watch, and now the HomePod can help you avoid burning dinner. With iOS 12, the HomePod gains support for setting multiple timers, something that you can’t do on an iPhone or Apple Watch. Even better, you can name those timers with commands like “Hey Siri, set an 8-minute cookie timer.”
When the timer ends, the HomePod plays its timer sound and announces “Cookie timer” repeatedly until you say “Hey Siri, stop” or tap the top-center button. In other words, the feature works exactly as it should and as you’d expect. Now Apple needs to make the iPhone and Apple Watch timers work the same way.
Locate iOS Devices
Since HomePods don’t move around much, iOS 12 makes them a reliable source for finding a nearby device: an iPhone, iPad, iPod touch, Apple Watch, or Mac, but not AirPods. Just say “Hey Siri, where’s my Apple Watch?” or “Hey Siri, ping my iPad.”
It would seem that this feature should work with any device that appears in your Find My iPhone app, including devices from Family Sharing members, but in my testing, the HomePod repeatedly failed to realize that any of Tonya’s devices were in the house. So this feature may currently be limited to the devices of the person whose Apple ID controls the HomePod.
If the device is nearby, Siri says so and automatically plays a pinging sound on it so you can find it. (There is one exception: with the iPhone, Siri tells you it’s nearby and then asks if you want to play the sound.) If the device isn’t in the house, Siri tells you to use icloud.com or the Find My iPhone app.
Search for Songs by Lyrics
Apple has made much of both the iOS 12 Music app’s capability to search for songs by their lyrics and the fact that you can invoke it via Siri in iOS and on the HomePod. It sort of works—if you have a lyric rattling around in your head and can’t remember which song it’s from, you can ask something like, “Hey Siri, what song includes the lyric “Ground control to Major Tom?” (The feature is available only for lyrics in English.)
Unfortunately, the hit rate in my testing was only so-so. Siri worked some of the time, but I instantly ran across three types of errors. In each case, I also tested on my iPhone X running iOS 12.
- Sometimes Siri on the HomePod would just fail, saying it didn’t know who performed the song. Searching on “And the waitress is practicing politics” correctly found Billy Joel’s “Piano Man” on my iPhone but came up empty on the HomePod.
- Sometimes Siri would find a cover of the song and prefer it over the original, which seems wrong. Looking for “Hello darkness, my old friend” should find Simon and Garfunkel’s “The Sound of Silence,” not a cover by Disturbed. Siri on the iPhone made this mistake as well.
- Sometimes Siri on the HomePod would come up with a completely incorrect song. Searching for “breaking the back of love” turned up Juice WRLD’s “Lucid Dreams” (which does include all those words, but not in that order) on the HomePod. Siri on the iPhone properly identified “The Back of Love” by Echo & The Bunnymen.
I was surprised to see such different results between the HomePod and the iPhone. I also tested these searches on the Mac in both macOS 10.13 High Sierra, which mimicked the HomePod, and 10.14 Mojave, which repeatedly failed or found an entirely different wrong song each time. Since the Siri interface on both the iPhone and Mac shows how it recognizes commands, it was easy to confirm that my input was the same in each case, and it seems likely that it was the same on the HomePod. So what accounts for the differences in output?
The moral of the story is that searching for lyrics on the HomePod might or might not work, but for a better answer, use Siri on the iPhone or type the words into the Music app on the iPhone or iPad.
View Network Name
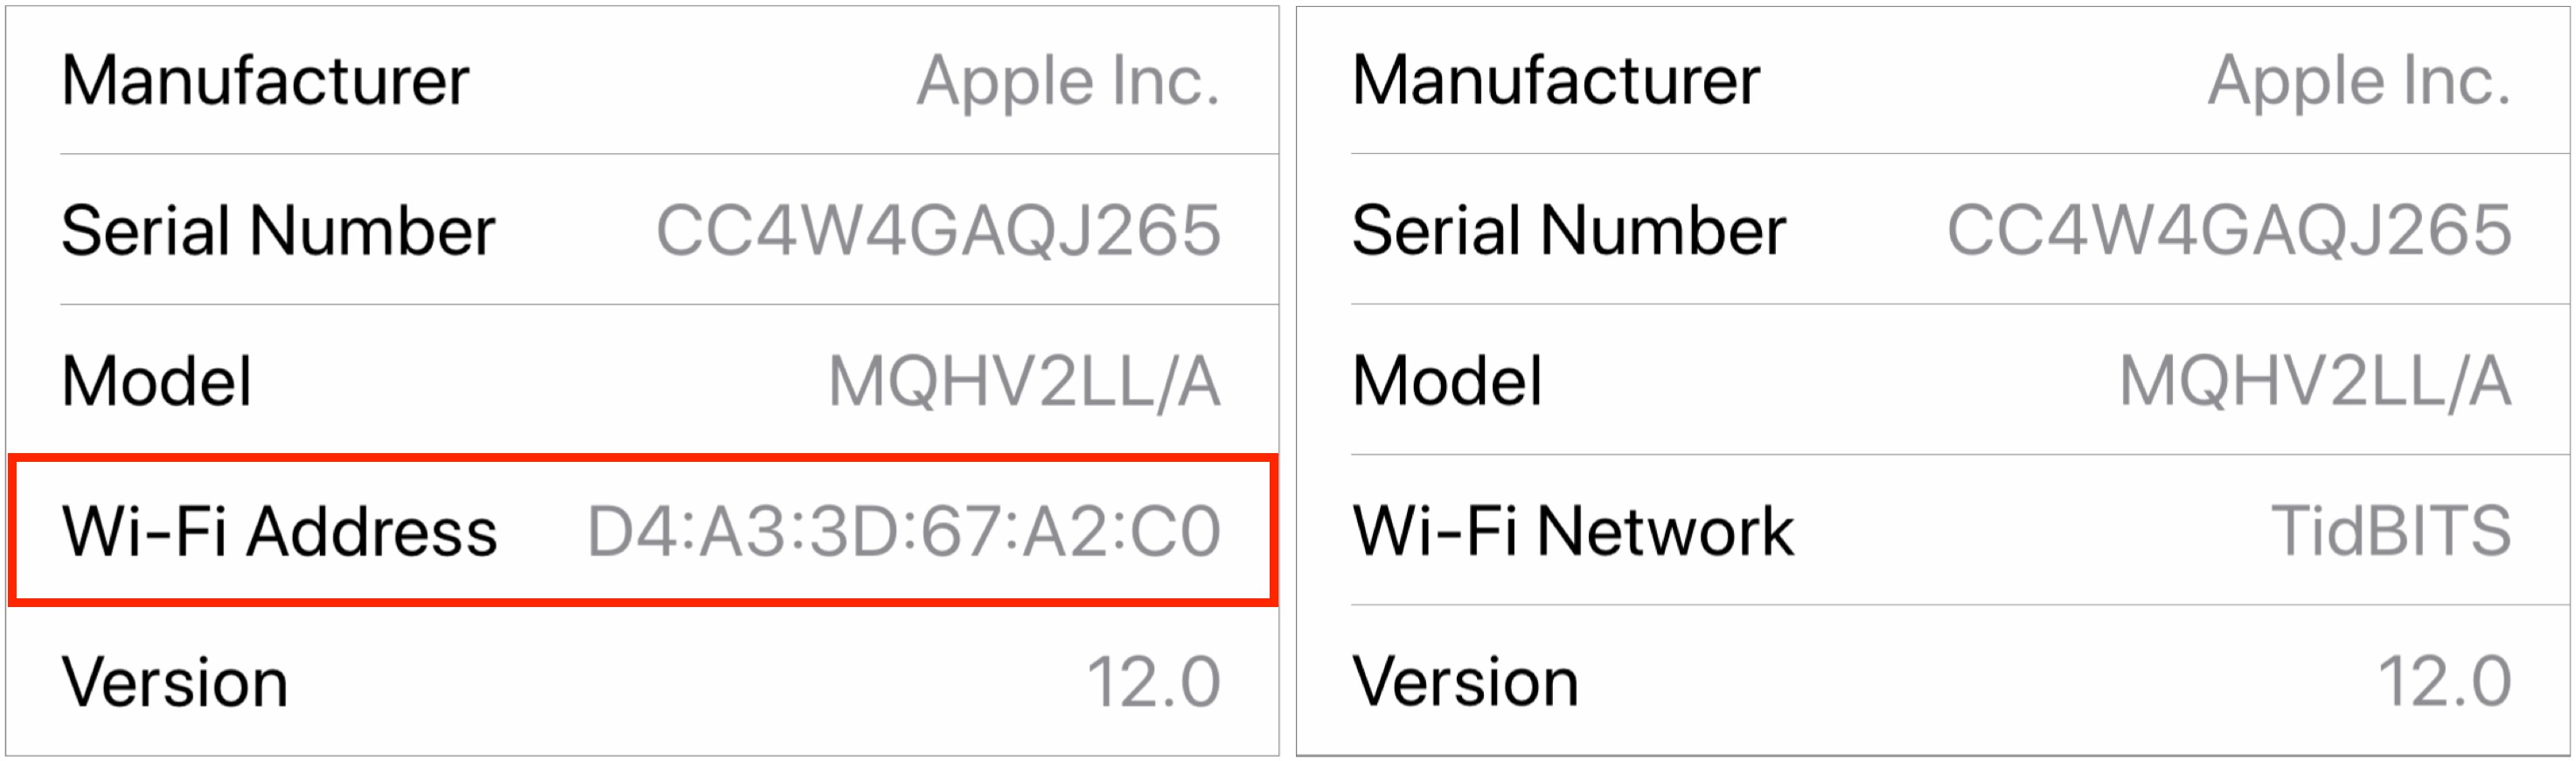
If you have multiple Wi-Fi networks available and are having troubles with your HomePod, you might want to check which network your HomePod is using. The hidden trick for doing this is to open the Home app on your iPhone, force-touch the HomePod’s icon, tap Settings, scroll to the bottom, and then tap the Wi-Fi Address line to morph it to Wi-Fi Network and reveal the current network name.
Work with Calendars in More Languages
Apple doesn’t explain precisely what “Calendar support to include all languages” in the release notes means, but if you’ve enabled personal requests in the HomePod settings, you can presumably ask Siri to check your calendar, create new meetings, and tell you where a meeting is, all in your preferred (if supported) language.
Does iOS 12 on the HomePod Change Anything?
All in all, iOS 12 on the HomePod is a welcome update, especially in the ways that it turns the HomePod into an even better speakerphone and kitchen timer. The capability to ping a misplaced device could also be handy, particularly for people whose clothes tend to lack pockets, forcing them to leave their iPhones around the house when at home. Searching by lyrics seems like a nice feature, but it’s hard to imagine my memory and Siri’s capabilities aligning such that I’d find it useful. Your mileage may vary.
How might the iOS 12 update play into someone’s decision to buy a HomePod instead of a smart speaker powered by Alexa or Google Home? I can’t say that it is likely to make any difference. It seems quite clear that Apple is going for an ecosystem play here—if you buy into Apple’s devices and services, you’ll be happiest with a HomePod. Amazon and Google are doing the same thing, so if you’re an Android or Windows user, devices that use Alexa or Google Assistant will likely better fit your needs and expectations. That was true before iOS 12 debuted for the HomePod, and it remains true today.
Do you have a HomePod, and if so, what do you use it for? Let us know in our quick three-question survey.
Inside iOS 12: Do Not Disturb Learns to Turn Itself Off
Apple’s enhancements to Do Not Disturb (DND) are among the most welcome changes in iOS 12, in large part because they make DND work the way many of us have wanted since the feature made its debut in iOS 6. There are two main improvements: an automatic end to manually invoked DND sessions and a Bedtime mode that holds notifications until you’re awake in the morning.
As a reminder, DND silences phone calls, alerts, and notifications while your iOS device is locked (or, optionally, at all times). Alarms and timers set in the Clock app continue to work normally even when DND is active. You can allow phone calls from certain groups of people to break through the DND cone of silence, and a Repeated Calls switch lets anyone break through by calling a second time within 3 minutes.
Do Not Disturb While Driving extends DND functionality to when you’re on the road, determining that either by a connection to a car Bluetooth system or based on detected motion (see “iOS 11 to Bring Do Not Disturb While Driving,” 21 August 2017). Do Not Disturb While Driving also automatically replies to text messages so people know you’re in the car, and gives them an opportunity to get through by sending “urgent” as an additional message.
Those features of DND haven’t changed at all, so let’s look at what’s new.
Automatic Termination of DND Sessions
One of the core problems with DND is that manually invoked DND sessions in previous versions of iOS don’t end at a reasonable time. If you have DND scheduled for 11 PM to 8 AM, for instance, a manually invoked DND session at any time during the day won’t end automatically until 8 AM the next day. Forget to turn DND off after your 10 AM doctor’s appointment, and you won’t receive notifications or phone calls until the next morning. It’s even worse if you don’t have a DND schedule. In that case, it’s not clear from the interface that a manually invoked session will ever end.
In iOS 12, you can still turn DND on manually with a single tap on its button in Control Center, and such a session works just as it did in previous versions of iOS, ending automatically when DND disables itself on schedule. However, the big improvement is that you can force-touch or press and hold down on the DND button in Control Center to bring up the DND card, which provides more options.
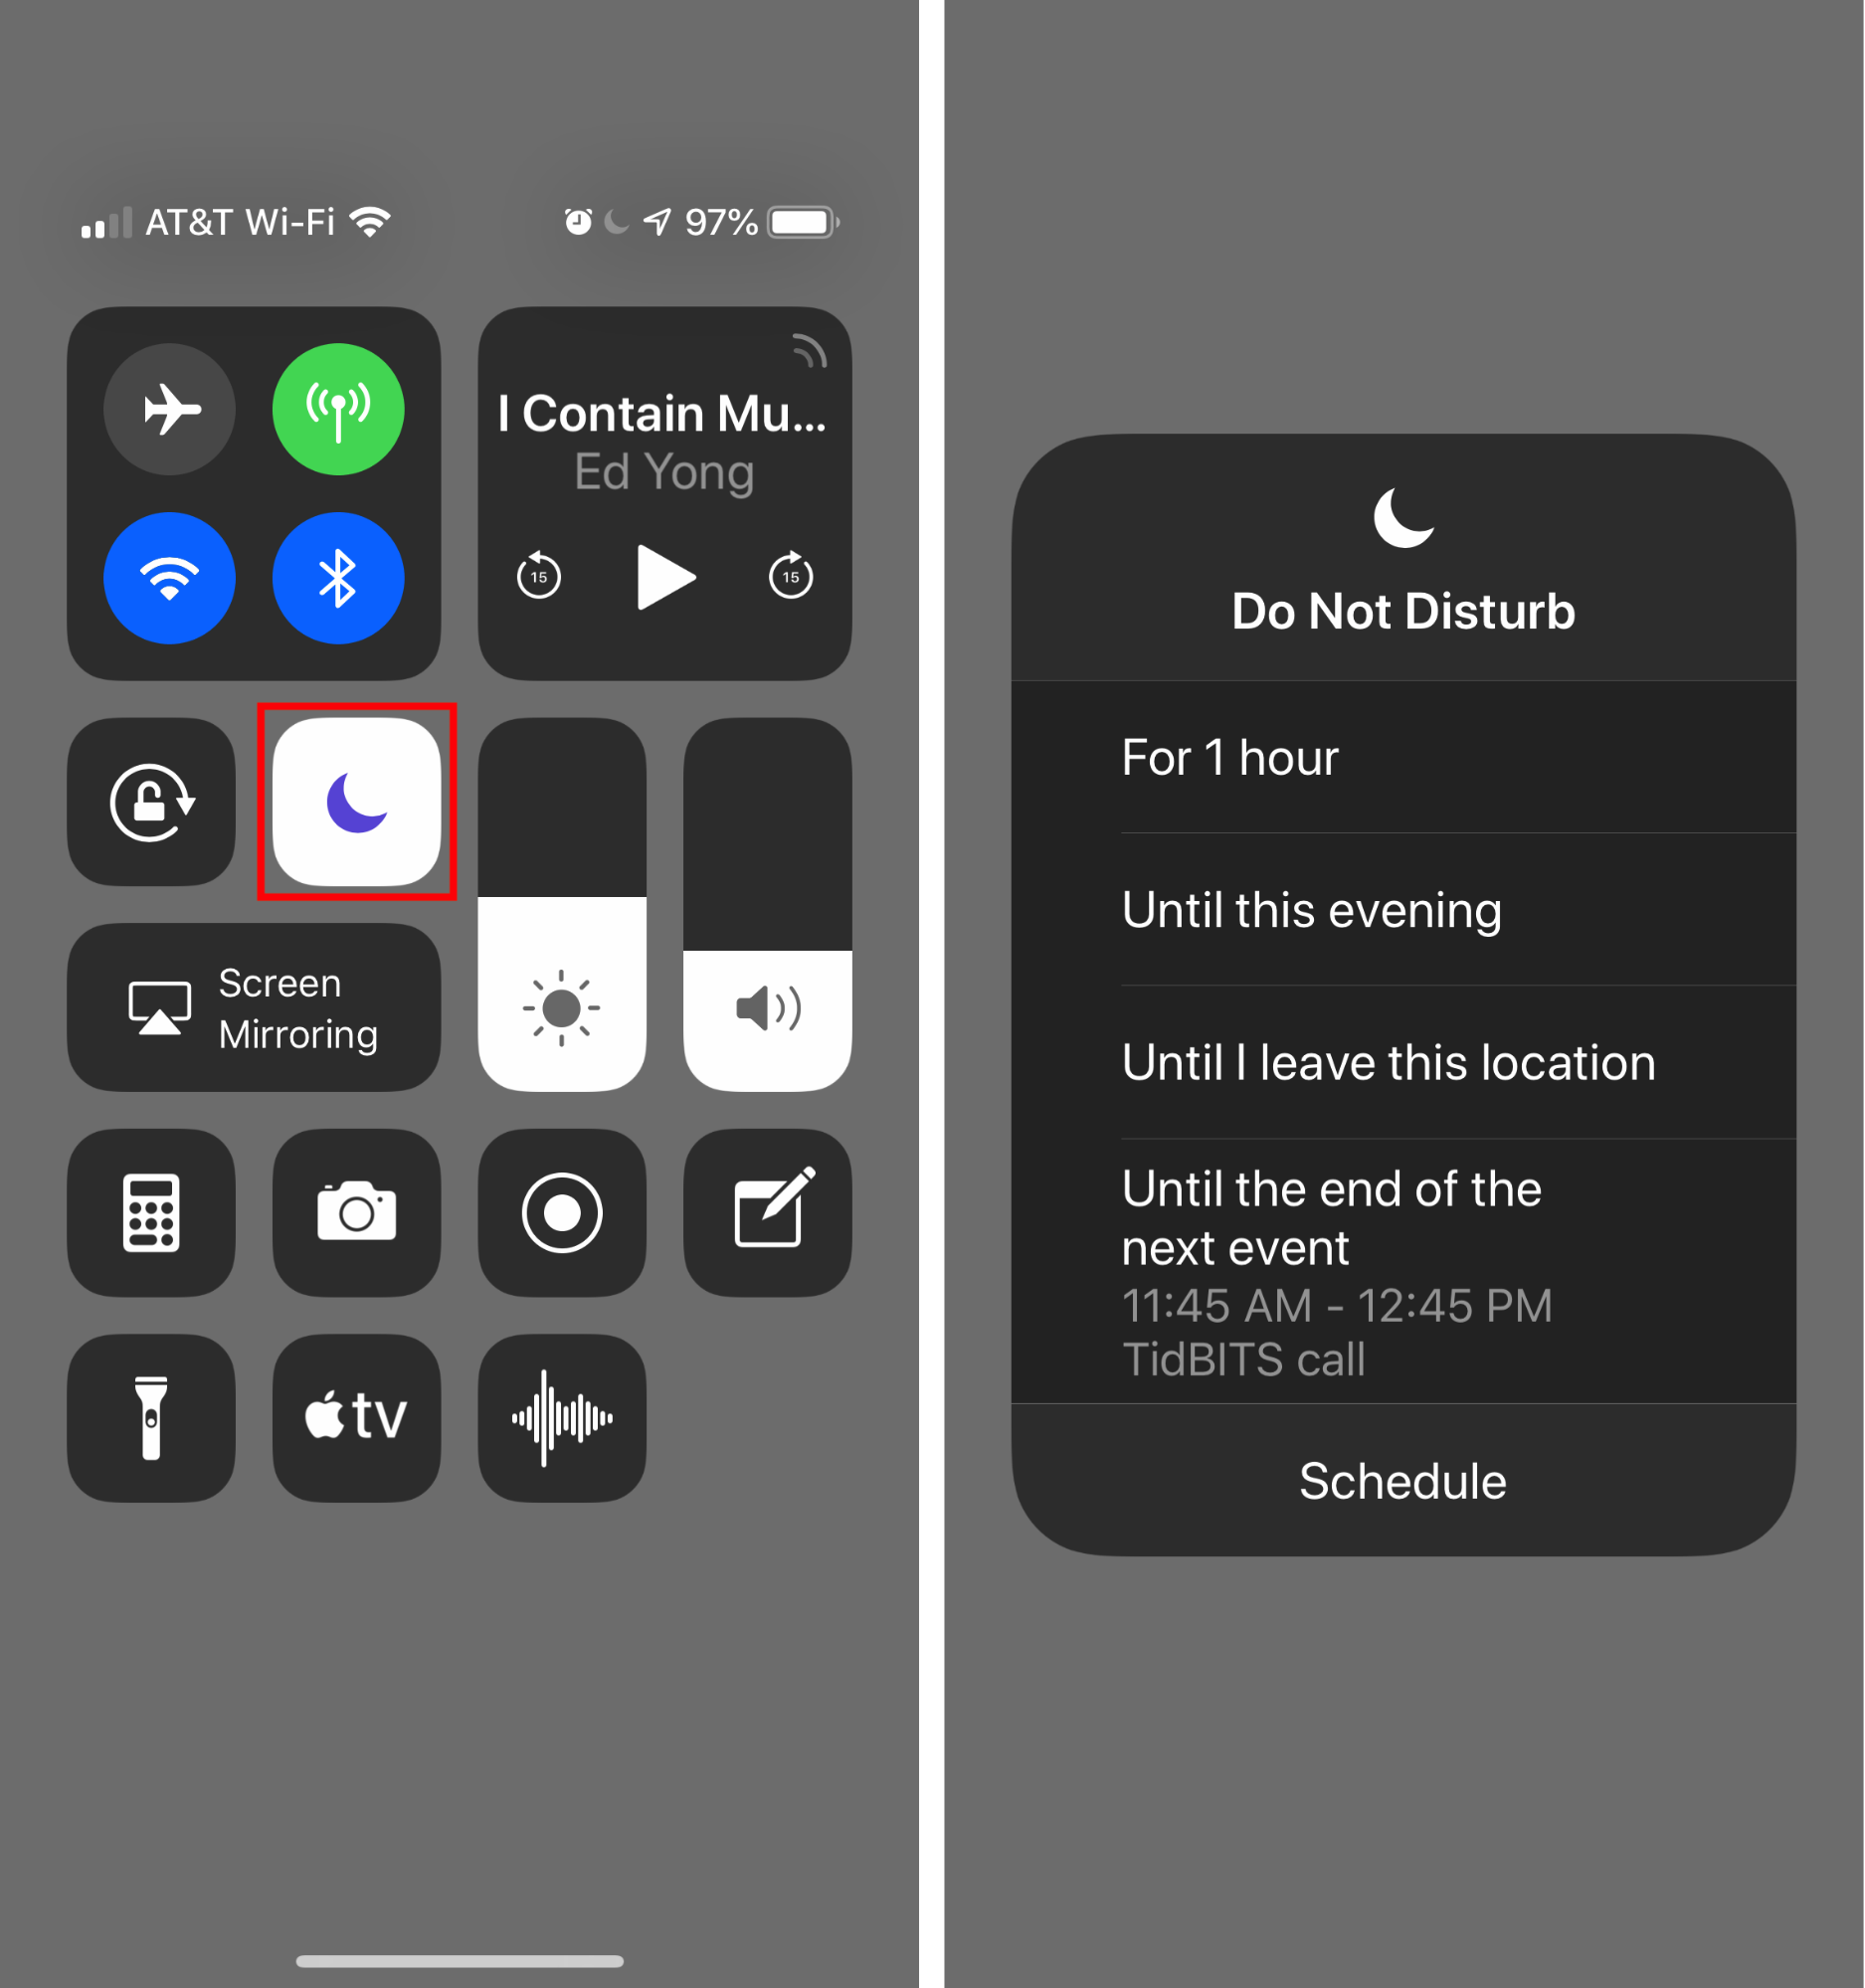
You’re presented with five choices:
- For 1 hour: This first choice is the easiest, and just tells DND to hold all your calls for an hour, after which it will turn off automatically. Use this one if you want some temporary peace and quiet and don’t want to think about turning DND off in any other way.
- Until this evening/Until tomorrow morning: The second option changes depending on the time of day. If you invoke it during the day, it will silence calls and notifications until 7 PM. Select it at night, however, and it will quiet your iPhone until 7 AM. I suspect this option won’t be used all that much because most people will be uncomfortable enabling DND for an arbitrary amount of time.
- Until I leave this location: Use this choice when you’re invoking DND in conjunction with being in a particular spot that you’ll leave as soon as you’re done. It’s great for movies, plays, doctor’s appointments, and so on.
- Until the end of the next event: When you enable DND during an event that’s on your calendar, this fourth choice appears, giving you the option of turning DND off at the end of the event. Its allure is its precision—as soon as your scheduled call is over, you can be sure you’ll receive notifications again.
- Schedule: Tap this button to open Settings > Do Not Disturb.
Regardless of which of the four initial options you choose, iOS 12 puts a notification on the Lock screen telling you when DND will turn itself off. At any time before then, you can tap the Lock screen notification to disable DND.

When our son Tristan was in high school, he bemoaned the fact that DND offered only a single schedule, which he quite reasonably used to prevent his iPhone from waking him up at night if friends texted him. He wanted a second schedule that he could use to silence notifications during school hours as well, to ensure that his iPhone would never make noise during a class.
Although iOS 12 doesn’t provide multiple schedules in Settings > Do Not Disturb, you can use the additional options to simulate them. For instance, a high school student in a similar situation could create a “School Hours” event for every weekday from 9 AM to 3 PM, set a weekday reminder to enable DND at 8:55 AM, and select the “Until the end of the next event” option to ensure that DND would turn itself off after the dismissal bell. The “Until I leave this location” option might also work, although it would depend on how tightly it interprets “this location.”
However, if you really want a second DND schedule, these workarounds aren’t necessary, thanks to the next new feature of DND in iOS 12: Bedtime.
Do Not Disturb During Bedtime
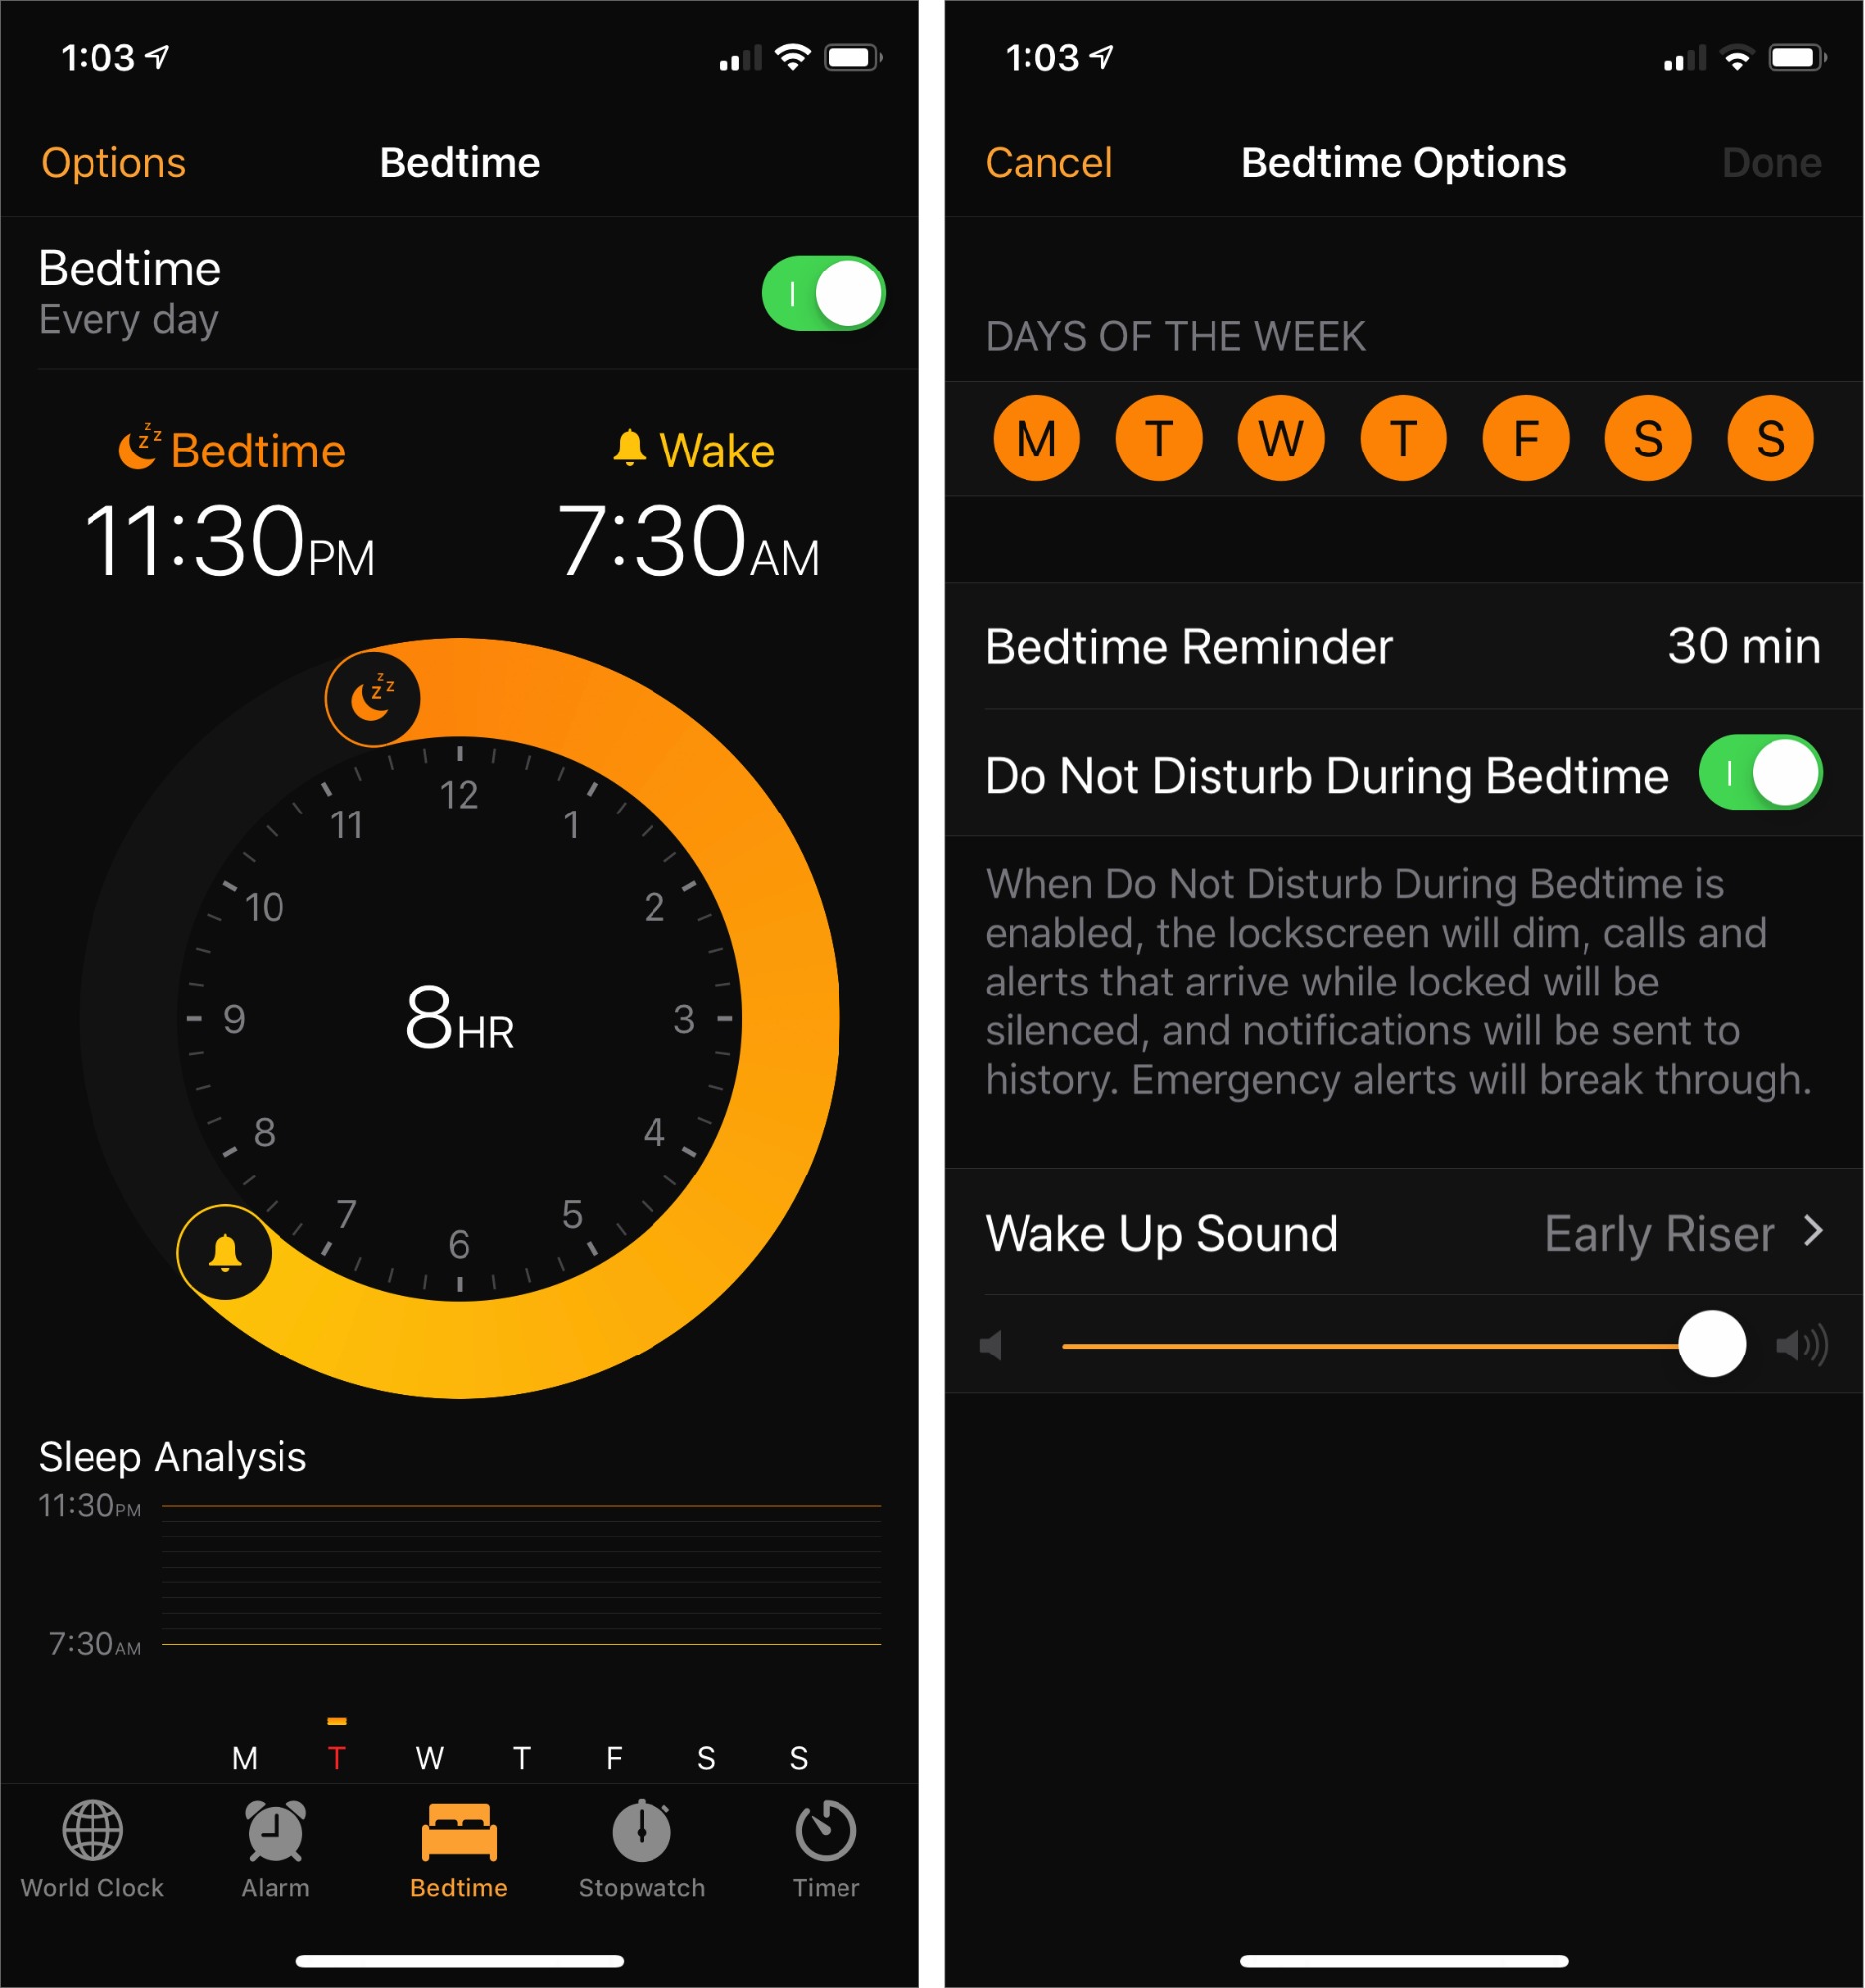
iOS 12 adds a new Bedtime switch in Settings > Do Not Disturb. You might think that this is related to the Bedtime feature in the Clock app that aims to help you go to sleep and wake up on a consistent schedule. As far as I can tell, however, it can be entirely independent—until writing this article, I hadn’t enabled Bedtime in the Clock app, and DND’s Bedtime feature worked fine for me before that.
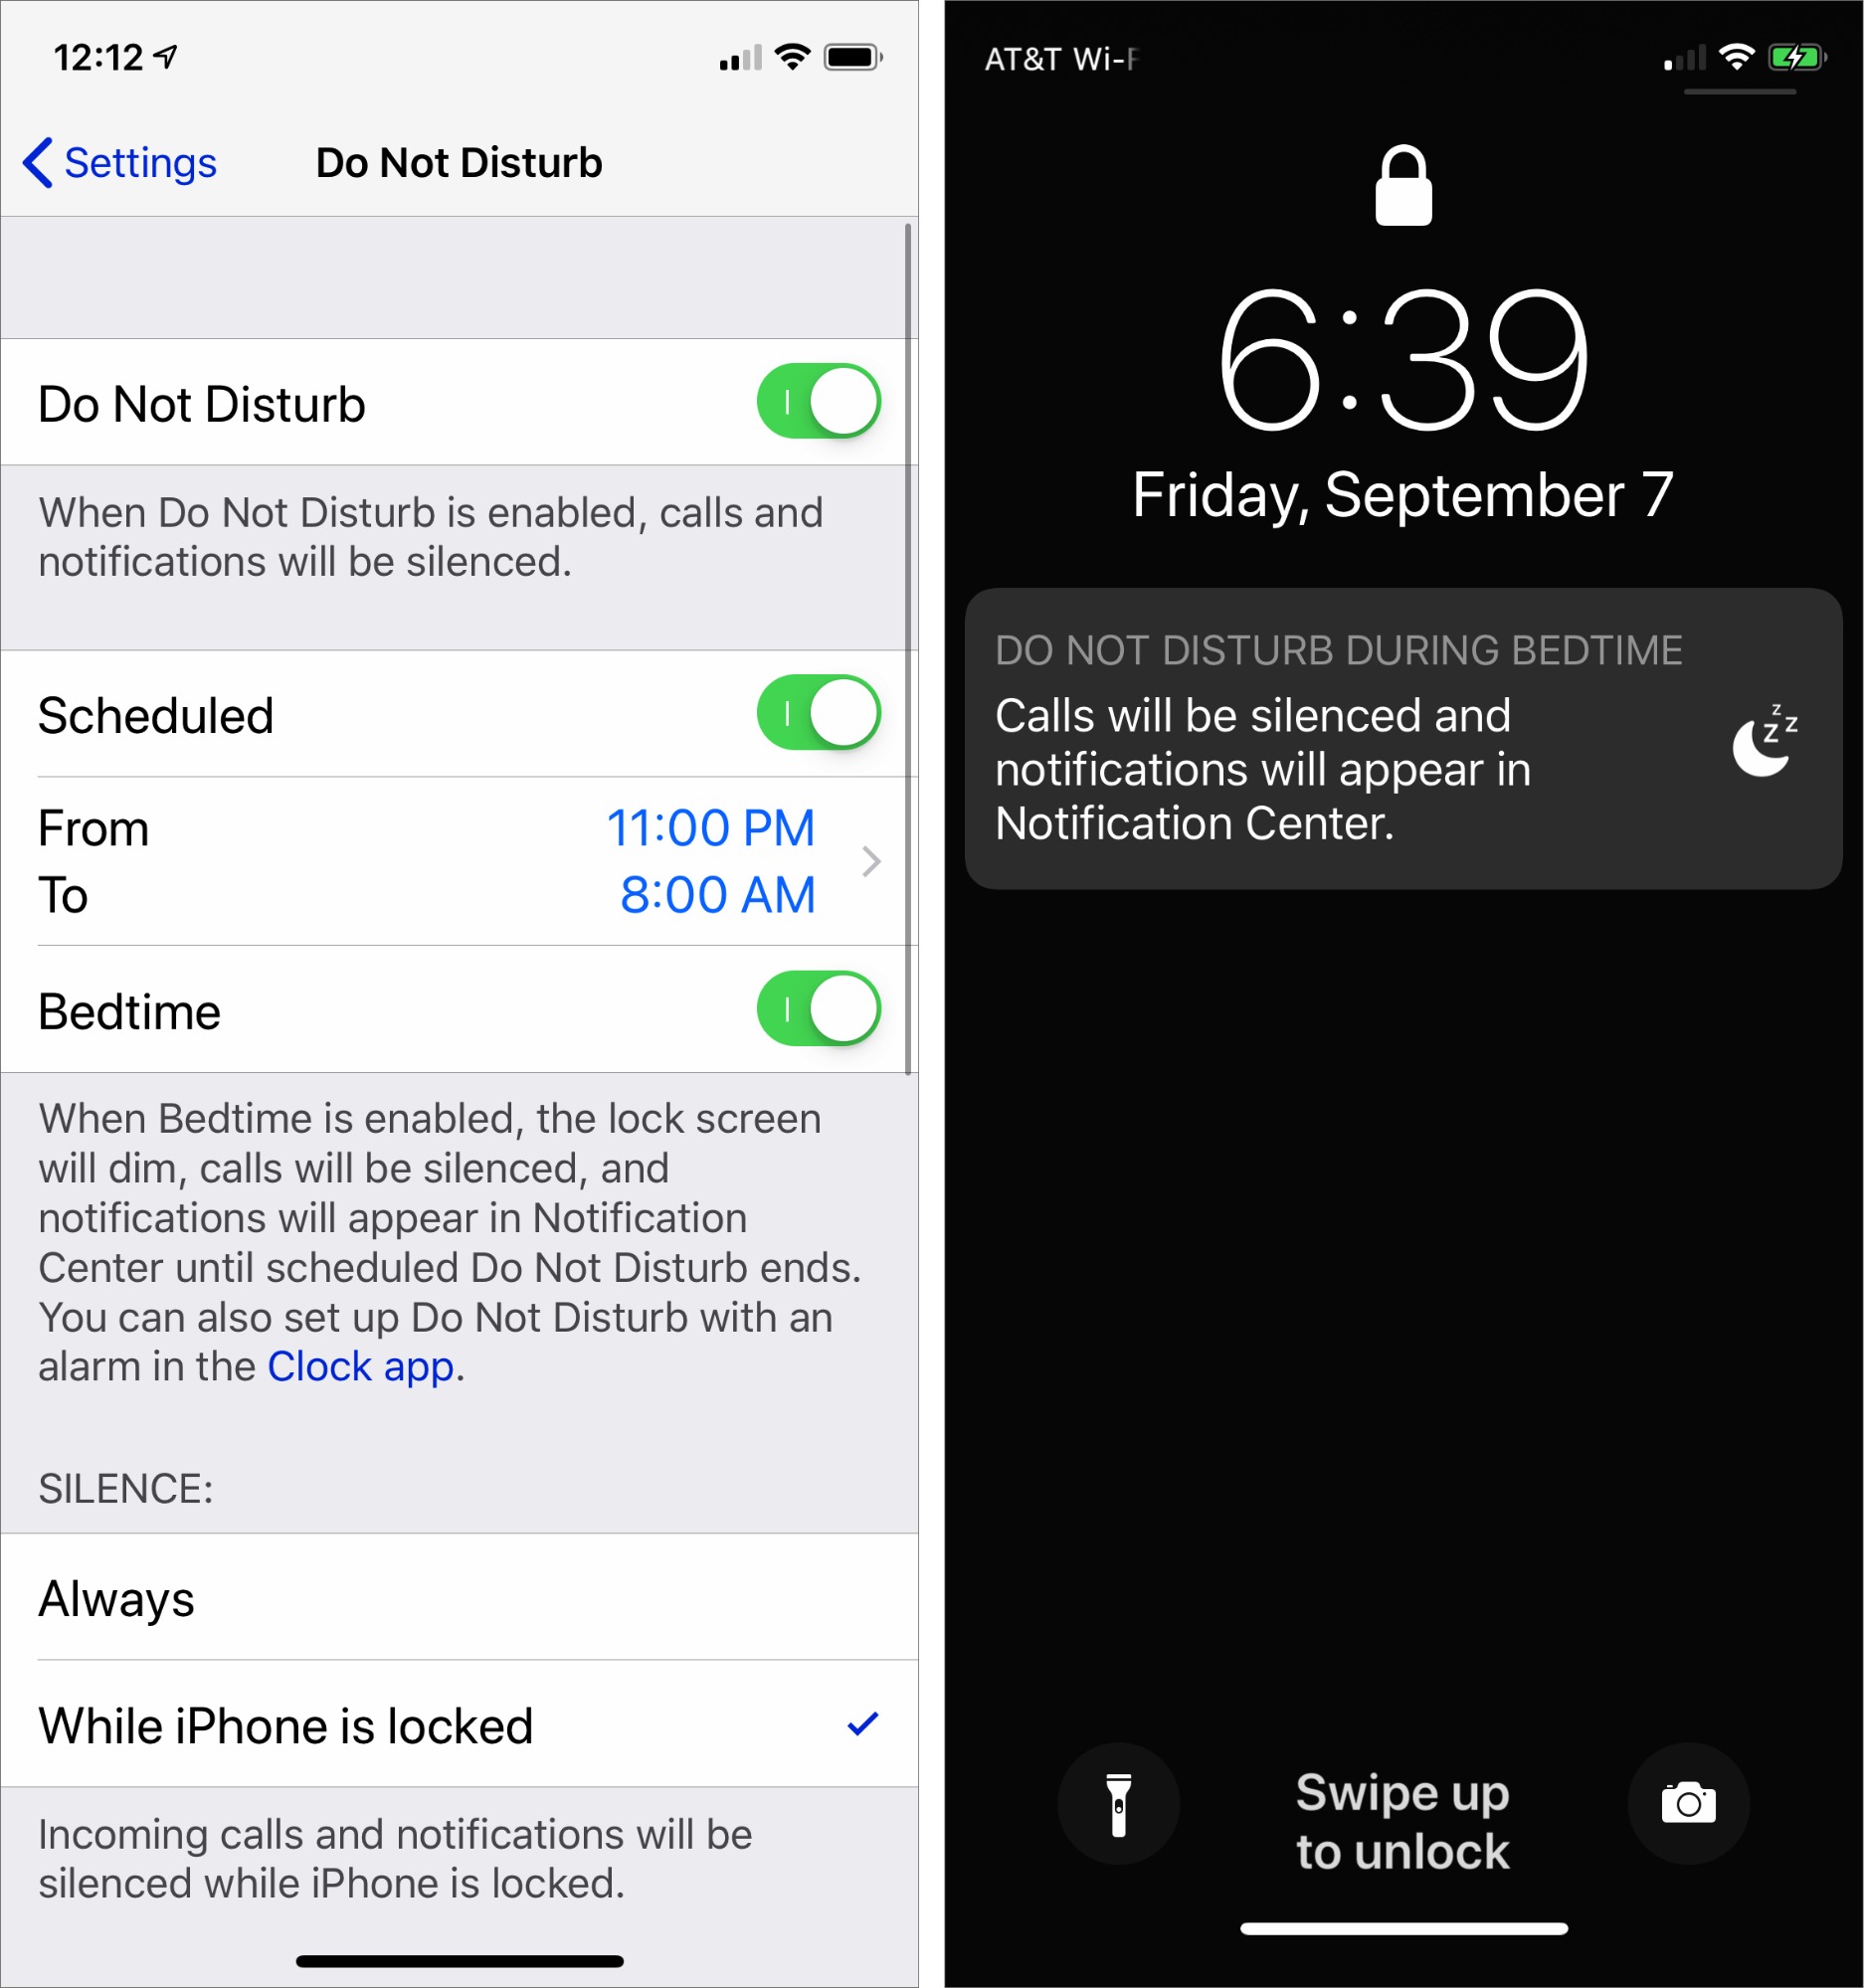
There’s quite a bit of explanatory text underneath the Bedtime switch, which says:
When Bedtime is enabled, the lock screen will dim, calls will be silenced, and notifications will appear in Notification Center until scheduled Do Not Disturb ends. You can also set up Do Not Disturb with an alarm in the Clock app.
The idea behind Bedtime is to reduce the impact of glancing at your iPhone to see what time it is in the middle of the night. Dimming the Lock screen and blacking out the Lock screen wallpaper means it won’t shock your eyes, and sending notifications only to Notification Center means you won’t see a notification that would entice you to use the iPhone and thus ruin your night’s sleep.
As with the manually invoked DND sessions, you can turn off DND by tapping the notification on the Lock screen. That’s helpful if you get up early and want notifications and calls to start flowing in.
This option doesn’t make much of a difference for me, since I tap the bedside table to get my Apple Watch to display the time briefly if necessary, and I can’t remember ever reading a notification on the iPhone before I had the Apple Watch. Nevertheless, the Bedtime feature is welcome, and I’m pleased to see Apple thinking about how it can make iOS devices fade into the background of our lives more, rather than constantly clamoring for attention.
Let’s return to the last sentence in Apple’s explanatory text: “You can also set up Do Not Disturb with an alarm in the Clock app.” This is quite confusing, and as far as I can tell, not precisely true—there are no DND options associated with standard alarms in the Clock app. That’s too bad—a “Disable Do Not Disturb” alarm option akin to the way timers have a “Stop Playing” option could be useful.
However, tapping the “Clock app” link in that text takes you to the Clock app’s Bedtime screen, and if you set up Bedtime there, a Do Not Disturb During Bedtime switch appears in the Bedtime options screen (see “Using the Bedtime Timer in iOS 10,” 7 October 2016). And indeed, DND works with this Bedtime schedule just as it does with its own schedule.
This then is the slightly weak answer to the lack of multiple DND schedules. In my son Tristan’s situation, where he wanted DND enabled during school hours, he could have used the Clock app’s Bedtime schedule to silence notifications from 9 AM to 3 PM and kept his DND schedule at 11 PM to 7 AM. (Using Bedtime for his actual sleeping hours wouldn’t have worked because he wouldn’t go to bed until he was done with his homework, which could go as late as 3 AM, and his sleep schedule on weekends was—unsurprisingly—radically different.)
So there you have it—iOS 12 gives Do Not Disturb new capabilities to turn itself off and tries to prevent iPhones from being lousy bedside companions.
How do you use Do Not Disturb? Or do you use it at all? Let us know in our quick five-question survey.
Inside iOS 12: There Is No “I” in “Books”
As conventional wisdom would have it, Apple’s ignominious defeat in the Department of Justice’s ebook price-fixing suit a few years back so soured Apple on the book business that the company let its iBooks division languish ever since (see “Explaining the Apple Ebook Price Fixing Suit,” 10 July 2013). That wisdom, however, isn’t entirely true: Apple has, as it characteristically does, made incremental improvements to its ebook reading app a number of times since its DOJ debacle. Nonetheless, iBooks has looked almost completely unchanged since Apple demolished its skeuomorphic wooden shelving back in the early days of iOS 7 (see “Apple Unveils Completely Redesigned iOS 7,” 10 June 2013).
Until now. In fact, “iBooks” is no more: in iOS 12, Apple has re-christened the app “Apple Books.” At least that’s what it calls itself internally; the app icon is merely called Books. With the new name comes a new look—for those parts of the app you spend the least amount of time using.
Let me explain: once you have a book open and you’re actually reading it, everything in the new Books app looks and works much as it always did. The page layouts look the same. The typefaces you can use to display your books remain the same. Scrolling through books, searching within books, marking up books, even turning pages (including the app’s skeuomorphic page-turning animation) have survived the journey into iOS 12. That’s smart: most of us spend our time in an ebook app reading, and few of us would want a flashy new book-reading interface to distract us from the book itself with a bunch of tinkling bells and high-pitched whistles.
What has changed is the virtual space in which your ebooks reside and the stores from which you obtain them.
The Reading Now Screen
The changes start with the Reading Now screen, the first screen you see when you open Books. It presents the books you have read most recently, arrayed in a spacious, side-scrolling list of large book covers—displayed large enough so you can read the title and the author! At the left end of this list is your “current” book—the book you have read most recently, open to the page where you left off. On an iPad, this image is even large enough for the text to be readable.
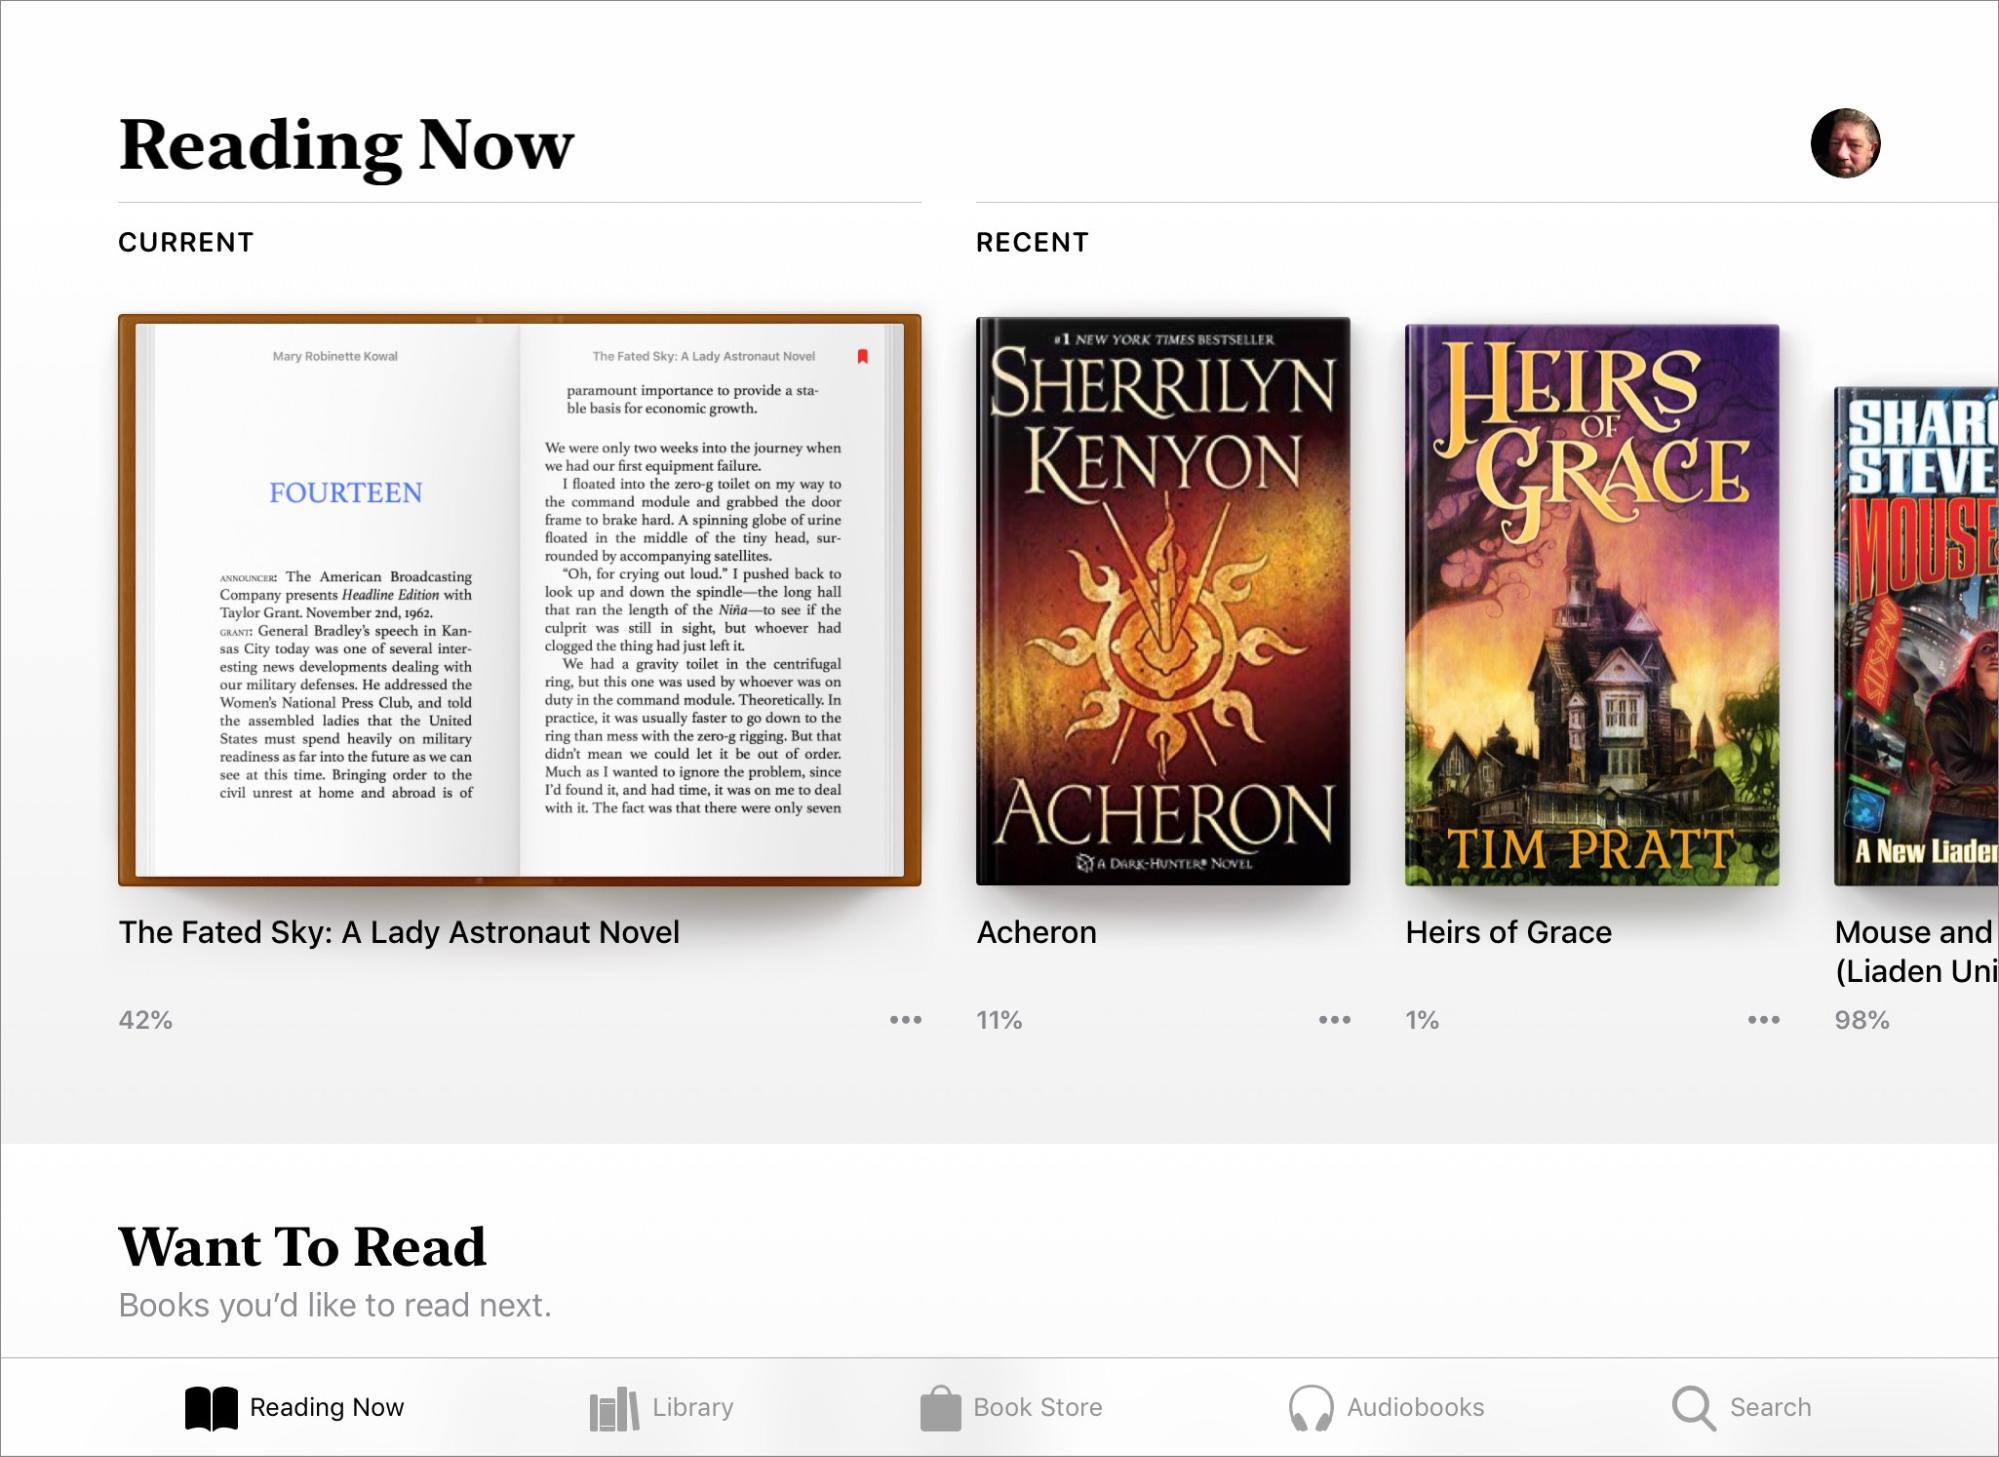
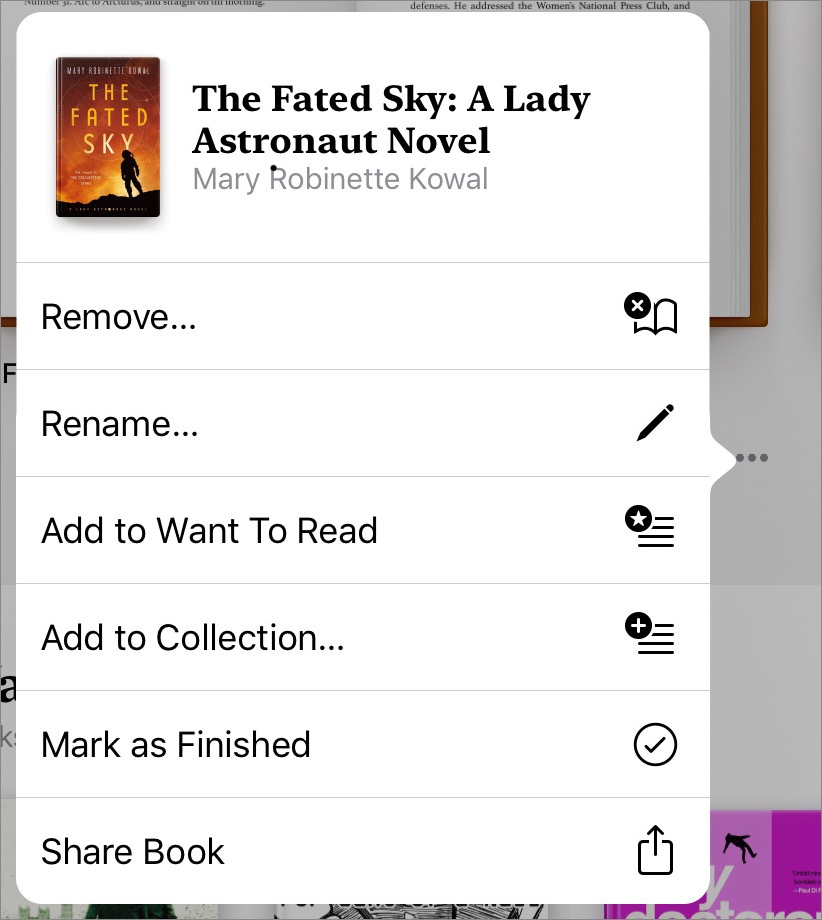
Each of the books displayed in the Reading Now list includes a percentage showing how far you are into the book, as well as a More (•••) button that provides a menu of commands you can apply to that book.
From this More menu, you can remove a book, rename a book, add it to a list of books you want to read, add it to a collection, mark it as finished, or share it with others. Note that you share the title, author, and, if available, a link to the book in Apple’s online Book Store, not the book itself.
The Reading Now screen also provides several other sideways-scrolling lists, such as:
- Want To Read: The first time you open the Books app, this list may appear, pre-populated with books that Apple thinks you might want to read, based on your past reading and purchasing habits (I say “may” because that’s how it worked for me; Adam Engst saw no such list until he added a book to it manually). Over time, as you exercise the Want To Read command, this list will contain books that you have added instead of Apple’s starter suggestions.
- For You: This list comprises book recommendations based on your reading and purchasing history. Unlike Want To Read, you can’t add books to this list; Apple Books does that for you.
- Featured Books: The name of this list can vary: it displays books that Apple is promoting in its Book Store. As I write this, I see “Read It Before You Watch It,” which contains books that have been made into movies.
The Library and Your Collections
The Reading Now screen is a serviceable entry point, but when you want to wander through the riches of your personal book hoard, tap Library at the bottom of the screen.

This screen, initially at least, displays your complete library of books: EPUBs, audiobooks, and PDFs. You can display the books by their covers either in rows of big thumbnails or a list of smaller ones, and you can sort the books by title, author, most recently opened, or in a manual order that you decide. The screen also provides information that was previously hard to get: how many books of each format your library contains (I currently have 876 books and 72 PDFs but only 1 audiobook).
What about your carefully thought-out collections? You still have them: tap the Collections menu above the list of books and then tap the collection you want to display. All of your collections survive the trip from iBooks, with the exception of your old “Books” collection, the default collection into which your EPUBs ended up when you hadn’t assigned them to any other collection. Instead, when you first open the Books app, you see an alert telling you that “Books” has been renamed “My Books.” You’ll still see a Books collection, and it is still the default repository for your EPUBs, but now it lists all of your EPUBs.
In fact, you have several default collections in Apple Books:
- Want To Read: You’ve seen this before on the Reading Now screen, but it is also available as a separate collection screen in the Library.
- Finished: This lists books you have marked as Finished.
- Books: All your EPUBs.
- Audiobooks: All your audiobooks.
- PDFs: All the PDFs in your library.
- Downloaded: The books that you currently have on your device; your complete library lives in iCloud.
Following the built-in collections are all the collections you have made in the past. But there is a big difference, and a welcome one: in Books, a book can appear in multiple collections! That is, collections no longer work like Finder folders—a file can only be in one folder at a time—but instead act like Finder tags. For example, I have a collection named “MEC” that contains books that I have written, but I can also add any of those books to other collections, such as “Take Control” or “Fiction.”
This change has consequences. When you choose Remove from a book’s More (•••) menu, you can opt to remove a book from the currently displayed collection, remove the download (while keeping it in your library and on any of your other devices that use the same library), or delete it everywhere. This refined capability, with its improved messaging, is welcome.
One caveat: During the transition period, when you are most likely to have some devices running iOS 11 or macOS 10.13 High Sierra and others running iOS 12 and 10.14 Mojave, changes you make to collections in Apple Books other than completely removing a book from your library are not reflected in iBooks, nor are changes to collections in iBooks reflected in Apple Books. A helpful alert and a notification both let you know this.

Book Stores and Searching
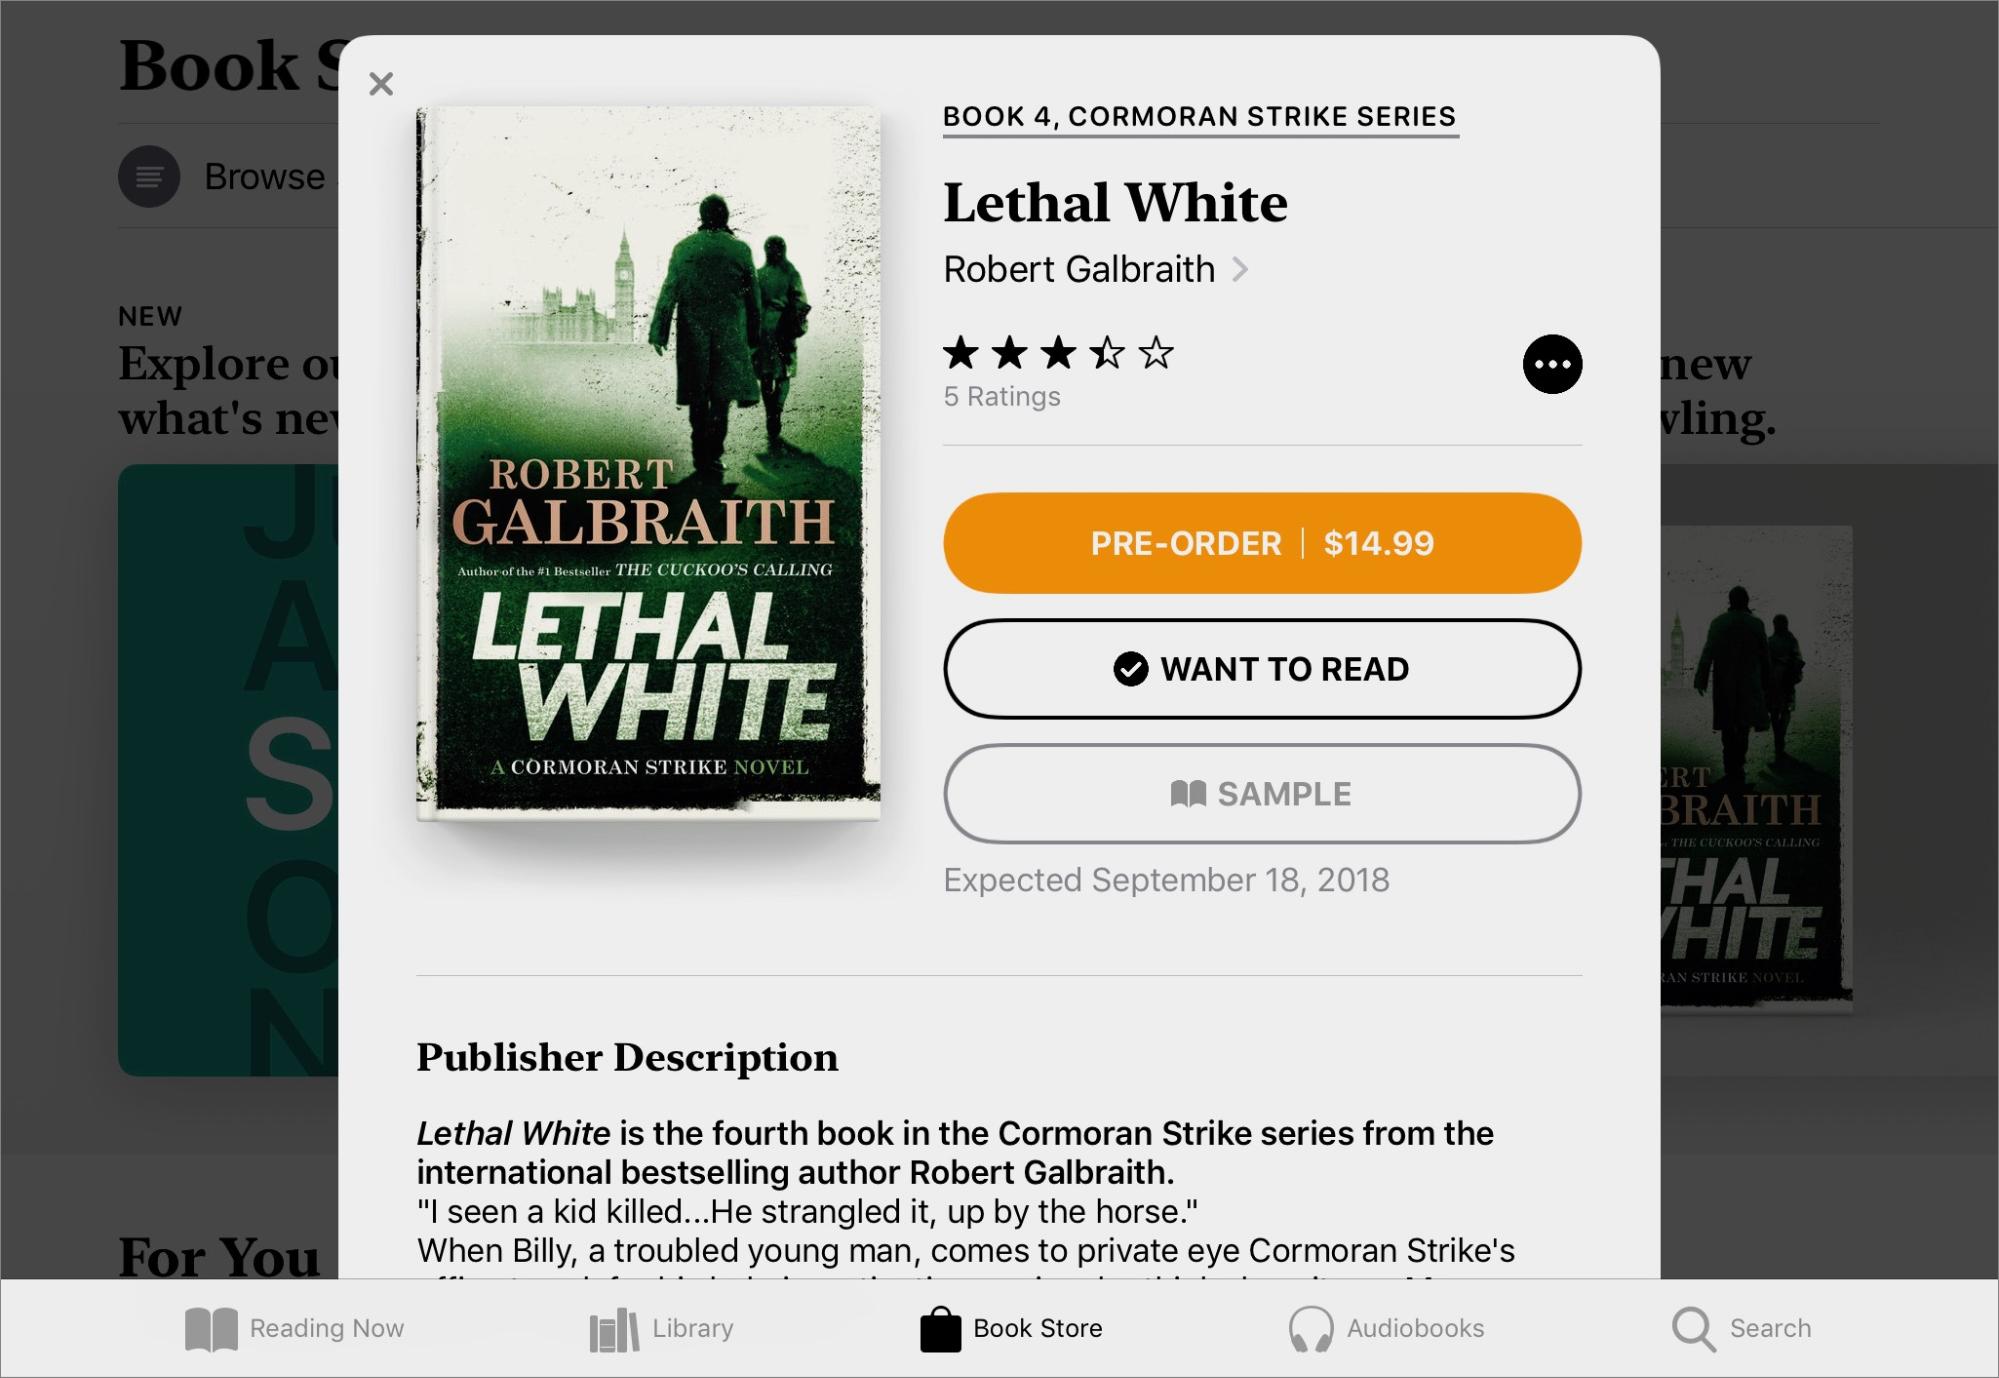
Right now, Apple Books seemingly offers not one but two stores from which you can purchase books: Book Store and Audiobooks. Or maybe it offers separate entrances to different departments of the same store, because although each has its own button on the Books app’s toolbar, they’re really the same service. In any case, Apple has redesigned its book vending service to match the recent revamps of the company’s music and app stores, with the typical New & Trending, Top Charts, and similar sections on the main screen. This screen also contains a For You section, similar to that on the Reading Now screen. In addition, the main screen offers a Browse Sections menu, so you can quickly tunnel down to various book genres and other specialized lists.
The new Book Store also integrates with the Want To Read standard collection offered by Books. When you tap a book’s entry in the store, you have the option of adding it to your Want To Read collection.
The Search pane in Books no longer hides above the top of the screen where you have to swipe down to see it, but, instead, is invoked by tapping the Search icon at the bottom of the screen. Like before, as you type your search term, Books displays the books from your library that match, but it now also offers suggestions you can tap to find matching books, similar to how searches in the Music app work.
The Bottom Line
I spend a lot of time reading books, and a lot of that time in iBooks, so the thought of a major revamp of Apple’s ebook reading app concerned me. Fortunately, Apple seems to have executed the iBooks-to-Books transition gracefully. The company has made changes where needed, but where they weren’t, Apple’s engineers restrained themselves admirably. I welcome the new library management and search features—I’m particularly happy with the new flexibility of book collections—and am grateful that none of Apple’s changes are in my face when I’m doing what I do most often with the app: reading books.
How much of your reading do you do on an iOS device, and in which apps? Let us know in our quick three-question survey.