#1623: How to turn off YouTube’s PiP, use AirPlay to Mac, and securely erase Mac drives
We’re in the quiet weeks before Apple releases new devices and operating systems, so we have a “How To” issue for you this week, with three practical articles. Josh Centers leads off with a quick explanation of how to turn off the new Picture-in-Picture feature of the YouTube app for iOS and iPadOS. Then he turns his attention to one of the features highlighted in last week’s survey: AirPlay to Mac, which lets you send audio or video from an Apple device to your Mac’s speakers or screen. Finally, Adam Engst examines all the ways you can securely erase a Mac’s SSD or hard drive to ensure that no one can access sensitive data on devices you’re passing on. Notable Mac app releases this week include Bookends 14.1.1 and Parallels Desktop 18.
How to Turn Off YouTube’s New Picture-in-Picture Feature
Picture in Picture (PiP) is not a new feature. Apple introduced it on the iPad years ago and added it to the iPhone with iOS 14. But there has always been one notable app that didn’t support it: Google’s YouTube. In fact, YouTube aggressively worked to block Picture in Picture, even when the user visited YouTube in a browser instead of using the app. The community would figure out workarounds (like “TipBITS: Watch YouTube Videos in Picture in Picture” 19 July 2019), and YouTube would plug them.
Why did YouTube care so much about blocking PiP? The most likely reason is that many people listen to music by starting the video of a particular song and then letting YouTube’s algorithm play related tracks. But YouTube lives and dies by its ads, and unlike YouTube Music and streaming services like Pandora and Spotify, YouTube’s ads are meant to be seen as well as heard. Since the entire point of PiP is to do something else with the video playing in a small window or even entirely off-screen, it makes sense that YouTube wouldn’t want its ads to be easily ignored.
But hell recently froze over. After many years, YouTube has finally rolled out PiP support for its app.
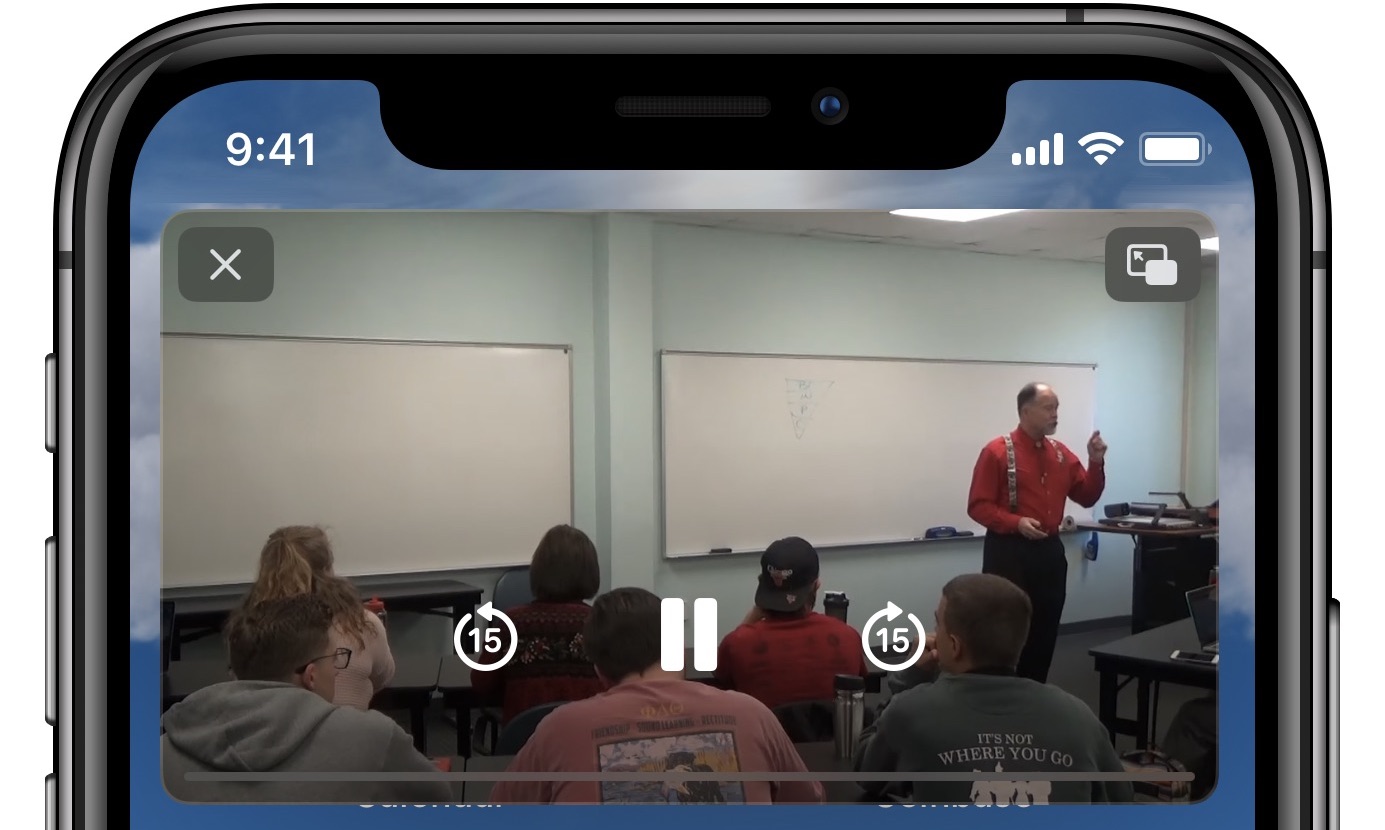
Its sudden appearance caught many by surprise, including me. I was watching a YouTube video on my iPhone, switched to the Home screen, and was flabbergasted when the video kept playing, taking up nearly half the screen while doing so. “Huh,” I thought, “I guess YouTube finally rolled out Picture in Picture.” After years of working around YouTube’s hacks to disable the standard iOS feature, I felt like I was doing something sketchy when it finally worked as intended. A double-tap on the video shrunk it to the corner of the screen, and a swipe to the right hid it entirely (although hidden video stops playing automatically after about 30 seconds).
My wife had a similar reaction. “Did you or the kids do something to the YouTube account,” she asked one night. “I was watching a video and went to make a phone call, but the video kept playing!” She assumed we’d signed up for some premium service.
The problem is that most of us have been trained to stop a YouTube video by simply switching away from the app. Of course, you can always dismiss the window by tapping it to reveal controls and then tapping the X in the upper-left corner to close the window, but that’s a really small target to tap on an iPhone screen.
So if you want to prevent YouTube videos from opening in PiP, you have two options.
Turning Off Picture in Picture on YouTube
You can disable the Picture in Picture feature just for YouTube:
- Open the YouTube app and, if necessary, tap Home at the bottom to navigate to the Home screen.
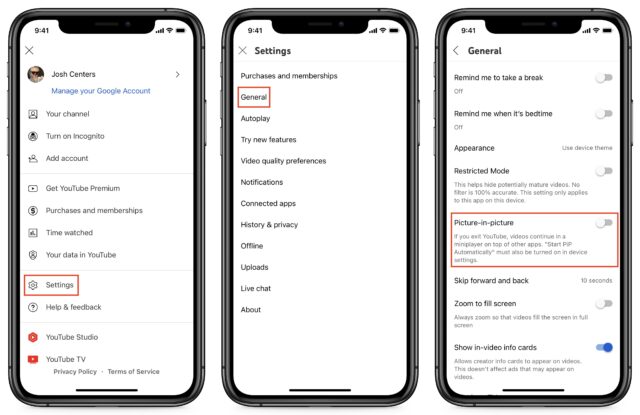
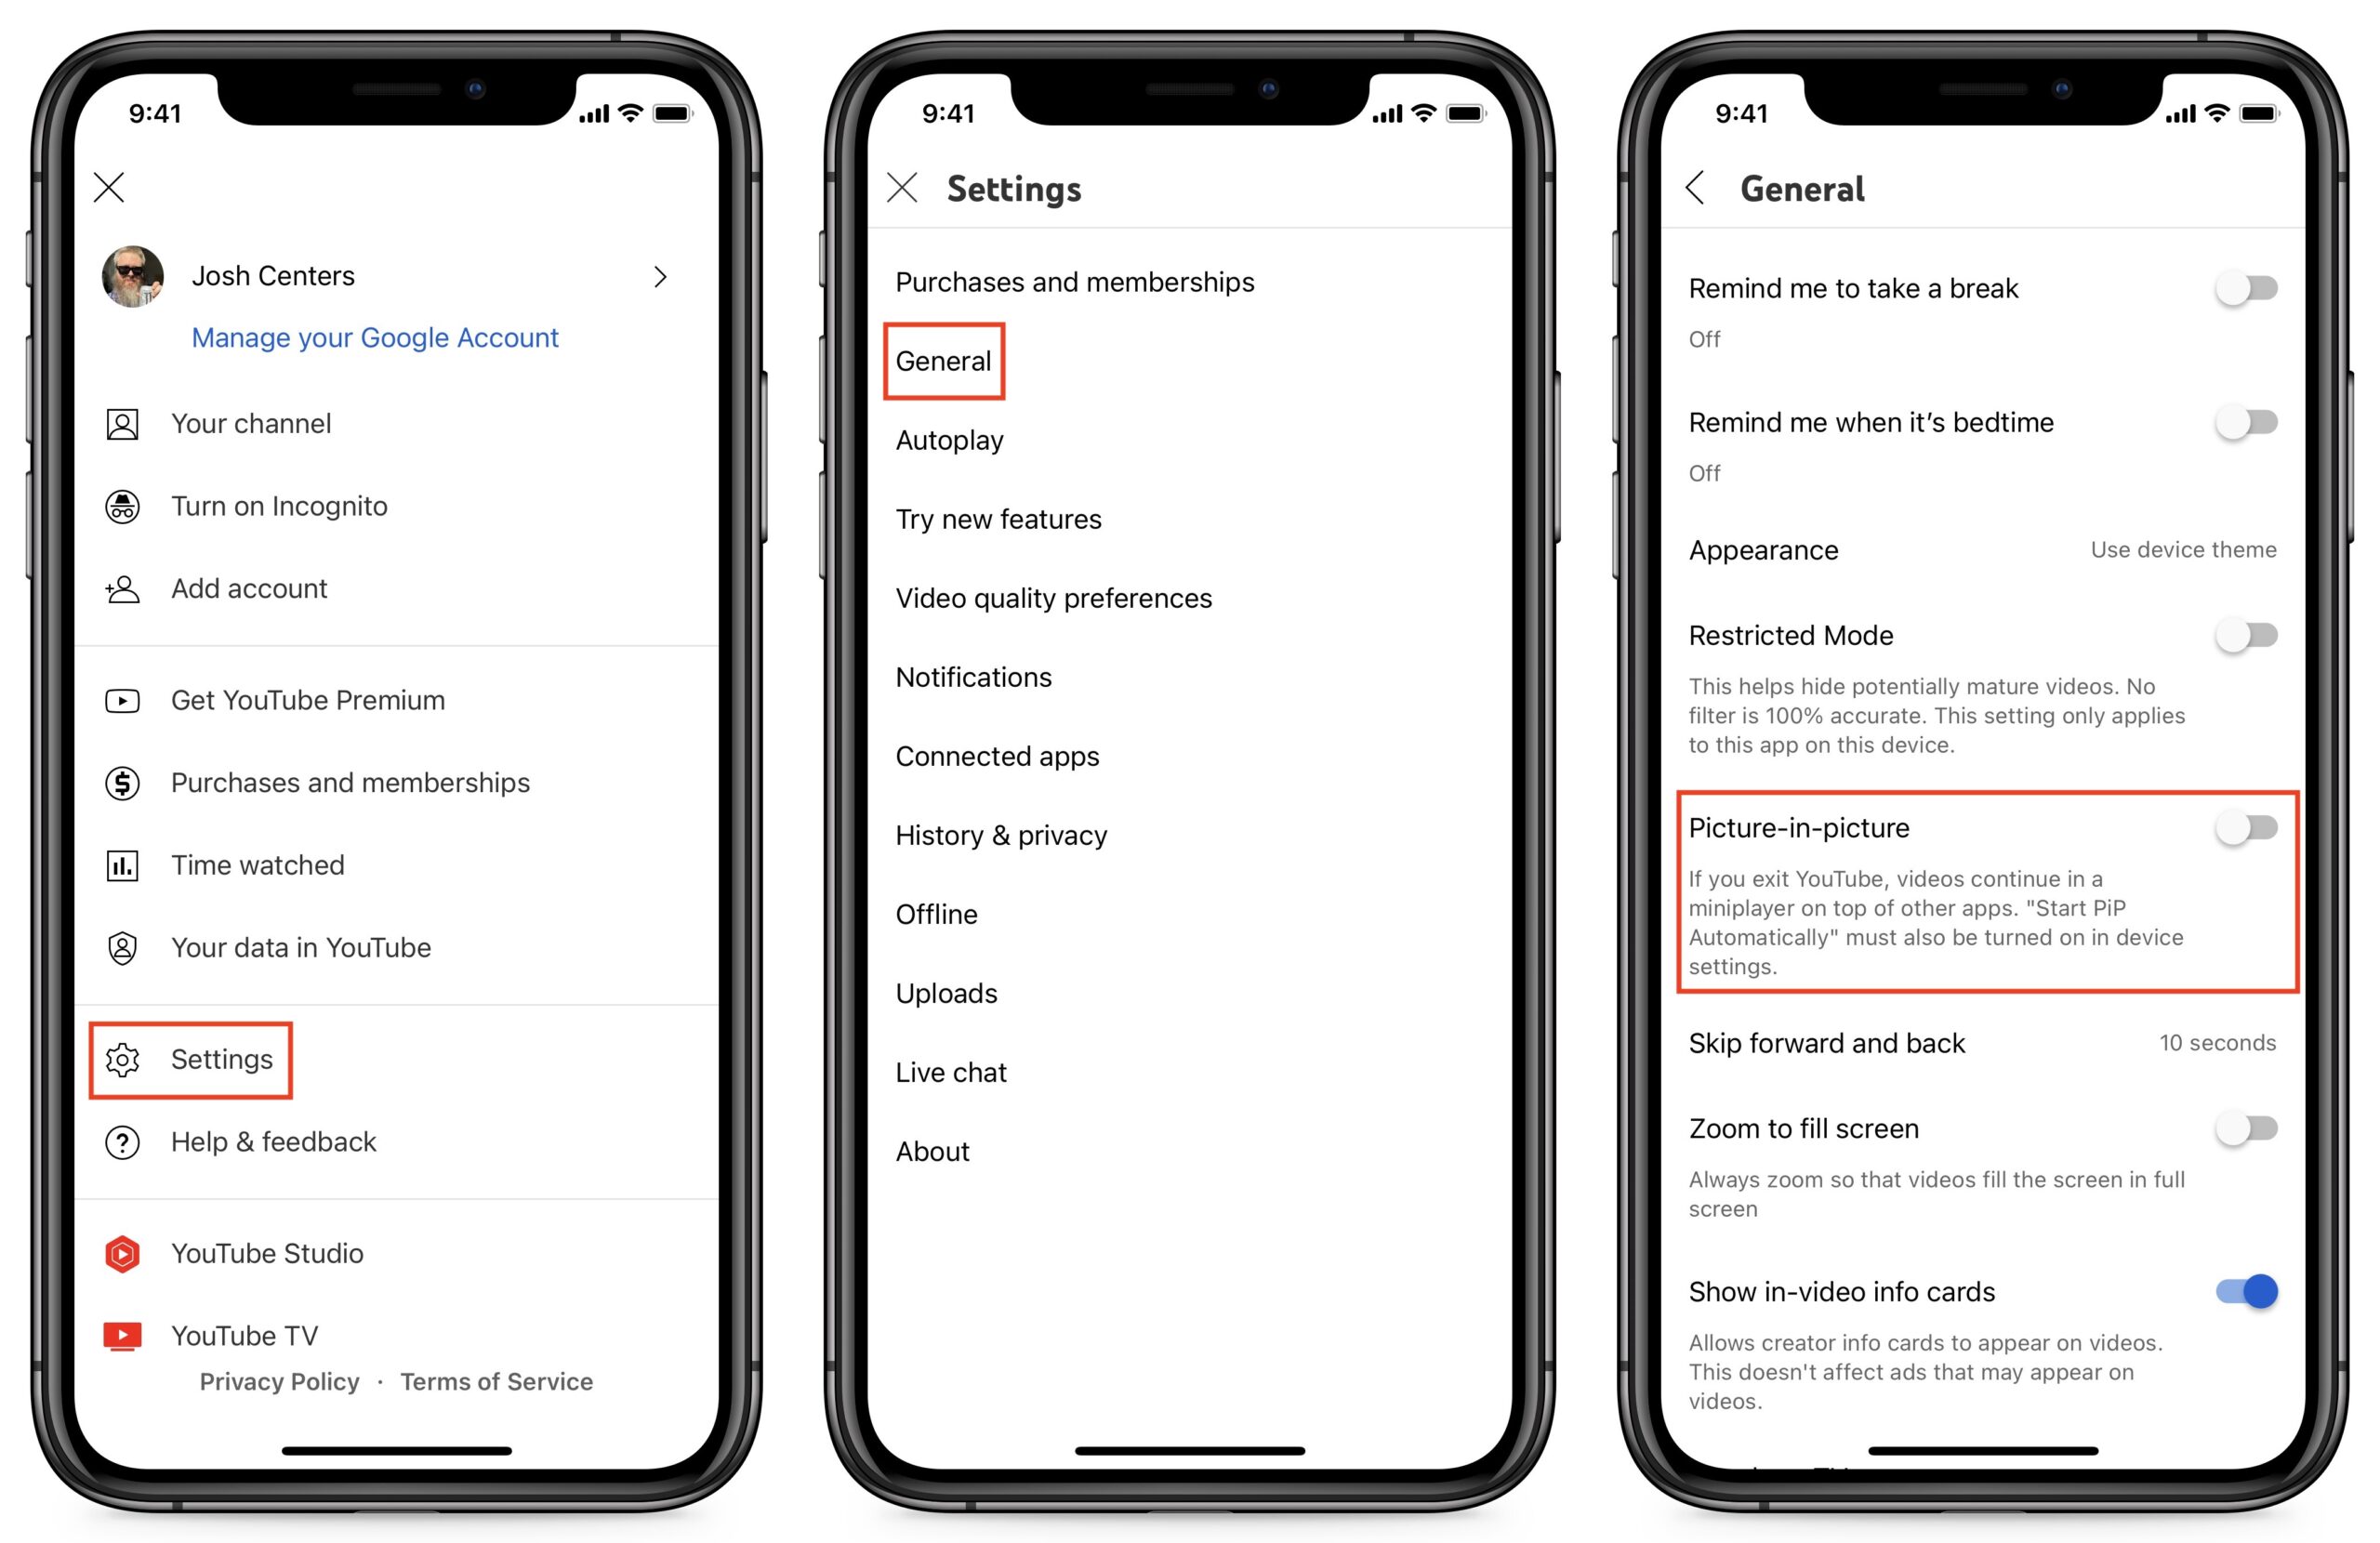
- Tap your profile picture in the upper-right corner.

- Tap Settings > General, and turn off Picture-in-picture.
Turning Off Picture in Picture for All Apps
If Picture in Picture annoys you in general, you can disable it system-wide by going to Settings > General > Picture in Picture and disabling Start PiP Automatically. You can still activate Picture in Picture manually for a video by tapping the PiP button, but it will no longer surprise you when you navigate back to the Home screen or switch to another app.

How to AirPlay to Your Mac
Back when I was first working on Take Control of Apple TV in 2014, which was about AirPlay as much as the Apple TV itself, I thought to myself how nice it would be if I could AirPlay content from my iPhone to the larger screen of my Mac when in my office. Years passed, and I gave up on Apple ever offering such a feature, but then Apple surprised me by announcing AirPlay to Mac in macOS 12 Monterey.
The question is: who wants to use AirPlay to send audio or video from an Apple device to a Mac? If our recent survey of TidBITS readers is anything to go by, the answer is: maybe not many (see “Survey Results: Which iOS 15 and macOS 12 Monterey Features Do You Actually Use?,” 8 August 2022). In the survey, 74% of respondents reported never having used the feature, with 21% saying they used it occasionally and only 5% using it frequently. In an era of ubiquitous access to cloud-based services, AirPlay may not be as relevant as it once was, but there are still times when being able to AirPlay to a Mac could be a helpful trick, especially if you connect a Mac mini to your TV as a home entertainment device.
Another use case you may appreciate is AirPlaying audio from your iPhone to your Mac. Your Mac undoubtedly has better speakers than your iPhone, so you get better audio quality while sitting at your desk. Plus, you can use your iPhone as a remote control device if that’s more convenient than fussing with apps on your Mac. Lastly, if you need to leave your desk, you can turn off AirPlay on your iPhone to keep playing the audio without missing a beat. This approach works particularly well with apps like Overcast that aren’t native to the Mac. Instead of messing with the minimalistic Overcast Web interface and hoping it syncs correctly, you can AirPlay from the Overcast iPhone app to your Mac.
AirPlay to Mac Preliminaries
The receiving Mac must be in the list below and running Monterey for AirPlay to work:
- iMac (2019 and later)
- iMac Pro
- MacBook Air (2018 and later)
- MacBook Pro (2018 and later)
- Mac mini (2020 and later)
- Mac Pro (2019)
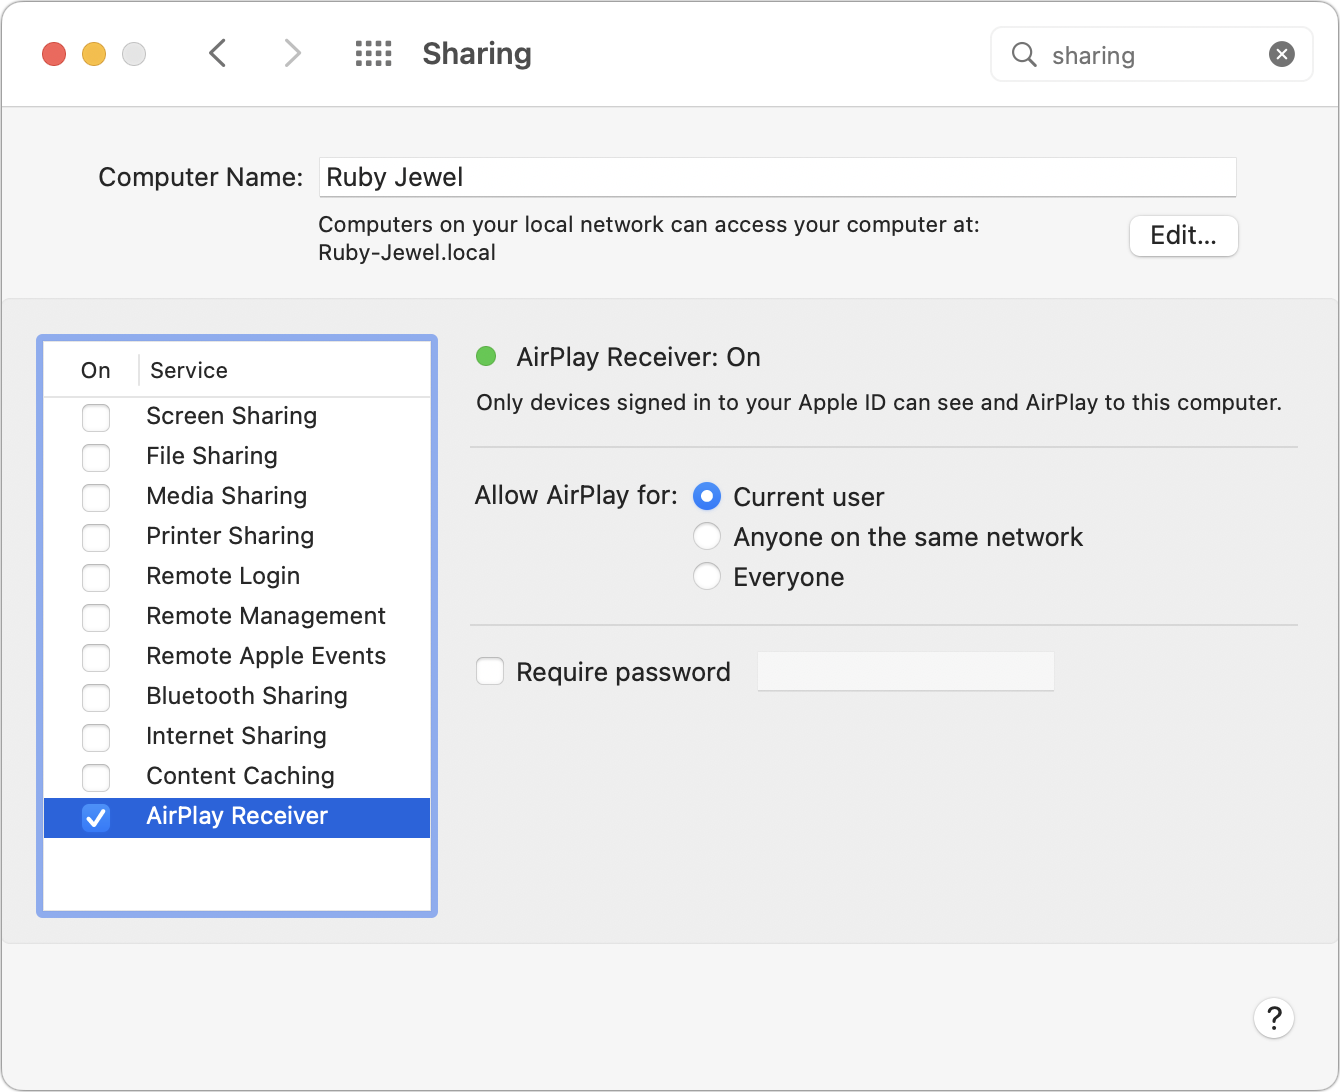
Also, make sure that AirPlay Receiver is enabled on your Mac. It should be on by default, but check by going to System Preferences > Sharing and making sure that AirPlay Receiver is selected. You can also choose to restrict AirPlay to the Apple ID tied to the current user or anyone on the same network, and you can set an AirPlay password to restrict access further if you have office or family pranksters.
As far as the iPhone goes, you need only an iPhone 7 or later. Apple says that even older iPhones may be able to AirPlay to Macs at a lower resolution if you enable Everyone in System Preferences > Sharing > AirPlay Receiver.
AirPlay Audio to a Mac
AirPlaying audio is the simplest and maybe the most useful, so we’ll start there. All you have to do is initiate AirPlay from your device and select the Mac as the target.
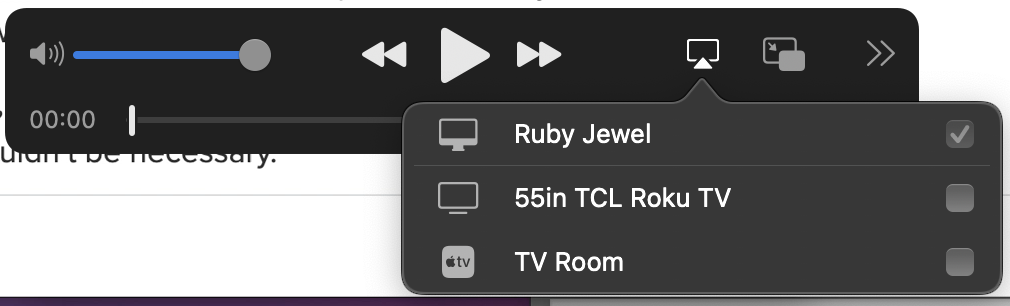
In iOS and iPadOS, the easiest method is to look for the AirPlay icon in your audio app—it looks like a triangle topped with three circles. I’ve highlighted examples from Audible, Music, and Overcast in the screenshot below. Tap the AirPlay icon, select your Mac, and the audio should start. If you can’t hear anything, you may need to turn up the volume on your iPhone or iPad and the receiving Mac.
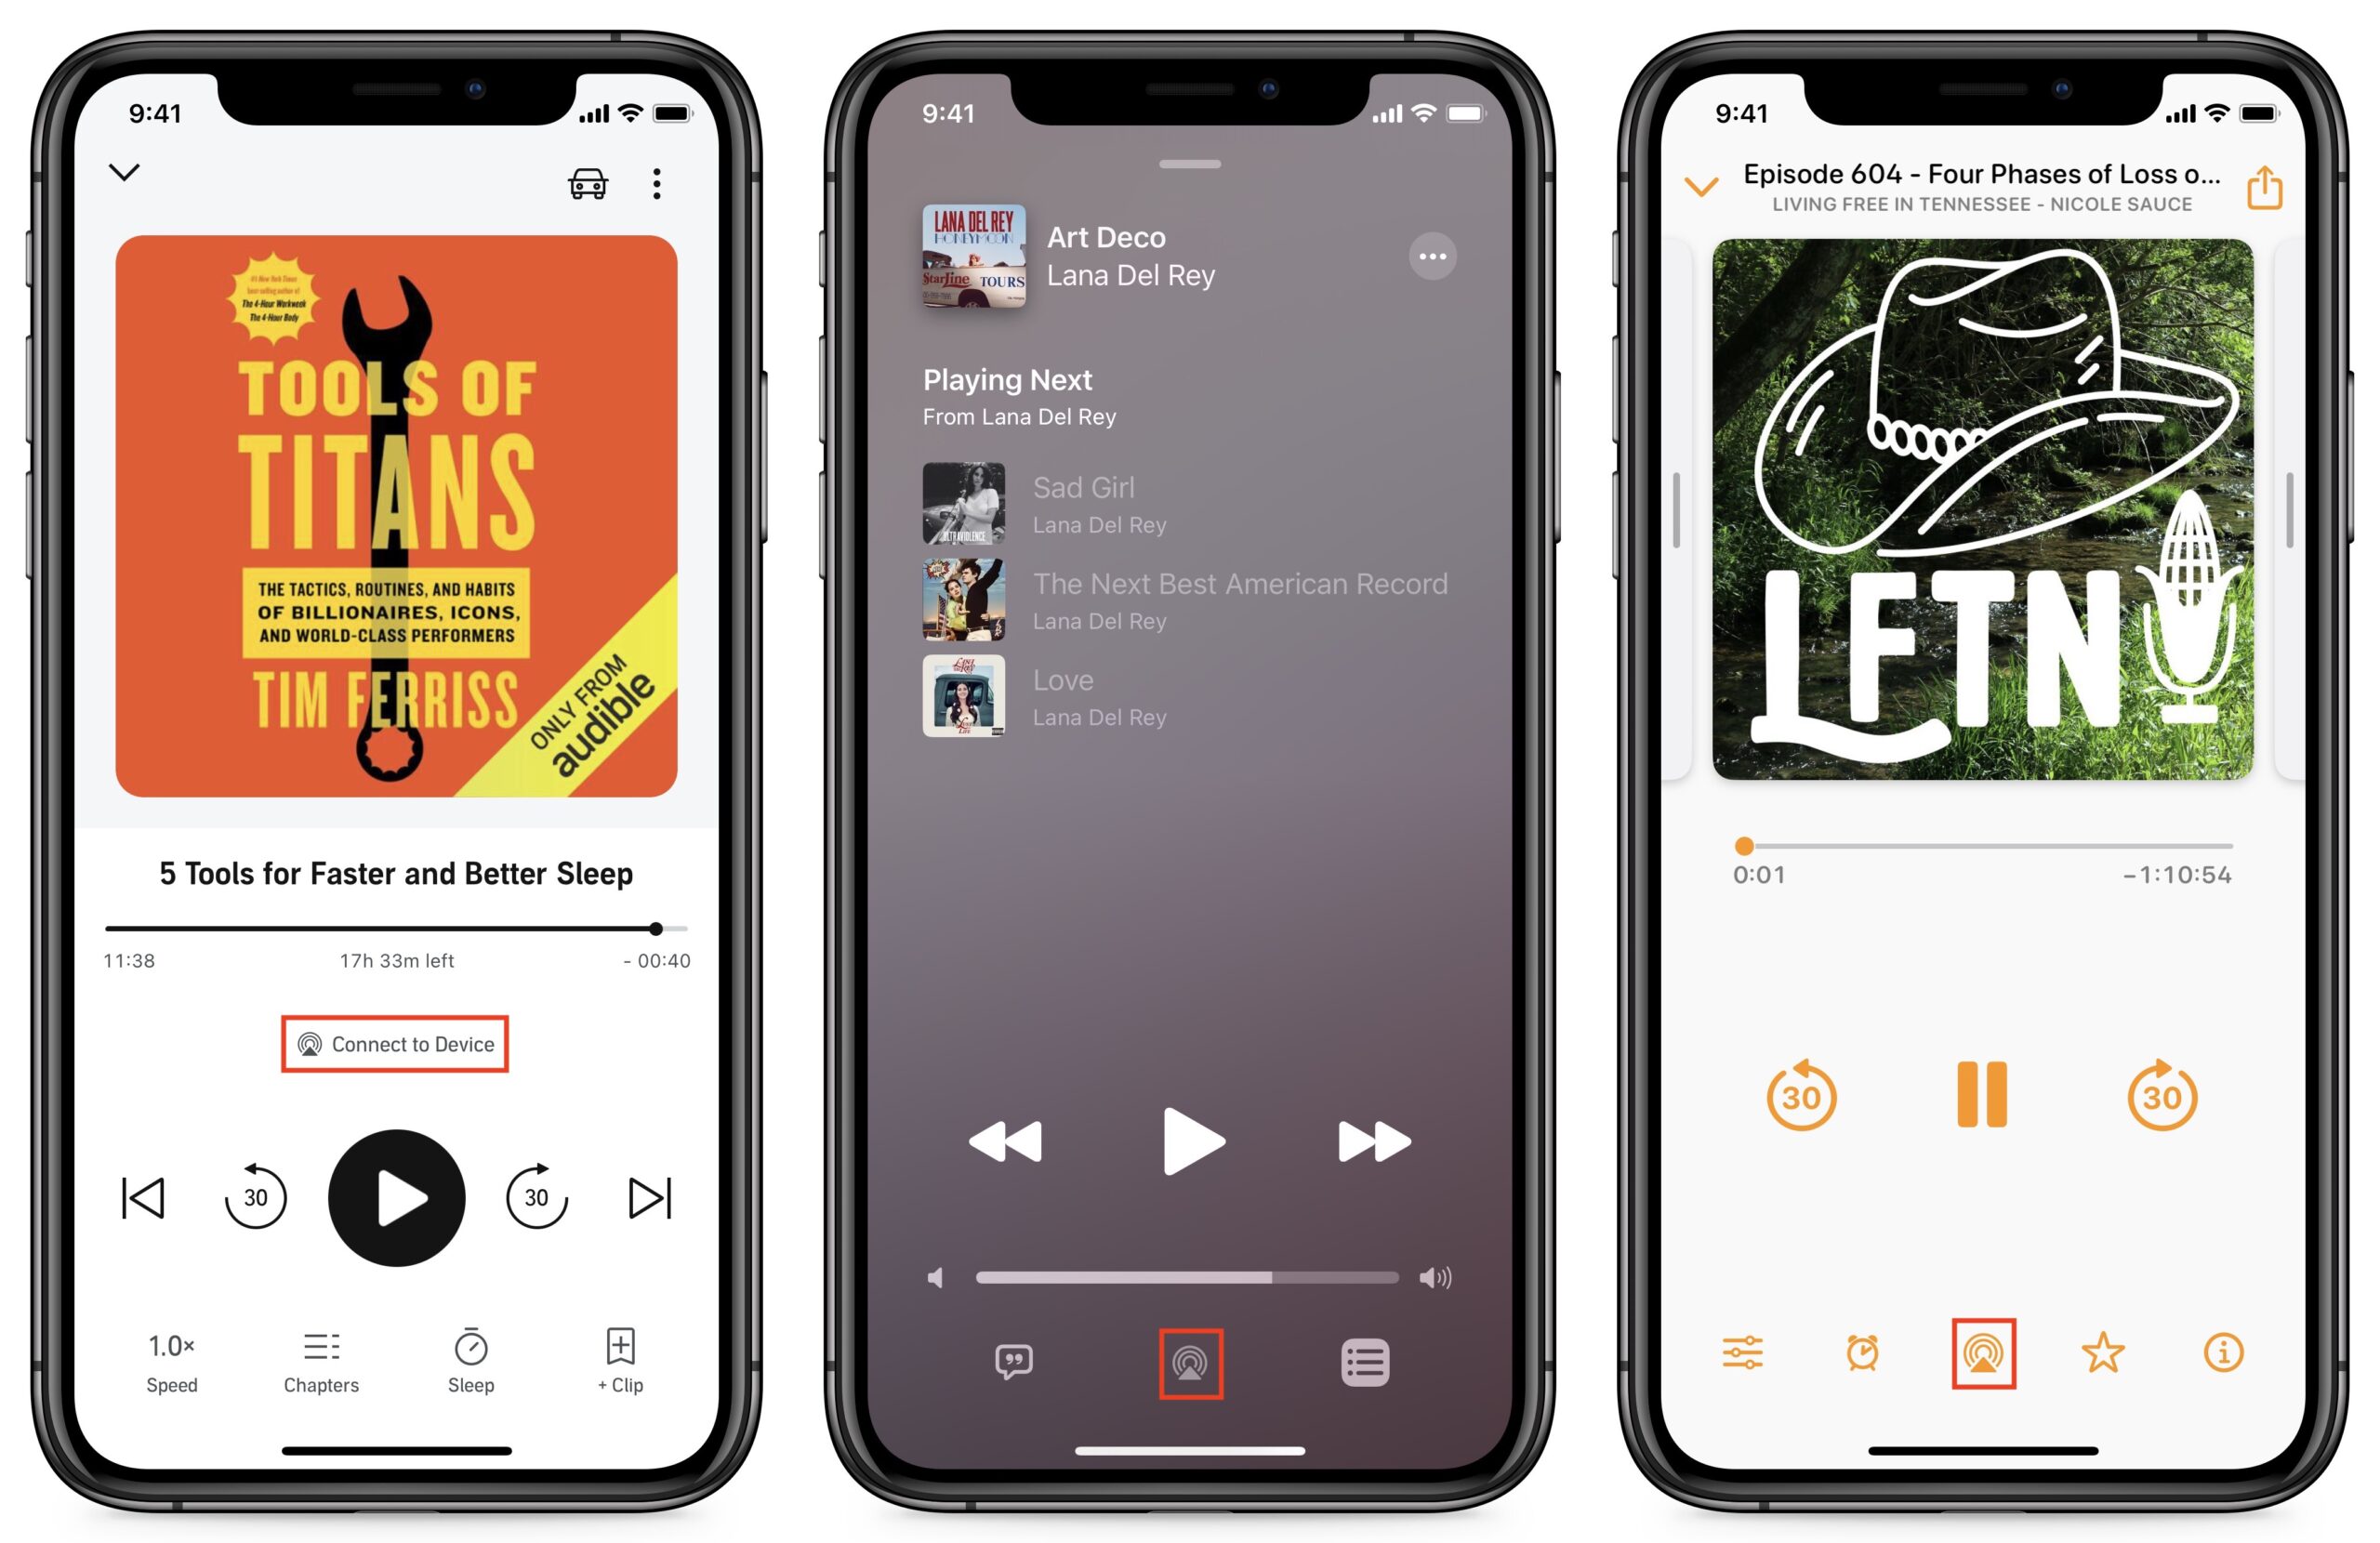
YouTube is a little tricker. You have to tap the Chromecast icon and then AirPlay & Bluetooth Devices.

If your preferred app doesn’t have an obvious AirPlay icon, you can initiate AirPlay from Control Center. Tap the AirPlay icon in the upper-right corner of the media player control and select your Mac as the output device.

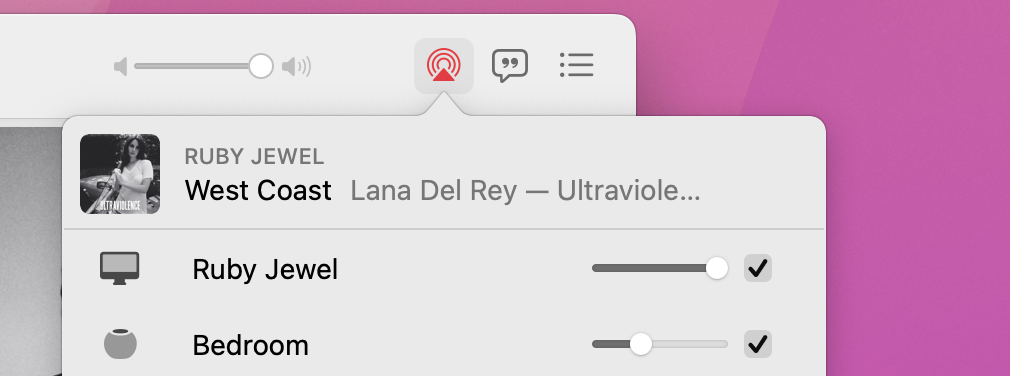
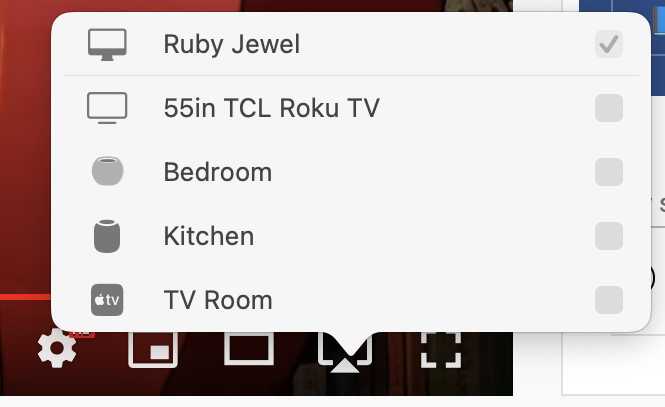
Mac apps don’t tend to have AirPlay icons. One notable exception is Music, which displays a pop-up menu that lets you select multiple AirPlay receivers. You can use that feature to fill your entire house with audio by selecting other Macs, HomePods, and even Apple TVs. This is one of Music’s underappreciated features, and it has only improved over the years as Apple has expanded AirPlay’s reach.
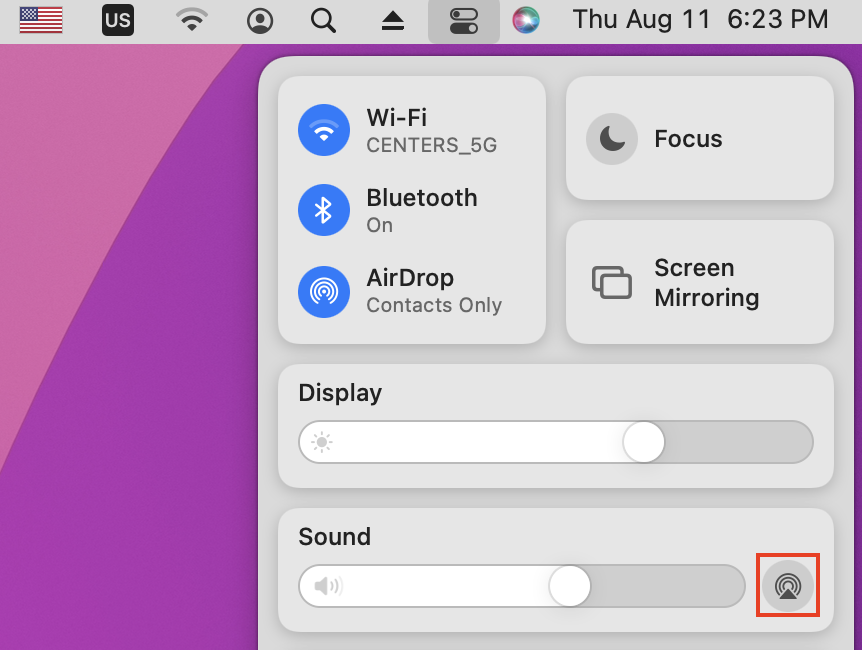
The best way to send AirPlay audio from a Mac is through Control Center in the menu bar. Click the AirPlay icon in the Sound controls and select an output device. Note that this causes all media audio to be played through that AirPlay receiver, but system-generated sounds remain local to your Mac.
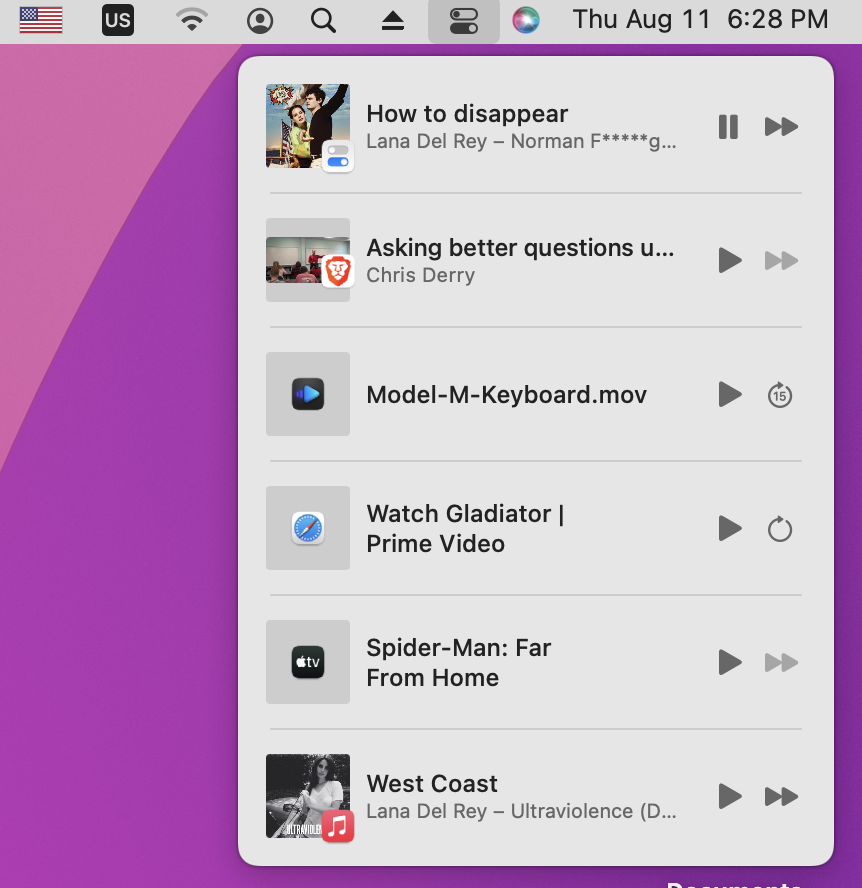
Control Center also lets you view and control playback of all audio streams on your Mac, both incoming and outgoing. The most recent media stream appears at the bottom of Control Center, and if you click it, you’ll see all the other streams on your Mac. (Tip: Command-click an app’s stream in this list to switch to that app.)
AirPlay Video to a Mac
AirPlaying video works the same way in iOS and iPadOS: tap the AirPlay icon in an app or go through Control Center.
From a Mac, it’s a little trickier and must be triggered on a per-app basis. Two apps that support AirPlay are Apple’s QuickTime and TV apps, which display an AirPlay icon in the control panel. Note the AirPlay video icon has the triangle topped with a rectangle.
Safari also includes AirPlay support. Video sites like YouTube (shown below) that offer AirPlay features provide an AirPlay icon. However, other sites, like Amazon Prime Video, do not support AirPlay.
Unfortunately, receiving AirPlay video on your Mac takes over your entire machine. Video is played fullscreen, with no option to shrink it to a window. Plus, if you have multiple monitors, those not used for AirPlay are blacked out entirely. You can switch video between monitors by moving the pointer and using a menu in the upper-left corner, but no matter what, your Mac is temporarily unusable for anything else.

Exit AirPlay on the receiving Mac at any time by pressing Escape.
Screen Mirroring to a Mac
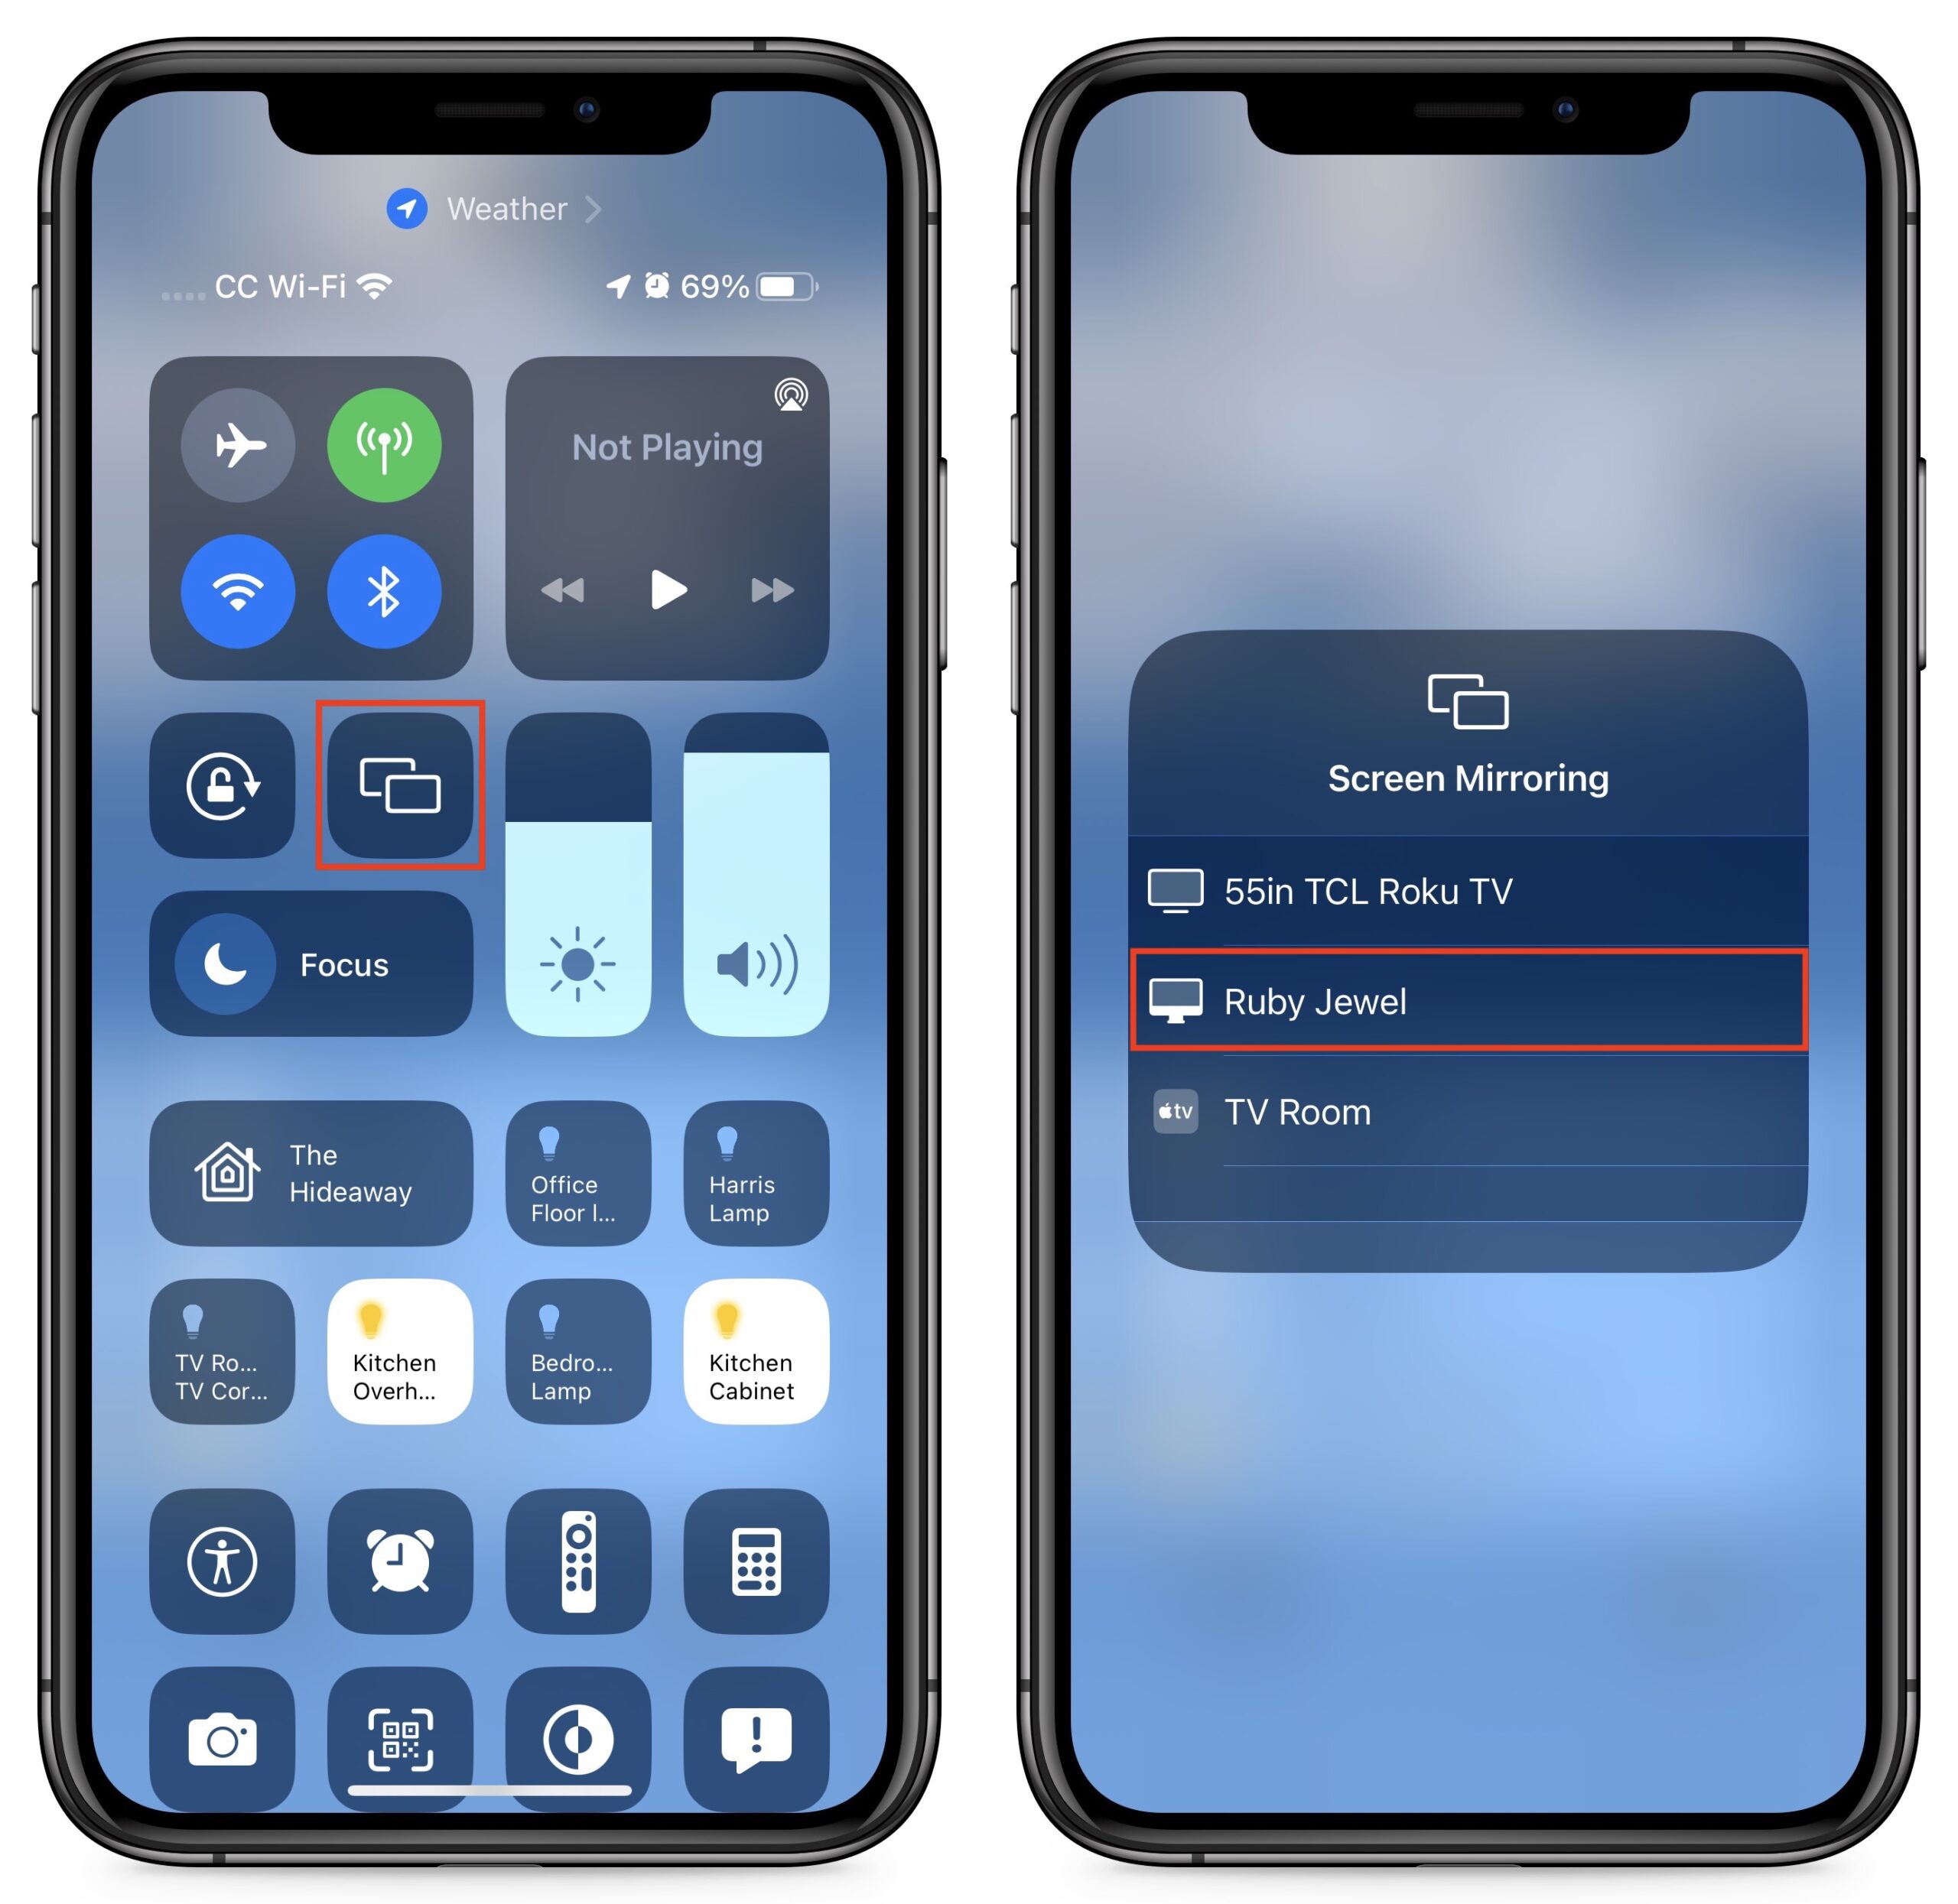
You can also use AirPlay to mirror one device’s screen to a Mac, which could be extremely effective when demoing something on an iPhone or iPad to other people. It’s trivial to initiate in iOS or iPadOS. Open Control Center, tap the Screen Mirroring button, and select your Mac as the destination device. Unfortunately, screen mirroring works like video—the iPhone’s or iPad’s screen takes over the entire Mac screen.
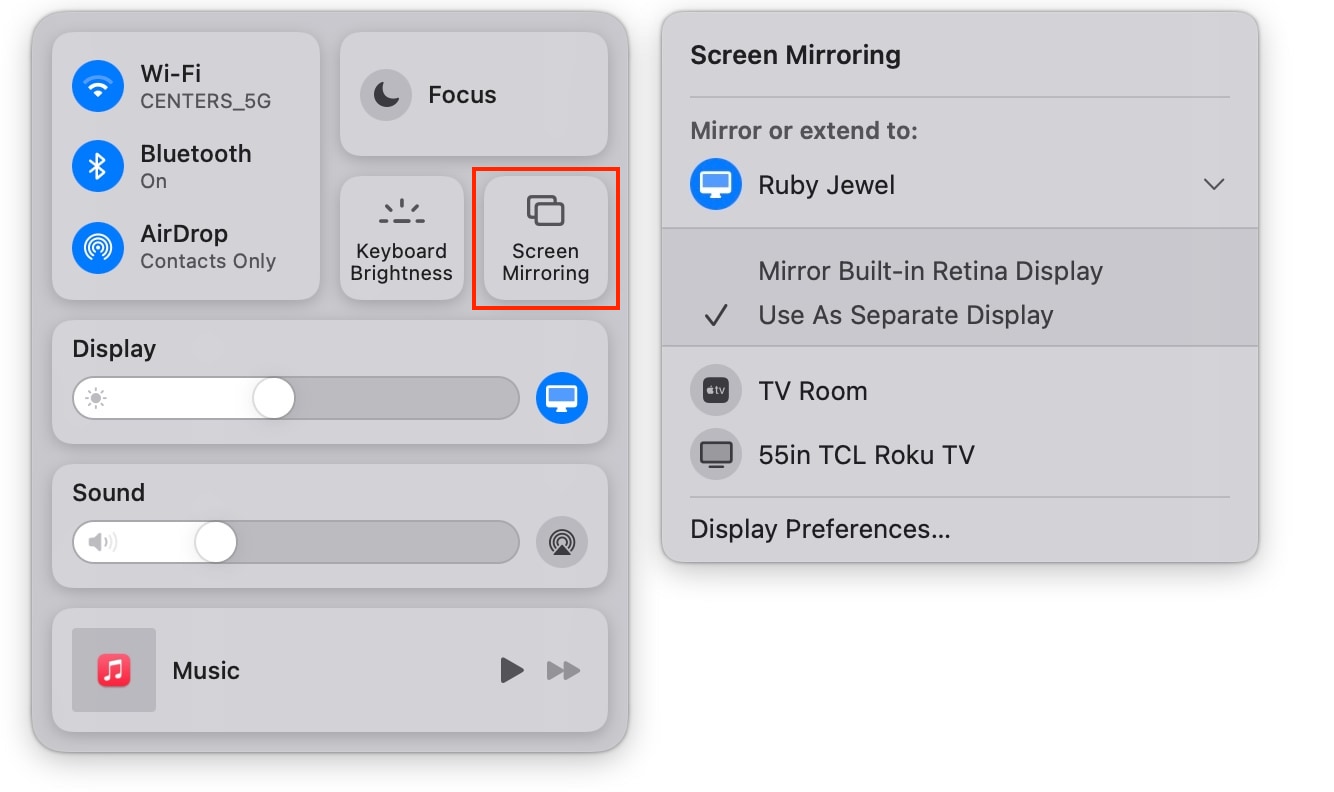
The process is similar on the Mac. Open Control Center, click the Screen Mirroring button, and select the destination Mac. However, there’s one significant difference. When you select the destination Mac, you can choose between mirroring and using it as a separate display. In this situation, taking over the destination Mac’s screen feels appropriate, though any secondary displays on the destination Mac are still ignored.
However, if you have dreams of using an older iMac as a secondary display using AirPlay, let me put an end to those right away. The resolution on the destination Mac will likely be problematic, and performance isn’t very good. When we tested this with an M1 MacBook Air using a 2020 27-inch iMac as a destination, AirPlay defaulted to the iMac screen’s native resolution, which resulted in too-small pixels. But selecting the normal 2560×1440 resolution in System Preferences > Displays > Display Settings lived up to the “low resolution” tag that appeared next to it in the list, as you can see in the oddly fuzzy screenshot below. You might be able to find a resolution that’s crisp and provides enough screen real estate to be useful, but it’s not guaranteed.

AirPlay to Mac may not be the killer feature we imagined in the early days of AirPlay, but it’s legitimately useful in all its combinations, so keep it in mind whenever you wish you could display something on a larger or additional screen.
How to Securely Erase a Mac’s SSD or Hard Drive
Over on TidBITS Talk, user Lucas043 posed a question that prompted a fascinating discussion. Lucas043 has a Samsung Portable T7 SSD being used for backup. The SSD has intermittent access problems and is still under warranty, so it could be returned with no problem, but it contains sensitive client data. Lucas043’s question: What’s the most secure way of erasing the drive?
There are multiple answers to this question, but not all may be appropriate for a drive that’s being returned under warranty. Others may be perfect if you want to erase an SSD or hard drive securely but have different goals for the drive afterward.
It’s also worth considering what you think “securely” should mean. Do you want to prevent someone from recovering the files with off-the-shelf software? Are you concerned that a company like DriveSavers could extract the chips or attach new controllers? Do you worry about a government-level agency reconstructing the data?
Let’s go through the possibilities.
Destroy the Drive
The simplest way of ensuring that no one could ever read the data on an SSD is to don some eye protection and hit it repeatedly with a hammer. That’s quick, effective, and satisfying, but it does present a problem when trying to return the drive under warranty. Samsung probably doesn’t cover SSDs that come back in numerous small bits. Of course, you must physically destroy the chips inside the SSD, so make sure they’ve been thoroughly smashed.
With a hard drive, a hammer would have a similar effect, though you would want to make sure you damaged the actual platters, which is best done by drilling several holes in them. I recently did this for some elderly friends with a few old drives and a dead Mac mini (see “Helping Senior Citizens Reveals Past Apple Lapses and Recent Improvements,” 24 June 2022).

If you’re concerned about government-level extraction, drilling holes in a hard drive might not be sufficient. For that, a degausser would be more effective, or you could open the drive, remove the platters, and destroy their surfaces with sandpaper or something abrasive. There are also shredders that can eat drives, but these and degaussers are mostly appropriate for IT departments that have to decommission numerous drives containing sensitive information.
For normal people, once you’re done destroying your drive, take the remnants to an electronics recycling center in your area. When I did that, I winced when the guy who took the 2010 iMac and Cinema Display from me tossed them across the loading bay into a large bin. They were dead, of course, but still—Macs aren’t generally something that one throws.
Erase the Drive with Disk Utility
The most obvious way of erasing a drive is to select it in Disk Utility and click the Erase button. Disk Utility will unmount the drive, delete the directory that keeps track of which blocks are used by which files, and create a new directory. In other words, none of the data is actually being erased; all that’s disappearing are the pointers to the storage blocks where the data is located. No directory, no access to the data.

That’s fine if you plan to reuse the drive yourself or give it to someone you either trust or don’t believe could ever muster the technical know-how to recover data from the erased drive. Or, more realistically, it’s also sufficient if your data isn’t that sensitive.
However, a simple erase in Disk Utility won’t pass muster for those concerned about security. Some apps can scan the blocks of a drive and recreate the directory, enabling file recovery. Particularly if the drive could be scanned for data shortly after being reformatted, before new data has been written over the previously used blocks, you have to assume that even a relatively non-technical person could recover much of the data.
Secure Erase the Drive Using Disk Utility
The solution to the previous approach’s limitation may seem obvious: write random data and zeroes to every block on the drive during the formatting process. That way, no recovery software can read the data that remains behind after the directory has been deleted. Disk Utility makes this easy: select the drive, click Erase, and in the dialog that appears, click Security Options and choose how many passes of random data and zeroes it should write.
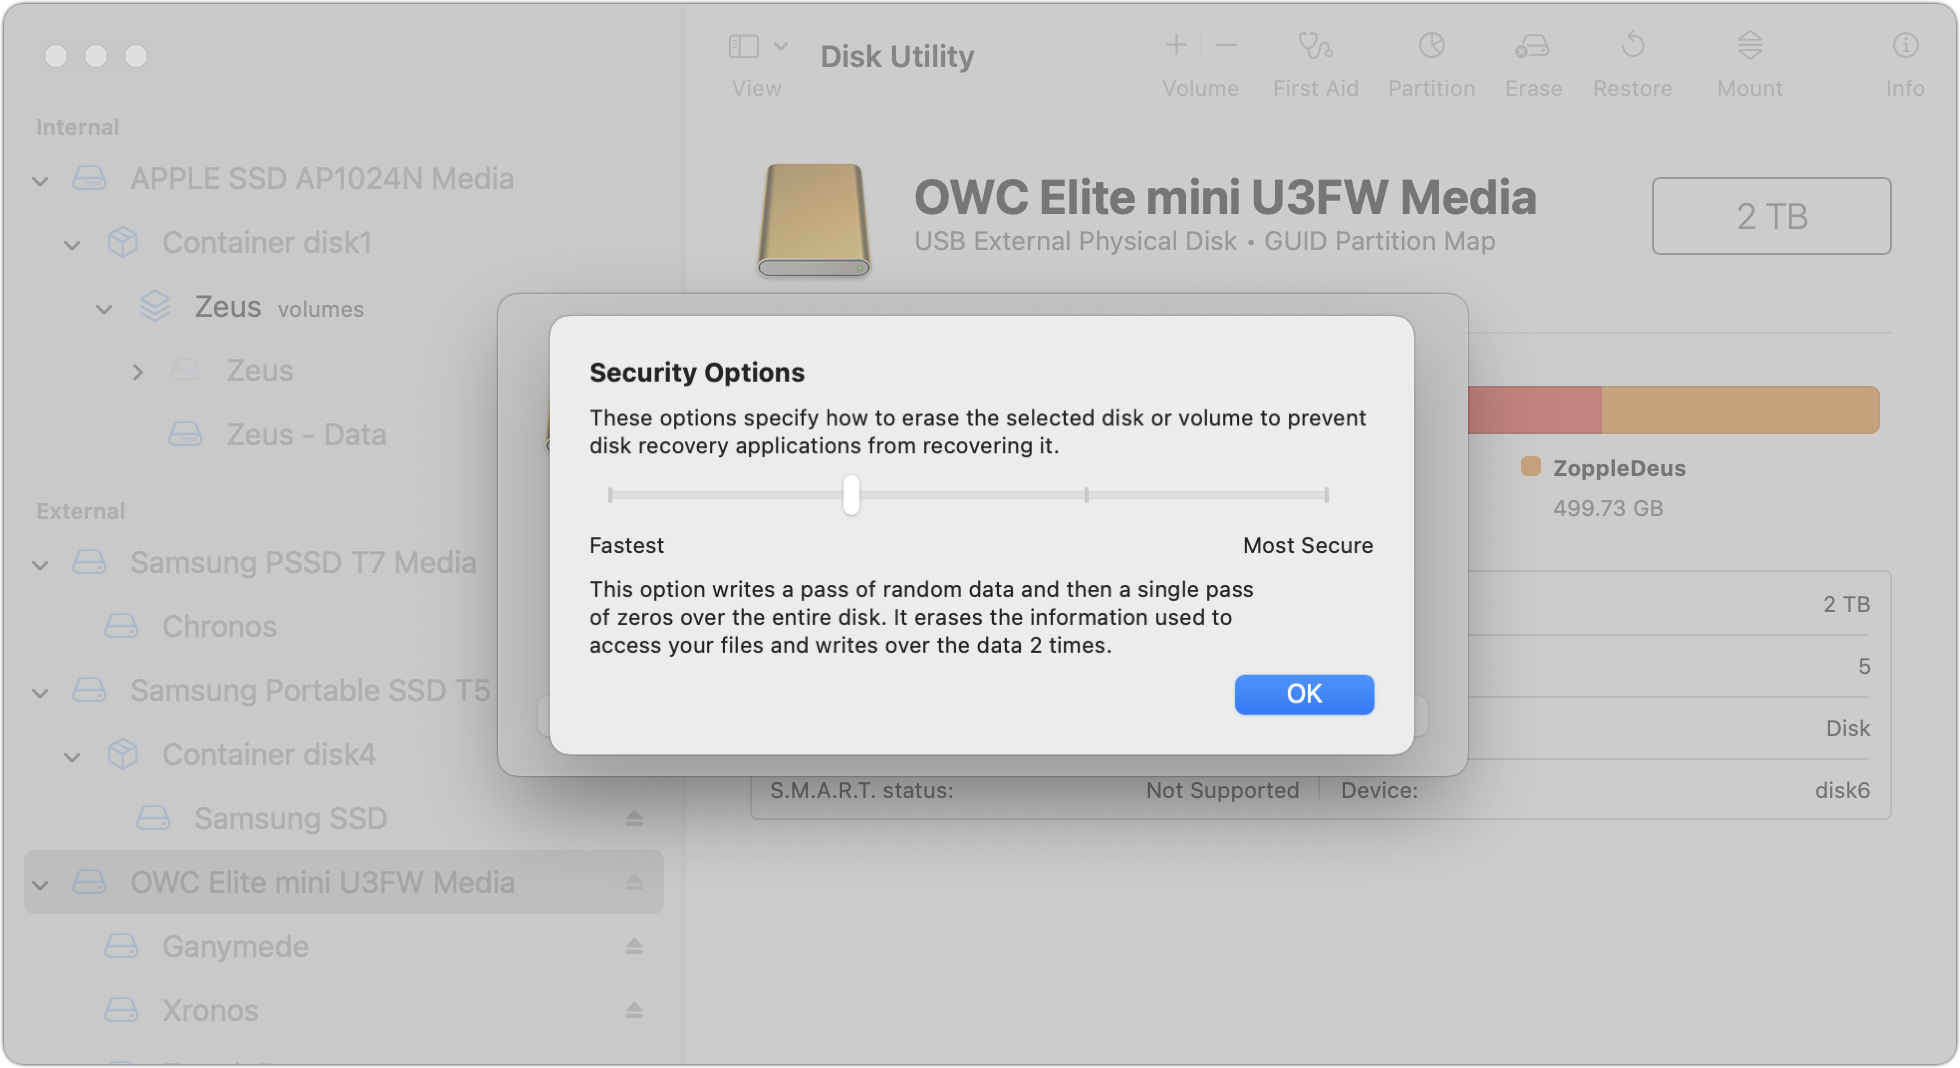
Apple describes the options well but doesn’t point out that the more passes, the longer the process. I’ve never tried a seven-pass erase, but it could take days to complete on a sufficiently large drive:
- Fastest; Not Secure: This option does not securely erase the files on the disk. A disk recovery application may be able to recover the files.
- Two-Pass: This option writes a pass of random data and then a single pass of zeros over the entire disk. It erases the information used to access your files and writes over the data two times.
- Three-Pass: This option is a DOE-compliant three-pass secure erase. It writes two passes of random data followed by a single pass of known data over the entire disk. It erases the information used to access your files and writes over the data three times.
- Most Secure; Seven-Pass: This option writes multiple passes of zeros, ones, and random data over the entire disk. It erases the information used to access your files and writes over the data seven times.
Beyond the time involved, there are some additional caveats.
First, the Security Options button shows up only when it’s appropriate to use. One practical upshot of that is that you must select a drive—not a volume—in Disk Utility’s sidebar before clicking Erase because volumes don’t use all the blocks on a drive. If you’re worried about security, you want to be sure that all the blocks have been zeroed out.
Second, data could remain on a drive after a secure erase, thanks to the automatic swapping of bad blocks for good ones. If a block goes bad, the controller swaps it for a good one on the fly. If you then erase the drive, only the replacement good block will be erased, potentially leaving sensitive data on the bad block. Only a highly capable outfit like DriveSavers or a government-level agency could conceivably retrieve the data, but it’s not inconceivable. Nor is there any way of knowing what would be in those bad blocks.
Third, the Security Options button is available only when you’re reformatting a hard drive, not an SSD. Here’s why (thanks to David C. for this explanation and a lot of the great detail in the TidBITS Talk discussion). For technical reasons beyond the scope of this article, there is no direct relationship between the logical data blocks that software (including macOS) accesses and the physical data blocks in the SSD’s flash chips. The SSD controller’s firmware (on an SSD’s circuit board or in a Mac’s Apple silicon processor or T2 chip) maintains a database that maps logical blocks to physical blocks.
When you write to an SSD and the logical blocks you’re writing to already contain data, the SSD controller doesn’t overwrite the corresponding physical blocks (again, for technical reasons beyond the scope of this article). Instead, it writes the data to new, unused physical blocks, changes the logical-to-physical mapping database, and marks the previously used physical blocks as “garbage.”
Garbage blocks are not accessible to software (they are not mapped to any logical blocks), but they still contain data that could theoretically be accessed by equipment designed to bypass the SSD controller by directly reading the chips or hacking the SSD controller’s firmware.
At some later time, the SSD controller will perform garbage collection, which erases these garbage blocks, making them available for reuse. The specific mechanism used for garbage collection and when it actually occurs depend on the firmware running in the SSD controller and will vary for different SSD brands and models. Depending on the drive’s firmware and your usage—garbage collection is usually done only when the drive is otherwise idle—garbage collection might not take place for hours or even days.
This is why a secure erase is considered unreliable when used on an SSD. The act of writing random data to every logical block guarantees that all the physical blocks with your real data will be marked as garbage and therefore be inaccessible by software, but it does not guarantee when those garbage blocks will be collected and erased. If you plan on disposing of the drive, you have no way to know if the garbage data was collected before you last disconnected it from power. Apple’s removal of the Security Options button when erasing an SSD is an acknowledgment that it’s not sufficiently secure.
Still want to perform a secure erase of an SSD? You can do so from the command line, using the diskutil command.
- Run
diskutil listto determine the identifier of the drive in question. You’ll need to parse through the results to find the desired drive. - Use something like
diskutil secureErase 1 disk3to erase the drive, after which you’ll need to repartition it in Disk Utility before using it again. The 1 in the command above is for a single-pass zero fill erase, but if you readman diskutil, you’ll see all the other options, including the excessive-sounding Gutmann algorithm 35-pass erase.
If you’re not comfortable with the command line, this isn’t the time to experiment. Even then, I’m going to recommend that you avoid this technique, partly because it’s conceivable you could mistype the drive identifier and erase the wrong drive, but mostly because Apple includes a strongly worded note warning against it:
NOTE: This kind of secure erase is no longer considered safe. Modern devices have wear-leveling, block-sparing, and possibly-persistent cache hardware, which cannot be completely erased by commands. The modern solution for quickly and securely erasing your data is encryption. Strongly-encrypted data can be instantly “erased” by destroying (or losing) the key (password), because this renders your data irretrievable in practical terms. Consider using APFS encryption (FileVault).
We’ll get to encryption next, but some have wondered if there’s a way to create a huge device-filling file that would fill all the blocks with data. Alas, that’s almost exactly the same as using diskutil secureErase, so while it will probably clean out most data, it’s impossible to know what will happen with garbage collection. Don’t waste your time.
Encrypt the Drive, Then Erase It
The real solution to this problem is encryption. The ideal scenario involves enabling encryption on a drive before you do anything else with it, such that all data written to the drive is encrypted. When you later erase the drive, the encryption key will be destroyed along with the directory, rendering the data unreadable even if someone at the level of DriveSavers or a government agency were able to extract the data spread across the drive’s blocks.
How you do this depends on whether you’re encrypting your Mac’s startup drive or an external drive:
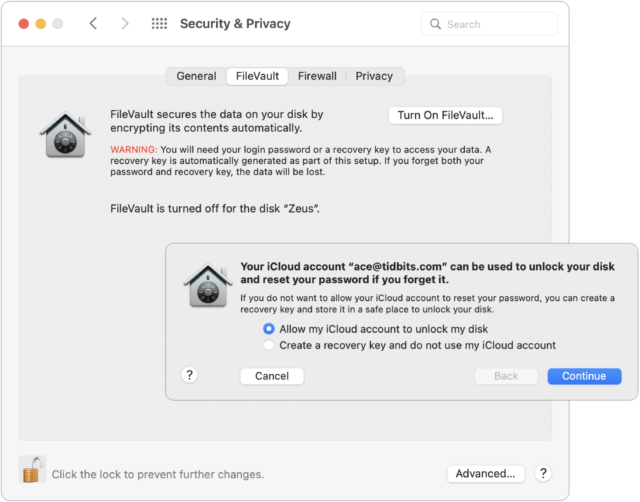
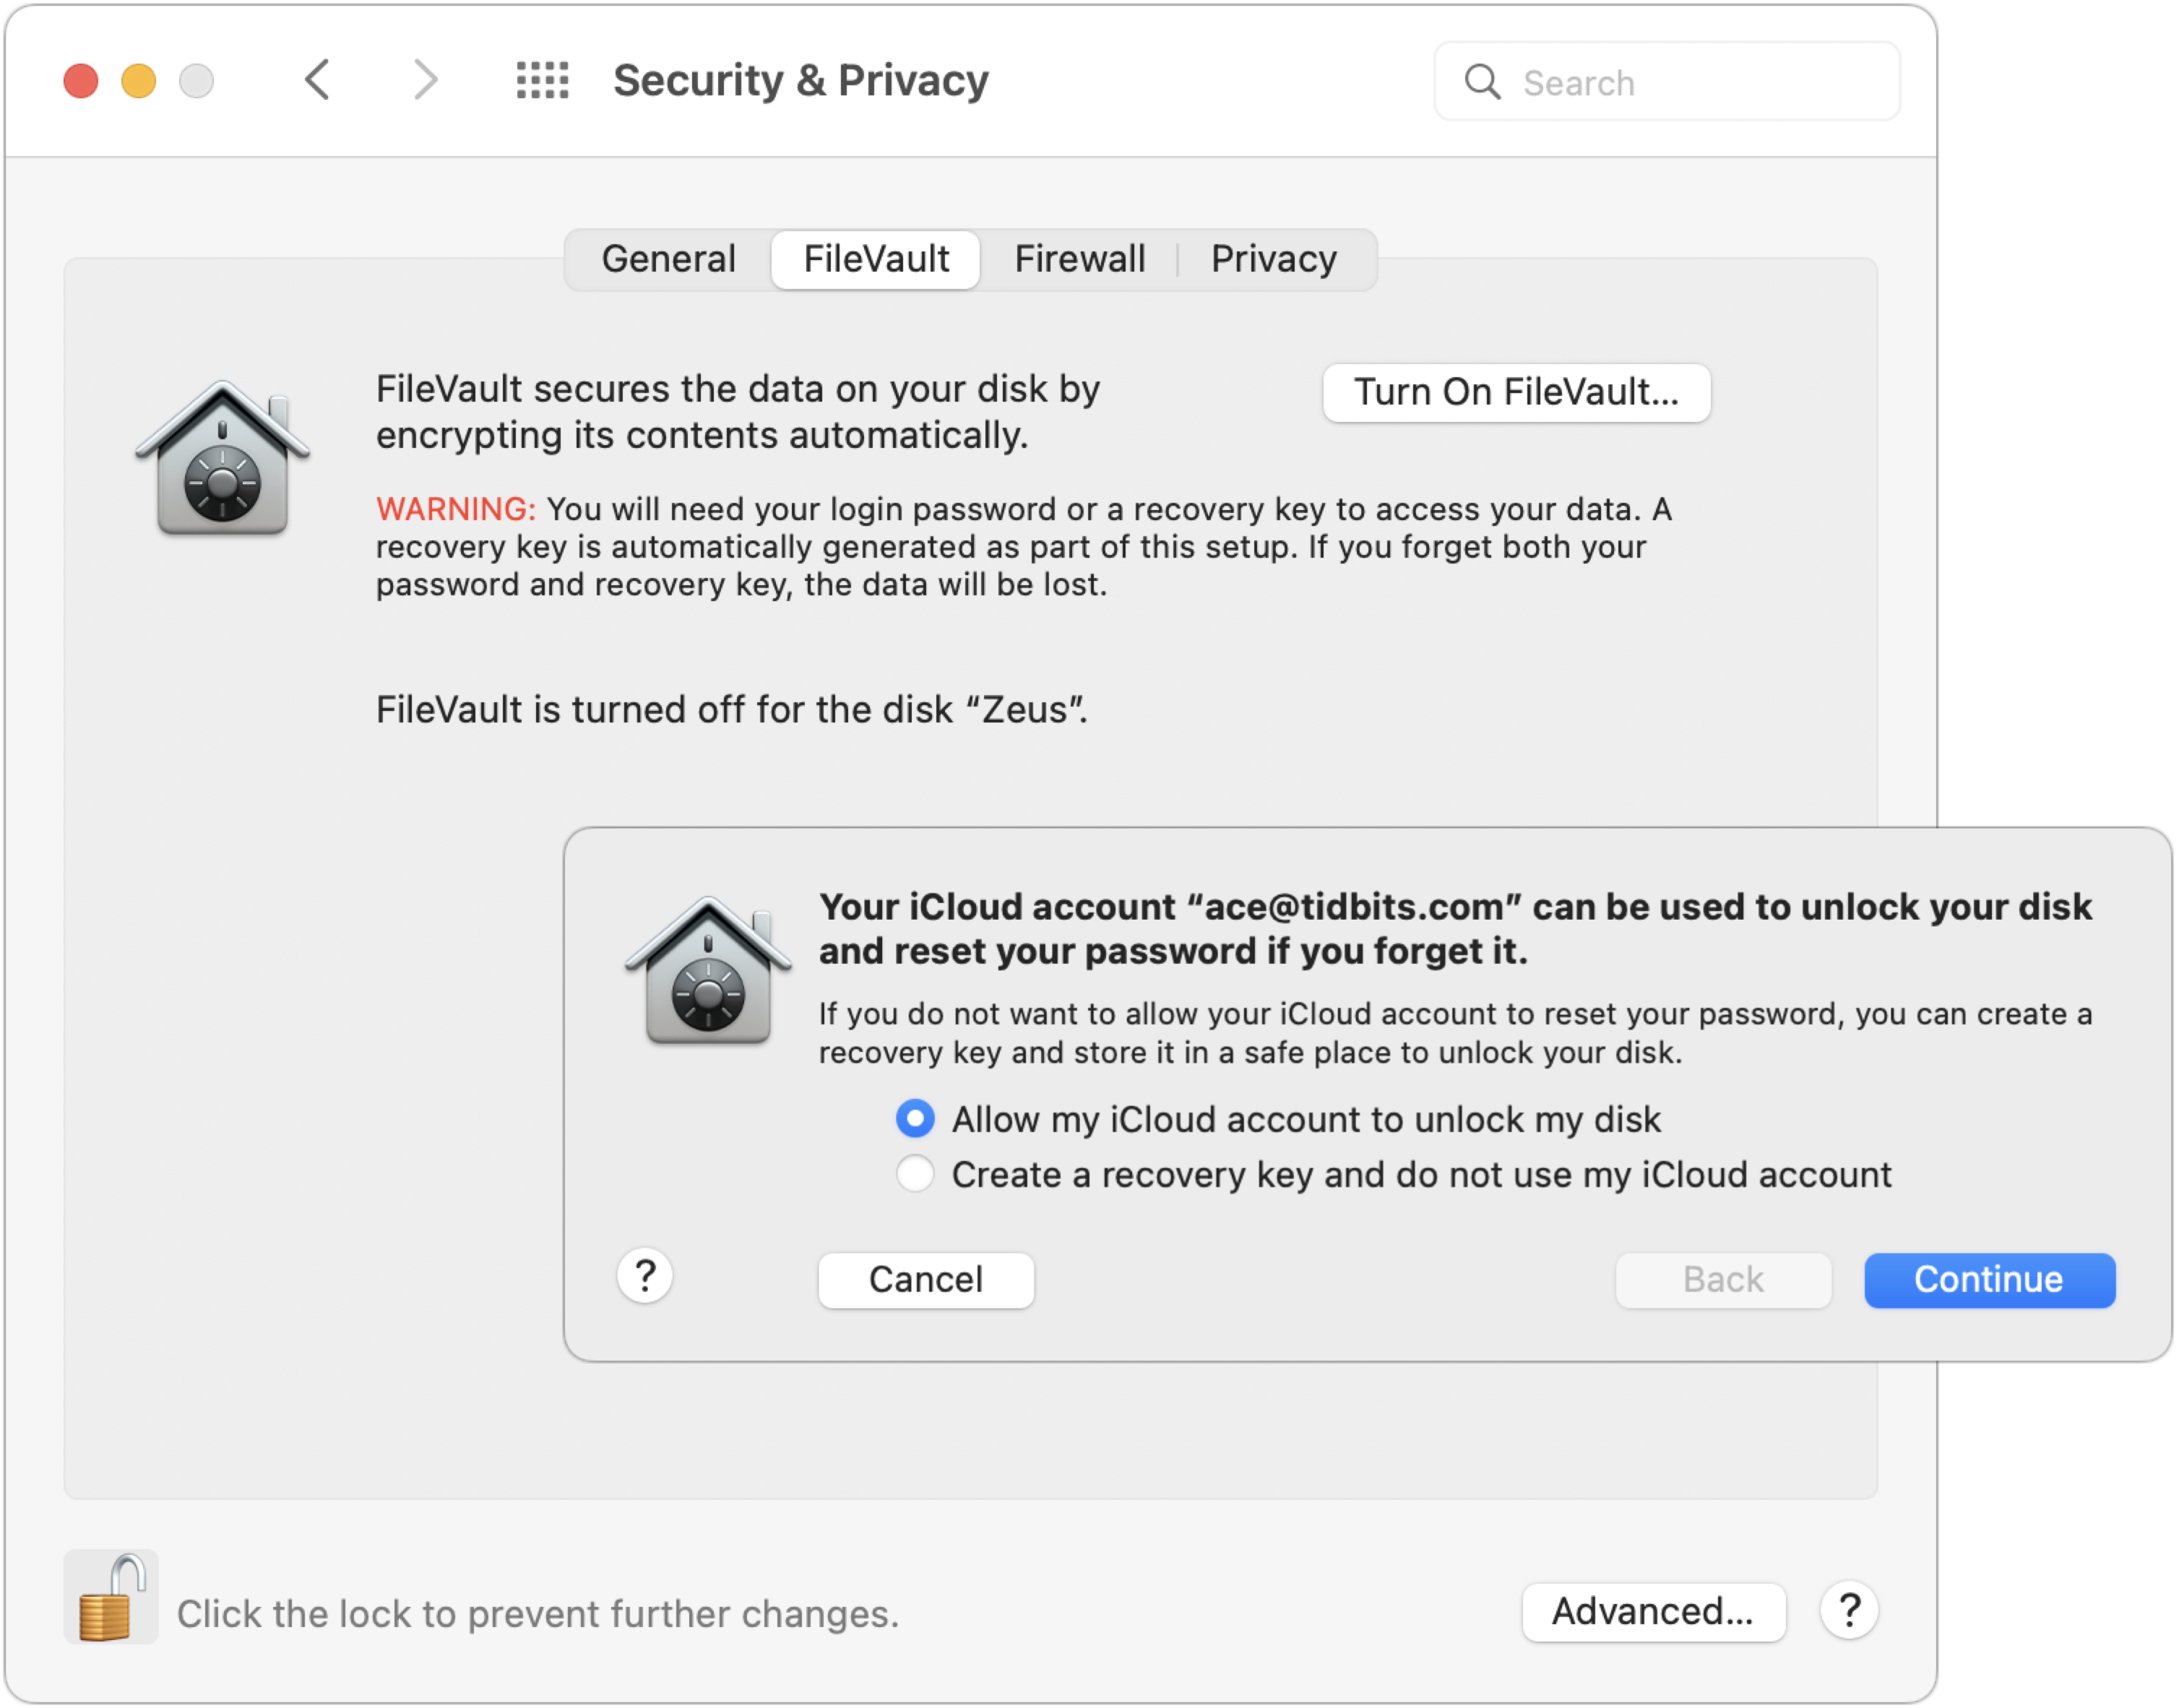
- Startup drive: To encrypt your Mac’s startup drive, turn on FileVault. Go to System Preferences > Security & Privacy > FileVault and click Turn On FileVault. You’ll get a dialog asking if you’d prefer to be able to unlock your drive using your iCloud account or use a recovery key. My feeling is that either is fine, but both are vulnerable to the xkcd wrench attack—I use the iCloud account approach.
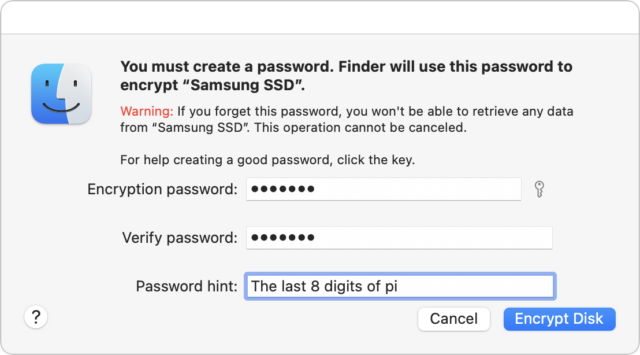
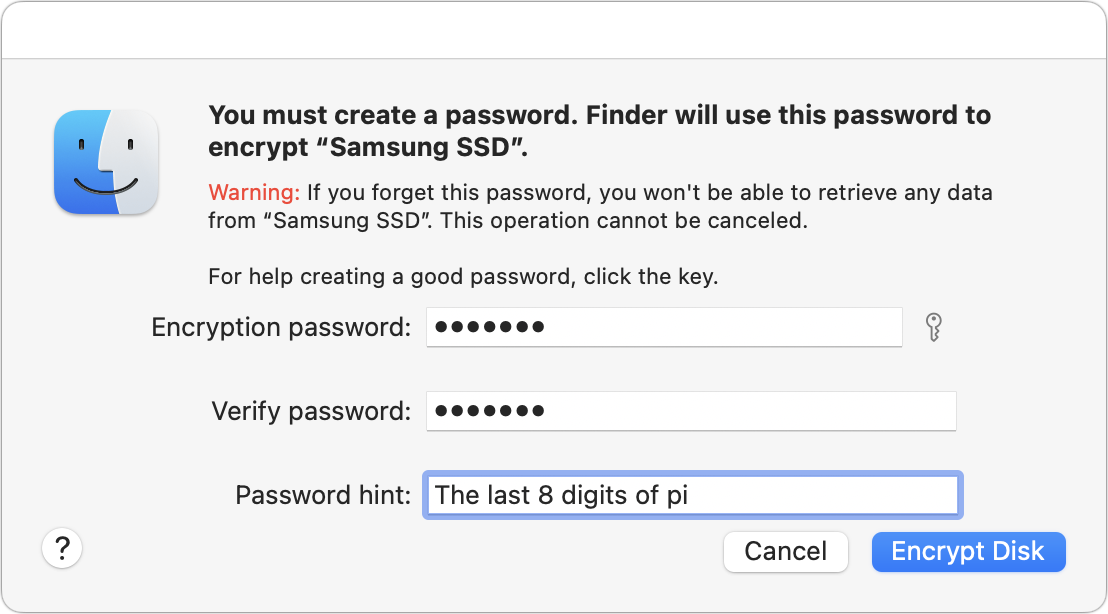
- External drive: FileVault protects only the startup drive; for external drives, take advantage of the APFS support for encryption. Control-click the drive in the Finder and choose Encrypt. You’ll be asked for a password and a hint, and macOS will help you pick a strong password if you like, though I’m pretty comfortable with the one in the screenshot. The next time you mount the drive, you’ll be asked for the password and given the opportunity to store it in your keychain so you don’t have to enter it manually again.
It’s worth keeping some facts in mind before doing all this.
- It’s quick and easy to turn FileVault on and off if you’re using a Mac with Apple silicon or an Intel-based Mac with a T2 chip. In that case, the data on the drive is already encrypted, but a password isn’t required to decrypt the data. That encryption ensures that the flash memory can’t be removed from the logicboard and decrypted; however, anyone with access to the Mac could theoretically still access the data. Enabling FileVault ensures that your account password is necessary to decrypt the drive.
- Enabling FileVault on an older Mac, particularly one with a hard drive, will take a long time because it has to encrypt everything, rather than just changing the key to one you control. Thus, if you’re enabling encryption just so you can erase the drive securely, let it finish before you erase. The FileVault screen in the Security & Privacy preference pane displays the status.
- If you’re encrypting your Mac’s startup drive and backing up with Time Machine, you should also make sure to encrypt the Time Machine backup drive. The same goes for any other backups you make to external drives.
- Encrypting data on an external drive, particularly a hard drive containing a lot of data, may take some time.
- There’s some question as to the vulnerability of data on erased blocks if you enable FileVault or encrypt an external drive after data has been written to it. The encryption will prevent access to any current data, but we don’t know if the erased blocks might still contain data that a sufficiently sophisticated attacker could extract. My feeling is that if you have a Mac with Apple silicon or a T2-enabled Mac, there’s no worry because the data is always encrypted; some erased data might be accessible, but it would be nearly impossible to put it together and decrypt it. It’s a little more of a worry with previously erased data on a subsequently encrypted external drive, but we’re still talking about intelligence agency-level work to access it. If you’re that important of a target, you should have enabled encryption before doing anything else with the Mac or external drive.
When it comes time to dispose of a Mac, you can destroy the encryption key by opening System Preferences and choosing Erase All Content and Settings from the System Preferences menu.

For an external drive, erase it in Disk Utility like any other drive. There’s no need to worry about security options because the encrypted data become random bits as soon as the encryption key is destroyed.
To make a long story short, if you think you’ll ever be concerned about erasing a drive securely, the best time to encrypt it is as soon as you start using it. If you haven’t yet turned on FileVault or encrypted a drive, the second best time to do so is now.