#1648: iPhone passcode thefts, Center Cam improves webcam eye contact, APFS Uncertainty Principle
After the Wall Street Journal’s chilling account of how iPhone thieves obtain users’ passcodes and proceed to take over their digital lives, Adam Engst offers guidance on protecting yourself from such attacks. He also reviews the unique Center Cam, a tiny webcam on a gooseneck stalk that lets you maintain eye contact while on video calls, and coins the APFS Uncertainty Principle, which states that APFS makes it impossible to determine exactly how much space any given action will free up on your Mac. Finally, we share a 1984 photo from the Steve Jobs Archive. Notable Mac app releases this week include BBEdit 14.6.4 and VMware Fusion 13.0.1.
Auditing Free Drive Space: Where Have All the Gigabytes Gone?
Howard Oakley’s explanations of the underpinnings of macOS are always interesting, but his latest post on his Eclectic Light Company blog, “How to get the Trash working properly,” particularly drew my attention. In it, he points out that deleting a very large file to free up space doesn’t necessarily have the desired effect, at least right away.
The reason, he says, is that Time Machine works by making APFS snapshots of your entire drive on every backup and retaining those for 24 hours. Because one of those snapshots contains the very large file, you may not get the space back until a full day later, when Time Machine has deleted those snapshots to make way for new ones.
Oakley says that some backup apps use a similar approach—he calls out Carbon Copy Cloner—but unlike Time Machine, such apps generally provide options to disable the feature, change how long snapshots are retained, and delete the snapshots if you need the space right away. Time Machine has no such options, but you can delete the snapshots manually in Disk Utility. (Still other backup apps, such as Arq and Backblaze, don’t use APFS snapshots but consume significant amounts of space for caching purposes—that’s getting some discussion in TidBITS Talk right now.)
I’ve been pondering just how difficult—perhaps impossible—it is to know how much free space you actually have on a Mac’s drive these days (see “Ensure Sufficient Free Space before Upgrading to Ventura,” 15 November 2022 and “iPhones and iPads Now Require a Passcode on Every Backup/Sync,” 11 January 2023). The complexity underlying APFS and macOS in general creates a situation where the amount of free space isn’t entirely deterministic. Howard Oakley examines the variables in “Explainer: Disk free space,” and Jeff Carlson explains APFS in his Take Control of Your Digital Storage, Second Edition ebook.
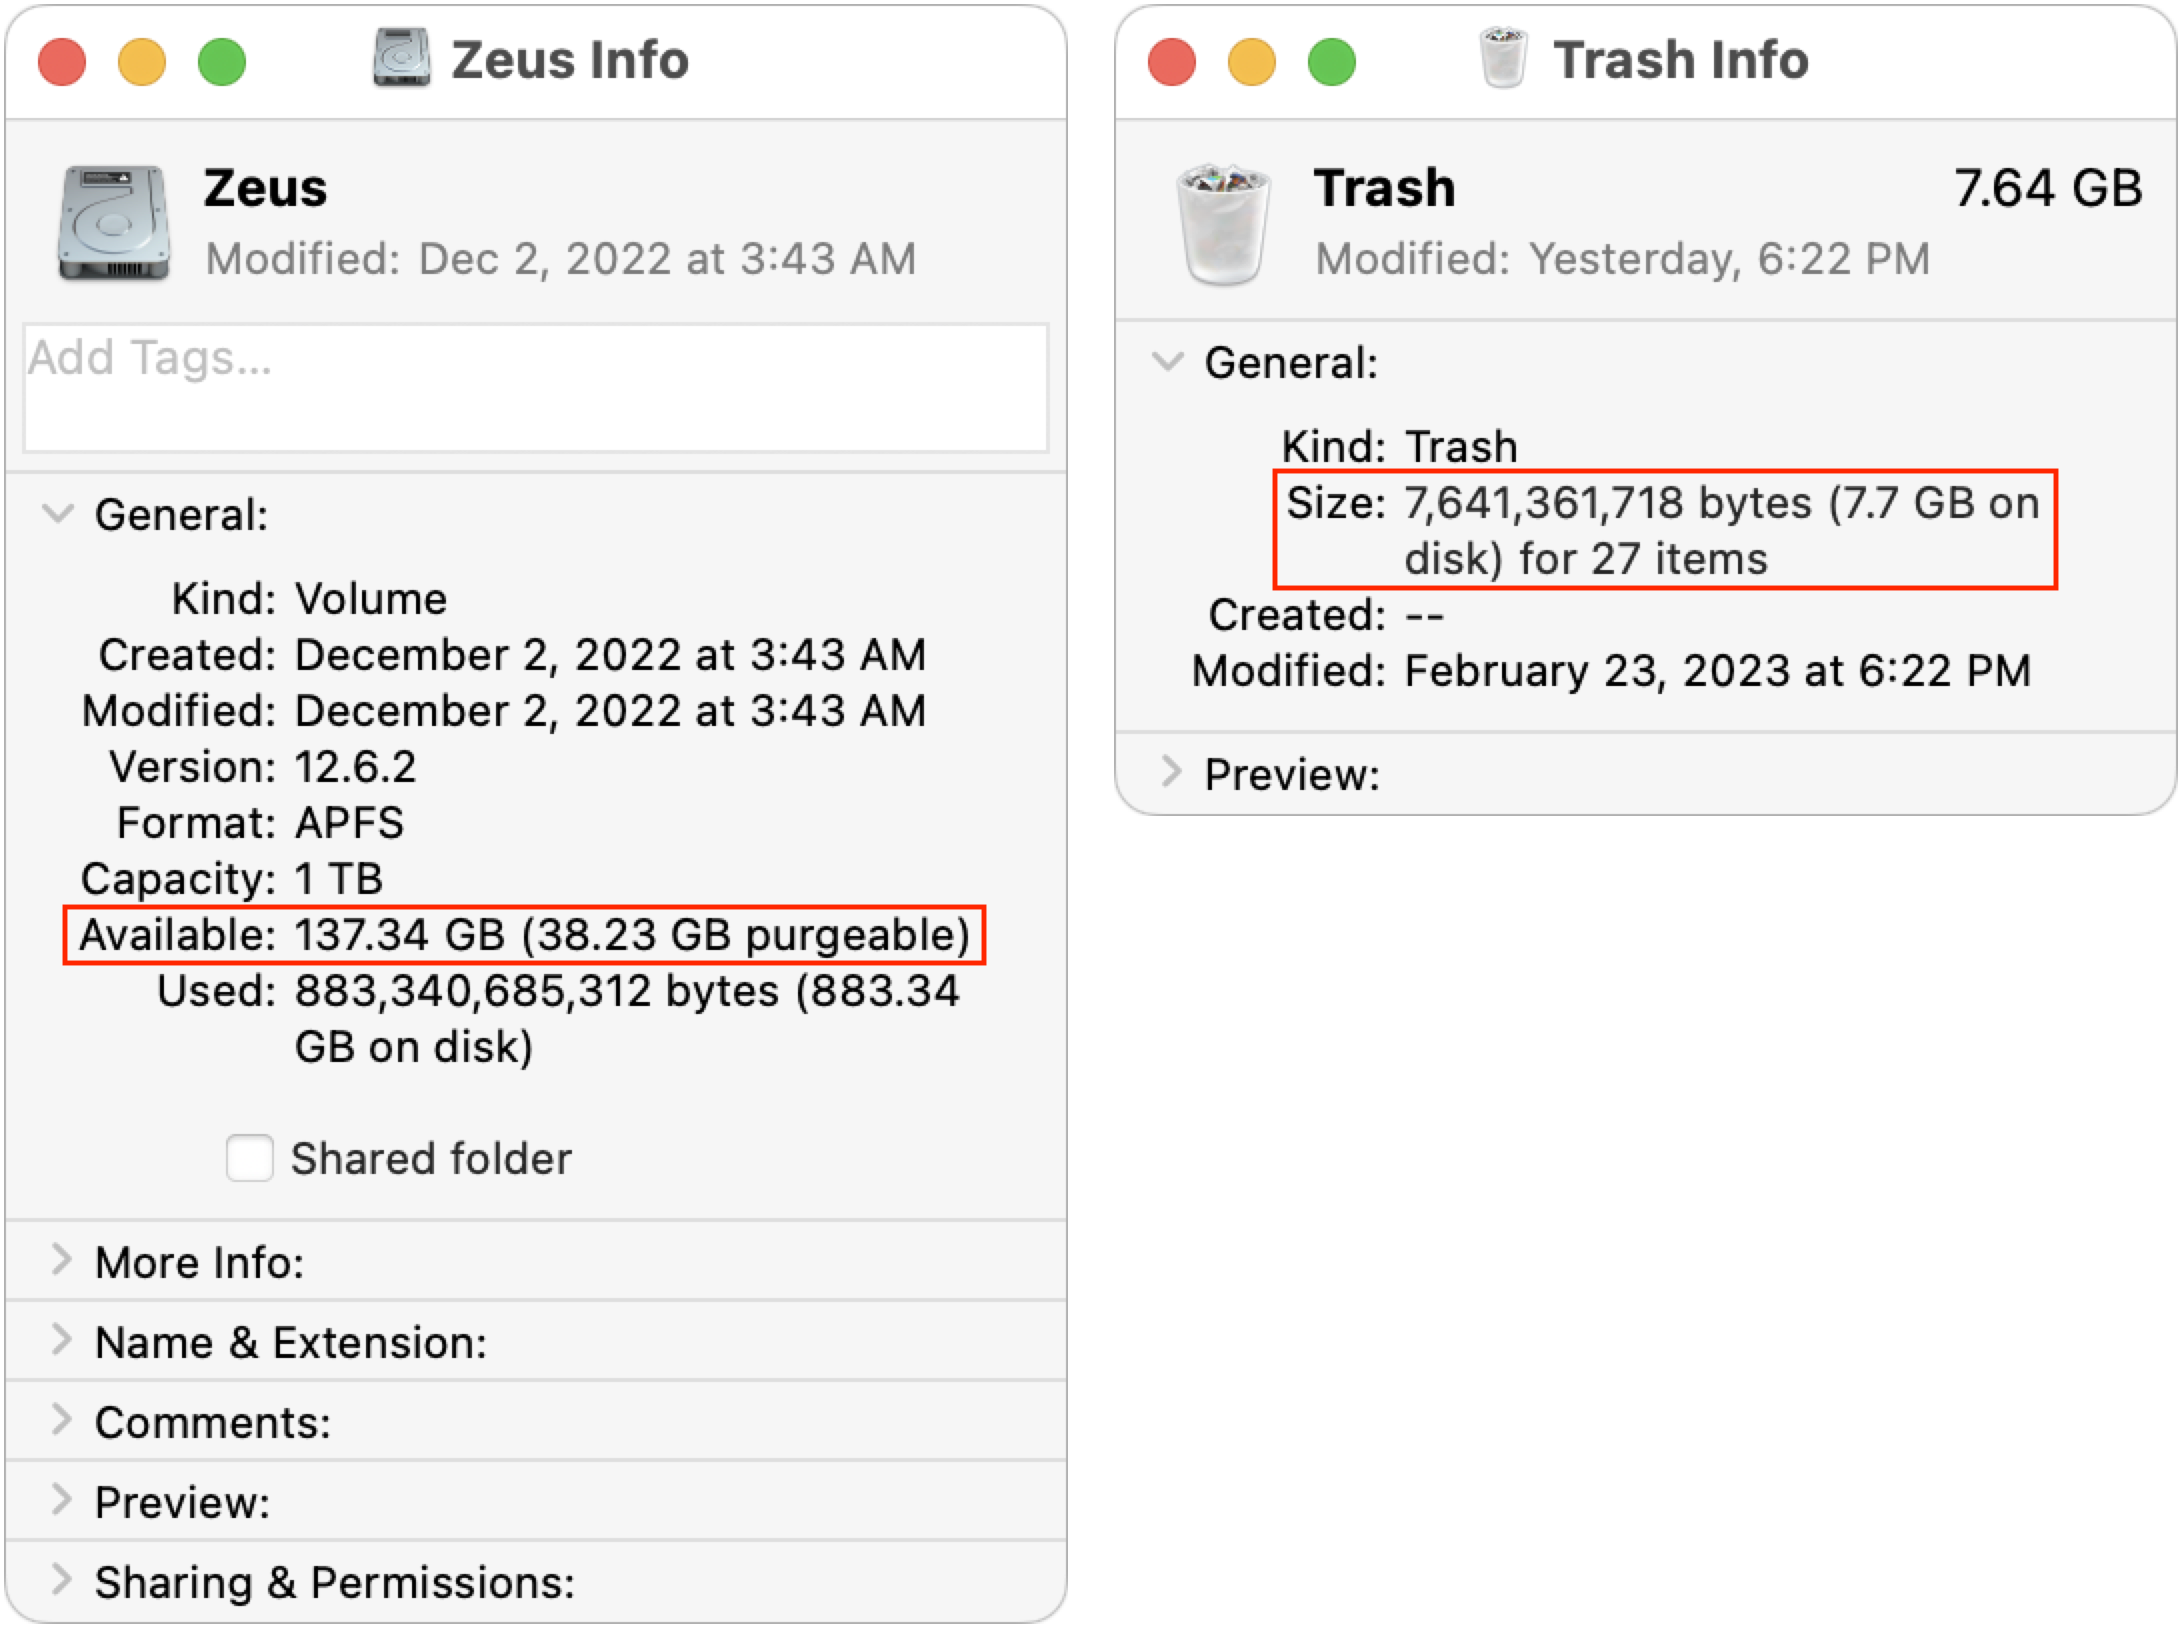
I decided to see if I could replicate some of these issues, at least in macOS 12 Monterey, which I’m still running on my 2020 27-inch iMac until I find the time to do a much-needed clean installation of macOS 13 Ventura. I recently upgraded to V2 of the Affinity suite (see “Consider Switching from Creative Cloud to Affinity V2,” 5 December 2022), but I hadn’t gotten around to trashing the earlier versions of the Affinity apps. They’re about 2.5 GB each, and I put them in the Trash yesterday. This morning, Get Info on my boot drive reported 137 GB free, and the Trash contained 7.6 GB.
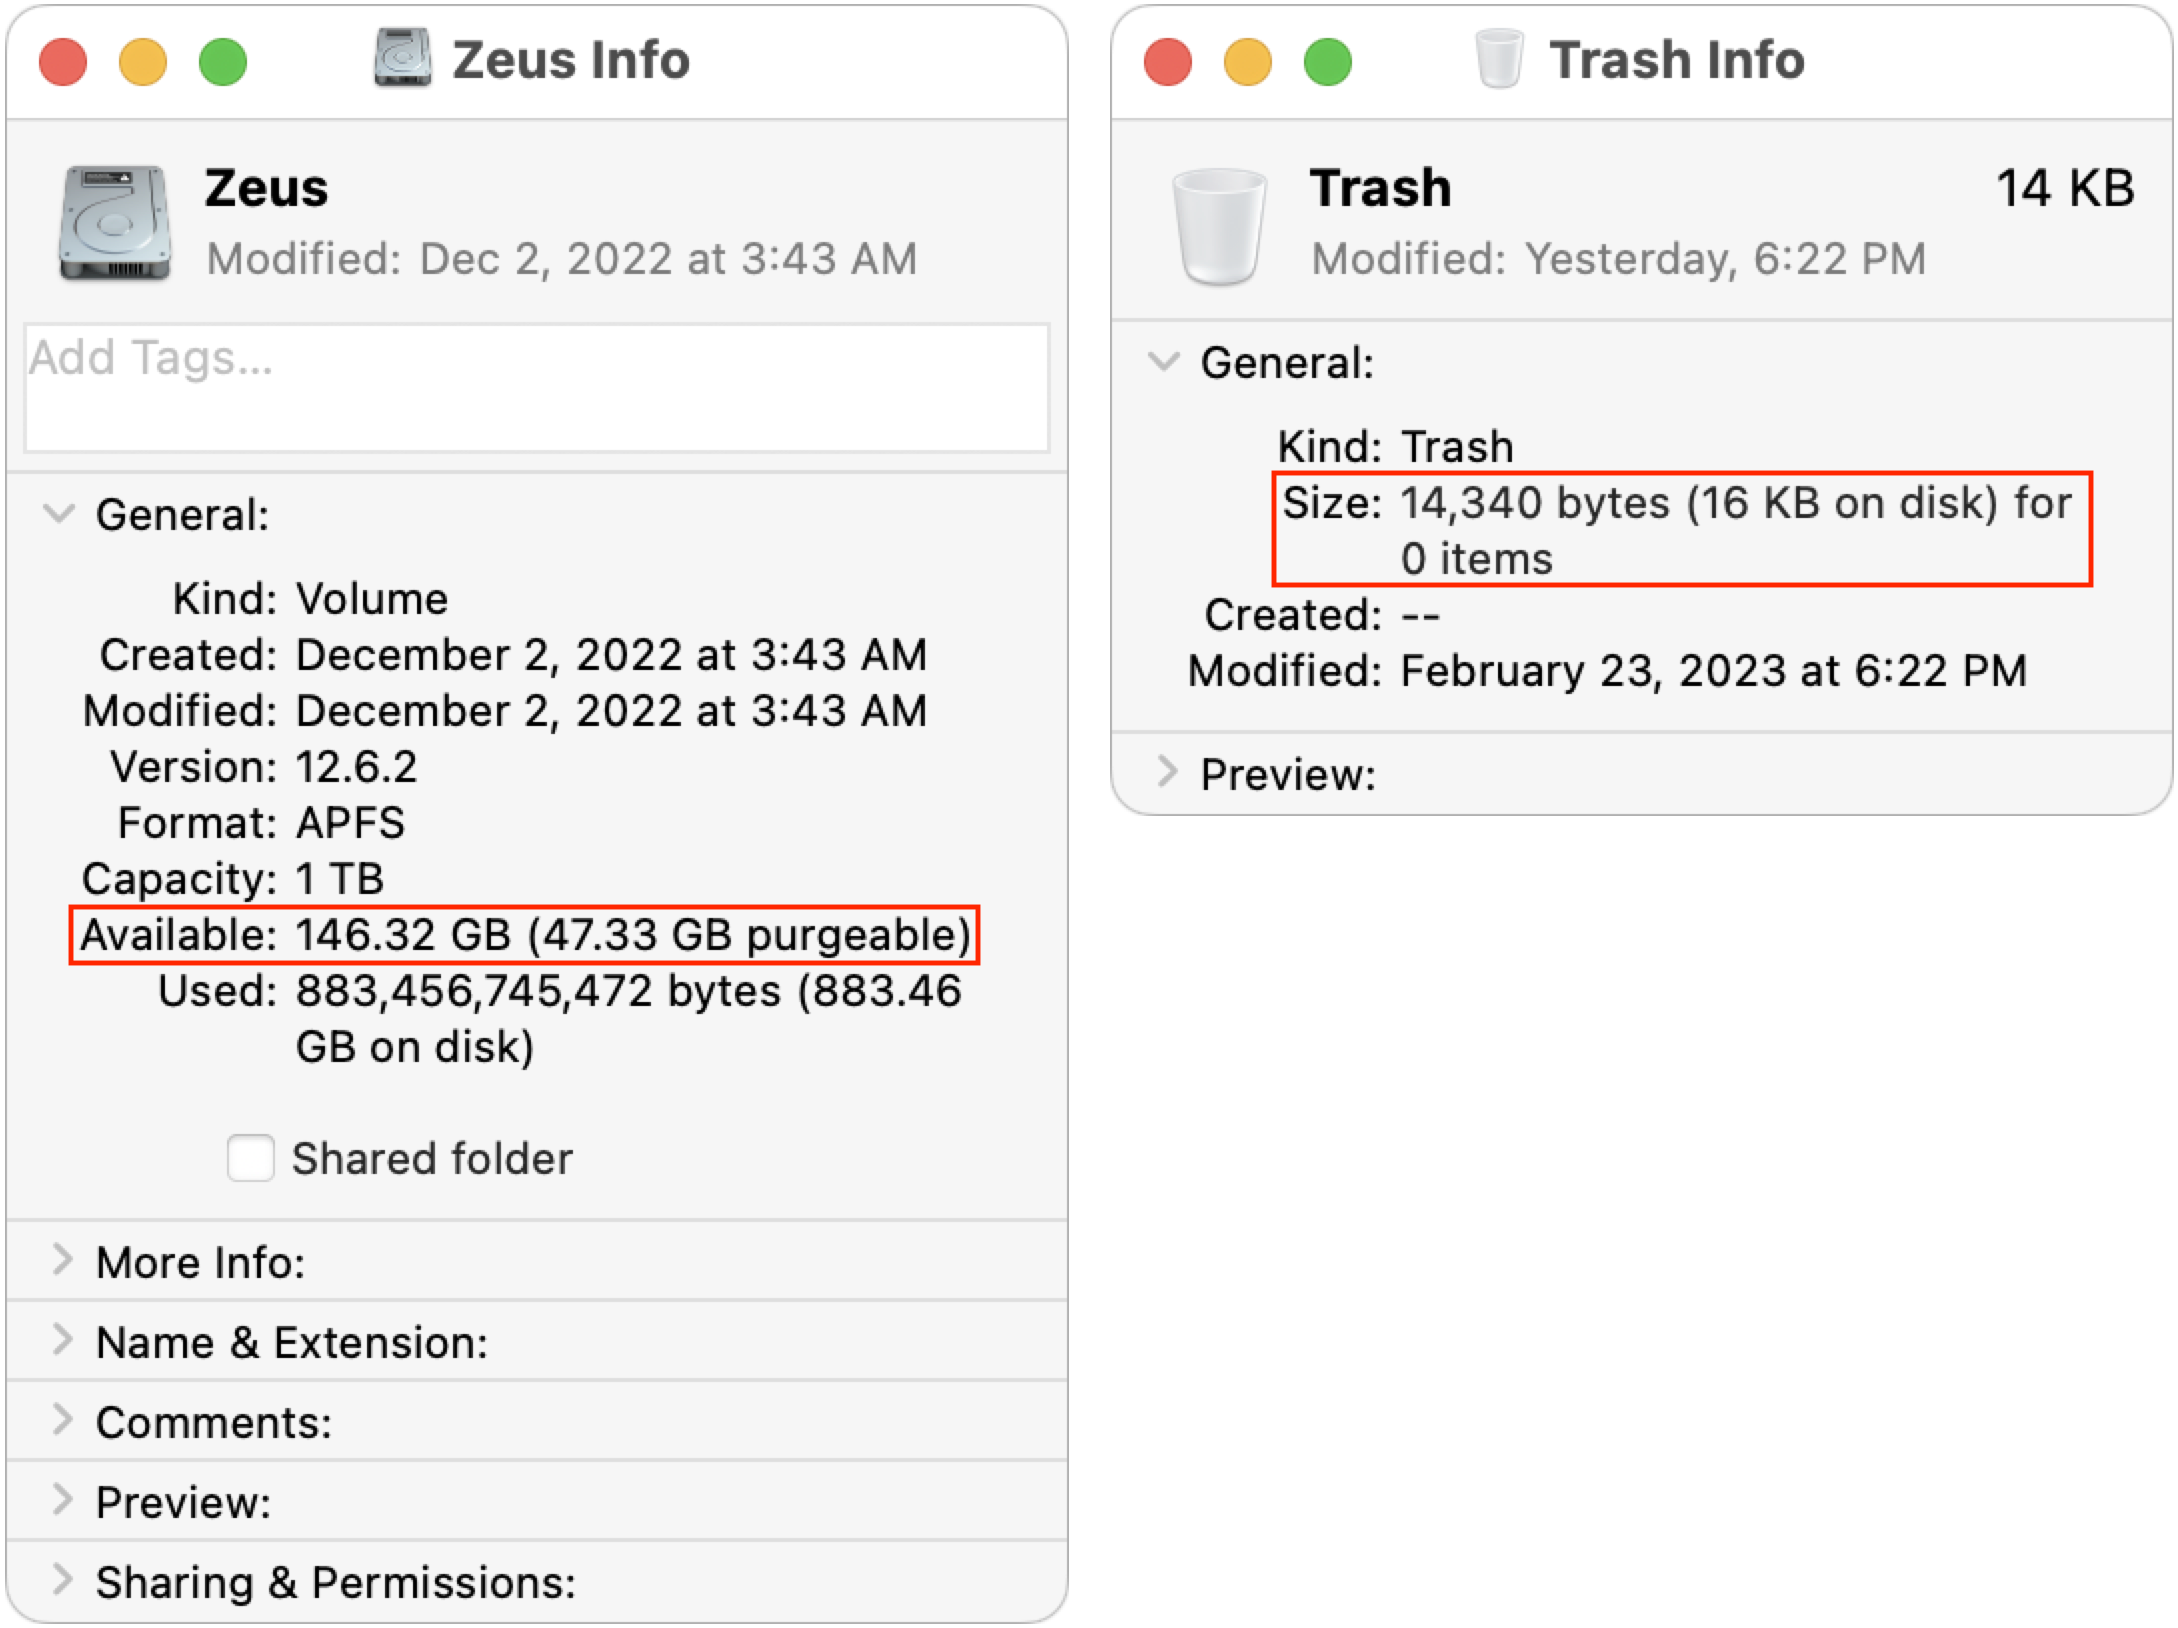
I figured that if I emptied the Trash, I’d either see no change due to the Time Machine snapshot issue or have almost exactly 145 GB free. Surprisingly, neither was true. After a minute or so, the free space number did rise—as expected—but first to 148 GB (not shown) before settling down at 146 GB. I can’t explain why it was a full gigabyte higher than would seem possible.
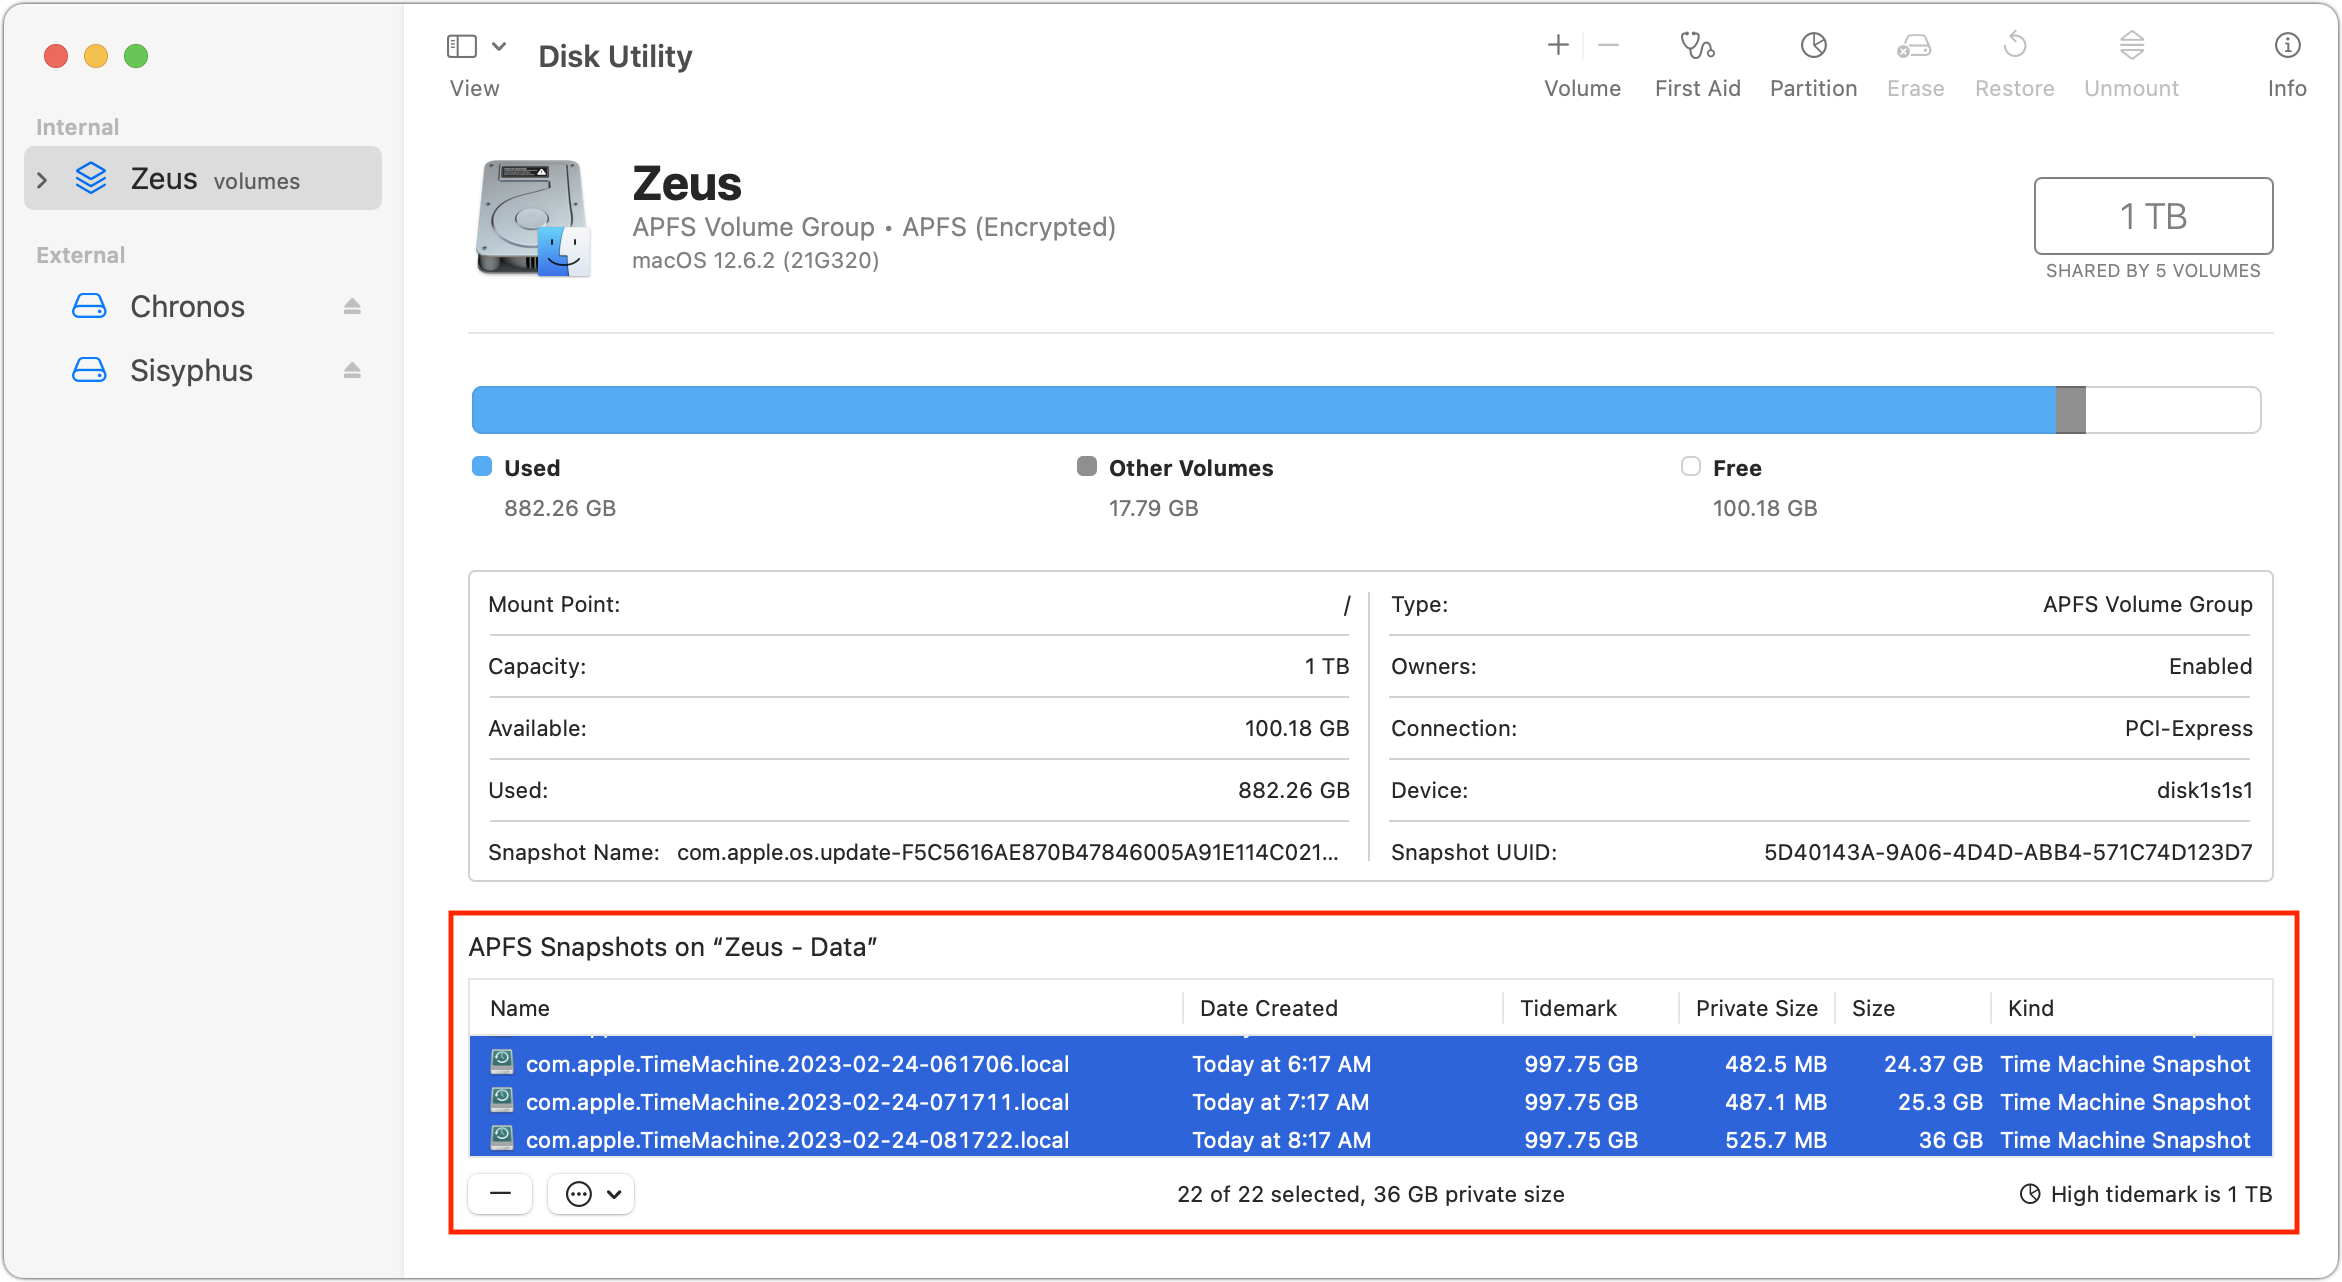
So, for whatever reason, I was not seeing what Howard Oakley was describing. That’s good, I suppose, since his scenario was going to cause confusion for users. Nonetheless, I wanted to see what role those Time Machine snapshots played in the free space available on my drive. When I looked in Disk Utility, I had 24 snapshots, nominally consuming 36 GB. (By the time I took the screenshot below, I had already deleted two individual snapshots without making any difference in the amount of free space.)
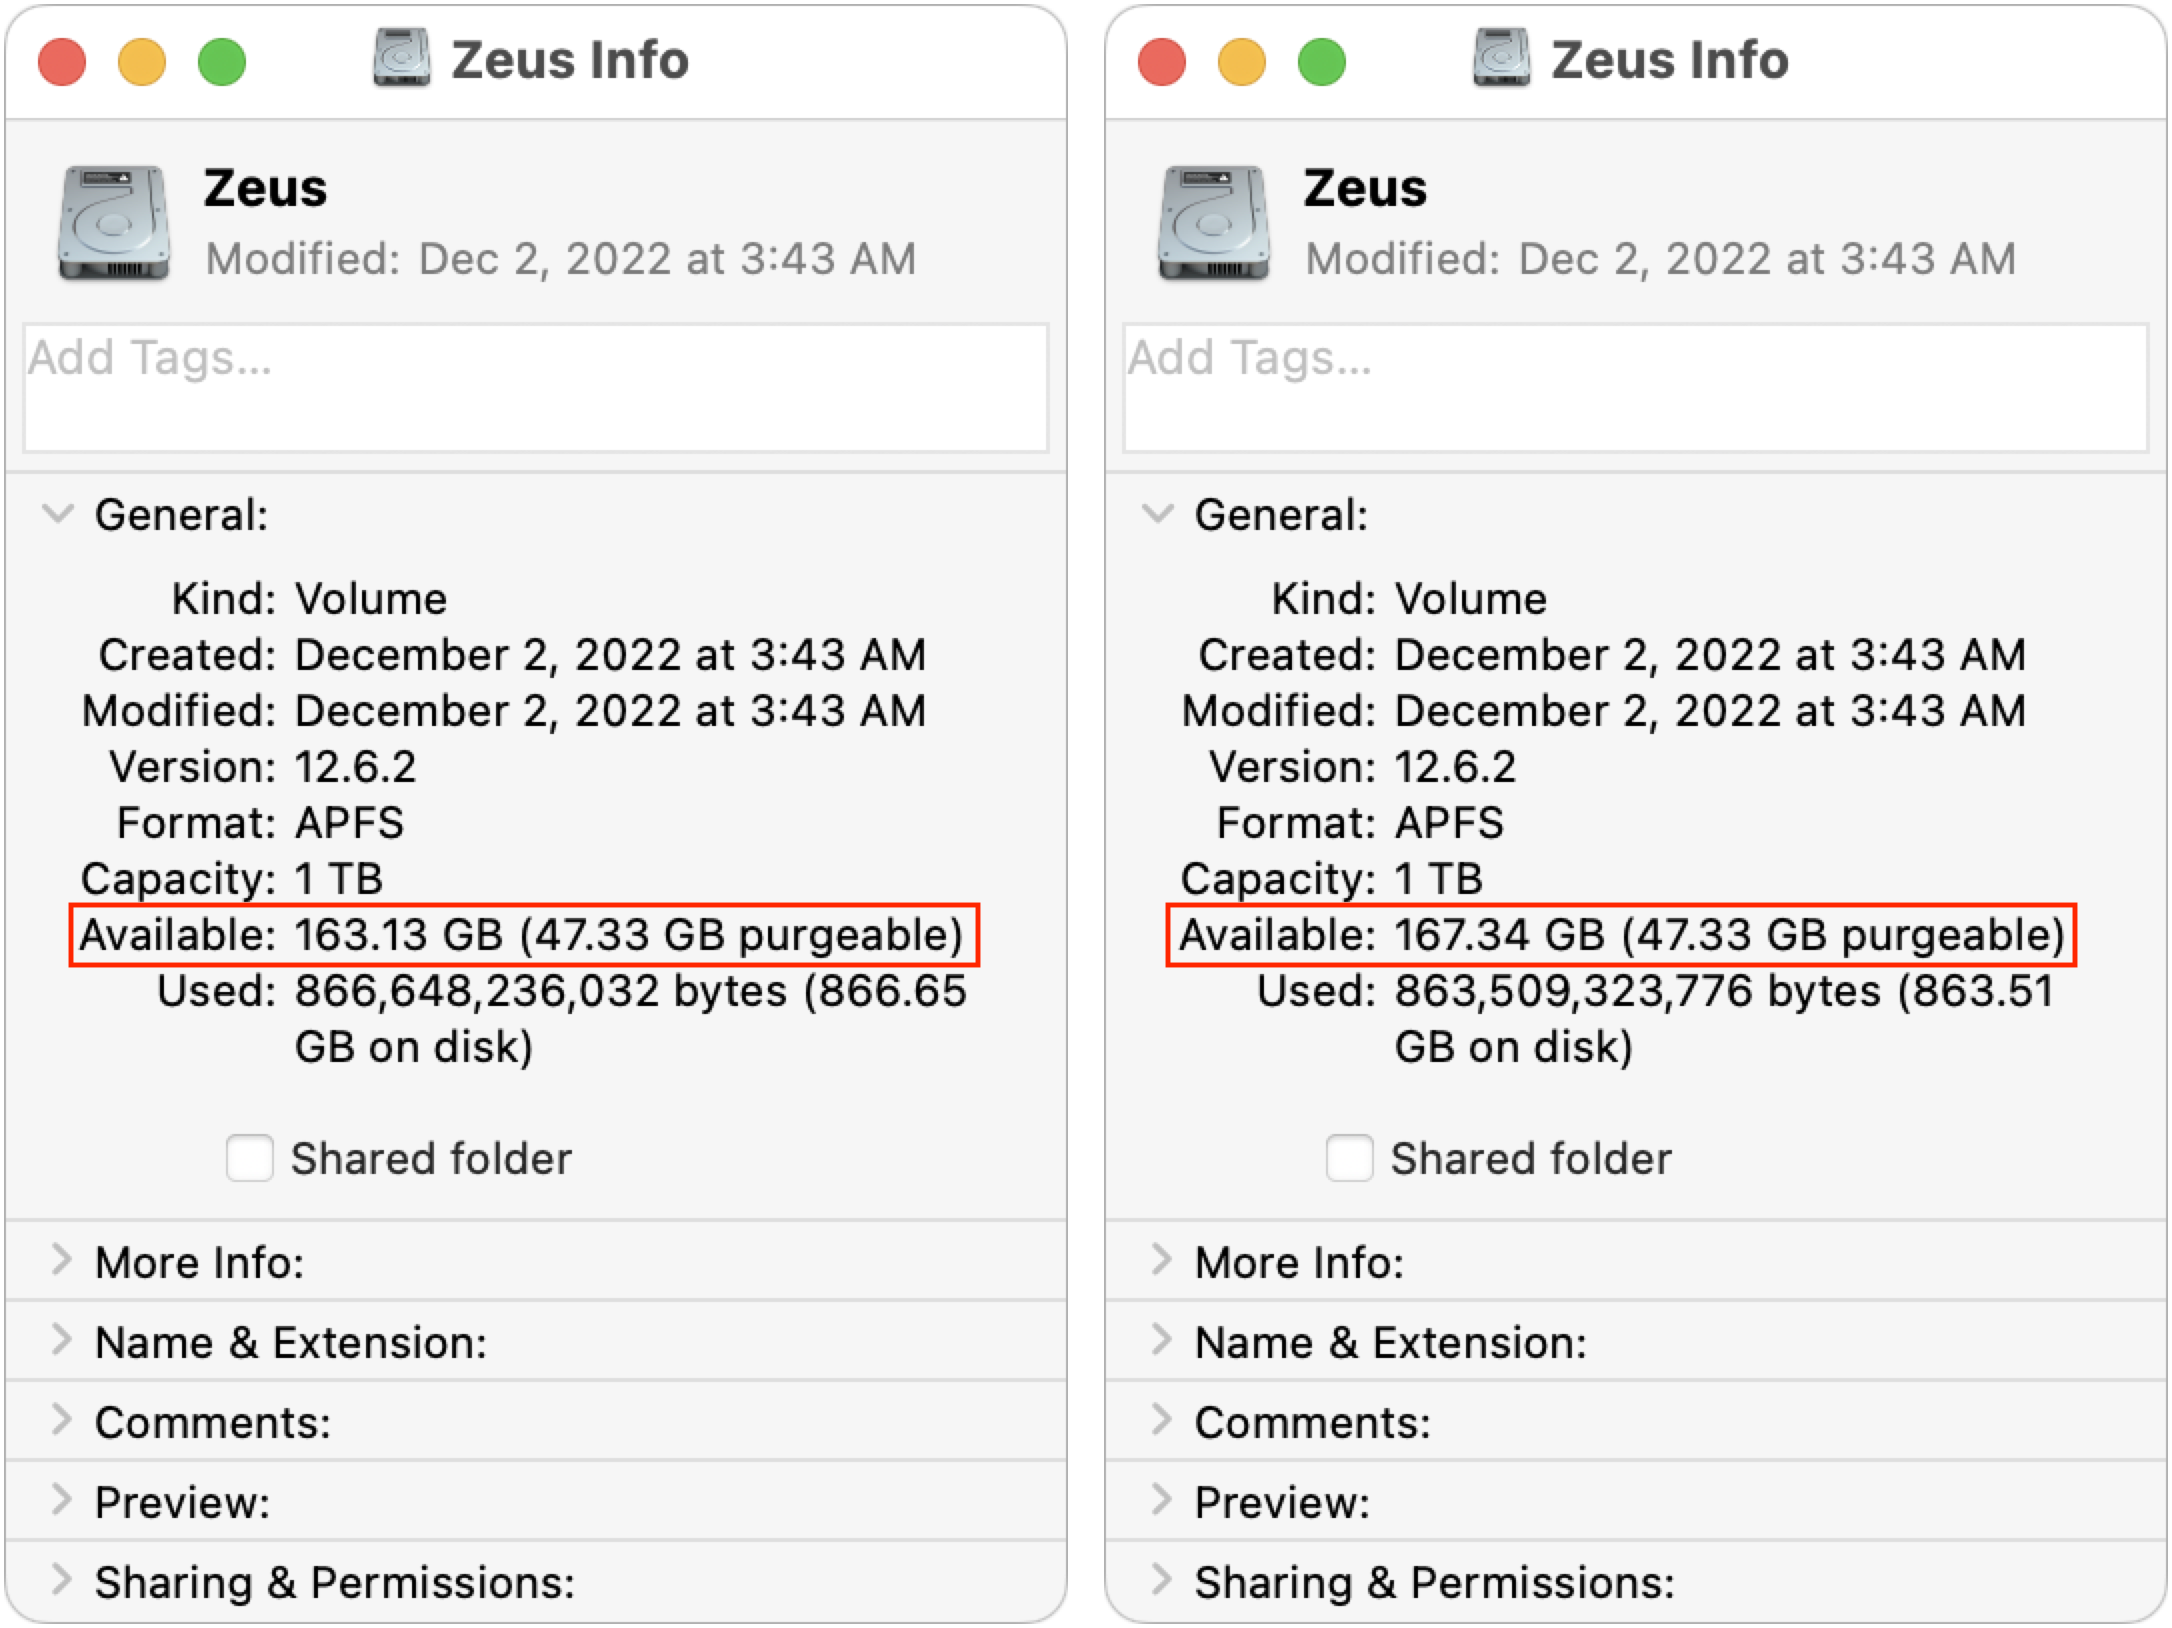
Regardless, when I selected all the snapshots and clicked the – button below the list, my free space number rose again, first to 163 GB (below left) and then, five minutes later, to 167 GB (below right). I’m somewhat perturbed that it changed so significantly over five minutes, but it may take that long for APFS to recalculate. However, since I had been at 146 GB free before, I would have expected it to rise to 182 GB. I can’t even begin to explain why it rose by only 21 GB.
Grasping at straws, I decided to restart, just in case that somehow helped the filesystem come to a better conclusion about the amount of free space. Unfortunately, after my Mac came back up (with the same apps running), the free space number had dropped to 159 GB. Inexplicable!

Unless things have changed significantly in Ventura—my M1 MacBook Air isn’t a good testbed for this scenario—I no longer believe it’s possible to audit the free space on a Mac or to explain precisely how much space should be freed up by a particular action. Call it the APFS Uncertainty Principle (in which APFS expands to Absolutely Perplexing Fluctuating Space). Therefore, my advice is:
- Unless you’re simply curious, don’t waste time and mental energy trying to determine why deleting files or snapshots doesn’t free up the amount of space you think it should. macOS has become more complex than in past years, and the numbers no longer add up.
- More so than ever before, do not let your boot drive get low on free space. You may be prevented from working until you jump through space-clearing hoops that might be time-consuming and inconvenient.
- When buying a new Mac, choose an SSD with sufficient headroom for your data to grow. For instance, if you’re pushing the limits of a 512 GB SSD, get the 1 TB SSD on your next Mac, even if doubling your storage seems like overkill. Data never shrinks. (Besides, the smallest SSDs may be half the speed of larger ones due to using a single NAND chip instead of two NAND chips.)
Have you had to go to great lengths to free up space on your Mac? Let us know in the comments what you tried and how it worked.
Center Cam Solves Webcam Eye Contact Problem
When videoconferencing became the norm during the pandemic, we all became aware of a basic problem with webcams—even when you’re looking at the other person’s image on your screen, the webcam that actually records where you’re looking is somewhere else, making it difficult to maintain eye contact. On Macs, the webcam always sits above the display, so when you’re looking at the other person, they usually see you looking down instead. And if you don’t center the video window, you can also appear to be looking off to the side. In this example, I’ve put the video window in the bottom right corner of my iMac’s screen. Terrible idea.

The best workaround is to shrink the other person’s preview and position it at the top of your screen, right under the webcam. That way, when you watch the other person’s face, you’ll appear to be looking right at them. You can help yourself remember to do this by writing “Look at me!” on a sticky note and attaching it to the top of the display, just above the webcam. (I also recommend hiding your own preview if you’re an accidental narcissist like me and can’t avoid looking at yourself.)

“Surely there’s a higher-tech solution to this digital awkwardness,” you’re thinking. Machine-learning solutions can artificially adjust your eyeballs, at least beyond the Mac. On the iPhone, you can turn on Eye Contact for FaceTime calls (Settings > FaceTime > Eye Contact), but it works only on the iPhone XS or later, running iOS 14 or later, and only when using FaceTime. It can also be…a little creepy. For Windows PCs with Nvidia graphics cards, the Nvidia Broadcast app has an Eye Contact feature that a video editor unnervingly used to make movie characters stare at you during their scenes.
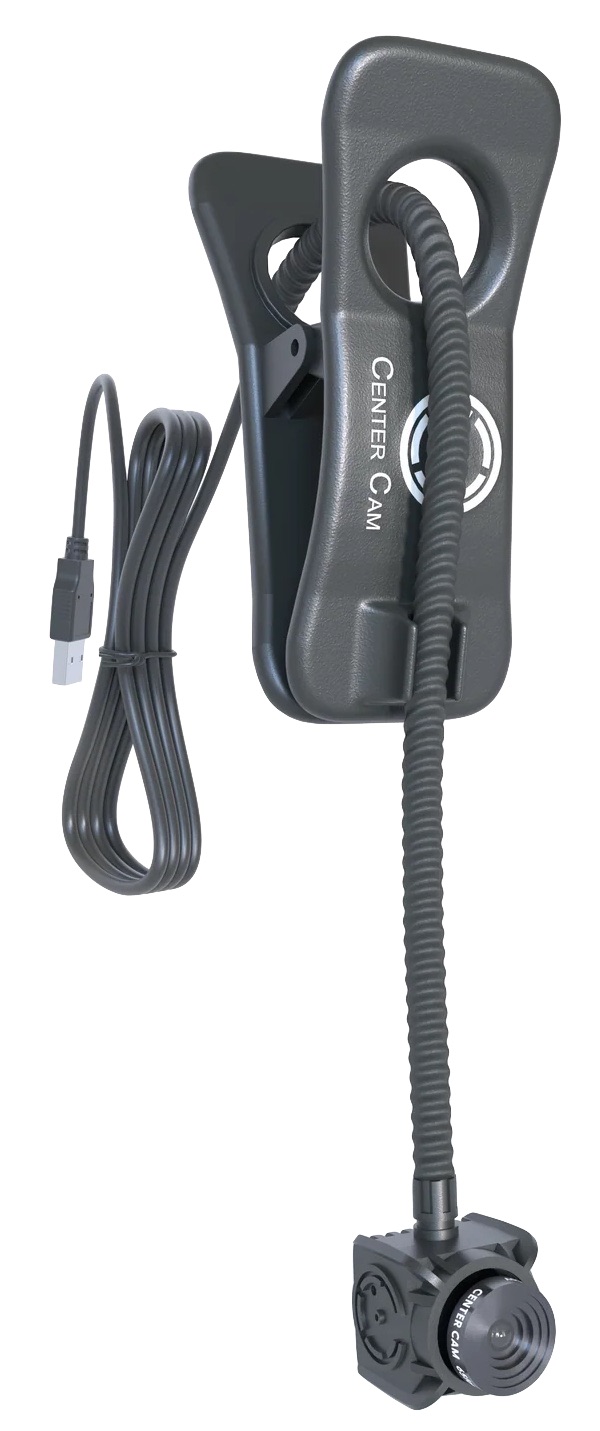 But we’re trying to bridge the uncanny valley, not dive into it, and that’s what makes the Center Cam interesting. Billing itself as “The World’s Middle-Screen Webcam,” it’s a tiny video camera on a thin gooseneck stalk with a clip that attaches to the top of your display.
Inventor Ian Foster came up with the idea while doing an internship as part of his master’s degree in social work counseling during the pandemic. The rapport he had built in person with his youth clients fizzled once they were forced to move to remote counseling, partly due to the inability to maintain the eye contact essential for establishing trust. His solution was to design a webcam that was small enough to go in the middle of the screen during a video call.
Although the guts of a webcam aren’t all that large, most standalone webcams are a few inches wide, and putting that much hardware in the middle of the screen would be awkward at best and problematic in terms of how much of the display it would obscure at worst. They would also likely require a thicker stalk that would cover even more of the screen.
Center Cam Hardware
The Center Cam is a 0.60-inch (15 mm) cube, with a 0.40-inch (10 mm) round lens on the front. It hangs from a gooseneck stalk that you can bend however you want. The stalk is 16 inches (40 cm) long and 0.25 inches (6 mm) thick, providing plenty of positioning flexibility without getting in the way more than necessary. The gooseneck snaps into a slot on the clip to secure it in place and then feeds through the back of the clip, which you attach to your display. Most people will probably have the gooseneck come down from the top, but another approach might be to clip it on the side of the display and bend the gooseneck so it starts horizontally and then turns down.
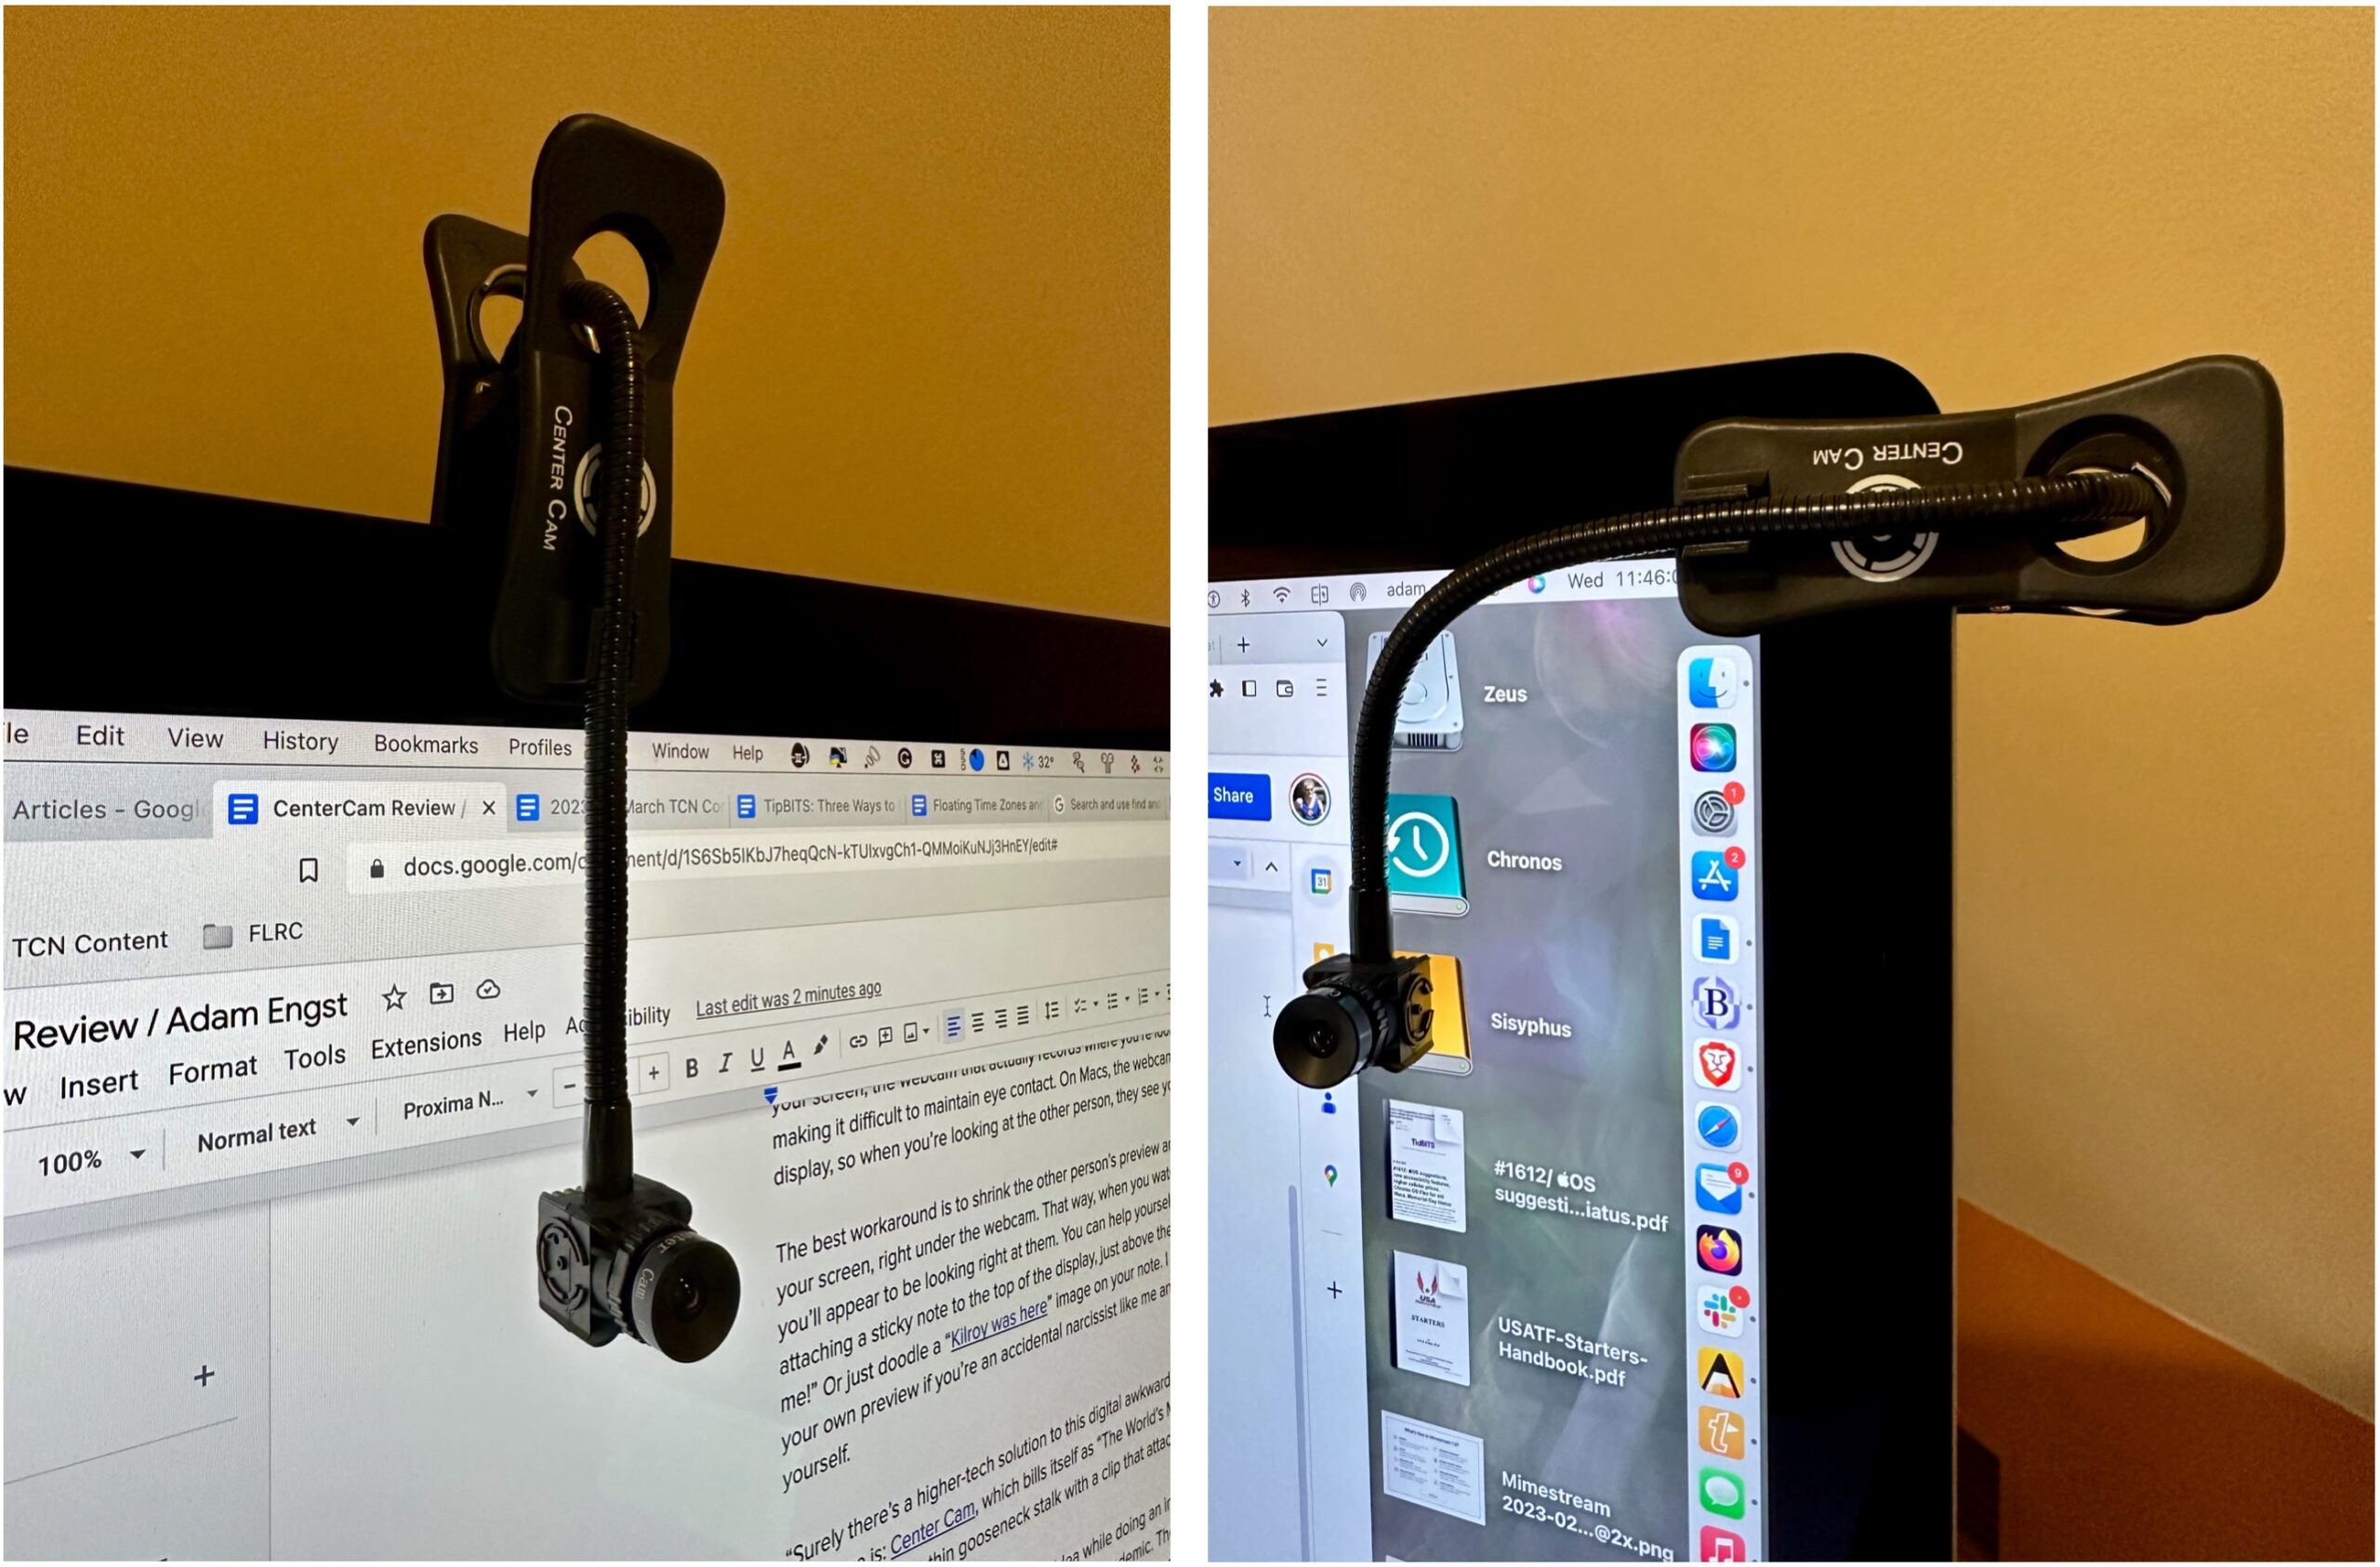
The spring-loaded clip expands to 2 inches (5 cm) wide, enough to clamp onto most screens. It has a ridged, rubbery material on the inside of the clip to ensure that it doesn’t scratch the display’s glass, and the tension is strong enough to hold it in place but not so strong that you have to worry about damaging the screen. I had no issues attaching it to either my 27-inch iMac or my 27-inch Thunderbolt Display, both of which have bezels that make it easy to keep the clip outside the functional area of the display. Although I didn’t use it for real with a laptop, the MacBook Air’s thinner top bezel forced me to position the clip lower, obscuring some of the top of the screen.
I found that the best location for the Center Cam was vertically down the left bezel of my iMac’s screen, next to my 27-inch Thunderbolt Display. That way, I could position the Center Cam in the dead space between my two screens, which worked well when I put a video call window up against the side of the display next to the Center Cam. For those with only one screen, it’s easy to move the Center Cam off to the side or remove it entirely when you’re not on a video call.
It’s important to realize that the clip is symmetrical, with another slot on the back. You’ll want to snap the rear portion of the gooseneck into the back slot to keep the weight of the gooseneck from pulling the clip off center. Even so, if the clip lists to the side, bending the gooseneck in the back can even out the forces to keep it straight.
The Center Cam sports a 1080p camera with 30 frames-per-second video. (Don’t get too excited—Zoom and some other videoconferencing systems often drop the resolution to 720p or even lower.) It has an ƒ2.1 lens and a 65º horizontal field of view, and it comes with a little lens cap for those who want to be certain that it can’t be used for covert video. The lens rotates to focus manually, so you can adjust it if necessary (apparently, it could shift during shipping). Mine was fine out of the box, and after playing with the focus briefly, I’ve left it alone.
The cable that snakes through the gooseneck is roughly 42 inches (106 cm) long, so you shouldn’t have any trouble connecting it to a USB port. It has a USB-A plug and requires only USB 2.0, though it also includes a USB-C adapter for newer Macs.
Once connected, the Center Cam appears to apps as a normal video input option called “CC HD webcam.” It also has its own microphone, cleverly called “SPCA2281B2 Camera,” which I haven’t used much. It works, but it’s not great, and I prefer the AirPods Pro.
The Future’s So Bright, You Gotta Wear Shades
Here’s where I’d like to say that I adore the Center Cam and have switched all my video calling to it. Unfortunately, that hasn’t been the case.
The entire point of the Center Cam is that it enables you to look better to other people, specifically by helping you maintain eye contact. It works well for that purpose, and when I asked people on calls if they could tell that I was using a camera that helped with eye contact, they all said yes.
The problem is that the Center Cam is extremely light-sensitive. On the one hand, that’s good because it means that it works well in low-light situations. (Ironically, the Center Cam Deluxe package includes a ring light clip instead of the standard clip—it’s hard to imagine needing it.)
On the other hand, if you’re near a window or need an overhead light for other purposes, the image can be overexposed. From the eye-contact perspective, the image below is great, but the overhead light blows out my hair. And not in a good way.

For comparison, here’s the same image taken with the iMac’s FaceTime HD camera. The FaceTime HD camera has a much wider field of view than the Center Cam, so you can see a lot more of the room around me. Plus, light and color are better balanced in the FaceTime HD camera’s image.

To bring down the halo effect on my hair, I turned off the overhead light. That dimmed the room, but not problematically so, as long as I didn’t need to read anything on paper. In the image below, my hair looks reasonable, and my skin is a more natural color, but the side of my face is over-illuminated by the window to my right.

Next, I dropped the shades, which made the room significantly darker than I like. Using the Mac wasn’t a problem—I’m a touch typist—but I couldn’t work with anything else on my desk. The image below is quite a lot better, however, with decent skin color and even lighting.

In the image above, most of the light on my face comes from the screen itself, which was largely white due to the documents I was using. But that’s easily avoided with a clever utility called HazeOver that dims the windows of all but the frontmost app to reduce distractions. Using HazeOver to black out everything but the Zoom preferences window significantly reduced the light on my face but made the Mac harder to use.
It’s also possible to adjust the Center Cam’s image somewhat with another utility called iGlasses. It can control the Center Cam’s exposure and brightness, along with temperature, tint, saturation, contrast, gamma, sharpness, and white balance. I played with it a bit but didn’t feel I’d made the image better enough to continue.
For comparison, here’s another shot from the iMac’s FaceTime HD camera with the overhead light off and the shades drawn—it’s much darker than the equivalent Center Cam image just above.

What about nighttime, which is when I do a lot of my Zoom meetings? I need the overhead light in my office on, which causes the Center Cam to overexpose my hair again, and generally gives the image a much warmer tone.

In comparison, the iMac’s FaceTime HD camera’s version of the shot looks quite similar to its daytime image.

I may be overthinking all this. However, in practice, what often happens when I’m using the Center Cam is that I connect to a Zoom call at the scheduled time, turn on the video, and am immediately unhappy with my preview. Rather than burn meeting time fiddling with the room lighting so the Center Cam’s image looks better, I switch to my iMac’s FaceTime HD camera, which provides a good image regardless of the room lighting.
But that’s just me. For some people and situations, eye contact is more important than overall image quality, which is hard to guarantee with videoconferencing anyway. If you’re looking for a webcam that will help you maintain eye contact during video calls, the Center Cam is worth considering. Its approach of putting the camera precisely at your eye level in the middle of your screen works well and doesn’t obscure more of the screen than is necessary. Although I wouldn’t recommend it if your office has a lot of windows, it’s ideal for anyone who works in dark surroundings. At $119.99, the Center Cam costs more than standard webcams, but that’s the tradeoff for its unique industrial design.
How a Thief with Your iPhone Passcode Can Ruin Your Digital Life
Joanna Stern and Nicole Nguyen of the Wall Street Journal have published an article (paywalled) and accompanying video that describes a troubling spate of attacks reported by individuals and police departments aimed at iPhone users that may involve hundreds to thousands of victims per year in the United States.
Watch the video, but in short, a ne’er-do-well gets someone in a bar to enter their iPhone passcode while they surreptitiously observe (or a partner does it for them). Then the thief steals the iPhone and dashes off. Within minutes, the thief has used the passcode to gain access to the iPhone and change the Apple ID password, which enables them to disable Find My, make purchases using Apple Pay, gain access to passwords stored in iCloud Keychain, and scan through Photos for pictures of documents that contain a Social Security number or other details that could be used for identity theft. After that, they may transfer money from bank accounts, apply for an Apple Card, and more, all while the user is completely locked out of their account.
And yes, they’ll wipe and resell the iPhone too. Almost no crimes like this have been reported by Android users, with a police officer speculating that it was because the resale value of Android phones is lower. In the video, Joanna Stern said a thief with the passcode to an Android phone could perform similar feats of identity and financial theft.
The Wall Street Journal article details three kinds of attacks, only one of which is clearly avoidable. The one that’s heavily emphasized in the article I describe above. But Stern and Nguyen also spoke to victims who were drugged—a sadly common problem—and interviewed others who were subjected to violence to reveal their code. In no case have the victims done anything wrong, and anyone who frequents bars or similar venues in urban areas should beware.
Given the high profile of the Wall Street Journal coverage, I fully expect Apple to address this vulnerability in iOS 17, if not before. The obvious solution is to require the user to enter the current Apple ID password before allowing it to be changed in Settings > Your Name > Password & Security > Change Password. That won’t block access to iCloud Keychain, but at least it would let the user wipe the iPhone.
Apple probably hasn’t prompted for the current Apple ID password in the past because the passcode is considered a secure second factor—you have the iPhone, and you know the passcode. In contrast, when you log in to the Apple ID site to manage your account, you must provide your current password, go through two-factor authentication, and enter the current password again to change it. It seems like an easy change to make, at least until Apple has had a chance to think through other options.
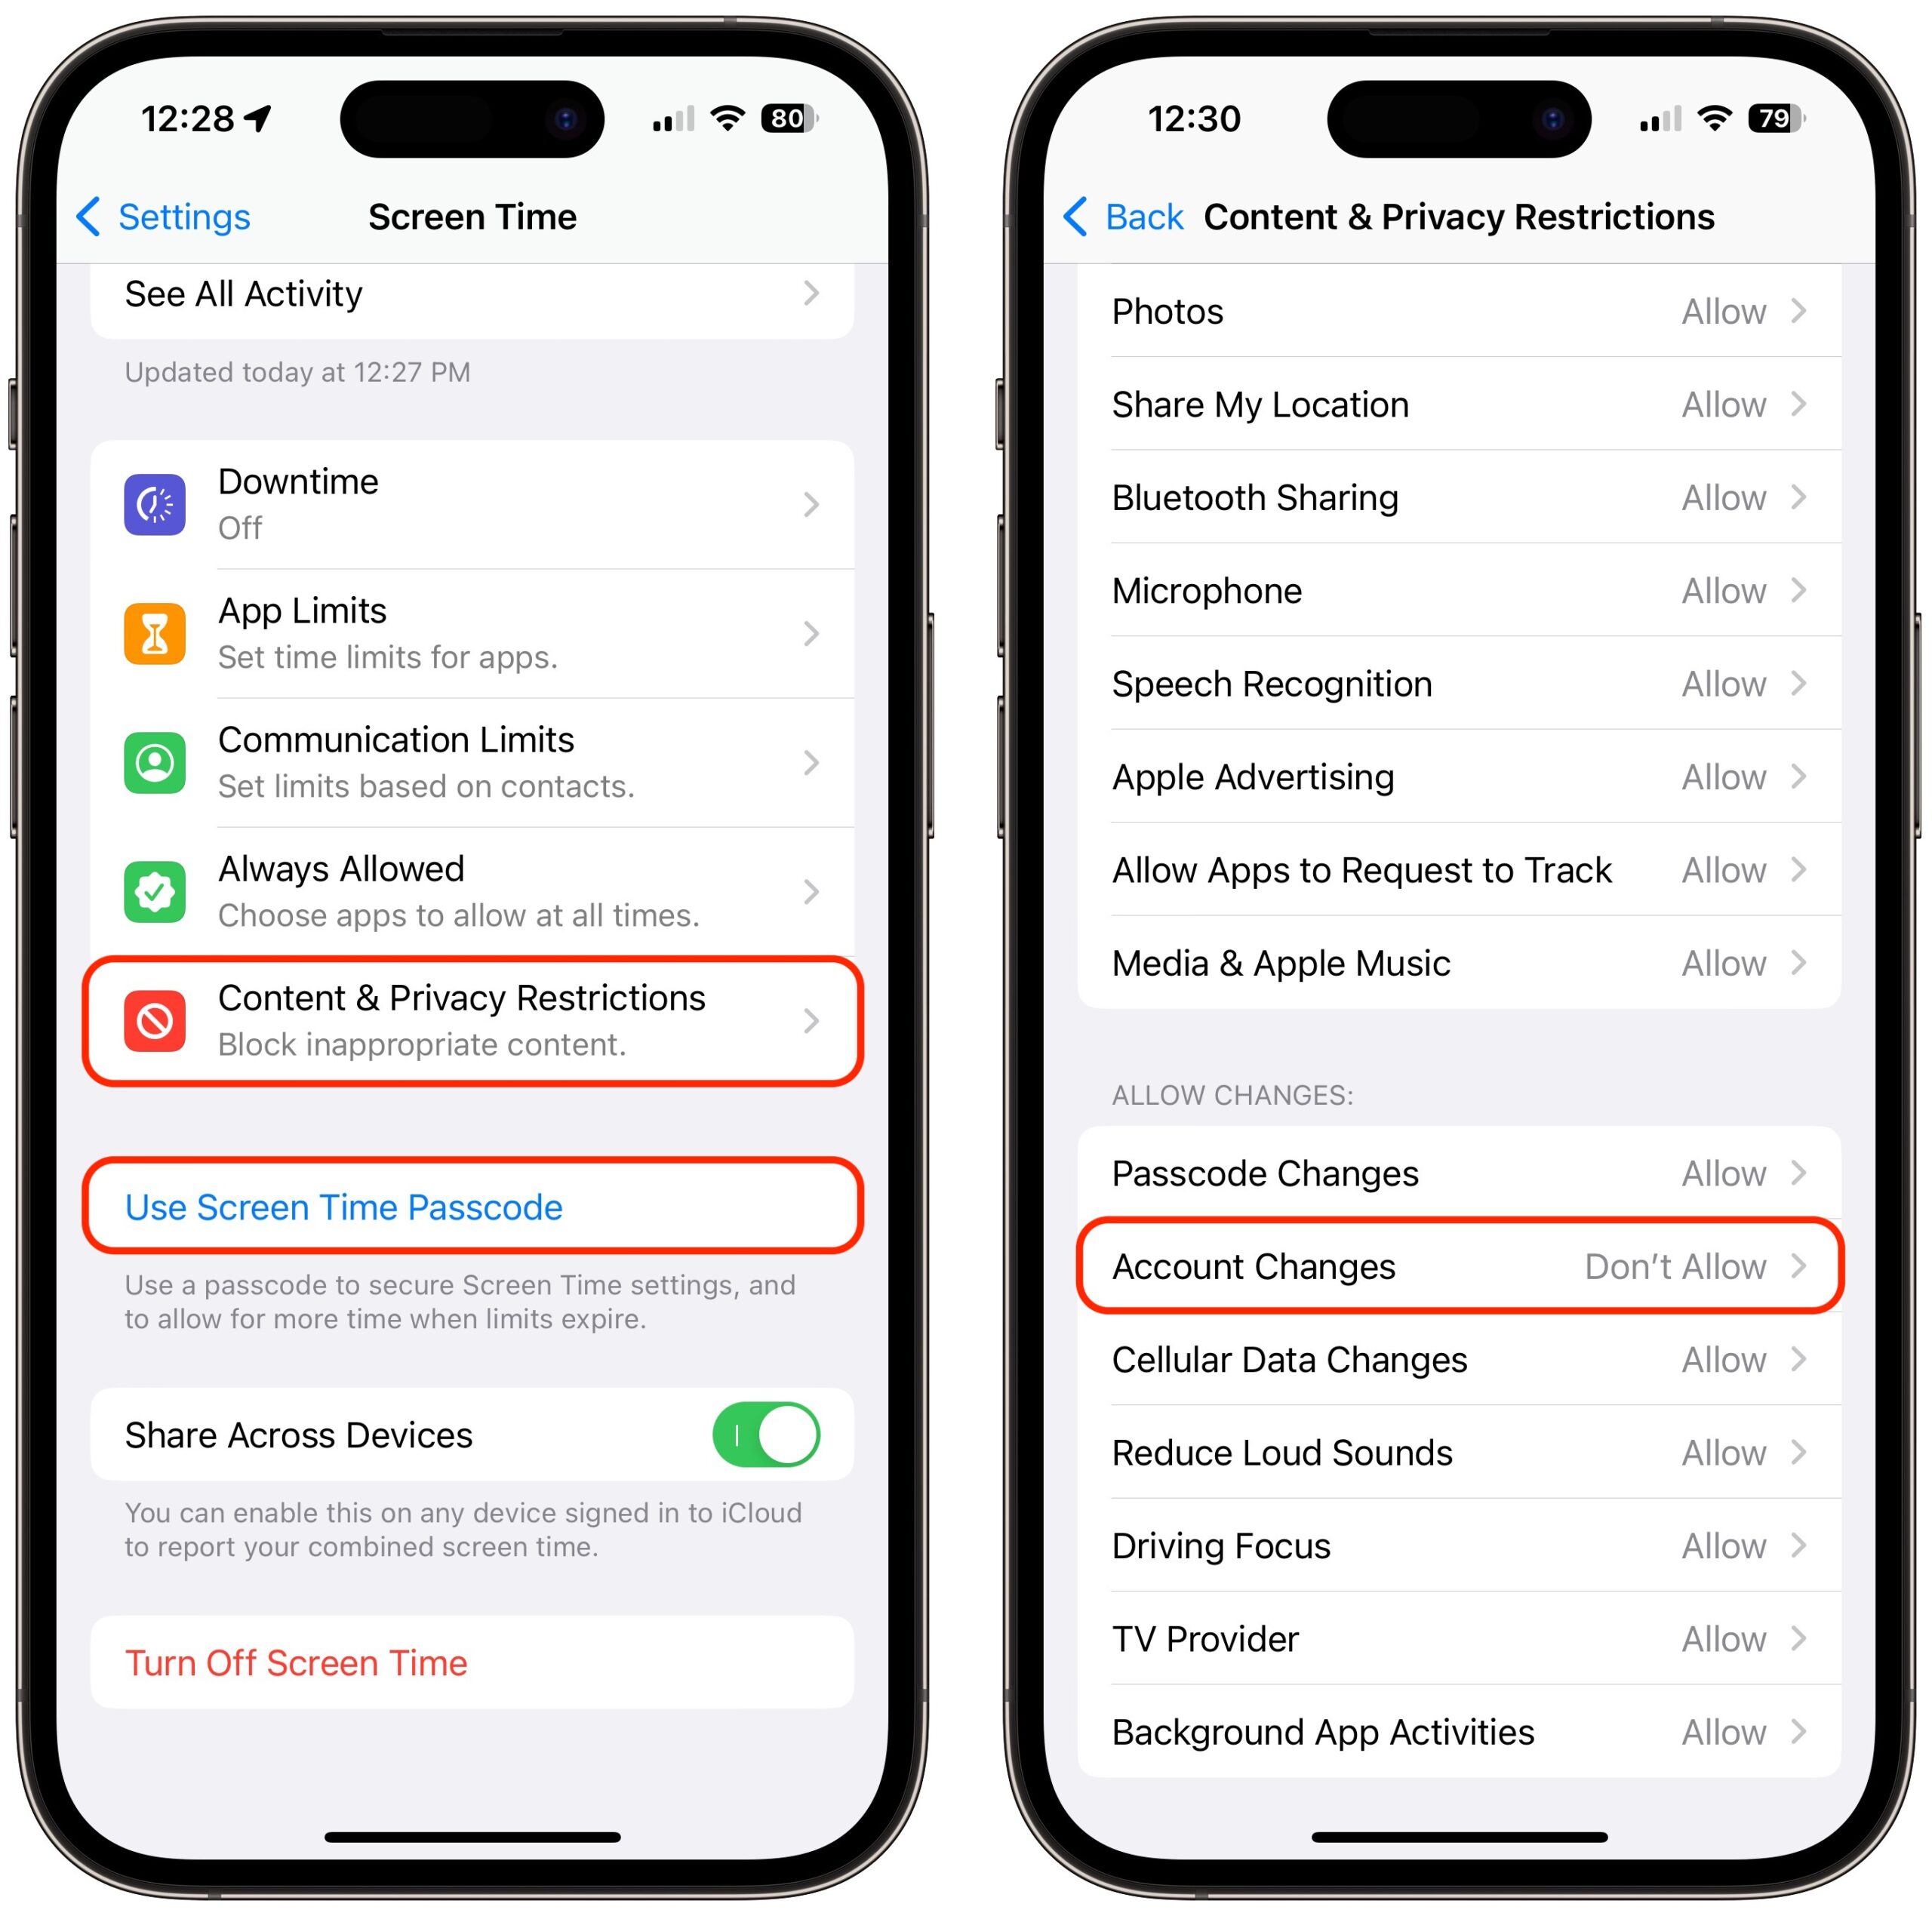
The closest we have to an additional password step is a Screen Time passcode. If you enable Screen Time, set a separate four-digit Screen Time passcode, turn on Content & Privacy Restrictions, and select Account Changes > Don’t Allow, no one can change your Apple ID password without that passcode. Unfortunately, it prevents you from even entering Settings > Your Name without first going to Settings > Screen Time > Content & Privacy Restrictions > Account Changes > #### > Allow. Most people wouldn’t put up with such a speed bump.
Another flaw that Stern and Nguyen note is that Apple’s new hardware security key option, if enabled, doesn’t always prompt for the hardware key when making changes if the user has the device passcode (see “Apple Releases iOS 16.3, iPadOS 16.3, and macOS 13.2 Ventura with Hardware Security Key Support,” 23 January 2023). The security key protection can be entirely removed, too, without having one of the hardware keys. Apple should re-evaluate how this high-security option—albeit one only a subset of users will employ—lives up to its promises.
How to Protect Yourself
You might think you would never be the victim of a watch-snatch-and-grab theft, being drugged at a bar or on a date, or a violent crime. But the theft of a passcode can happen in other circumstances. And it has such severe consequences, as the Wall Street Journal reporters noted, that even if you’re not a barfly or live in an area with a high incidence of violent property theft, I think everyone should take stock of these ways to deter malicious use of their passcode:
- Pay attention to your iPhone’s physical security in public. These attacks require both your passcode and physical possession of your iPhone. Many of us have become blasé about exposing our iPhones in public because we use them constantly and because everyone else has smartphones as well. Apple has also done a great job with the message that an iPhone is useless to a thief due to a passcode protecting its contents and Activation Lock ensuring it can’t be resold intact—this probably makes us less concerned about its security even if there’s a hassle and expense in replacing it. There’s no good way to prevent a thief from grabbing the iPhone from your hand when you’re using it, but if you can keep it in a pocket or purse when it’s not in use, rather than holding it or leaving it on the table in front of you, that reduces the chance that a thief will target you.
- Always use Face ID or Touch ID in public. The key to these attacks is acquiring the user’s passcode; the easy way to do that is to observe or record you entering it. If you rely entirely on Face ID or Touch ID, particularly when in public, no one can steal your passcode without you knowing. (Police believe those who are drugged while drinking have their faces or fingers used, but that doesn’t reveal their passcodes.) If you have been avoiding Face ID or Touch ID based on some misguided belief about the security of your biometric information, I implore you to use it. Your fingerprint or facial information is stored solely on the device in the Secure Enclave, which is much more secure than passcode entry in nearly all circumstances. If you are one of the few people for whom Face ID or Touch ID works poorly, conceal your passcode from anyone who might be watching, just as you would when entering your PIN at an ATM.
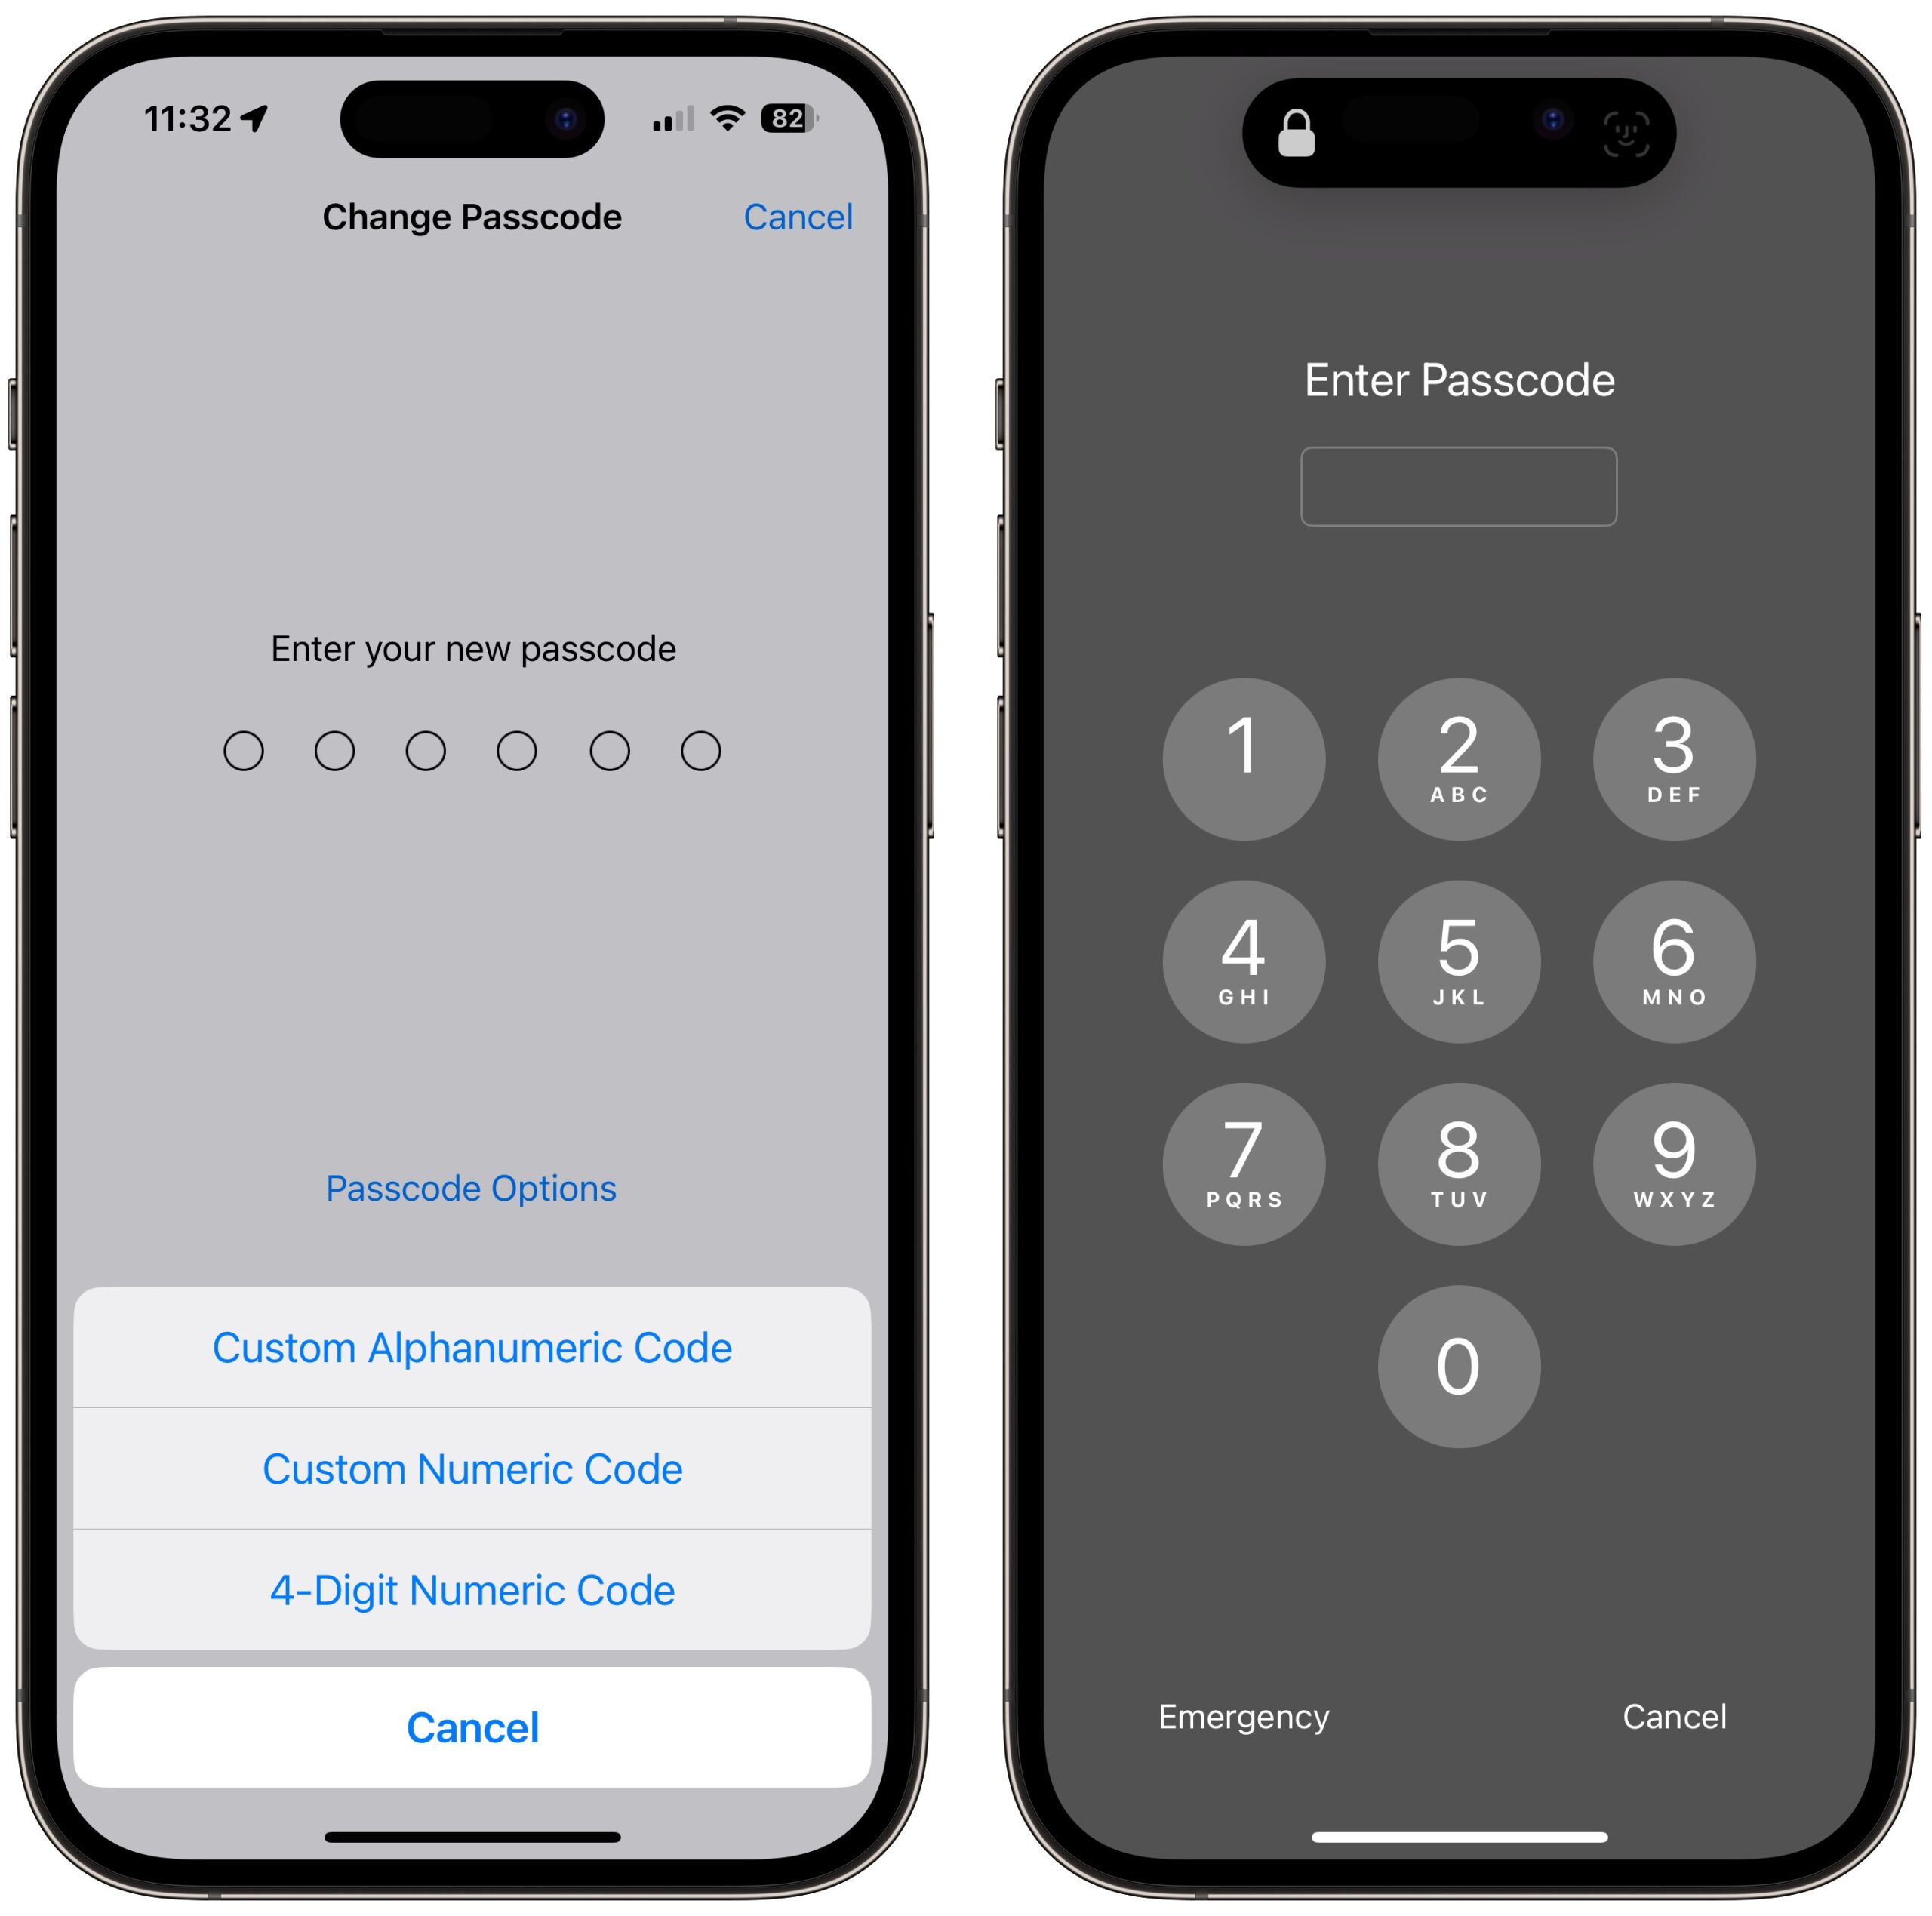
- Consider a stronger passcode. By default, iPhone passcodes are six digits. You can downgrade to four digits, which is a bad idea, but you can also upgrade to a longer alphanumeric passcode. In the video, Joanna Stern recommends that, and it might make it harder for someone to observe surreptitiously, but I’m unconvinced the increased security would be worth the added effort. Someone could still record you entering your alphanumeric passcode, and the longer and harder it is to enter, the more time it will take and the more focused you will be on typing it correctly, making you less aware of your surroundings. (Interestingly, if you set an alphanumeric passcode with just digits, you still get a numeric keypad to enter it, whereas if you add non-numeric characters, you have to use the full keyboard.) Still, I can’t recommend most people go beyond a standard six-digit passcode. Just make sure it’s not something trivially easy to observe or guess, like 111111 or 123456.
- Never share your passcode beyond trusted family members. If you wouldn’t give someone complete access to your bank account, don’t give them your passcode. If extreme circumstances require you to trust a person outside that circle temporarily, change the passcode to something simple they’ll remember—even 123456—and change it back as soon as they return your iPhone.
- Use a third-party password manager instead of iCloud Keychain. It pains me to recommend this option because Apple keeps improving the interface to iCloud Keychain with Settings > Passwords and System Settings/Preferences > Passwords. But until the operating systems protect access to iCloud Keychain passwords with more than the passcode, relying on iCloud Keychain is just not safe enough. In contrast, third-party password managers secure your passwords with a separate password. Even if they support and you enable biometric unlocking, the fallback is the password manager’s account password, not the device passcode.
- Delete photos containing SSNs or other identification numbers. It’s common to take a photo of your Social Security card, driver’s license, or passport as a backup, just in case you lose the real thing. That’s not a bad idea, but storing such images in Photos leaves them vulnerable to these attacks. Instead, store them in your password manager. Search in Photos on
SSN,TIN,EIN,driver’s license, andpassport, along with your actual Social Security and other identification numbers. Also search onVisa,MasterCard,Discover,American Express, and the names of any other credit cards you might have photographed as a backup. (Searching for text in Photos works in macOS 13 Ventura and iOS 16. For older operating system versions, try Photos Search; see “Work with Text in Images with TextSniper and Photos Search,” 23 August 2021.)
My Response
I’m putting my time where my mouth is. Even though I’m at a very low risk for these attacks, which primarily target bar-goers in large cities and people in areas with frequent street crime, I’ve taken steps to reduce my exposure.
First, I already rely on Face ID whenever possible, and I’ll be even more aware of who’s watching while entering my passcode if Face ID fails and I’m forced to tap in my secret digits. I’m already slightly embarrassed to have my iPhone out when I’m in public when I’m not using it, and I’ll probably keep it in my pocket even more than I used to.
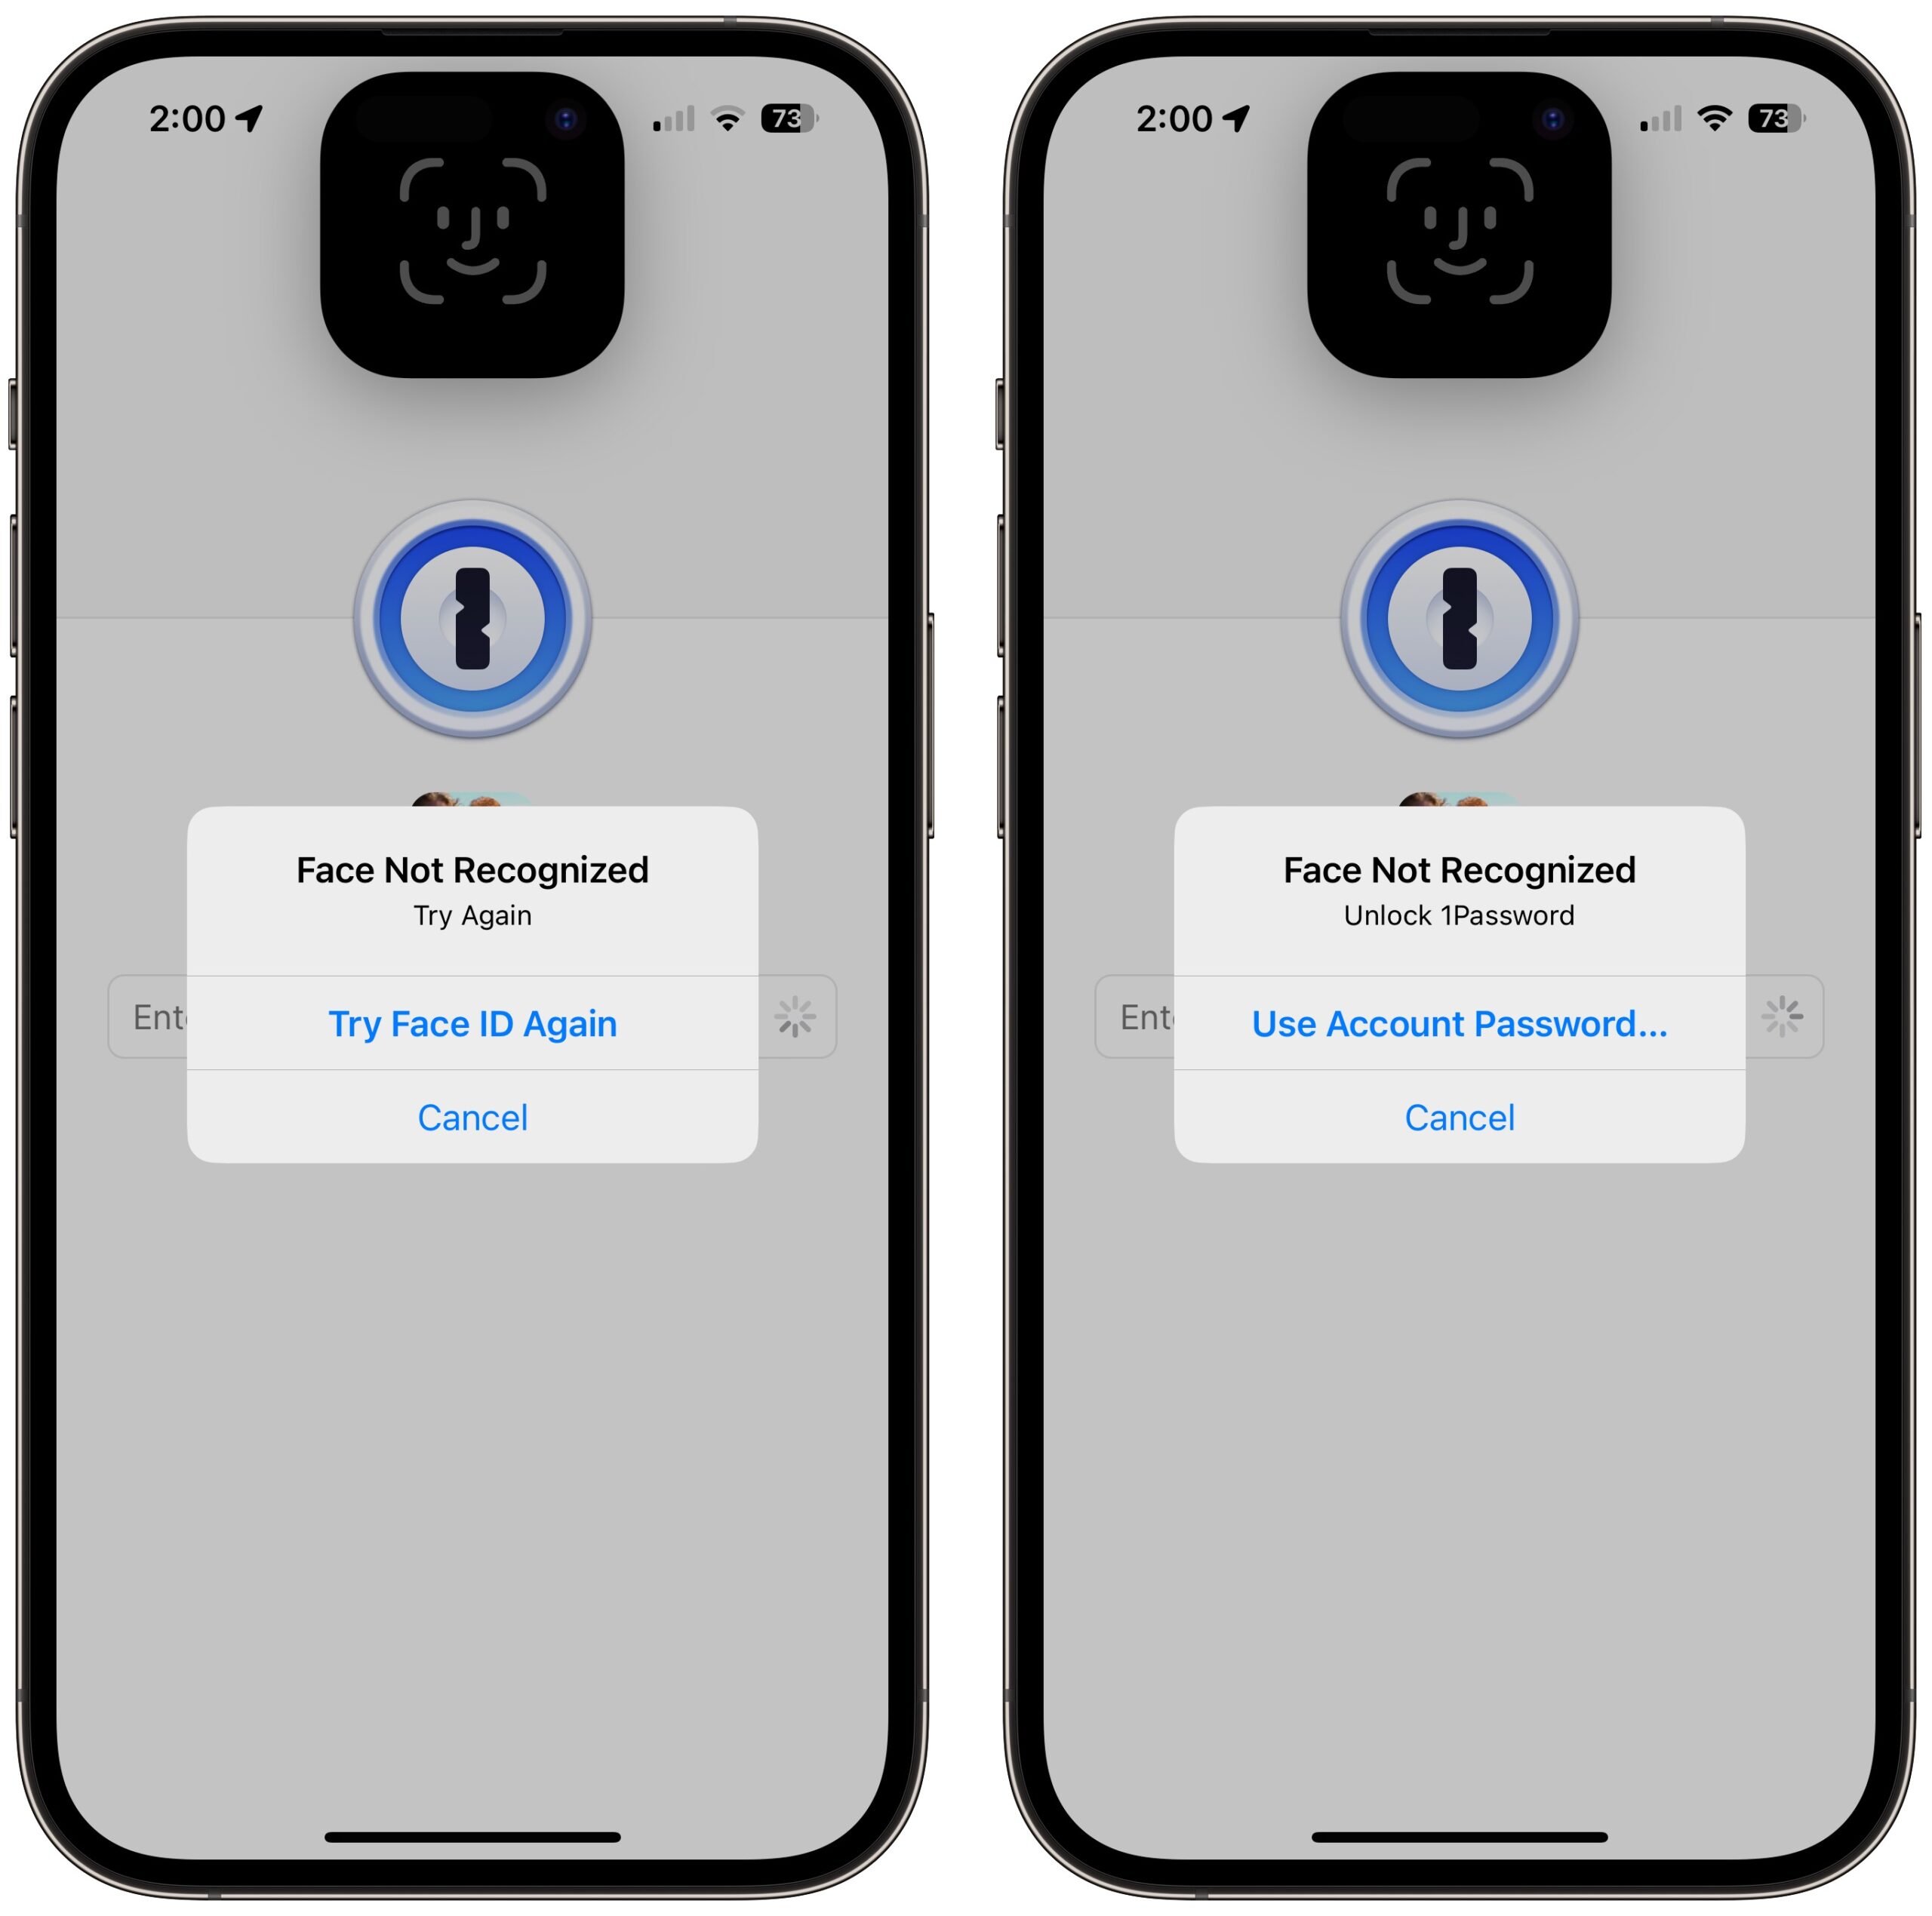
Second, I decided to clear out all my iCloud Keychain-stored passwords. On my MacBook Air, I went to System Settings > Passwords, selected all of them, and pressed Delete. (You can also do this in Safari’s Passwords settings pane.) Because I have never seriously used iCloud Keychain, this was no hardship—everything in there was essentially random. Until recently, I used LastPass, but after LastPass’s breach, I switched to 1Password and imported all my LastPass passwords (see “LastPass Shares Details of Security Breach,” 24 December 2022). I had a lot of passwords already stored in 1Password from various imports and tests over the years, plus the vaults I share with Tonya and Tristan. Whenever I use a password now, I take a few minutes to clean up duplicates and related cruft, like leftover autogenerated passwords.
I realize those who rely on iCloud Keychain won’t be comfortable deleting their passwords, but I can say that I found it simple to switch to 1Password from LastPass, and 1Password offers instructions for exporting iCloud Keychain passwords and importing into 1Password. Do the export/import dance and live with 1Password—or whatever password manager you choose—for a week or two to make sure it’s working for you before deleting everything from iCloud Keychain. If you decide to return to iCloud Keychain in the future, that’s possible too.
Third, I visually browsed and used text searches in my Photos library for identification cards and the like, exporting a few for import into 1Password and deleting everything afterward. (Remember that Photos stores deleted images in the Recently Deleted album for about 30 days before deleting them permanently. To remove them immediately, select the photos in that album and hit Delete.) I found my driver’s license, passport, credit cards, insurance cards, and other cards from my wallet. Make sure to click See All after performing a Photos search if there are more than a handful of results. I even searched on card and scrolled through 500-odd photos to find a few that escaped other searches. (Who knew I took so many photos containing cardboard?)
I briefly considered moving those sensitive images to the Hidden album in Photos and using the new iOS 16/Ventura option to protect that album with Face ID or Touch ID. Unfortunately, when I tested multiple Face ID failures on my iPhone, I was eventually prompted for my passcode, which revealed the Hidden album. It’s another example of how the passcode is the key to your kingdom.
While the chance of any given person falling prey to this sort of attack is vanishingly small, and I’m not actually worried for myself, the Wall Street Journal reporting led me to think about and clean up my broader security assumptions and behavior. I appreciated the nudge, and I’d encourage you to reflect on your security situation as well.
