#1517: Apple on #BlackLivesMatter, export Apple Card statements, Kudoboard for virtual special occasions, videoconferencing tips
In the wake of worldwide protests surrounding the killing of George Floyd, Apple used its Apple Music service to express support of and solidarity with Black communities, curated a collection of movies in a Confronting Systemic Racism section in Apple TV, and posted an open letter from CEO Tim Cook on the topic. On a far more mundane note, the company has also finally enabled Quicken and QuickBooks exports of Apple Card statements. Are you lamenting not being able to get together with family and friends for a birthday, graduation, or retirement? Try using the Kudoboard service to create a multimedia replacement for the group-signed greeting card. Finally, for those of you concerned about how you look and sound on video calls, Glenn Fleishman has tips for upping your videoconferencing game. Notable Mac app releases this week include BBEdit 13.1, Pixelmator Pro 1.6.4, ChronoSync 4.9.10, Bookends 13.4.2, Fetch 5.8.1, and Carbon Copy Cloner 5.1.18.
Apple Statements and Actions on #BlackLivesMatter
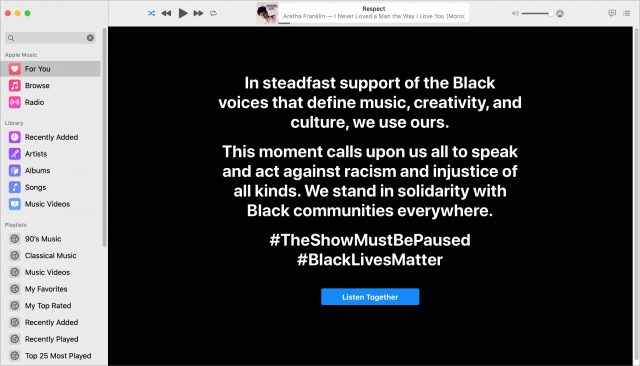
As protests surrounding the killing of George Floyd continue around the world, Apple last week joined the music industry in a “Blackout Tuesday” in support of Black voices and Black communities. All of Apple Music’s screens—For You, Browse, and Radio in the Music app—displayed just Apple’s statement and a single Listen Together button that played the Beats 1 radio station. It was a powerful and appropriate statement, and one that I hope we can all get behind.
You could still play music from Apple Music that you added to your library, and you could still search for and play artists, albums, and songs in Apple Music. Personally, I spent that afternoon listening to Aretha Franklin.
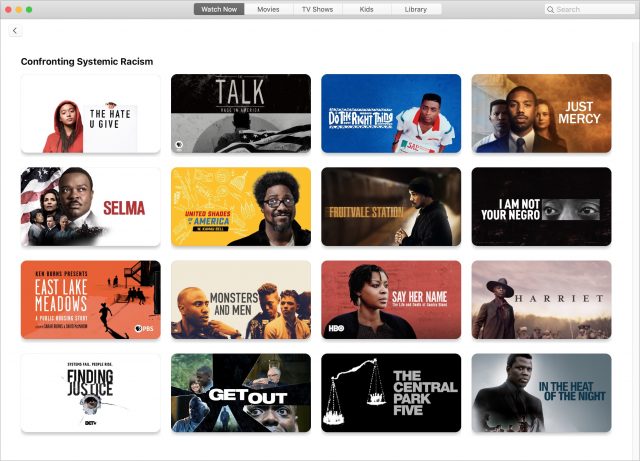
Apple has also collected a number of movies and documentaries in a Confronting Systemic Racism section in Apple TV—scroll down in Watch Now. (Amazon Prime has done something similar as well.)
Later in the week, Tim Cook penned an open letter, “Speaking up on racism,” in which he acknowledges that we’re still living in a world underpinned by an “everyday experience of deeply rooted discrimination” and suggests:
To create change, we have to reexamine our own views and actions in light of a pain that is deeply felt but too often ignored. Issues of human dignity will not abide standing on the sidelines. To the Black community — we see you. You matter and your lives matter.
As much as these expressions of support are absolutely welcome, Apple, like many tech companies, has had trouble implementing its commitment to diversity in its US workforce, particularly in leadership roles. The company releases a regular report on its Inclusion & Diversity page detailing its progress in hiring what it calls “underrepresented minorities”—look at the interactive chart at the bottom of the page for the numbers. Apple will undoubtedly be updating the page with figures from 2019 soon, and we’ll cover it more thoroughly then.
You Can Now Export Apple Card Statements to Quicken and QuickBooks
When Apple launched the Apple Card, it came without any way to export your transactions such that you could import the data into a personal finance app—all you could get out was a PDF. Apple started to rectify that glaring lapse at the beginning of the year by adding the capability to export transaction data in CSV (Comma Separated Values) format (see “Apple Card (Finally) Gains CSV Statement Export,” 23 January 2020).
However, CSV format wasn’t sufficient for many personal finance apps. In February 2020, Apple added support for OFX (Open Financial Exchange) format. It was a somewhat troubled release, with TidBITS Talk participants trading tips on how to edit exported files to get them to import properly into various apps. Apple worked out the kinks over the next few months, and the complaints died down.
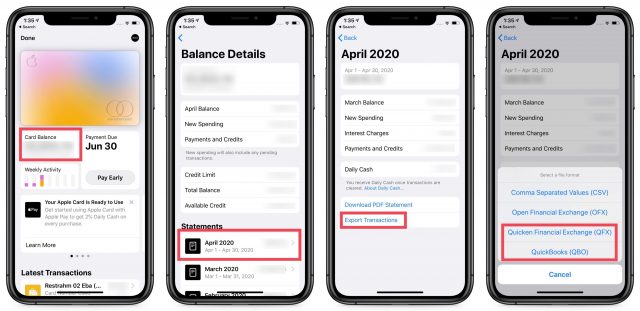
Now Apple has extended the formats available to Apple Card users even further by adding support for Quicken’s proprietary QFX (Quicken Financial Exchange) format, which is an extension of OFX, and the QBO format used by Intuit’s QuickBooks. Here’s how you export those formats:
- Open the Wallet app on your iPhone.
- Tap your card balance.
- Under Statements, tap the desired month.
- Tap Export Transactions.
- Choose either Quicken Financial Exchange or QuickBooks. Comma Separated Values and Open Financial Exchange are still options.
- Choose the destination from the share sheet. The easiest ways to get them to your Mac are probably AirDrop (your Mac might be an AirDrop shortcut at the top of the share sheet), which will send the exported file to your `~/Downloads` folder, or Save to Files (pick a location in iCloud Drive).
For something that’s human-readable, you can still download your statement as a PDF. In Step 4 above, instead of tapping Export Transactions, tap Download PDF Statement.
Here’s how you can use the various formats Apple Card can now export:
- QFX: Import into Quicken by choosing File > Import > Bank or Brokerage File.
- QBO: In QuickBooks, choose File > Utilities > Import and then Web Connect Files.
- OFX: Import into any app that supports this format, like Banktivity, Moneydance, and You Need a Budget.
- CSV: Open in any spreadsheet or import into an app that supports CSV import and lets you map import fields appropriately.
- PDF: File for later reference or print; it’s not structured data that you can import.
If anyone has figured out how to automate this process with Shortcuts, let us know!
Now if only Apple would let multiple people in a family share an Apple Card. Other common requests include the capability to download transaction data without waiting for a statement and support for other countries. How else would you like to see Apple improve the Apple Card experience?
Kudoboard Offers a Virtual Alternative for Special Occasions
Longtime TidBITS contributor and friend Jeff Carlson recently celebrated his 50th birthday, something that in more normal times might have involved a blowout party with numerous guests. (Happy birthday, Jeff!) Needless to say, the COVID-19 pandemic has squelched such events, whether they’re for birthdays, graduations, promotions, retirements, baby showers, or the like.
To mark the occasion, Jeff’s wife Kim asked his family and friends to contribute to an online collection of felicitations using a Web-based service called Kudoboard. It was the first time I’d run across Kudoboard or a similar site, and I thought it was a lovely solution to the problem of celebrations during a time of physical distancing. The company describes the service as a multimedia replacement for the greeting card that gets passed around and signed.
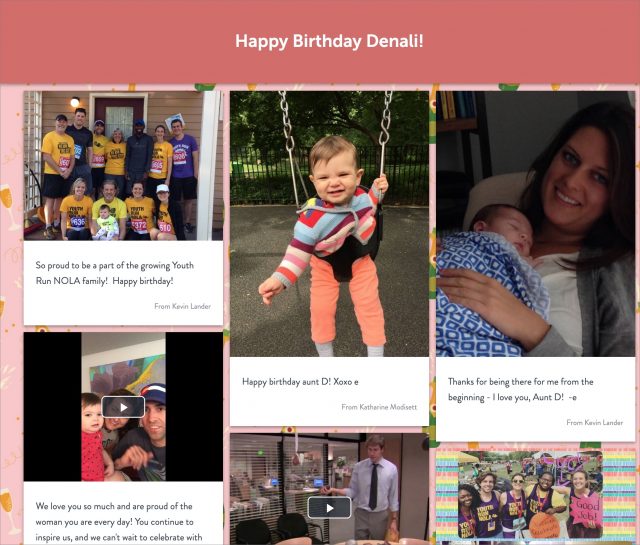
Jeff’s board is private—and it wouldn’t make much sense to anyone who doesn’t know him—but it ended up being a marvelous mass of photos and movies of Jeff throughout the years, along with animated GIFs for those who wanted to bring some cultural dynamism to their congratulatory sentiments. You can get a sense of what it might look like from this sample page—there are other samples that give you a sense of how it works in different situations.
I spent some time in Photos marking pictures of Jeff so the facial recognition in Photos could find more pictures of him. Then I chose a movie (not automatically identified by Photos, but next to a photo that was) of Jeff and his daughter riding the carousel at the Children’s Creativity Museum above Moscone Center, where we were gathered for Macworld Expo. Tonya chose another image of the three of us—similar to the one below that’s more understandable here—working on a couch at a Macworld Expo.
Obviously, we’re friends with Jeff in a particular context, and we’ve never met his extended family or college friends, so we mostly enjoyed scanning through the photos and movies from people we do know in his life. But even the contributions from people we didn’t know were interesting for what they revealed about him—and what those closest to him thought of him. Apparently, we’re not alone in thinking he’s a great guy. And most important, Jeff appreciated the effort his wife, friends, and family went to, saying:
I have to admit, the board was a surprise and was unexpectedly touching. Part of it, I think, is because as the Photographer Guy, I’m always the one behind the camera. So to see photos of me with everyone was rather nice.
Kudoboard has a free option that’s limited to 10 posts, but the company offers two options for more intensive uses. The $5.99 Premium plan increases the number of posts to 100, and the $19.99 Milestone board provides unlimited posts and can play all the posts as an online slideshow, which would be suitable for projecting at an event, once those are possible again. Both of those plans are one-time fees for that particular board. For those who want to use Kudoboard repeatedly or who want to leverage them within a business, the company offers a $149-per-year Starter Plan and a $299-per-year Business Plan.
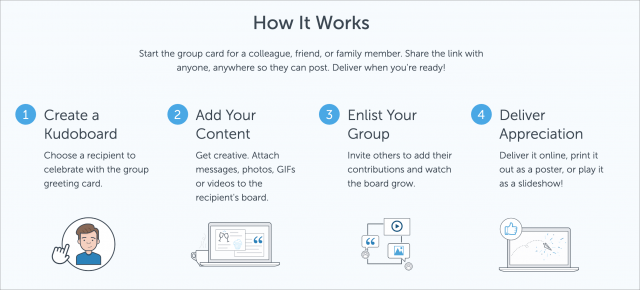
Using Kudoboard is simple. Once you create a Kudoboard and add some starter content, you invite others to contribute content. That’s actually the hardest part, particularly if you want to keep the Kudoboard secret from the recipient while people are populating it. After everyone has posted, the recipient can view the result online, or you can deliver it as a slideshow (with the Milestone plan) or printed poster.
To print a Kudoboard, you can choose from 3-, 6-, and 12-column layouts, and get either a digital download or a rolled poster. The 3-column layout prints at 12 inches wide (30 cm), the 6-column layout runs 24 inches wide (61 cm), and the 12-column layout is 48 inches wide (122 cm). The price is $30 plus $4 per square foot (30 cm square), and shipping is built into the cost. You can also get a digital download as a 200 dpi JPEG for free, and Kudoboard suggests that using a local print shop with a large format roll printer will probably cost $7–$10 per square foot.
I particularly like the fact that Kudoboard is a great way to share old photos of friends and colleagues with a focused group of people outside of the privacy-abusing forms of social media. A special occasion shouldn’t mean that Facebook gets more of our personal data for its sausage factory. Kudoboard’s privacy notice says, “Kudoboard is not in the business of selling your information. We consider this information to be a vital part of our relationship with you.”
That said, you shouldn’t upload anything private or confidential to a Kudoboard. Boards are protected only with obscurity, so anyone with the randomly generated link can see the board, although the company seems to do a good job keeping search engines out.
Even after we can once again gather freely for special occasions, I can see plenty of uses for Kudoboard. Many of us have people in our lives who are far-flung geographically, or who simply have a scheduling conflict with a celebration. Give it a try and let us know in the comments how it worked for you.
Become a Videoconferencing Pro with These Tips
Videoconferencing became the de facto way of conducting business from the outset of the COVID-19 pandemic. Even though we are months into it now, you may still find yourself uncomfortable with or tired out by participating in video calls. First, let me tell you this is normal and human: it’s exhausting to be on video all day. But, second, it doesn’t have to be that way—at least not all the time. I’ve been researching and writing about the topic for months, as well as collecting tips from others. And, of course, I’ve participated in 20 times more video calls than I had in an average year before this.
Let’s look at some of the best ways you can improve videoconferencing for yourself to ensure that you’re putting your best foot forward. (Not that anyone ever sees if your socks match anymore.) That’s essential, assuming you’re concerned with how well you can be seen or heard by others, and you should be, because it may impact how seriously you’re taken.
Although a few of these tips are specific to Zoom, most apply to videoconferencing systems in general, which I covered in “Videoconferencing Options in the Age of Pandemic” (2 April 2020). More recently, I just published a full 148-page book, Take Control of Zoom, to provide more in-depth information on that service. And for a bigger-picture look at setting yourself up to work remotely for longer, download my free book, Take Control of Working from Home Temporarily.
Improve Your Video
There is nothing more terrifying to those who aren’t routinely videoconferencing than having to start using it! A few years ago, I had a contract job with regular video meetings. I wound up making a number of changes in my workspace to make it look tidy and professional so I felt less embarrassed to be on camera. (While it may seem overly self-conscious to worry about this much, and I agree in part, I’ll also point you to this forensic examination of celebrities’ bookshelves seen in the background of their video appearances.)
For optimum results on camera, follow this advice:
- Position yourself so your head fills the space. Your head should occupy most of the top-to-bottom space of your onscreen space. If you’re farther away, other participants may be unable to see your facial expressions, which may in turn cause you to seem distant and unengaged. It can stand out particularly if the size of your onscreen image is noticeably different from other session members.
- Use a computer whenever possible. While you can participate in a videoconference using a smartphone or tablet, the results are often erratic or even poor. The front-facing cameras on most mobile devices are higher quality than computer webcams, but it can be difficult to get a handheld device into the right position to show your face. Holding one also often prevents you from doing something else, like taking notes or consulting reference information. If a phone or tablet is all you have, get a stand or a tripod mount (like the Glif adapter or GorillaPod mounts) to hold it in a fixed position at the right level.
- Consider a webcam upgrade for your computer. Most laptops and many desktop computers already have a webcam, so why spend extra? Because camera webcams are usually low quality, both in resolution and in dealing with low-light and mixed-light conditions. Apple still puts an ancient 720p camera in its latest laptops, and the company’s choice is not unusual. Plus, built-in webcams are difficult to adjust, often forcing you to move the entire display to change the camera angle. Webcams have been in short supply during the global crisis—the Logitech C920S I prefer remains unavailable—so you might have to make this a wishlist item.
- Connect a standalone camera as a webcam. If you have a standalone camera, you might be able to connect it to your computer and use it as a high-quality webcam. Several utilities take a feed via direct USB, through an HDMI-to-USB adapter, or via an on-camera Wi-Fi connection, and then map it to a virtual webcam. Some tools are in beta or even alpha, and compatibility with Zoom and other services keeps changing. Check out Camera Live (free, alpha), CamTwist (free, no longer developed), Canon EOS Webcam Utility (beta, free), Ecamm Live (14-day trial then $12–$25 per month). Watch for announcements from other camera makers, too.
- The camera should be above where you’re looking. If your camera is located somewhere away from where you appear to be paying attention, other participants will assume you are zoned out or rude. External cameras typically mount on top of your screen. If you’re consulting one device and using another, arrange them so you can look the camera in the eye. In a two-monitor situation, be aware of which display has the active camera.
- Improve your lighting. We rarely light our workspaces so our faces are evenly and moderately lit. A dark, noisy, or blown-out face is distracting and hard for others to view. You have a lot of options, all of which start with not shining a light directly on your face. Facing a light-colored wall and shining a desk lamp at it can help immensely, as can boosting the brightness on your display or bringing up a large field of white behind your videoconferencing window. You can also get a “ring light,” a circle of LEDs, designed and used for selfies and video studio lighting. The price of these varies across a large range. Search for “selfie rings” and “studio lighting rings.” Oh, and don’t sit in front of a window unless you can compensate for the bright light behind you.
- Use a physical backdrop. Virtual backgrounds are all the rage (see below), but a physical one can be useful, too, and it doesn’t cut out your hands or produce other weird visual artifacts as you move. I purchased a fake bookshelves backdrop. It’s not fooling anyone, but it’s a darned sight more attractive than the detritus—I mean, gorgeous collection of historical type artifacts in boxes and bins waiting to be sent out—behind me in my basement. You might also get a solid color background to use as a green screen; see below.

It’s a little silly, but better than shelves covered with boxes and a washer/dryer combo.
Improve Your Audio
In nearly every case, unless you already record audio or have a lot of computer-based phone calls at home, you will need to upgrade your setup. It’s worth testing the built-in mic and speaker in your computer, smartphone, or tablet. They might be good enough, but make sure to get the opinion of others—even have them record your output—to see if your gear makes you easily heard, avoids echoes and feedback, and doesn’t have distracting qualities (like sounding as if you’re 20 feet away from the mic or speaking from the bottom of the Royal Albert Hall).
For better and more comfortable results, however, you can choose among four general alternatives that bump your audio up a notch or two:
- Headset: A headset with over-the-head or in-ear speakers and a boom-style mic in front of your mouth can be inexpensive and dramatically improve the quality of any call you take or meeting in which you’re involved. For video calling, a boom-mic headset also keeps your face visible—though the mic can be distracting at times, especially when it’s right in front of your mouth.
- Earbuds: Earbuds can vary widely in quality, but you probably already own some, and as the path of least resistance and a technology you already know, they might be your best option. Earbuds can be very comfortable, but some people tire of them after a while. Remember that wireless earbuds must be charged more frequently when they’re in near-constant use. (If you own AirPods and spend most of the day in video calls, use one AirPod at a time and keep the other in the case. When one starts to die, you can pop the other in, wait a moment, and then take the dying one out and charge it.)
- External mic plus headphones or speaker: Some people already own an external mic for podcasting or other audio recording work. Because these mics are higher quality than those in headsets, and because you may already have them properly positioned—such as on a swing-arm—for comfortable use, just set your software input on videoconferencing software to use the mic as an input. You may supplement the mic with earbuds or headphones, although the latter may look too bulky on some video calls. Other folks rely on the built-in-speakers in their computer. Most videoconferencing apps have automatic echo cancellation, which may be sufficient to remove any echo or feedback.
- Noise-canceling headphones: Also consider noise-canceling headphones that include mic input in the over-the-ear cups. The headphone part may seem a little much to other video-session members, but your face remains unobscured. In my household, only one of us used noise-canceling headphones in early March. By May, all four of us had bought—or received as gifts—wireless ones. The best noise-canceling headphones use active noise cancellation—they listen for ambient sound and produce a sort of anti-sound to suppress it. Active noise cancellation necessitates a rechargeable battery, even in wired headphones. Many people prefer wireless headphones for flexibility, though Bluetooth audio quality can be spotty.
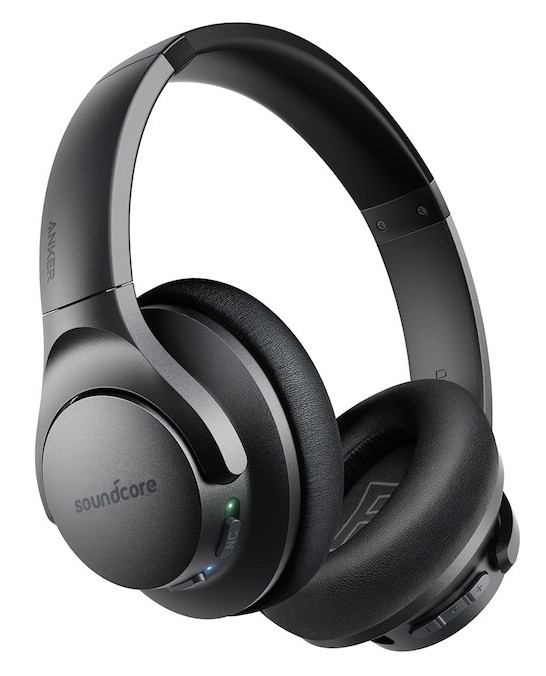
I am a fan of the low-cost Sony ZX110NC Noise-Canceling Headphones ($48) for listening only. They have fairly small ear cups and fold up, and they rely on a single AAA battery. I get dozens of hours of use with a single charge of a rechargeable cell. The noise-canceling Anker Soundcore Life Q20 headphones ($59.99 with a $10-off coupon at Amazon) have full-size ear cups, Bluetooth, and a mic. Anker says you get 60 hours of use from a single charge.
Prepare for a Session
No matter which videoconferencing tool you use, these tips will help you be a great host or participant:
- Run through your A/V first. Before starting a session, always check that your camera and audio are set to the devices you want to use. It’s entirely common to launch an app and find that the “wrong” audio and video devices are selected. Plus, audio devices are often flaky, and you might need time to restart your Mac to get it to recognize your peripherals properly.
- Set up your virtual background. Earlier, I suggested using a physical backdrop. But depending on the software you use, like Skype, you may be able to blur your background so people focus on you instead of what’s behind you. Several services, like Zoom and Skype, let you use a virtual background, and swap in an image or a looping video, although the latter can easily become distracting to others. I like to use virtual backgrounds of rooms and spaces that are appropriate for the meeting. While talking with letterpress printers, for instance, I put up an image of a shop in which I did a residency in 2017. If you pair a solid-color physical backdrop with a virtual background, the software can do a better job of cutting out a dynamic outline of you.

Zoom lets you use a physical green screen to drop out a backdrop more precisely. In the images above, I use a physical green screen at left and none at right. The algorithmic detector at right makes my head more bullet-shaped and erases some of my fingers!
- Tune up your appearance. Nobody should tell you how you should look. But you might prefer to appear a certain way on camera. If you regularly use makeup, or if you just want to reduce glare from your face or pate—I resemble that remark!—you may feel more confident or professional by applying some. Some videoconferencing software lets you change your appearance slightly. Zoom has a blur feature that lightly smooths out your facial features, so you can feel like an aging film star who demands petroleum jelly on the lens for his close-ups. It may make you look a little unnatural but could make you feel less self-conscious.
- Disable your own thumbnail. One way to reduce the worry about how you look is to hide the video view of yourself that all conferencing software offers. Turning it off may allow you to focus on other speakers more easily, too. In Zoom, hover over the video stream that shows you, click the More ••• button, and choose Hide Myself. Cisco Webex has a similar option. For other services, like FaceTime and Skype, consider a well-placed sticky note on your screen.
- Don’t be naked! You think I’m kidding? Let me quote from a recent New York Times “Work Friend” column: “I was recently talking to a group of professional women across a wide range of ages and geographic locations. Two had firsthand accounts of witnessing someone appear fully or partially nude while dialing into a work meeting because he or she was unaware the call featured video as well as audio. Don’t assume that because you can’t see someone, they can’t see you.”
- Maybe don’t use video. Do you need to participate by video? Will you be the only one who opts out? For calls with just a handful of people, especially where you know their voices, restricting everyone to audio reduces cognitive load and may improve the discussion. Consider if the burden of being on camera outweighs its utility. A lot of people chose to avoid appearing on camera before the pandemic and find being required to do so now to be stressful. If you have a choice, consider whether it works for you.
Participate Well in a Session
Finally, let me offer a little advice that helps out during a meeting:
- The mute button is your friend. Generally, keep your audio muted when you’re not speaking unless you’re in an extremely quiet environment. This reduces background noise. Preferably, everyone starts the meeting muted; in some cases, a host or facilitator may lock everyone to mute and unmute people as they are called on. Find the mute/unmute shortcut for the system you’re using. It’s fine to use a physical mute button if your mic has one, but pressing or holding down a keyboard key to toggle the microphone is usually easier. In Zoom, if you mute yourself, you can unmute by pressing and holding the Space bar. When you release the Space bar, mute resumes.
- Disable notifications on your devices. Particularly if you’re going to be sharing your screen, be sure to Option-click the Notifications icon in the upper-right corner of your Mac’s main display. Enable Do Not Disturb in Control Center on iOS devices.
- Pay attention (or at least pretend to). Don’t glance around to other places while on camera. While speaking, routinely look just below or into the camera—the focus is set on webcams so looking slightly below the lens makes it look like you’re staring directly at the lens. When listening, provide visual, non-verbal feedback, like nodding. Otherwise, your apparent disinterest can make it a lot harder for those who are speaking.
- Raise your hand to speak. If you’re in a participatory meeting, raise your actual hand or use a tool within the videoconferencing app to indicate you want to speak or be called on. A meeting organizer should start with some directions about how to get their attention and contribute.
- You can start and stop streaming video. Most videoconferencing tools let you control whether you’re sending video, turning your spot in a call into an audio-only session. Zoom, for instance, lets you click a Start Video button after the call begins, so you intentionally begin streaming, and you can always click it again to stop streaming. With networks and services sometimes overwhelmed, you may be able to improve audio and video quality by asking participants who aren’t speaking to pause their video to reduce bandwidth usage.
Millennia of civilization never prepared human beings for spending hours a day staring at tiny dots of light and assembling them into pictures of other people with whom we had to try to have real conversations. We can admit it: videoconferencing is literally unnatural, and our brains—our souls, maybe—aren’t made for it. But by putting your best face forward, you might ratchet down the stress and discomfort of an always-on-video workstyle. And we can all hope the necessity and frequency of such sessions lessen over time.
