#1477: Avoiding Netflix autoplay previews, Sip color manager for Mac, choosing a Lightning to USB adapter, CES 2019 gadget reviews
iOS 13 will finally offer support for mice and external storage devices, so Josh Centers explains why one of Apple’s two Lightning to USB adapters is a better choice than the other. If you hate Netflix’s autoplay previews as much as Adam Engst, you can avoid them with a pair of Apple TV apps he has discovered. Do you struggle with macOS’s aging color management tools? Timothy Buck joins us again to review Sip, a smart color management app for developers and graphics professionals. Wrapping up the issue, Jeff Porten reviews a trio of gadgets he collected at this year’s CES: a battery that can power an iPhone and a MacBook simultaneously, an audio equalizer app for the Mac, and a pair of wireless Bluetooth earbuds that are about half the price of Apple’s AirPods. Notable Mac app releases this week include 1Password 7.3.2, ChronoSync 4.9.4, BusyCal 3.6.9, and DEVONthink 3.0 Public Beta 6.
Buy the Best Lightning to USB Adapter for iOS 13
While at an Apple Store recently, I decided on a whim to grab a Lightning to USB Camera Adapter. Testing iOS 13 gave me a couple of excellent reasons to do so since it offers support for USB drives and mice.
Indeed, when I plugged a USB mouse into the adapter and connected it to my 10.5-inch iPad Pro, it worked. While using a mouse to control an iPad is a neat novelty, it remains to be seen how useful mouse support in iOS will be overall. One clear benefit is that it allows you to work further away from the iPad so you can use it more like a traditional desktop.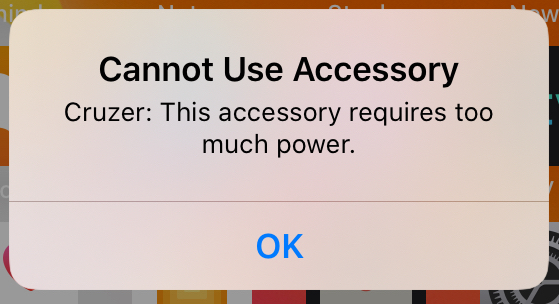
Next, I tried plugging in a USB thumb drive and promptly received an error saying that the accessory requires too much power. Drat.
Happily, I was able to work around this limitation by plugging a powered USB hub into the adapter and connecting my thumb drive to the hub. The downside of this workaround is the amount of gear involved: a USB cable from Apple’s adapter to the hub and the hub’s beefy charging brick. I’d prefer not to travel with such a collection. Plus, the Lightning to USB Camera Adapter supports only USB 2.0 speeds, which aren’t ideal for transferring data quickly.
So I (figuratively) kicked myself when I learned that Apple sells another Lightning to USB adapter that works better for this scenario: the Lightning to USB 3 Camera Adapter. It costs only $10 more and supports USB 3.0 speeds, at least on iPad Pro models. More importantly, it features both a USB-A port and a Lightning passthrough port. The Lightning passthrough port is helpful because you can connect a normal Lightning cable to it, and plug that Lightning cable into one of Apple’s tiny USB wall chargers. Then it can both charge your device and power accessories like thumb drives.
Another alternative is to buy a thumb drive with a Lighting plug. Yes, they exist, but most people probably already have a collection of standard USB flash drives lying around.
The real question is why Apple continues to make and sell the old, inferior Lightning to USB Camera Adapter. I can’t imagine there’s much difference in manufacturing costs between the two adapters, so the older adapter’s only advantages are its lower cost and slightly smaller size.
Avoid Netflix AutoPlay Previews on the Apple TV with Reelgood and WatchAid
After Josh Centers looked into the Reelgood and JustWatch video discovery services (see “A Million Streams and Nothing to Watch? Reelgood and JustWatch to the Rescue!,” 21 June 2019), I stumbled on not one but two partial solutions to the problem of Netflix assaulting us with autoplay previews (see “#DeathToAutoPlay—No More Audio and Video That Plays Automatically!,” 6 February 2019).
Reelgood to the Rescue, Sort Of
It turns out that Reelgood publishes an Apple TV app as part of its iOS Reelgood app. Although the app is simple—it doesn’t let you do any of the searching or browsing that you can do in the iOS app or the Web app—it does provide one key feature: you can open a movie or TV show on one of your Reelgood watchlists in Netflix directly from the Reelgood app (with a brief pause for you to select your account if you have multiple Netflix accounts).

That means you can use the Netflix app only for watching, and you don’t have to subject yourself to Netflix’s user-hostile interface just to get to your show.
I say the Reelgood Apple TV app is a “partial” solution for two reasons. First, although it can open a movie or TV show episode in the Netflix app, and it’s easy to return to Reelgood afterward by pressing the Menu button, the Reelgood app doesn’t know you finished watching. So you have to mark each one as watched when you’re done by clicking the Seen It button. When you do that, Reelgood moves movies to the Watched list or, for TV shows, presents the next episode.
Second, although we also watch some shows in Amazon Prime Video, Reelgood can’t perform the same trick to open shows in the Amazon Prime Video app. That’s disappointing since it means we can’t just initiate all watching from the Reelgood app.

Watch Better with WatchAid
While I was doing my background checking on the Reelgood app, I ran across a mention of WatchAid, another app that lets you search for TV shows, add them to a queue, and then initiate watching directly from the app. As with Reelgood, WatchAid provides an iOS app with an Apple TV adjunct. Unlike Reelgood, you can use WatchAid’s Apple TV app entirely on its own, or sync it with your iOS devices. If you put WatchAid on the top row of your Apple TV’s main screen, it even shows preview thumbnails for your shows when you have the icon selected.
![]()
Initially, WatchAid seemed like a complete win for us, since it can open shows in both Netflix and Amazon Prime Video (plus other services), and when you exit out of the destination app by pressing the Menu button, WatchAid asks if you’d like to mark that episode as watched.
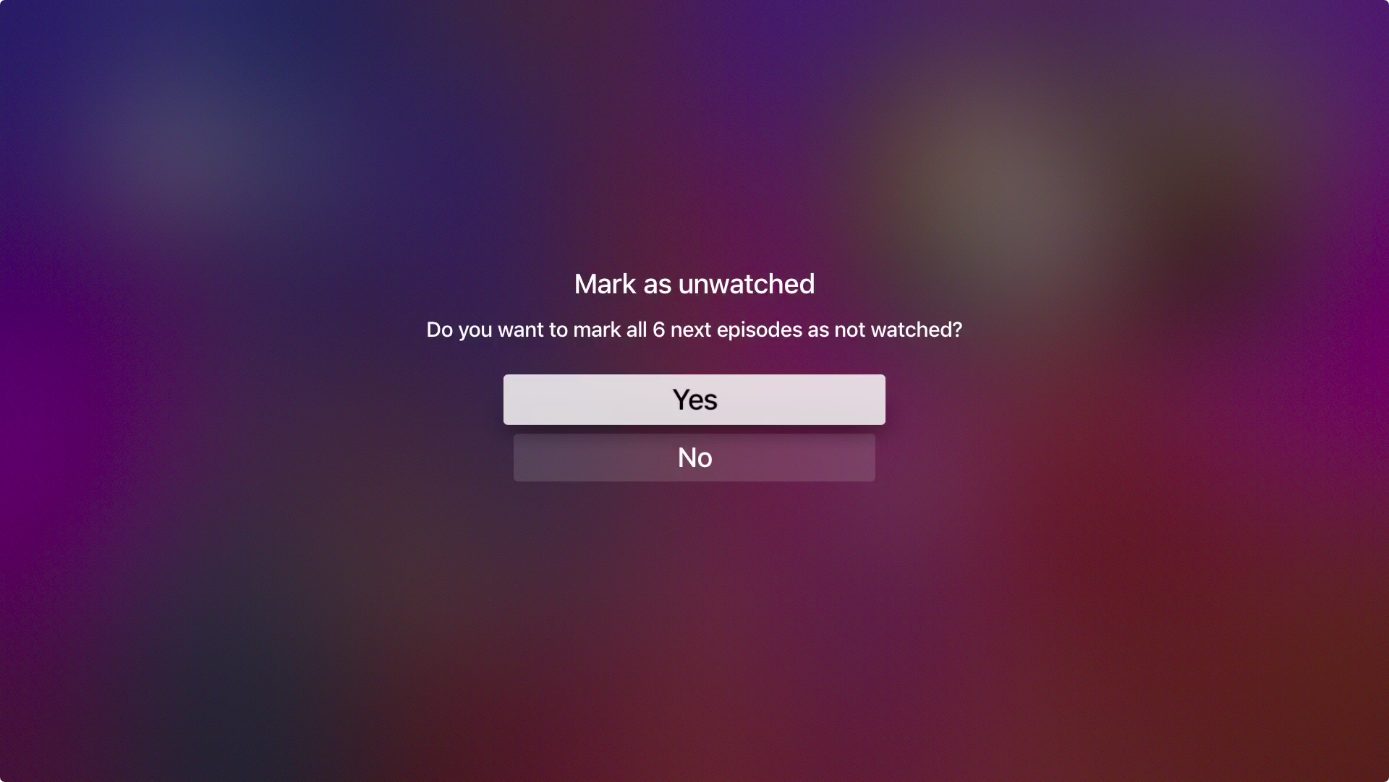
WatchAid also lets you populate your queue from within the Apple TV app. It lacks a category or genre browser, and its search capability is fussy due to the standard Apple TV search interface, but when you do find a show, you can follow it or view episodes to pick up in the middle. Just select the show you want to watch next, and WatchAid asks if you want to mark later shows as not yet watched.


On the downside, WatchAid’s database is less complete and less accurate than Reelgood’s. For instance, WatchAid thinks 3rd Rock from the Sun is available with a Netflix subscription (it’s not) and doesn’t realize it’s available with an Amazon Prime subscription (it is). WatchAid also doesn’t yet know that Netflix has just released season 3 of Glow. Plus, the WatchAid app frequently fails to connect to its server and requires clicking a Retry or Cancel button. Minor, but annoying.

But the real reason WatchAid is only a partial solution to the Netflix auto-play preview problem is that it works just with TV shows, and not with movies. Most of our viewing is TV, so that’s not a dealbreaker for us, but it may work less well for those who primarily watch movies.
So if you’ve become fed up with your streaming video apps pushing TV shows and movies you don’t want to watch, or you dislike being bombarded with autoplay previews, give WatchAid’s Apple TV app a try. It’s not perfect, but it’s a better experience than fighting with Netflix. And if WatchAid doesn’t float your boat and particularly if you already use Reelgood, perhaps its Apple TV app would be more to your liking.
Sip: Smart Color Management for Your Mac
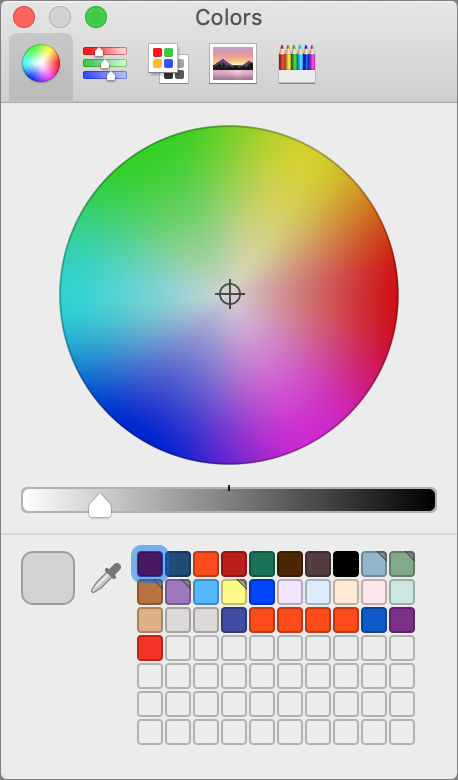 If you work with color on the Mac, you’re probably painfully aware that the macOS Colors palette hasn’t changed in years. It offers several different types of color pickers, an eyedropper tool for sampling a color from the screen, and wells for storing color swatches. It’s functional for occasional use but becomes clumsy quickly—try remembering which red is which when you’ve saved multiple similar versions. Many graphics apps offer their own color tools, but they’re useless as soon as you need to work in another app. Luckily, there’s a solution: Sip.
Sip is a $10 menu bar app that allows you to pick colors anywhere on your Mac, quickly organize them into palettes, and smartly use those colors in other apps. Brothers André Gonçalves and Rui Aureliano designed Sip with advanced features for professional developers and designers, but its core functionality is simple enough that any Mac user might find it useful for color management.
Sip Basics
The first thing you’ll do with Sip is pick some colors. You can open the color picker—which is a circle that magnifies a small portion of the screen underneath it—by clicking the menu bar icon or pressing a keyboard shortcut (Command-Control-Option-P). Sip provides plenty of shortcuts, all of which you can change in its settings.
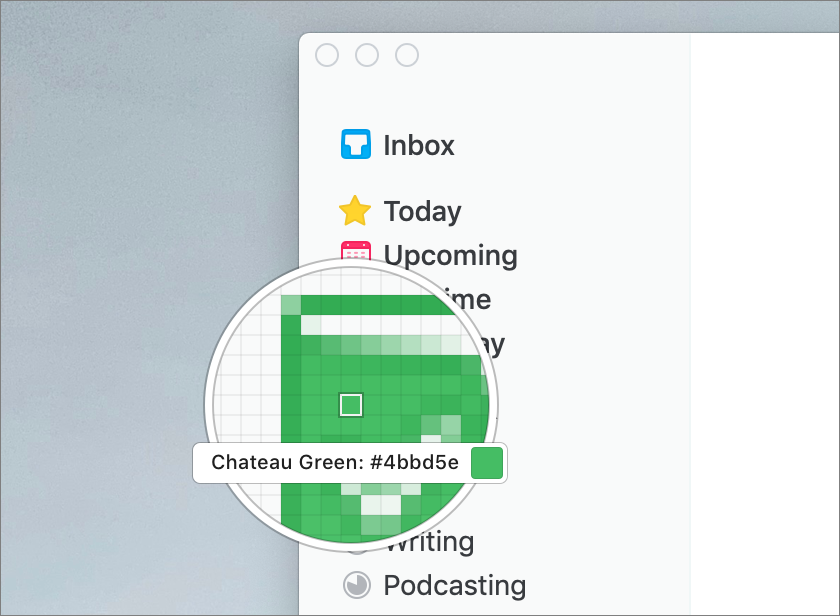
To pick a color, position the color picker over the desired hue, wherever on the screen it may be, and click. That adds the color to Sip and copies it to your clipboard. Press a modifier key while picking a color to add additional tweaks:
- Shift: Adds multiple colors in a row.
- Option: Automatically creates a new palette and puts each color you pick in that palette (more on palettes shortly).
- Control: Creates a new palette with the colors you’re picking.
- Command: Sends the color directly to the app in which you’re working, if it’s one of the 17 currently supported apps, including Web development apps like Coda and Espresso, and Adobe’s Illustrator, InDesign, and Photoshop.
For more precise color picking, use Sip’s keyboard shortcuts to increase or decrease the zoom of the color picker, to make the color picker’s grid larger or smaller, and to move the color picker around in 1- or 10-pixel increments. This is great for grabbing a 1-pixel border color or the color of small text.
You can also send colors to Sip directly from Sketch or Photoshop using the Sip shortcuts for Get Border Color or Get Fill Color. Clicking the color wheel in the top right of the menu bar window opens a Photoshop-like color editor where you can pick a color or enter hexadecimal or RGBA values.
Once you have some colors in Sip, you’ll probably want to create palettes to keep them organized. You might want a palette for brand colors, another for a project you’re working on, and a few more for colors that inspire you.
To create your first palette, click the hamburger menu in the menu bar window and then choose New Palette. All the colors you’ve picked so far will already be in your color history. Drag colors from your color history into your new palette. You can also drag to rearrange the colors within any palette.
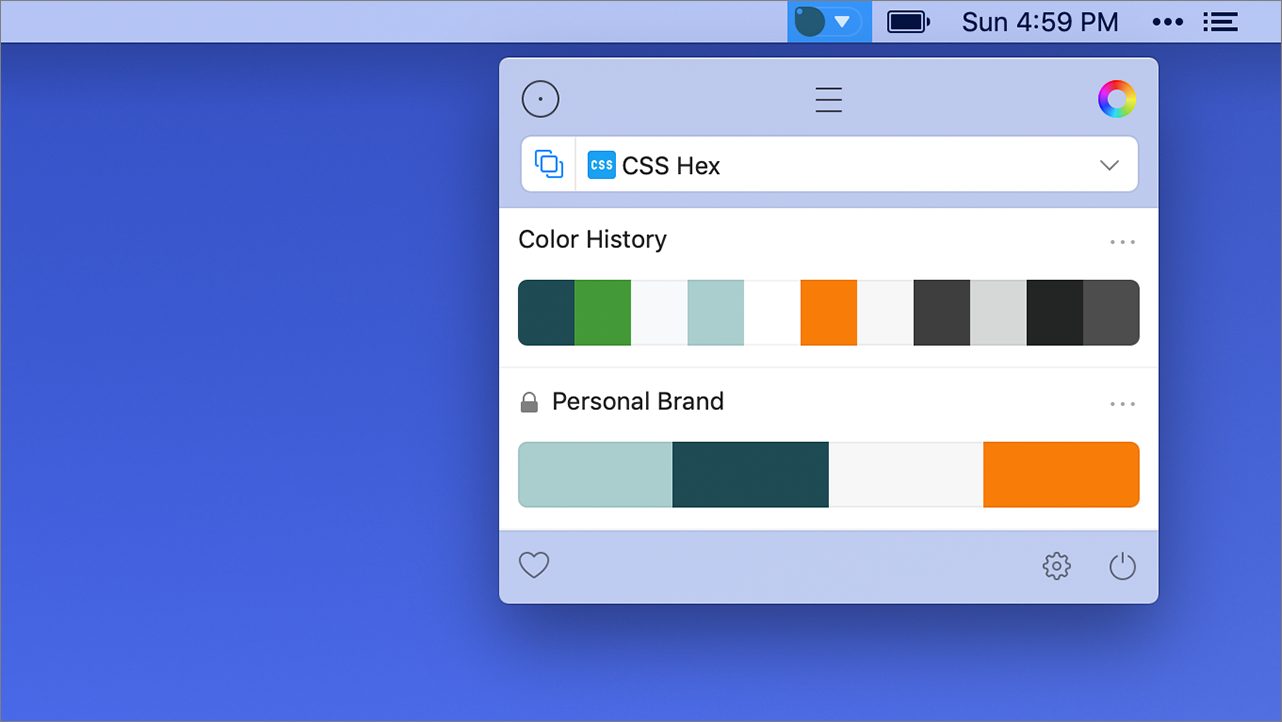
Control-clicking the palette gives you options to rename, duplicate, lock, or favorite it. Favorites are helpful once you have a bunch of palettes. Clicking the heart in the bottom left of the menu bar dropdown will show only your favorite palettes.
Clicking the name of the palette takes you into a list view of all the colors in that palette. Sip automatically generates names for your colors like Sunglow or Blue Haze, but you can Control-click any color in the list view to rename it. I like naming my colors by use case, such as Background, Highlight, Header Text, and Body Text. Control-clicking any color in the list also provides options to delete, replace, or edit the color with a Photoshop-like color editor.
Once you’ve organized your colors into palettes, you can begin using them in other apps. Selecting any color from your history or a palette in the menu bar window copies the color to your clipboard. Sip can also show a draggable color dock on the edge of your screen; you can define which of your palettes appear in this dock. Selecting a color in the color dock works the same as the menu bar window.

Your color palettes, color history, and settings sync between Macs, and Sip automatically backs them up by taking snapshots that are saved locally in case you accidentally delete something.
Sip Formats
If you find yourself using different color formats in different apps, like hexadecimal in Photoshop and CSS RGBA in Sublime Text, Sip has you covered. You can turn on Smart Formats, define which format is used with each app, or simply use the presets. With Smart Formats on, when you paste colors from Sip into an app, it will automatically use the correct color format.
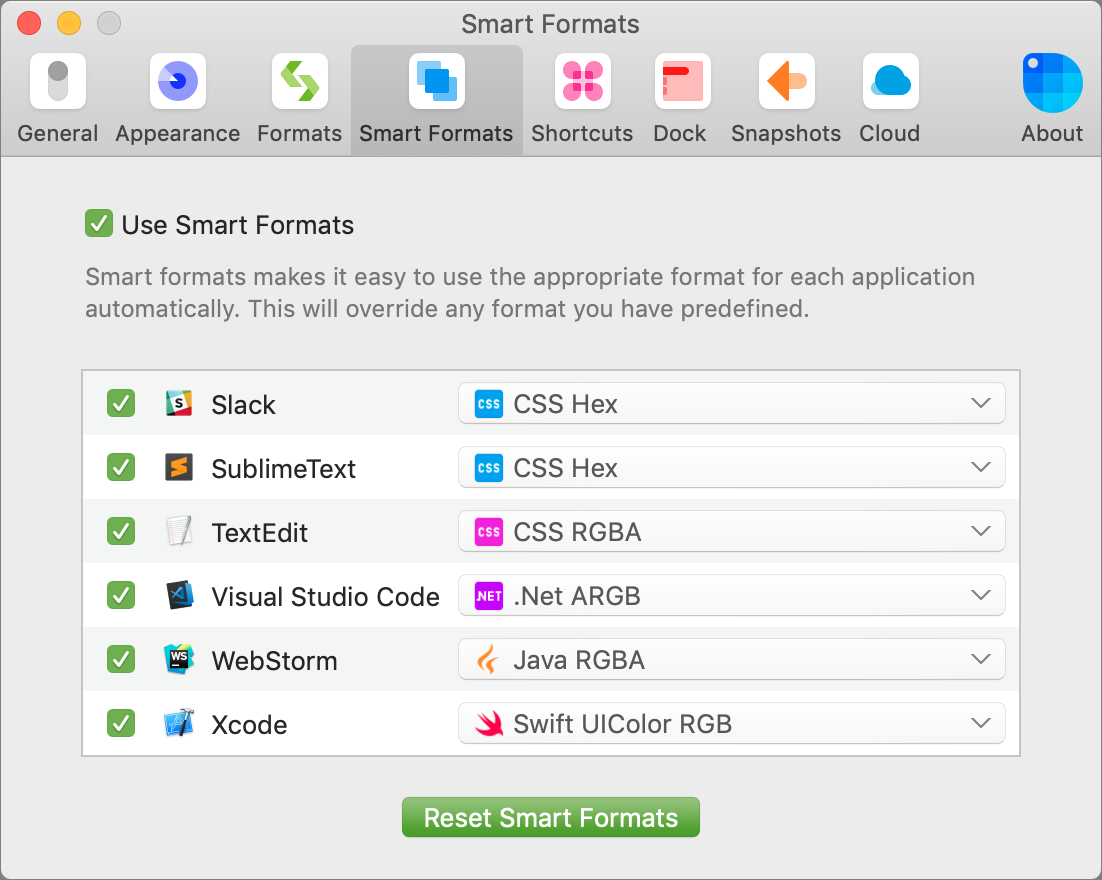
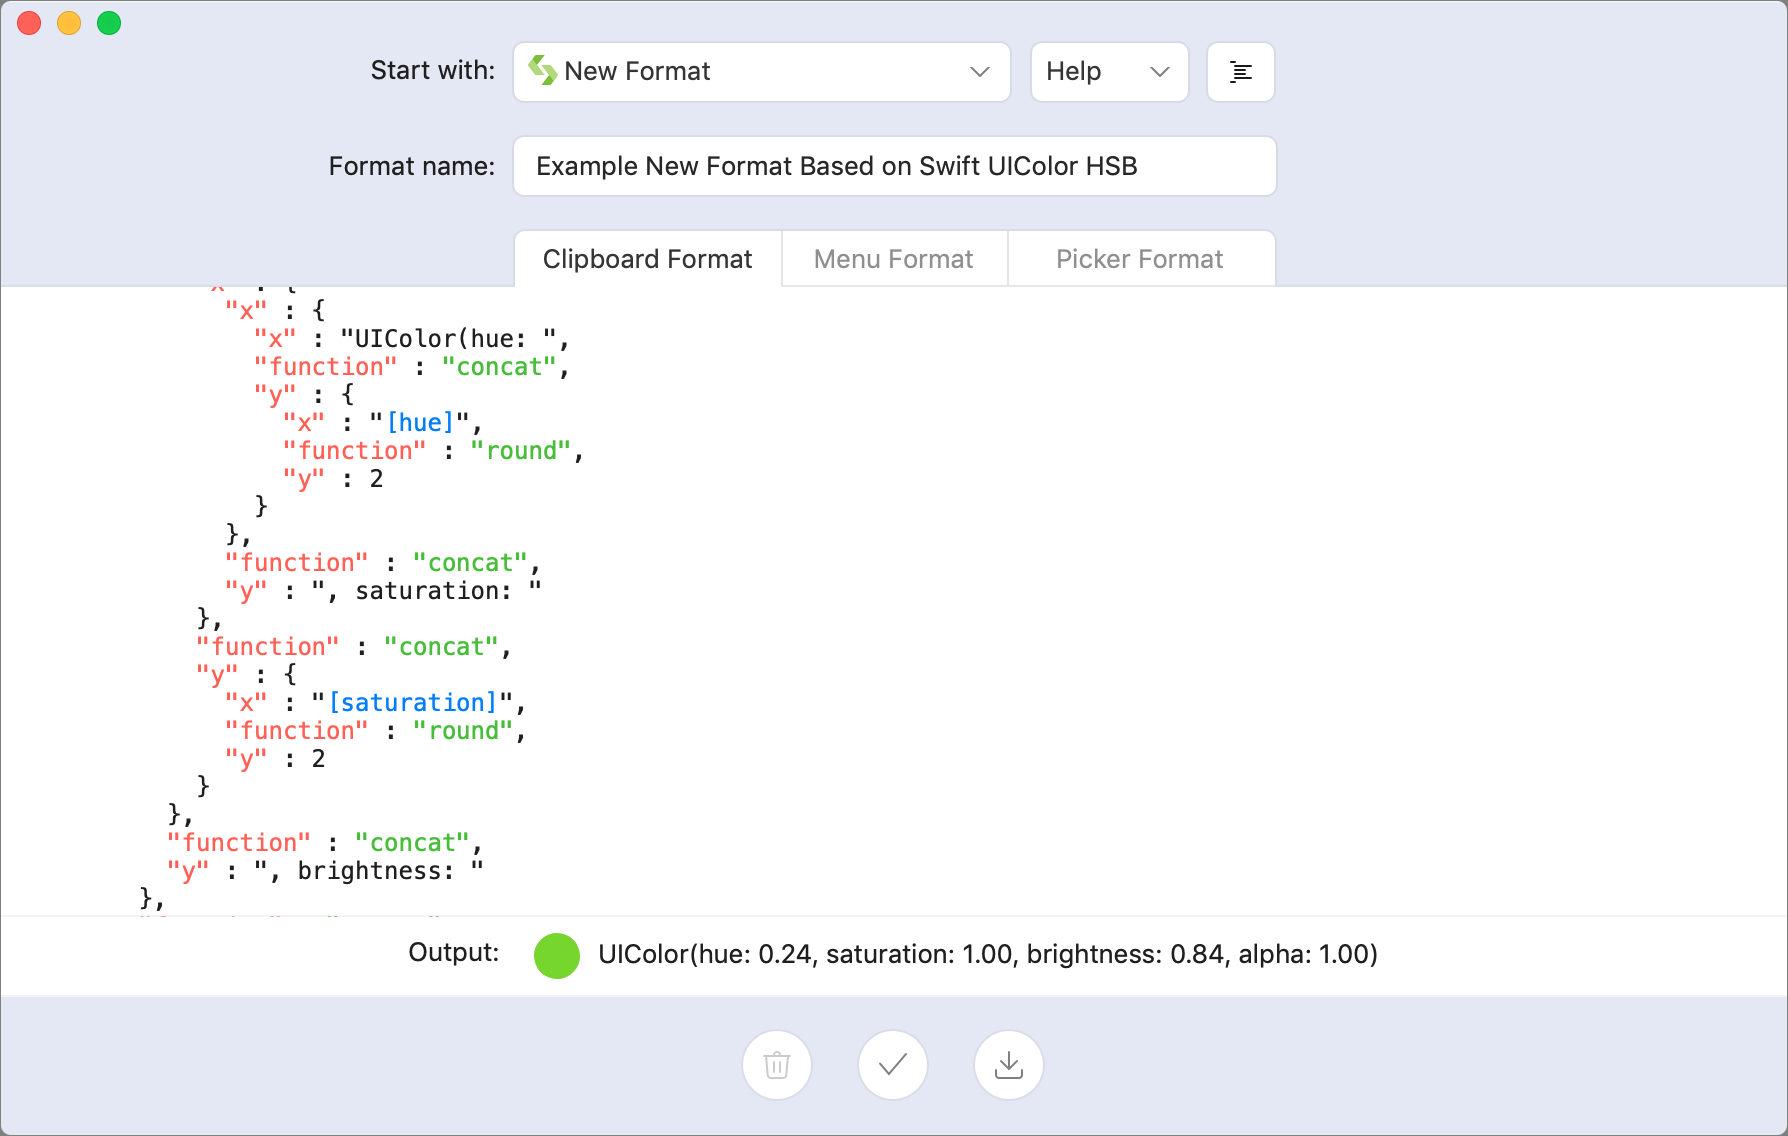
I’ve never had to create a custom format, but if the list of built-in formats lacks something you need, you can create your own based on any of the existing formats or from scratch. You’ll find the Custom Format editor within the hamburger menu in the menu bar window. It allows you to define separately how the color is saved to your clipboard, viewed in the menu, and viewed in the picker.
Sip Accessibility Tools
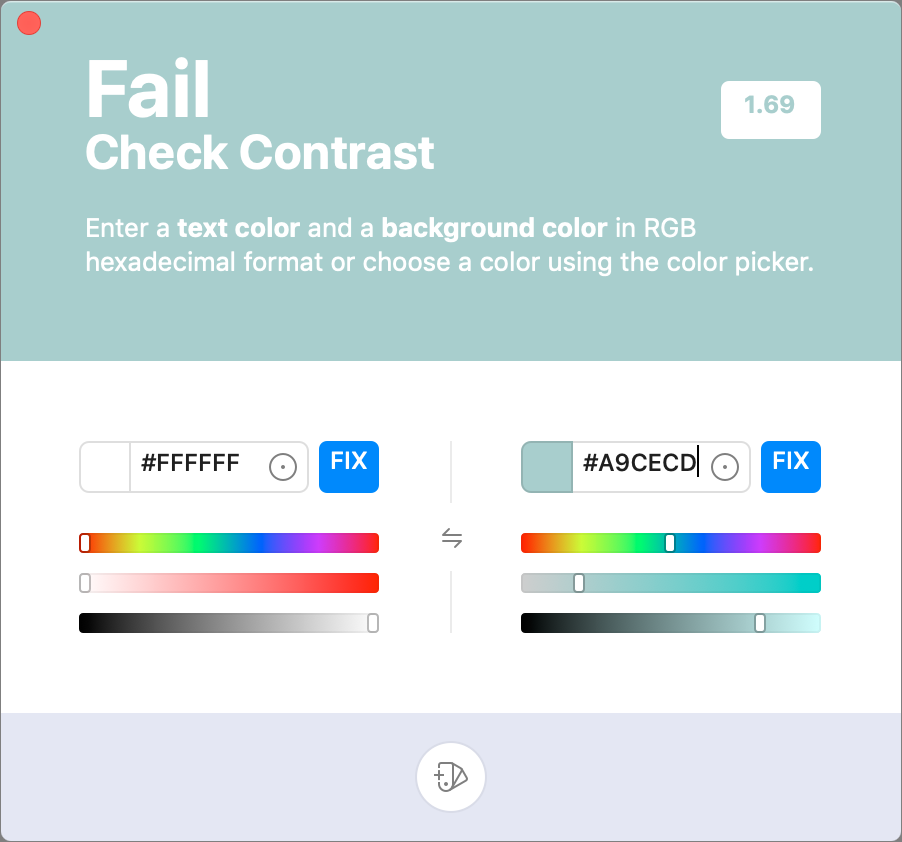
Sip’s Check Contrast feature helps you make sure that the contrast of the colors you are using is accessible to people with low vision. To check contrast, choose Check Contrast from the hamburger menu. Then pick a background color and text color. Sip will provide a numeric score as well as an overall grade of AAA (great!), AA (acceptable contrast for type smaller than 18 point), A Large (acceptable for type larger than 18 point), or Fail.
While I was using this feature to take screenshots for this article, Sip showed me that a white-on-seafoam color combination I was using on my Web site wasn’t accessible. I was able to make a simple color change to my site, and now it’s more usable for people with low vision.
Taking a Sip
You can try Sip for free for 15 days. After the free trial ends, you’ll need to purchase the app.
Sip uses a pricing model popularized by the design app Sketch. It costs $10 for one year of app updates on one computer. If you want to license more than one computer, you’ll receive a discounted rate: $8 each for 2–5 computers, $7 each for 6–9 computers, $6 each for 10–19 computers, or $5 each for 20 or more computers. Once the first year is up, you can purchase another year of updates for half the cost of your first year, or you can keep using the version of the app you’re currently using for no extra cost.
If you’ve struggled with color management between apps, Sip is well worth the price, and it’s easy to test the trial version to see if it will improve your workflow. I know it has improved mine.
CES 2019 Reviews: iPhone/MacBook Battery, Mac Equalizer App, and AirPods Alternatives
Mid-year greetings from TidBITS’s intrepid Consumer Electronics Show reporter (see “CES 2019: CES Unveiled Kicks Off the Annual Gadget-fest,” 8 January 2019). It’s always interesting to see what new and sometimes bizarre gadgets are unveiled at the show, but some never come to pass, while others disappoint upon arrival. Occasionally we’ve published reviews, but few of these products deserve a full article-length dive. So this year we’re trying collections of shorter reviews.
MyCharge HubMax Universal Battery
It’s hard to get that excited about a battery, but the unassuming HubMax Universal quickly went from “interesting” to a regular part of my gear. It’s a 10,050 mAh battery in a compact case, with foldout cables for USB-C and Lightning charging, and it can charge three devices simultaneously (a USB-A port on the bottom lets you charge other devices with any standard charging cable). A small button lights up LEDs to show your remaining charge. A wall plug flips down on the back and folds away flat when not in use, but notably, this means that it won’t fit AC outlets without several inches of extra room—it has to go at the end of my 6-outlet extension cable.
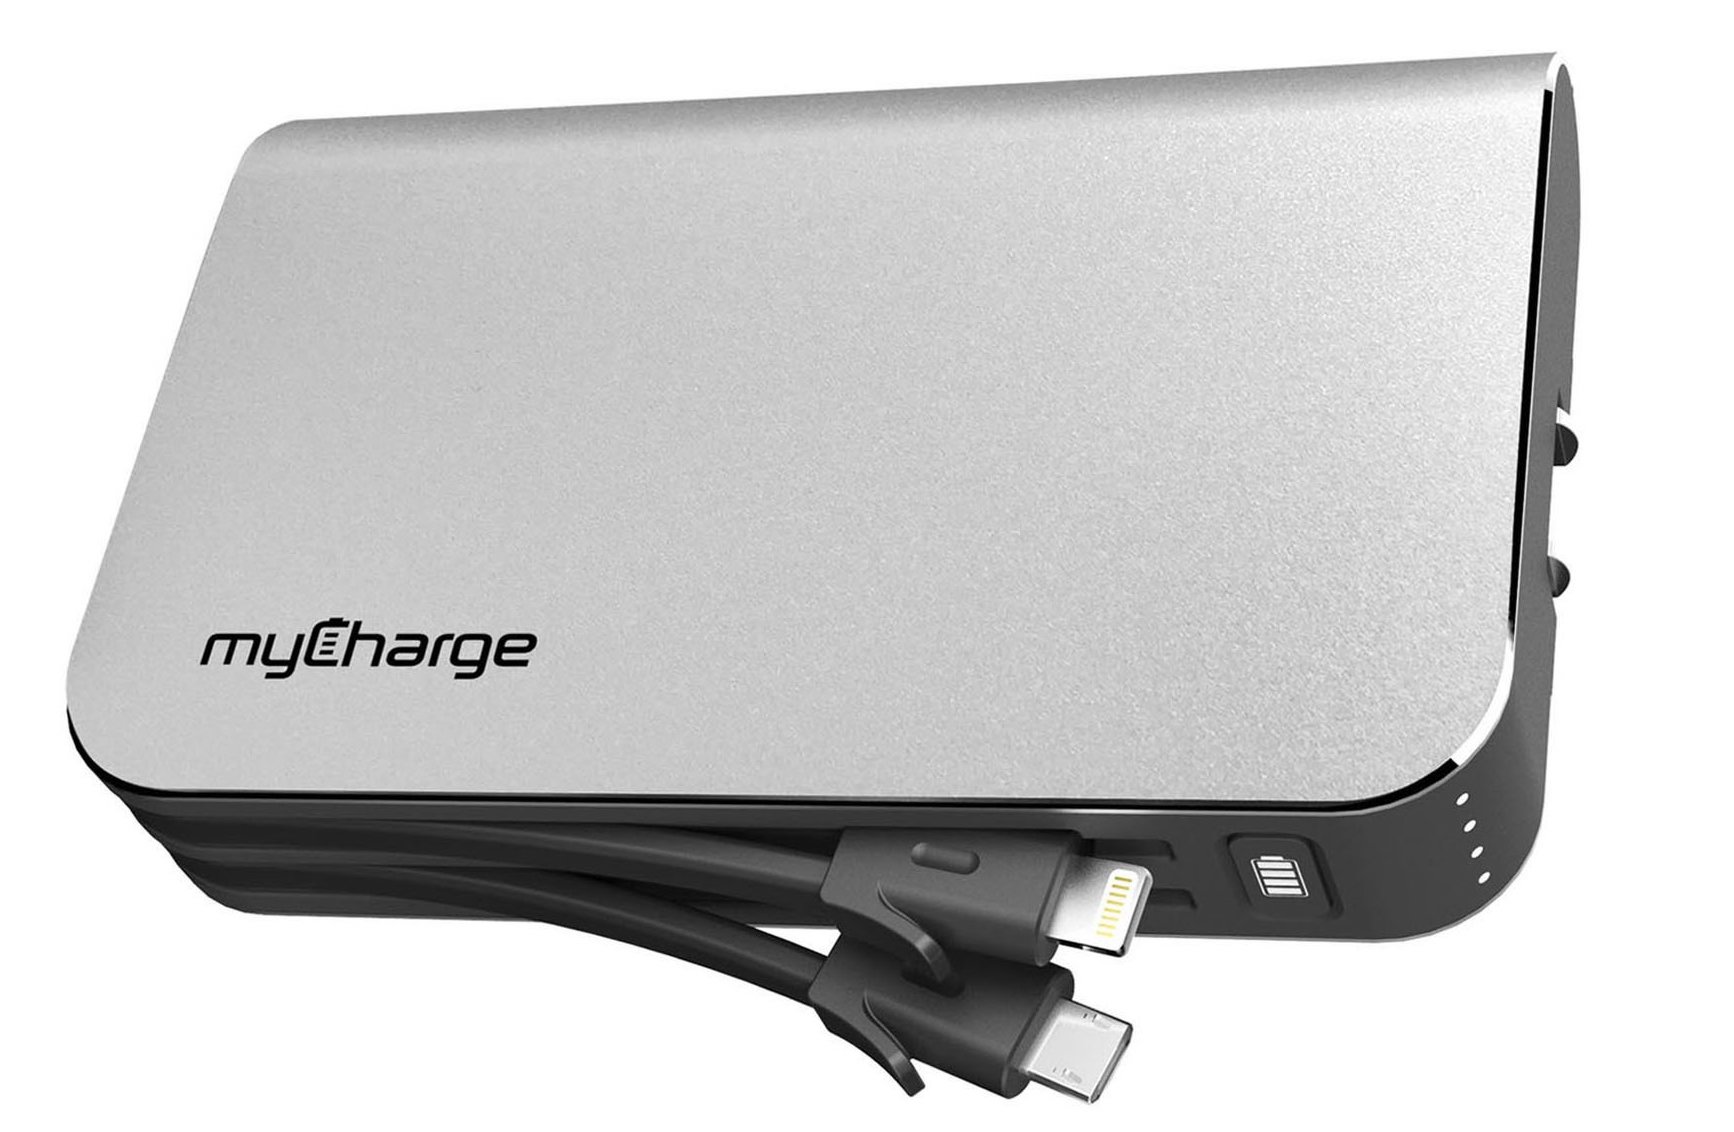
I have a few quibbles, mostly that the obvious missing feature is a micro-USB cord, as that’s ubiquitously needed for small gadgets. MyCharge’s separate HubMax battery offers that cable, but you’ll give up the USB-C cable for it.
The USB-C cable is outgoing only, so you can’t recharge the HubMax Universal from a MacBook Pro running off AC. The built-in cords are short enough that it’s difficult to use a device while it’s charging; it’s easy to carry around a phone and battery sandwich, but tilt the phone to use the screen and it’s easy to dislodge the cable.
I’m not sure what voodoo some batteries use to stop charging a full phone, but the HubMax Universal doesn’t seem to have it—leave a phone plugged in overnight and it’ll drain the HubMax Universal completely. That’s a lot of juice, given that a full HubMax Universal can provide an emergency 60–90 minutes to my 13-inch MacBook Pro. Perhaps more importantly, it took just 2 minutes of charging to take the MacBook Pro from brick to boot.
But the key thing about the HubMax Universal is its size. With dimensions of 4.6 by 2.8 by 0.9 inches (11.7 by 7.1 by 2.3 cm) and a weight of 19 ounces (.54 kg), it fits easily in a (men’s) trouser pocket or any small bag. I carry a huge battery in my backpack, but when traveling light, I used to have to devote several pockets to a small battery and the necessary cables to keep my gadgets going. Having power is a big deal to me because I could be stranded by a dead phone. With the HubMax Universal, I can grab it and go, knowing my phone and iPad won’t run out of power all day.
At $99.99, you can find cheaper batteries in the same power storage class, but nothing I’ve seen is this convenient. MyCharge’s Hub series contains a range of similar products, with models offering either USB-C or micro-USB with Lightning, in various battery capacities and prices that start at $49.99.
Nahimic Audio Equalizer for Mac
Nahimic is an audio equalizer that runs in the Mac menu bar and promises to make your music and movie audio sound better. On the first launch, or whenever it detects new audio hardware, it asks you to set up a sound profile for the device. The app contains a long list of manufacturers, speakers, and headsets—more popular models are more likely to appear—and says that the frequency adjustments will be perfectly tuned for each one. If your output hardware isn’t included, the app relies on stock profiles, and Nahimic asks for permission to send data back to the mothership so it can create and push new profiles based on crowdsourced data.
Many other apps provide an equalizer with frequency bands and technical mumbo-jumbo, which can lead to endless fiddling—only Kirk McElhearn knows the difference between the Classical and Live Hall iTunes presets. With Nahimic, there is no way to muck with its hardware or individual frequency settings, and the app presents your choices in a sentence with three options:
I want my (music/movie) in (stereo/3D) with (neutral/deep bass/bright sound/clear vocals/punchy sound)
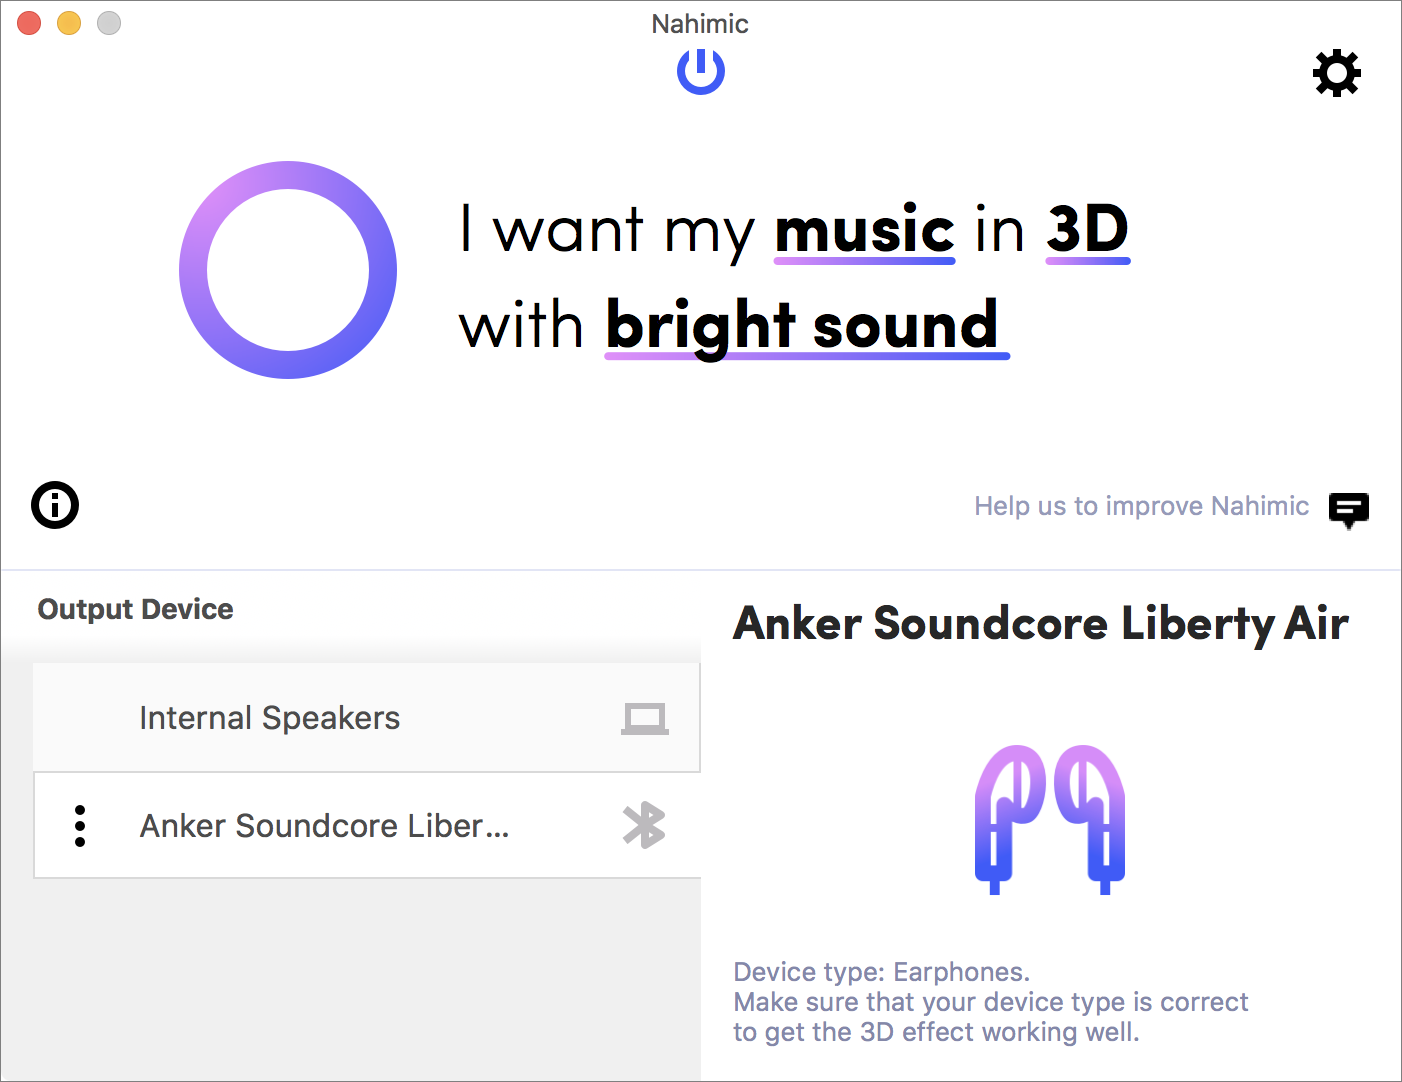
This is a great interface. Each sound output option is quite audibly different: bright sound indeed emphasizes the frequencies that make pop music, uh, pop, while punchy sound provides a bass reverb that’s not the same as a volume increase. The 3D effect makes it sound like there are additional headsets hovering in front and back of my ears; it’s good enough that “stereo” sounds flat, and I don’t see why anyone would use it.
The app lacks only one thing, and it’s understandable. iTunes lets you create an equalizer customized and permanently attached to each track (Edit > Song Info > Options > Equalizer, if you’ve never seen it), but Nahimic can provide only one setting to rule them all.
But get past the improved sound and the software has a few annoyances. There were occasional times when I had to fiddle with Sound output in System Preferences or Nahimic’s interface, and once or twice I seemingly lost output entirely until a reboot—these problems haven’t happened in a while, so Nahimic may have fixed them in a software update. Weirdest of all, Nahimic offered to set up my iPad as an audio device—but when it’s the target for output, there’s dead silence.
That said, audio now sounds better to my ears and that’s what the app is for. There’s a free trial to find out if your ears agree, and the price is $9.99, making it almost a no-brainer if you listen to Mac audio often and care about the sound (or use cheaper headsets that lose some frequencies). Just don’t click OK if Nahimic suggests non-speakers as audio devices.
SoundCore Liberty Air True Wireless Headphones
Only in the last year have we seen decent lower-priced competitors for Apple’s AirPods, such as the SoundCore Liberty Air. SoundCore is a brand produced by Anker, which has a solid reputation for batteries and chargers. And indeed, the Liberty Air is pretty good—about half the price of AirPods, with approximately half as many good features. Like Nahimic, the sound is great, but then it goes downhill.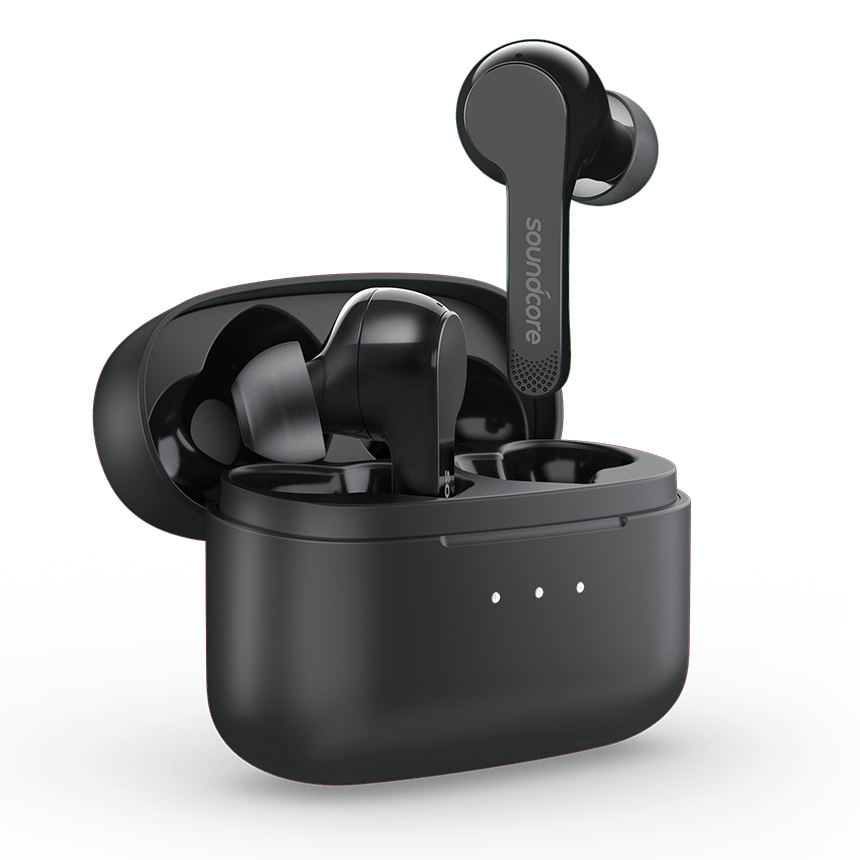
Regarding the sound, you’ll have no complaints unless you’re an audiophile who spends far more than $80 on headphones. Music is crisp and clear with decent bass, and unlike many Bluetooth headsets I’ve tried over the years, there aren’t frequency dropouts that cause songs I know well to sound wrong.
If your ears aren’t the right shape for AirPods, you’ll appreciate the Liberty Air’s three pairs of rubber ear tips that help you get the right fit and provide better sound isolation than the AirPod teardrop. But if you want to hear ambient sounds because you’re allergic to oncoming traffic, these earbuds aren’t for you—an ear tip that lets in sound will also pop out of your ear when you’re jostled.
The other way the Liberty Air excels is battery life. SoundCore claims 5 hours in the buds and four charges in the battery case, for a total of 20 hours. It might even be longer. Some days I can almost go from wake to sleep while playing music or podcasts the entire time. It seems that the short times I use the battery case—simply to hold the buds so I don’t lose them while ordering coffee or some such—are enough to keep them going.
Unfortunately, that’s where the accolades end. The Bluetooth connection is annoying. There are regular brief dropouts of the left earbud and occasional longer disconnects that require a reset (by putting both buds back in the case for a moment). I would not be surprised if this problem is more common when you’re surrounded by RF emitters, such as 25 different Wi-Fi networks or a dozen discoverable cell phones. It’s irritating when the left bud drops for just long enough that I don’t know whether it will come back on its own or if I need to reset it.
The microphone is so poor that I’m surprised it’s advertised at all. In dead silence, it works for Siri and Google Assistant, but if the recordings I’ve made of myself are any indication, they’re no joy for any human listening to you. In a light breeze or moderate fan noise, I’ve never completed even a brief call without switching to the handset. SoundCore’s FAQ admits that call quality isn’t good in this kind of design, but then makes the claim the Liberty Air uses digital signal processing to make voices clearer. That may be true but implies that the result is usable, which it’s not.
The carrying case is well-designed, with just the right heft. It’s not too heavy in a pocket and has a pleasant tactile feel and curvature. The lid has a bit of a wobble when closing that I wouldn’t notice if I weren’t doing a review. But sometimes the earbuds don’t seat properly, and after a few hours I’ll take them out to find that one is dead. If that’s the right one, neither will work, because only the right earbud can be used for mono sound. The other annoyance is that if I’m charging the case from a micro-USB cable with my home hub, it disables earbud charging until I unplug the cable. This doesn’t happen when charging the case off a battery. One reason I’m not sure how much time I get from a charge is that the case’s three-light LED battery indicator spends nearly all its time at two lights; I’ll see three lights only when it’s fresh off a charge, and one light only right before it dies completely.
As for the earbuds themselves, they’re sufficiently comfortable that I forget I’m wearing them—which has been a problem when I’ve taken off a sweatshirt and launched one across the room. (Buy white or black depending on what color your floors are, and shop for contrast. Drop a black earbud crossing a city street and you’ll never find it before it’s crushed.) Sound controls are done with touch-sensitive pads rather than buttons, which sounds cool but works poorly—it means that just brushing the earbud triggers functions. If I reseat the left bud in my ear for better sound, sometimes I find myself talking to Siri. Half the time when I carry a bud in my hand for a minute to hear what’s going on around me, I put it back to find I’m listening to a different song or the buds are turned off entirely. And for all that trouble, standard functionality like changing the volume can’t be done without Siri’s help. Like some other Bluetooth headsets but not AirPods, these remain stubbornly connected to a device until its Bluetooth is turned off or out of range; if I pack my MacBook and forget to turn off its connection, it will happily monopolize my earbuds while Power Napping and my phone won’t connect.
All that said: there’s a market for $79.99 earbuds with good sound and long battery life. Just don’t buy these if you’re relying on them for anything else, particularly a functional mic. I’ve had several higher-priced wired Bluetooth headsets that sounded much worse and didn’t last as long, despite much more space for larger batteries.


