#1520: Reporting bugs to Apple, what’s coming in tvOS 14 and HomeKit, explaining HEIC, accessing a deceased family member’s Apple account
Now that WWDC has wound down, we wrap up our coverage with a look at what’s coming in tvOS 14 and HomeKit, plus pass on advice from former Apple engineer David Shayer on how to report bugs to Apple so they get fixed. If the discussion about how the College Board didn’t accept HEIC images for AP test answers had you confused about what HEIC is and how it compares to other image formats, you’re not alone—Glenn Fleishman explains it for all of us. Finally, in the unfortunate event that someone you know dies and their family can’t get access to their Apple account, we explain the necessary process for getting to the data. Notable Mac app releases this week include Yojimbo 4.5 and The Levelator 3.0.2.
What the HEIC? Apple’s Highly Compressed Image Format Still Confuses
To store more photos and videos on a mobile device, you can either buy more storage or increase image compression. Apple has enabled both paths. It expanded maximum storage so that a 256 GB iPhone isn’t ludicrously expensive. But that gets you only part of the way there.
In 2017, Apple added support for successors to JPEG for images and H.264 for video:
- HEIF (High Efficiency Image File Format) is a container format that allows extensive metadata, still images, and sequences (like bursts or Live Photos) to co-exist in a single file.
- HEVC (High Efficiency Video Coding), also known as H.265, can encode video using 40–50% less data than H.264 while maintaining the same quality.
(For the technical nitty-gritty, read “HEVC and HEIF Will Make Video and Photos More Efficient,” 30 June 2017.)
Despite all of this happening nearly three years ago, we at TidBITS found ourselves scratching our heads recently about HEIF and HEVC. While Apple uses those terms, files created using those schemes are stored, respectively, with the filename extensions .heic and .mov. (This came up because of the College Board mishandling iPhone images. See “Take a HEIC: Make Sure AP and Other Test Uploads Work from Your iPhone and iPad,” 21 May 2020.)
The former, HEIC, apparently stands for High Efficiency Image Container—more on that in a moment. The latter is potentially even more confusing since MOV files have been around for decades. MOV is a video container format that can hold media encoded in many different ways, including HEVC.
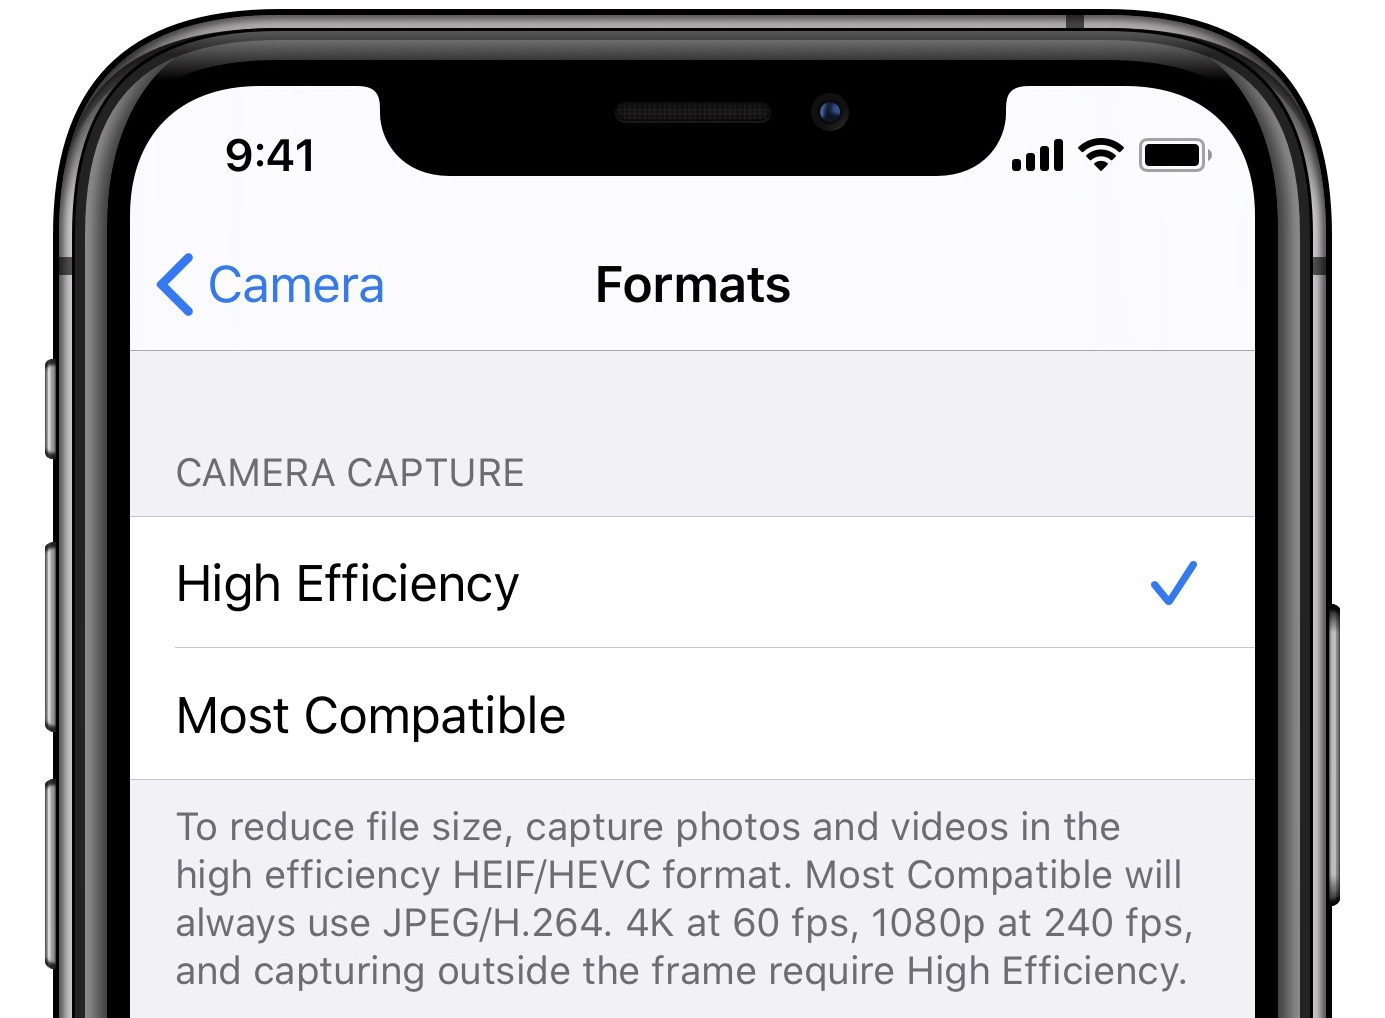 Apple discusses HEIF and HEVC in various places, including in Settings > Camera > Formats, where you choose between High Efficiency for the newer formats and Most Compatible for JPEG and H.264—though H.264 is also stored in a MOV container. But the company doesn’t mention HEIC or the use of MOV for storing HEVC—even on the page on which it explains HEIF and HEVC.
Since we couldn’t easily sort it out despite the fact that we live and breathe this kind of thing, we spent some time teasing it all apart for you.
HEVC
H.265, which is just another name for HEVC, provides substantial improvements in compression by being more clever and versatile in analyzing individual frames of video and then equally smart in storing differences between adjacent frames. HEVC can compress still images or sequences of video.
HEIF
HEIF is a container format developed by the Moving Picture Experts Group, which has created many licensed audio and video formats. HEIF is used for still images. It supports an image stored by itself, potentially with added modification layers from an image-editing program, alpha masking, and depth layers. It also allows for multiple images stored as a sequence (such as a burst mode) or to enable simple animation (as with Live Photos).
You can think of a container format as a sort of folder within a file. Older image formats like GIF, JPEG, PNG, and TIFF pack metadata into the image file, usually at the start. A long-ago change to GIF allowed the integral storage of multiple frames for animations, and TIFF can support multiple pages in a single file. But each of these options requires, in effect, unpacking the entire file. Because HEIF is a container, each discrete image or sequence has its own file within the container, and metadata is stored in separate files as well. It’s a more robust, more compatible way to ensure files can be read across systems, even far into the future.
HEIC
An HEIC file is one specific way to use HEIF, in which the HEIF container relies only on HEVC to encode images. Other operating systems, camera software, and image-editing apps may produce or support variations on HEIF, like AVCI, which uses the AVC (Advanced Video Coding) encoder to store data within HEIF.
With iCloud Photos enabled, you can see the .heic extension on images synced from an iPhone to Photos for macOS. iOS is careful about exporting, however, so your HEIC files may be converted to a JPEG image (for still images) or a JPEG and an H.264 MOV file (for Live Photos) if iOS thinks the receiving device can’t display HEIC.
MOV
HEVC videos are packaged inside MOV containers. Without inspecting them further, there’s no way to know whether or not they contain H.265 data—which requires iOS 11 or later or macOS 10.13 High Sierra or later—or whether they contain H.264-encoded video that will play on older devices. As with HEIC, iOS may export an H.264-encoded MOV file unless it can determine the destination can read HEVC/H.265.
You can check a MOV’s internal encoding formats by opening it in QuickTime Player in macOS and choosing Window > Show Movie Inspector. Under Format, the inspector will display the encoding video and audio formats, as well as dimensions and other details.

I hope that clears things up, at least a little. In short, HEIC is Apple’s flavor of HEIF that relies solely on HEVC for compression for still images. For HEVC-compressed video, Apple continues to use MOV containers.
Here’s What Next for tvOS 14 and HomeKit
Apple didn’t say much about tvOS 14 and HomeKit during its 2020 WWDC keynote, but some nice features are arriving for both later this year. We’re covering them together because there is more overlap than ever between Apple TV and Apple’s home automation platform. I’ll have my work cut out for me this year updating Take Control of Apple TV and Take Control of Apple Home Automation. And I’m sure Glenn Fleishman will be busy with updates to Take Control of Home Security Cameras.
What’s Coming in tvOS 14
As has been the case for a few years now, tvOS 14 won’t bring anything revolutionary to the Apple TV. Still, it will add the Home app, better integration with security cameras, a picture in picture feature that isn’t bound by the Apple TV app, more 4K support, audio sharing for AirPods, and broader game controller support.
The real question is if Apple will introduce new Aerial screensaver videos—for many people, they’ve been the most visible improvement in the last few tvOS releases.
Home App
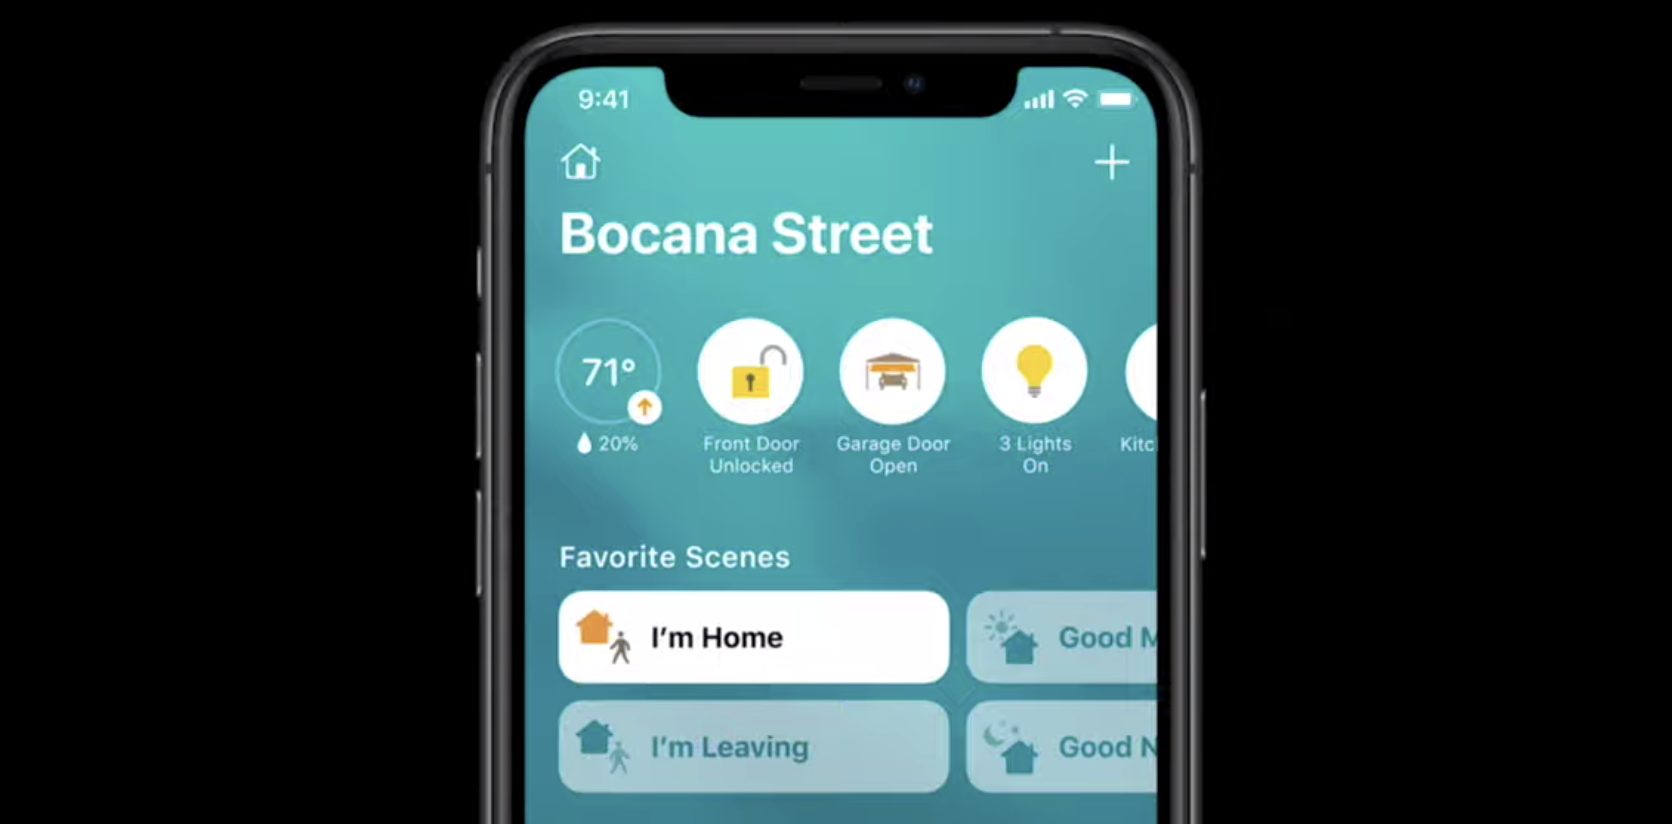
The biggest news in tvOS 14 is the addition of the Home app. While you’ve been able to control HomeKit accessories with Siri on the Apple TV for years, there was no first-party graphical interface. That changes in tvOS 14. I’m not sure how useful the Home app will actually be, but it’ll be good to have, especially if you share a house with someone who doesn’t otherwise use Apple products.
What’s interesting about Home on the Apple TV is how it integrates with any HomeKit cameras you may have. Just as in iOS, you’ll be able to access favorites from Control Center, including a view from the cameras you’ve set up. You can select one to see a full-screen view.

tvOS 14 makes HomeKit video doorbells more interesting. When someone rings the doorbell, a preview window appears over whatever video is playing, showing the view from the camera.

Better 4K Support
Apple likes to tout the superior image quality of the Apple TV, but there are a few places where it still lags. One that’s been a particular bugaboo for some Apple TV users is the lack of 4K video support in YouTube, the subject of a recent comment in TidBITS Talk.
It was a classic case of Apple and Google butting heads over formats. Google supports 4K YouTube videos only in the open-source VP9 codec, while Apple steadfastly supports only H.264 and H.265. There’s speculation as to what sort of compromise they reached, but it’s enough to know that the two have resolved their conflict.
Another 4K improvement is that you can AirPlay videos in their full 4K glory from the Photos app in iOS 14 to the Apple TV in tvOS 14.
Improved Picture in Picture
Apple announced Picture in Picture (PiP) for the Apple TV last year, a feature that had been on my wishlist for a long time. But I was disappointed when, at some point in the beta cycle, Apple restricted PiP so that it worked only inside the Apple TV app (see “How to Use tvOS 13’s Picture in Picture,” 5 October 2019). My guess is that Apple needed more time to work out the kinks, and the original feature was indeed buggy in the betas.
The good news is Apple is now apparently confident enough to take PiP system-wide, and it’s likely key to the new HomeKit camera integration. I’ll be curious to see if YouTube allows PiP on the Apple TV, unlike on the iPad (for workarounds, see “TipBITS: Watch YouTube Videos in Picture in Picture,” 19 July 2019).
AirPod Audio Sharing
With tvOS 14, you can connect two pairs of AirPods to the Apple TV and listen to them at the same time, so you and your spouse can both enjoy a movie while the kids sleep. Apple didn’t mention which versions of the AirPods would be supported, but we hope it will be all of them.
Gaming Improvements
Apple added limited multi-user support in tvOS 13, which allows multiple members of a household to have their own profiles, at least for some built-in apps like Apple TV. That’s expanding in tvOS 14, with game progress, leaderboards, and invitations for each unique user.
tvOS 14 also extends the third-party controller support Apple introduced in tvOS 13, with support for the Xbox Elite Wireless Control Series 2 and Xbox Adaptive Controller. The latter is great news for those with accessibility needs. (I mistakenly thought the Xbox Adaptive Controller was already supported by last year’s tvOS and iOS revisions. If you purchased one based on my advice, I apologize profusely. See “Xbox and PlayStation Game Controllers with Apple Arcade: The FAQ,” 25 October 2019).
Interestingly, Apple phrases it as “including” those two controllers. What other controllers will tvOS 14 support? Something not yet announced?
That’s about it for tvOS 14: nothing earth-shattering, but some welcome improvements for Apple TV fans. And we’re hoping for some new screensavers—as pretty as the Aerial videos are, they still get old.
What’s Coming in HomeKit
As with tvOS, Apple didn’t reveal anything game-changing about HomeKit’s future, other than promoting an industry group formed last year. But there are some helpful new enhancements, especially for HomeKit security cameras.
Project Connected Home Over IP
The big news about HomeKit, though it’s not really new, is that Apple is teaming up with Amazon, Google, and other home automation vendors to create a single standard for home automation devices. While Project Connected Home over IP was announced last year, and Apple offered no new details in the keynote, the company felt it important to remind keynote viewers of the alliance (see “Apple Teams Up with Rivals to Create Open Smart Home Standard,” 18 December 2019). Hopefully, that alliance will be fruitful, and we’ll soon be able to control our smart home devices from whatever device we prefer.
Improvements to the Home App
One of the toughest challenges for average HomeKit users is knowing how to take full advantage of their hardware. They might know how to turn lights on and off but be unaware of or forget about scenes and automations. In iOS 14, the Home app will suggest automations to you when you add a new accessory.
While this might help empower HomeKit users, I’m worried that new users might absentmindedly enable automations, forget about them, and be stricken with what I dub “haunted house syndrome” in Take Control of Apple Home Automation. That’s when rogue home automation causes lights to turn on and off and no one knows why.
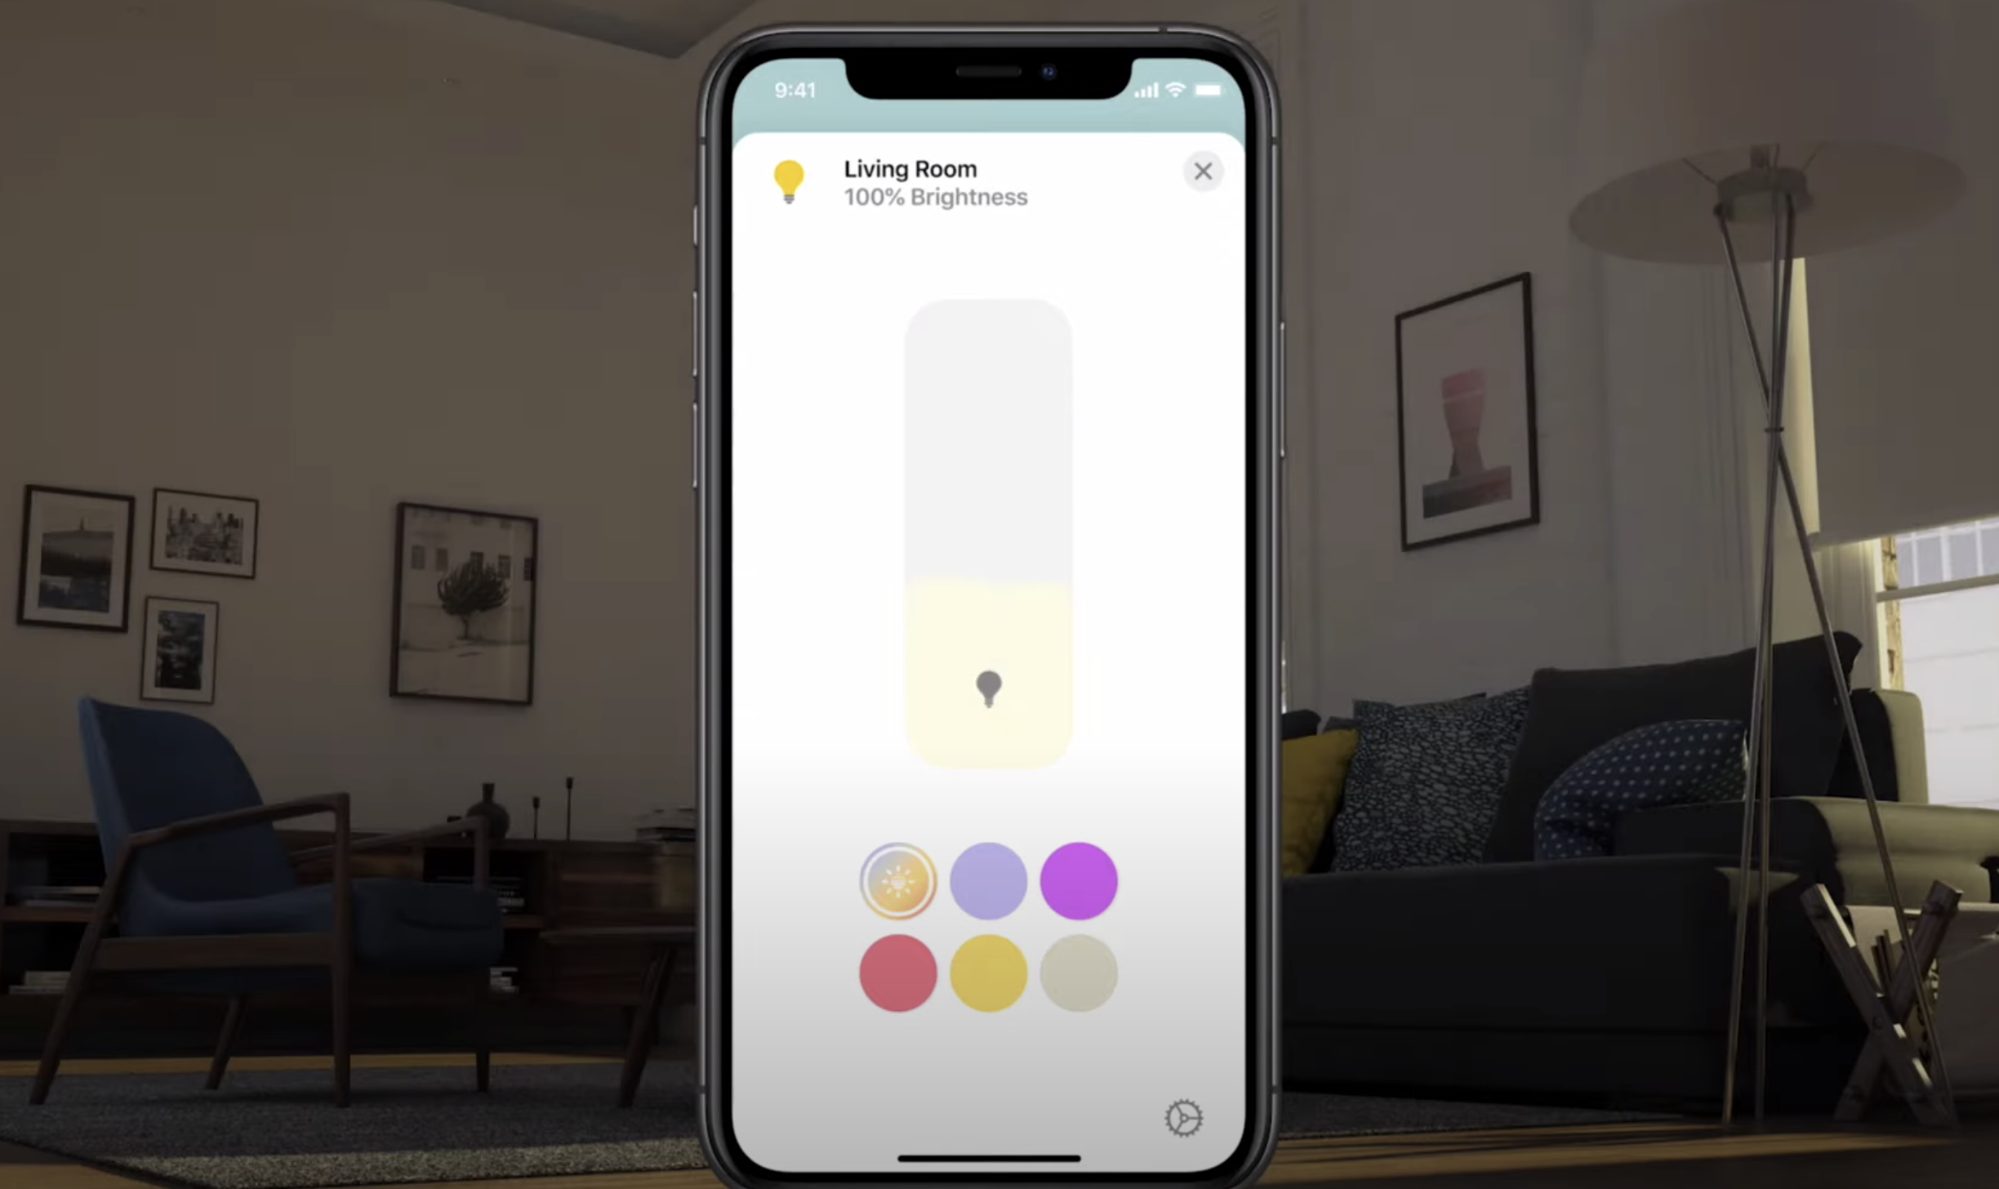
One thoroughly welcome improvement is an overhaul of Home’s status display. No longer just an annoying list of the status of your accessories, it now displays icons that let you take action with various accessories.
Adaptive Lighting
Adaptive lighting has long been a common feature of smart lights that can change color, like the Philips Hue, and now the Home app supports it directly. Adaptive lighting changes throughout the day, reducing blue light at night to help you fall asleep more easily. I’m curious to learn if it will be adjustable, or if you’ll have to either live with Apple’s opinions about lighting or turn the feature off entirely.
Security Camera Improvements
The most significant HomeKit updates come to security cameras. First up are Activity Zones that you can draw in the camera’s field of view to denote areas that should trigger motion alerts. You probably want an alert if someone walks up to your door, but not every time a car drives down the road.

Another smart addition to HomeKit cameras is facial recognition. Working from data in the Photos app, HomeKit can identify people on camera. This feature is primarily aimed at video doorbells. So when someone whom iOS recognizes rings your doorbell, you’ll receive a custom alert on your iPhone, iPad, Apple TV, and even your HomePod.

So that’s what’s coming in tvOS 14 and HomeKit, at least as far as Apple is sharing now. Do any features get you excited about implementing or adding to your home automation? Tell us in the comments.
How to Report Bugs to Apple So They Get Fixed
WWDC has come and gone and left in its wake a slew of new operating system betas—macOS 11 Big Sur, iOS 14, iPadOS 14, watchOS 7, and tvOS 14.
If you’re feeling brave and want to donate some of your time to helping Apple improve these operating systems for everyone, you can test these betas, either immediately if you’re in the Apple Developer program, or shortly afterward, once Apple releases the public betas. Once you install the beta (not on your primary device, of course, because that would be foolhardy!), you’ll promptly run into bugs. That’s why it’s a beta release, after all. If it was ready, it would be shipping.
It’s easy to feel like Apple releases these betas mostly for PR reasons, but that’s far from the truth. Apple does care about receiving bug reports from developers and users alike. But, as you can imagine, hundreds of thousands of developers reporting bugs can overwhelm even Apple’s resources.
How do you report bugs so Apple actually fixes them?
Use Feedback Assistant
Apple solicits bug reports from users and third-party developers via Feedback Assistant, which is both a pre-installed app and a Web site. I recommend using the app to report new bugs. It guides you through specific questions based on the type of bug you’re reporting, automatically generates a sysdiagnose file, and prompts you for logs and reports relevant to that type of bug. The iOS version of Feedback Assistant can also report bugs on connected Apple TV, Apple Watch, and HomePod devices.
The Feedback Assistant app is installed in macOS 10.15 Catalina and later, and in iOS 12.4 and later. On beta operating systems, the Feedback Assistant app appears on the Dock (macOS) or the Home screen (iOS). If you don’t want it in the Dock on the Mac, you can find Feedback Assistant in /System/Library/CoreServices/Applications/Feedback Assistant. It’s often easiest to launch it with Spotlight. You can also launch Feedback Assistant from Safari on any device by navigating to applefeedback://
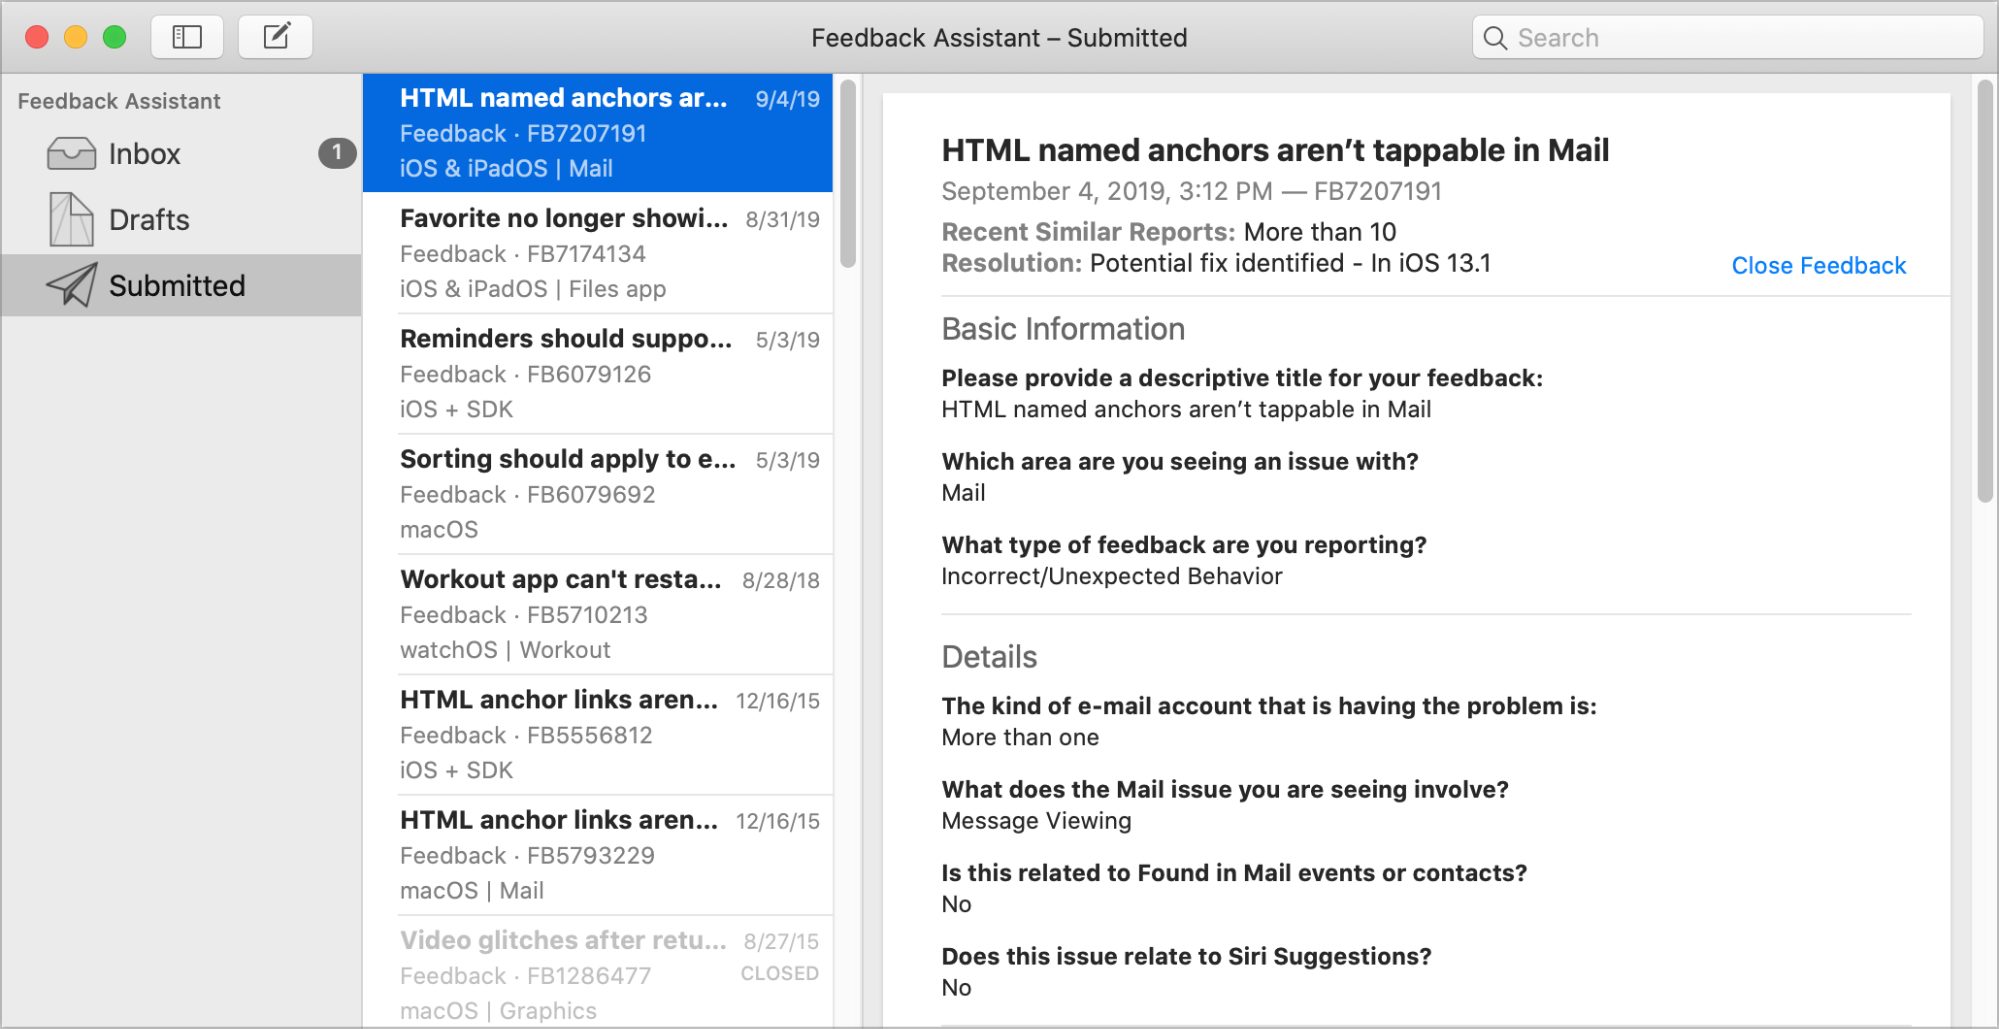
Every Feedback Assistant bug report is reviewed by someone from Apple Developer Support. That person may answer easy problems themselves or kick the report back if it’s obviously missing key information. If your bug report looks good, they copy it from Feedback Assistant into Radar, Apple’s internal bug tracking system. Radar then sends the report to the appropriate engineering team, where it may or may not be fixed, or even read.
Apple has published an introduction to reporting bugs that’s worth a look, but read on and I’ll tell you how to maximize your chances of getting your bug resolved.
Write Good Bug Reports
Between WWDC in June and the iPhone launch in September, Apple operating system engineers work 12-hour days, six or even seven days a week. They’re finishing up features that their boss told the next boss up were already done (oops!). They’re fixing bugs reported by Apple Quality Assurance (QA) engineers. They drop everything to fix the occasional bug reported by an Apple vice president. (Yes, Apple management uses pre-release products, and they report bugs too.) After all that is done, they’re also supposed to fix bugs reported by third-party developers and users of the public betas.
When I was an Apple software engineer, this was my job. I’d get dozens of new external bug reports daily, and I had time to address only some of them. Many developers wrote great bug reports, but some looked like they were written by a third-grader who skipped their ADHD medication. You can guess which ones got more attention. Here’s what you need to do to write a good bug report. Some of these are specific to developers, but most apply to everyone:
- Craft a descriptive title. A good bug report starts with a good title. Make the title clear and concise. Bug meetings are long, grueling affairs in which engineers and product managers prioritize hundreds of new bugs. Bugs are listed by title, so your bug’s title is just one in a very long list. A descriptive title makes it easier for engineers to know what it covers without having to open the bug report and read the description. It’s all too likely that bug reports with generic or too-short titles will get passed over with a vague promise to come back later.
- Describe the problem. Explain what actually happens, and what you think should happen. Don’t assume that it’s obvious what’s wrong. If Apple developer documentation describes what should happen, link to it. Don’t assume I know all the Apple docs by heart.
- Include clear steps for reproducing the bug. Don’t forget to list any initial conditions, and don’t skip any steps. If the bug doesn’t happen every time, note how frequently it occurs.
- Be concise. I have a stack of bugs to fix after yours. Please use my time efficiently. The more easily I can reproduce your bug, the more likely I am to fix it.
- Include screenshots or video. If possible, include a screenshot or screen recording showing how to reproduce the bug, including the bug actually happening. A picture makes the problem obvious. It also makes it harder for an engineer to ignore the problem. Out of sight, out of mind.
- Clarify the context. Does the bug occur on the device, on the simulator, or on both? Does it occur in both the debug build and release build? Have you tried different device models? Include all this information.
- Include code. If I’ll need code to see the bug, include code. At a minimum, include a few lines of code that demonstrate the bug. If at all possible, attach a sample Xcode project that demonstrates the bug. Don’t attach your entire app; I don’t want to wade through it. Create a new, empty app in Xcode and add just enough code to show the bug. Add a big, obvious comment saying, “The bug happens here!” so I don’t have to look through all the source files. Attaching an Xcode project has one more advantage, which is that it includes all your build settings. Some bugs happen only with certain build settings.
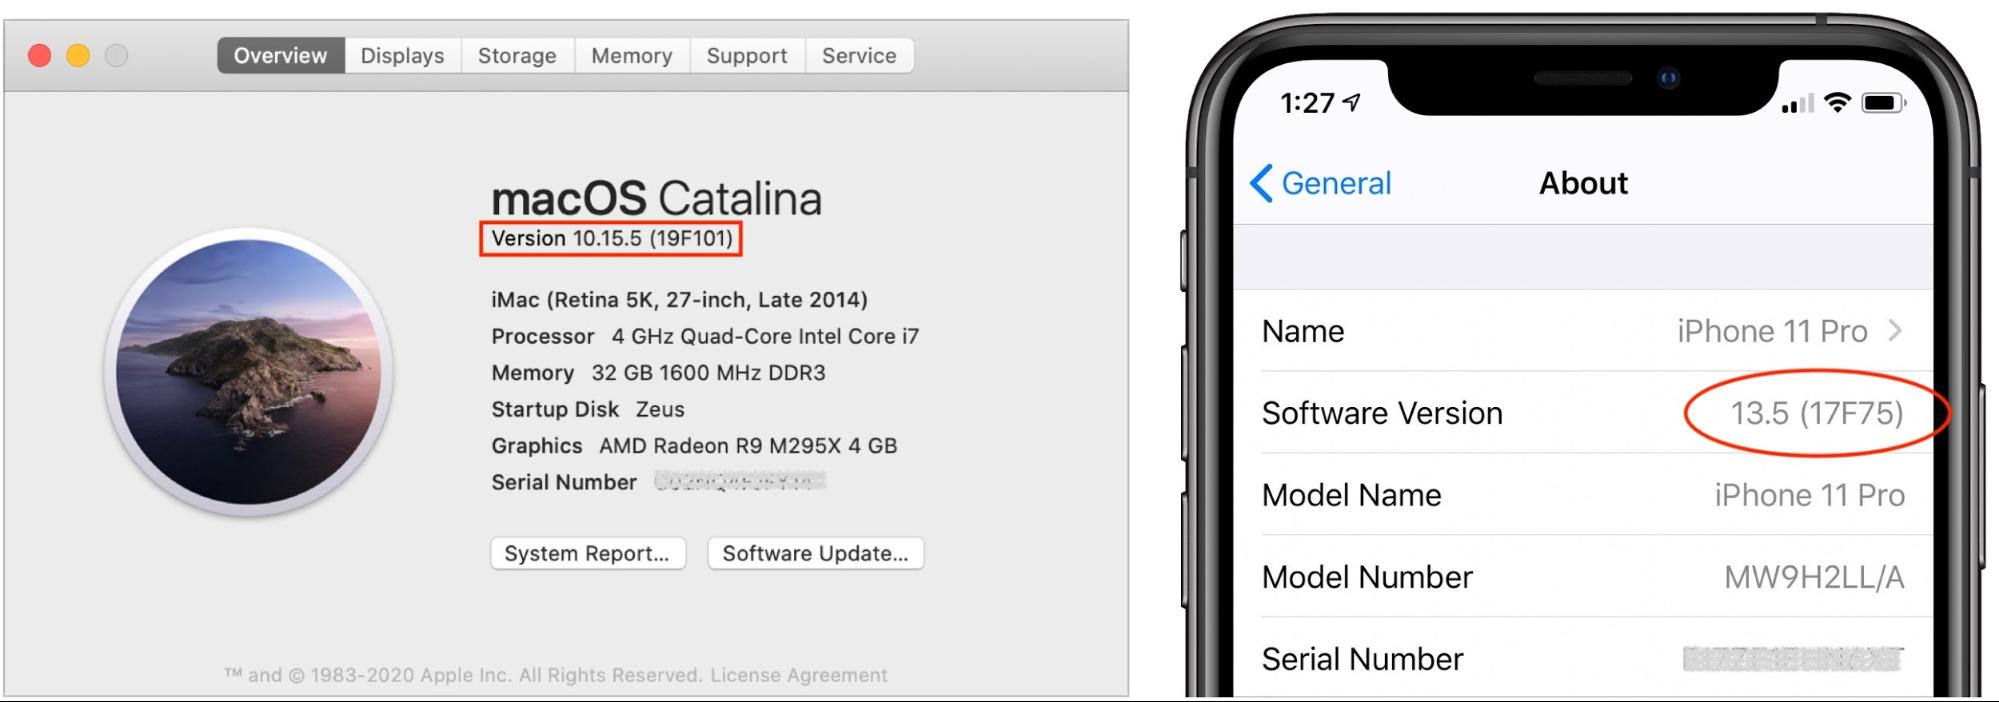
- Specify build numbers. If you discuss operating system versions, include the build number (such as 17E262) in addition to the operating system version. (To find the build number in macOS, choose About This Mac from the Apple menu and then click the macOS version number. In iOS, go to Settings > General > About and tap the version number.) Inside Apple, operating system builds are identified by build number. Apple engineers don’t always know offhand which build number corresponds to a particular external beta or release. They can look it up, of course, but anything that saves them time makes it more likely your bug gets fixed.

- Include sysdiagnose and logs if relevant. If you use the Feedback Assistant app, it will automatically include a sysdiagnose and prompt you for logs relevant to that type of bug. A sysdiagnose is a report that includes a metric shipload of information about what’s running in your system. It’s extremely useful for those who know how to read it. If you use the Feedback Assistant Web site, you’ll have to generate a sysdiagnose by hand, which isn’t hard. Be sure to attach any relevant console logs or other logs that might contain relevant information. Apple provides instructions for generating a sysdiagnose, along with all kinds of specialized logs for specific types of bugs.
- Specify the Xcode version. Each operating system beta release typically includes a corresponding Xcode beta release, so be sure to use the latest Xcode. The bug could be in one of the frameworks included in Xcode, not in the operating system itself. You don’t want to report a bug that has already been fixed because you tested it with an old version of Xcode.
Report Bugs Promptly
Apple creates a new internal operating system build each night, called the daily build. Apple engineers install the daily build each morning. Some daily builds are fairly stable; others are not. Every few weeks between WWDC and shipping, a stable build becomes a beta candidate. It gets additional testing to ensure all aspects seem stable. If approved, it gets a beta number and is released to developers and users participating in the public beta.
By the time the beta is posted, Apple engineers already consider it old since they’ve installed weeks of daily builds in the meantime. By the time you download it, test it, file a bug report, your bug report is copied from Feedback Assistant to Radar, and an Apple engineer looks at it, they think that beta is positively antediluvian. The longer it takes you to report a bug, the harder it is for engineers to recreate the situation you’re seeing.
So when a new beta comes out, test it and file bug reports immediately. Make your bug report as current as possible when an Apple engineer sees it.
Check Each Subsequent Operating System Release
It would be nice if Apple informed you if your bug was fixed. It would be nice if the tooth fairy was real, too. Apple receives dozens, if not hundreds, of bug reports about each issue from outside the company. Internal Apple engineers may have already written up the bug as well. One bug report, usually the one with the clearest explanation of the problem, is designated the original. The others are marked as duplicates, or dups, and at least in theory, all bug reporters will be notified when the bug is fixed. If your description doesn’t closely match the description in the original, it may not get detected as a dup, and you may not be notified when the bug is fixed.
As a result, for each newly released beta, you’ll want to test to see if your bug is fixed. If not, consider writing a new bug report against the new release. That brings the bug back to Apple’s attention and lets the engineers know it wasn’t fixed in the latest update.
Even if you think your bug report will be marked duplicate, report it anyway. Think of your report as a vote for that bug to be fixed. When engineers are sitting in bug meetings and deciding which bugs to prioritize, a bug with 100 dups gets more consideration than a bug with 3 dups because it’s obviously affecting a lot more people.
If your bug is fixed, it won’t be marked fixed in Feedback Assistant until the operating system version with the fix ships, whether that’s a beta or the final release. Apple doesn’t like to announce fixes until they ship.
Developers, if a bug is blocking a key feature of your product and doesn’t seem to be getting fixed, email Developer Support and ask if there’s a status update, or if they have any suggestions for a workaround. Wheels sometimes need to squeak to get the grease.
If you have a friend who works in Apple engineering, you might ask them to look up the bug in Radar, to see if it looks like it’s going to be fixed. There are several things that could prevent this. Your bug may not have been copied from Feedback Assistant to Radar yet. Not all engineers can view all Radar bugs for security reasons. And your friend may not feel comfortable doing this for you. If they do, they’ll probably give you general information, like “it’s on track to be fixed in a coming release.” Even knowing this can be useful. Don’t ask your friend to pressure Apple to fix the bug. Chances are that your friend doesn’t work in the department that owns the bug and doesn’t know the engineer it’s assigned to. Apple employs thousands of engineers. They’re not supposed to discuss bug status with non-employees, so don’t put your friend in an awkward spot.
One final note. Feedback Assistant and Radar use separate bug numbering systems. Apple engineers can translate one to the other. Radar is not an acronym. It has been Apple’s bug reporting system for 30 years. Developers used to have a Web portal directly into the Radar database called RadarWeb, though they were restricted to the bugs they reported. Feedback Assistant replaced RadarWeb, and it provides a separate database for tracking bugs reported by third-party developers and users.
Respond to Apple Quickly
Sometimes an Apple engineer will ask for more details or logs. Try to short-circuit this by including any relevant logs with the initial bug report. Occasionally Apple asks for specific additional data or sends a profile that will generate a special log file. Respond quickly. The longer the bug sits, the more likely the engineer will move on to another task. Check your open bugs regularly.
Sometimes it seems like an Apple engineer asks for more info just to stall. When I worked there, I saw that tactic deployed against bugs written by other Apple engineers as well as third-party developers. An engineer asks for some plausible additional information, which takes time to collect. Half the developers never respond, and the engineer can then ignore those bugs, as they’re “waiting for additional information.”
Other Bug Report Sources
Apple’s Crash Reporter automatically detects and reports crashing bugs. Teams are rated on how many active crashes are in their code. Apple has a good system, both technically and procedurally, for fixing crashing bugs. That’s not to say you shouldn’t report crashing bugs—bug reports can still increase the urgency of the fix.
When reporting crashing bugs or kernel panics, hardware bugs, or printing problems on the Mac, you’ll need to include a System Information report. Use the System Information app in the Utilities folder to generate this report (just choose File > Save).
Apple engineers do pay attention to some developer forums, blogs, and podcasts. Complaints that pop up repeatedly may be written up as bugs in Radar. I’ve seen text from a developer post copied into a Radar bug report. But Apple engineers rarely post in developer forums because the company discourages it. Or at least that used to be true: Apple’s redesigned developer forums encourage developer participation (see “Apple Announces WWDC 2020 Schedule,” 11 June 2020). Although it’s rarely acknowledged, Apple engineering does track developer opinions.
Understand Bug Priority
Apple assigns all bugs a priority, from P1 to P5. P1 is a crashing or data loss bug, and such bugs generally must be fixed. P2 is a feature that doesn’t work, and Apple almost always fixes such problems. P3 is a feature that doesn’t work correctly; Apple likes to fix P3 bugs, but some get postponed. P4 is a user interface issue or other minor bug, but such bugs often get postponed. P5 is an enhancement request; such requests tend to get ignored.
Some Apple engineers just fix the bugs they’re assigned, working from high priority to low priority. Often they never make it to the low priority bugs. But more experienced Apple engineers also cherry-pick some lower priority bugs that they know will annoy users and make sure they get fixed. Apple engineers use Apple products too, and want them to work well. Some departments even give out prizes to the engineer who fixes the most bugs.
When the ship date is far away, Apple engineers are allowed to check in pretty much whatever code they like. As we get closer to alpha, beta, and eventually golden master, there are more constraints. First, only P1 or P2 bugs can be fixed. Then only P1 bugs from an approved list. Each bug and fix is rated, for the seriousness of the bug, and the risk of the fix. No one wants a high-risk fix for a minor bug. As release nears, even serious bugs can be postponed. Having a bad, but rare, bug with well-understood characteristics is better than a poorly understood fix with insufficient testing time. The fix will get added to the first patch release, after more rigorous testing.
Apple’s Development Cycle
To maximize the chance of getting your bugs fixed, it helps to understand Apple’s development cycle. After the major X.0 releases of iOS and macOS ship, usually in September, development work starts on the next year’s X+1 releases for each. Development continues through the end of the year, and by February or March, QA starts seriously testing builds and reporting bugs. Over time, the development version becomes more stable, going from barely usable to not that bad. By May, the daily build is starting to look decent. Then comes the rush to put together the WWDC beta. All those unfinished features and ignored bugs suddenly get more attention.
Beta 1 at WWDC may look pretty rough when you first install it (on a test device!), but it still represents a ton of work. That’s when you want to start reporting bugs! Apple engineers have been assigned to read bug reports and fix problems. Take advantage of the attention and report any bugs you find.
More beta releases will come in July and August. Test each one, to see if your bugs are fixed, and look for regressions, which are previously working features that broke. Remember, if a bug you reported in a previous beta still isn’t fixed, don’t be afraid to report it again.
As September approaches, the betas become more stable, but Apple also makes fewer changes. If you found a minor bug that isn’t fixed by August, it will probably still be there in the golden master. Report it anyway, and Apple will hopefully fix it in one of the early patch releases.
The new operating system usually ships in September as version X.0.0. The patch releases follow immediately. X.0.1 and sometimes X.0.2 are planned even before X.0.0 ships. X.0.1 has a few important bug fixes that didn’t make it into the X.0.0 release. X.0.2 has less vital bug fixes that were too late for X.0.0. In a bad bug year, there may even be an X.0.3 release.
Once those first patch releases are out of the way, Apple engineers start working on the next major release X+1. They don’t have much bandwidth to fix bugs in the currently shipping operating system anymore. Continue to report bugs, but the likelihood they’ll get fixed drops considerably.
(As an aside, Apple teams are usually divided by area or feature, not by main release versus patch release. If you’re a power management engineer, for instance, you’ll work on that feature in both the initial X.0 release and all patch releases. It works poorly to have one engineer write the initial code and another engineer come along later and fix bugs because the second engineer isn’t intimately familiar with the code, why it was designed that way, what ideas were tried and discarded, and so on. It’s better to have an engineer own a particular piece of code, including all releases.)
There will probably be an X.1 and X.2 release, but those typically introduce new features, like iCloud folder sharing and battery health management in Catalina. These releases will have some bug fixes, but that’s not their primary mission. It never hurts to report bugs during this time, but unless they’re particularly bad, don’t expect them to be addressed until the next major release at the earliest.
In the end, if you want Apple to fix the bugs you find (and who doesn’t?), follow these simple rules. Write clear, complete bug reports. Include screenshots, video, and sample code, if possible. Report bugs as early as possible. Work within Apple’s development cycle.
And most important, keep sending in your reports. Bugs that aren’t reported don’t get fixed.
How to Request Access to a Deceased Family Member’s Apple Accounts
Of those two guarantees in life, death and taxes, death has dominated the headlines this year. While taxes in some parts of the world were delayed, 500,000 people have died from COVID-19 around the world so far, over 125,000 of whom were in the United States, and over 22,000 of whom perished in New York City, a mere 4-hour drive from where I live. And then there are the high-profile killings of George Floyd, Breonna Taylor, Ahmaud Arbery, and far too many other people of color.
So, without further comment on the sociological and epidemiological crises that we’re all facing, yes, death has been on my mind of late.
Then I saw a message on a private mailing list I’m on, asking for help after a member of an acquaintance’s family died unexpectedly in a boating accident. The guy who died was the sole admin of his Family Sharing account and hadn’t left shared passwords or shared security phrases, so the family members couldn’t access the administrative side of the account, including the billing info, which needed to be updated so the account wouldn’t be deactivated for lack of payment.
Troublingly, when they worked with Apple support, the reps weren’t able to help, telling them unless they could figure out the password or otherwise gain access on their own, the account would go into a suspended state. They were worried they’d lose all their family shared data if that happened. I suspect this doesn’t happen all that often or Apple’s support reps would have known that the company has a policy for such situations. Since I’d never heard of this policy before, I figured it was worth sharing more broadly in the unfortunate event that someone needs the information therein.
The Apple support document, “How to request access to a deceased family member’s Apple accounts,” lays out the process and the necessary paperwork. The key is a court order that specifies:
- The name and Apple ID of the deceased person
- The name of the next of kin who is requesting access to the decedent’s account
- That the decedent was the user of all accounts associated with the Apple ID
- That the requestor is the decedent’s legal personal representative, agent, or heir, whose authorization constitutes “lawful consent”
- That Apple is ordered by the court to assist in the provision of access to the decedent’s information from the deceased person’s accounts
I suspect that acquiring such a court order would be time-consuming and most easily done in conjunction with a lawyer. Once you have it, contact Apple support and be clear about what you need, the fact that you have a court order, and that you’re working in accordance with this support note.
In the particular example I gave above, the family is still waiting for their state to fulfill their request for a court order two weeks after it was filed, in part because it took some time to get the official death certificate. Luckily though, they discovered that they could work around the problem by having each member of the family remove themselves from the family plan on their own devices. After that, they were able to create a new family plan and add everyone back to it.
Two other notes. First, just as when the FBI requests help with getting into a criminal’s locked iPhone, Apple is very clear about how it cannot break passcode encryption, saying:
Please note that devices locked with a passcode are protected by passcode encryption, and unless the next of kin knows the device passcode, Apple will not be able to remove the passcode lock on the device without erasing it.
So you might be able to get Apple to help sufficiently to erase a deceased family member’s devices, but there’s no way to access the information on that device. It’s conceivable that you could restore an iCloud backup to a new or erased device once you have access to the deceased person’s Apple ID, but I don’t know for sure if that’s possible.
Second, while boating accidents are a particularly unexpected way to go (they account for only 0.02% of deaths in the US), it’s only sensible to plan for a similar eventuality. Several years ago, Joe Kissell wrote a tremendously helpful book on the topic, Take Control of Your Digital Legacy, and introduced it in TidBITS with “Aunt Agatha Ponders Her Digital Legacy” (30 January 2017). In the book, Joe walks readers through the thinking necessary to create a digital inventory of your online accounts, purchased media, software, personal data, and cryptocurrency. If you make such a digital inventory, you can rest easy knowing that your family won’t have extra work in the event that you die without warning.