#1552: macOS 11.2.2 defangs non-compliant USB-C hubs, starting seeds with HomeKit, do you still need a bootable backup?
If you’re using a recent MacBook Pro or MacBook Air with Big Sur and a powered USB-C hub or dock, be sure to read our coverage of macOS 11.2.2, which protects those Macs from damage caused by non-compliant USB-C gear. Thinking about starting seeds soon? Josh Centers shows how you can use a smart outlet and simple HomeKit automations to give your garden a head start. Finally, faced with issues surrounding bootable duplicates in Big Sur, Adam Engst re-evaluates his longstanding advice that a bootable backup of your Mac is an essential part of a backup strategy. With Apple making it increasingly difficult to make bootable duplicates, are they still necessary in an era of cloud computing and multiple devices? Notable Mac releases this week include CleanMyMac X 4.8, Fantastical 3.3.5, Little Snitch 5.1.1, Firefox 86, Downcast 2.9.61, and GraphicConverter 11.4.
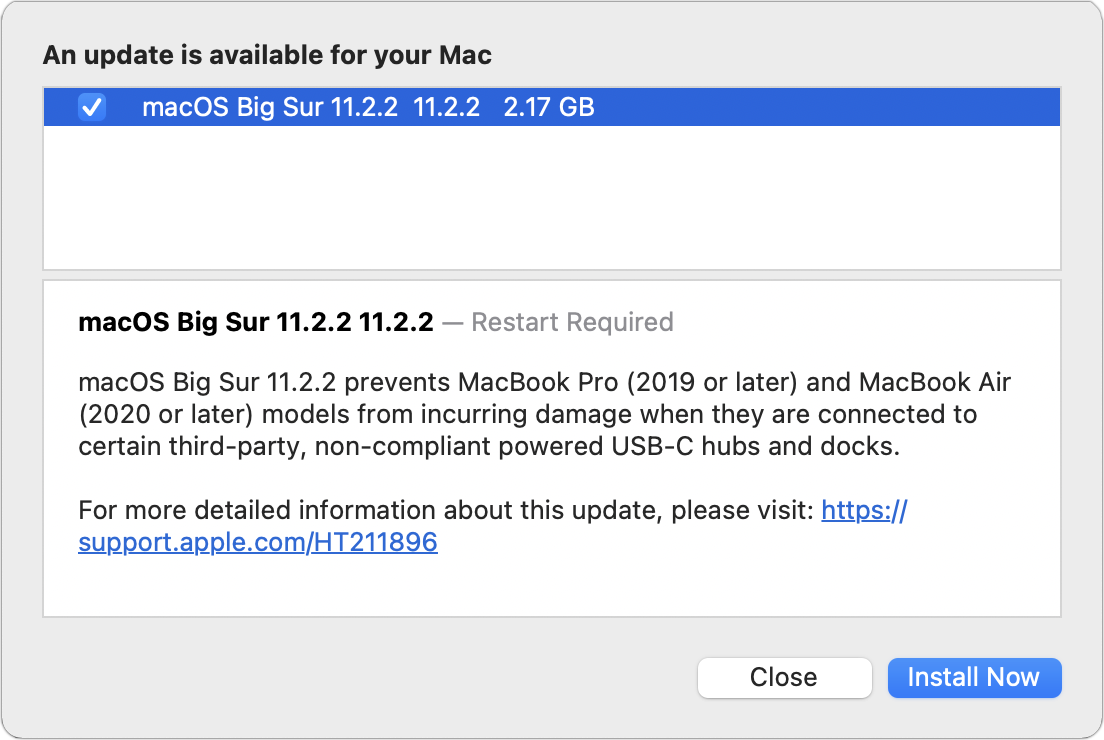
macOS 11.2.2 Protects MacBook Pro and MacBook Air from Non-Compliant USB-C Hubs and Docks
Here’s an unusual update. Apple has released macOS 11.2.2 Big Sur, saying that the update prevents MacBook Pro models from 2019 and later and MacBook Air models from 2020 and later from being damaged by “certain third-party, non-compliant, powered USB-C hubs and docks.” Apple lists no other changes, even security fixes. It’s a 2.17 GB download.
Apple makes no mention of a repair program, which implies that the company feels that any damage incurred is not its fault, although most of the bricked Macs appear to have been replaced under warranty or AppleCare.
Nor does Apple name names, so there’s no way to know which USB-C hubs and docks might be dangerous here. The general advice is with power-carrying accessories is to stick with well-known and reputable manufacturers. Although there’s no guarantee that they would have produced compliant peripherals, it’s probably easier to ask such companies if their products are compliant.
That said, a Reddit thread collects reports from people who have experienced problems with particular devices, including those from Dodocool, HyperDrive, Satechi, and ZMUIPNG. If you’re buying a USB-C hub or dock right now, it’s probably safest to avoid powered ones for the moment.
Our initial take is that Apple engineers have evaluated enough damaged Macs to understand the problem—presumably too much or dirty power—and realized that they could prevent the problem by adjusting how the Mac interacts with the powered hub or dock. Hence macOS 11.2.2.
If you’re running Big Sur on a recent MacBook Pro or MacBook Air and have a powered USB-C hub or dock, we recommend unplugging it immediately and installing this update before using it again. If you don’t have such a hub or dock, or are using a different Mac, there’s seemingly no reason to install this update. macOS 11.3 should be coming soon.
More concerning is what to do with a MacBook Pro or MacBook Air running an earlier version of macOS with a powered USB-C hub or dock. Perhaps Apple will release a supplemental update for 10.15 Catalina and 10.14 Mojave to address the problem. If that doesn’t materialize, we’ll never know if the problem was somehow specific to Big Sur or if Apple chose not to open the codebases for those older operating systems. Regardless, if you use a powered USB-C hub or dock with a recent MacBook Pro or MacBook Air, we recommend unplugging it and contacting the manufacturer to determine if it might cause this problem.
Improve Your Seed Starting with HomeKit
Whenever I’m introducing Take Control of Apple Home Automation, I tell people that the best way to get started with home automation is with a simple smart outlet. I’ve used the Eve Energy and Wemo Mini, and Adam Engst is a fan of the Meross Smart Wi-Fi Plug Mini (see “HomeKit for the Holidays (And Home Troubleshooting Tips),” 15 January 2021). They’re cheap, and you can use them for all sorts of things. Recently, I put an Eve Energy into service to improve my gardening.
I’m a so-so gardener at best, but I improve a little every year. In 2020, after more failed attempts than I care to admit, I finally managed to start pepper and tomato seedlings indoors, planted them outdoors in the spring, and harvested from them all summer. This year, I’m heading into gardening season slightly more prepared.
There are a few tricks to seedlings. One is that they can’t get enough light. I managed to get a few seedlings to survive last year by leaving them in a lit bathroom all night, but I still had a lot of leggy specimens. Seedlings grow tall and thin when there isn’t enough light, which makes them more likely to be damaged when they move outdoors, and they’ll have a hard time growing into strong plants if they do survive.
This year, I’m trying to be smarter. I dug out an old chicken brooder lamp, fitted it with a very bright but efficient LED bulb, and clamped it to a bookshelf a few inches over my seedling tray. The nice thing about the LED bulb is I can put it close to the plants without overheating them.
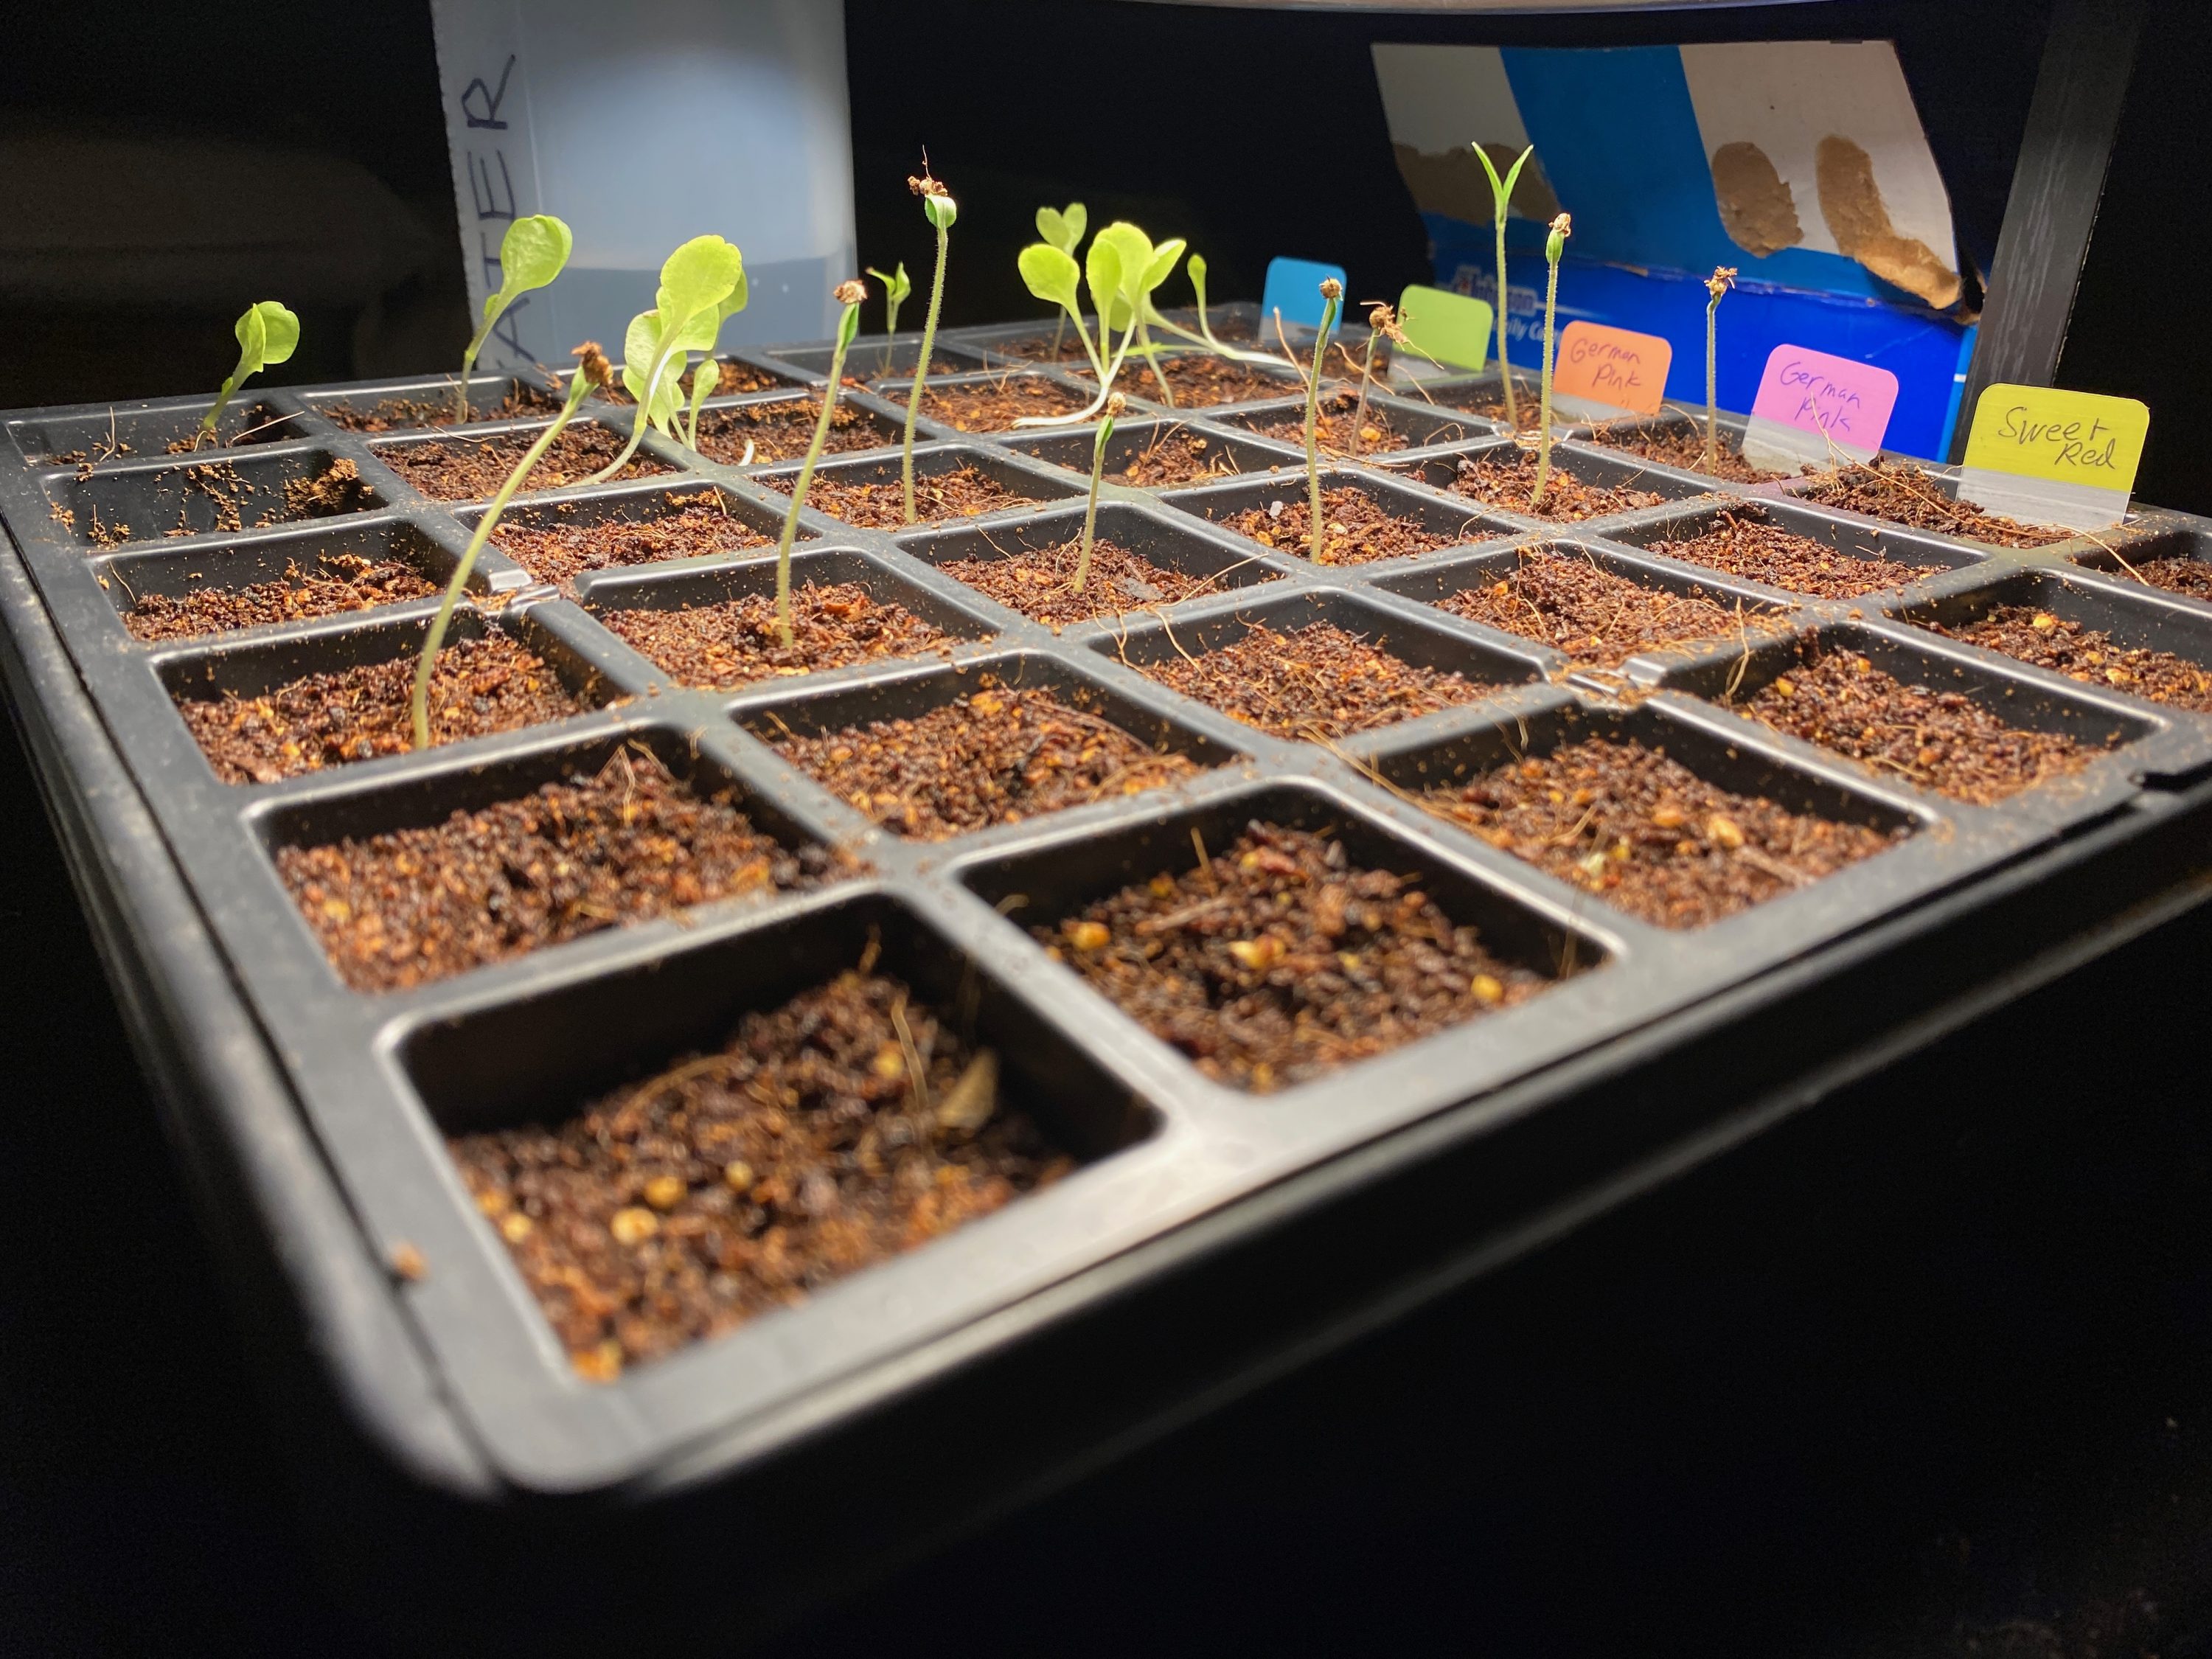
The other thing seedlings need is rest. Most gardeners agree that 16 hours a day is the right amount. But I can’t guarantee that I’ll always remember to turn the grow light on in the morning and turn it back off at night. Happily, I had an unused Eve Energy smart outlet sitting in a drawer, so I decided to automate my grow light.
Could you use a cheap timer instead? Sure, but I already had an extra Eve Energy around, smart outlets are pretty inexpensive these days (as low as $10 each for the Meross models), and they’re a lot more flexible. HomeKit automations allow many more triggers than just time of day, and when I’m done sprouting seeds I can put that Eve Energy to other tasks, like turning on my dehumidifier automatically when it gets hot here in Tennessee (see “A Prairie HomeKit Companion: The Elgato Eve Room,” 19 June 2017).
Once I added the Eve Energy to HomeKit, I set up two automations. The first turns the light on at 7 AM, and the second turns the light off at 10 PM.

Here’s how to set up timed automations in the Home app:
- Tap the Automation tab.
- Tap the plus + icon.
- Tap A Time of Day Occurs.
- Tap Time of Day if it’s not already selected.
- Enter the desired time. The default is the current time.
- Choose the days you want the automation to trigger. I chose every day.
- Tap Next.
- Choose the scenes or accessories you want to trigger.
- Tap Next.
At the last screen, you can review your automation and test it to confirm what it will do.
Now my grow light turns on in the morning and turns off automatically at night. Simple, but effective! My seedlings are happy and don’t require maintenance other than watering.
All this has me wondering if I could automate the watering too. Actually, yes I could, with an Eve Aqua water controller! In fact, I could tap HomeKit to grow an entire, if small, garden in an ēdn SmallGarden.
The Role of Bootable Duplicates in a Modern Backup Strategy
Is it time to upgrade to macOS 11 Big Sur? I’ll write more about that soon. However, there is one general concern that has caused us to hesitate to recommend upgrading. That’s the complexity of creating a bootable duplicate of your startup volume, also known as a clone. To understand why this seemingly simple task—just read all the data from one drive and write it to another—is causing such consternation, we need to step back briefly. And once we’ve done that, we can reassess the role of a bootable duplicate in a modern backup strategy.
Why Bootable Duplicates Have Become Difficult to Make
In 10.15 Catalina, Apple introduced APFS volume groups, a way of bundling separate volumes together to create a bootable macOS. A System volume holds all the files macOS needs to operate, while the Data volume contains only your data. The two volumes appear as a single entity in the Finder and wherever you might select or navigate files. The System volume is also read-only, so malicious software cannot modify the operating system, whereas the Data volume that contains your files remains read-write so you can install apps and create and modify documents.
This architectural change forced backup apps that make bootable duplicates to jump through hoops, since they couldn’t just read and write data anymore. Now a bootable duplicate had to have a System and a Data volume, and they had to be combined correctly into an APFS volume group. Eventually, all the leading apps figured out how to do this: see “Carbon Copy Cloner 5.1.10” (26 August 2019), “ChronoSync 4.9.5 and ChronoAgent 1.9.3” (11 October 2019), and “SuperDuper 3.3” (30 November 2019).
With Big Sur, however, Apple went a step further, adding strong cryptographic protections when storing system content on what is now called a Signed System Volume. (In fact, Big Sur doesn’t even read files directly from this System volume to boot your Mac. It first takes the additional step of creating an immutable APFS snapshot—a reference to the volume at a particular point in time—and starts up from that snapshot. Thus, Big Sur is actually booting from a cryptographically signed, immutable reference to a cryptographically signed read-only volume.)
This change increases security even more, but it also prevents all backup apps from creating bootable duplicates because they cannot sign the backed-up System volume. In theory, Apple’s asr (Apple Software Restore) tool makes this possible, but it didn’t work at all until just before Big Sur was released, still has problems, and even now cannot make a bootable duplicate of an M1-based Mac boot drive. On the plus side, Apple has said it plans to fix asr, but who knows when, or how completely, that will happen.
All three of the leading apps for making bootable duplicates have come up with workarounds. Carbon Copy Cloner can make a one-time bootable duplicate of an Intel-based Mac (but you must boot from it to install macOS updates) and for M1-based Macs [italics added after publication] recommends installing Big Sur onto a data-only backup after creating it. ChronoSync suggests installing Big Sur on an empty drive first and then using it for your data-only backup. The current version of SuperDuper has other issues with Big Sur, so SuperDuper’s workaround involves downgrading to SuperDuper 3.2.5, using that to make a data-only backup, and then installing Big Sur on the backup drive if you need to boot from it. Unfortunately, once you do this, you can no longer copy to the backup until you delete the System volume, so it’s best to stick with SuperDuper 3.2.5’s data-only backups.
Things become even more confusing if you add an M1-based Mac into the mix. At the moment, Howard Oakley reports that you can make a bootable duplicate only onto a native Thunderbolt 3 drive—a USB drive doesn’t work reliably for the purpose. That bootable drive also won’t start up Intel-based Macs, even if you set up separate APFS containers. The reverse is true as well—an external drive that will boot an Intel-based Mac will not necessarily boot an M1-based Mac. So, even if you can make one, a bootable duplicate won’t help you unless every Mac you want to use it with uses the same chip.

Do You Need a Bootable Duplicate?
Sometimes, when the world shifts in a way that renders past approaches unsatisfying, it’s worth reexamining the base principles in play. Why have we recommended bootable duplicates as part of a backup strategy anyway? Three reasons:
- Quick recovery: The primary reason for having an up-to-date bootable duplicate is so you can get back to work as quickly as possible should your internal drive fail. Simply reboot your Mac with the Option key down at startup, select the bootable duplicate, and continue with your work. If your Mac were to die entirely, you could use the clone with another Mac you own or borrow, or a replacement that you can purchase and return within 14 days.
- Secondary backup: Any good backup strategy has multiple backup destinations, preferably created using different software. If you consider your primary backup to be Time Machine, for instance, having a bootable duplicate made with another app and stored on a separate drive protects against both potential programming errors in Time Machine and physical or logical corruption of its drive. It’s best not to put all your eggs—or backups—in one basket.
- Faster migration: I have no data here, but if I needed to use Apple’s Setup Assistant or Migration Assistant to migrate to a new drive or Mac, I’d prefer to use my bootable duplicate over my Time Machine backup. With Time Machine, the migration will have to figure out what the newest version of every file is, whereas the bootable duplicate is, by definition, an exact clone.
When you think about it, only the first of these reasons requires that the duplicate be bootable. A data-only backup using different software to a separate drive is sufficient for the second two.
The last time I needed to boot from my bootable duplicate was a disaster (see “Six Lessons Learned from Dealing with an iMac’s Dead SSD,” 27 April 2020). I had been backing up to a 5400 rpm hard drive connected to a 2014 27-inch iMac via USB 3.0, but using it as a boot drive was “painful beyond belief.” Since then, I’ve switched to using a Samsung T5 external SSD for my bootable duplicate because its performance is so much better.
Performance isn’t the only issue here. When my internal SSD died, I spent many hours troubleshooting the problem before discovering that my bootable duplicate wasn’t going to help. I suspect that’s common—you don’t necessarily know that your internal drive is dead right away, so you’re going to try to fix it before falling back on your bootable duplicate. Quick recovery? I could easily have reformatted my internal SSD and restored from a backup in the amount of time I spent troubleshooting. In fact, I started down that road too, only to discover that I couldn’t even reformat, wasting even more time.
In the end, I got up and running with my everyday work using other devices: my 2012 MacBook Air, 10.5-inch iPad Pro, and iPhone 11 Pro. Most of what I do is in the cloud now, between email, Slack, Google Docs, and WordPress, so while I wasn’t as productive on the other devices as I would have been on the faster, double-monitor iMac, I could get my work done. Since then, I’ve replaced the 2012 MacBook Air with an M1-based MacBook Air with more storage and vastly better performance, so I would have even fewer issues using it as my fallback Mac.
All this is to suggest that the bootable part of a bootable duplicate is no longer as essential for many people as it was when we first started recommending that a comprehensive backup strategy should include one. Since then, it has become far more common for people to have multiple devices on which they could accomplish their work, and much more of that work takes place in the cloud or on a remote server.
The Parts of a Modern Backup Strategy
Allow me to update what I consider to be the pieces you can assemble into a comprehensive backup strategy that acknowledges the reality of today’s tech world. In order of importance:
- Versioned backup: Everyone should have a versioned backup made with Time Machine. Versioned backups are essential for being able to recover from corruption or inadvertent user error by restoring an earlier version of a file or the contents of a folder before deletion. Other backup apps, like ChronoSync and Retrospect, can make versioned backups too, but Time Machine backups are particularly useful because of how Apple integrates them into macOS migrations. I won’t pretend that Time Machine is perfect, but it’s part of macOS, has insider access to technical and security changes in macOS, and generally works acceptably.
- Internet or offsite backup: Local backups are worthless if all your equipment is stolen or damaged by fire or water. Historically, the recommendation was to rotate backup drives offsite, but in the modern world, an Internet backup service like Backblaze is much easier.
- Backup Mac or another device: Particularly given how hard it is for anyone but Apple to repair Macs, if you can’t afford days of downtime, think about both what device you could use for your work if your Mac were to fail and how you’d get your data to it. It might be a laptop you mostly use when traveling, your previous desktop Mac, or even an iPad. Just make sure to take your backup device out for a test run before you need it.
- Cloud-based access to key data: This isn’t a requirement—lots of people either can’t or don’t wish to store data in the cloud—but for many, it can be a way to access essential data from any device or location. For instance, $9.99 per month gets you 2 TB of iCloud Drive storage, and Apple’s Desktop & Documents Folders syncing feature could make it particularly easy to get back to work on another Mac. A similar amount of money would provide 2 TB storage on Dropbox, Google One, or Microsoft OneDrive.
- Nightly duplicate, data-only or bootable: Even if a duplicate can’t easily be made bootable, it’s still a worthwhile part of your backup strategy. It adds diversity by relying on different software in the event your Time Machine falls prey to bugs, by putting a backup on another drive, and by eliminating the need for special software beyond the Finder to restore data. And, of course, if you have to fall back to another Mac, a duplicate may be necessary so you can get back to work on your files.
Ensuring that you have an answer for all five options above would provide the most protection and the fastest recovery. But for many people, all five would be overkill.
I’d say that every Mac user should be making Time Machine backups, and some combination of Internet backup or cloud-based storage of data is a good idea. If your house were to burn down, wouldn’t it be nice if you didn’t lose your entire photo collection? iCloud Photos isn’t a full backup like Backblaze is, but either would ensure the survival of your irreplaceable photos and videos.
People whose livelihoods depend on their ability to meet tight deadlines might feel the need to have a relatively powerful backup Mac available at a moment’s notice, but for many people, an older Mac or less powerful laptop might be sufficient. For those who don’t rely on their Macs for work, an iPhone or iPad might meet all your communications needs until you can repair or replace a dead Mac. Also, remember that you can buy a new Mac from Apple and return it within 14 days, something that Apple Store employees reportedly recommend as a way to get up and running while waiting for a repair.
Similarly, those who keep a lot of data in the cloud or simply don’t value their data all that highly might be willing to risk having Time Machine be their only backup.
That said, I’ll stick with my nightly duplicates because they’re just too useful for troubleshooting and recovery. But I can’t say that bootable duplicates are the necessity they once were.
What do you think? How often have you relied on a bootable duplicate to return to work quickly after an internal drive failure? Have you been stressing about bootable duplicates in Big Sur? How would you respond to your Mac failing entirely?