#1576: Work with image text using TextSniper and Photos Search, upgrade your home Wi-Fi, comparing MagSafe battery packs
Ever wanted to search for text in your photos or copy text from a graphic? Apple’s Live Text technology promises just that in macOS 12 Monterey and iOS 15, but TextSniper and Photos Search offer those capabilities—and more—now. If your home Wi-Fi network isn’t keeping up with your needs, Wi-Fi expert Glenn Fleishman shares four ways to take your home’s Wi-Fi performance and coverage to the next level: mesh networking, powerline networking, MoCA, and more routers. Finally, for iPhone 12 users looking for wireless charging on the go, Julio Ojeda-Zapata wraps up the issue with a comparison of four MagSafe-compatible battery packs. Notable Mac app releases this week include Pixelmator Pro 2.1.3 and Parallels Desktop 17.![]()
![]()
Work with Text in Images with TextSniper and Photos Search
For as long as I can remember, there has been a categorical split between text and graphics. Speaking broadly, you can search, copy, edit, and otherwise manipulate text by the character, word, sentence, paragraph, or document. On the other hand, although graphics aren’t immutable, you can generally deal with them only at the pixel level (though some vector formats allow object-level manipulation).
But of course, it’s commonplace for text to appear within graphics files. It may be perfectly readable, but you can’t select it, copy it, or do anything else with it as text. Those characters are just collections of pixels.
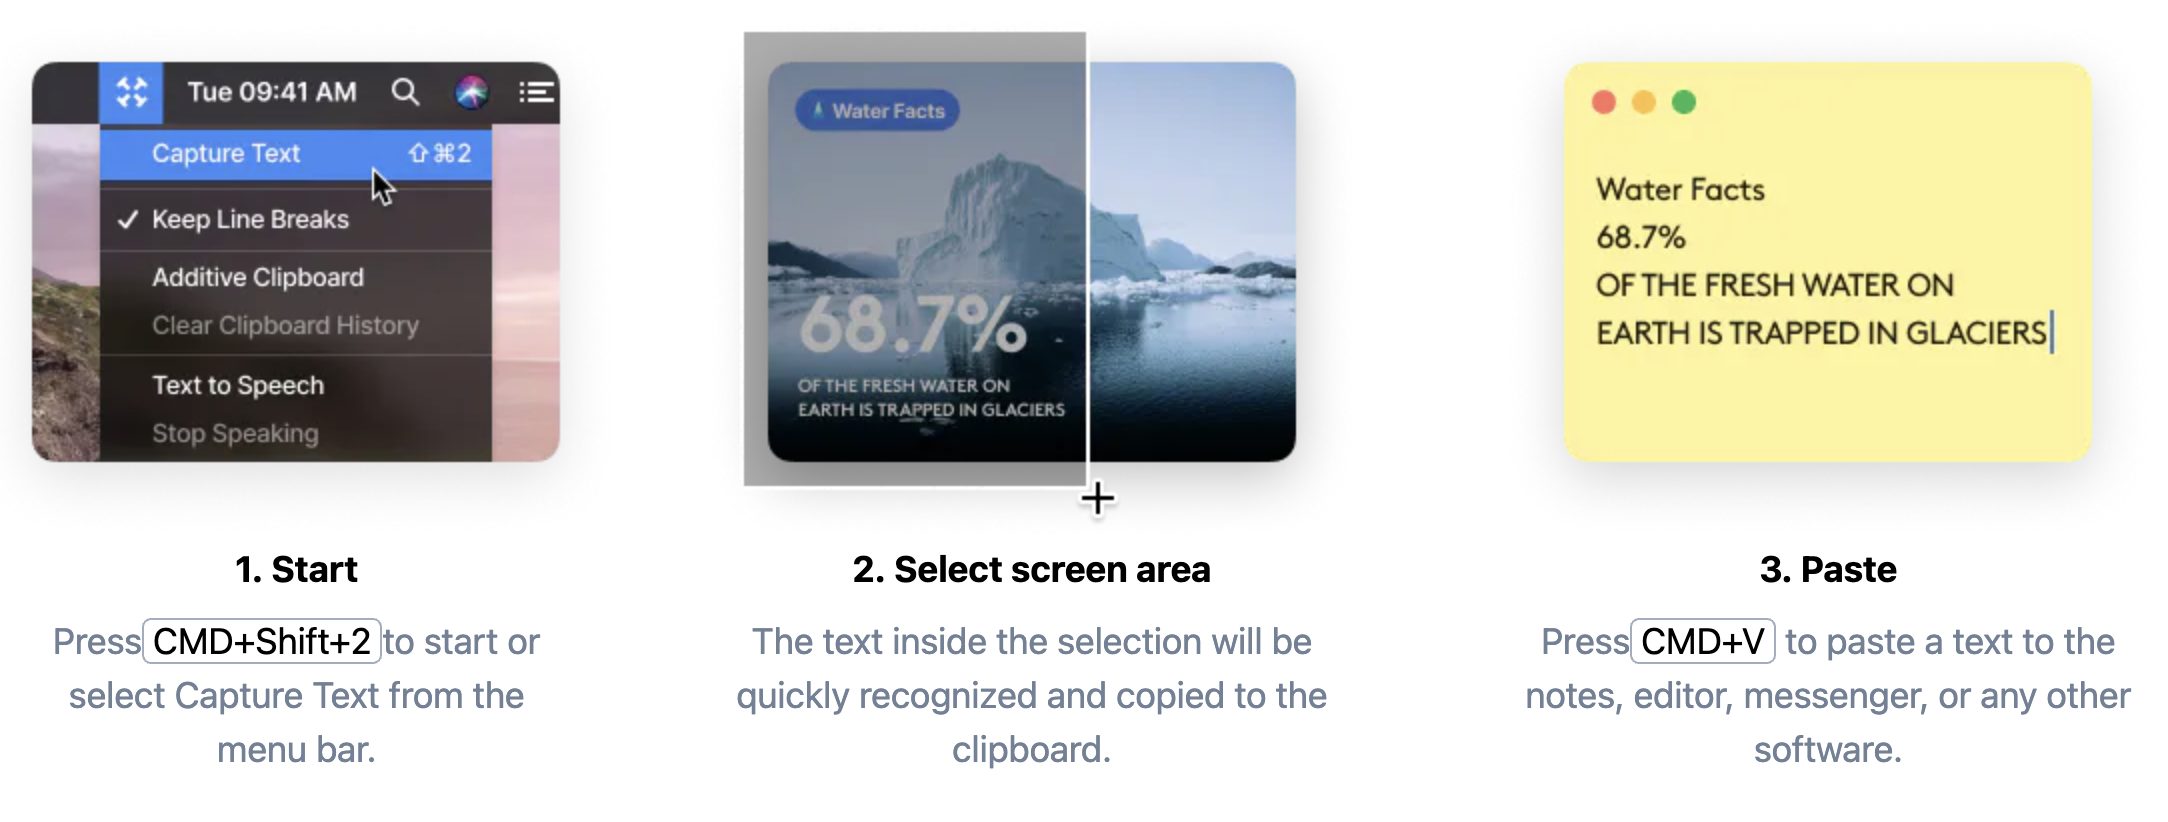
I’ve started using a pair of apps that blur this text/graphic distinction in a helpful way. TextSniper, from Andrejs and Valerijs Boguckis, promises to perform optical character recognition (OCR) on anything around which you can draw a rectangle, in essence, letting you copy text from onscreen images of any sort. And Alco Blom’s Photos Search offers both Mac and iOS apps that perform OCR on text found in photos in your Photos library, enabling you to find images by the text they contain and copy that text out. Both work well, within the constraints of OCR engines, and provide welcome features.
TextSniper
TextSniper is an elegant little utility for the Mac. Its core function, as I noted, is to perform OCR on any part of the Mac screen on which text appears, copying the selected text to the Clipboard for pasting wherever you want. You can think of it as taking a screenshot of just the text in an image. Choose Capture Text from its menu bar-collection of commands or press its keyboard shortcut, select an area of the screen that contains text, and then paste the text into a document. It works like a charm.
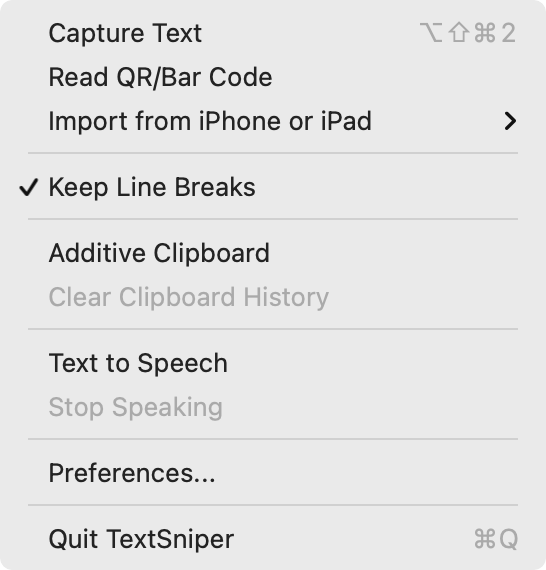 You don’t have to replace the contents of the Clipboard on every copy. An Additive Clipboard option lets you keep adding bits of text to the Clipboard, which could be particularly useful when extracting the text from a video or slide presentation. If you want more feedback about what you copied, a Text to Speech option reads the copied text. For those who work in fields with domain-specific jargon, there’s even a preference screen for adding custom words to the OCR engine’s standard lexicon.
TextSniper offers a few conceptually related features as well. It can also read QR codes and barcodes, putting the detected text on the Clipboard. (I’d like to see an option to have it display a notification that, when clicked, opened detected URLs in your default Web browser, just as QR code scanning does on the iPhone.) It can also tap into macOS’s Continuity Camera feature to use an iPhone or iPad to take a photo, scan a document, or add a sketch (see “How to Take Photos and Scan Documents with Continuity Camera in Mojave,” 27 September 2018). You can invoke all these features with user-specified custom shortcuts.
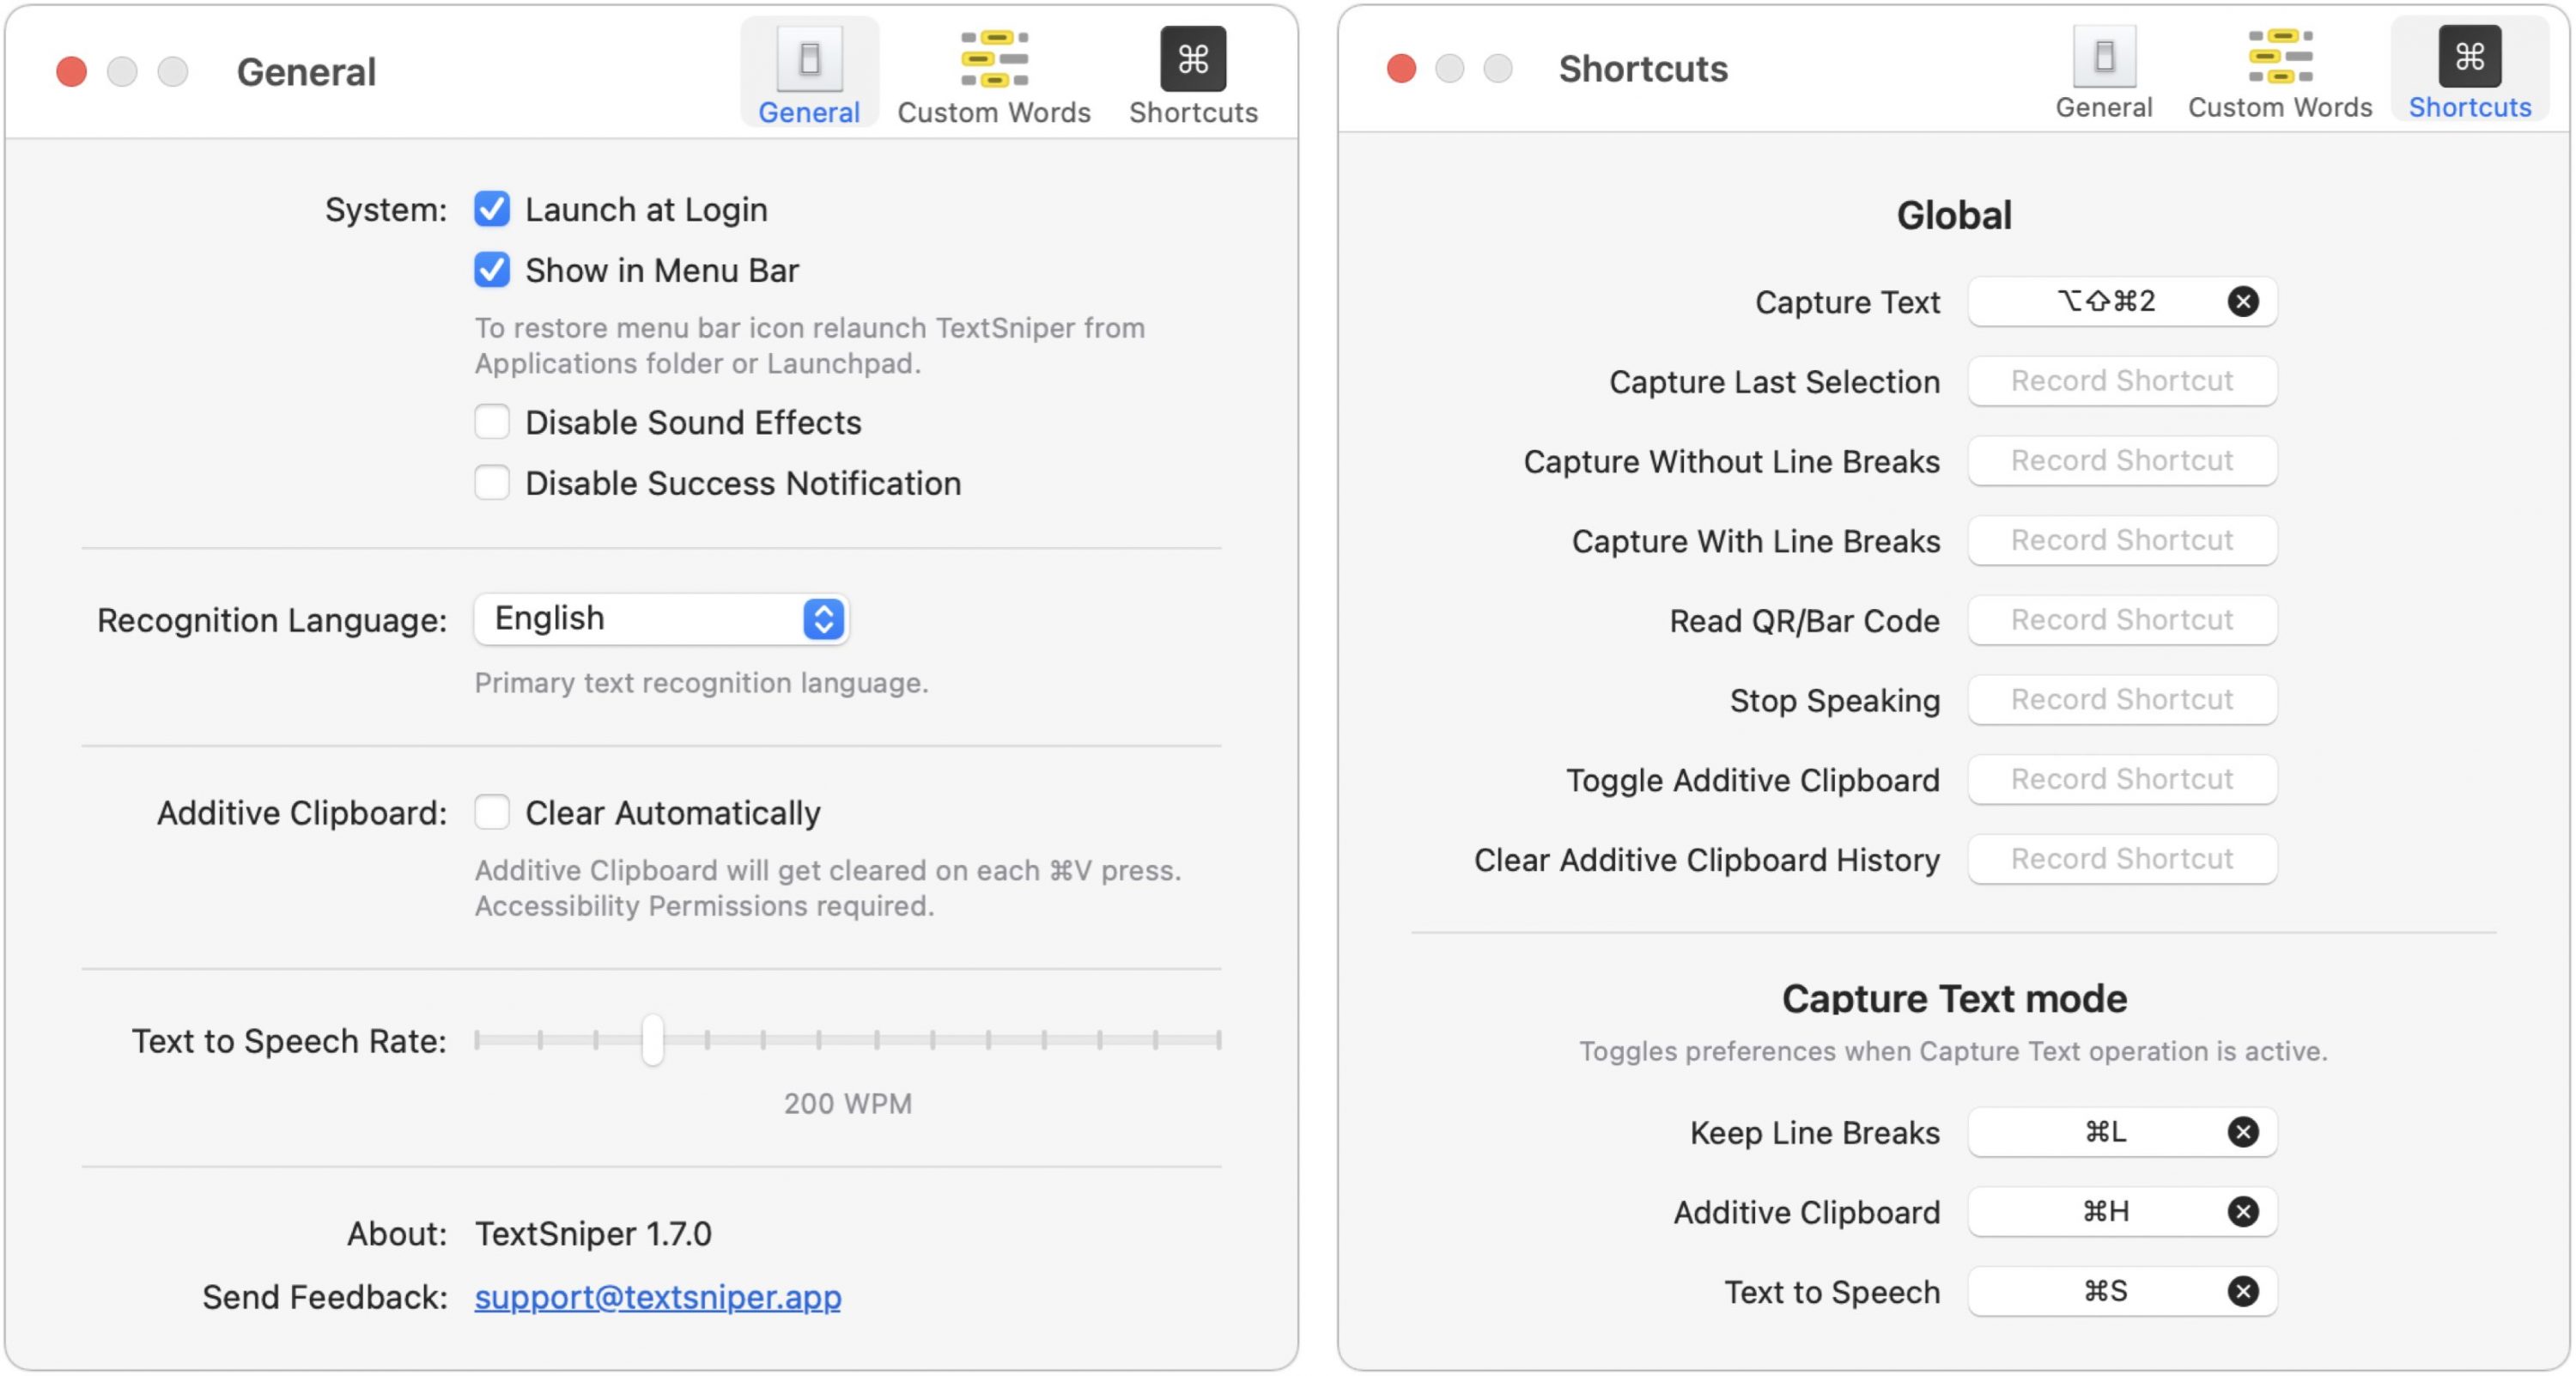
Although TextSniper runs in both macOS 10.15 Catalina and macOS 11 Big Sur, it can recognize only English in Catalina. In Big Sur, it recognizes seven languages—English, French, German, Italian, Portuguese, Spanish, and Chinese—and the developers tell me that it may work with other Latin alphabet languages but have issues with accented characters. It works natively on M1-based Macs.
I’ll admit that it took me a while to break free of that age-old split between text and graphics, but if you ever find yourself retyping something or living with a screenshot when what you really want is the text inside, give TextSniper a try. It costs $6.99 for a single Mac or $9.99 for three Macs when purchased directly from the developer (TidBITS members save 25%), and it’s available in the $9.99-per-month Setapp subscription service. You can also get it for $9.99 from the Mac App Store.
Photos Search
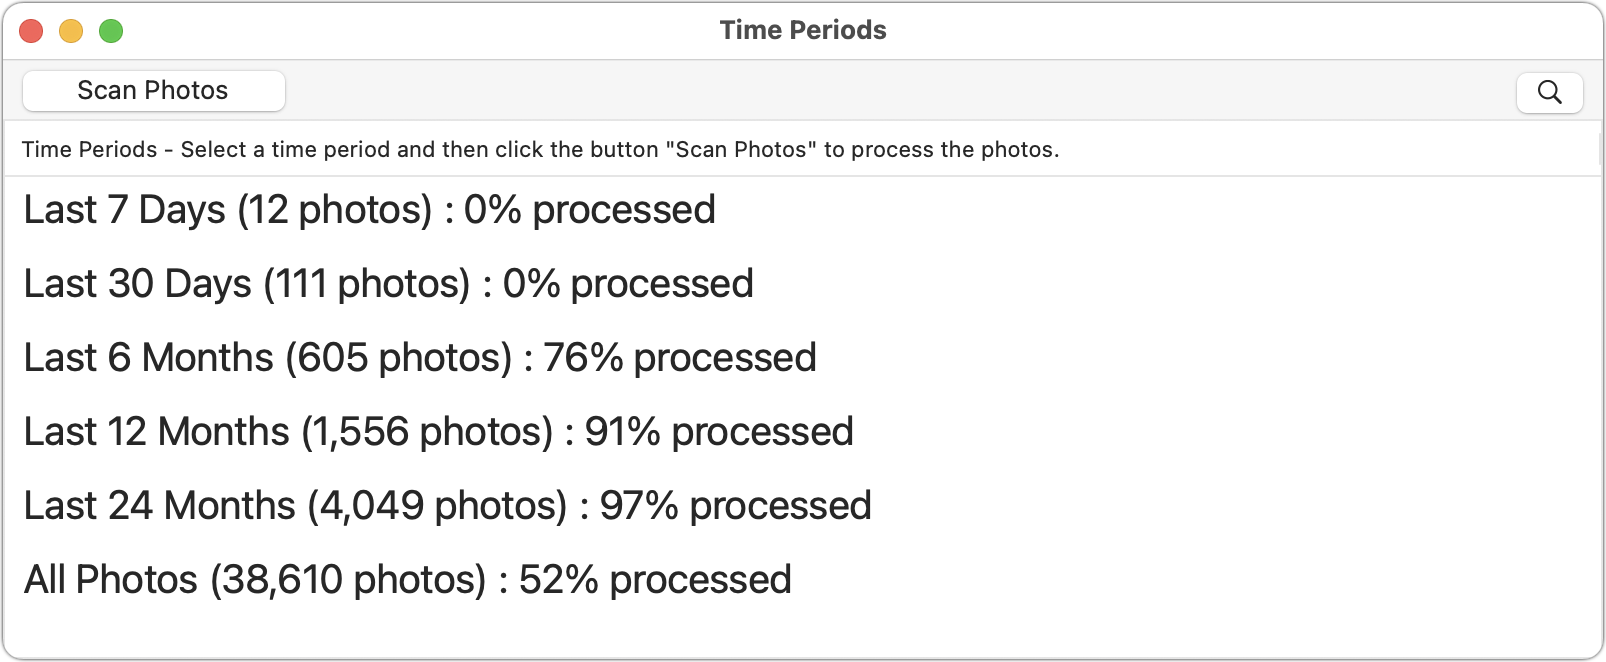
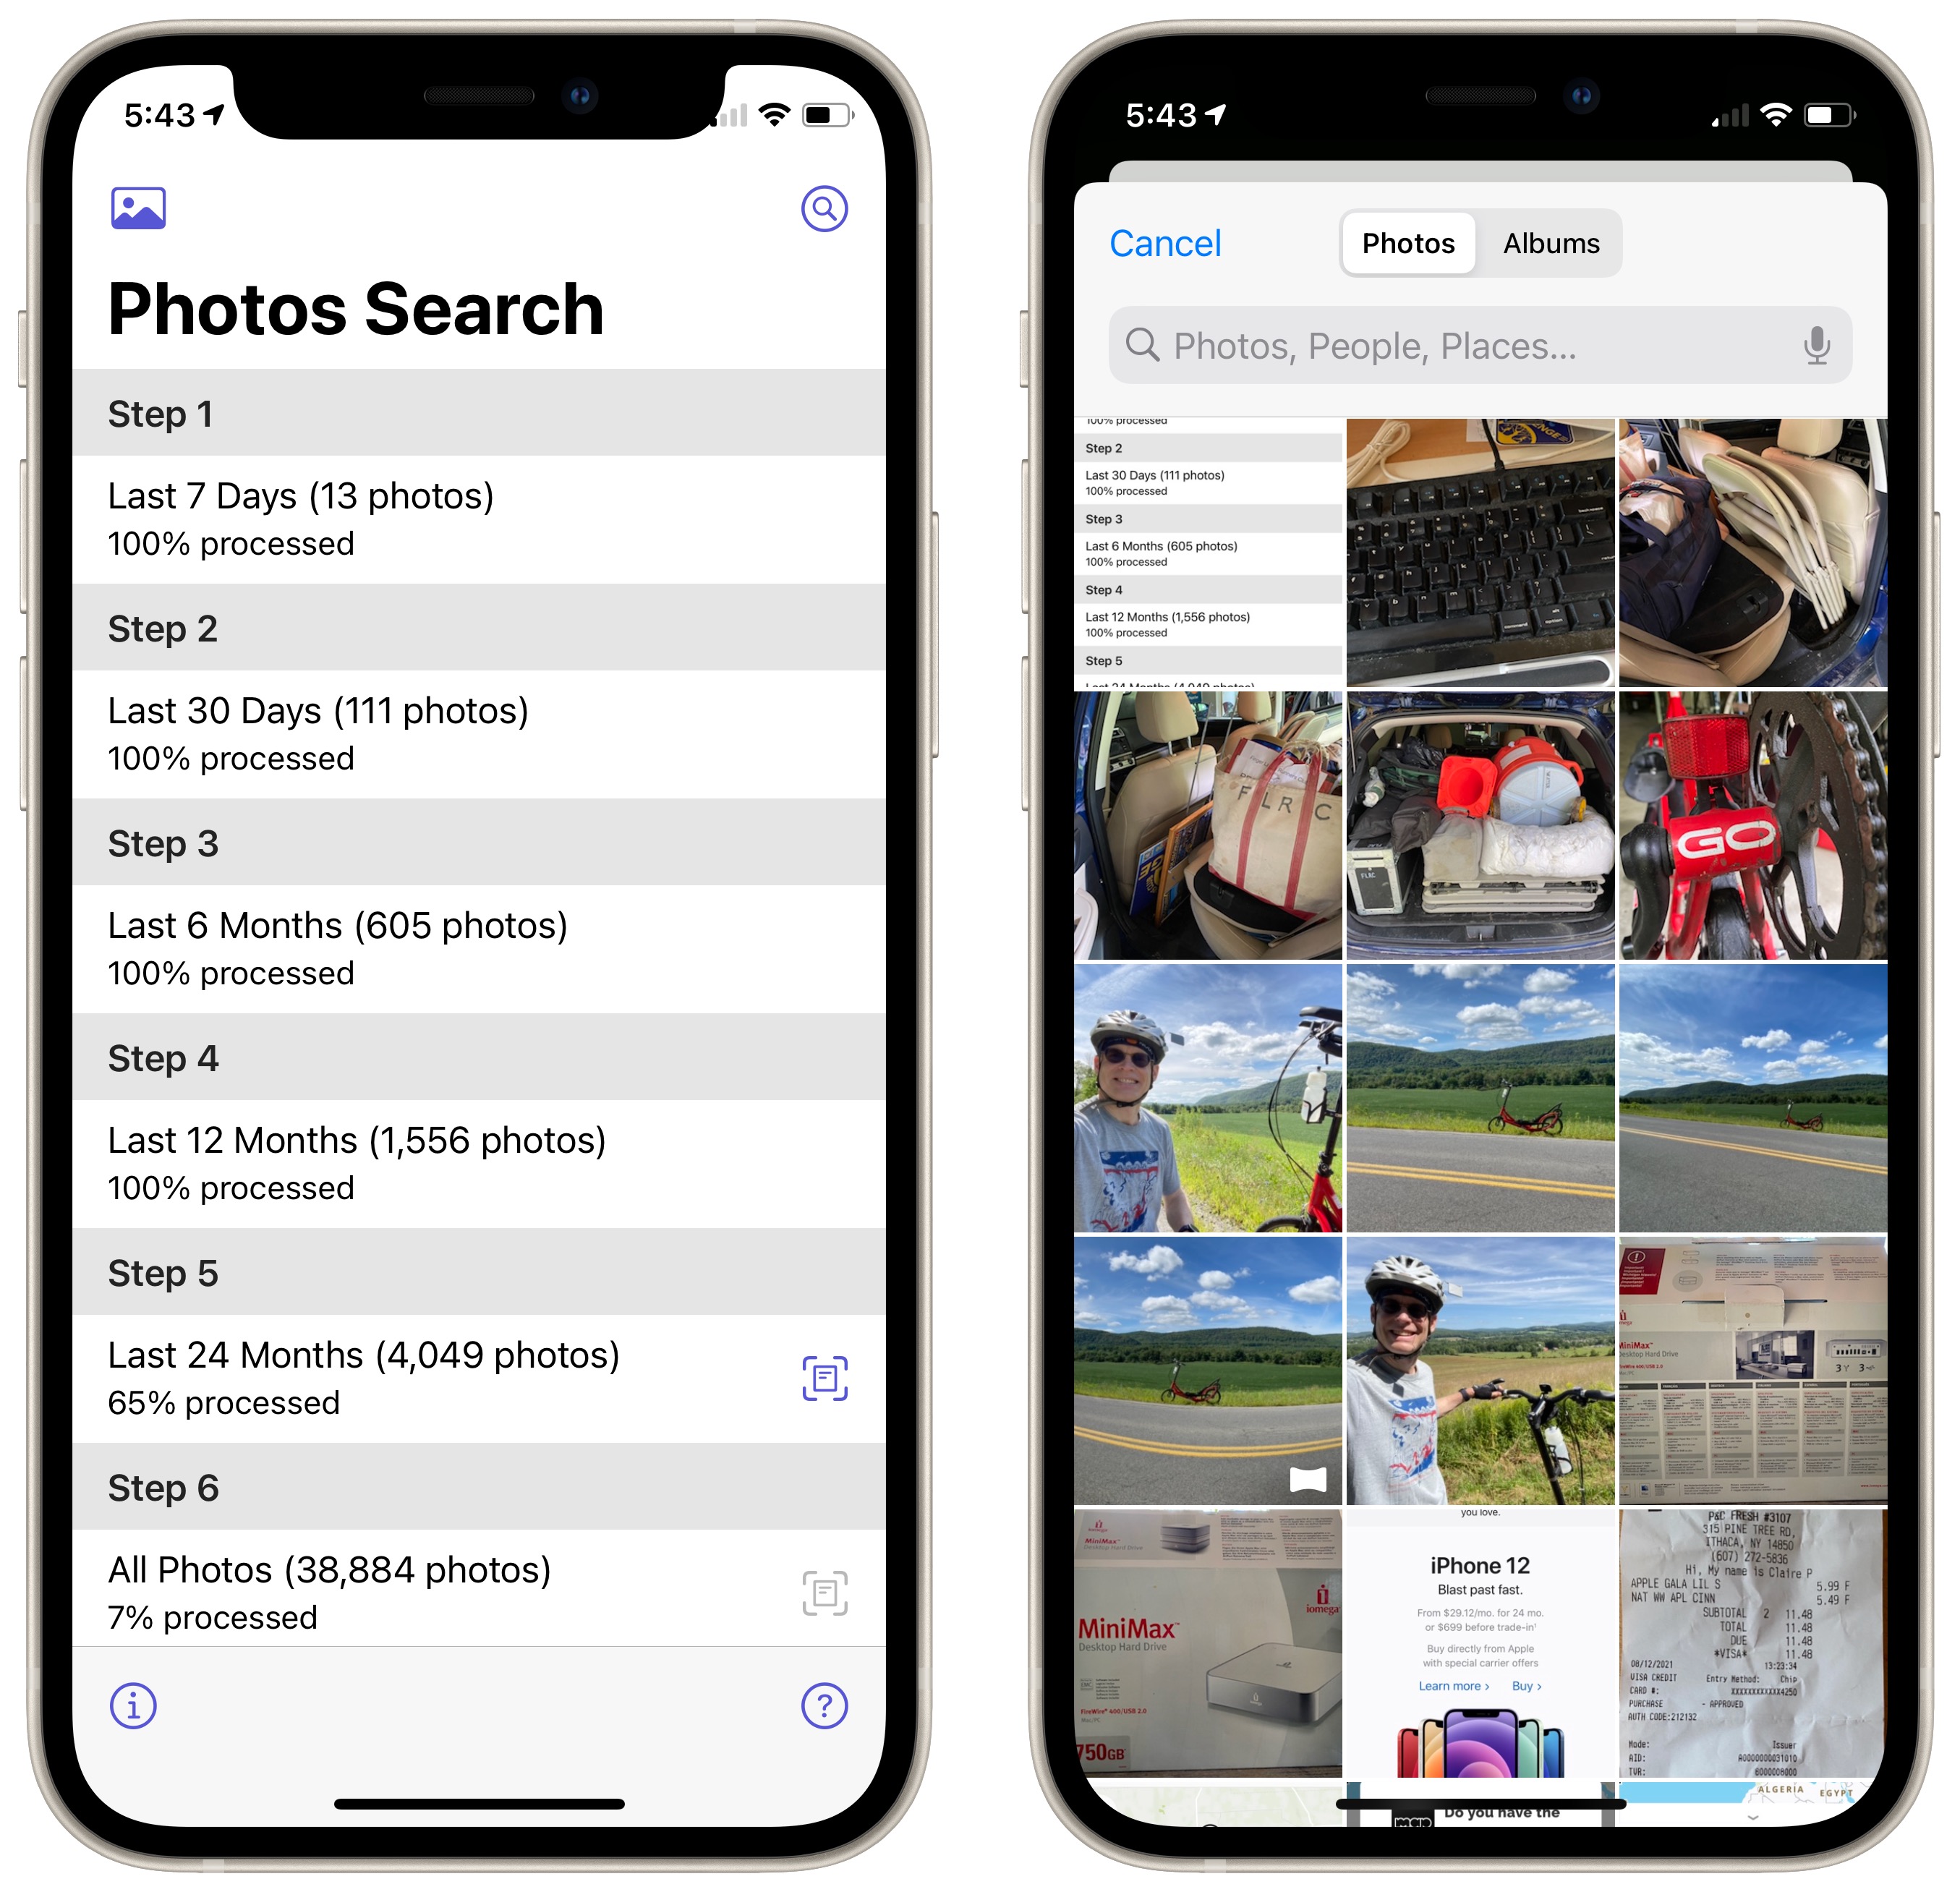
Alco Blom’s Photos Search relies on the same core concept as TextSniper, but it gives you a different superpower. Running in either macOS or iOS/iPadOS, Photos Search scans the contents of your Photos library and performs OCR on all the text it finds. Once it’s done—and it will take a long time to index a large library—you can search for photos that contain specified strings of text.
The interface for scanning different time periods is a little clunky, but it gives you control over when Photos Search hammers the CPU while doing OCR on images, particularly on the iPhone, where Photos Search can scan only while it’s the current app. Many people are likely to want to extract text from recent photos, so it makes sense to provide the option to scan just the last week or month of photos, which goes quickly. On the Mac, just select a time period and click Scan Photos.
In iOS, tap the icon to the right of a time period to scan all the images from that time period. You can also tap the icon at the top left of the screen to select and process a single image right away.
Once Photos Search has scanned a sufficient number of images, you can start searching for text in them. This turns out to be a remarkably useful feature. The first time I used it in the wild was when I was at a doctor’s appointment and was asked for my COVID-19 vaccination card. It’s an awkward size and would be difficult to replace, so I keep it in a safe place and just show people a photo of it. But when I took the photo, I didn’t think to title it, favorite it, or put it in a special album. I knew when my last shot was, roughly speaking, but rather than scroll through all my images since then, I used Photos Search to pull up all recent images containing the word “COVID.” It was magic. More generally helpful have been searches for text that appears in screenshots—I take a lot of screenshots—because screenshot text is so clear and easy for Photos Search to recognize.
![]() Not all searches work as well. For instance, I’ve taken many race photos of people on my High Noon Athletic Club wearing our new team jerseys. The club name is prominent on the jersey, but it’s curved over the sun logo, and many of the pictures are slightly fuzzy because the iPhone is weak at sports photography. Photos Search found no instances of “High Noon” on the new jerseys, but it did better with our old logo, where the High Noon words are straight. (That’s what it found in the screenshots below.) With the new logo, I can get somewhat better results by searching for only one of the two words. Alco Blom tells me that the inability to recognize curved text is a limitation of Apple’s Vision framework, so we hope Apple improves it in the future.
Not all searches work as well. For instance, I’ve taken many race photos of people on my High Noon Athletic Club wearing our new team jerseys. The club name is prominent on the jersey, but it’s curved over the sun logo, and many of the pictures are slightly fuzzy because the iPhone is weak at sports photography. Photos Search found no instances of “High Noon” on the new jerseys, but it did better with our old logo, where the High Noon words are straight. (That’s what it found in the screenshots below.) With the new logo, I can get somewhat better results by searching for only one of the two words. Alco Blom tells me that the inability to recognize curved text is a limitation of Apple’s Vision framework, so we hope Apple improves it in the future.
Even incomplete search results can help you jump to appropriate parts of your Photos library for manual browsing. If there are too many hits, you can also limit the results to specific time periods using buttons at the top.
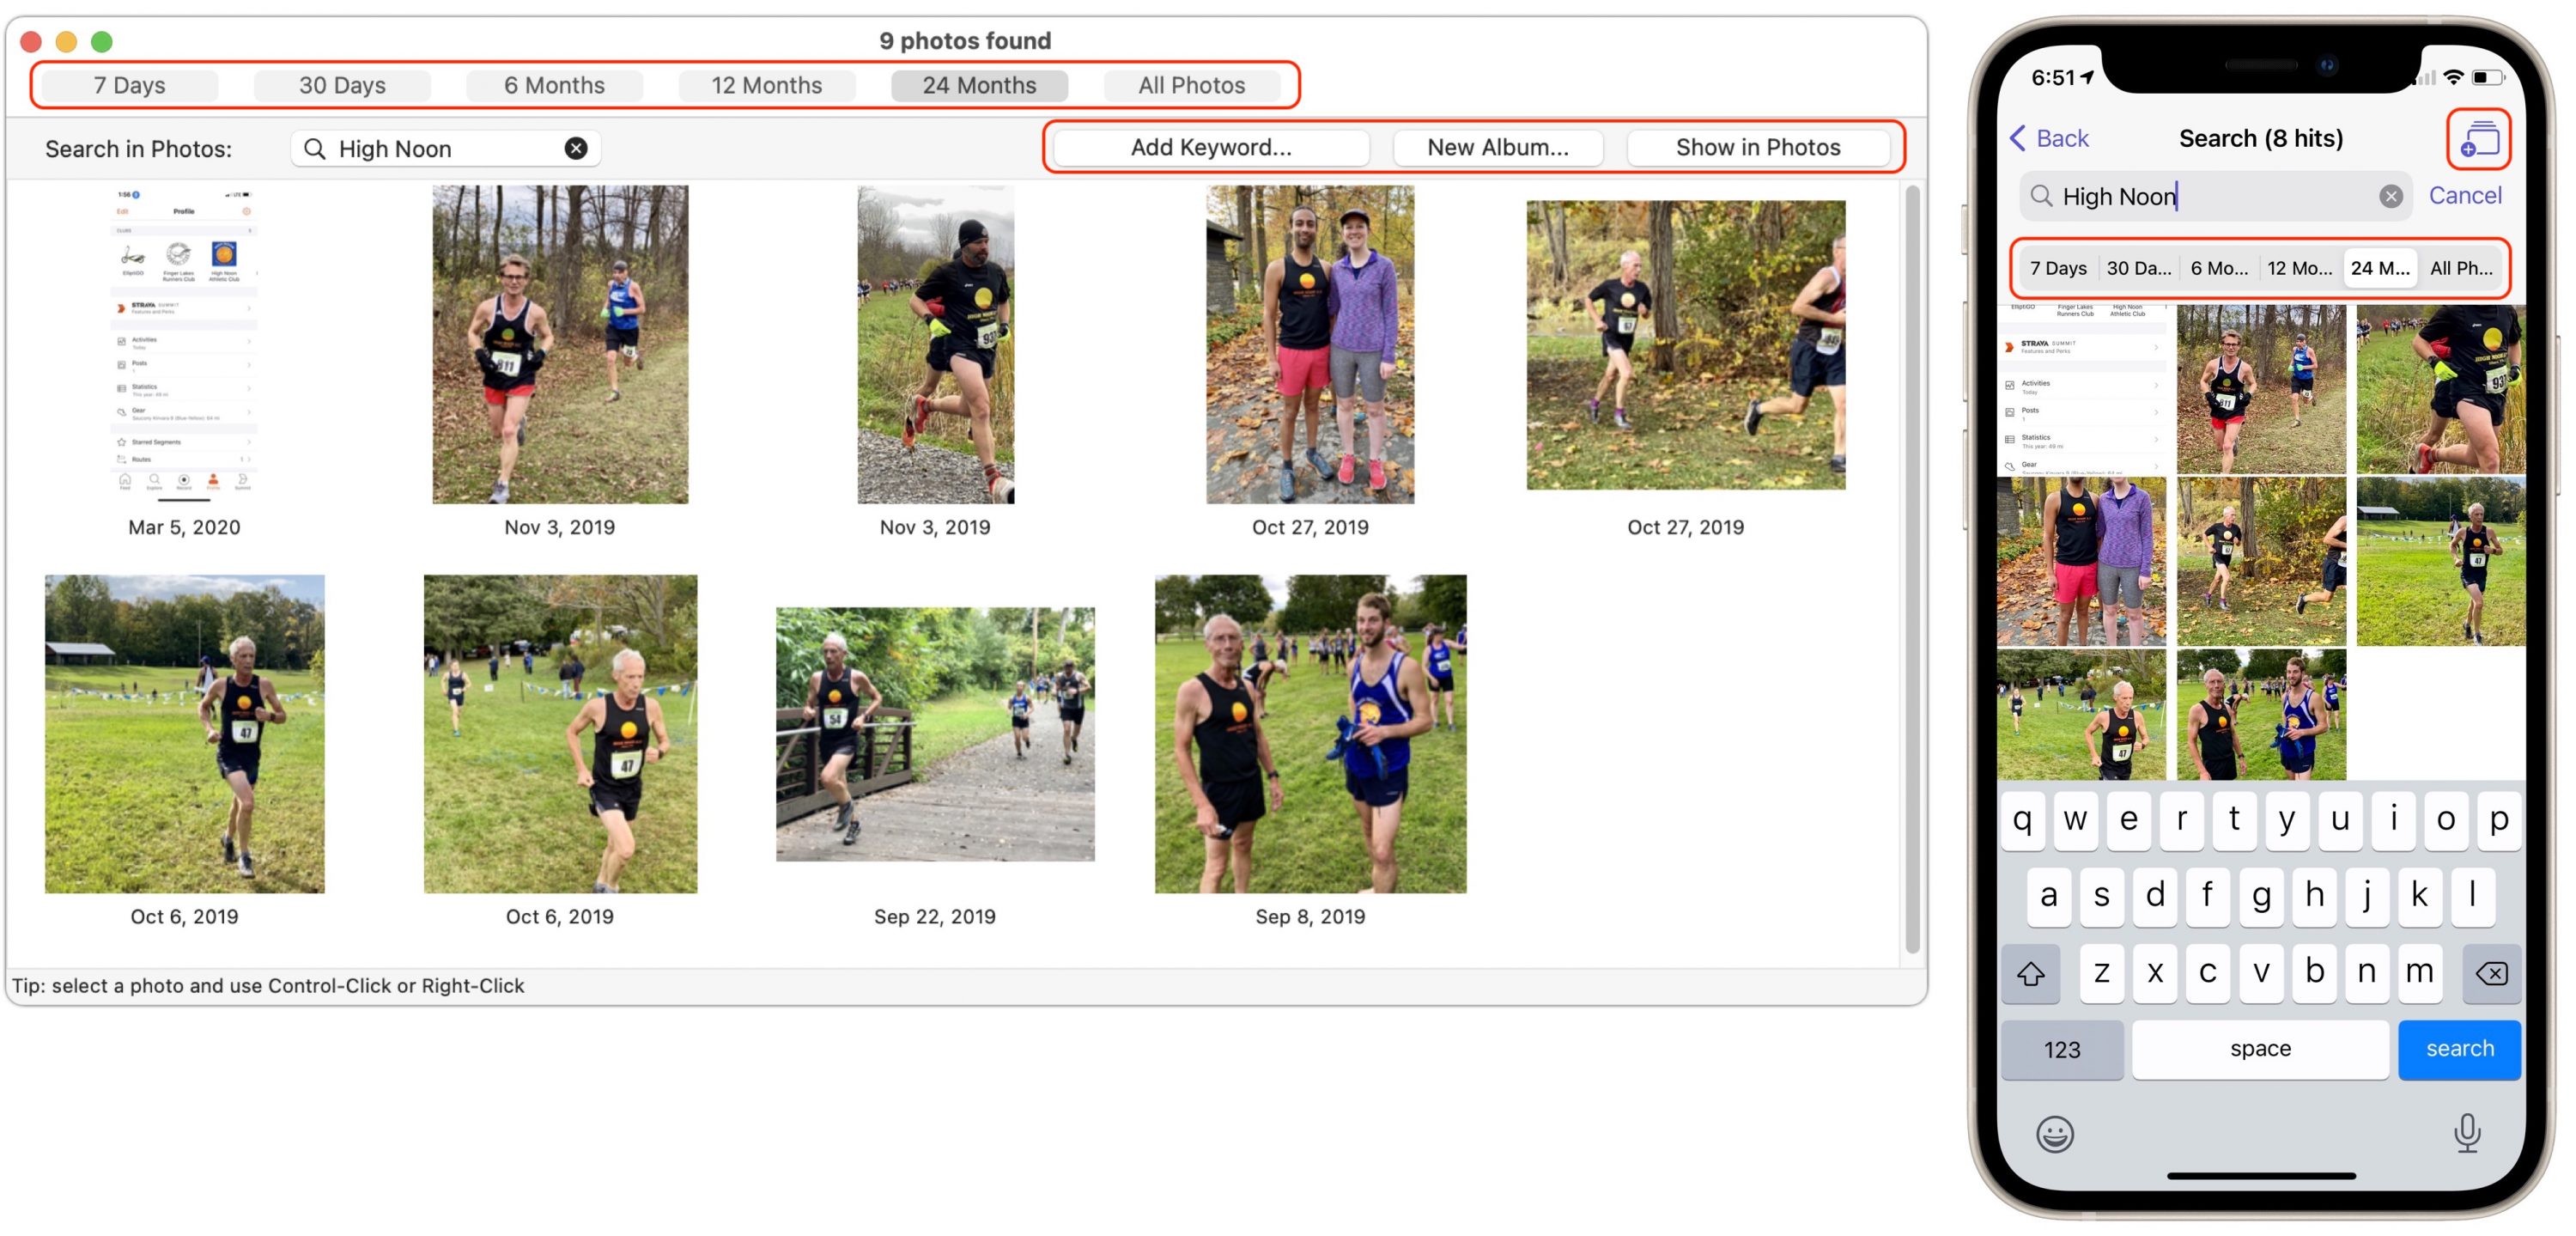
Once you’ve found images, double-click one to view it in Photos on the Mac or tap it to view it by itself in the iOS version. The Mac version offers buttons that let you add keywords to selected photos and put selected photos in a new album, whereas the iPhone version provides only a button to create a new album.
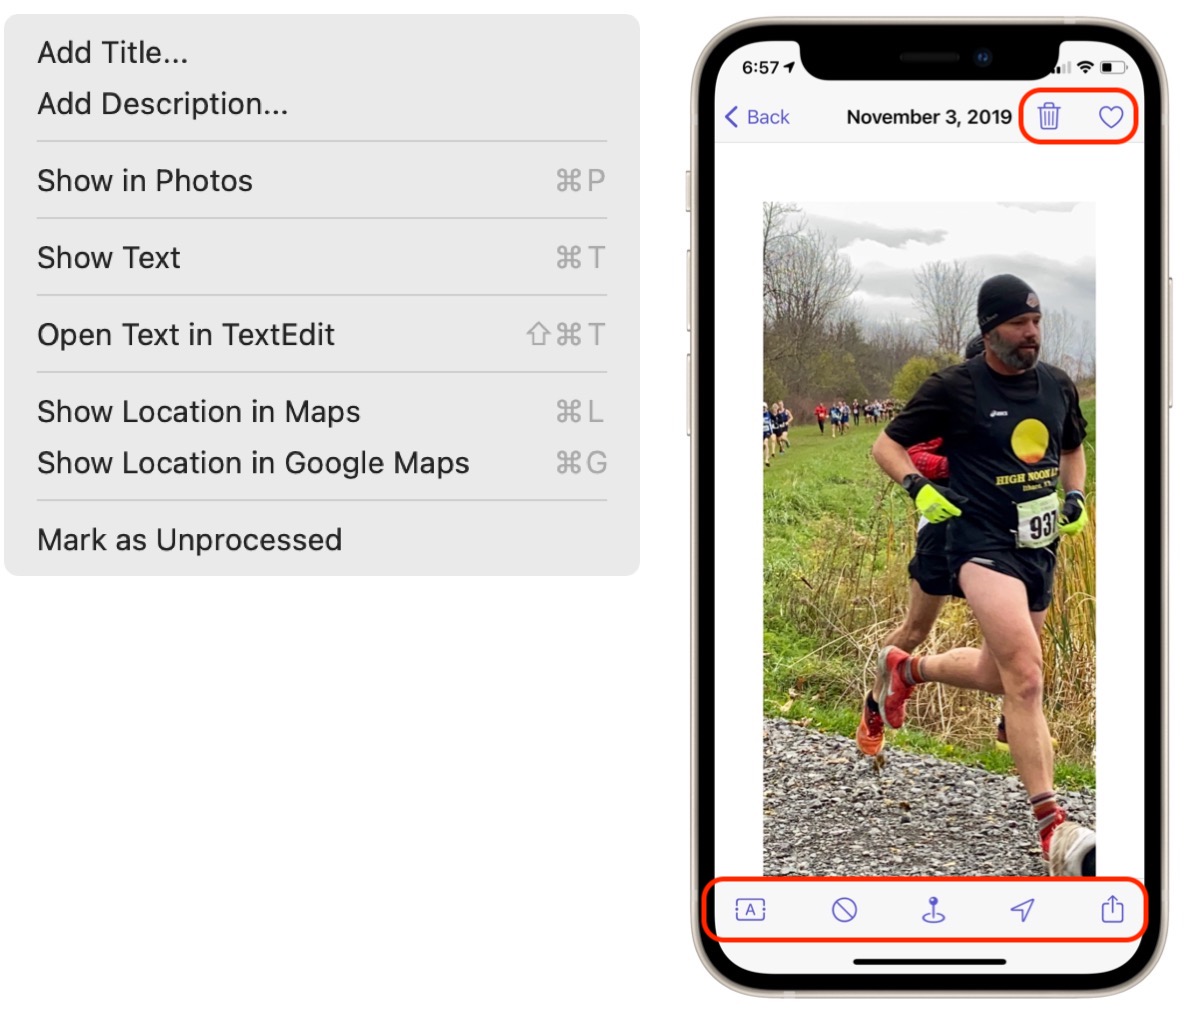
Using the Photo menu on the Mac, or the toolbar buttons at the bottom of the iPhone screen, you can avail yourself of other options. You can view (and copy) the recognized text, open it in a new TextEdit document (Mac only), or view the photo’s location in either Apple’s Maps or Google Maps. A Mark as Unprocessed option lets you remove an image from the index, which would enable you to rescan it after Apple updates the Vision framework, for instance. The iPhone version also lets you delete an image or mark it as a favorite using buttons at the top.
Other iOS-specific features include a pair of extensions that provide better integration with other apps. A Share extension lets you extract text from photos in other apps without adding them to your Photos library, and a Photos Editing extension allows you to extract the text from an image while editing it in Photos, saving you a trip to Photos Search.
Photos Search is available only from the Mac App Store for $12.99 for a bundle of the Mac and iPhone/iPad versions, or you can get the iOS version by itself from the App Store for $4.99.
What about Live Text?
The elephant in the room, of course, is Apple’s Live Text feature, promised for macOS 12 Monterey on M1-based Macs and iOS 15 on devices with at least an A12 Bionic chip (see “Ten Cool New Features Introduced at WWDC 2021,” 7 June 2021, and “The Real System Requirements for Apple’s 2021 Operating Systems,” 11 June 2021).
Will TextSniper and Photos Search be Sherlocked once Live Text becomes available? For those sticking with earlier versions of macOS or iOS, or with devices that don’t meet Live Text’s requirements, the answer is clearly no. TextSniper and Photos Search work well now and will continue to do even for those who don’t upgrade software or hardware soon.
Given that Live Text is still in beta, it’s hard to say how it will eventually compare to TextSniper and Photos Search. In theory, Live Text will let you select and copy text in images in Photos, Preview, Safari, and some other apps, so it could replace TextSniper in supported apps on the Mac. When Live Text worked, it was slightly more obvious to use than TextSniper—you just select text and copy it rather than taking a screenshot of sorts. However, in my quick testing, Live Text was persnickety to use in Safari, and the quality of its OCR wasn’t always as good as TextSniper’s.
Live Text also supposedly lets you search for recognized text, but this feature was so haphazard and failure-prone in Spotlight in beta 6 of iPadOS 15 on a 10.5-inch iPad Pro that I couldn’t effectively compare it to Photos Search. Searching for text in the Photos app itself didn’t work at all. On an M1-based MacBook Air running beta 5 of Monterey, Spotlight didn’t seem capable of searching for text within images in Photos, although it found text in a photo stored in Notes.
The jury must remain out on Live Text’s functionality until it ships, but my feeling is that TextSniper and Photos Search will continue to provide broader compatibility and more adjacent features regardless. So if you have ever wanted to work with text imprisoned within images, one or both of them may give you the power you need.
Improve Your Home Wi-Fi with Mesh, Powerline, MoCA, or More Routers
If you’ve made it this far through the pandemic without cursing your home Wi-Fi, congratulations! You’re a rare bird, and you don’t need this article. Read on, however, if you’re not getting the performance and coverage you want or you’re not sure what steps to take to improve your networked life.
Pay Attention to the Internet Connection
Your Wi-Fi network performance for Internet-based tasks is, of course, dependent on the speed of your Internet connection. If you’re stuck at low double-digit speeds from an incumbent carrier, it might be time to look at new local wired and wireless competitors, like T-Mobile’s 4G/5G home broadband service in some markets. (See “T-Mobile Offers Unlimited 5G Home Broadband Service,” 14 April 2021.)
You may also be able to call your provider and get a better plan or pricing by threatening to switch to a competitor. Over the last few years, I negotiated my 1 Gbps service from CenturyLink from its initial monthly price of $155 down to $85 as the company lowered what it charged new customers and then was willing to drop my fees to match.
If your Internet connection is as souped-up as you’re willing to pay for, let’s look at options to extend your home network and boost performance and coverage.
Connect the Network Dots with Cables
Despite having focused much of my tech writing on wireless networking for over 20 years, I often find wired connections work best. That’s true in nearly all cases except mesh wireless networking, which can sometimes benefit from a wired network, too! Most of the time, connecting a broadband modem and Wi-Fi base stations with wires provides the best throughput. It also gives you the option to plug in computers and streaming video boxes that need high throughput.
When it comes to wires, you have three options, each with varying costs, availability, and installation hassles: Ethernet, powerline, and MoCA.
Ethernet
All wired networking stems from Ethernet, a decades-old standard that’s affordable even in its gigabit flavor. The wiring, switches, and other elements you need to build or extend an Ethernet network will likely cost only tens of dollars. If you have access to crawl spaces or an attic, or if you can drill through even a single wall, you can pull Ethernet cable.
I used to buy a box of Ethernet cable, cut it to length, and crimp RJ45 connectors onto the ends. But because finished and tested Ethernet cables cost so little now, I prefer buying pre-made cables that I know have been tested to work—unlike those I made from scratch. For installing plugs in walls, I like double-sided wall plates that have a jack on either side.
Look for “Cat-6” cables, where the “Cat” means “category” and the “6” refers to a set of electrical specifications designed to allow for certain kinds of performance. You can pay a little less for Cat-5e, but it’s not worth the savings. Cat-6 has better insulation to protect against interference, and it’s designed for the long haul. If you want to use 10 Gbps Ethernet when that becomes affordable for home use, you can with Cat-6 cabling.
Modern Ethernet switches, cards, and other hardware have auto-sensing, auto-switching ports: long gone is the need to have special patch cables or flip switches. You just plug it all in. 100 Mbps and 1 Gbps devices can work on the same network with no additional effort or slowdown.
If you can’t easily access the innards of your home to run Ethernet cable, two other options have matured into great alternatives to or extensions of Ethernet.
Powerline Networking
Your home electrical wiring can carry both power and data by adding powerline networking adapters. A powerline adapter forms a network with other adapters plugged into the same leg of an electrical circuit in your home. The current generation of technology offers raw rates up to 2 Gbps.
Powerline adapters must plug directly into a wall socket and typically sport at least one gigabit Ethernet jack. Some also include a pass-through electrical plug, a built-in Wi-Fi router to extend a network, or a second Ethernet jack. Prices start at as little as $50 for a set of two with a data rate up to 1 Gbps.
If you live in a shared home or in a building with electrical wiring that may extend beyond your domicile, you can press a button on each adapter to enable security, much like simple Bluetooth pairing.
Powerline technology may not work across any two outlets in a home depending on how the electrical panel is set up, but the current generation is far more tolerant of wiring issues than the earlier ones.
MoCA (Multimedia over Coax Alliance)
Over a period of several decades, many new and renovated homes were wired for cable TV with coaxial cable in every room and a central wiring panel that distributed services from a provider’s incoming wire. MoCA takes advantage of this infrastructure by encoding 1 Gbps or 2.5 Gbps over coax, with adapters offering one or more Ethernet jacks. It’s more robust and reliable than powerline networking, but it’s also more expensive. A pair of 1 Gbps adapters costs nearly $140.
You may need to secure a network created via MoCA adapters if you have cable broadband or video service. A point of entry (PoE) filter prevents neighbors within a short distance from tapping into your network with their own MoCA gear. These filters are readily available and cost about $5. You can also (or instead) set a password on MoCA adapters that encrypts traffic between them via a Web administration interface, much like setting a password for a Wi-Fi network.
A Real-World Example
In my home, we hit the wall (almost literally) when my wife set up a new office space for her coaching business in our bedroom. Despite having an Ethernet-connected Wi-Fi router in a basement guest room directly beneath where she worked and a wireless extender in our bedroom, she could not get reliable throughput—critical for her video sessions with clients.
After buying some Ethernet cabling and gear and tracing empty spots in the house, I realized adding more wire would be very involved and might require bringing in a cabling specialist. Our house has largely wood lath and brittle plaster walls from the 1920s that are difficult to drill through without causing a lot of damage. Since we have no coax in the house, I tested to see if powerline networking would work for our situation.
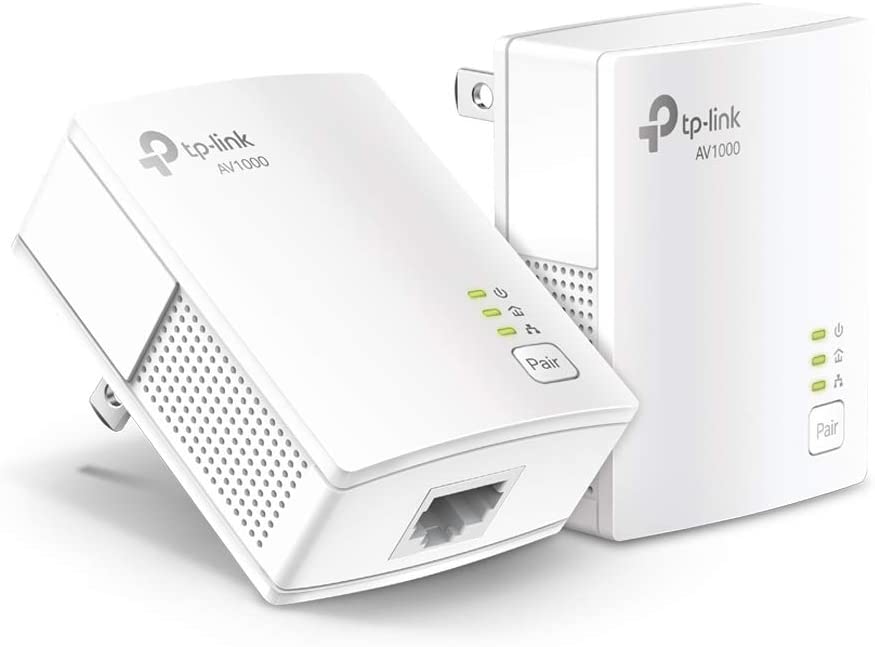
I purchased a pair of powerline adapters: the TP-Link AV1000 (TL-PA7017P kit, $52.99). They use the AV2 standard, which offers up to 1 Gbps, and each has one Ethernet port. (If you need higher throughput, the TP-Link AV2000 units (TL-PA9020P kit, under $100) have two Ethernet ports and a raw data rate of up to 2 Gbps.)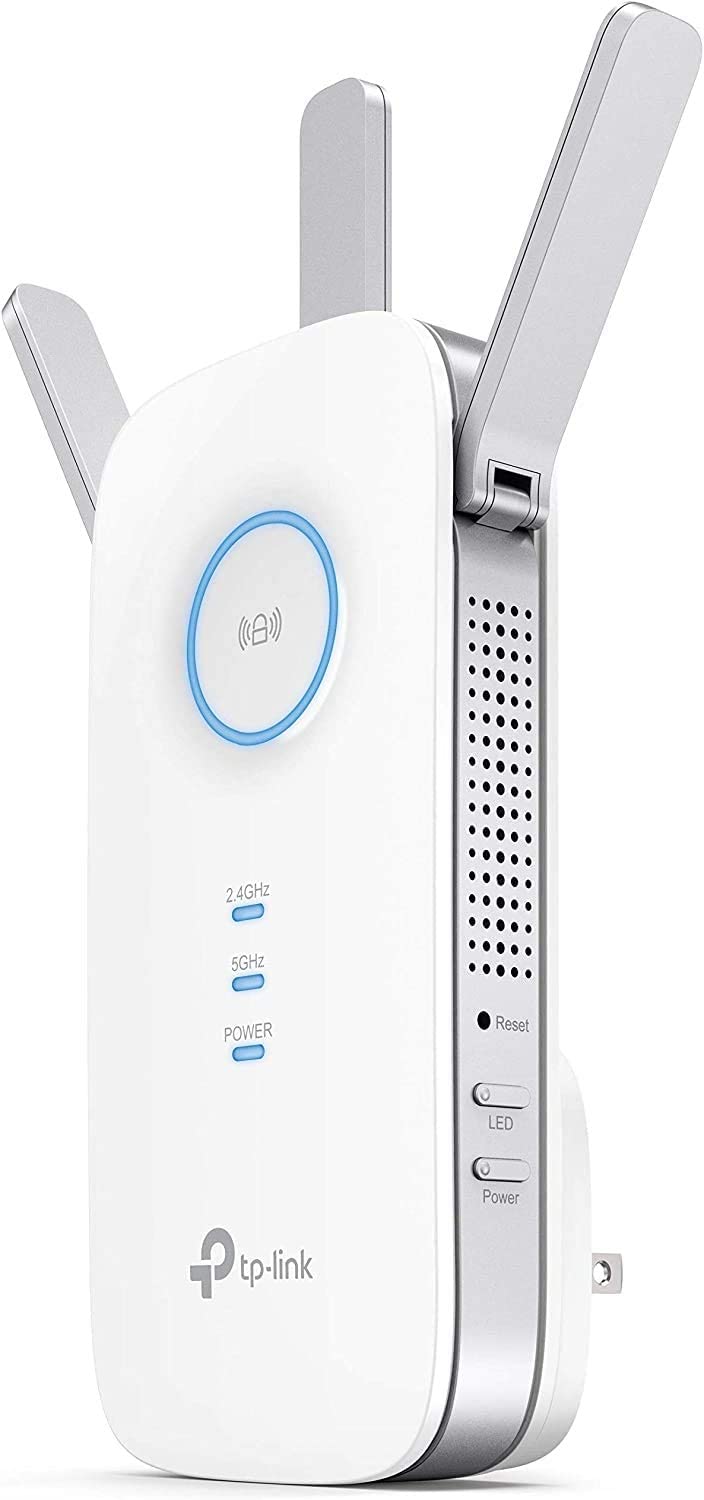
Given we already had a Wi-Fi range extender (the TP-Link AC1750 WiFi Extender, model RE450, $59.99) in the bedroom that couldn’t pump out more than 1 Gbps, we checked to make sure the TP-Link AV1000 could deliver the maximum data rate we needed. It did: that pair of plugs provided the wired extension, and our Wi-Fi range extender’s Ethernet port took its incoming connection from one of the powerline adapters. Problem solved.
Upgrade Your Wi-Fi Router
Upgrading to current Wi-Fi gateways or switching to mesh networking can solve problems of both low throughput and spotty coverage.
You may have outdated Wi-Fi gear. A lot of people do, and that included me until the pandemic hit. Then I had to add into the mix the bandwidth demands of two kids requiring full-time video-based remote learning. While most of my equipment supported at least the 802.11n wireless network standard (Wi-Fi 4), I upgraded everything that didn’t to 802.11ac (Wi-Fi 5). (For an explanation of generations, see “Wi-Fi Switches from Obscure Protocol Names to Simple Generation Numbers” 5 October 2018.)
To give you an idea of how easy it is to fall behind the networking curve when everything is working fine, I wrote about Apple adding 802.11ac to the AirPort Extreme Base Station over 8 years ago (see “802.11ac Promises Better Coverage, but Won’t Hit Advertised Speeds,” 13 June 2013).
A household with only 802.11n devices likely can’t keep up with multiple family members using videoconferencing, streaming video services, or bandwidth- or latency-intensive Internet services and games. Upgrade to 802.11ac for a substantial difference, or future-proof with the latest standard, 802.11ax (Wi-Fi 6), which now doesn’t cost much more than 802.11ac.
If I were making the change today, I’d probably switch to 802.11ax, which offers more efficient use of the wireless spectrum and higher potential maximum throughput than any previous version. The techniques in 802.11ax include advanced strategies to avoid interference with other routers and nearby networks. It can also target individual devices by varying power across multiple antennas to “steer” or “beamform” signals to where they best overlap for reception.
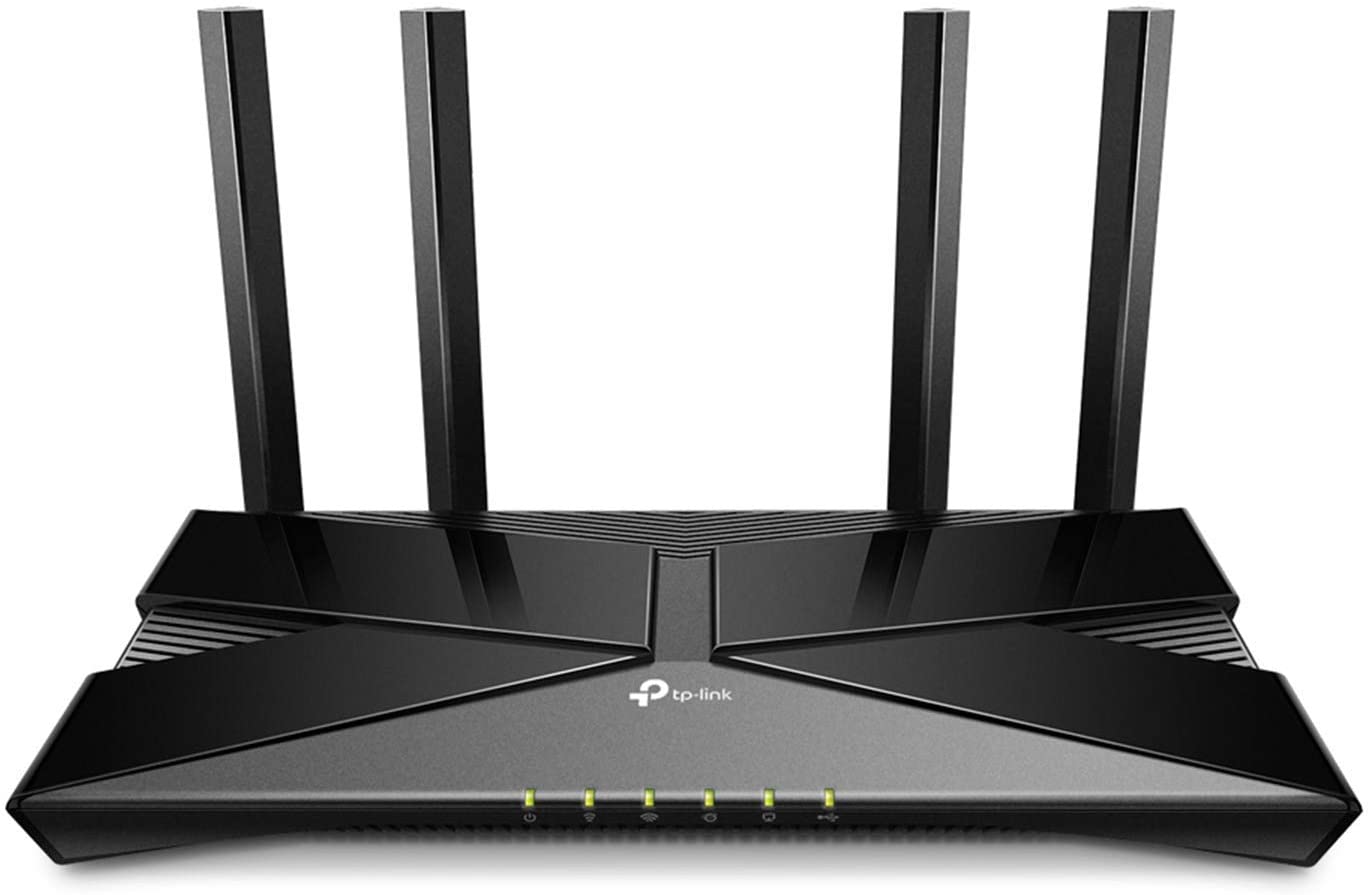
As one example of a modern 802.11ax router, take a look at the TP-Link Archer AX20, which at $99.99 can offer throughput that maxes out at 1.8 Gbps across 2.4 and 5 GHz bands and has four gigabit Ethernet LAN ports. (Neither I nor TidBITS have any relationship with TP-Link. I chose to standardize on TP-Link gear for cost, features, and management via its Tether app.)
Switch to Mesh Networking
Conventional routers like the TP-Link Archer AX20 still require wired connections to other routers to extend the network, using any of the techniques above for extending a network. Many people have instead opted into mesh networking, which can rely entirely on wireless communication among network components, called nodes.
As far as the client hardware is concerned—a computer, phone, tablet, or other device—the nodes act exactly like regular Wi-Fi access points. But when communicating among each other, nodes determine the most efficient way to send data packets between source and destination, whether to and from the Internet or among devices on the network.
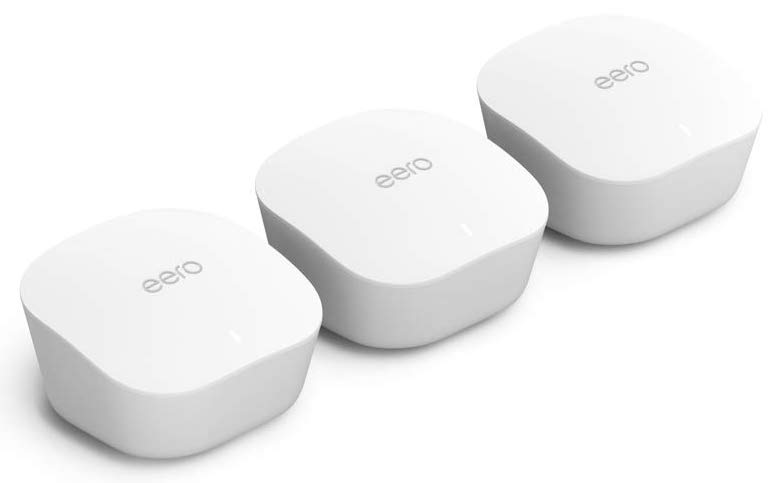
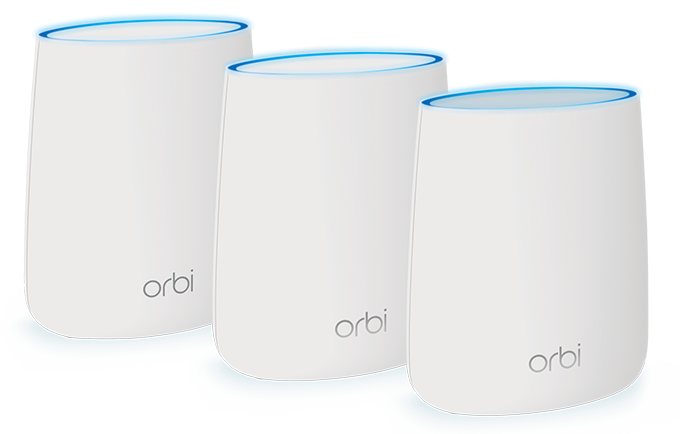
Nodes don’t require any wiring. You just set up two or more of them, often with iPhone app assistance about optimal placement, and they find each other and start routing data. The NetGear Orbi and Blackhawk and Amazon Eero (see “Eero Provides Good Wi-Fi Coverage in a Handsome Package,” 25 June 2016) are three of the most popular hardware options, but D-Link, Cisco Linksys, TP-Link, and others also have mesh offerings. (The Linksys Velop is the only one sold in Apple’s stores. See “Velop Provides First-Rate but Expensive Wi-Fi Mesh Networking” 9 July 2018.)
Mesh networking has one drawback: it uses Wi-Fi frequencies to communicate with both client hardware and other nodes. That means every re-transmission of data between nodes reduces the overall network throughput. With a busy network full of streaming data, that approach can cut into your performance and result in lower throughput, choppy video, and slower downloads and uploads.
If you need high and consistent throughput, I recommend purchasing either so-called “tri-band” mesh nodes or nodes that have wired backhaul:
- Tri-band: A tri-band node has three separate radio systems. One is devoted to the lower-throughput, backward-compatible, and better-penetrating 2.4 GHz band, while the other two work over the high-throughput 5 GHz band. One of the 5 GHz radios is dedicated to intra-node communication, dramatically improving overall throughput.
- Wired backhaul: It might seem ironic to get a mesh node and then rely on Ethernet for backhaul, but it’s a good alternative. By purchasing nodes with Ethernet ports designed for intra-node communication, you can opt for a cheaper dual-band mesh model and use Ethernet (or powerline or MoCA) to get the highest throughput. You still get most of the benefits of mesh networking: intelligent and dynamic routing, minimal configuration, and flexibility.
Mesh networking nodes that meet my high-throughput recommendations cost about the same as the comparable number of traditional Wi-Fi gateways.
The original dual-band Eero with Ethernet backhaul is $199 for a three-pack; the Eero 6 Pro with both Ethernet and a tri-band radio system runs $599 for its three-pack. The difference? The plain Eero promises coverage with three nodes over a smaller area than the Eero 6 Pro (5000 square feet/465 square meters versus 6000 square feet/557 square meters) and up to 500 Mbps of throughput compared to 1 Gbps.
A similar price split exists at NetGear, even comparing two sets of nodes that all have tri-band radio systems and Ethernet. The three-pack Orbi AC2200 Mesh WiFi System (bundle number RBK23) costs $299.99 and promises a maximum speed of about 1.3 Gbps over 6000 square feet. The three-pack Orbi AX4200 WiFi Mesh System (bundle number RBK753) is $449.99 (that’s $100 off its list price) and claims up to 4.2 Gbps across 7500 square feet/697 square meters.
Speed Up!
If you’ve been suffering with a Wi-Fi network that doesn’t provide the coverage and throughput you need for Zoom calls, Apple TV streaming, and everything else you want to do, there’s no reason to live with it any longer. Just spend a few minutes evaluating your needs, how much you’re willing to spend, and the physical constraints of your home. Then decide whether it makes sense to jump to a modern mesh network or rely on one of the wired solutions with additional traditional Wi-Fi routers.
Comparing MagSafe Battery Packs: Not A Simple Choice
When Apple unveiled its new MagSafe magnetic charging technology for the iPhone with a variety of desktop accessories (see “Seven Third-Party Accessories Show MagSafe’s Potential,” 4 June 2021), it was inevitable that MagSafe-friendly mobile battery packs would become available.
In fact, Apple was not the first to offer one—several third-party battery packs beat Apple to the punch for use with the iPhone 12, iPhone 12 mini, iPhone 12 Pro, and iPhone 12 Pro Max. Finally, last month, Apple unveiled its MagSafe Battery Pack as its official solution for on-the-go iPhone 12 magnetic charging.
I was excited about the releases because I have long depended on compact battery packs to get my heavily used iPhone 12 Pro through the day. As a bicyclist, I stick a battery pack in my bike’s saddlebag on daylong rides since my iPhone might otherwise conk out due to all my fitness tracking, Google routing, picture taking, video recording, text messaging, and voice calling. But I dislike having to wrangle two devices connected with a cord. Once, a charging cable got tangled in my bike gears while I was riding; I managed to avoid crashing, but getting the cable out took a while, and it was pretty frayed.
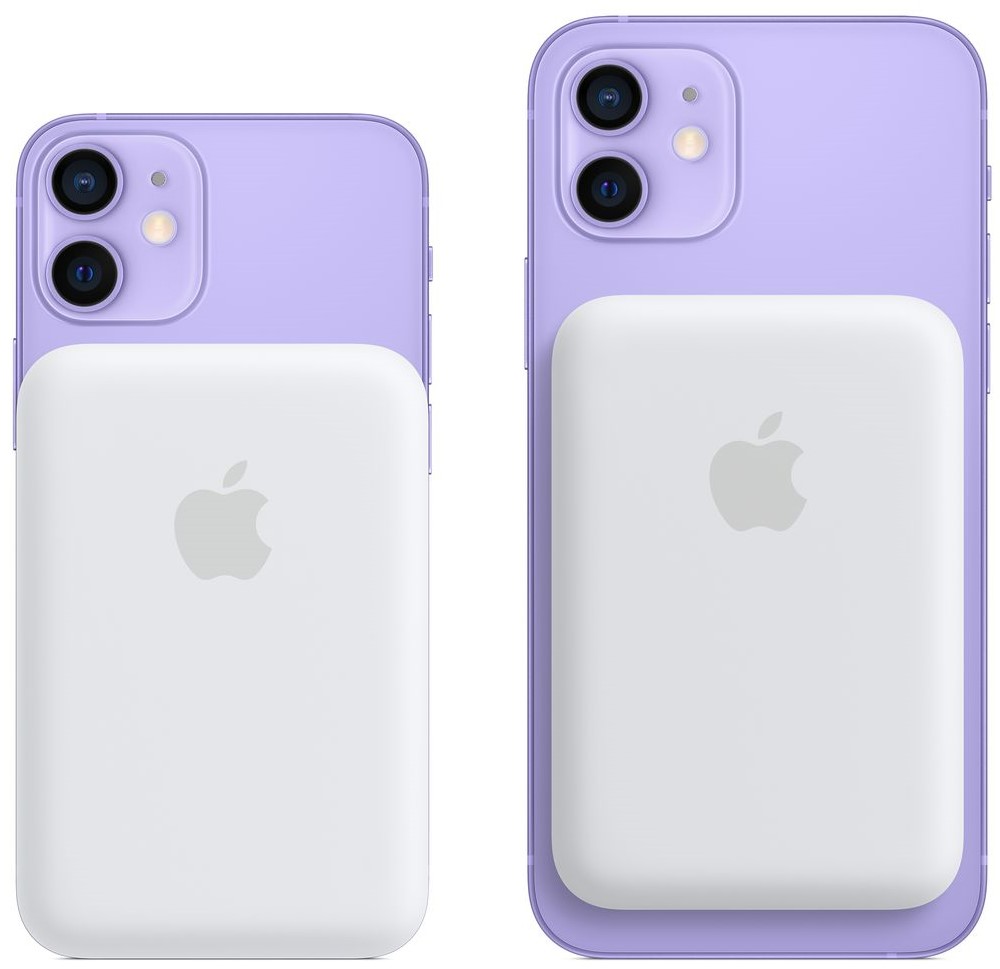
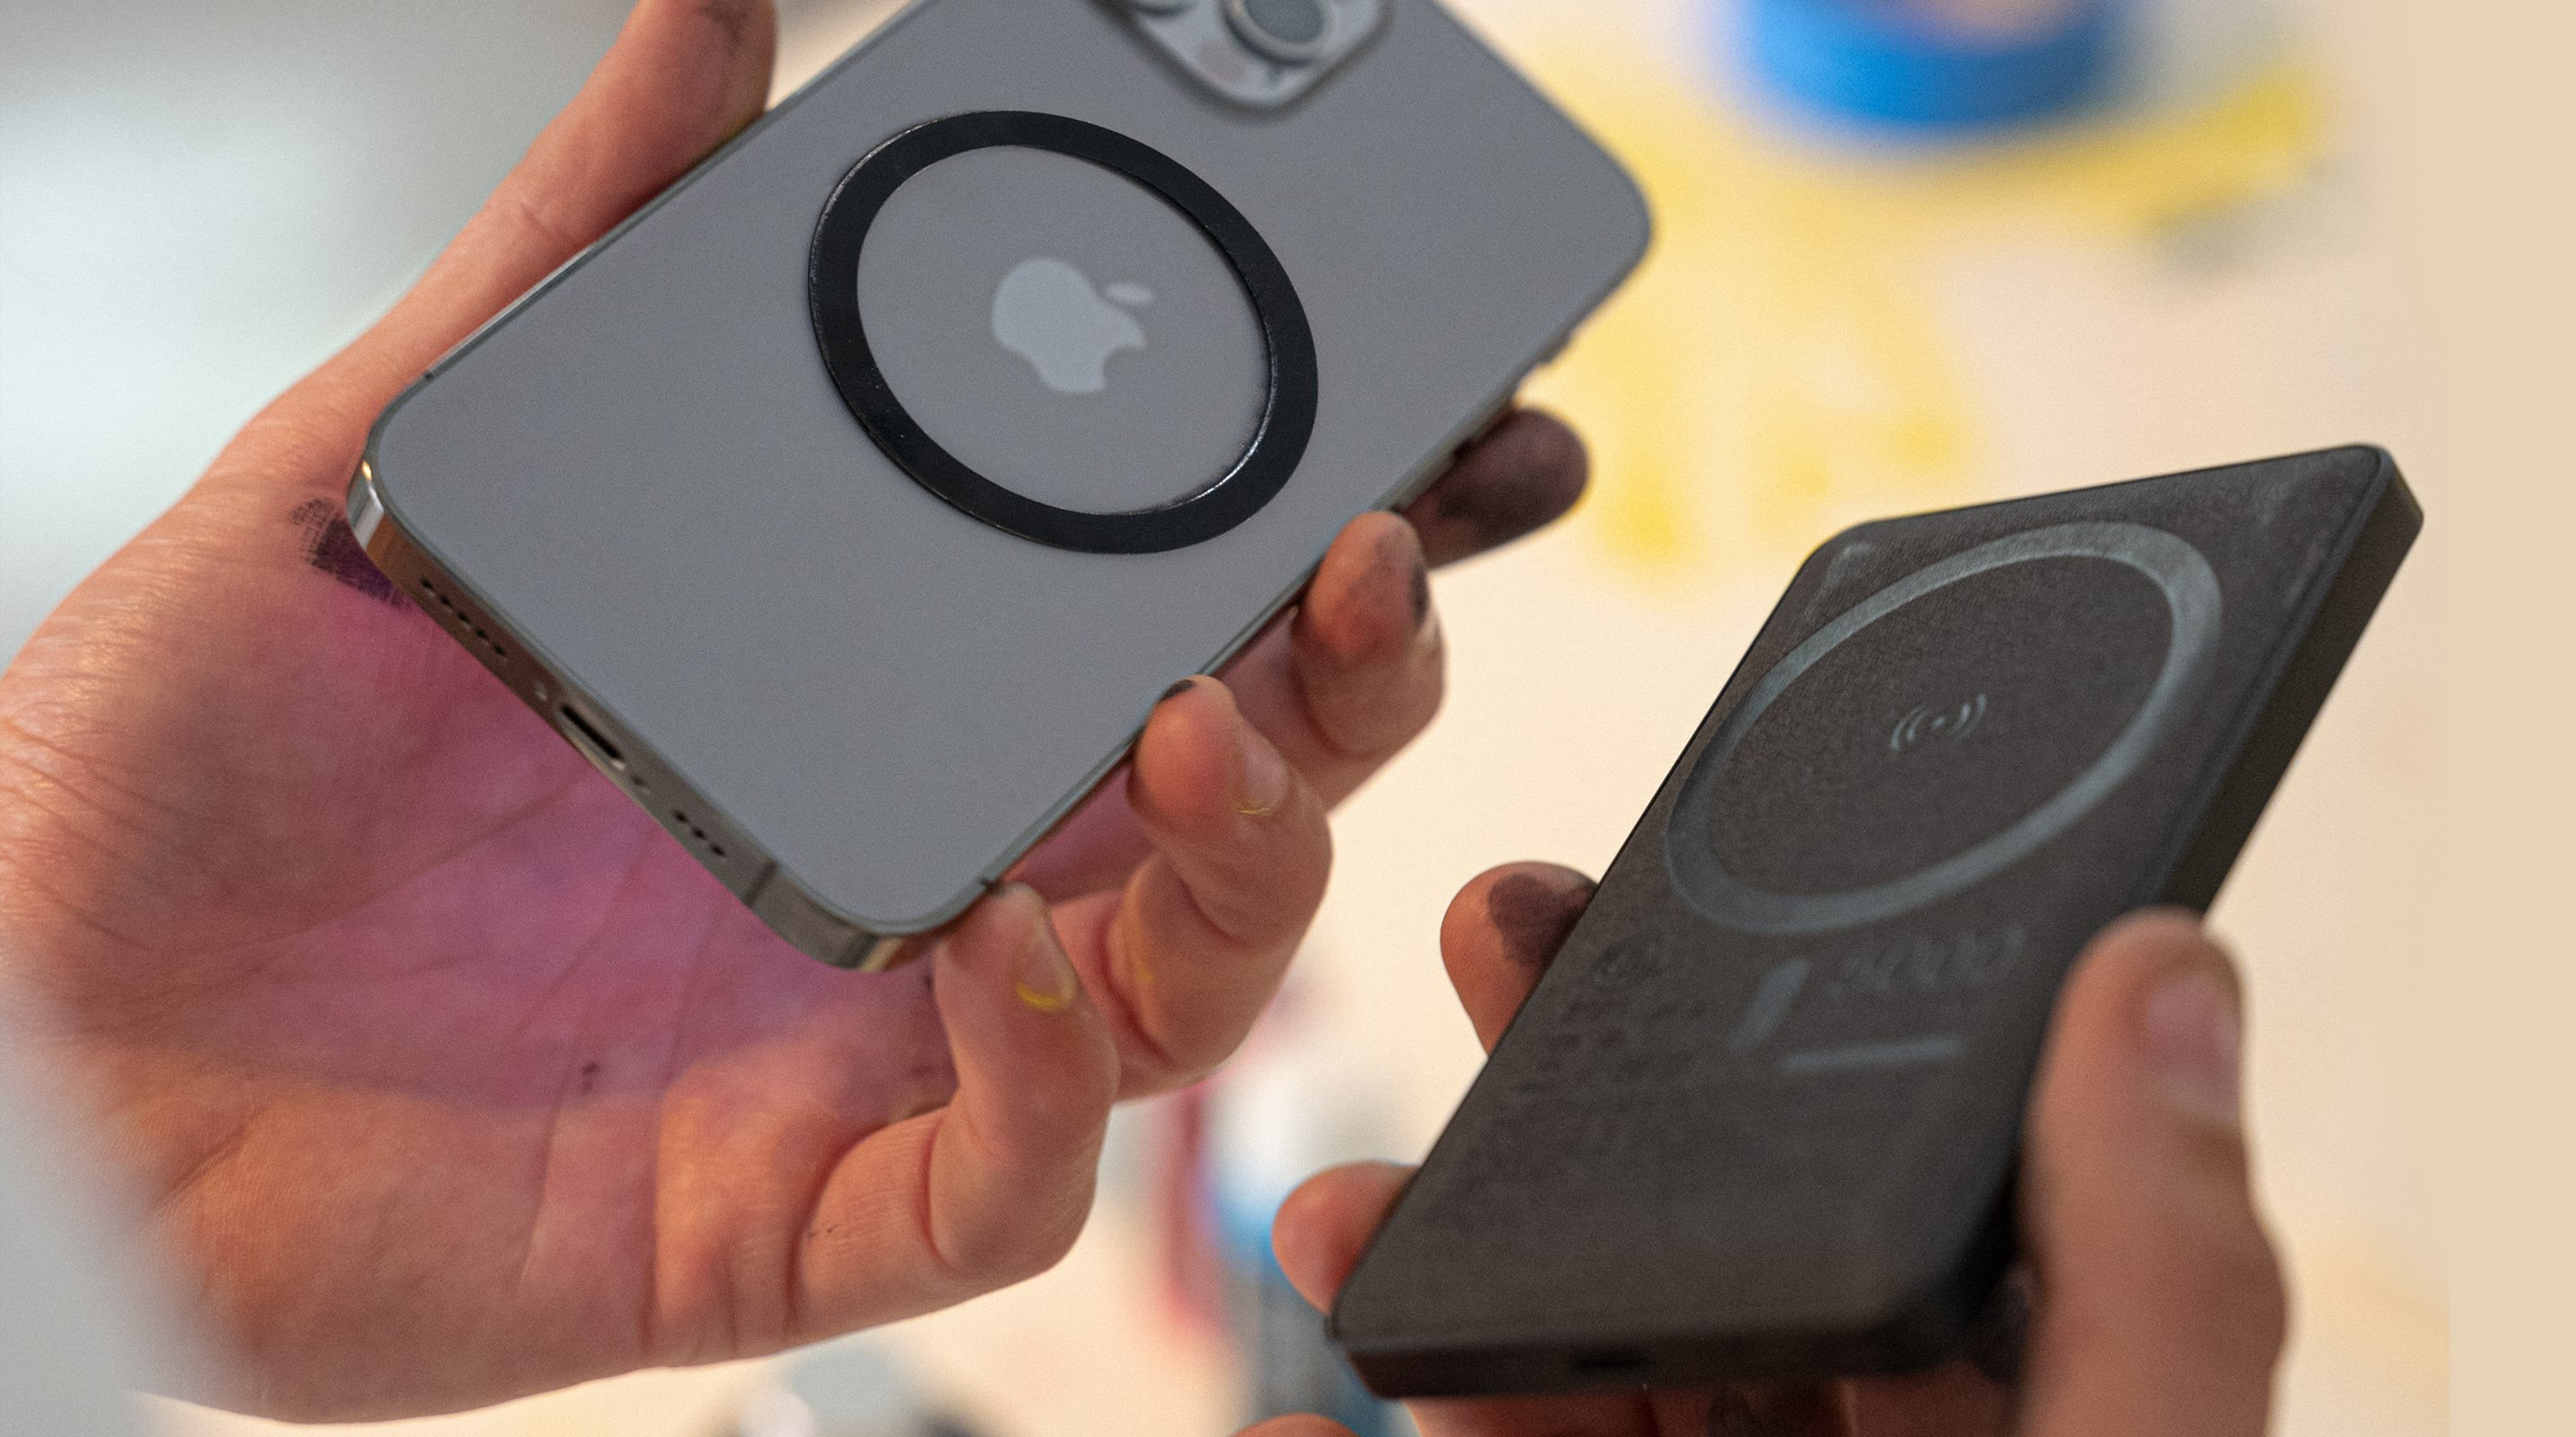
MagSafe eliminates such problems. Apple’s MagSafe Battery Pack and its rivals adhere magnetically onto the back of an iPhone 12 handset for a tidier bundle that I can tuck into one of my jersey’s pockets with no potentially perilous cable clutter.
But what’s the best MagSafe-compatible battery pack?
Many who buy one of the iPhone 12 models at an Apple Store may reflexively snatch the MagSafe Battery Pack off the shelf—it’s easy, it’s Apple, why buy anything else? Indeed, the Apple battery pack has distinct—if not decisive—advantages over its rivals. But those searching for value might find it wanting.
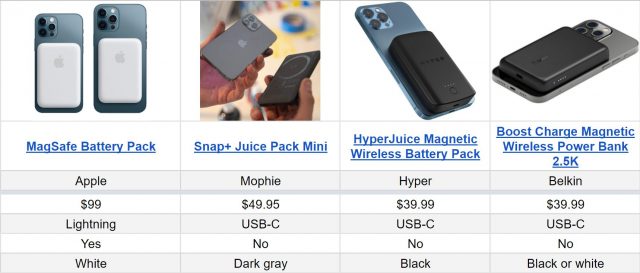
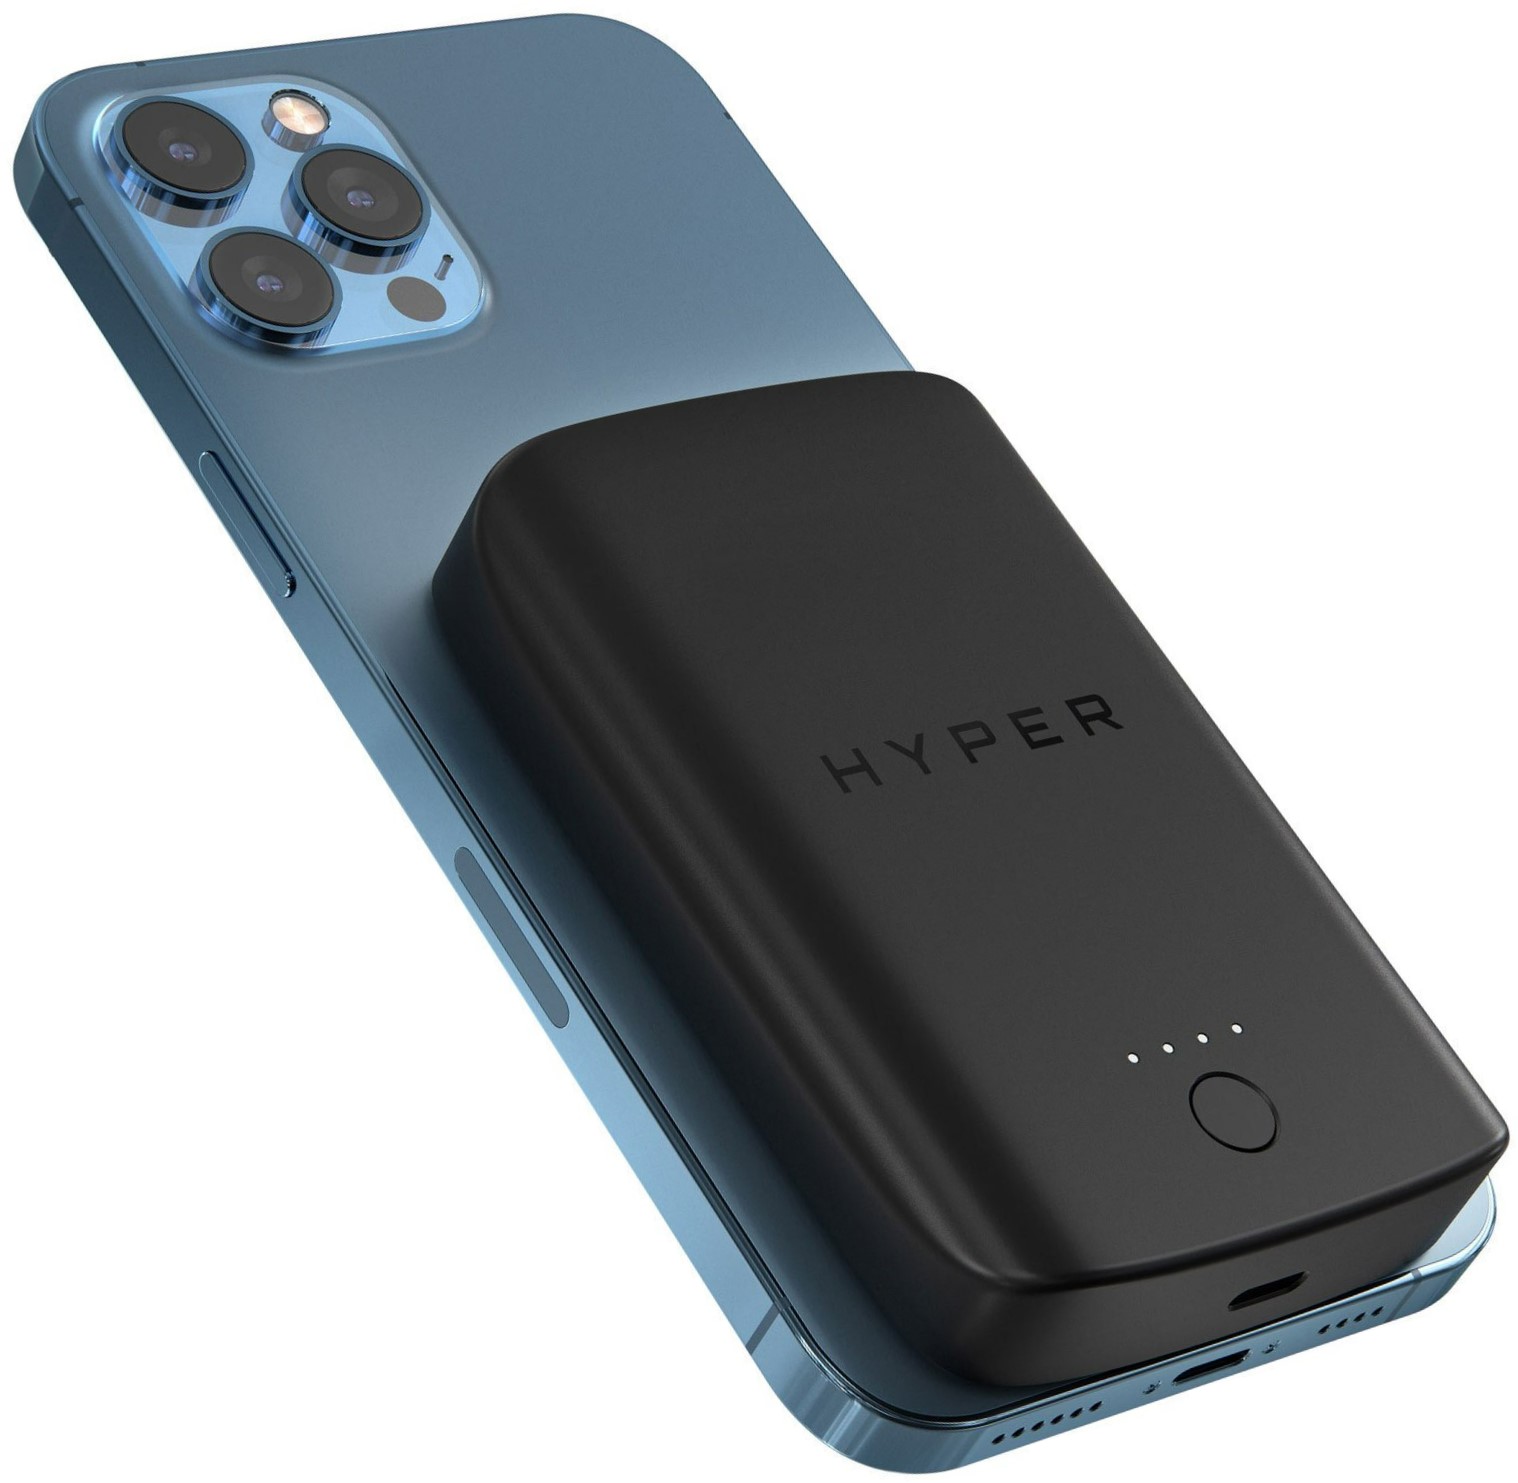
For this article, I tested the MagSafe Battery Pack along with three competitors, Mophie’s Snap+ Juice Pack Mini, Hyper’s HyperJuice Magnetic Wireless Battery Pack, and Belkin’s Boost Charge Magnetic Wireless Power Bank 2.5K. Other magnetic battery packs from the likes of Anker, Oisle, and Zens are available, but I did not have those available to test.
To make it easier for you to compare these battery packs at a glance, I built a comparison chart with specifications and other details.
Let’s see how they stack up against each another.
Price Tag
The most obvious comparison is on price—how much do these battery packs cost? Apple tends to charge a premium for hardware, and its MagSafe Battery Pack is no exception at $99. The Mophie Snap+ Juice Pack Mini is half the price of Apple’s $49.95, and the HyperJuice Magnetic Wireless Battery Pack and Belkin Boost Charge Magnetic Wireless Power Bank 2.5K are even less expensive at $39.99. Comparable battery packs from other third-party vendors are also in that price range.
For those reluctant to pay the Apple tax, it’s nice to have options, especially those that offer additional capacity and features.
MagSafe-certified vs. MagSafe-compatible
Apple, however, is the only manufacturer providing a MagSafe-certified battery pack. The others are merely MagSafe-compatible and lack specialized features found in Apple’s MagSafe Battery Pack. What does “MagSafe-certified” get you?
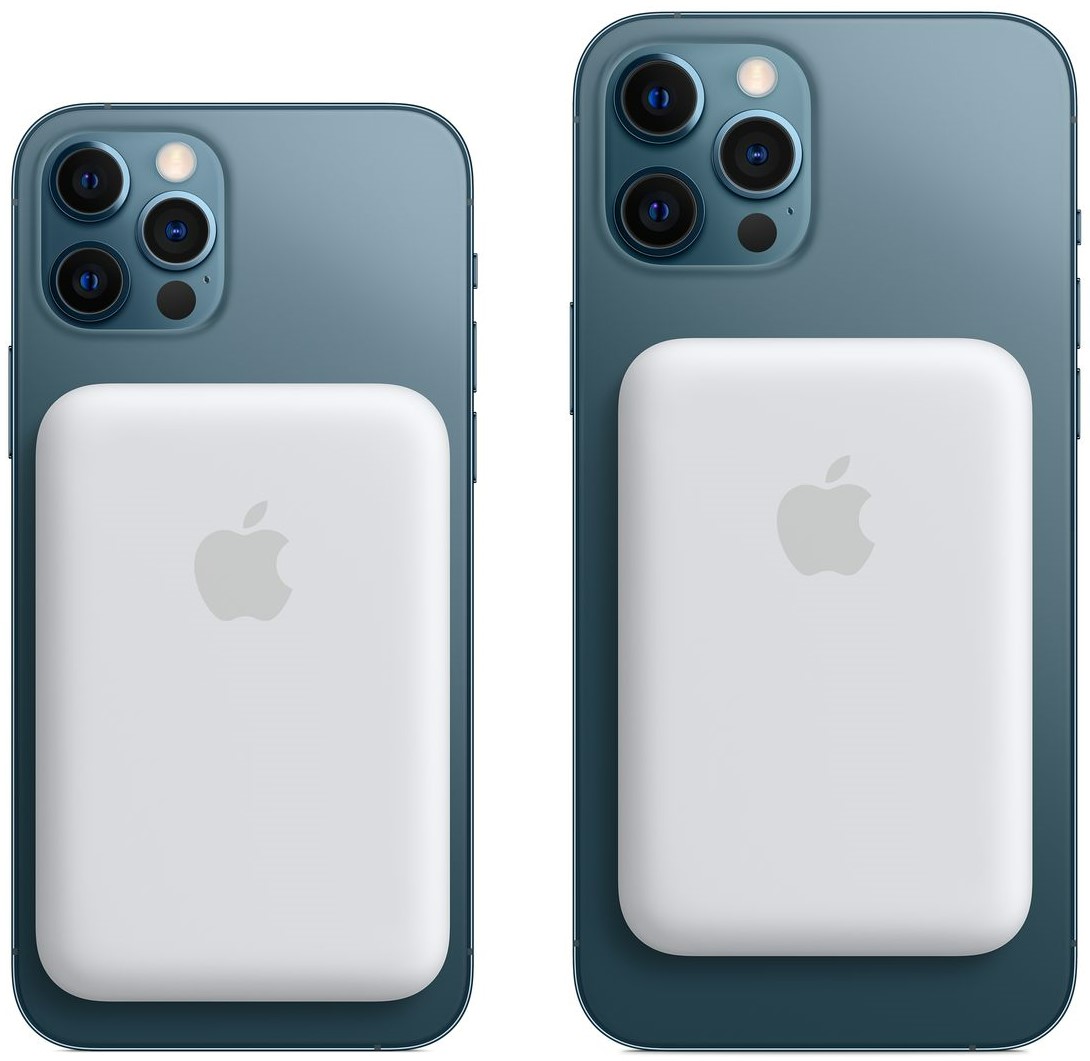
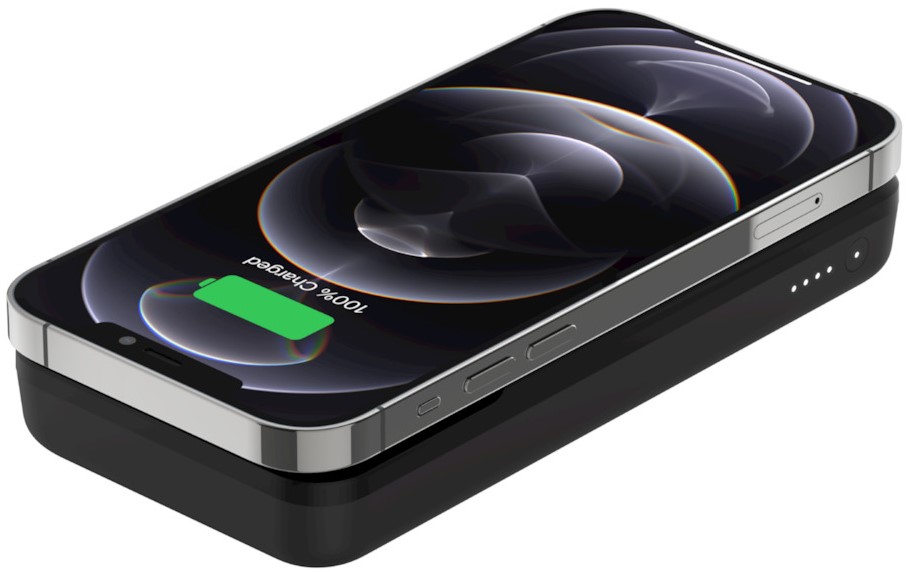
Apple’s MagSafe Battery Pack provides the best iOS integration. An icon for the battery pack appears in the Batteries widget (along with those for other devices from Apple and Beats by Dre) to show exact charging levels. The rival battery packs don’t appear in Apple’s widget. Plus, with the MagSafe Battery Pack, you get a nifty full-screen animation showing your phone charge level when you engage the MagSafe connection.

The competitors do have LED lights that display charge levels with a button press. They’re less precise than the iOS widget but sufficient for a quick check of the remaining battery charge. Similarly, the MagSafe Battery Pack has a single light that blinks green when the battery pack is fully charged. When it blinks amber, the battery needs additional charging time (but you can’t tell how much).
Apple’s MagSafe Battery Pack has other tricks that its rivals can’t match. For instance, charging your iPhone with the battery attached will charge both the phone and battery (with the iPhone charging first, up to 80%, and then the battery), provided you’re using a power adapter rated at 20 watts or higher.
Conversely, charging any of the battery packs with the iPhone attached will charge both the battery pack and iPhone. Hyper says this will even work if the pack’s battery is depleted, feeding power first to the iPhone and then replenishing itself.
The MagSafe Battery Pack has proprietary energy management features to help preserve the longevity of both the battery pack and iPhone. For instance, it will charge an iPhone only to 90% unless you override this setting in Control Center. Plus, if the MagSafe Battery Pack gets too hot, software inhibits charging above 80% until the battery cools down.
Ease of Use
None of the battery packs are difficult to figure out, but the MagSafe Battery Pack has a slight ease-of-use edge. Stick it to the back of the iPhone, and charging begins automatically.
With third-party battery packs, you must initiate a charging session by pushing a button. That’s no hardship, of course, but it is one more thing to remember to do. (And if you forget, no charging takes place.)
The HyperJuice Magnetic Wireless Battery Pack’s button is on the back, while the buttons on Mophie’s Snap+ Juice Pack Mini and Belkin’s Boost Charge Magnetic Wireless Power Bank 2.5K are on an edge, making them a bit more awkward to access.
Fit and Finish
Aesthetically, the MagSafe Battery Pack is the most refined of the set with rounded edging, a slightly grippy matte exterior, and a minimalist vibe thanks to that single light and an understated Apple logo, but no buttons or controls. It’s a lot less bulky than I had expected based on the photos I had seen of it before getting my review unit.

It fits with particular elegance on the iPhone 12 mini, with the side and bottom edges perfectly aligned. On the downside, the MagSafe Battery Pack is white, which looks nice right out of the box, but is not likely to weather well with longtime use (an issue I’ve had with other battery packs such as Belkin’s white Boost Charge Power Bank 10K with Lightning Connector). Apple made the same unfortunate color choice with its mobile MagSafe Duo Charger.
The HyperJuice Magnetic Wireless Battery Pack is black and hard to the touch with a mix of hard angles and curvy edges.
The Mophie Snap+ Juice Pack Mini has a more relaxed, dark-gray aesthetic, with a fabric-style, soft-to-the-touch yet rugged exterior that the company has used on other devices.

The HyperJuice Magnetic Wireless Battery Pack juts out from the phone more than the others, while the Snap+ Juice Pack Mini is about as thick as Apple’s MagSafe Battery Pack but longer and wider. These dimensions create a minor issue with the iPhone 12 mini since, according to the company, “users will experience a 0.19-inch overhang from the bottom of their device and will need to remove the juice pack for camera use.” Not ideal.
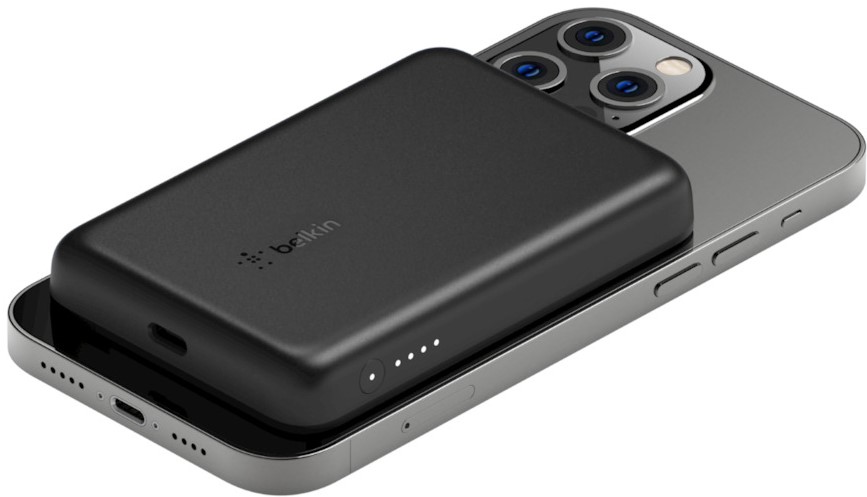
Belkin’s Boost Charge Magnetic Wireless Power Bank 2.5K circumvents the overhang problem because it’s nearly a dead ringer for the MagSafe Battery Pack, with similar contours and only slightly larger and heavier. Unlike the Apple battery pack, it’s available in black as well as white.
Lightning vs. USB-C vs. Qi
The MagSafe Battery Pack has a Lightning port for charging. The others rely on USB-C ports for replenishing their batteries.
Apple’s choice of Lightning makes sense since it aligns with other devices in the iPhone ecosystem. Apple suggests using its $19 20W USB-C Power Adapter but doesn’t bundle it with its iPhones or the battery pack. Nor is a Lightning cable included.
However, I must confess to a preference for the USB-C ports on the rival devices since USB-C is becoming ubiquitous. It’s built into Macs, Windows PCs, Chromebooks, Android handsets, and many tech accessories, along with an increasing number of Apple’s iPads. As a result, I have USB-C cables plugged into outlets throughout my house to charge the variety of gadgets used by my family. An iPhone and related accessories with USB-C ports are overdue.
The USB-C ports on the Hyper and Mophie battery packs have an obvious, useful function: they allow you to charge other devices using a cord. You can use a USB-C to Lightning cable to charge an older iPhone or a USB-C to USB-C cable to charge any phone or accessory with a USB-C port. You can even charge two devices at once, one magnetically, and the other with the cord.
Belkin’s Boost Charge Magnetic Wireless Power Bank 2.5K doesn’t support corded device charging even though it has a USB-C port. And don’t try using Apple’s MagSafe Battery Pack to charge a device via its Lightning to USB-C cable because the connection isn’t bidirectional—it won’t charge anything else.
All the battery packs double as traditional Qi chargers, regardless of whether they are plugged into power or running off their batteries. With the third-party devices, I had good luck wirelessly charging various devices, including AirPods cases and a Google Pixel phone.
But the MagSafe Battery Pack gave me a bit of grief. Accurately positioning a device for Qi charging was maddening, much more so than with the other battery packs. Also, its charging was much slower than with the other battery packs—at least when the MagSafe Battery Pack was not plugged into a 20W charger.
Mophie provides an ingenious bonus: a metallic ring called a Snap Adapter to put on an older Qi-compatible iPhone to mimic how a magnetic battery pack snaps onto an iPhone 12. The ring is somewhat fiddly to position and attach properly, but it’s worth the effort.
Charging Performance
These products are like other compact battery packs in that they offer limited capacity. Neither Apple’s MagSafe Battery Pack nor the third-party equivalents were able to fully charge my iPhone 12 Pro with their magnetic wireless connections.
In my testing with a drained iPhone 12 Pro, Mophie’s Snap+ Juice Pack Mini got the closest, bringing it up to 98% before it was empty. The HyperJuice Magnetic Wireless Battery Pack hit 82%. Apple’s MagSafe Battery Pack lagged at 65%.
My testing of the MagSafe Battery Pack roughly confirms Apple’s claims of 70% of additional charging with the iPhone 12 mini, 60% with the iPhone 12 and iPhone 12 Pro, and 40% with the iPhone 12 Pro Max.
While charging my iPhone, the MagSafe Battery Pack depleted its battery in just over 2 hours. The HyperJuice Magnetic Wireless Battery Pack took 3 hours and 30 minutes, and the Snap+ Juice Pack Mini took just under 6 hours.
But note that, in some cases, the speediest charging occurs at the top of the session. The MagSafe Battery Pack brought the iPhone to 50% in about 75 minutes. The HyperJuice Magnetic Wireless Battery Pack did even better, hitting 50% in a bit over an hour and 75% in a little over 2 hours. Mophie’s Snap+ Juice Pack Mini was the (slight) laggard at 50% in 90 minutes and 75% an hour after that.
The Belkin Boost Charge Magnetic Wireless Power Bank 2.5K is at a disadvantage in this competition because it has about half the capacity of its Hyper and Mophie rivals, measured in milliamp hours. It weighs in at 2500 mAh, while the HyperJuice Magnetic Wireless Battery Pack and the Snap+ Juice Pack Mini have double that. Belkin’s battery pack charged my iPhone 12 Pro up to only about 50% in just over 90 minutes and then died. Yet it costs as much as the HyperJuice Magnetic Wireless Battery Pack.
However, you should be aware of Belkin’s Boost Charge Magnetic Portable Wireless Charger 10K, which offers 10,000 mAh for $59.99. I didn’t receive one to try out, but it looks like a much better deal, albeit in a much larger package.
I conducted my testing with my iPhone 12 idle and in Do Not Disturb mode, with brightness at the dimmest setting. Using your iPhone while charging it will make it charge slower. As tech writer Raymond Wong discovered, MagSafe Battery Pack charging can be brought to a virtual standstill under some conditions.
Regardless, charging via a magnetic wireless connection (or regular Qi link) is inherently and incredibly inefficient. I fully grasped this after charging my iPhone 12 Pro using the Mophie and Hyper USB-C ports. The Snap+ Juice Pack Mini charged my iPhone to 80% (at which point it declared itself “sufficiently charged”) with approximately two-thirds of the pack’s battery capacity to spare, and it did so in less than 60 minutes. The HyperJuice Magnetic Wireless Battery Pack performed similarly. Stick to the wires if you want to transfer the most juice in the least amount of time.
A Reason To Avoid Magnetic Charging?
MagSafe isn’t a must-have if you are looking for a portable battery pack for one of the iPhone 12 models. After carrying the MagSafe Battery Pack and the alternatives for a couple of weeks, I’ve become less bullish on mobile magnetic charging.
The problem is that the battery is too easily dislodged. That was the case, for instance, when I ran errands on my touring bicycle and tucked the iPhone-and-battery pack combo in my pannier bag. Sometimes, as the gear jostled about, the battery shifted, preventing the iPhone from charging. Even in the back pocket of my jersey, the iPhone and battery sometimes disengaged as I pedaled.
So you should think about how you would use this technology and whether any such scenarios are too rough and tumble for a magnetic connection.
I wonder why Apple didn’t make a MagSafe battery pack built into an iPhone case, similar to the battery cases it sold for other iPhone models. I still have one on my iPhone 7.
With my iPhone 12 Pro, I have returned to charging cables (with great care to avoid another potentially perilous cord tangle). I am again using an old favorite, Belkin’s Valet Charger Power Pack 6700 mAh for Apple Watch + iPhone. It lacks modern features like Qi, USB-C, and MagSafe, but it has enough capacity to keep my iPhone juiced via a micro-USB cord on long rides—and it can also top up my Apple Watch multiple times. It is small and light enough not to burden me, though it is a bit bigger and heavier than the magnetic battery packs.
Not An Easy Decision
I thought my comparison testing would help me zero in on the obvious purchase—but it’s not that simple. Here’s my take based on various criteria:
- Price: Apple’s MagSafe Battery Pack, at $99, is a tough sell if you are on a tight budget. The HyperJuice Magnetic Wireless Battery Pack, at $39.99, is at the other end of the price scale, and it’s a bargain since there are no major compromises at that low cost.
- iOS integration: The MagSafe Battery Pack is the clear winner with Batteries widget support and more.
- Style: This is obviously a matter of taste. The MagSafe Battery Pack looks the most Apple-like, for those who care about that sort of thing. But I am fond of Mophie’s fabric-like styling that makes the other hard-touch battery packs look bland.
- Durability: None of the battery packs seem fragile, though I didn’t do drop tests. But scuffs and scratches are a concern, and the white MagSafe Battery Pack will likely look the worse for wear over time. (Ditto for Belkin’s Boost Charge Magnetic Wireless Power Bank 2.5K if you get it in white.) The Snap+ Juice Pack Mini should hold up the best since its textured surfaces will invisibly absorb punishment (as I have seen with other Mophie products).
- Charging performance: If you want the battery pack that will get closest to 100% when charging an iPhone 12 Pro, go for the Snap+ Juice Pack Mini. But the HyperJuice Magnetic Wireless Battery Pack provides the best fast-charge performance at 50% in about 1 hour and 75% in about 2 hours.
- Charging versatility. It’s nice to have more than one way to charge. Both the Snap+ Juice Pack Mini and the HyperJuice Magnetic Wireless Battery Pack charge devices via their USB-C ports as well as via magnetic connections and do so far more quickly when using a cable. You can even charge two devices at the same time, one with a cord and one magnetically.
In the end, there’s no one obvious choice for all users. It’s easiest to cross Belkin’s Boost Charge Magnetic Wireless Power Bank 2.5K off the list since it has the least amount of juice and lacks USB-C versatility. As for the remaining products:
- Apple’s MagSafe Battery Pack will appeal to those who want iOS integration and an Apple design aesthetic, and don’t mind paying at least twice as much. Also, its charging speed isn’t too shabby.
- The HyperJuice Magnetic Wireless Battery Pack provides the best bang for your buck, but looks the most conspicuous and awkward on an iPhone.
- Mophie’s Snap+ Juice Pack Mini is a bit pricier but avails itself respectably in terms of power and versatility. It has that cool, durable fabric-like exterior, and I like how thin it feels. It’s my favorite of the three.