#1649: More LastPass breach details and 1Password switch, macOS screen saver problem, tvOS 16.3.3 fixes Siri Remote bug
If you have experienced problems with your Siri Remote on a third-generation Apple TV 4K, update to the just-released tvOS 16.3.3. Password management service LastPass has released significantly more information about its 2022 data breaches, but it’s too late for Adam Engst, who shares some of his experiences switching to 1Password. Also this week, Adam delves into a bug—or a questionable design decision—that causes the macOS screen saver to ignore rotated and edited photos in favor of their originals, resulting in images displayed on their sides. Workarounds exist, but they’re not pretty. Notable Mac app releases this week include GraphicConverter 12, SoundSource 5.5.8, Zoom 5.13.10, CleanMyMac X 4.12.6, Pixelmator Pro 3.3, DEVONagent Pro 3.11.7, Timing 2023.2, and Photos Workbench 1.0.2.
tvOS 16.3.3 to Fix Siri Remote Problems for Third-Generation Apple TV 4K
Apparently, some owners of the new third-generation Apple TV 4K have been having problems where the USB-C Siri Remote doesn’t connect reliably. With luck, those issues will be a thing of the past once users install the just-released tvOS 16.3.3, which promises to fix this problem. The update is available only for the third-generation Apple TV 4K, and you can install it right away from Settings > System > Software Updates > Update Software or let it install on its own.
LastPass Publishes More Details about Its Data Breaches
In 2022, password management service LastPass suffered its latest significant breach, this one resulting in the loss of customer vault data (see “LastPass Shares Details of Security Breach,” 24 December 2022). Months later, the company has finally provided significantly more information about the breach, what data was compromised, and how users should respond. The new information is helpful, but it doesn’t make me regret switching to 1Password.
In a carefully worded blog post, LastPass CEO Karim Toubba lays out a more-detailed timeline of two chained incidents, with the first setting the stage for the second. He then points readers to a pair of security bulletins with recommended actions: one for LastPass Free, Premium, and Families users and another for LastPass Business users. Finally, he summarizes what actions LastPass has taken to better secure its systems. I particularly appreciated the extensive list of all the data types accessed, with notes about which fields were encrypted and which were not.
Notably, the company says that it hasn’t heard from the attacker nor seen any indication of the data being used.
There has been no contact or demands made, and there has been no detected credible underground activity indicating that the threat actor is actively engaged in marketing or selling any information obtained during either incident.
If you’re interested in security stuff, the various posts are worth reading, and LastPass has done a much better job of communicating this time, even if it’s overdue. In particular, if you’re still using LastPass, I recommend following the company’s advice to:
- Ensure the strength of your master password
- Increase the number of password iterations
- Turn on or reset multifactor authentication
- Review the Security Dashboard
- Turn on dark web monitoring
LastPass hasn’t yet made the last two options available to LastPass Free users, but the company says it will enable them shortly. Interestingly, LastPass has dramatically increased the number of password iterations. Some long-time users were still set at what is now an absurdly low 5,000, while newer users had 100,000 iterations. The default is now 600,000—that’s a big change.
I wonder what Karim Toubba must be going through. He joined LastPass as CEO in April 2022, and the first breach occurred just months later, in August 2022. The company has likely been in crisis mode ever since, and the extent of the changes (combined with the actual breach, of course!) suggests that its previous security stance was problematic. We hope the adults are now in charge and are taking the right steps to prevent future breaches.
Switching to 1Password from LastPass and Authy
On top of my irritation with LastPass’s interface, functionality, and reliability, the breach was the final straw, so I switched to 1Password and imported my data from LastPass. I chose the approach of exporting data from LastPass and importing it into 1Password because 1Password’s direct import capability doesn’t work if you have multifactor authentication turned on in LastPass. I wasn’t comfortable disabling that, even temporarily.
I’m not quite ready to delete all my data from LastPass, but that’s on my list once I’m confident that 1Password has all the capabilities I want. I realize that some people haven’t been happy with the changes in 1Password 8, but as someone who didn’t particularly use previous versions, I haven’t been perturbed. While not perfect, 1Password has been significantly more elegant than LastPass, which never provided anything resembling a native Mac or iOS experience. That was especially true in the last few weeks I used LastPass, when it felt like the company was making rapid changes in an effort to show users that it was doing something.
I particularly like using my Apple Watch to unlock 1Password on my 2020 27-inch iMac and my watch or Touch ID on my M1 MacBook Air. LastPass introduced app-based multifactor authentication a while back, but it never properly accepted input from its watchOS app, forcing me to pull out my iPhone every time to confirm login in its iOS app. I’ve subsequently reset LastPass’s multifactor authentication to use a normal time-based one-time password (TOTP) that I stored in 1Password, which auto-fills it whenever I log in to LastPass on my Mac—a distinct improvement over tapping a button in LastPass’s iPhone app.
1Password’s support for TOTP has been a big win. I started with authentication apps early, when Google Authenticator was the only game in town. When I learned that its data wouldn’t transfer to a new iPhone (it can now if you can scan a QR code on the old device), I switched to the free Authy ecosystem of apps, which has worked acceptably and syncs across my Macs, iPhone, and iPad. (I tried LastPass Authenticator briefly, but it’s available only for the iPhone and iPad, and I hate turning to my iPhone when logging in on the Mac.)
Authy provides the Authy Desktop app for the Mac, but every time I want to log in to an account requiring two-factor authentication, I have to launch Authy Desktop, search for the website (I have 28 accounts), click a button to copy the code, switch back to my Web browser, and paste the code. I thought about automating the process with Keyboard Maestro, but it would be nothing more than fragile monkey-clicking. The way 1Password auto-fills the TOTP as the next step in the login process has been a huge relief.
(Glenn Fleishman reminds me that you could opt instead to use Apple’s multi-platform support for TOTPs, but on the Mac, it works only within Safari. If you use other Mac browsers or apps, you have to bring up Safari > Preferences > Passwords or the Passwords settings/preference pane, authenticate, search, click, and copy; see his article, “Add Two-Factor Codes to Password Entries in iOS 15, iPadOS 15, and Safari 15,” 7 October 2021. And, of course, then there’s the whole iCloud Keychain vulnerability if your iPhone and passcode were stolen; see “How a Thief with Your iPhone Passcode Can Ruin Your Digital Life,” 26 February 2023.)
Moving my two-factor authentication setup from Authy to 1Password has been fussy and time-consuming. Amazon Web Services was the only service that allowed me to register 1Password as an additional authentication device. For all other accounts, I’ve had to reset two-factor authentication or turn it off and back on. The threat of being completely locked out of an account is scary, so I’m careful to add the new TOTP to both 1Password and Authy (again) before I delete the old account in Authy. While I don’t anticipate using Authy after I get everything set up in 1Password, it feels like a useful backup if storing the TOTP in 1Password alongside the account credentials feels problematic. Remember to record one-time or “scratch” codes if a site offers them when enabling two-factor authentication—they can be a lifeline if you have a TOTP blowout.
Much as with the Wall Street Journal’s coverage of iPhone passcode thefts, I’ve come to see the LastPass breach as an opportunity to rethink my approach to password security. I wasn’t entirely happy with LastPass before the breach but couldn’t muster the enthusiasm for switching. By cleaning up duplicates and other cruft in 1Password organically, as I need to use the associated sites, I can nibble away at a task that would be too enormous to face all at once—I have over 900 logins. I’ll ultimately have a better handle on my passwords than ever before.
But I’ll still be happy if passkey support—see “Why Passkeys Will Be Simpler and More Secure Than Passwords,” 27 June 2022—becomes widespread quickly such that I don’t need all these stinkin’ passwords!
macOS Photo Screen Savers Still Don’t Properly Display Rotated or Edited Images
In the days of After Dark, near the start of TidBITS in the early 1990s, screen savers were a big deal—they regularly made news. After Dark was modular, supporting a fertile ecosystem of independent developers alongside licensed options from franchises like Star Trek, Disney, and Marvel Comics. Sadly, After Dark—and its iconic flying toasters—never made the leap to Mac OS 9. Although the package was revived for Mac OS X, it never regained anything resembling its previous glory (see “After Dark Returns for Mac OS X,” 9 June 2003). If you want to refresh your visual memory of the core After Dark modules, see “Revisit the Flying Toasters via CSS” (12 June 2015).
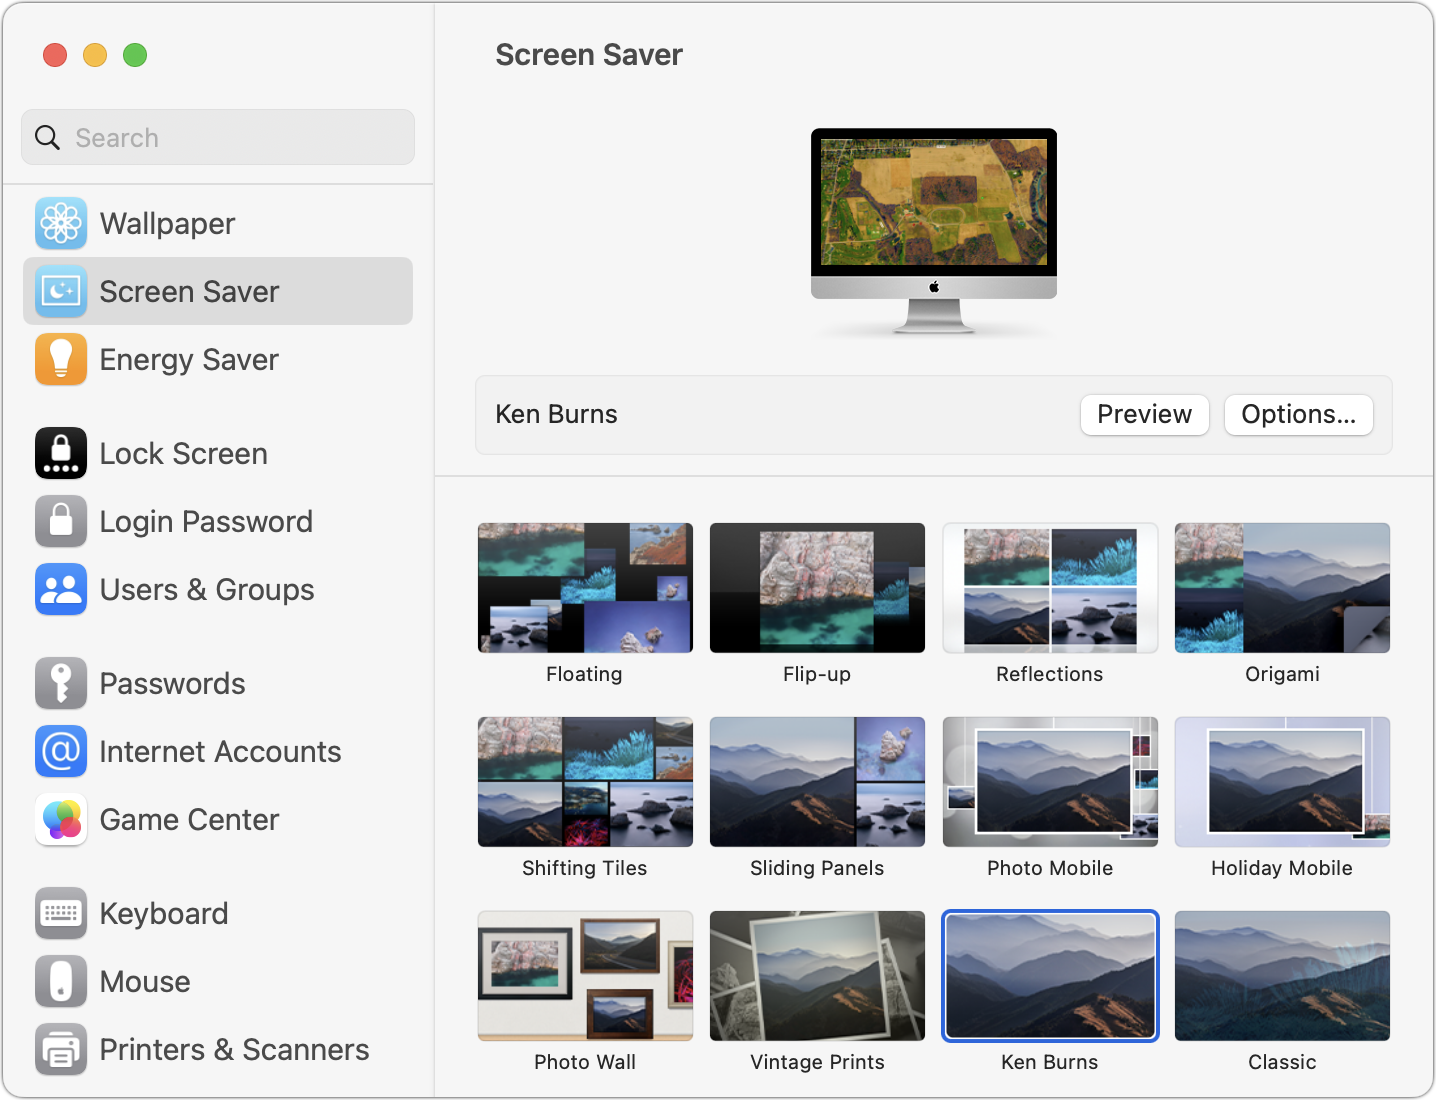
By the early 2000s, the world had moved on, which Apple helped by giving Mac OS X its own modular screen saver capabilities, with screen savers that display either pretty patterns or selections from your photos. Apple’s Ken Burns screen saver, which pans and zooms through your photos, has been particularly popular, and the company has added numerous other photo-based screen savers to macOS over the years.
But therein lies the longstanding rub: an unresolved bug that spans many years. The big win of Apple’s photo screen savers is that they let you select photos from your Photos library or a folder. According to the author of ArtSaver, an independent macOS screen saver that offers many more options, Apple doesn’t allow third-party apps access to your Photos library.
What’s the bug? Let’s imagine that you’re my parents. (They’re special, but in this scenario, not unusual.) While digital picture frames are popular and ever larger—you can get affordable ones up to 15 inches—they still don’t compare to a 27-inch iMac. And there’s the trouble of managing albums and transferring them to a digital frame. Why wouldn’t you use your iMac to shuffle through decades of family photos already stored on your computer?
So you pick one of Apple’s basic photo screen savers—my parents are not fond of the flippy, zippy ones where photos bounce frenetically—and configure it to display the images from a particular album. That works fine until it hits a photo that was captured in portrait orientation and that you rotated to landscape in Photos. That photo still stubbornly displays in portrait orientation, not landscape, so the subject is on its side.
This is not a subtle bug, though when my parents complained about it, it took me a little while to figure out what was different about the affected images. The problem is simple: Apple’s photo screen savers display only original, unedited images in Photos. If you have edited an image, including rotating it, the screen saver ignores your changes, instead using the original image stored separately in Photos.
It’s no secret, but Photos stores your original images in a folder (called “originals”) within the Photos Library package. When you edit an image in the app, those changes are applied as a series of transformations rendered on top of the original and shown in preview in thumbnails. However, when the screen saver module references an album image, it doesn’t trigger what may be a computationally expensive operation to render the image as you’d see it in Photos. But few other apps should be consuming significant CPU cycles when the screen saver is active.
My parents are a few versions of macOS behind because they’re using a 27-inch iMac from 2014, which can’t be upgraded to macOS 12 Monterey, much less macOS 13 Ventura. But it took me only a few minutes to confirm that the bug still exists in Ventura. I copied a few photos into a new album, rotated a couple of them and made wildly obvious color edits to several others, and then tested that album in the various photo-based screen savers in System Settings > Screen Saver. Clicking the Preview button showed that it was using the originals and not my rotated or edited versions.
Workarounds
There are workarounds, but you’re not going to like them because they waste disk space and require regular maintenance to include new photos.
The first method requires you to export and reimport your edited photos so that the screen saver software sees them as “originals.” When you export edited images to the Finder, Photos “burns” the edits into the files, making them permanent. You can then reimport those images into Photos, either deleting the ones you exported to save space and reduce confusion, or keeping them for future edits, both of which are problematic.
This approach suffers from at least the following problems:
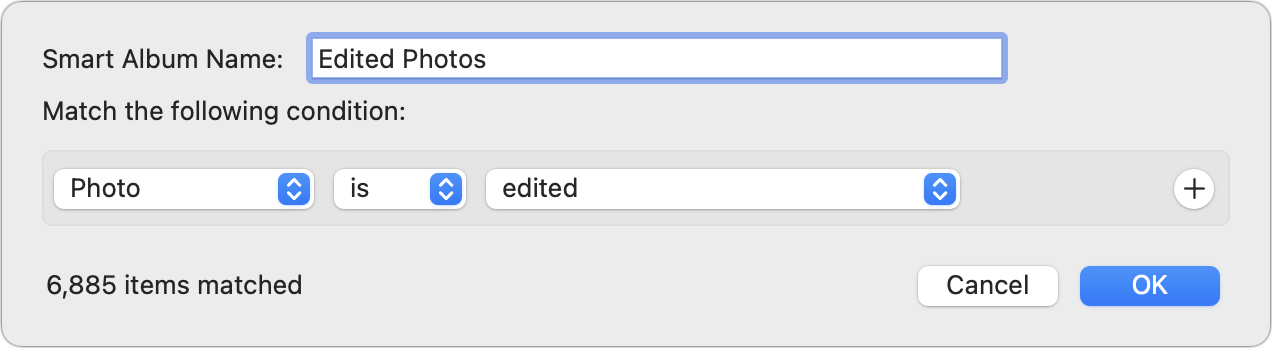
- It will be clumsy. Although you can create a smart album that contains only edited photos for export, it will likely still collect oodles of images—nearly 7000 in my Photos library. When you reimport, consider importing into an album and applying a keyword so you can identify these images easily later.
- You’ll need significant disk space temporarily. Exporting and reimporting all those will take time and consume disk space, and unless you temporarily disable Time Machine and any online backup software like Backblaze, they could cause your backups to balloon in size as well.
- Some metadata will be lost. Although you can choose to export photo titles, captions, keywords, and locations, when exporting using File > Export > Export # Photos, you’ll lose album and project inclusions. Don’t just drag the photos to the Finder, or you’ll also lose titles, captions, and keywords.
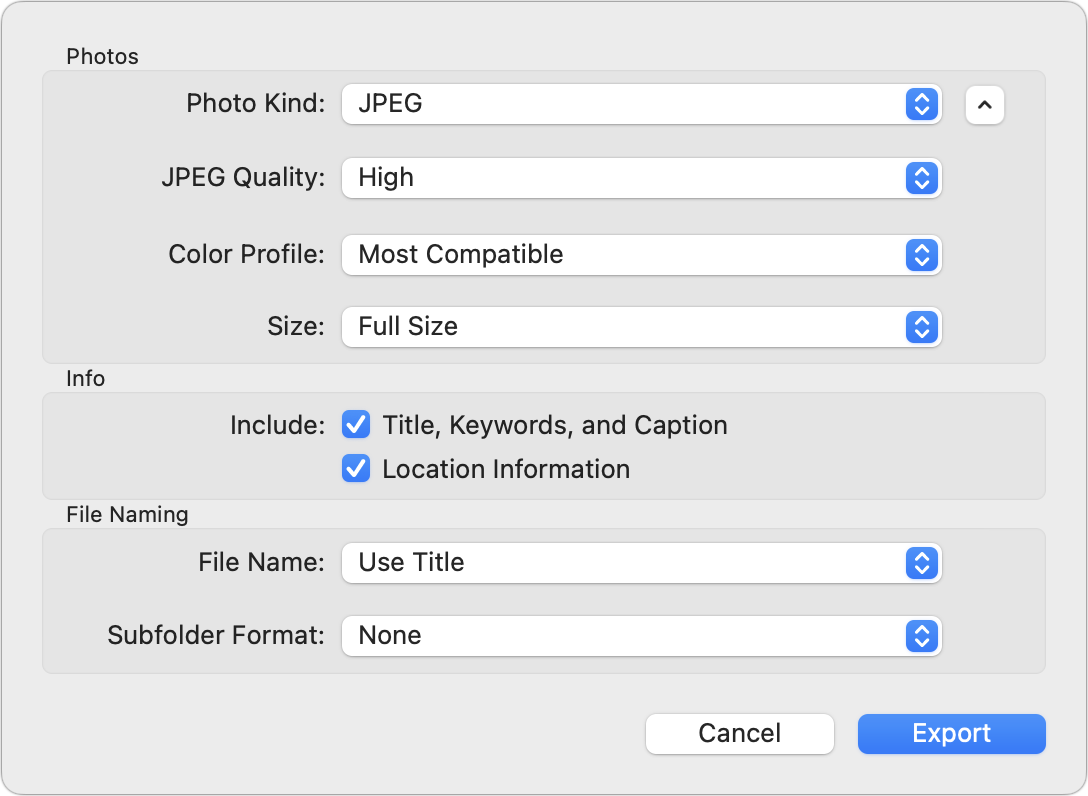
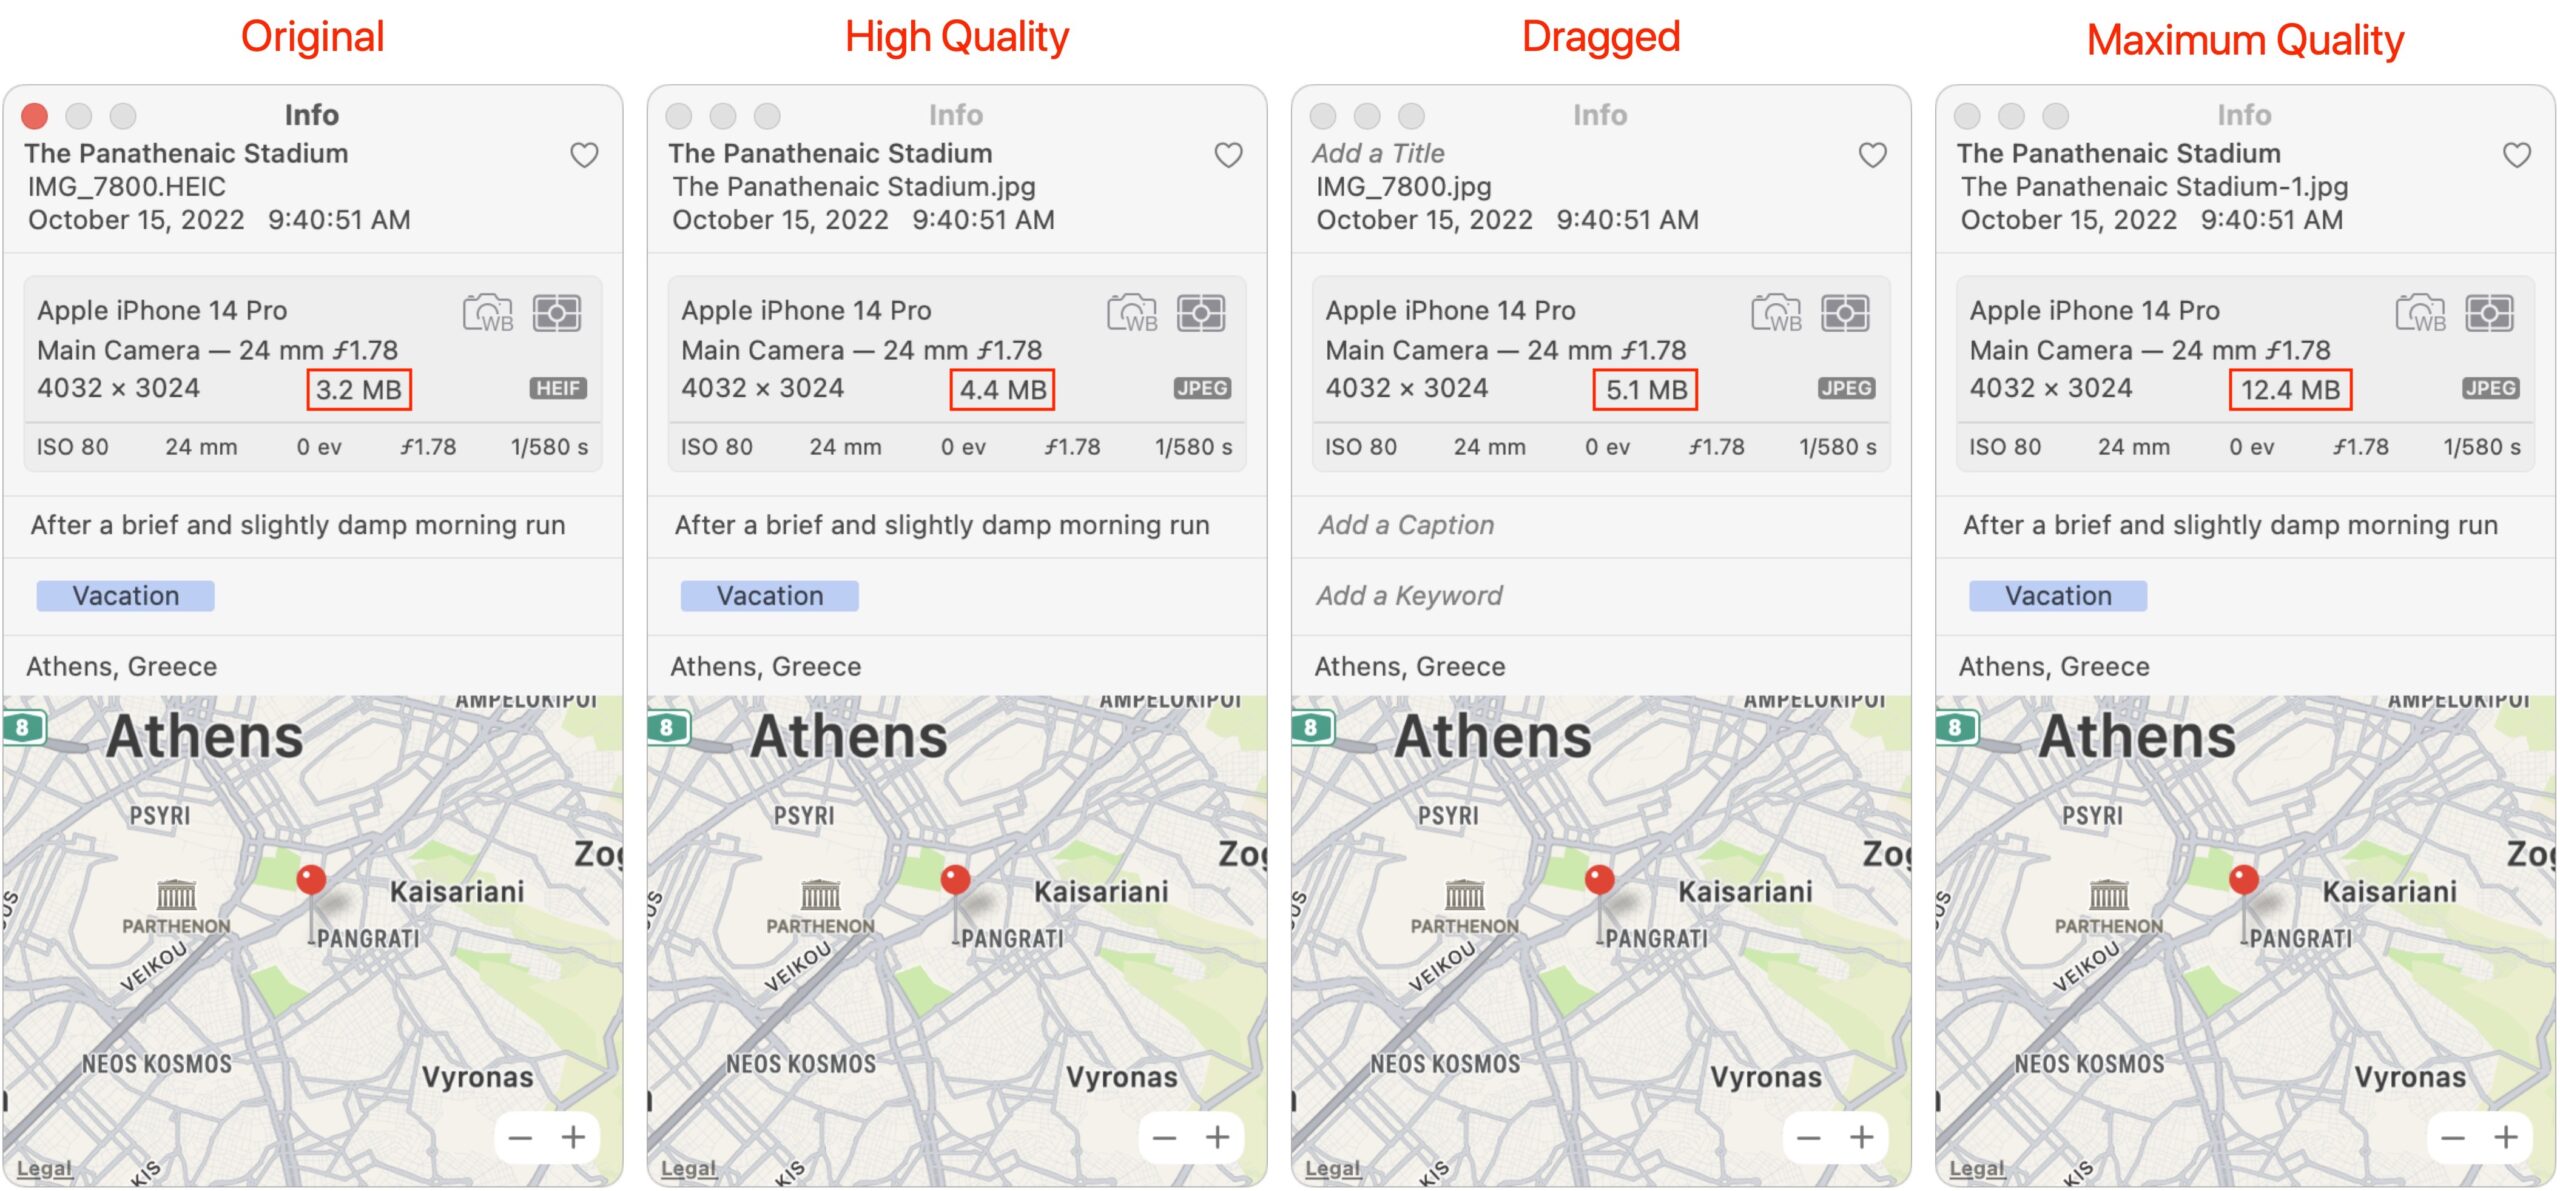
- The imported images may be larger. If your originals are in HEIF format, replacing them with JPEG versions will likely require more disk space. I started with a 3.2 MB original in HEIF and exported by dragging and by using the High and Maximum settings in the JPEG Quality pop-up menu. The High-quality export grew to 4.4 MB, the dragged image was 5.5 MB, and the Maximum-quality export was a whopping 12.4 MB. If you’re instead keeping the versions you exported for later editing, you could export images at the size of your screen to save space.
- You won’t be able to revert anymore. Of course, if you’re replacing your original images with exported and reimported versions, you won’t be able to use the Revert to Original command for such photos. That may not be an issue for those that were just rotated, but you might not appreciate losing history on more complex edits.
- Duplicates could cause confusion. If you decide to export at a lower resolution to save space and keep the originals when reimporting, you’ll end up with duplicates that may confuse other aspects of your Photos use.
I’m a purist about not throwing away data that could be useful later, so I’m highly uncomfortable with this workaround. The alternative of keeping both the originals and smaller imports makes me even more concerned about wasting space and dealing with duplicates.
Second, you could export only the photos you want your screen saver to display to a folder in the Finder and then point the screen saver at that folder. Even if you export images at just the resolution of your screen and with a tighter JPEG compression level, this workaround consumes a lot of disk space as well and requires even more work to maintain the folder manually with future exports rather than relying on an easily updated album or automatically updated smart album. It’s similarly unsatisfying.
My parents will likely just be annoyed at the incorrectly rotated photos in their screen saver until Apple fixes this bug. But given how many years it has existed, I’m not holding out hope that we’ll ever see it fixed. Personally, I’ll stick with the Electric Sheep screen saver I’ve liked for years, although the rabbit hole that I got sucked down while working on the introductory paragraph reminded me of the Pure Mac Screen Savers, XScreenSaver, and Screensavers Planet collections of screen savers. There’s lots of eye candy out there.