#1604: Universal Control how-to, show proxy icons in Monterey, Eat Your Books cookbook index
We have a tasty issue for you this week, with Jeff Carlson’s review of the Eat Your Books cookbook index website sandwiched between a pair of Mac articles. First, Adam Engst shares a tip on how macOS 12 Monterey users can display draggable window proxy icons all the time without requiring an annoying hover to reveal them. Then Josh Centers takes a hard look at Universal Control, the fabulous new feature of macOS 12.3 and iPadOS 15.4 that lets you use your Mac’s keyboard and pointing device to control up to three other Macs or iPads. Notable Mac app releases this week include Zoom 5.10, Carbon Copy Cloner 6.1.1, BusyCal 2022.1.4 and BusyContacts 1.6.5, Retrospect 18.5.2, Mellel 5.1.1, Alfred 4.6.5, and Google Chrome 99.
TipBITS: Always Show Window Proxy Icons
One of the least known and most useful shortcuts in the Mac toolbox has long been the capability to use a window’s proxy icon—the little icon next to the window’s title—as though it were any other icon in the Finder.
![]()
Alas, in macOS 11 Big Sur, Apple decided to hide the proxy icon by default, forcing you to hover over the window title for a second to make the proxy slide in from the left. It was discovered that this Terminal command could make the delay shorter, though hovering is still required.
defaults write -g NSToolbarTitleViewRolloverDelay -float 0
I use proxy icons a lot, but I missed the online chatter that included this Terminal command, so I’ve been quietly muttering at Apple every time I waited for a proxy icon to appear. More frustrating is that I also missed the fact that Apple silently provided an option to bring back proxy icons completely in macOS 12 Monterey. I was recently helping a TidBITS reader who didn’t know about Reduce Transparency in System Preferences > Accessibility > Display when I saw another checkbox that was new to me: Show Window Title Icons. (Reduce Transparency eliminates bleed-through color from the background and keeps the menu bar gray regardless of the wallpaper image. It’s essential for me.)
![]()
Lo and behold, selecting that checkbox brings back proxy icons to Finder windows (like the one at the top) and document windows (such as the one below) alike—no need for hovering! Life just got a little better, and had I known about this option, it would have encouraged me to upgrade to Monterey sooner.
![]()
While I’m glad that Apple added an Accessibility option to make the window proxy icons visible again, I firmly believe that hiding them by default remains a mistake. Proxy icons show what type of content is in the window, and with documents, they visually link the document to its app. The proxy icon for a Pages document looks different from the proxy icon for a TextEdit document or any other app—it’s a valuable visual hint to the user.
What Apple got right back in 1998 with Mac OS 8.5, as John Gruber noted, is that document proxy icons aren’t just a visual aid—they’re almost fully functional representations of the file. Similarly, Finder proxy icons stand in perfectly for the folders they represent, offering a handy target for operations. In classic Mac OS, proxy icons also indicated the document’s modification state. (BBEdit continues to work this way, showing proxy icons regardless of the macOS setting and dimming them when there are unsaved changes.) Form and function, all rolled up into a space-saving icon.
To be fair, apart from hiding the proxy icon and forcing users to hover over the window title to reveal it, Apple’s rethinking of how to embed functionality into document window titles isn’t terrible. Clicking the downward-pointing arrow next to the title reveals a popover that lets you rename, tag, move, and lock the file. When a document has unsaved changes, the word Edited appears under the title (and the red close button gains a black dot in the middle). So perhaps Apple’s designers thought the proxy icon was both too subtle and extraneous.

Unfortunately, the popover doesn’t provide nearly the same level of functionality as the proxy icon. Consider these real-world examples of how I use proxy icons, only one of which could be accomplished through the new popover interface:
- Navigate in Save dialogs: Drag a Finder proxy icon to a Save dialog to navigate directly to that folder. (You can also drag a document icon from a Finder window to a Save dialog to navigate to its folder and pre-fill its name in the Save As field. This is a great way to replace an unwanted file or name the new file as a version of the dragged one.)
- Enter paths in Terminal: Drag a Finder proxy icon to a Terminal window whenever you want to enter a long path without typing it. I regularly use this with
cdto change to a deeply nested directory. - Move files opened from email: Drag a document proxy icon to the Desktop to move the file there. I often do this when I open email attachments because they’re usually stored somewhere deep in a folder hierarchy.
- Attach documents to email: Drag the proxy icon for a document to an email message (or app icon in the Dock) to attach that document to the message. That’s usually easier than finding the document in the Finder or navigating to it in an Open dialog. This trick also works for opening a document in any other app that can handle the document type.
- Duplicate or alias a file: Modified drags work as well, so if you hold down the Option key while dragging a document proxy icon to the Desktop, you’ll get a copy of the file. Hold down Command-Option, and you’ll get an alias. I don’t use modified drags frequently, but they’re handy on occasion.
It seems that the only thing you can’t do with a document proxy icon is send its file to the Trash. Even though macOS allows the drag, nothing happens.
If you use proxy icons in some other way than I’ve outlined above, let us know in the comments. And if you haven’t used them in the past, give them a try!
Use the Web to Cook Your Books
At some point during the last year, my teen declared that I wasn’t allowed to buy any more cookbooks. We had run out of space in the kitchen, even after a culling session that weeded out some old titles (exotic Jell-O recipes from the middle of the last century won’t be coming back, nor am I likely to cook dinner for dozens). And let me reassure you, my collection is modest compared to many home cooks, maybe a few dozen titles in all.
You're not ready for my jelly, are you pic.twitter.com/vJZRbrIf1t
— 70s Dinner Party (@70s_party) March 1, 2017
But I still run into the cookbook conundrum: finding a recipe involves keeping a mental model in my head of which books contain my favorite recipes, and when that fails, I have to flip through multiple volumes. Even though my library is small, the books are shoehorned into various available corners of my kitchen, so I also need to remember where each one is located. (And are they organized in a sensible fashion? No. Have you met me?)
So, like many people, I often turn to a Google search for recipes. That’s fine—if often overwhelming—but it feels like I’m cheating on my cookbooks, which I purchased because they’re beautiful, informative, and usually tell a story about the chefs or the cuisines they feature. I like cookbooks!
Then I discovered Eat Your Books, a website that combines the searchability and discoverability of modern technology with the richness (and generally higher quality) of printed cookbooks.

Disclosure: You Don’t Eat Any Books
The core of Eat Your Books is an extensive reference database of the contents of over 160,000 cookbooks and food magazines. It won’t show you any actual recipes because, the company says, that would violate copyrights. (That’s not precisely true; lists of ingredients and simple sets of instructions are not copyrightable. However, recipe introductions and creative instructions can be protected. I suspect the company is trying both to support authors and avoid potential litigation.) Instead, you can search for the name of a dish or ingredient and see matching recipes that come from the books you own.
For instance, let’s say I have some spinach that I need to cook before it wilts. At Eat Your Books, I can click My Bookshelf > Recipes in the toolbar at the top, enter “spinach” in the search field, and view all the recipes in my cookbooks that include spinach. Since spinach is such a common ingredient, I can also filter the results, such as narrowing it down to just recipes from India.

When I click a recipe that looks good, Eat Your Books presents me with the cookbook and the page number on which it appears, along with a list of ingredients so I can make sure I have them all on hand. I can add the items to a simple Shopping List view that I can print or bring up in Safari on my iPhone when I’m at the store.

A free Eat Your Books account lets you add up to five books or magazines and an unlimited number of sources for online recipes. A Premium membership, which removes those limitations, costs $3 per month or $30 per year.
Adding a book to your library is speedy. Using the search field under Library > Books, I found nearly all of my cookbooks by typing just partial book titles. You can also enter an ISBN. I was going to make a joke about how I’ve misplaced my CueCat, and how it would be great to scan barcodes if you have a large library… and then I discovered that the Import Books feature does exactly that.
Seeing large book covers as icons is a huge help, such as when I needed to specify that I own the 1997 edition of Joy of Cooking, not earlier or later editions.
Not all of the books in the Eat Your Books library have been indexed. You can still add one to your bookshelf, but you won’t see search results from it. This happens with “books that are unlikely to be indexed by EYB because they are not on sufficient [numbers of] Bookshelves.” In that case, you can click the Request Index link and ask Eat Your Books to add it to the indexing to-do list, or you can request to index the book yourself.
Side Dish Sources of Recipes
Books are the main course, but you can also add food magazines and blogs to your bookshelf. With magazines, you can add each issue as it becomes available or specify that you subscribe to the title to automatically add new issues as they are indexed. To catch up on your back issues, enter a date range of issues. The format is the same: recipe names, ingredients, and page numbers for that issue.

Indexed blogs are in some ways the most interesting part of Eat Your Books because they include a Recipe Online link that takes you to the actual recipe published on the site. Being able to search through a curated set of food blogs is a huge win. There must be hundreds of thousands of them (most telling you at length what Hubby and Precious Child think of their recipes before getting to the actual recipe), rendering the results from a general Google search overwhelming. With Eat Your Books, though, you can restrict your searches to the food bloggers whose taste and expertise you appreciate.

You can also add notes and reviews to recipes on your bookshelf, which can be shared with the greater Eat Your Books community or saved privately in your account. The public notes can be helpful to scan for recipes you haven’t made before, though they still occasionally suffer from comments from people who made numerous radical substitutions but are peeved that the recipe didn’t come out right. Of course, you can bookmark favorite recipes to aid in quickly getting back to them—or at least to their page numbers.
If you run across an online recipe you like, you can use a bookmarklet to add it to your bookshelf. It attempts to scrape the information from the site and pops up a window for you to add other information that wasn’t grabbed. However, the recipe must be approved by Eat Your Books before it goes into the library. I’ve long used the service AnyList for saving recipes, which does a great job. Others at TidBITS are fond of Paprika (see “FunBITS: Paprika Recipe Manager for iPhone, iPad, and Mac,” 14 March 2014).
Feed Your Cookbook Appetite
You can also browse for cookbooks you don’t own. The Eat Your Books home page spotlights books, ingredients, and food-related news, such as a feature on cookbooks that celebrate the cuisine and people of Ukraine. Eat Your Books also features reviews of new titles and lists of best-selling titles from many independent booksellers, including my favorite local all-cookbook book store, Seattle’s Book Larder.
When you’re browsing a cookbook, you can also see how many people have it in their bookshelves, which is a great way to see which titles are popular. The list also reveals how many books the members own—or at least have added to their bookshelves. It’s not uncommon to see people with thousands of titles!
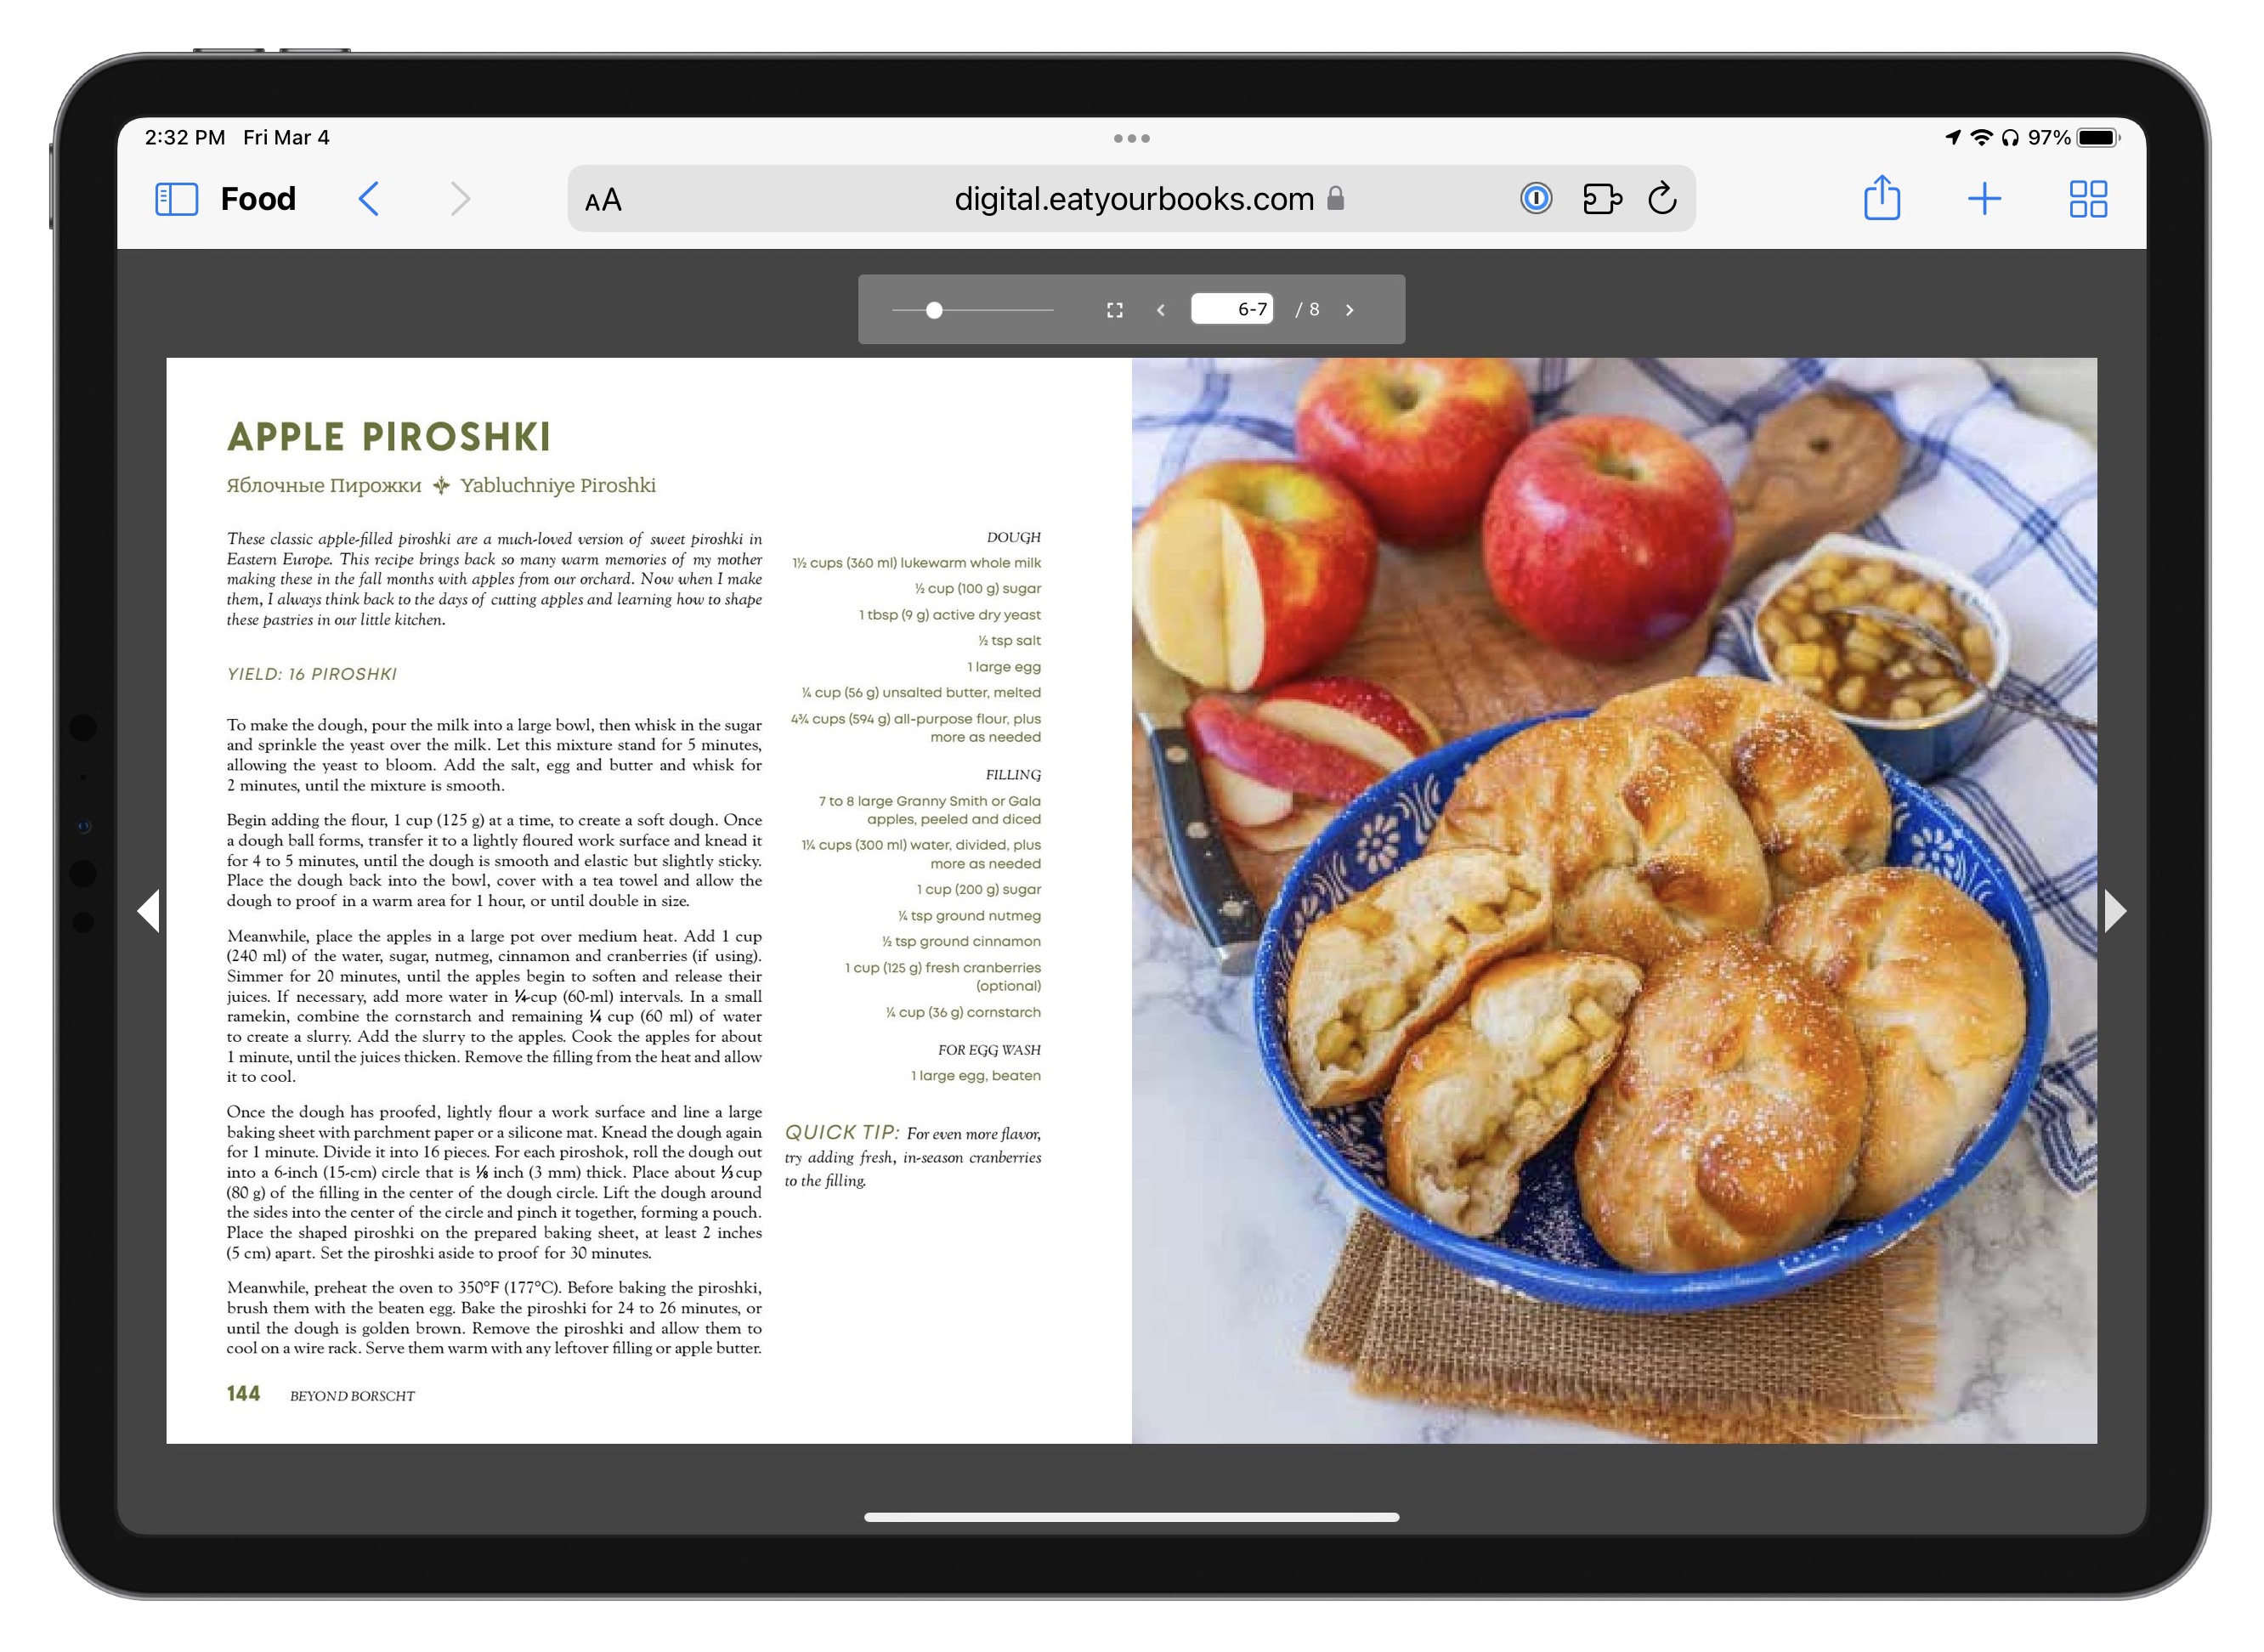
Some cookbooks in Eat Your Books include EYB Previews, which are PDF-like selections containing a few pages to give you a feel for the recipes and look. As you can see, the site also looks great on an iPad.
Unsurprisingly, if you find a book you want, you can buy it using affiliate links that support the site.
A Few Scorched Edges, but Overall a Good Bake
I have only a few criticisms of Eat Your Books. Some older recipes (pre-2015) don’t include page numbers, only cookbook titles. That’s not a major problem, since you can always check the table of contents or index when you actually open the book.
A trivial annoyance is navigation. It would be nice if the home page would display a search field for My Bookshelf > Recipes when you’re logged in. But it’s easy enough to create and use a bookmark to the My Bookshelf page, whose search field does default to Recipes.
These are minor gripes. Although Eat Your Books is a database at its center, its heart is the love of cookbooks shared by its members. The site is trying to make a cook’s life easier and more integrated with the real world, not supplant the beauty and storytelling qualities of good cookbooks. It also helps me get out of ruts where I cook the same handful of dishes from the few cookbooks I can remember and reach.
Using Universal Control in macOS 12.3 Monterey and iPadOS 15.4
Universal Control may be the most-delayed feature of Apple’s 2021 operating systems, only just now appearing in macOS 12.3 Monterey and iPadOS 15.4, but it’s one of the most interesting. Universal Control lets you use a single keyboard and pointing device connected to one Mac to control multiple Macs and iPads. Despite the feature appearing in macOS 12.3 and iPadOS 15.4, Apple labels it as a beta, suggesting that users may still encounter hiccups.
Even for a beta, the experience is nearly seamless. Once you’ve set up Universal Control in System Preferences > Displays, you can move your pointer from one Mac to another Mac or an iPad and back, just as though they were external monitors making up an extended Desktop. Keyboard focus—which device receives typed keystrokes—follows the pointer, so once you move the pointer to another device and click an app, that device behaves just as though you’re using it directly. With an iPad, it acts though you have connected a trackpad and hardware keyboard (see “The iPad Gets Full Trackpad and Mouse Support,” 28 March 2020). Even better, you can drag files and other items between devices.
It’s important to distinguish Universal Control from Sidecar, Apple’s technology for turning an iPad into a secondary display for the Mac (see “Catalina’s Sidecar Turns an iPad into a Second Mac Monitor,” 21 October 2019). Sidecar still exists and, in fact, shares a menu with Universal Control in the Displays preference pane. Similarly, with Macs, you need to differentiate between viewing a screen with AirPlay and controlling it using Universal Control. More on that shortly.
Although we don’t know Universal Control’s provenance, it’s far from a new idea, at least with regard to controlling one Mac from another. Fifteen years ago, Adam Engst used a utility called Teleport that provided exactly these features (see “Tools We Use: Teleport,” 27 August 2007). Even more interestingly, Teleport developer Julien Robert worked for Apple then and reportedly continues to do so. A little birdie tells us that Teleport has even continued to receive private updates inside Apple. It also turns out that Teleport was open-sourced some years ago. John Britton has been maintaining it, providing a Mac-only option for those not running macOS 12.3 everywhere.
Universal Control Requirements
Before getting started, make sure your devices support Universal Control. Hardware support goes back some years, although Universal Control does not support all Macs that can run Monterey or iPads compatible with iPadOS 15. Also, make sure that:
- All devices are signed in to the same iCloud account
- Bluetooth and Wi-Fi are enabled on all devices
- Handoff is enabled in System Preferences > General on the Mac and in Settings > General > AirPlay & Handoff on the iPad
- Your Apple ID is set up for two-factor authentication
- The devices are within 30 feet (10 meters) of each other
- Neither the Mac nor iPad is sharing its Internet connection
With Universal Control, you can connect and control up to three additional devices from your Mac at one time. Mix and match however you would like, whether that means controlling three other Macs, three iPads, two Macs and an iPad, or two iPads and a Mac. We suspect that’s more than enough since it will get difficult to arrange even that many devices in a usable fashion. Remember, Universal Control must be initiated from a Mac, so you need a Mac in the mix somewhere.
Setting Up Universal Control
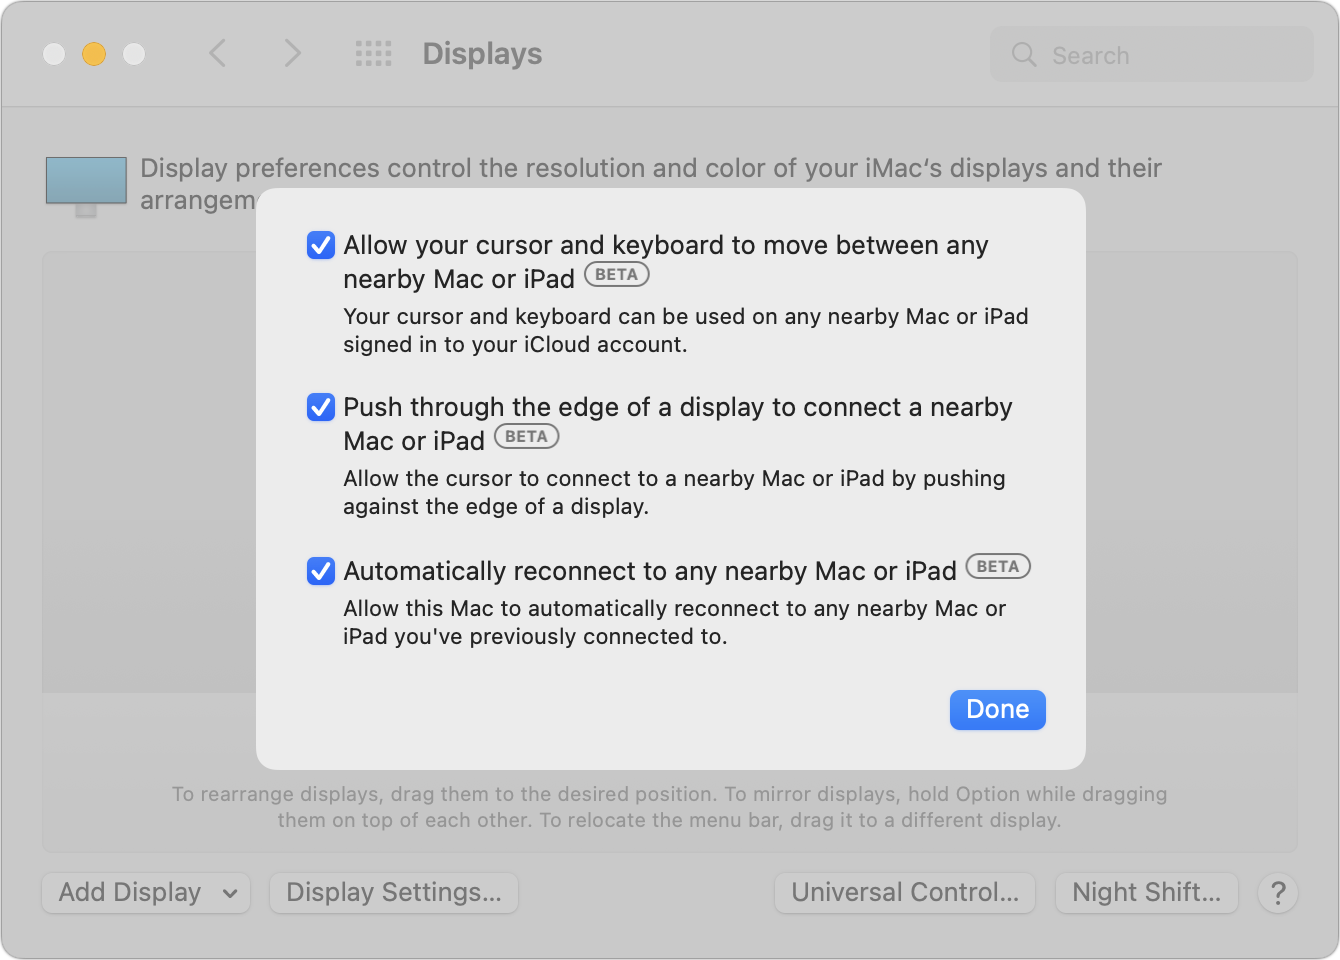
Universal Control is simple to set up. On all your Macs, open System Preferences > Displays and click Universal Control. Select all three of the checkboxes. The first one—“Allow your cursor and keyboard to move between any nearby Mac or iPad”—is Universal Control’s primary switch.
On an iPad, go to Settings > General > AirPlay & Handoff and make sure Cursor and Keyboard is enabled.
That may be all you need to do, thanks to the “Push through the edge of a display to connect to a nearby Mac or iPad” checkbox. When selected, that lets you connect by moving the pointer from your Mac to the other device, just as you’d do with an external display. Available Macs and iPads should appear in System Preferences > Displays.
In the Displays preference pane, you can—and should—drag the display thumbnails around to make them better match their real-world relative positions on your desk. Otherwise, it’s difficult to move the pointer between devices fluidly. Unlike secondary displays, which abut their Mac’s primary display, thumbnails representing Universal Control devices are separated slightly, as you can see below.
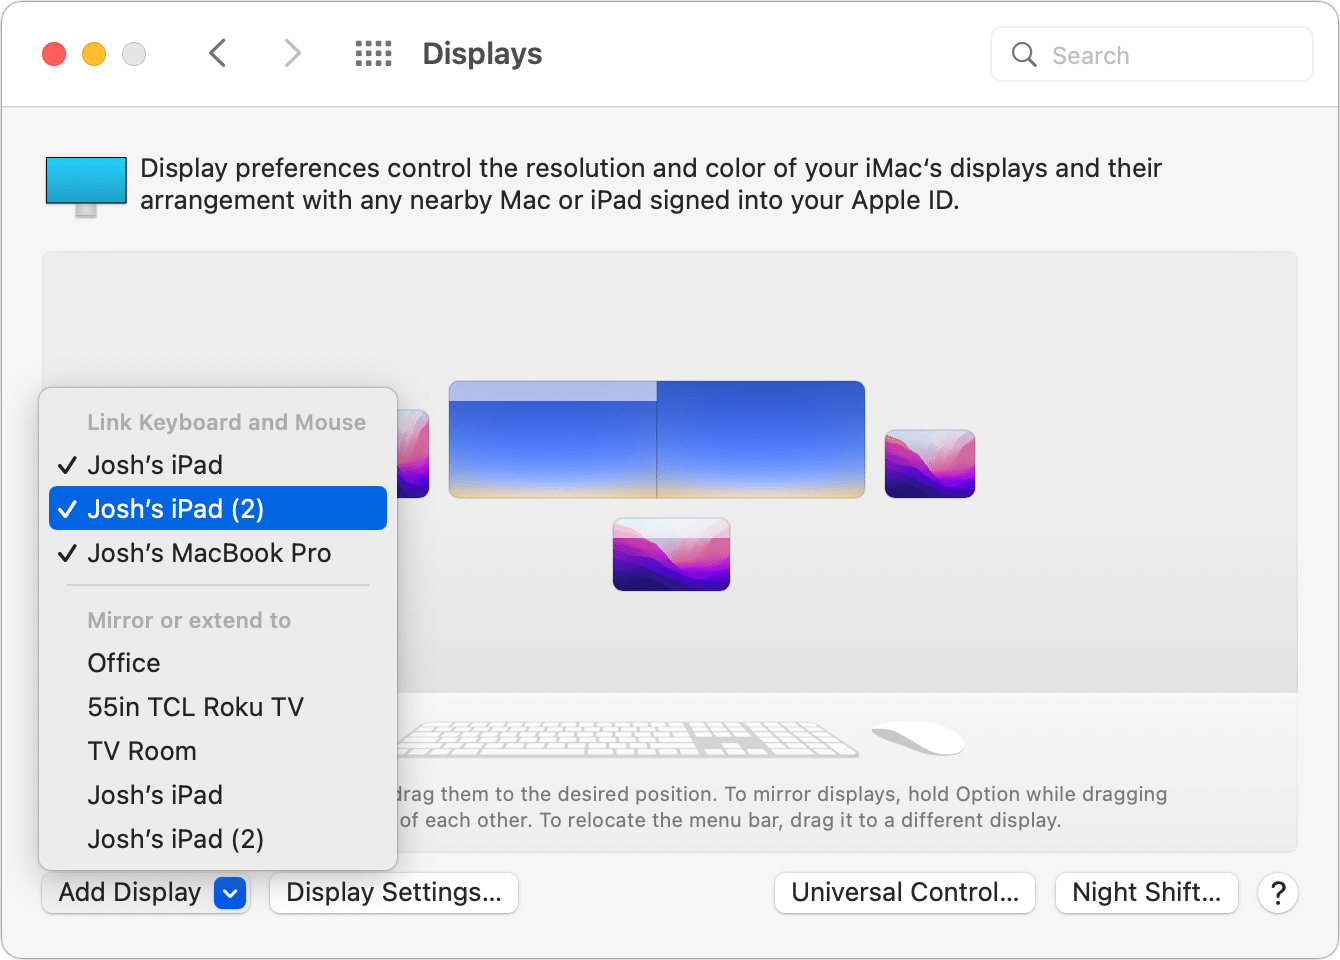
If the desired Mac or iPad doesn’t automatically appear in the Displays preference pane, from the Add Display pop-up menu, select the device you want to control under “Link Keyboard and Mouse.” As long as you’ve selected “Automatically reconnect to any nearby Mac or iPad,” you shouldn’t have to repeat this step.
Note the “Mirror or Extend to” section of the Add Display pop-up menu. That’s how Apple provides access to Sidecar, which lets you use an iPad as a secondary display for the Mac, mirroring or extending its Desktop. You’ll also see Macs running Monterey (which can act as an AirPlay receiver) and Apple TVs in this menu. You can select an iPad or Mac in only one of the two sections at a time. In other words, you can’t control an iPad or Mac via Universal Control while simultaneously using it as a secondary Mac display. That makes sense because Universal Control lets you drive the device’s native interface, whereas Sidecar/AirPlay hides the native interface behind the Mac’s secondary display. There’s no harm in switching back and forth between Universal Control and Sidecar/AirPlay.
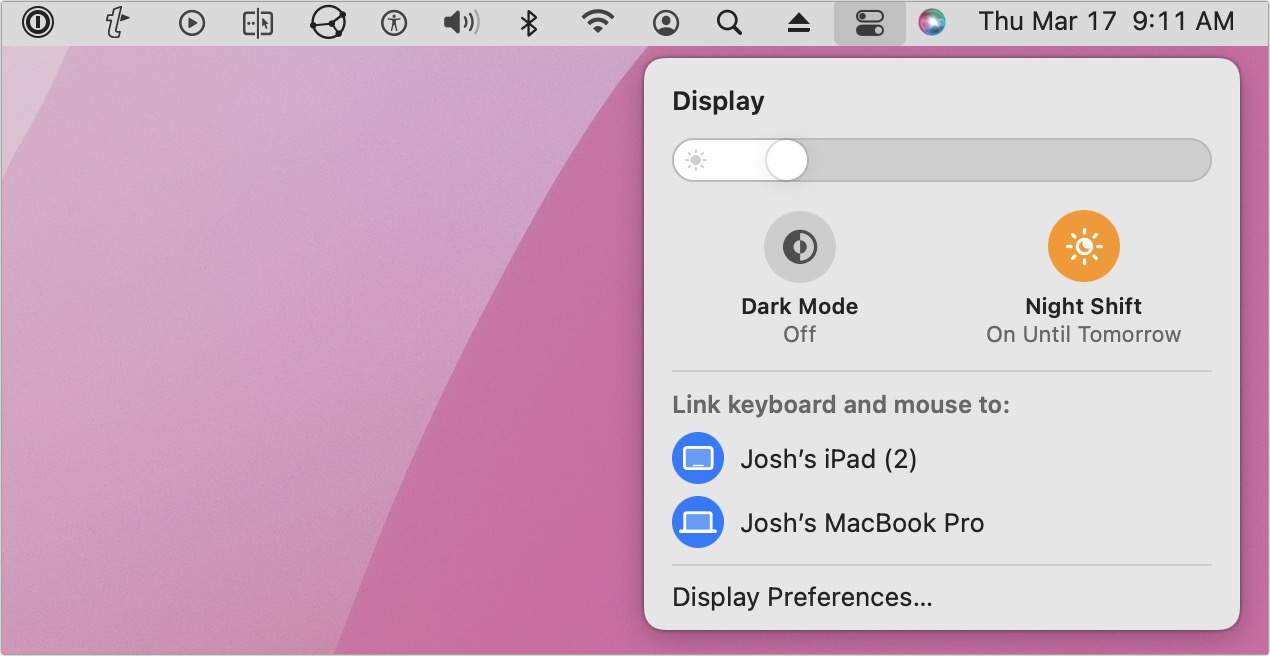
If the automatic connection doesn’t work, you can also connect to another Mac or iPad through the Mac’s Control Center by clicking Display and selecting a device under “Link keyboard and mouse to.” The device icons show as gray when they’re merely available and change to blue when you select them.
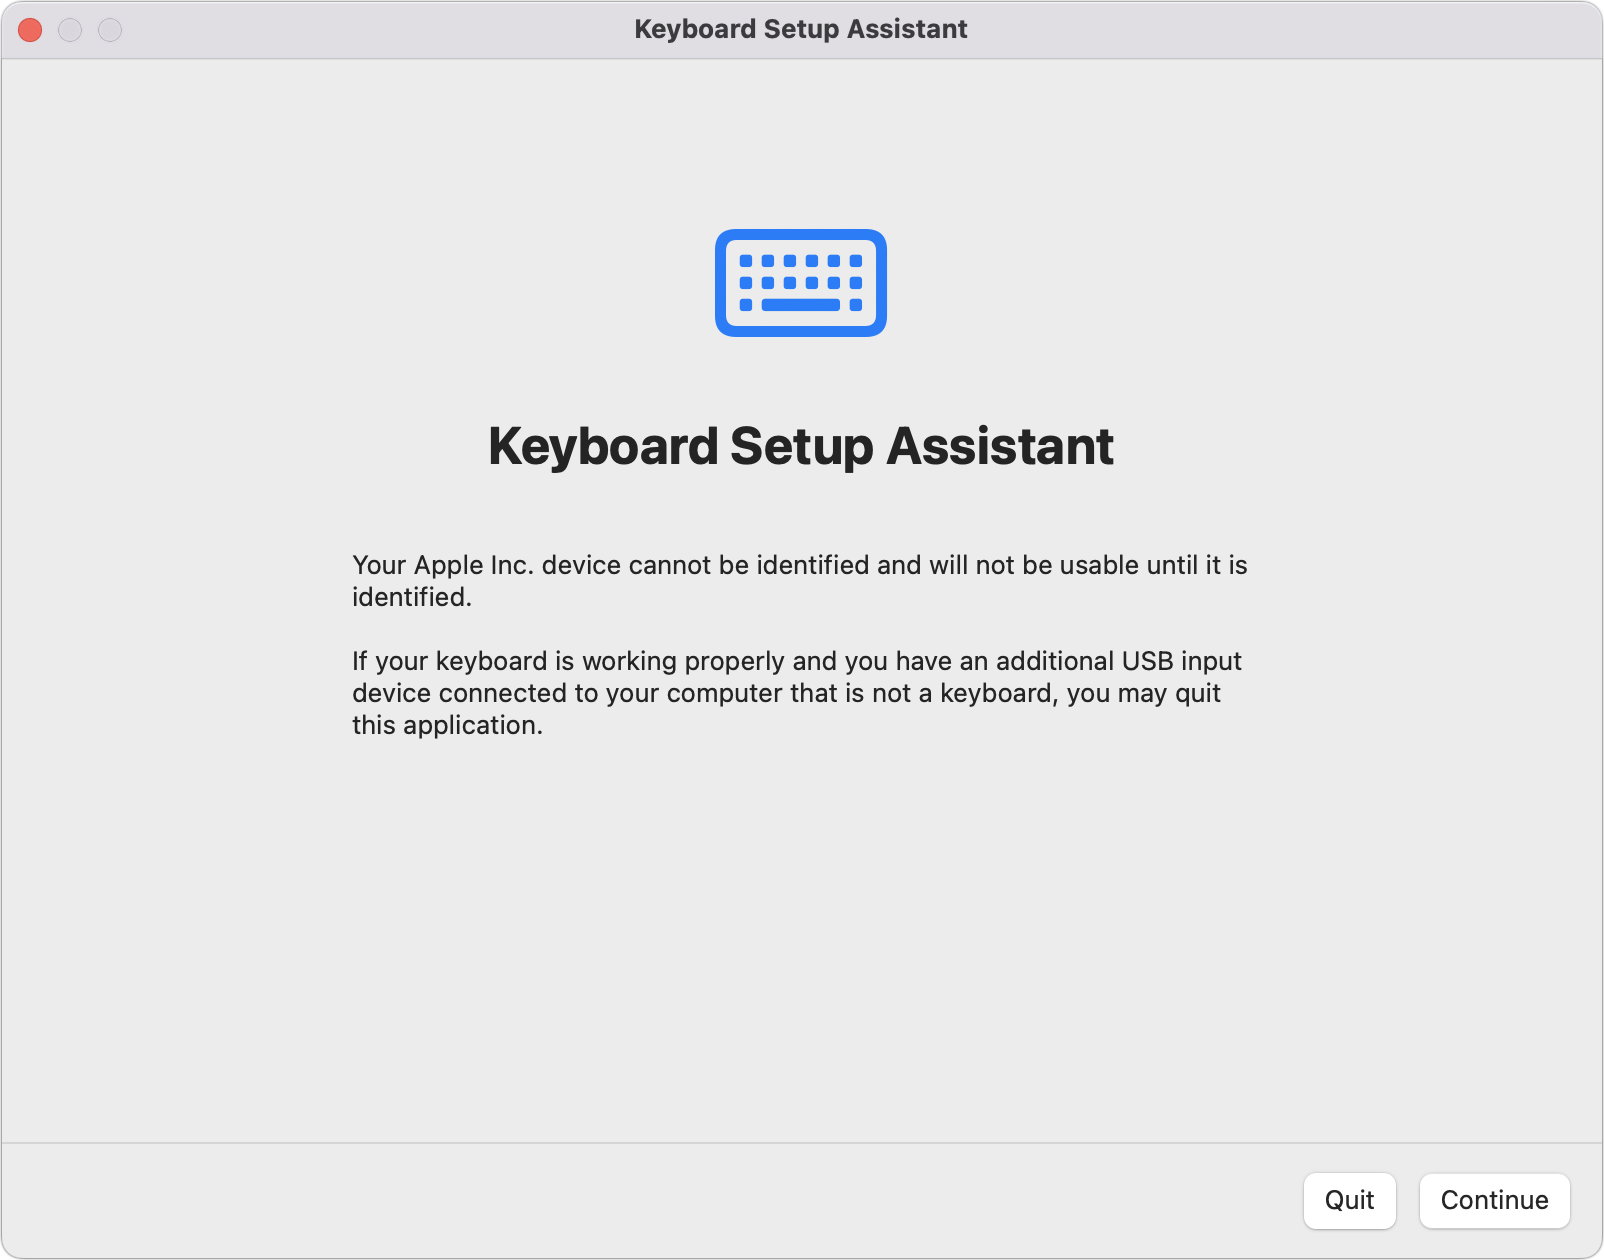
One oddity: The first time I connected to a new device, the Keyboard Setup Assistant appeared on the initiating Mac, presumably because of a mismatch between the new keyboard and the device’s native one. You can click Continue to identify the keyboard or even just click Quit—I saw no issues either way. The Keyboard Setup Assistant never appeared for Adam Engst in his testing, so it must be related to something associated with macOS settings or state.
Given that Universal Control remains in beta, it shouldn’t be surprising that there are rough edges. At one point, it wouldn’t let me add a second iPad—telling me I had already reached the limit with two devices—until I put the also-connected MacBook Pro to sleep. After I connected the second iPad, I woke up the MacBook Pro, and all three devices worked fine.
Using Universal Control
If you’ve ever used multiple monitors on a Mac, Universal Control will seem instantly familiar. Depending on how you have your screens arranged in the Displays preference pane, when you move your pointer off-screen in the direction of another device, the pointer will jump to that device. It works that way both on the Mac and iPad. Once the pointer is on another device’s screen, you can use that device just as though you were controlling it directly.
As you would expect, moving from a Mac to an iPad is a little jarring since the pointer changes from an arrow to a little circle and switches to the iPadOS pointing-device paradigm, which is a hybrid between a traditional pointer and a touchscreen. Most notably, the pointer is attracted to Home screen icons and many other controls, which transform it into a selection highlight. Regardless, in basic usage, Universal Control just works.
Universal Control provides two additional capabilities that make it easy to move data from one device to another. First, you can copy data on one device with Command-C, move the pointer to another device, and paste into an app on the second device with Command-V. The fact that copy-and-paste is foundational technology makes it no less welcome. We don’t know exactly how Universal Control implements clipboard sharing, but it seems faster and more reliable than Apple’s Universal Clipboard technology, which also shares clipboards between your devices.
Second, you can drag and drop items between two Macs or even between a Mac and an iPad. The obvious use is moving files between Macs, but Apple suggests you could also drag a sketch from the iPad to your Mac or move a photo from your Mac into a Messages conversation on your iPad. The Messages example doesn’t make much sense because you could more easily drag into Messages on your Mac.
Since each Mac in a Universal Control set is running independently—additional Macs are not secondary displays—you can’t drag a window from one Mac to another, as you would from a Mac to its external monitor.
Universal Control Quirks
Although Universal Control works extremely well, some inevitable oddities crop up in actual usage.
- All devices are (nearly) equal participants: Once you’ve turned it on, Universal Control has no concept of primary and secondary devices. If you have an iMac and a MacBook Pro sitting next to each other, you can use the iMac’s keyboard and mouse to control the MacBook Pro, but you can also use the MacBook Pro’s keyboard and trackpad to control the iMac. Similarly, you can use a connected iPad’s trackpad and keyboard to control Macs.
- Losing the pointer: With multiple screens in play, it can be easy to lose your pointer. On a Mac, you can “shake” the pointer to make it grow in size and become easier to spot. However, that won’t work if the pointer is on the iPad. Here’s a little trick to solve that problem: if you move your pointer using another Mac, it will appear in the center of that Mac’s screen. Let’s say you’re using an iMac and MacBook Pro together, and you lose track of the pointer but need to click something on the MacBook Pro. Just touch your MacBook Pro’s trackpad, and the pointer appears in the center of its screen, ready to go wherever you want.
- Keyboard shortcut conflicts: One of the small confusions of controlling an iPad with your Mac’s keyboard is that the same keyboard shortcuts may have different results on each platform. For example, typing Command-H while using the iPad simulates pressing the Home button. However, Command-H hides windows on the Mac. Unless you’re certain which device is receiving keystrokes, you can end up with unpredictable behavior.
- Click for keyboard focus: Making the previous problem worse is the fact that simply moving the pointer from one device to another isn’t enough to transfer keyboard focus. You must also click somewhere on the destination device. If you forget to click, you can end up in a situation like this: Start typing in a window on your Mac, move your pointer to an iPad showing an active note in Notes, and type a few more characters. You might think your keystrokes would go to the iPad, but you’d be wrong—without that additional click in an app on the destination device, you’d still be typing into the window on the Mac.
- Click for Mac pointer focus: The focus issue also affects some mouse clicks between Macs—your first click will make the clicked app active, and the second one will activate the button or link. That’s not always the case on Macs, and it never seemed to crop up in our iPad testing. We suspect those who use Universal Control will develop the habit of clicking as soon as they move the pointer to a new device.
- Keyboard-centric sleep while using an iPad: Say you have your Mac set to turn its display off after 1 minute. You then use Universal Control to work on your iPad. As long as you use the keyboard, there’s no problem. But if you’re just reading, using your trackpad or scroll wheel to scroll, the Mac will turn its display off after 1 minute and break the Universal Control connection. Press a key, and the Mac wakes up to its login screen. This seems to happen only when using an iPad—additional Macs keep their screens on while being controlled despite their screen sleep settings. If you plan to use Universal Control regularly, consider increasing the “Turn display off after” time in System Preferences > Energy Saver/Battery on Macs from which you’ll control iPads.
- Not all drags work: I was able to drag a photo from the Photos app on the Mac to the Files app on an iPad, but trying to drag a photo from Files on the iPad to Signal on the Mac failed. I suspect that individual developers will have to adjust their apps to accept items dragged over from another device. Copy and paste may work in such situations, or you could always fall back on AirDrop or iCloud Drive.
Again, we are talking about a beta here. We saw several instances where a remote Mac or iPad stopped accepting clicks or fell out of the Universal Control set entirely. In the case of iPads, putting it to sleep and waking it back up usually fixed the problem. Other times we had to select the recalcitrant device from the Add Displays pop-up menu in the Displays preference pane. We expect most such issues to disappear as Apple updates macOS and iPadOS.
Universal Control: Refilling a Hole in the Universe
Universal Control is a tremendously cool feature, even if it merely brings Teleport back to the masses and extends it to iPadOS. The simple fact of the matter is that Teleport hasn’t been a well-known solution for many years, forcing those who wanted to use the same keyboard and pointing device with multiple Macs to use a hardware switch that could cost $50 to $500, depending on its capabilities.
With Universal Control, Apple is adding a core feature to its ecosystem, one that further integrates different devices. Apple doesn’t want you to replace your Mac with an iPad; it wants you to buy an iPad and a Mac. And now you can use them together more easily than ever before. For many, just being able to flip back and forth between their Macs and iPads will be a huge win—that’s undoubtedly the prime use case.
Some people may see Universal Control as a way to increase screen real estate by using multiple Macs simultaneously. It’s probably not worth buying new Macs for that purpose, but it might be a great way to keep an older MacBook Pro useful after purchasing a new Mac Studio, for instance. The downside is, of course, that you have to keep both Macs up to date and figure out the best way to sync data between them.
Finally, if you’re more iPad-focused than we are, you could also dedicate an iPad on your desk to a single app that either doesn’t exist on the Mac or doesn’t work as well. Universal Control might also be a fluid way to move iPad-only content to the Mac, such as drawings created with an Apple Pencil.
How are you using or planning to use Universal Control? Let us know in the comments.