#1445: ECG comes to the Apple Watch, Apple OS updates, Google Fi for iPhone, Anker vertical mouse
Apple has released updates to all of its operating systems: iOS 12.1.1, macOS 10.14.2, tvOS 12.1.1, and most notably, watchOS 5.1.2. That last update also brings the ECG app to the Apple Watch Series 4 and enables irregular heart rhythm monitoring on all supported Apple Watch models—Julio Ojeda-Zapata explains how to set up and use these features. If you’re having forearm or wrist pain from mousing, Josh Centers reviews a “vertical mouse” from Anker that could ease your symptoms. For those looking to save money on their iPhone cell plan, it might be worth checking out Google Fi, but as Jeff Porten describes, there are devils in the details. Notable Mac app releases this week include Mactracker 7.7.6, Security Update 2018-003 (High Sierra) and Security Update 2018-006 (Sierra), Safari 12.0.2, Pixelmator Pro 1.2.4, Pixelmator 3.8, Logic Pro X 10.4.3, GarageBand 10.3.2, and DEVONthink/DEVONnote 2.10.2.
Apple Releases iOS 12.1.1, macOS 10.14.2, and tvOS 12.1.1
Apple has updated iOS, macOS, and tvOS to fix some usability quirks and address bugs. As always, it’s a good idea to wait a few days before updating to make sure there aren’t any major issues.
iOS 12.1.1
The best thing about iOS 12.1.1 is that it brings back the single tap to flip between the front- and rear-facing cameras during a FaceTime call. In iOS 12, Apple inexplicably buried that button behind another panel, which was frustrating. You can also once again capture Live Photos in FaceTime calls, a feature that had been present prior to iOS 12.0. Note that you can capture Live Photos only in one-on-one FaceTime calls, not in group calls.
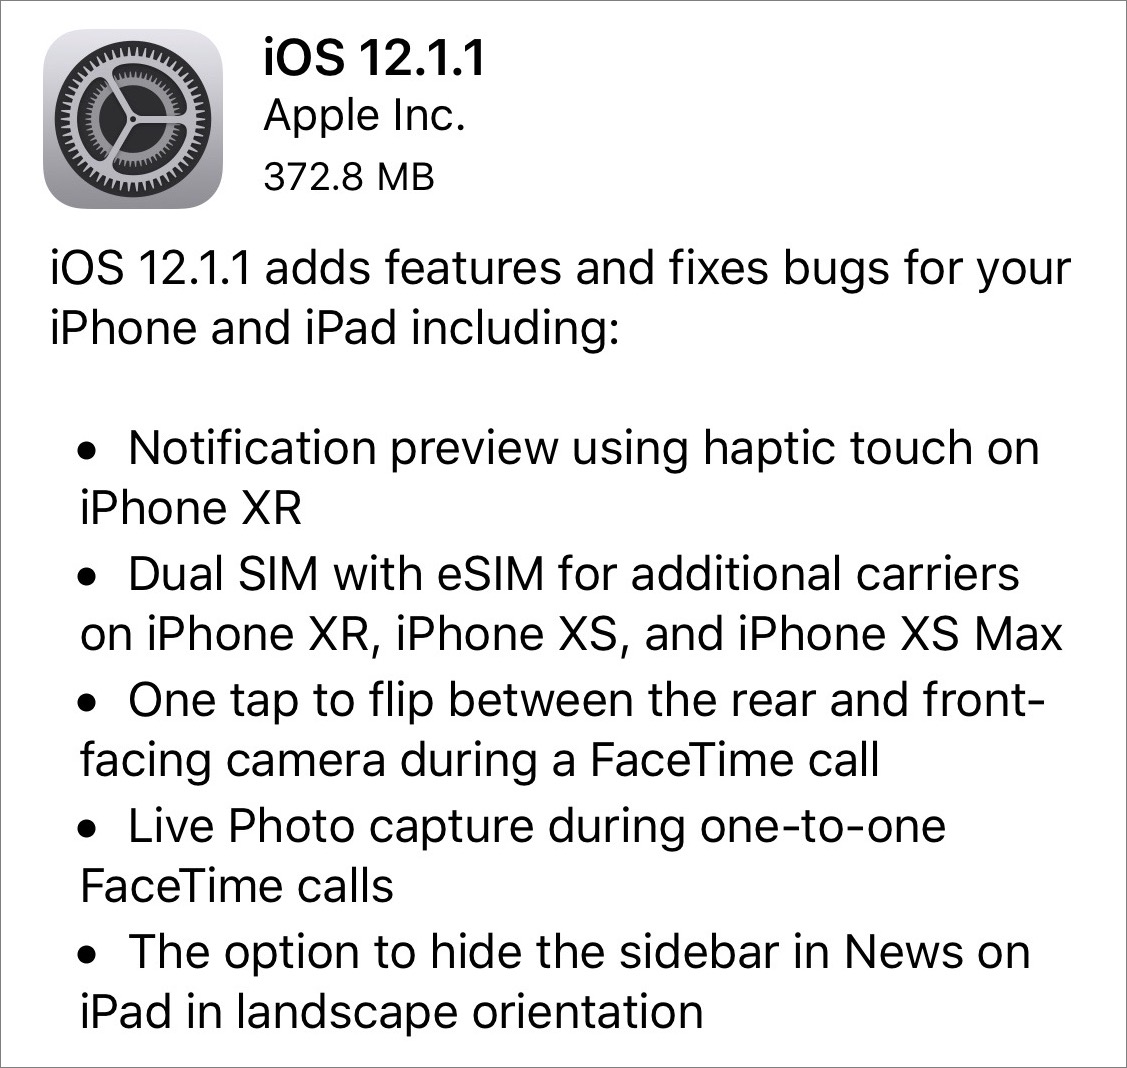
iPhone XR users will be pleased to know that iOS 12.1.1 lets you use haptic touch to preview notifications. We can’t help but wonder if increased support for haptic touch bodes ill for the future of 3D Touch.
The iOS 12.1.1 update also expands carrier support for the dual SIM feature of the iPhone XS and XR, though Apple doesn’t specify which carriers now support it.
iOS 12.1.1 also brings:
- The option to hide the sidebar in News on the iPad in landscape orientation
- Real-time text (RTT) when using Wi-Fi calling on the iPad and iPod touch
- Stability improvements for dictation and VoiceOver
- A fix for a bug that caused Face ID to become unavailable temporarily
- A resolution for an issue that could prevent visual voicemail from downloading
- A cure for a problem that could prevent Voice Memos recordings from uploading to iCloud
- A remedy for a bug that may have prevented time zones from updating automatically
- A repair for a Messages problem that could prevent predictive text suggestions when typing on the Chinese or Japanese keyboards
- 17 security fixes
The iOS 12.1.1 update is 292.3 MB on the 10.5-inch iPad Pro and 372.8 MB on the iPhone X, and you can obtain it in Settings > General > Software Update or install it through iTunes.
macOS 10.14.2
The macOS 10.14.2 Mojave update brings real-time text support for Wi-Fi calling, adds a menu item to News for opening a story in Safari (File > Open in Safari), and resolves a bug that prevented iTunes from playing media to third-party AirPlay speakers. It also includes 12 security fixes.

You can install the 2.47 GB update in the new Software Update pane of System Preferences.
tvOS 12.1.1
The tvOS 12.1.1 update includes “general performance and stability improvements.” Did you expect something else? Well, there are also 11 security fixes. If automatic updates aren’t on, you can update your fourth-generation Apple TV or Apple TV 4K by going to Settings > System > Software Updates.
watchOS 5.1.2 Brings ECG to the Apple Watch Series 4
The Apple Watch was the surprise star of Apple’s September press event (see “Apple Watch Series 4: Bigger Screens, New Faces, and Enhanced Health Monitoring,” 12 September 2018), partly because of a health-monitoring feature no one saw coming: electrocardiogram (ECG) reading.
Apple announced that users of the new Apple Watch Series 4 would be able to use an ECG app along with electrodes built into the watch to determine if their hearts were beating normally or were showing signs of atrial fibrillation (AFib)—a condition that can lead to major health complications such as strokes. The company also unveiled a passive-monitoring feature to detect irregular heart rhythms and extended this capability to most older Apple Watch models.
These features were said to cement the Apple Watch’s preeminence in the smartwatch market, and help establish it as a leading health-monitoring device with a likelihood of saving lives (see Rich Mogull’s TidBITS article “I’m a Paramedic: Here’s How the Apple Watch Series 4 Will and Won’t Save Lives,” 3 October 2018).
However, the heart-monitoring features didn’t ship with the Apple Watch Series 4, and Apple promised them in a future update. That update is here in the form of watchOS 5.1.2. To install it, open the Watch app on your iPhone, go to My Watch > General > Software Update, and tap Download and Install. The update sizes vary—we saw 132 MB on an Apple Watch Series 2 and 176 MB on a Series 3. Installation may take longer than you think it should—we recommend updating while you sleep.
The ECG app and irregular heart rhythm detection are currently available only in the United States, Puerto Rico, Guam, and US Virgin Islands. Apple will have to apply for and receive approval from medical regulatory agencies in other countries before it can make the features more widely available.
Setting Up and Using the ECG App
Apple claims that the Apple Watch Series 4 along with the new ECG app in watchOS 5.1.2 marks “the first direct-to-consumer product” enabling average people to take an electrocardiogram entirely on their own. That’s patently untrue; AliveCor’s KardiaBand provided exactly these features a year ago—a family member of one of the TidBITS staff used it over the last year after undergoing heart valve repair surgery.
Regardless, electrodes built into the Apple Watch Series 4’s back crystal and Digital Crown work in tandem with the ECG app to provide a heart reading. When the user touches the Digital Crown with a fingertip, an electrical circuit is completed and heart signals are measured, which takes about 30 seconds.
Before you can use the ECG feature, you need to do a bit of preparation following the installation of watchOS 5.1.2. Press the Digital Crown to find the ECG app, which is mixed in with all the other watch apps, and tap it to open. It then prompts you to open the Health app on your iPhone.
The first step is entering your date of birth. Then, after a bit of a crash course on ECG readings, and a few warnings about what the ECG app can’t do—no heart-attack, blood-clot or stroke detection, for instance—you’re ready to take your first ECG.
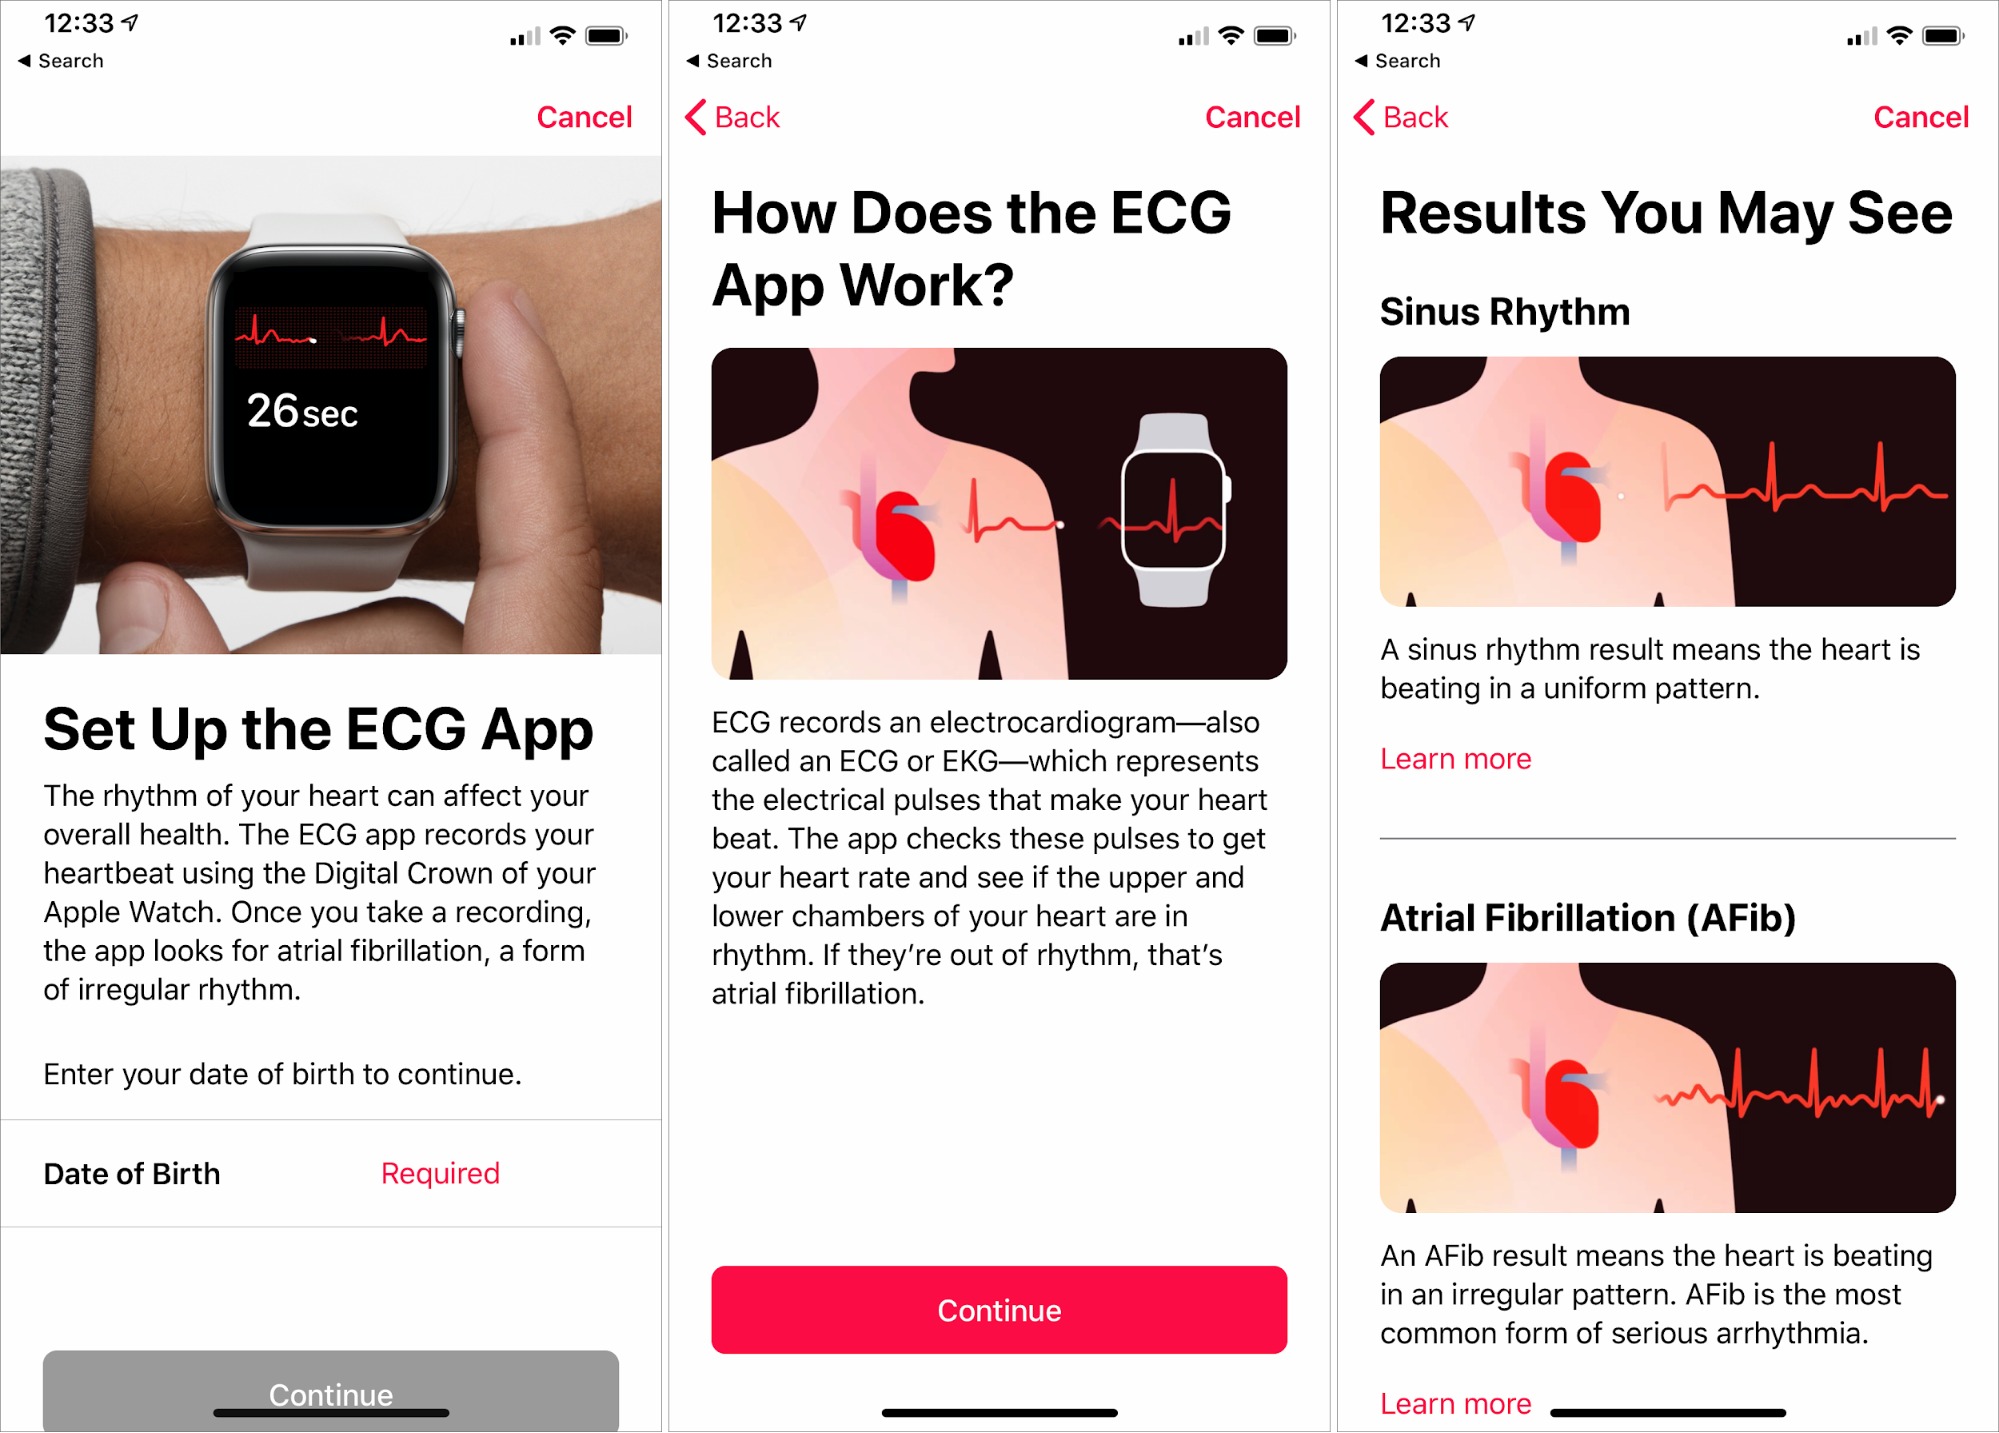
For me, this worked without a hitch. As instructed, I made sure my watch fit snugly on my left wrist, rested my arms on a flat surface, and held my right index fingertip to the Digital Crown. The ECG app then counted down from 30.
According to the app, I checked out fine. My “sinus rhythm” indicated that the ECG didn’t show atrial fibrillation and that my heart was beating in a uniform pattern.
Results are stored in the iPhone’s Health app, and you can share the data with your doctor as a PDF document. On your iPhone, go to Health > Heart, and under This Week, tap Electrocardiogram (ECG). Tap the chart at the top. Then look for Export a PDF for Your Doctor, and use the standard Share function to email the PDF or send it out by other means.
Here’s what my exported PDF looks like:
Is the ECG App Any Good?
I’m no judge of how well, in the medical sense, the ECG app works. My TidBITS colleague Rich Mogull is a paramedic, though, and has a bit more insight.
Rich tweeted a lot about the topic after installing the watchOS 5.1.2 update. Among his observations:
- Results contain more data for doctors than he expected. In fact, he thinks they could get insight into other kinds of heart arrhythmias, but Apple specifically says the ECG app is not designed to do that.
- He echoes Apple’s warning that the Apple Watch Series 4 is inadequate for detecting heart attacks, which requires more sophisticated equipment.
- He warns that all ECGs are prone to electrical interference from movement. “You definitely want your hands resting on something,” he said.
All that aside, the ECG app successfully detected a family member’s already-known case of AFib, so Rich can confirm that the feature works.

Irregular Heart Rhythm Monitoring
Separate from but related to watchOS 5.1.2’s newfound ECG support is its new capability to monitor for irregular heart rhythms. Unlike the ECG readings, irregular heart rhythm monitoring occurs in the background without the user having to do anything.
An alert from this feature would presumably nudge an Apple Watch Series 4 user into taking an ECG reading, which could point to AFib. According to Apple, a rhythm notification means the Apple Watch has “identified an irregular heart rhythm that may be AFib and confirmed it with multiple readings.”
Good news for those with older Apple Watch models: the irregular-rhythm monitoring is available on the Apple Series 1, 2, and 3. The original Apple Watch is left out, though.
To set up this feature, on your iPhone running iOS 12.1.1, go to Watch > Health > Heart and enable Irregular Rhythm Notifications.
Other Features of watchOS 5.1.2
The watchOS 5.1.2 update is largely focused on the ECG feature, but it has a handful of new features unrelated to health monitoring:
- Direct access to supported movie tickets, coupons, and rewards cards in Wallet when tapped to a contactless reader
- Notifications and animated celebrations when you achieve daily maximum points in a day during an Activity competition
- New Infograph complications for Find My Friends, Home, Mail, Maps, Messages, News, Phone, and Remote
- Lets you manage your availability for Walkie-Talkie conversations from Control Center—tap the new Walkie Talkie
 button
 - 12 security fixes
As is often the case with watchOS, we see no particular reason to delay the upgrade past the requisite several days to make sure it isn’t causing problems. The new features are welcome, have no apparent downsides, and enable the much-anticipated hardware capabilities Apple promised for the Apple Watch Series 4 and older models with watchOS 5’s initial release.
Anker’s Vertical Mouse Provides Cheap RSI Relief
Does working at your Mac—and particularly using the mouse or trackpad—cause you wrist or forearm pain? If so, you’re not alone.
For those of us who spend a great deal of our days working on a Mac at a desk, ergonomics is a constant concern. Chair height and monitor positioning are important, but for repetitive stress injuries, keyboards and pointing devices are the main culprits. The traditional mouse is particularly troublesome for many people because it forces the forearm to twist and because dragging requires you to apply downward pressure that makes sliding the mouse across the desk surface harder. Those facts paved the way for alternatives, first trackballs and then trackpads, with a few oddities thrown in (see “Rolling Faster, Farther with the RollerMouse Pro,” 11 December 2006).
But even those alternatives have an issue: they require that you put your forearm in a pronated position, with the palm down. That’s not a problem in and of itself, but holding your arm in the pronated position for long periods of time can become uncomfortable in comparison to the neutral position your forearm adopts if you just stand normally—it’s also called the handshake position. (Typing on a standard keyboard suffers from the same problem, which is why there are ergonomic keyboards that are raised in the middle.)
In an attempt to give people who have trouble maintaining a pronated forearm position an alternative, vertical mice put their buttons on the side instead of at the top. Designers have invented all sorts of interesting shapes to make this possible, but the most common is a wedge-like shape that slants at a 45º angle, which necessitates a wider base for support.
If you’re skeptical of this concept, I don’t blame you, but for those who want to give it a shot, try the $14.99 Anker Ergonomic Optical USB Wired Vertical Mouse (you can spend $5 more for a wireless version, but it requires a tiny USB dongle instead of using Bluetooth). While I like Anker products, there’s nothing special about this device—it’s just a generic Chinese vertical mouse with the Anker label. If you don’t mind a bit of a wait, you can even order such products for less than $10 direct from China through AliExpress. My arm was killing me, so I opted for Amazon Prime’s two-day shipping.
In terms of buttons and features, the Anker vertical mouse isn’t anything special in the PC world, but it’s more flexible than Apple’s Magic Mouse 2. It offers left and right click buttons, a clickable scroll wheel, next and previous page buttons, and a button to adjust the mouse’s dots-per-inch to either 1000 or 1600—the higher setting provides finer control but makes it easier to miss your targets. And here’s a nice touch: in addition to pressing in on the scroll wheel for a middle click, you can also flick the wheel up instead, which puts less strain on your forearm.

Make the Mouse Play Nice with macOS
While Anker’s vertical mouse provides basic capabilities out of the box, it needs some tweaking for full functionality. The next and previous page buttons don’t work at all, and if you have Scroll Direction: Natural enabled in System Preferences > Trackpad > Scroll & Zoom, the scroll wheel will be backward. Unfortunately, macOS doesn’t let you set mouse and trackpad scroll separately (and you may want to keep a trackpad around, as I’ll explain shortly).
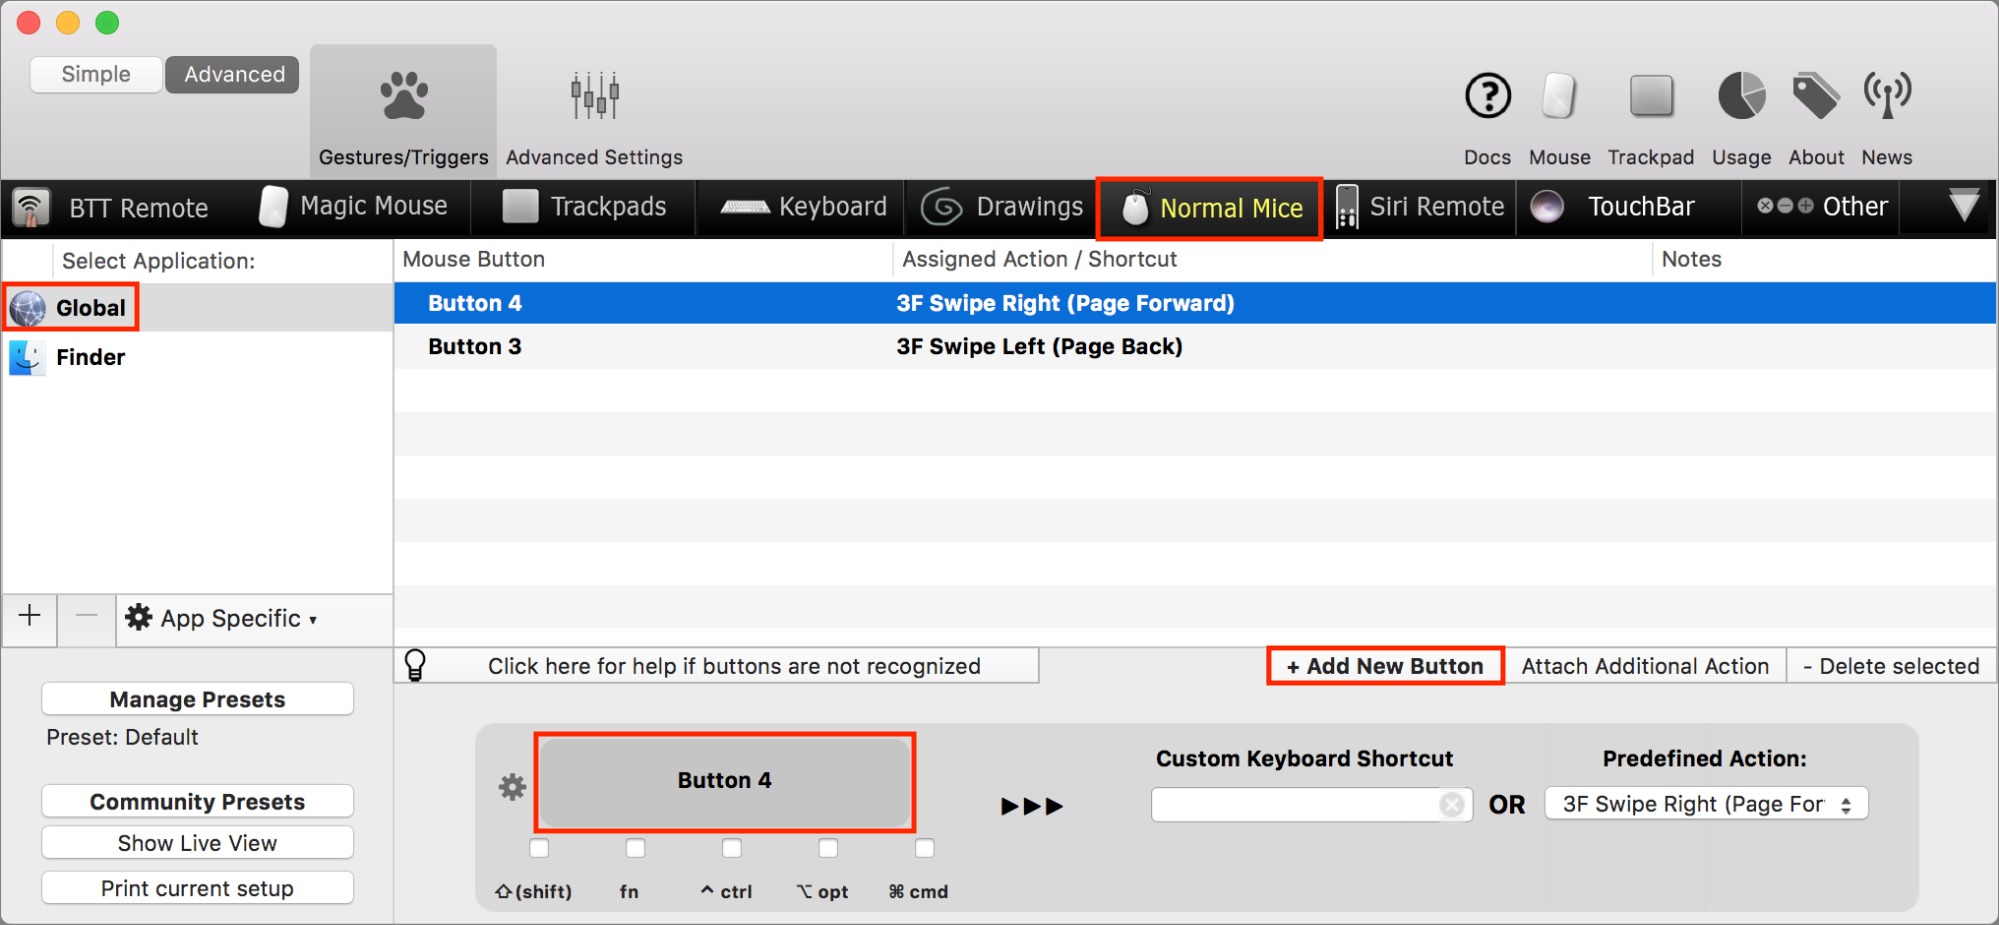
The amazing BetterTouchTool (available on its own and also now as a part of the SetApp app library) can fix these woes. In the black toolbar in its main window, select Normal Mice for device type, select Global in the sidebar, and click Add New Button. Move the mouse pointer to the gray area near the bottom of the window and click either the next or previous page button on the mouse—you’ll have to do this twice regardless of which you start with. Set the predefined action as either 3F Swipe Right or 3F Swipe Left—these will work consistently as page forward and page back in most Mac apps.
Next, you’ll want to fix the scroll wheel. Click Advanced in the top toolbar (see above) to reveal Advanced Settings, and click Mouse in the right side of that top toolbar corner. In the next screen, make sure you’re in the General tab and select “Inverse scrolling for normal mice only.”

Finally, click Advanced Settings and select “Launch BetterTouchTool on startup,” in the General tab, since none of these features will work unless BetterTouchTool is open.
How Well Does Anker’s Vertical Mouse Work?
Was the Anker vertical mouse worth $15? Absolutely. Within a day of connecting it to my Mac, years of forearm pain vanished. And the pain hasn’t returned in subsequent weeks. But how does it work as a mouse, given its odd shape?
Pretty well, actually. It takes a bit of getting used to, but not as much as you might think. It took me a day to accustom myself to it. I’m not much of a PC gamer these days, but I fired up Counter-Strike: Global Offensive to put the Anker mouse through its paces. I made it through the tutorial just fine and can safely say that my mediocre results were not limited by the mouse. Crippling RSI was one of the reasons I shifted away from computer gaming, and this mouse might make it enjoyable again.
One design issue with Anker’s vertical mouse is that the side of my hand tends to rest on the desk, which presents two problems:
- My wrist rests on the corner of the desk, which is painful—I reduced that with a wrist rest.
- Since my pinky usually rests on the desk surface, sweeping the mouse from left to right often catches my pinky skin between the mouse and desk. This isn’t painful but does interfere with the mouse’s movement, which could be annoying in games. If I were to look for another vertical mouse, I’d want one that offered a hand-rest.


Also note that this is very much a right-handed mouse. Anker doesn’t offer a left-handed model, but searching for “left-handed vertical mouse” on Amazon or AliExpress will bring up left-handed versions of the same device.
Finally, I’ve discovered that Apple has curtailed the usefulness of a standard mouse in macOS over the years, focusing it on trackpads now. Moving around the iMovie timeline without a trackpad is tough, as is moving between tabs in Finder windows. As Adam Engst and I discovered when writing Take Control of Preview, you can’t even use the draw tool or rotate objects in Preview without a trackpad. I keep a Magic Trackpad off to the side of my iMac for gestures.
I can’t say whether the Anker (or its many Chinese variants) is the best vertical mouse on the market, but it’s certainly among the cheapest. If you suffer from mouse-induced forearm pain, give it a shot and see if it helps.
Google Fi Comes to the iPhone… Mostly
Google has promoted its Project Fi cellular phone service (see “The Why Behind Google Fi,” 28 April 2015) from a “project” to a regular Google service, giving it the new moniker Google Fi. (Fi rhymes with “eye,” officially, much like “Wi-Fi,” but how most people pronounce it is a coin flip.) This announcement came alongside what sounded like a technical innovation: unlike Project Fi, Google Fi is now available on a wider range of phones, including the iPhone. Since Fi has an innovative billing plan, this could be very good news for iPhone owners unhappy with their present carriers.
And it is—but for now, only in limited circumstances. The reasons for these limitations require some explanation, because things might get better in the future.
Finding Out About Google Fi
Google Fi is an MVNO (Mobile Virtual Network Operator), industry-speak for a carrier that doesn’t own a cellular network but instead leases space and bandwidth from established cellular providers. Early on, MVNOs all rode on Sprint in the United States—not for any technical reason, but because Sprint was the only major carrier willing to offer generous enough terms that MVNOs could sell their (usually) cheaper plans and still turn a profit. Eventually, AT&T, Verizon, and T-Mobile realized they were missing out on some money, and now you can find MVNOs on every network. In fact, most carriers have either launched or acquired MVNOs for the purpose of segmenting their marketing and sales where they don’t want their official plans to go.
Even so, when Google launched Project Fi in 2015, it was radically different, because it didn’t restrict you to one mobile network. A Fi phone can roam on multiple cellular networks and Wi-Fi, all seamlessly. When you’re using a Fi phone, you don’t know which network you’re using. And since there are no roaming fees, you typically don’t care. If you come within range of an open Wi-Fi hotspot that Google keeps in its database, your phone will automatically switch to it securely if the cellular signal is weak. A Fi call can also use any network you manually join, such as the one in your coffee shop. Likewise, wander outside a Wi-Fi zone where cellular signal is better, and your phone may switch again. When you’re on a highway or train, a third-party app can show your phone switching between carriers every few minutes, depending on which service has the highest quality at the moment. If one of these switches happens while you’re in a call or using data, it nearly always takes place seamlessly without dropping the call or disconnecting you.
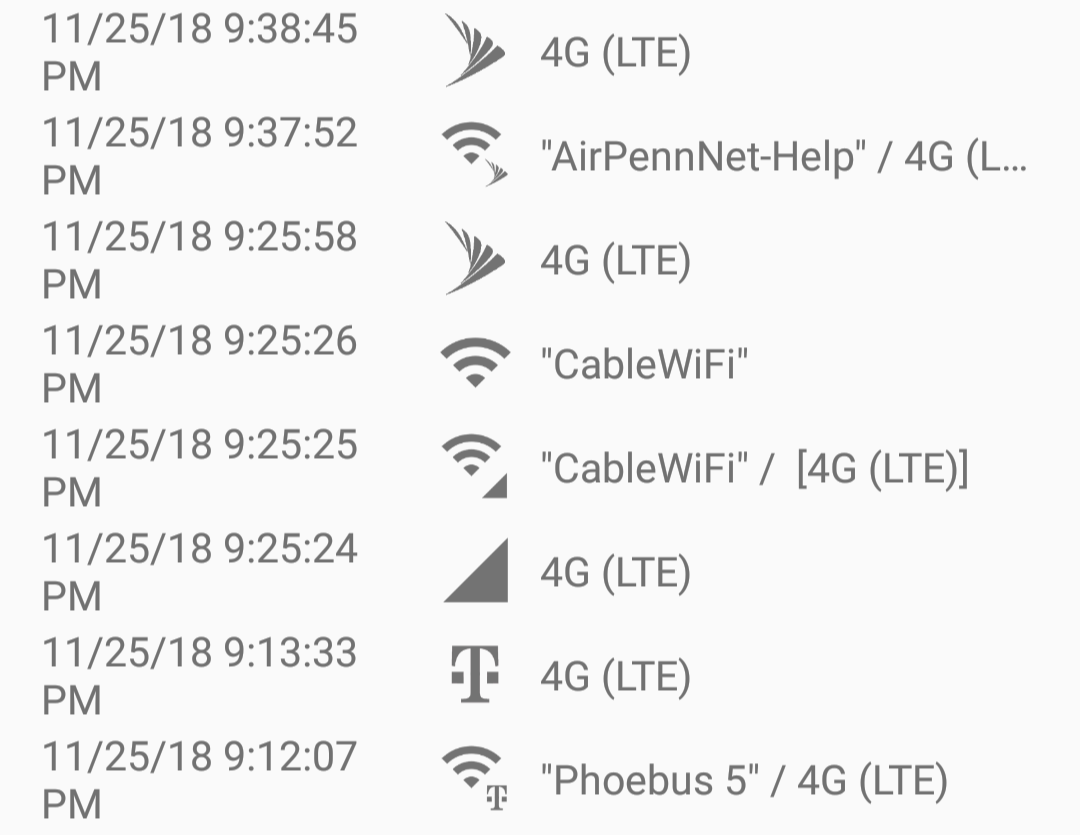
This kind of network hunting requires a bit of technical black magic inside the phone. While every new phone sold in the US can roam on the three networks Fi currently uses—Sprint, T-Mobile, and US Cellular—a normal phone is typically set to have a favorite home network, roam as little as possible, and make switching obvious for the phone’s owner. A cell phone roaming indicator used to mean (especially back in the early 2000s) that your service was poorer and cost ten times as much; many people preferred to turn it off and stay disconnected until they were back on their home network.
In contrast, Fi creates a pool of cellular and Wi-Fi signals and offers it to the phone as a buffet. The only reason you might care which network you’re on, and the reason why I have the utility app that created the screenshot above of T-Mobile and Sprint usage, are those rare occasions when Fi chooses the network with the strongest signal, but another one has better Internet speeds. This app also lets me switch manually between them.
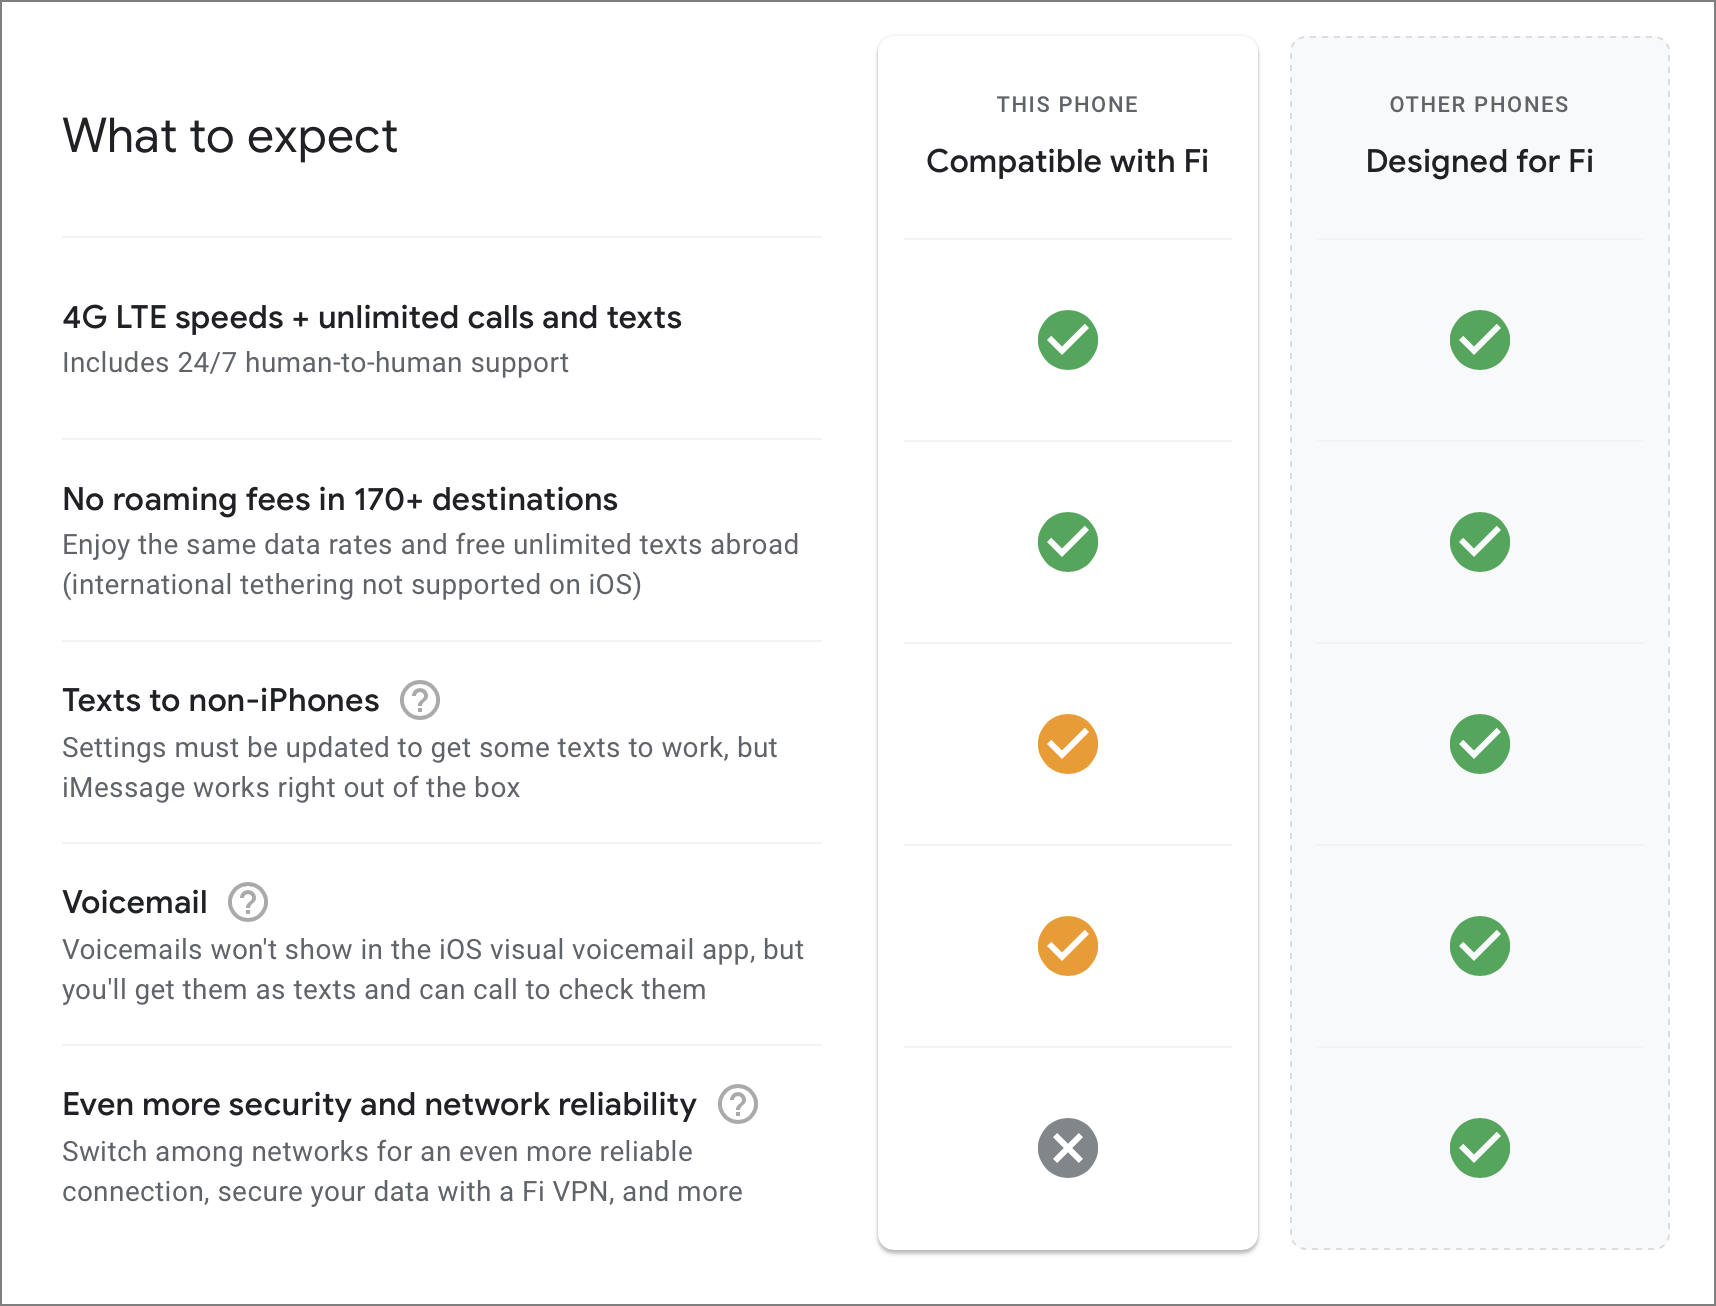
These roaming features required special phones throughout Fi’s existence, and still do. With Project Fi, you knew you had a Fi-compatible phone if you purchased one from Google, or bought the same model unlocked from another source. Under Google Fi, phones that can automatically shop for networks are called “designed for Fi,” while phones that cover only the basics are considered “compatible with Fi.” For iPhones, any phone from the iPhone 5s onward is “compatible,” but none is “designed.” The only designed-for-Fi phones are Android-only models in the Google Store. (I’ve been using an Android phone since I switched to Fi, making me the black sheep of the TidBITS family.) As with any phone, if you purchased an appropriate model from a carrier that locked it to its service, it must be unlocked before it can be used with another service, including Google Fi.
For Google Fi, the basics appear to be, “your iPhone will use the T-Mobile network,” end of story. That focus on T-Mobile takes away one of Fi’s best features, because in a city with overlapping network availability, there’s always the odd room or building that’s a dead zone for one service or another. Having access to more than network means that these dead zones seamlessly go away. Some buildings, especially old and massive ones, can act as a Faraday cage that blocks all outside radio signals—but if there’s Wi-Fi inside, the phone will work. On the East Coast, the only places I regularly go with weak signal across all Fi networks are short stretches of the I-95 highway between Philadelphia and Washington, DC, but federal and municipal buildings are locally famous for disconnecting everything from a cell phone to an FM radio. And I’ve never had a problem while traveling, which I couldn’t say before I switched.
There is perhaps one silver lining to the iPhone network issue. In the Project Fi days, iPhones and most Android phones were simply called “incompatible.” (Technically, you could use an iPhone with Project Fi, with the above restrictions and a few others, so long as you used a compatible Android phone to activate the SIM card before putting it into the iPhone.) Now, however, Google Fi for iOS is “in beta.” Google will tell you what you can’t do with an iPhone, but the word “beta” implies that these limitations might go away someday. Maybe that requires iPhone hardware designed with Fi in mind, maybe that requires Google to hand a large suitcase of cash to Apple for the right to use particular iPhone frameworks, and maybe Google is just using marketing language to cover for the fact that it’ll never happen.
But that’s in part why I said the basics “appear to be” limited to using the T-Mobile network. Google Fi support says that the codes that switch networks on a designed-for-Fi phone won’t work on an iPhone, and I believe them—but I’d be somewhat surprised if there won’t be workarounds and hacks circulating on the Internet soon. Phones are fiendishly complicated devices, but there are fiendishly clever people trying to get them to do things they’re not supposed to. However, it is safe to say that should such workarounds appear, it will be far more trouble to use them on an iPhone unless Apple and Google make it so iPhones are on par with the designed-for-Fi devices. (I’ll also note that historically, some of these hacks could permanently brick a phone. I don’t recommend attempting a recipe you find online unless you fully understand what it’s telling you to do.)
Financial Details about Fi
The other reason to subscribe to Google Fi, other than network roaming, is the price. Fi frequently works out to be cheaper than competing service, but it depends on what you do with your phone.
As opposed to other networks whose plans and definitions of “unlimited” seem to vary in correlation with sunspots and hog futures, Google Fi is straightforward. A phone costs $20 per month for unlimited calls and texts, and $10 per gigabyte of data. Additional phones on the same plan are $15 per month, plus data. You can pick out in advance how much data you expect to use, but it only matters for your first payment: if you pay $50 and only use 1.5 GB, the extra $15 is credited on your next bill. If you go over, Google charges the overage to your next bill. Google Fi is no-contract; you can cancel or suspend at any time. If you’re willing to use Android, you can also save money when you need a new phone. The cheapest designed-for-Fi phone isn’t as nice as an iPhone XS or Pixel 3, but it’s pretty good.
Instead of prevaricating about how it’s “unlimited,” Google offers something called “Bill Protection.” You’ll pay $10 per gigabyte for the first 6 GB (i.e., until your bill reaches $80), at which point the meter turns into what other plans call “unlimited.” In Fi’s case, there’s a speed restriction that kicks in if you exceed 15 GB in one month. Unlike other plans, if you want to get rid of the speed restriction, you can opt to go back to paying $10 per gigabyte for your data usage over 15 GB for the remainder of the month.
There are two other aspects to Google Fi’s pricing that are somewhat astounding compared to the rest of the industry. The first is that Internet data is Internet data with no caveats, and Fi doesn’t care which device is using it. Some plans meter whether your data is being used in the phone or with the phone sharing its data connection via tethering as a hotspot, and impose separate caps or additional costs for tethered data. Fi has never made this distinction and still doesn’t, but with a huge caveat: with an iPhone, you simply can’t do tethering while traveling outside the United States.
The other is that it doesn’t matter where you are on the planet, the price is the same. Use your data in Manhattan or Mumbai, and it’s the same $10 per gigabyte. Make a phone call in any country outside the United States and there’s a flat charge of $0.20 per minute, or it’s free if you use a Wi-Fi hotspot for the call. When I compare this plan to all those years when AT&T considered Canada to be as exotic as Mars and priced accordingly, I weep with joy. It’s also a nice change from landing in a country and having to find a kiosk to buy a domestic SIM for my phone.
Unfortunately, Wi-Fi calling is not currently available on an iPhone—so if you plan on using one internationally, you’re facing $0.20 per minute ($12 per hour) surcharges unless you move your voice calls to FaceTime, Google Hangouts, or something similar using VoIP. This situation becomes even more confusing because calls made on Google Fi are also Google Hangouts calls—call my phone and my Mac and iPad will also ring. I haven’t been able to confirm this, but it may be that it costs $0.20 per minute to place a call while roaming internationally using the Phone app, but it would be free in the Hangouts app. Even better, whatever the situation is now, it’s likely to change.
You may be thinking that international roaming is a great deal for those living in other countries where most people are closer to an international border. Unfortunately, Google Fi won’t help you with that, because Fi accounts must be based in the United States. That said, the service is entirely paperless, it’s all mediated by the Fi app, and you can associate a Fi account with any Google account. The only technical restriction is that you have to be within the US to activate the phone. So you might conclude that, as long as you have a compatible method of payment, whether you can set up an account using an American friend’s assistance is between you and your conscience.
Figuring Out Fi’s Value
As it stands, if you use an iPhone on Google Fi, you’re essentially using T-Mobile, so its plans are the ones to use as a comparison to determine if Google Fi is a good fit for you. The first test: T-Mobile’s unlimited plan currently costs $70 per month, so if you regularly use more than 5 GB of data each month, the answer is “T-Mobile is better,” full stop.
The second test concerns coverage. You can check T-Mobile’s coverage map for likely signal strength in areas you frequent, but if the coverage is weak or non-existent, the answer is “Stick with your current cell carrier.”
If you have good T-Mobile coverage and don’t use large amounts of mobile data, keep reading.
For the rest of this comparison, I’ll be comparing with T-Mobile’s current offering for new customers—which could be entirely different from what you have now, even if you’re on T-Mobile. It’s common for cell carriers to maintain grandfathered plans for years, or to make special exceptions. For example, T-Mobile currently doesn’t advertise anything except unlimited plans—but I’m sure it does offer such plans in some circumstances. So I’ll only compare to what’s advertised. I can’t compare apples to the particular oranges of your current plan.
- Is switching worth the effort? If your data usage is high enough that you’ll pay almost $50 per month for data on Google Fi, you’ll save under $100 per year. But if you spend most of your time in Wi-Fi coverage and thus keep your Fi bill around $30–$40 per month, the savings could be nearly $500 per year. The lower the savings, the less likely you should be to switch unless one of the next comparisons is extremely attractive.
- If you like using the iPhone’s visual voicemail system and rely on it, that could be reason enough not to switch. You should be less concerned about the other features you can’t have on the iPhone beta features chart shown above. “Improved network security” just means you can’t use Google’s VPN service when connected to a public Wi-Fi hotspot because your iPhone won’t tunnel network traffic through the VPN like a designed-for-Fi Android phone will. Texting to non-iPhones will work fine after changing a few settings. When you activate your iPhone, the Fi app walks you through what to do. If you have any problems, my experience with Fi customer support has been stellar, and I have no doubt that they’ll get you up and running. The key feature you’re missing is network roaming—if and when that comes to the iPhone, throw out this entire list because you’re no longer comparing to only T-Mobile anymore.
- Both T-Mobile and Fi offer unlimited talk and texts. But T-Mobile’s data offerings have various limitations. Tethered data for your other devices is included in “unlimited,” but throttled to 3G speeds. (If that doesn’t sound too bad, I assure you you’ll feel differently 15 minutes after using it.) In Mexico and Canada, you’re capped at 5 GB of 4G LTE data, which is generous for visits but not if you’re there regularly. T-Mobile does offer a generous cap of 50 GB before it throttles your speed domestically—which, honestly, is a little too good and makes me wonder if there aren’t unadvertised lower thresholds that also kick in.
- If you’re over 55 or a veteran, T-Mobile has some attractive deals for multiple lines. They’re hard to beat.
- T-Mobile’s “unlimited” data includes “unlimited” video streaming—which is to say, for most video providers it’s throttled to 480p standard definition. Watching a movie in high def over Fi cellular could cost you $10—but only until you’ve used 6 GB and hit the pricing cap, after which you might want to have an HD option that you can’t have on T-Mobile.
- T-Mobile’s plan offers a few benefits that, if you use them, save you some money. It includes a Netflix subscription worth $8 per month. The quoted price includes taxes and fees, which can be an extra $5–$10 on other plans. T-Mobile has an agreement with Gogo Inflight for an hour of Wi-Fi usage and unlimited texting, which otherwise is priced higher than the altitude of your plane.
- T-Mobile charges $10 per month for unlimited LTE data for your Apple Watch, while Google Fi charges you the actual data cost. Unless you’re listening to three hours of Apple Music literally every day, Fi is cheaper.
- At publication time, T-Mobile offers various free stuff and discounts if you purchase multiple lines or phones. These effectively create a contract even if you’re officially month-to-month, because you’ll pay penalties to cancel service before these benefits are paid out. In comparison, Google sometimes offers service credits and discounts on a phone purchase (the $249 Moto G6 currently costs $199 and comes with a $100 credit on your Fi bill), but occasionally has ridiculous sales—on the day the company announced Google Fi, and only on that day, a $1,000 phone purchase was good for a $1,000 travel certificate.
If you only skimmed that list until your eyes glazed over, and then skipped to the end of the bullets, you probably want to be a Google Fi subscriber. “$20 per month plus $10 per gigabyte” is easily memorized. That alone was a strong incentive for me to sign up with Fi, after spending more than a decade comparing byzantine plans. Plus, there’s no contract—the most painful part of trying out Fi and later deciding to go elsewhere is porting the phone number for a few days each time.
Finally Deciding Whether to Switch
If Google Fi offered the same services on the iPhone that it does for designed-for-Fi phones, it would almost be a no-brainer to recommend it to many people (and to recommend many current Android users to switch to an iPhone; I certainly would). My phone bills were over $80 per month the last time I was on T-Mobile. On Project Fi, I cut them in half, and I’ve cut them still further by using a data hotspot I purchased through my nonprofit (see “TechSoup: Get Deep Discounts on Technology for Your Nonprofit,” 18 October 2018).
However, as things stand, every phone that’s not “designed for Fi” is a second-class citizen. It’s impossible to tell whether that’s something that can be fixed by Google (in either software or legal agreements with Apple) or in future iPhones. I don’t think either company is particularly incentivized to make iPhones full citizens on Fi, but two weeks ago I would have told you that I never expected to see iPhones officially supported on Google’s network at all. They may surprise me. If they do, then yes, I think Fi offers enough unique services that everyone should take a strong look at it.
In the meantime, iPhone users who think their phone bills are too expensive should give Google Fi a look; if you’re paying for unlimited service if you don’t need, or if you’re getting hit by large international surcharges regularly, it’s a good solution. But unfortunately, you can’t get the best of what it offers right now with your iPhone.
