#1478: TidBITS reader survey, training Siri, Apple Card benefits, tips for navigating with Apple Maps and Google Maps
We want to hear from you! We’re running a reader survey to find out if we’re providing the articles you want and how we can improve. Also, in this issue, Adam Engst proposes that Apple should train Siri with user feedback instead of labor-intensive eavesdropping. Now that Apple Card has started to become available, Josh Centers explains how to get the most out of your Apple Card benefits. And Adam shares real-world observations and advice for using Apple Maps and Google Maps while traveling. Notable Mac app releases this week include Keyboard Maestro 9.0, Mailplane 4.1.4, GraphicConverter 11.0.1, Lightroom Classic CC 8.4, Microsoft Office for Mac 16.28, and Parallels Desktop 15.0.
Please Vote in the TidBITS 2019 Reader Survey!
Our last reader survey ran in late 2015, when we were starting on the major site redesign and Internet infrastructure transition that finally came to fruition in April 2018. Between the new site and all the changes in Internet publishing over the past few years, we’ve started to wonder if our sense of how we’re doing still matches what you think. Since the majority of our funding comes directly from TidBITS readers via our membership program, we focus on what’s best for readers rather than advertisers.
To answer that question and more, we would greatly appreciate it if you would participate in our TidBITS 2019 Reader Survey. We’ve broken it into a few short sections, and it should take about 5 minutes to complete, or a bit more if you want to provide optional free-form feedback for some of the questions. The survey itself relies on Google Forms, and it should work on any device, although it will be easiest to enter free-form responses on a Mac or an iPad with a keyboard.
The core motivation for the survey is that we have a hard time evaluating how much you like what we’re writing. When we publish an article, the main feedback we get is in the comments, and even then, the discussion doesn’t always reveal whether readers found the article helpful or interesting or anything else, just that they have opinions about the topic. Engagement is good, but even the lack of engagement isn’t necessarily indicative. In our previous reader survey, Agen Schmitz’s Watchlist items about Mac software updates were rated highly, but they seldom garner any comments.
For many other publications, Web stats show how popular an article is, but that has never worked well for us because so many of our readers receive TIdBITS in email. TidBITS articles that rack up a notable number of Web hits do so because of getting significant external coverage from other sites, showing up in Google News briefly, or ranking highly for a specific Google search. We always appreciate that attention, but it doesn’t come from the regular readers and TidBITS members we work for.
Our other motivation for the survey is to see what you think of the Internet infrastructure and visual redesign that we put into place in 2018. Although it may have seemed like we were done in April 2018, we’ve been tweaking and refining ever since, and we just moved our email delivery system from SendGrid, which was costing us over $200 per month, to Amazon SES, which is about $20 per month. Although the most significant changes may be behind us, if we see small ways to improve the user experience, we can add those to the development list.
So please, take the survey and let us know how we’re doing!
Why Can’t Users Teach Siri about Its Mistakes?
With the recent fuss about Apple contractors listening to some of our Siri conversations (see “Apple Suspends Siri’s “Response Grading” Eavesdropping,” 2 August 2019), I couldn’t help but wonder why we users can’t perform this task. If you’re anything like me, you already talk back to Siri when it makes mistakes or triggers unexpectedly.
Apple never said precisely what its contractors were doing, but TechCrunch’s Matthew Panzarino, who Apple favored with the exclusive explanation, described the “grading” process like this:
This takes snippets of audio, which are not connected to names or IDs of individuals, and has contractors listen to them to judge whether Siri is accurately hearing them—and whether Siri may have been invoked by mistake.
His description brings to mind Apple’s famous “1984” ad, and its endless rows of gray-clad workers, except they’re all wearing headphones, listening to Siri audio snippets and pressing one of three buttons for each: Correct, Incorrect, Inadvertent Invocation. It’s a dystopian image, and we can only hope the actual job is less soul-sucking.
Whether or not the scene I’m visualizing has any overlap with reality, I see no reason that we users can’t provide the feedback Apple needs to improve Siri’s accuracy. Here’s my proposal.
Opt-in, for Starters
Regardless of anything else, Apple would need to make this proposed Siri feedback program opt-in, by asking users if they want to enable Siri feedback during initial setup and via a toggle switch in Settings > Siri & Search.
That’s just polite, given that inadvertent invocations can record speech that the user never intended to be public. Apple has already said it will make the current human-driven grading program opt-in.
Feedback via Siri Shortcuts or Buttons
When enabled, the Siri feedback switch would create three Siri shortcuts with the default phrases of “Good job,” “That’s wrong,” and “I didn’t invoke you.” The Settings screen should provide usage instructions as well. You’d be able to give Siri feedback after any response, either via voice or with buttons for devices with screens.
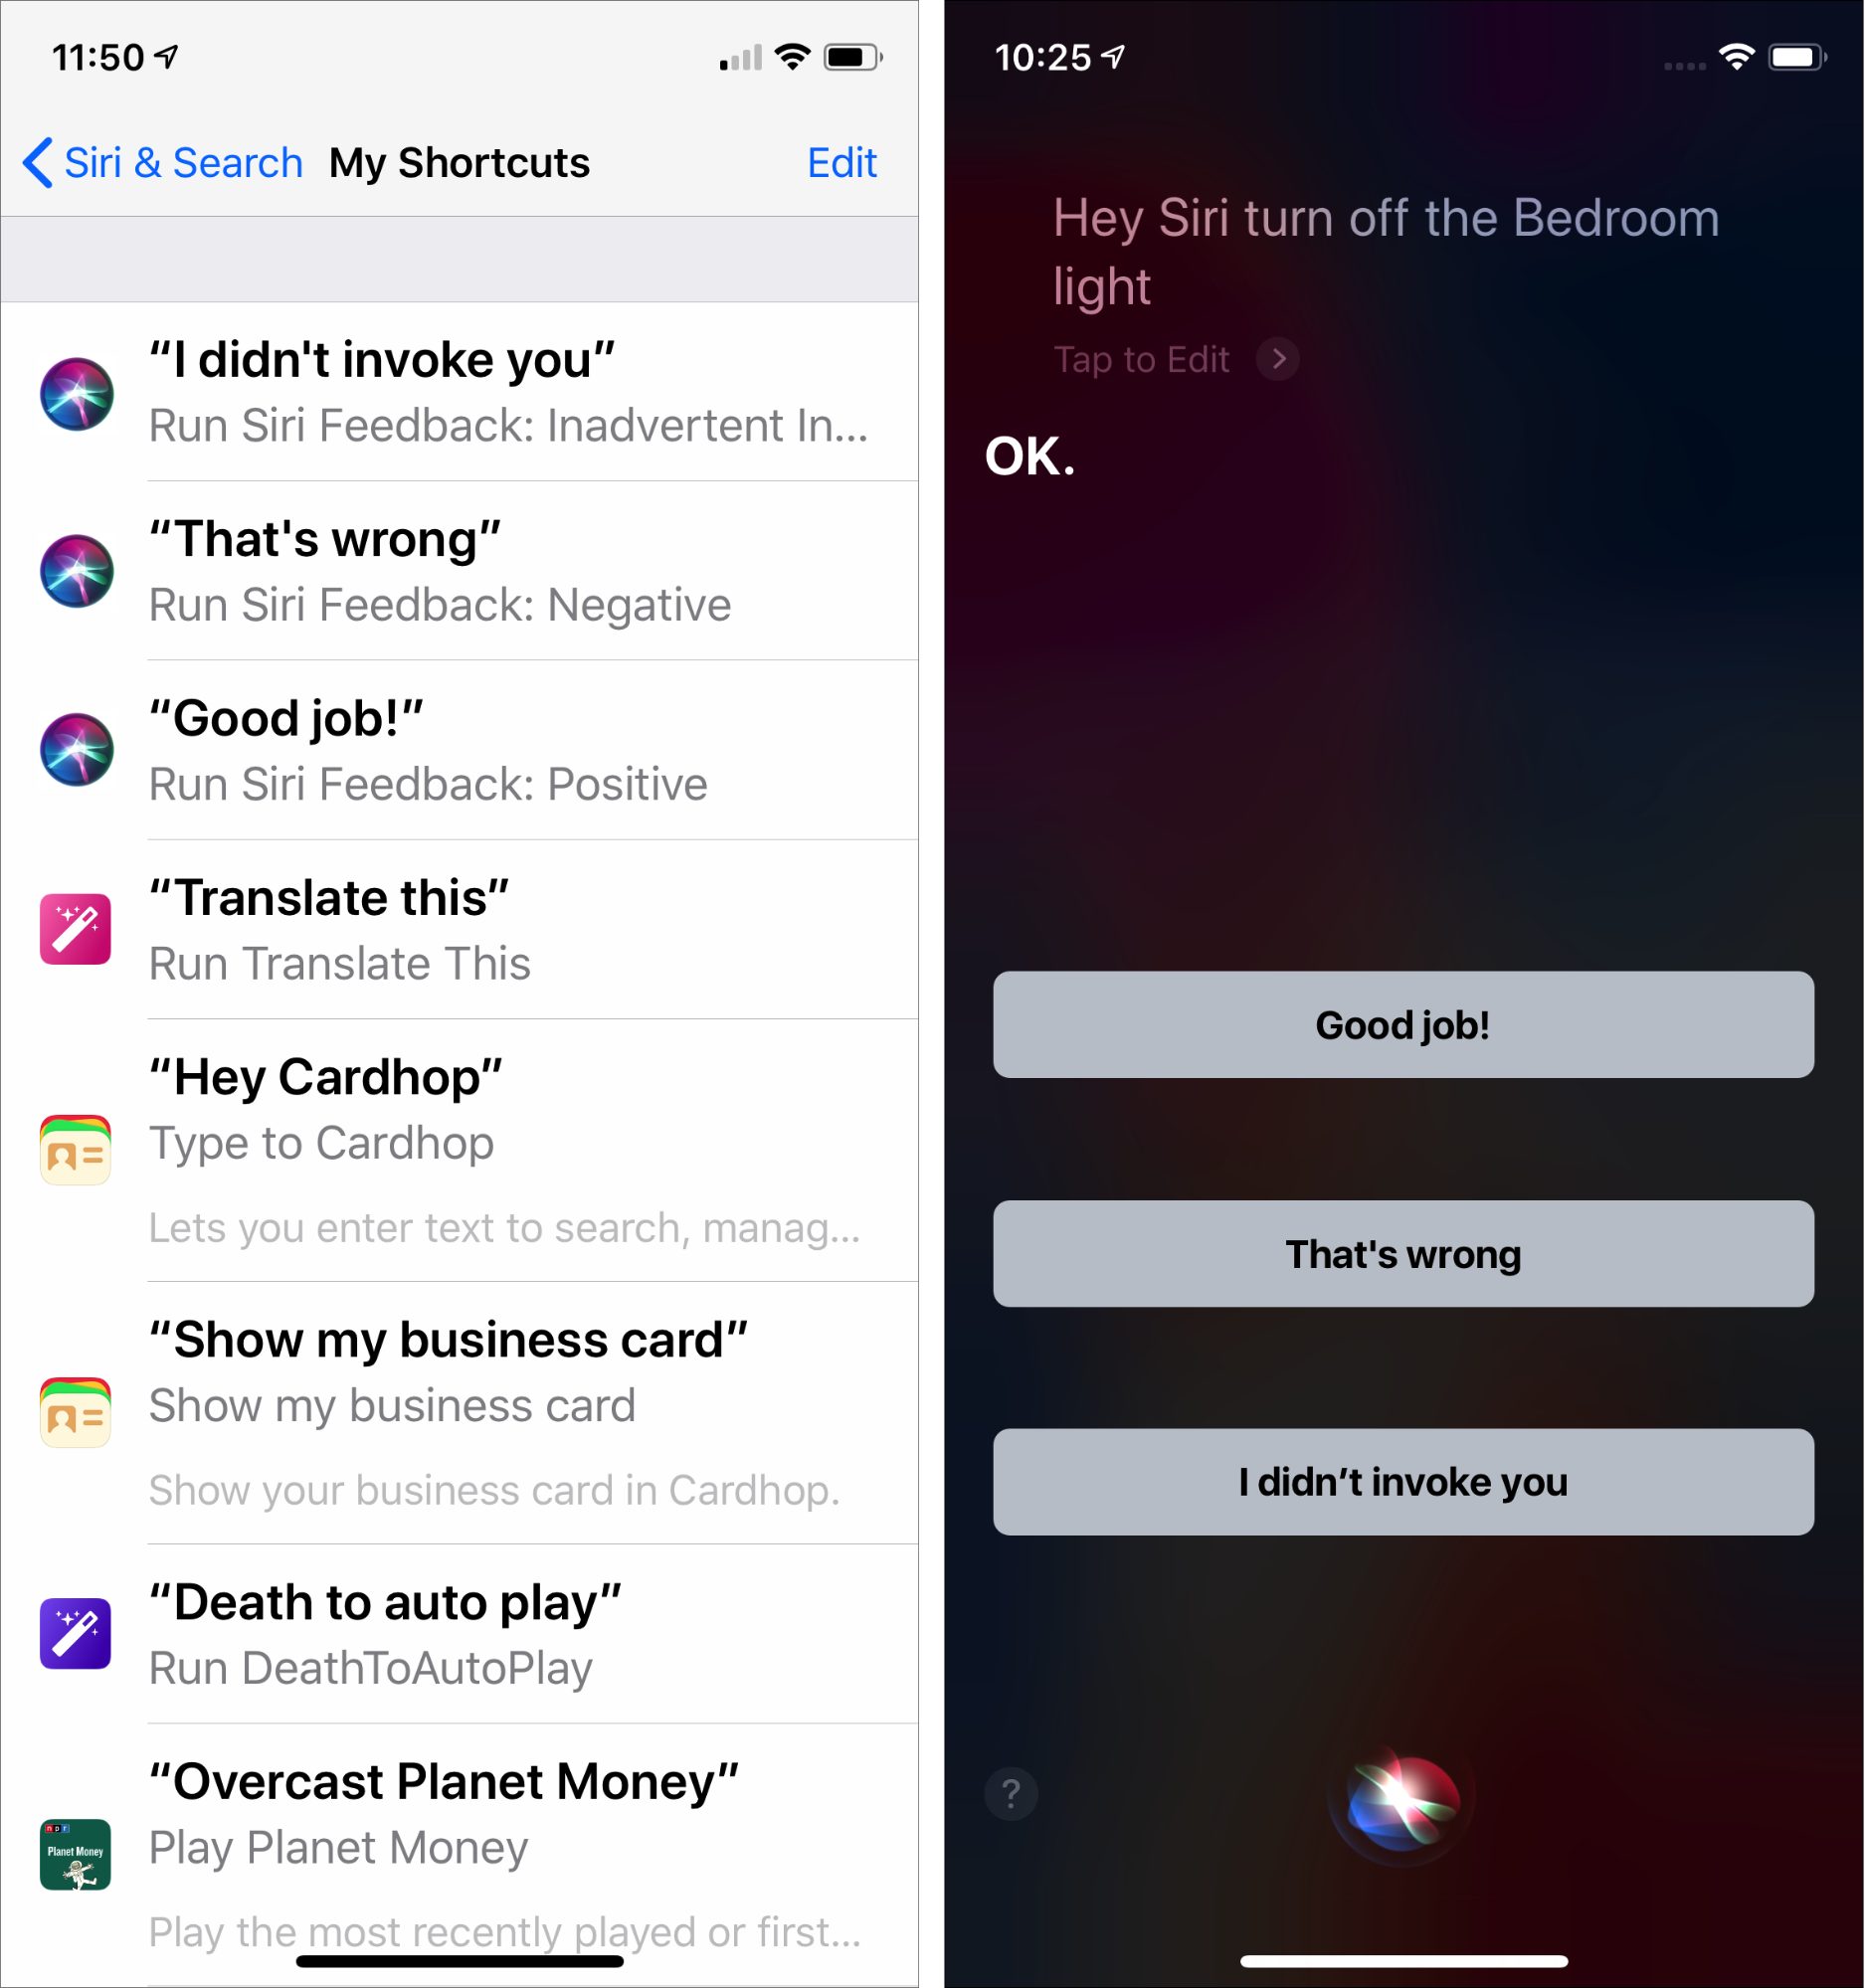
As with other Siri shortcuts, you’d be free to change the phrase however you like—I imagine the inadvertent invocation would become “Shut up!” for many people and there would be more colorful replacements for “That’s wrong.”
Obviously, there should be no requirement that you provide feedback on any particular interaction with Siri, so the “Good job” response probably wouldn’t get that much use. After all, if Siri works properly, there’s little reason to offer praise—you’re not training a dog. I’d reserve such feedback for when Siri surprises me with an accurate response to a difficult query.
I suspect the other two corrections—for an incorrect response or an inadvertent trigger—would be far more commonly used. I already have trouble restraining myself from admonishing Siri when it misunderstands my commands, and it drives me nuts when Siri pipes up for no apparent reason whatsoever. OK, I admit it, I’d be among the people changing “I didn’t invoke you” to “Shut up!”
Plus, when you correct one of these Siri mistakes, Siri should apologize for messing up. A simple “I’m sorry” would go a long way toward reducing user annoyance.
Ideally, Apple would enhance Siri so it could keep listening for feedback and followup queries after it responds to you, allowing you to avoid prefacing the feedback phrase with “Hey Siri” or a button press. Google Home already does this with its Continued Conversation feature, which listens for 8 seconds after it responds, and Amazon’s Alexa listens for 5 seconds after responding with its Follow-Up Mode.
I don’t know if Apple could get the results it needs by just taking user reports at face value or if it would still need to send some percentage of reports to humans for additional verification.
Don’t Take That Tone with Me
So far, what I’ve described is largely mechanical, and well within the capabilities of both Apple and users. I’d happily start correcting Siri tomorrow if Apple added such a feature.
But I’d like to see Apple’s vaunted engineers go further and start recognizing tone of voice and emotional state. I assume that a machine-learning algorithm could be taught to distinguish between a user’s normal tone of voice and volume and when they speak more abruptly and loudly. I’m sure lots of us raise our voices in irritation when Siri interrupts a conversation or completely biffs what seems like a simple command.
“Hey Siri, play a Beatles song.”
“NO. Not Ann Peebles! The BEATLES!”
With such recognition—and assuming the Siri feedback switch is enabled—Apple could detect signals that Siri had messed up without any extra interaction from the user. The accuracy level would undoubtedly be lower because your irritation might have resulted from the cat having just brought in a dead mouse rather than anything Siri did, but it would still be better than nothing.
More Feedback for Less Cost
Matthew Panzarino said that Apple’s grading program likely evaluated fewer than 1% of Siri’s daily requests. In 2015, Apple noted Siri was handling 1 billion requests per week, which works out to 143 million requests per day. That number has undoubtedly skyrocketed since 2015, but let’s go with it.
How many people would Apple need to hire to process even 1 million requests per day—a round number in that “less than 1%” range? Assuming someone could process 3 requests per minute on average, and keep that up for a full 8-hour day, Apple would need at least 700 workers. So unless Apple is really processing far fewer requests than “less than 1%” implies, it seems likely that the company has been employing thousands of people to improve Siri’s accuracy.
Replace those people with millions of Siri users, and I’d suggest that Apple would get vastly more feedback that was potentially more accurate and would save boatloads of money. Besides, this is the sort of thing computers should do, not people. That job must eat your brain.
How about you? Would you sign up to give Siri feedback if that were an option? Let us know in the comments.
How to Get the Most from Your Apple Card Benefits
Apple Card invites are rolling out for those who signed up for the preview of Apple’s new credit card. Coverage has been intense—Macworld has a FAQ that covers all the details, and Jeff Porten wrote about its implications earlier this year for TidBITS in “Apple Card: More Than Just a Credit Card” (28 March 2019). Rather than cover such heavily trodden ground again, I wanted to explain how you can maximize your Apple Card benefits.
The Apple Card’s signature perk is daily cash rewards, which vary depending on what you buy and how you buy it. You’ll receive:
- 3% back on purchases made directly from Apple, including the Apple Store, the App Store, iCloud storage, and iTunes
- 2% back on Apple Pay purchases made from non-Apple retailers
- 1% back on all other purchases, including those made with the physical Apple Card
Use Apple Card for Your Apple Services
An easy way to get that 3% cash-back is to use your Apple Card for all of your Apple services. Apple provides a shortcut in the Apple Card settings to do just that:
- Open the Wallet app.
- Tap your Apple Card.
- Tap the ••• button in the upper-right corner.
- Scroll down and tap Make Default at Apple.
These steps make your Apple Card the default payment method for all of your transactions with Apple, including app purchases from the App Store, Apple TV subscriptions, iCloud storage, your Apple Music plan, and even AppleCare if you choose to pay per month.
You can double-check that Apple Card is your default by going to Settings > Your Name > Payment & Shipping. Your Apple Card should be listed as the first payment method.
If you have an Apple Watch, you can check to see if the Apple Card is its default payment method by opening the Watch app and tapping My Watch > Wallet & Apple Pay > Default Card.
Use Apple Pay
Of course, Apple wants to incentivize you to use Apple Pay, which is why the company gives you 2% cash-back on every purchase you make with it through Apple Card. Apple Pay is well-enough established at this point that I won’t bore you with a complete guide, but here are some quick pointers on using it:
- To make sure your Apple Card is the default Apple Pay method, go to Settings > Wallet & Apple Pay, and scroll down to Default Card. If it’s not Apple Card, tap it and choose Apple Card.
- To use Apple Pay in a store, double-press your iPhone’s Home or side button and authenticate with Touch ID or Face ID. Alternatively, activate it from your Apple Watch by double-pressing the side button. Once you’ve activated Apple Pay, hold your device near the card reader.
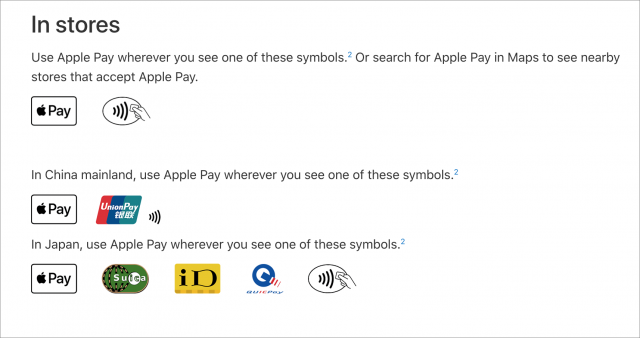
- Figuring out what stores take Apple Pay can be tricky. Apple has a list of Apple Pay partners, but your best bet is to look for one of these symbols around the register. If you’re not sure, ask the cashier.
- Remember that you can use Apple Pay in some iOS apps like Lyft and on some Web sites when viewed in Safari, like the new, improved Take Control site. You don’t have to use Safari to use your Apple Card online, but you’ll get only 1% cash-back instead of the 2% that comes with Apple Pay purchases. Look for your card number, date, and security code in Apple Card settings under Card Information (remember, tap the ••• button in the card’s listing in the Wallet app).
- If you suspect your Apple Card number has been compromised, you can request a new card number from the Card Information screen.
Use Apple Card with the iPhone Upgrade Program
If you subscribe to Apple’s iPhone Upgrade Program, you can switch your payment method to the Apple Card to get that 3% cash-back with every monthly payment. But how you change your payment method isn’t obvious, and Apple doesn’t explain it.
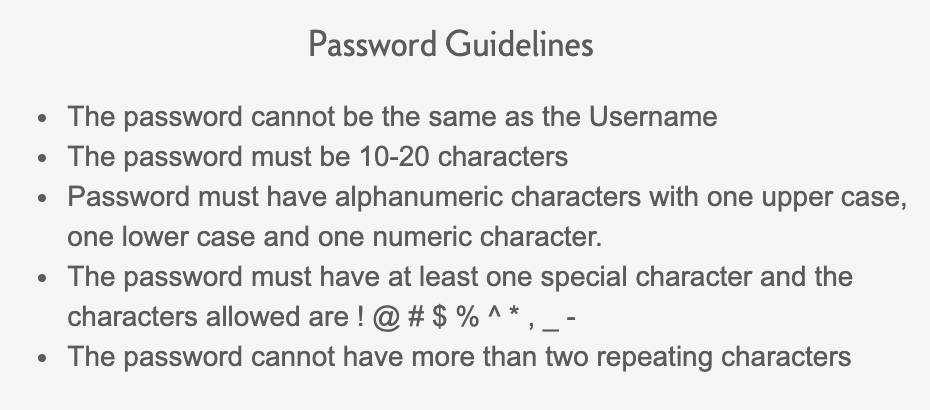
The iPhone Upgrade Program is managed by Citizens One, so if you need to do anything with it other than buying or trading in an iPhone, you’ll have to create a Citizens One account. As I discussed in “The iPhone Upgrade Program: A Year in Review” (30 November 2017), the hardest part is creating a password that conforms to all of Citizen One’s byzantine requirements. You’ll also need your loan number, which you can find in one of your monthly email receipts from Citizens One.
Once you’ve set up your account, log in and click Change Payment Account under your current balance. Click the dropdown list labeled Change My Payment Account, and choose Add a New Payment Account.
Again, you can find your Apple Card number and other information by opening Wallet, tapping your Apple Card, then the ••• button, and finally Card Information. After you click Confirm, your Apple Card should be the default payment method for your iPhone Upgrade Program subscription.
Claim Your Cash
One of the unique benefits of the Apple Card is that Apple credits you with your cash-back payments every day, but it’s not immediately obvious how you access that cash. Apple pays you through its Apple Pay Cash system and puts the money on that virtual card.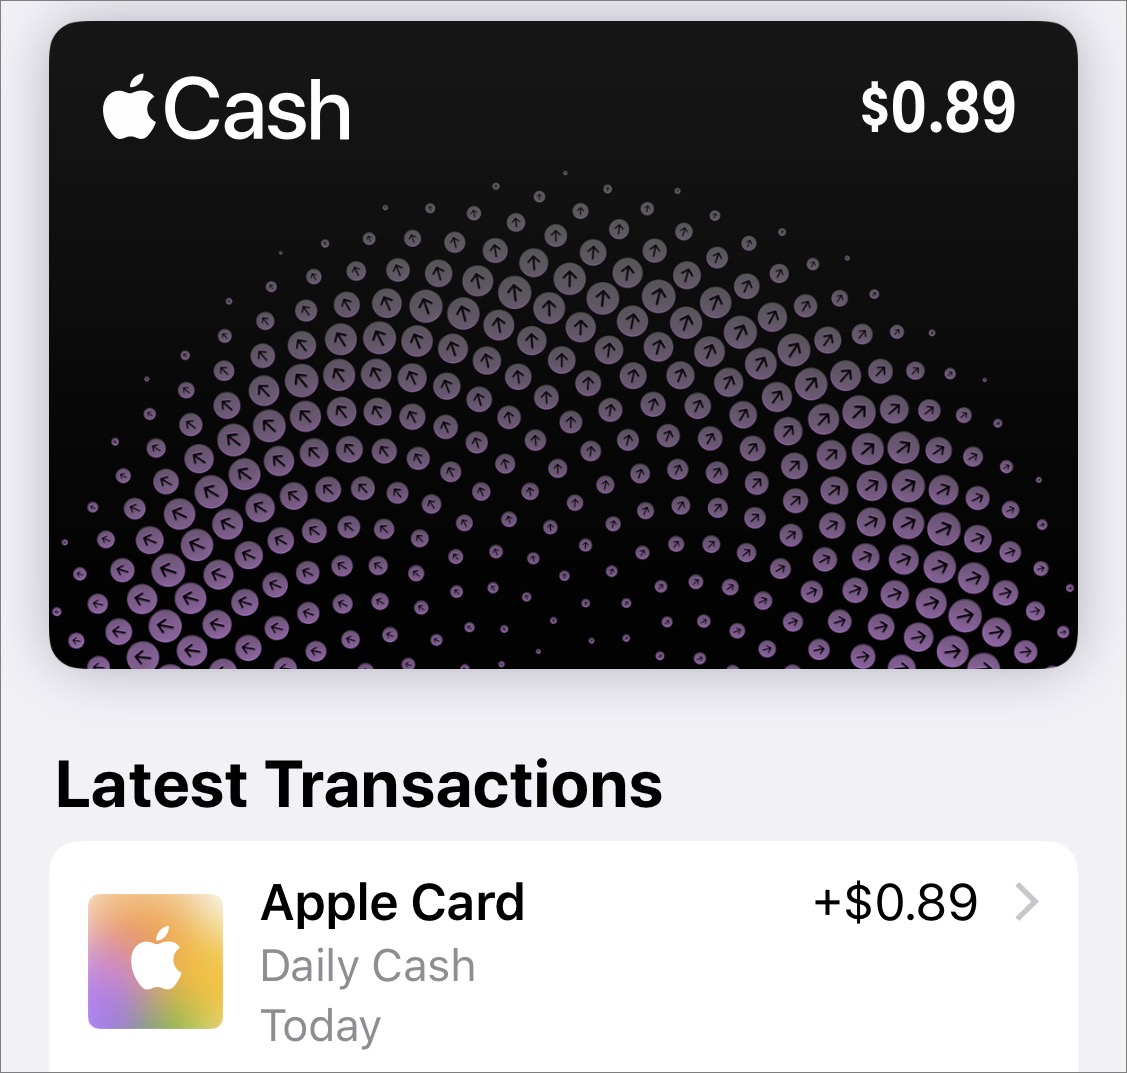
If you look at your cards in Wallet, you should see Apple Pay Cash in the stack, along with its current balance if you have one. Tap that card to see your latest transactions, including your Apple Card’s Daily Cash rewards.
You can use Apple Pay Cash to send money to friends (see “How to Use Apple Pay Cash for Person-to-Person Transactions,” 7 December 2017), but if you want to spend that money anywhere else, you’ll have to withdraw it first. While viewing your Apple Pay Cash card, tap that ••• button and then Transfer to Bank. You’ll need to have a bank account tied to Apple Pay Cash if you don’t already.
Avoid Interest Charges
There are no fees associated with the Apple Card, which is great, but that doesn’t mean it’s free to use. If you carry a balance, you’ll be paying an annual percentage rate of anywhere between 12.99% and 23.99% on the balance. Your payment is due on the last day of every month, and although you’ll receive a notification to pay it, it’s all too easy to miss or be unable to complete the transaction. For instance, if you lose your iPhone, there’s currently no way to pay your bill otherwise!
Thankfully, you can set up automatic payments so you’ll never be charged interest:
- Go to Apple Card settings by opening Wallet, tapping your Apple Card, tapping the ••• button, and tapping Scheduled Payments.
- Tap Continue.
- Tap Pay My Bill.
- Tap Next.
- Keep “When Payment Is Due” selected and tap Next.
- Authorize with Touch ID, Face ID, or your Apple ID password.
You’ll also need to have a bank account set up in Apple Card settings > Bank Accounts. If you already have a bank account linked to Apple Pay Cash, you can link that to your Apple Card with just a couple of taps.
What are your thoughts or first impressions about Apple Card? Let us know in the comments, and tell us what your plans are in our quick one-question survey.
Real-World Observations about Mapping Apps
Last month, Tonya and I spent two weeks in Switzerland, where the public transit system is, at least to us Americans, utterly amazing. It seems that it’s possible to go just about anywhere in the country via transit, and let me tell you, the buses, trams, and trains really do run with the punctuality for which the Swiss—a nation of watchmakers—are known.
While we were there, the apps I used the most were Apple Maps and Google Maps. We had a Swiss Travel Pass that provided free passage on all but the mountain railways (where it gave us a discount), and nearly every day found us mapping routes to our next adventure or destination. I used both apps heavily, often simultaneously, and came up with some observations that you might find helpful on your next trip.
Mapping Apps Use Lots of Power
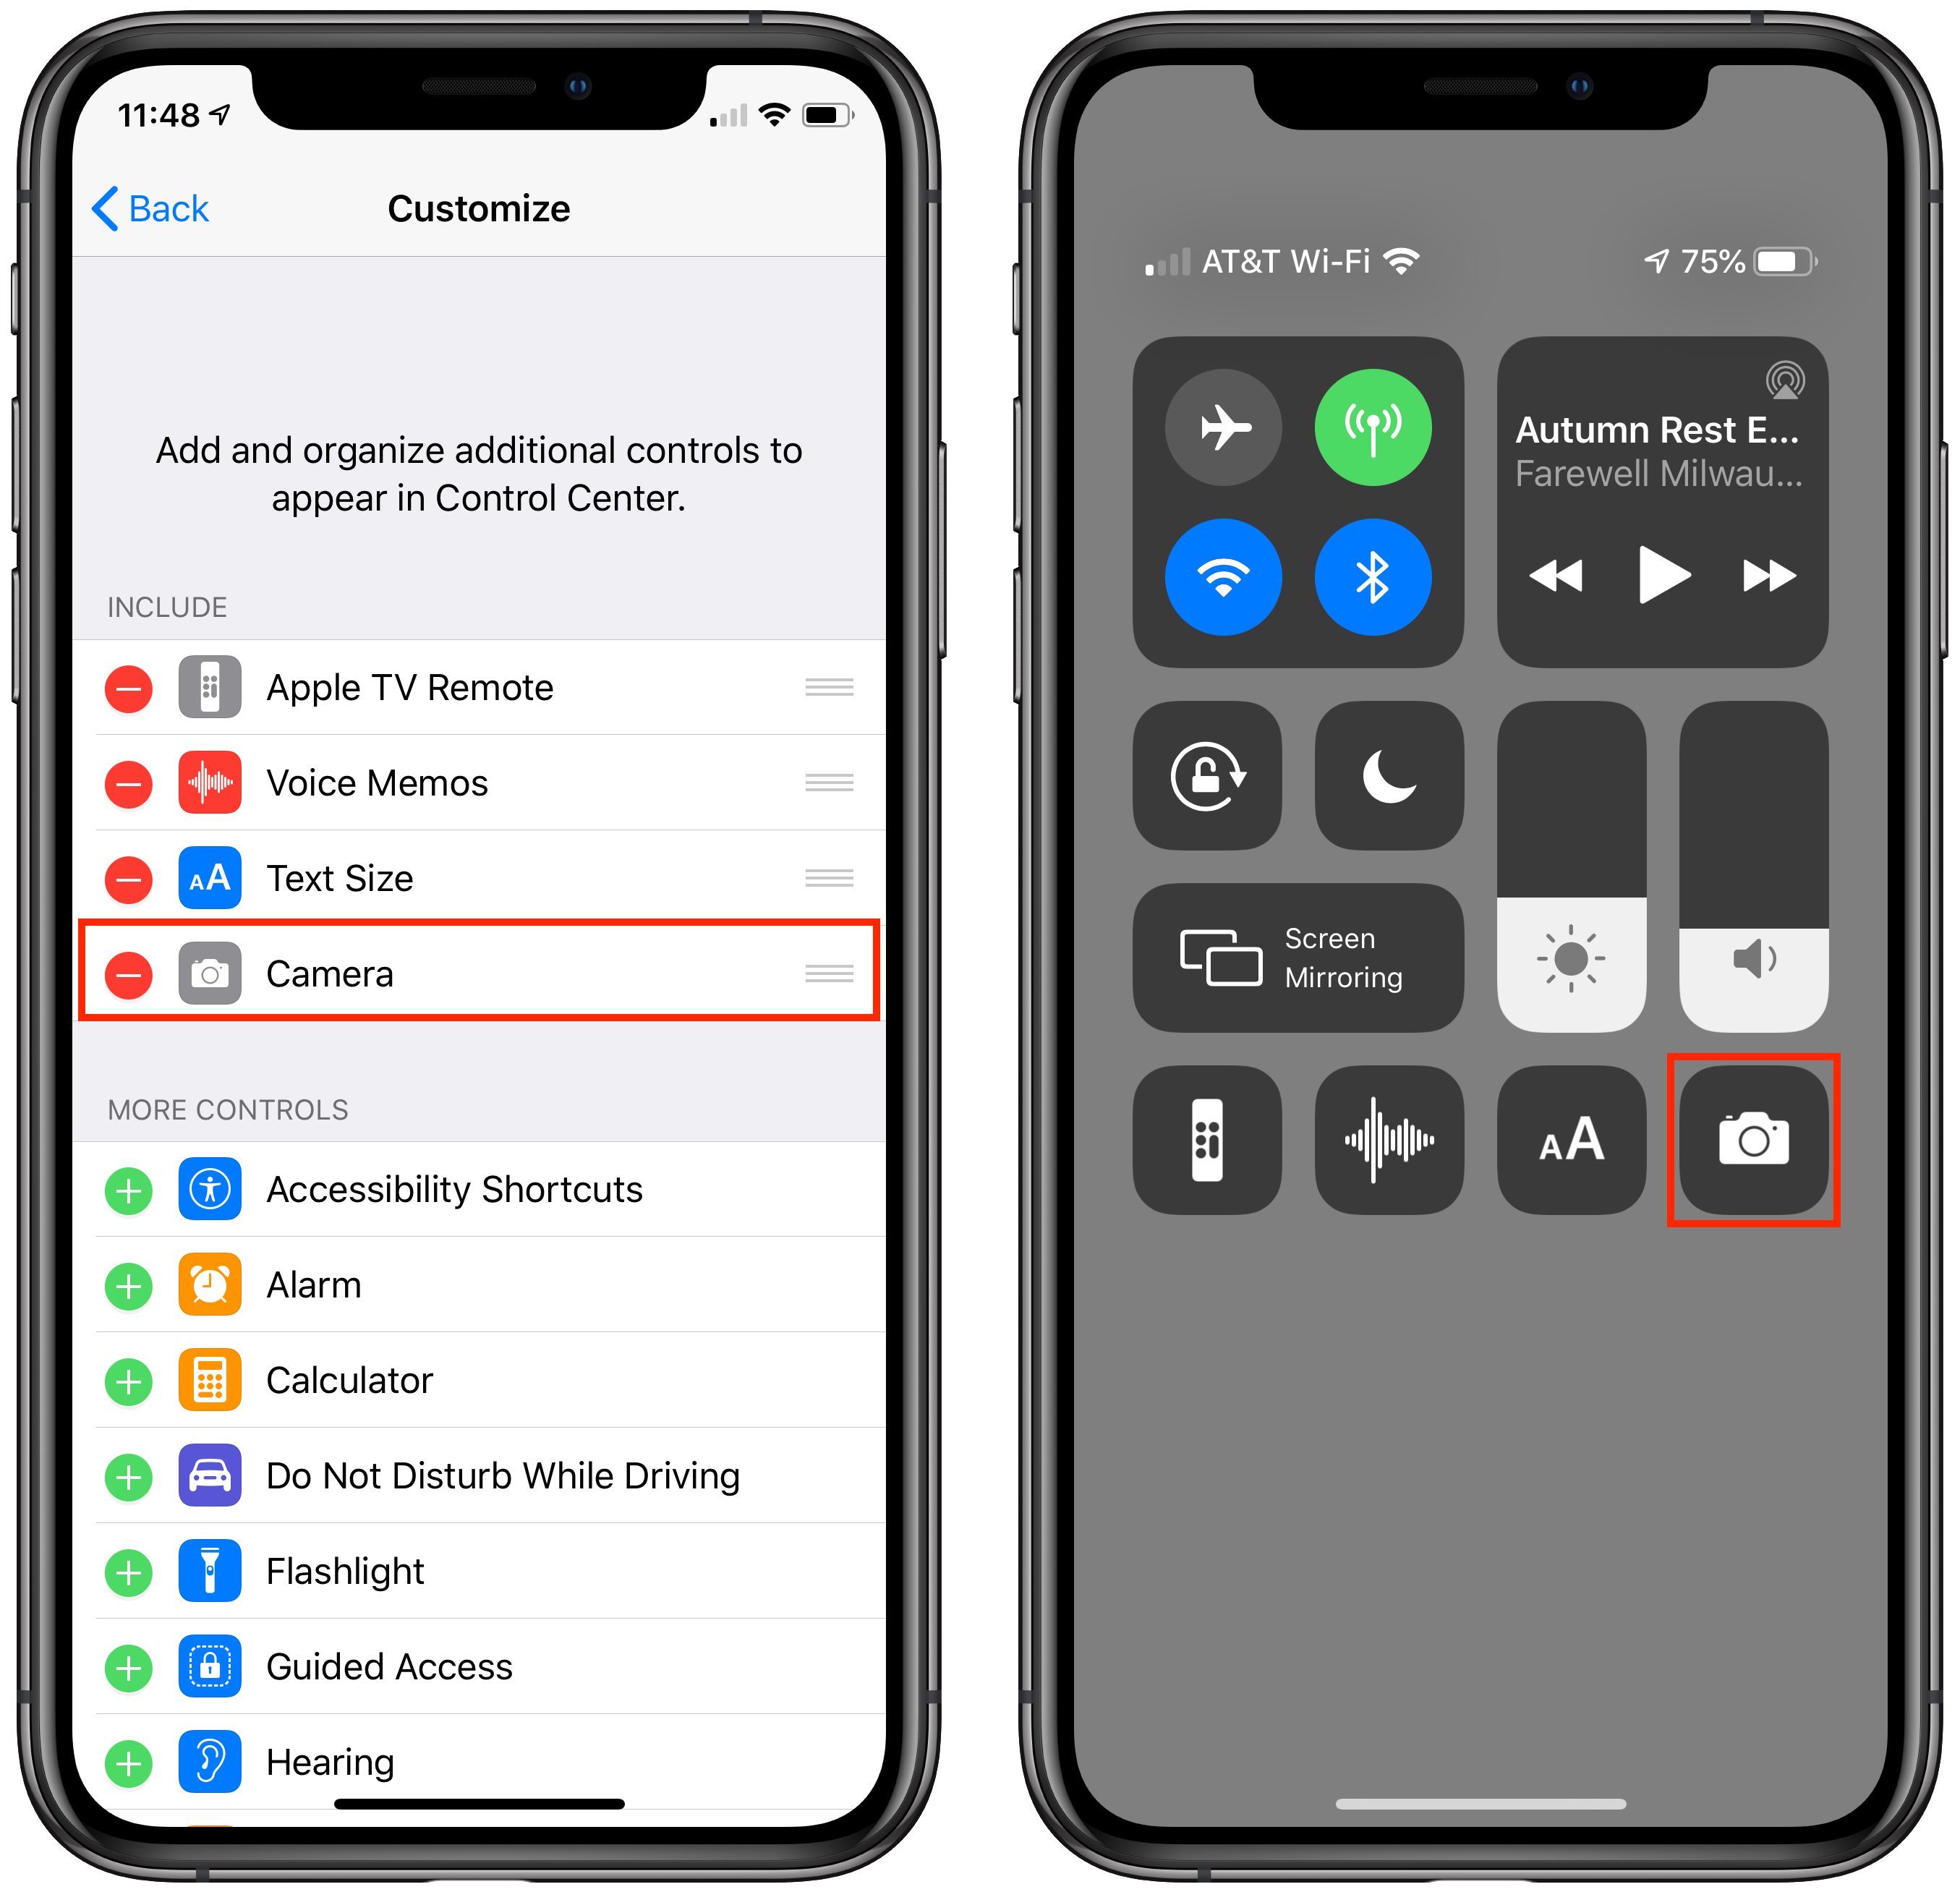
Unless your iPhone battery is in great shape, I strongly recommend having an external battery pack with you when traveling. Losing access to mapping apps because of a dead iPhone will be extremely stressful. My iPhone X still has a Battery Health Maximum Capacity of 94%, and only once or twice was I in danger of running out of battery before we stopped for the day. However, I always put it in Low Power Mode in the morning to reduce power usage. Embarrassingly, I didn’t realize it at the time, but I could have added a Low Power Mode button to Control Center to avoid the trip to Settings > Battery every day.
As I noted in “Orange Holiday Europe: A Cheap 4G SIM for Your European Vacation” (22 July 2019), Tonya’s iPhone 6s had more problems. It suffered from a Battery Health Maximum Capacity of only 88% despite her replacement battery being newer than my iPhone X, so she always carried an external battery and still restricted her usage to essentials. As a result, I did almost all the mapping, since those apps drained her battery all the more quickly.
Apple Maps Better for Walking
Apart from one day when we borrowed a tremendously cute Smart Fortwo from a friend, we walked or took transit everywhere. Or, more accurately, we walked and took transit everywhere, since getting to and from stations always required some walking, and we were also exploring Lausanne, Lucerne, and Geneva on foot. Since I was using both Apple Maps and Google Maps, I’d try walking directions in one, then the other, or sometimes both at the same time.
Apple Maps did a better job with walking directions than Google Maps due to its special place within the Apple ecosystem. It sent turn-by-turn directions, complete with custom haptics, to my Apple Watch, and it took over the Lock screen, so I could quickly glance at the screen to see how we were doing. In contrast, Google Maps was limited to notifications. And although I can’t quite find the words, I found Apple Maps walking directions more reassuring and solid, making it more comfortable to use in the moment.

Apple Maps Lock Screen Prevents Camera Use
Apple Maps taking over the Lock screen could be helpful, but it also proved annoying. We were in tourist mode, so I often wanted to whip out my iPhone, tap the camera button on the Lock screen, and take a quick snapshot. When Apple Maps was on the Lock screen, it removed the camera button, forcing me to unlock the iPhone and open the Camera app manually. While walking, paying attention to the map, and talking with Tonya, losing access to the Lock screen camera shortcut made for some awkward interactions.
I didn’t think of it at the time, but I could have added the Camera to Control Center (Settings > Control Center > Customize Controls) and accessed it more quickly by swiping down from the upper-right corner of my iPhone X, even when on the Maps-occupied Lock screen. I’d recommend setting that up in advance if you plan to use Apple Maps for walking directions when you also want to be able to take a photo quickly.
Both Apps Show the Direction You’re Pointing
Over the years, my main problem with walking directions, regardless of app, has been figuring out the direction in which to start. Both Apple and Google have improved their apps in this regard. In the past, I’d often find myself walking half a block before it was clear that I had guessed wrong about which direction to go initially. The icon that indicates your position now gives an indication of which way you’re pointing, so you can usually just turn around slowly to figure out which way to go.
The only problem with this is that the icons can be fairly small, and if your close-up vision isn’t great and you’re in bright sunshine, it can be challenging to read the screen well enough to determine direction. Even with the directional icon, I always checked that we were going the right way and several times had to admit that I’d sent us in the wrong direction. Which, as a guy equipped with high-tech mapping gear, was tough.
Large Stations Can Still Be Confusing
When you take the train into Geneva, you arrive at Gare Cornavin, a massive transit hub for both trains and local trams and buses. The problem, and neither app did a good job of helping us, is that there are at least two rather widely separated spots to catch buses or trams. Both apps could tell us which number bus or tram to use, but neither was able to tell us where to find it. Worse, because there were multiple routes that would work and time kept passing, as we tried to figure out what to do, the possibilities—and where to get the recommended bus—kept changing. Since we had arrived late at night and were exhausted, it was all the more stressful.
I have no helpful suggestions about how to resolve this problem. The simple fact is that sometimes, even with these advanced mapping apps, you need some local knowledge to be able to navigate a transit system effectively.
Walking Directions While in a Transit Route Suck
As I noted, setting up a route via transit almost always requires walking to get to the station. The problem is that neither app does a good job of providing those necessary walking directions. Both show you a map with lines that indicates where to go, but neither gives you turn-by-turn directions while you’re walking, forcing you to watch your iPhone and look for turns manually the entire time. I could have sworn they didn’t show the directional icons either, but perhaps that was merely me not being able to see the screen well while walking in bright sun. Regardless, why can’t these apps provide the same interface for walking directions while in a transit route?

I sometimes ended up setting up our transit route in Google Maps before switching out to Apple Maps for separate walking directions to the first station. That was more effective, but particularly in downtown Geneva, Apple and Google often disagreed not just about the best way to get somewhere, but how it could be done at all, forcing us to pick one and stick to it. I suspect either would have worked, but much like when you were a kid and depending on your parents to navigate, it was disconcerting to have them argue.
Bus Routes Aren’t Always as the App Suggests
On our first night in Geneva, after we finally guessed at which bus to take from Gare Cornavin to the Airbnb where we were staying, I was somewhat concerned to see our moving location in Google Maps deviate from the predicted blue line. Luckily, we were still going in the right direction, so we stuck with it, and the bus did eventually rejoin the predicted route and stop where we needed. But because you sometimes have to make quick decisions about whether to stay on a bus or get off because it’s going the wrong way, that deviation made for a fraught few minutes.
Bus Stop Names Don’t Always Match Up
Also trying were the times when the names of bus stops didn’t match with what the mapping apps advertised. The discrepancies weren’t huge, but when you’re already somewhat at sea due to not speaking the language of the area, it can induce uncertainty.
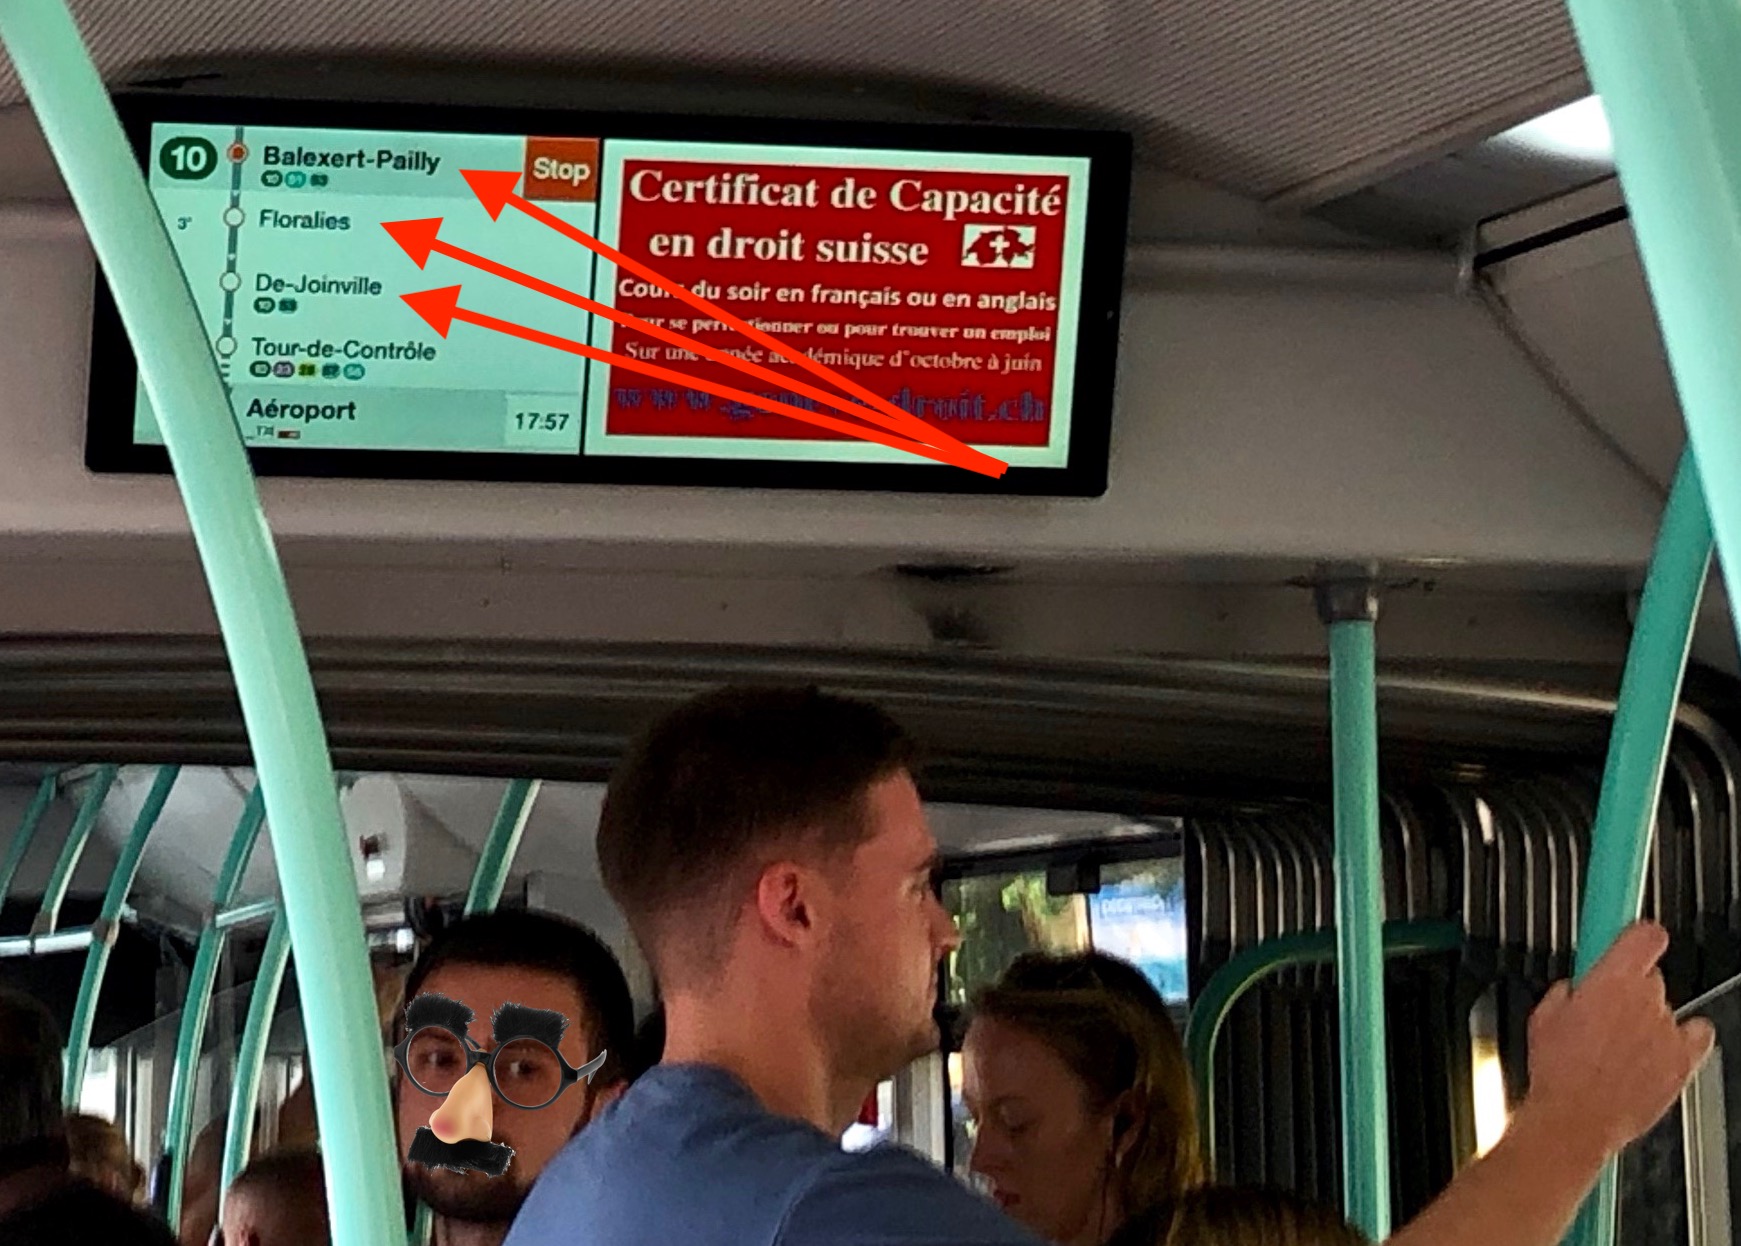
For instance, at one point, both Apple Maps and Google Maps told us to get off at “Cointrin, De-Joinville,” with the previous stops being “Vernier, Balexert-Pailly” and “Vernier, Floralies,” but the screen in the bus that advertised upcoming stops read merely “Balexert-Pailly,” “Floralies,” and “De-Joinville.” It’s easy to see that the first word is being dropped when you have time to reflect, but when you’re hot and tired at the end of a long day and you’re squished into a standing-room-only bus with your backpack, the fact that the names start with different words can be tough to parse. In short, be aware that the mapping apps may use slightly different names.
It’s Hard to Preview New Routes While on Transit
One of the reasons to have at least two mapping apps available at all times is that when you’re on a train in the middle of a transit route, it’s tricky to stop and restart the route, as you might want to do if you want to preview a different possibility or need to switch to a slightly different eventual destination.
That’s because the apps have no way of knowing that you’re already on a train, so they’ll try to direct you to the closest station, which may be behind you or require taking an entirely different transit option if you were on foot at your current location.
I learned quickly that it was best to let Google Maps keep routing us while I switched out to Apple Maps to check out a different route possibility or to ponder what would be involved with the next day’s travel.
Beware the Last Bus of the Day
One day we traveled from Grindelwald in the Swiss Alps to Geneva, which involved five trains, two buses, a funicular, a cable car, and a tram, along with bumming a car ride. That was because we went to Moléson for via ferrata and hiking—separately, since Tonya wouldn’t be caught dead clambering up a mountain face that looked like this.

Once we had reconvened at the stunningly scenic restaurant halfway up the mountain (you took the funicular to the restaurant level and then the cable car to the top, or in our case, back down from the top, since I went straight up and Tonya hiked around and up to the peak), I mapped out the rest of the trip to Geneva and was shocked to see that it was predicted to take 18 hours, rather than the 3 hours I had expected.

The problem was that the last bus for the day between Moléson and Gruyere—yes, where they make the cheese—had run for the day at 6:37 PM, and it was just after 7 PM. Both mapping apps therefore thought we should wait until 7 AM the next morning. Luckily, a Swiss family that had also been climbing kindly agreed to give us a ride into Gruyere, saving us a forced 4-kilometer march with full backpacks in an attempt to make the last train out of Gruyere.
Missing this bus took us by surprise because we had become accustomed to being able to go anywhere on the Swiss transit system, at any time. But of course, not all routes run at night. To co-opt a phrase, caveat viator! And read my next after-the-fact observation below.
Remember That You Can Set the Route Start Time
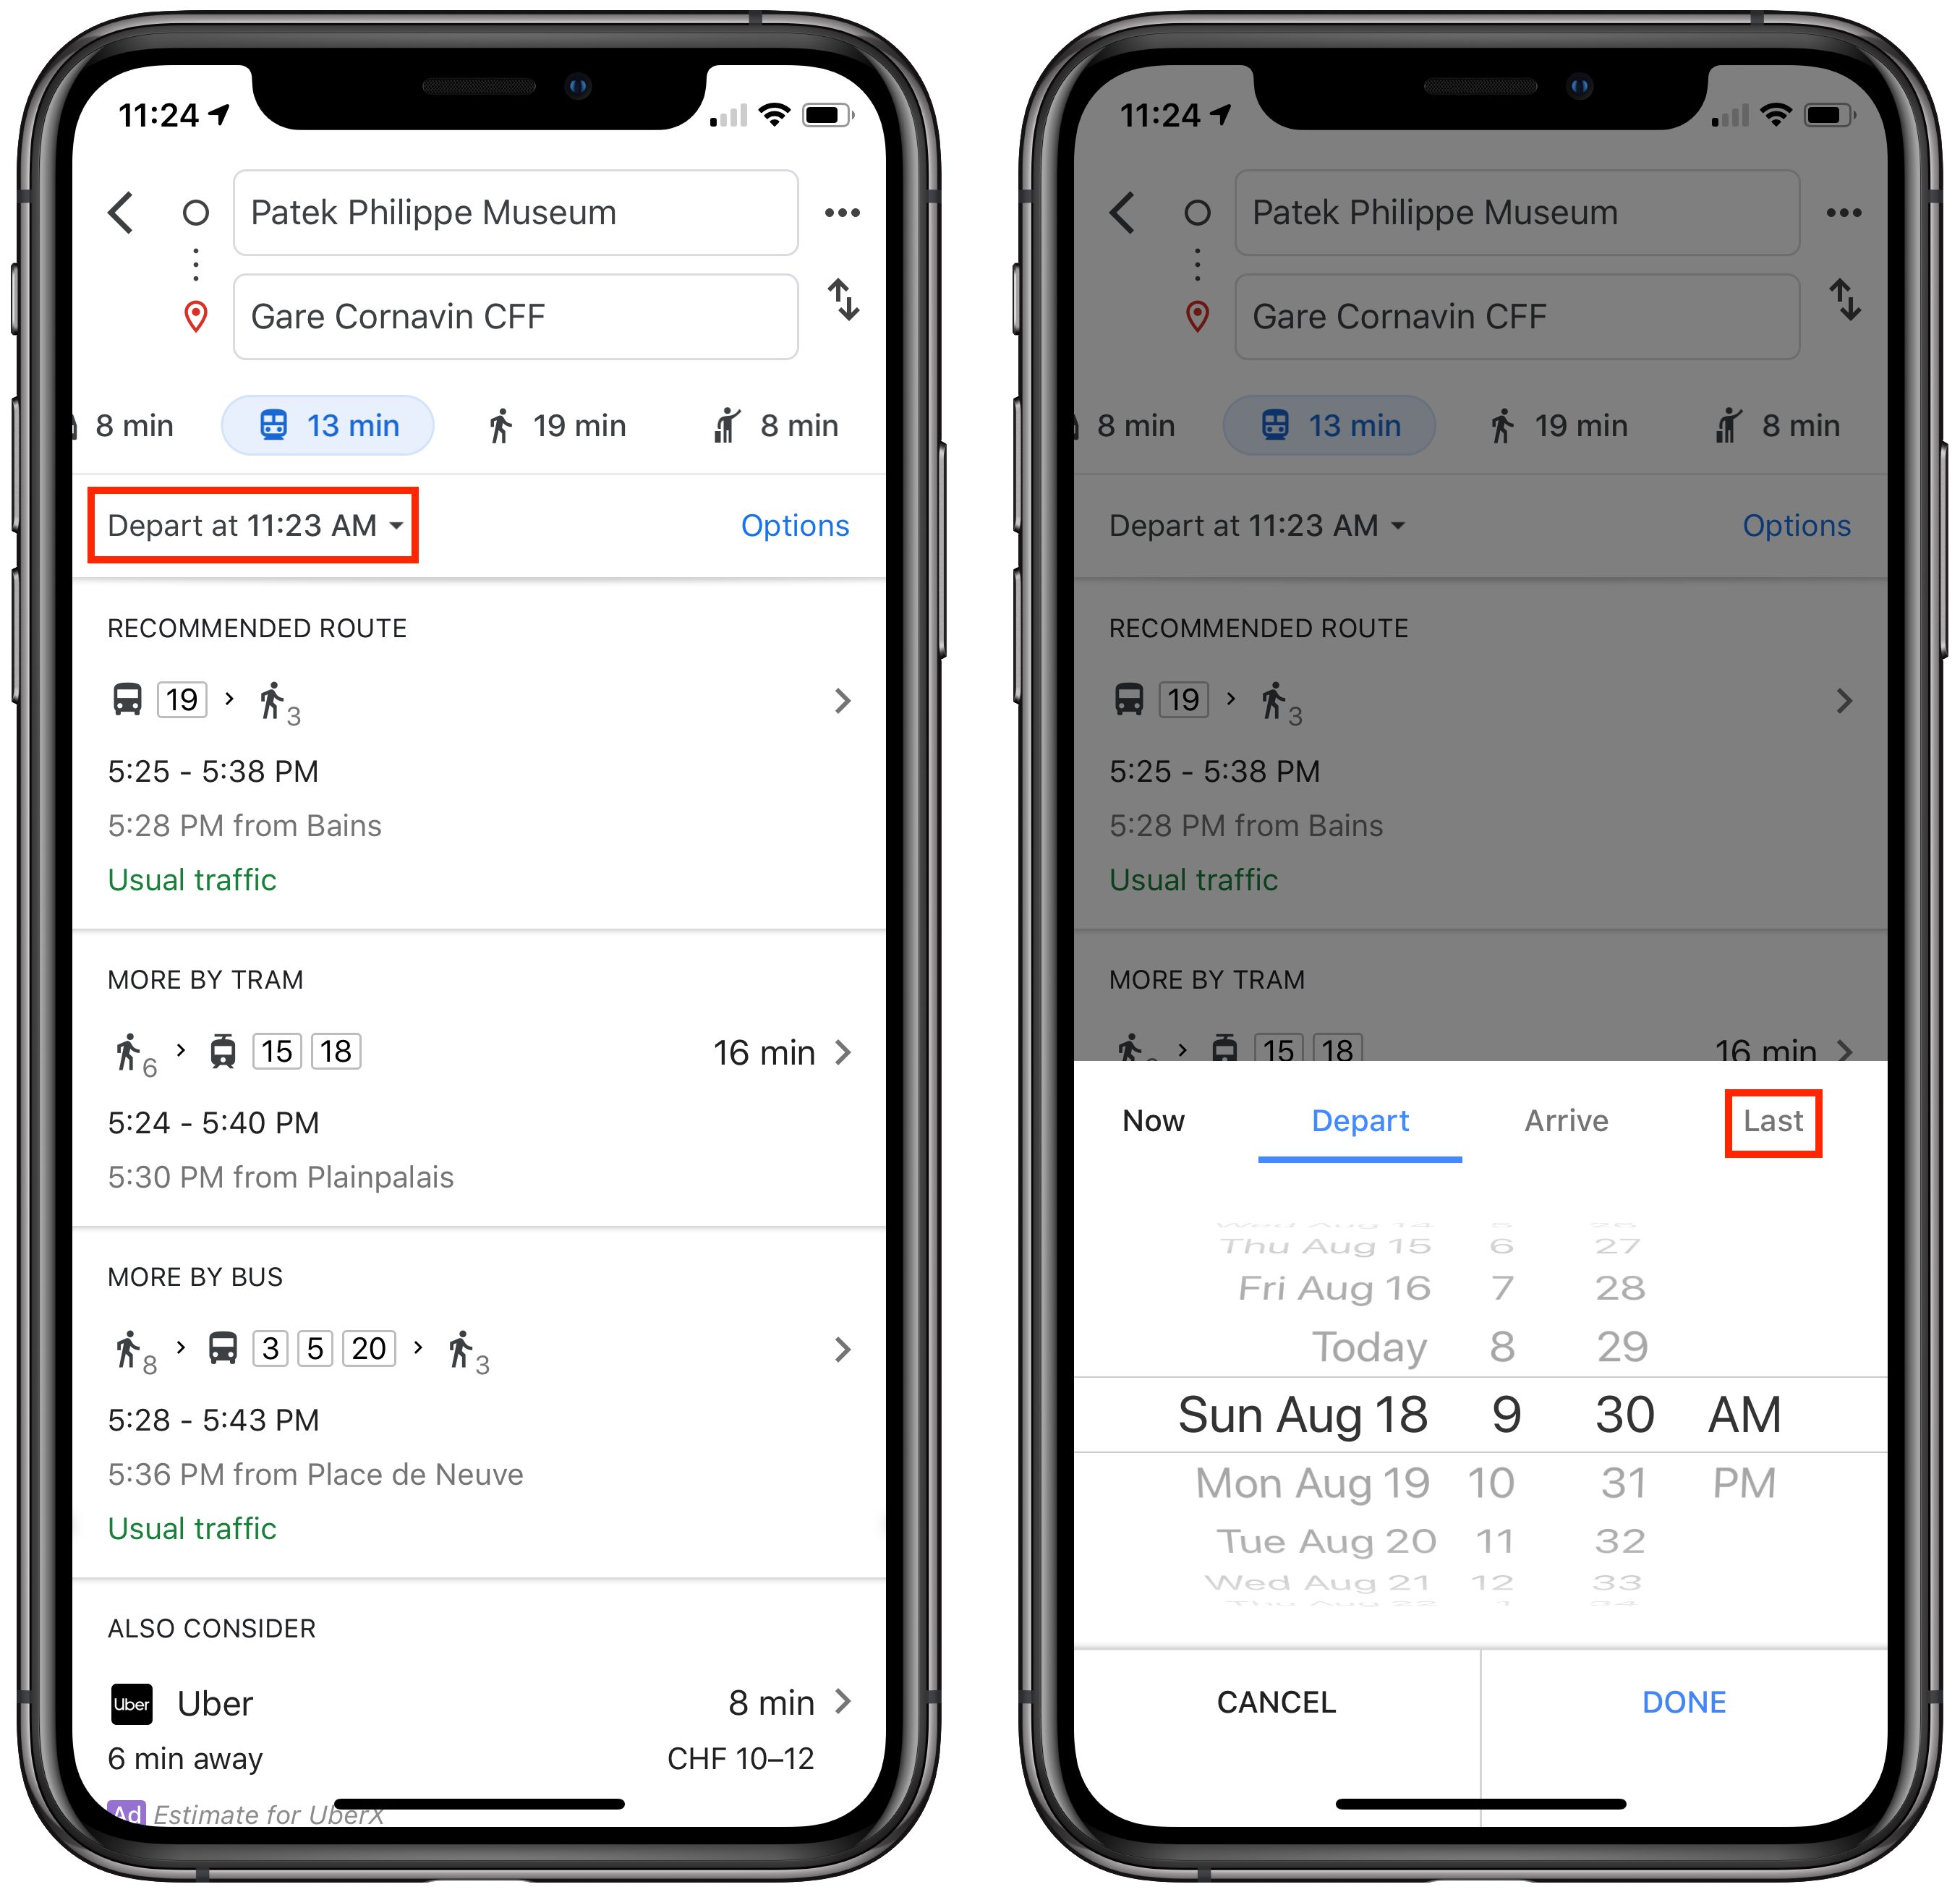
Most of the time when you’re using a mapping app, you want to go from your current location to some destination, leaving shortly. You probably know that you can also get directions between two arbitrary places, but you may not have realized that you can also change the leaving time when getting transit directions. That’s important if you need to sync up your day’s activities with transit schedules.
In Apple Maps, once you set up your route, but before you tap Go, tap the Leaving Soon link in the From line, and set the desired date and time.

Similarly, In Google Maps, after you set your start and destination spots, but before you pick one of the suggested routes, tap the Depart At menu and set a different date and time. When I did this, I discovered that Google Maps offers a Last option for any given day, which would have been nice to know that day we were on Moléson!
What If There’s No Connectivity?
Neither Apple Maps nor Google Maps ever complained about not being able to download necessary map data while we were in Switzerland. However, our iPhones sometimes showed only the EDGE status icon instead of 3G, 4G, or LTE, and we occasionally noticed the dreaded No Service status as well. Offline maps could have been helpful in such a situation. The other utility of offline maps is that you could put your iPhone in airplane mode to save battery power or to avoid data charges while still being able to navigate. (Your iPhone’s GPS remains active in airplane mode as long as you’re running iOS 8.2 or later.)
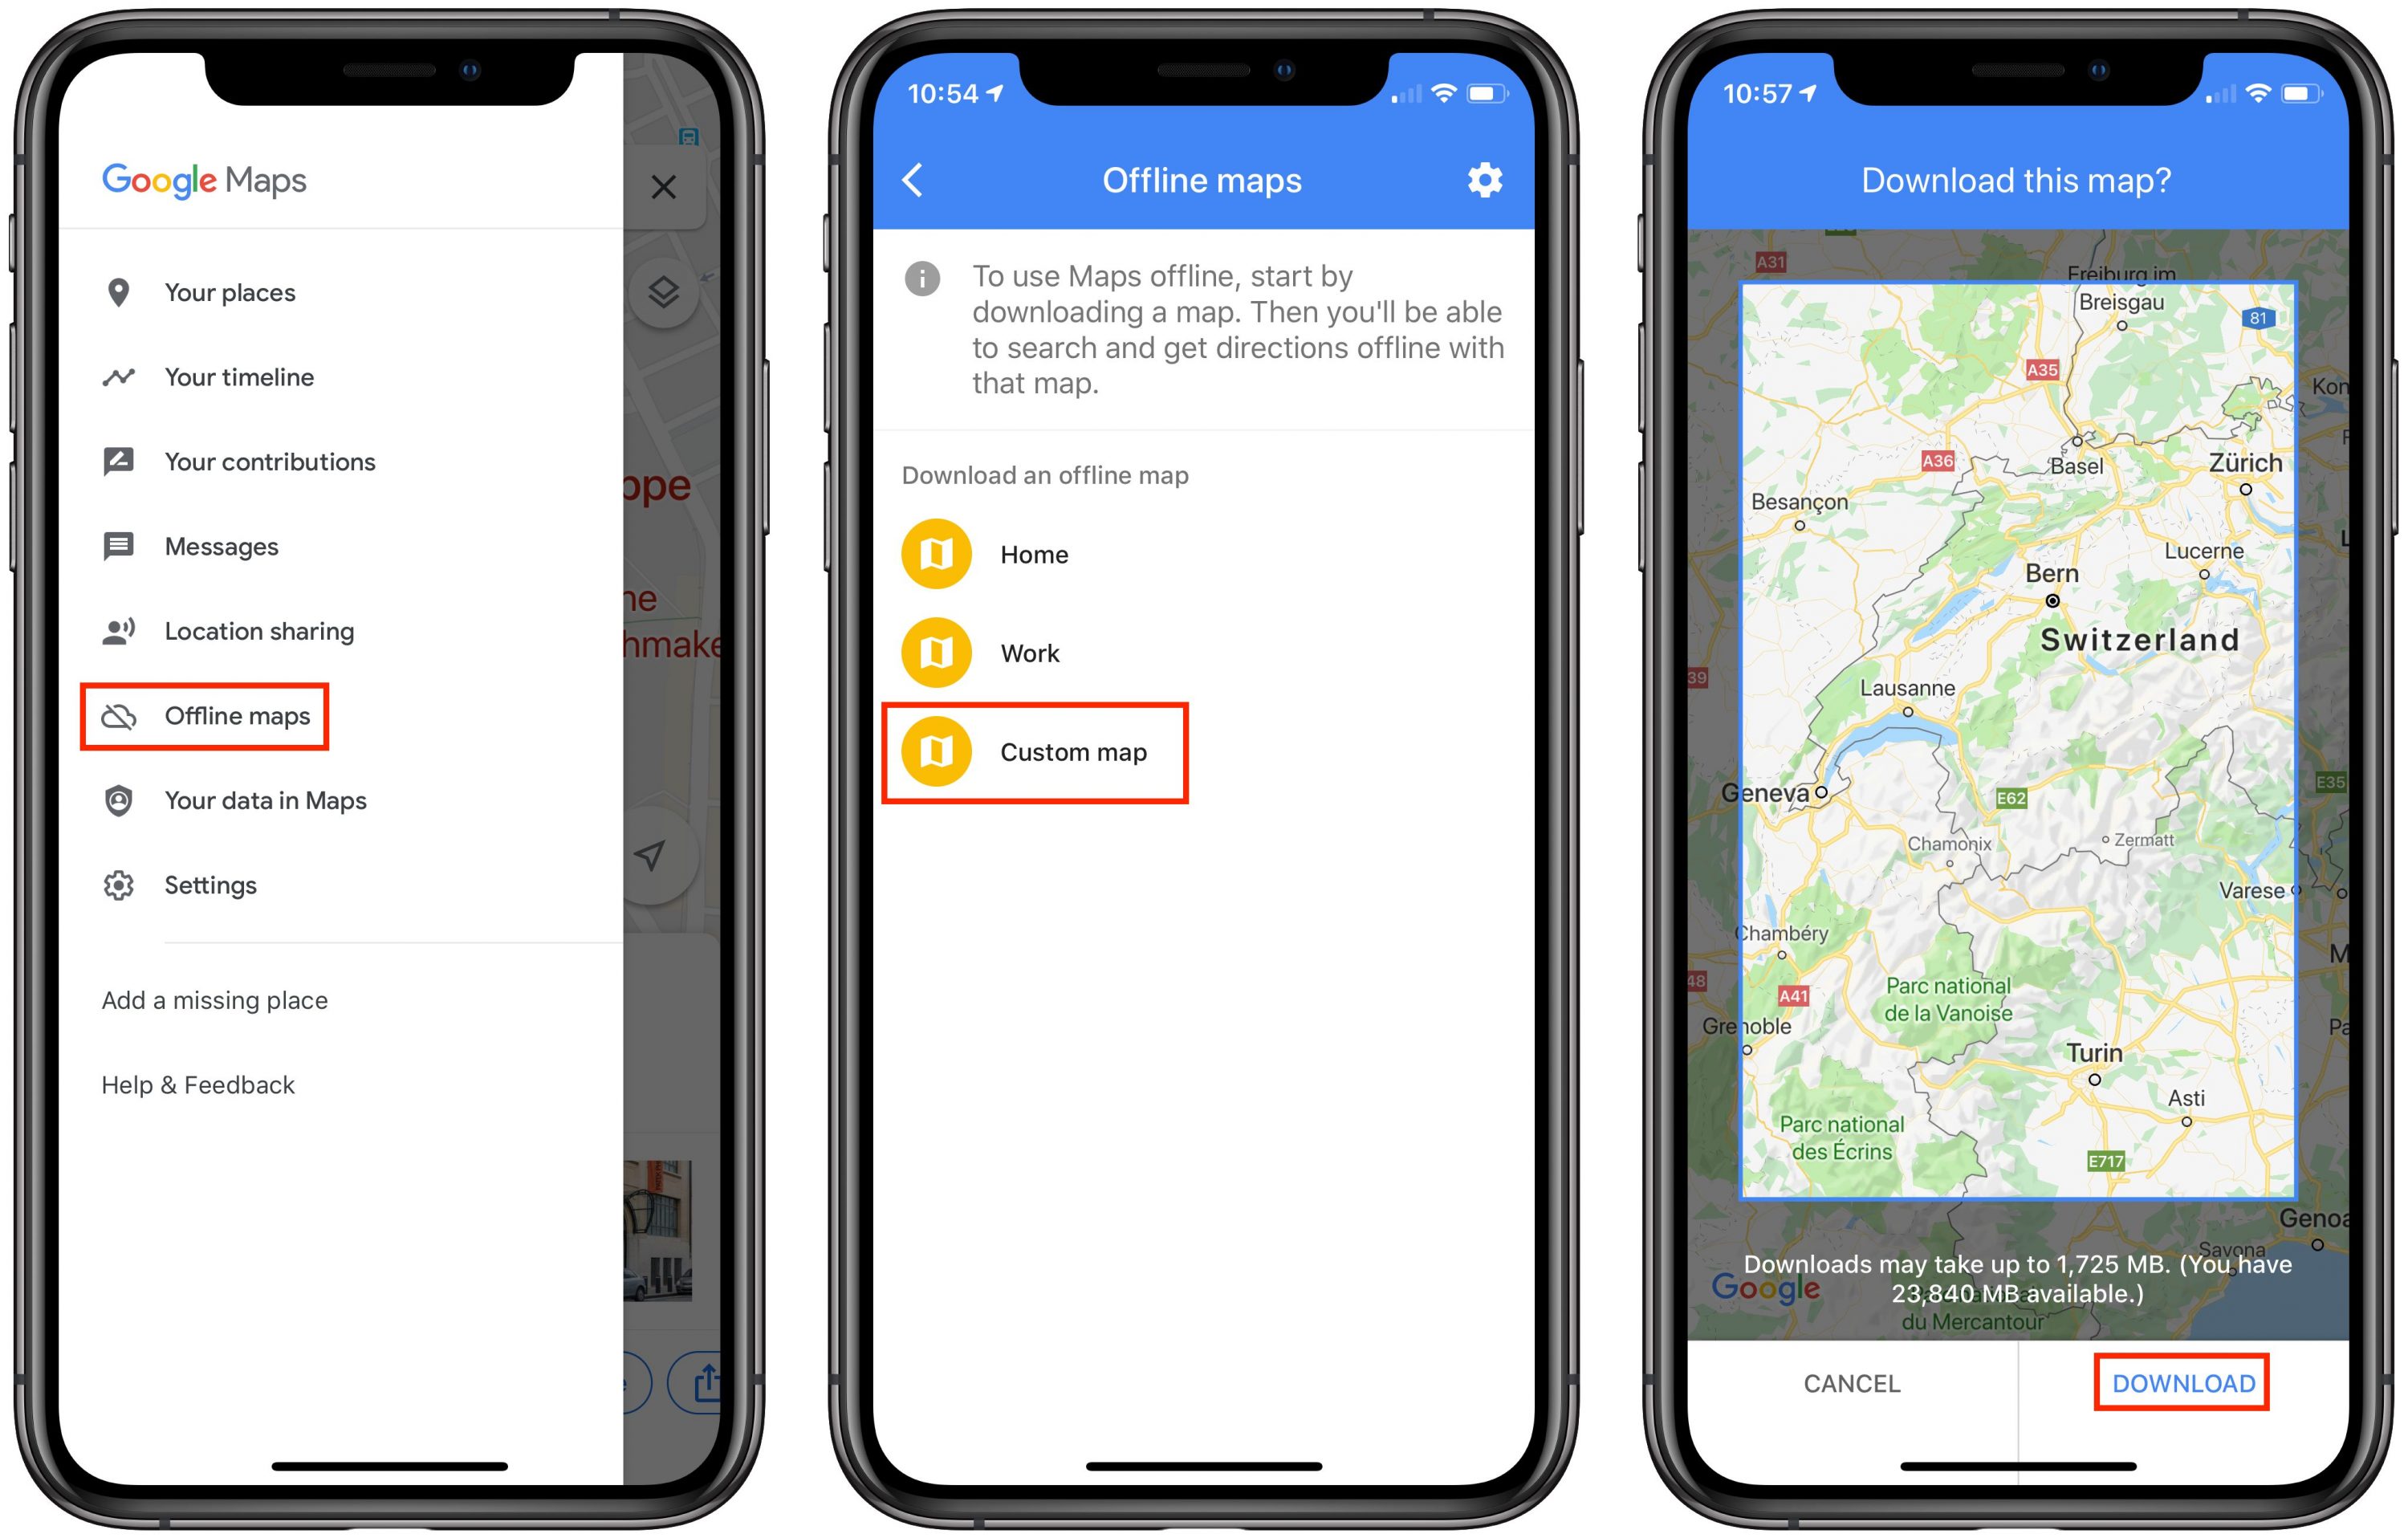
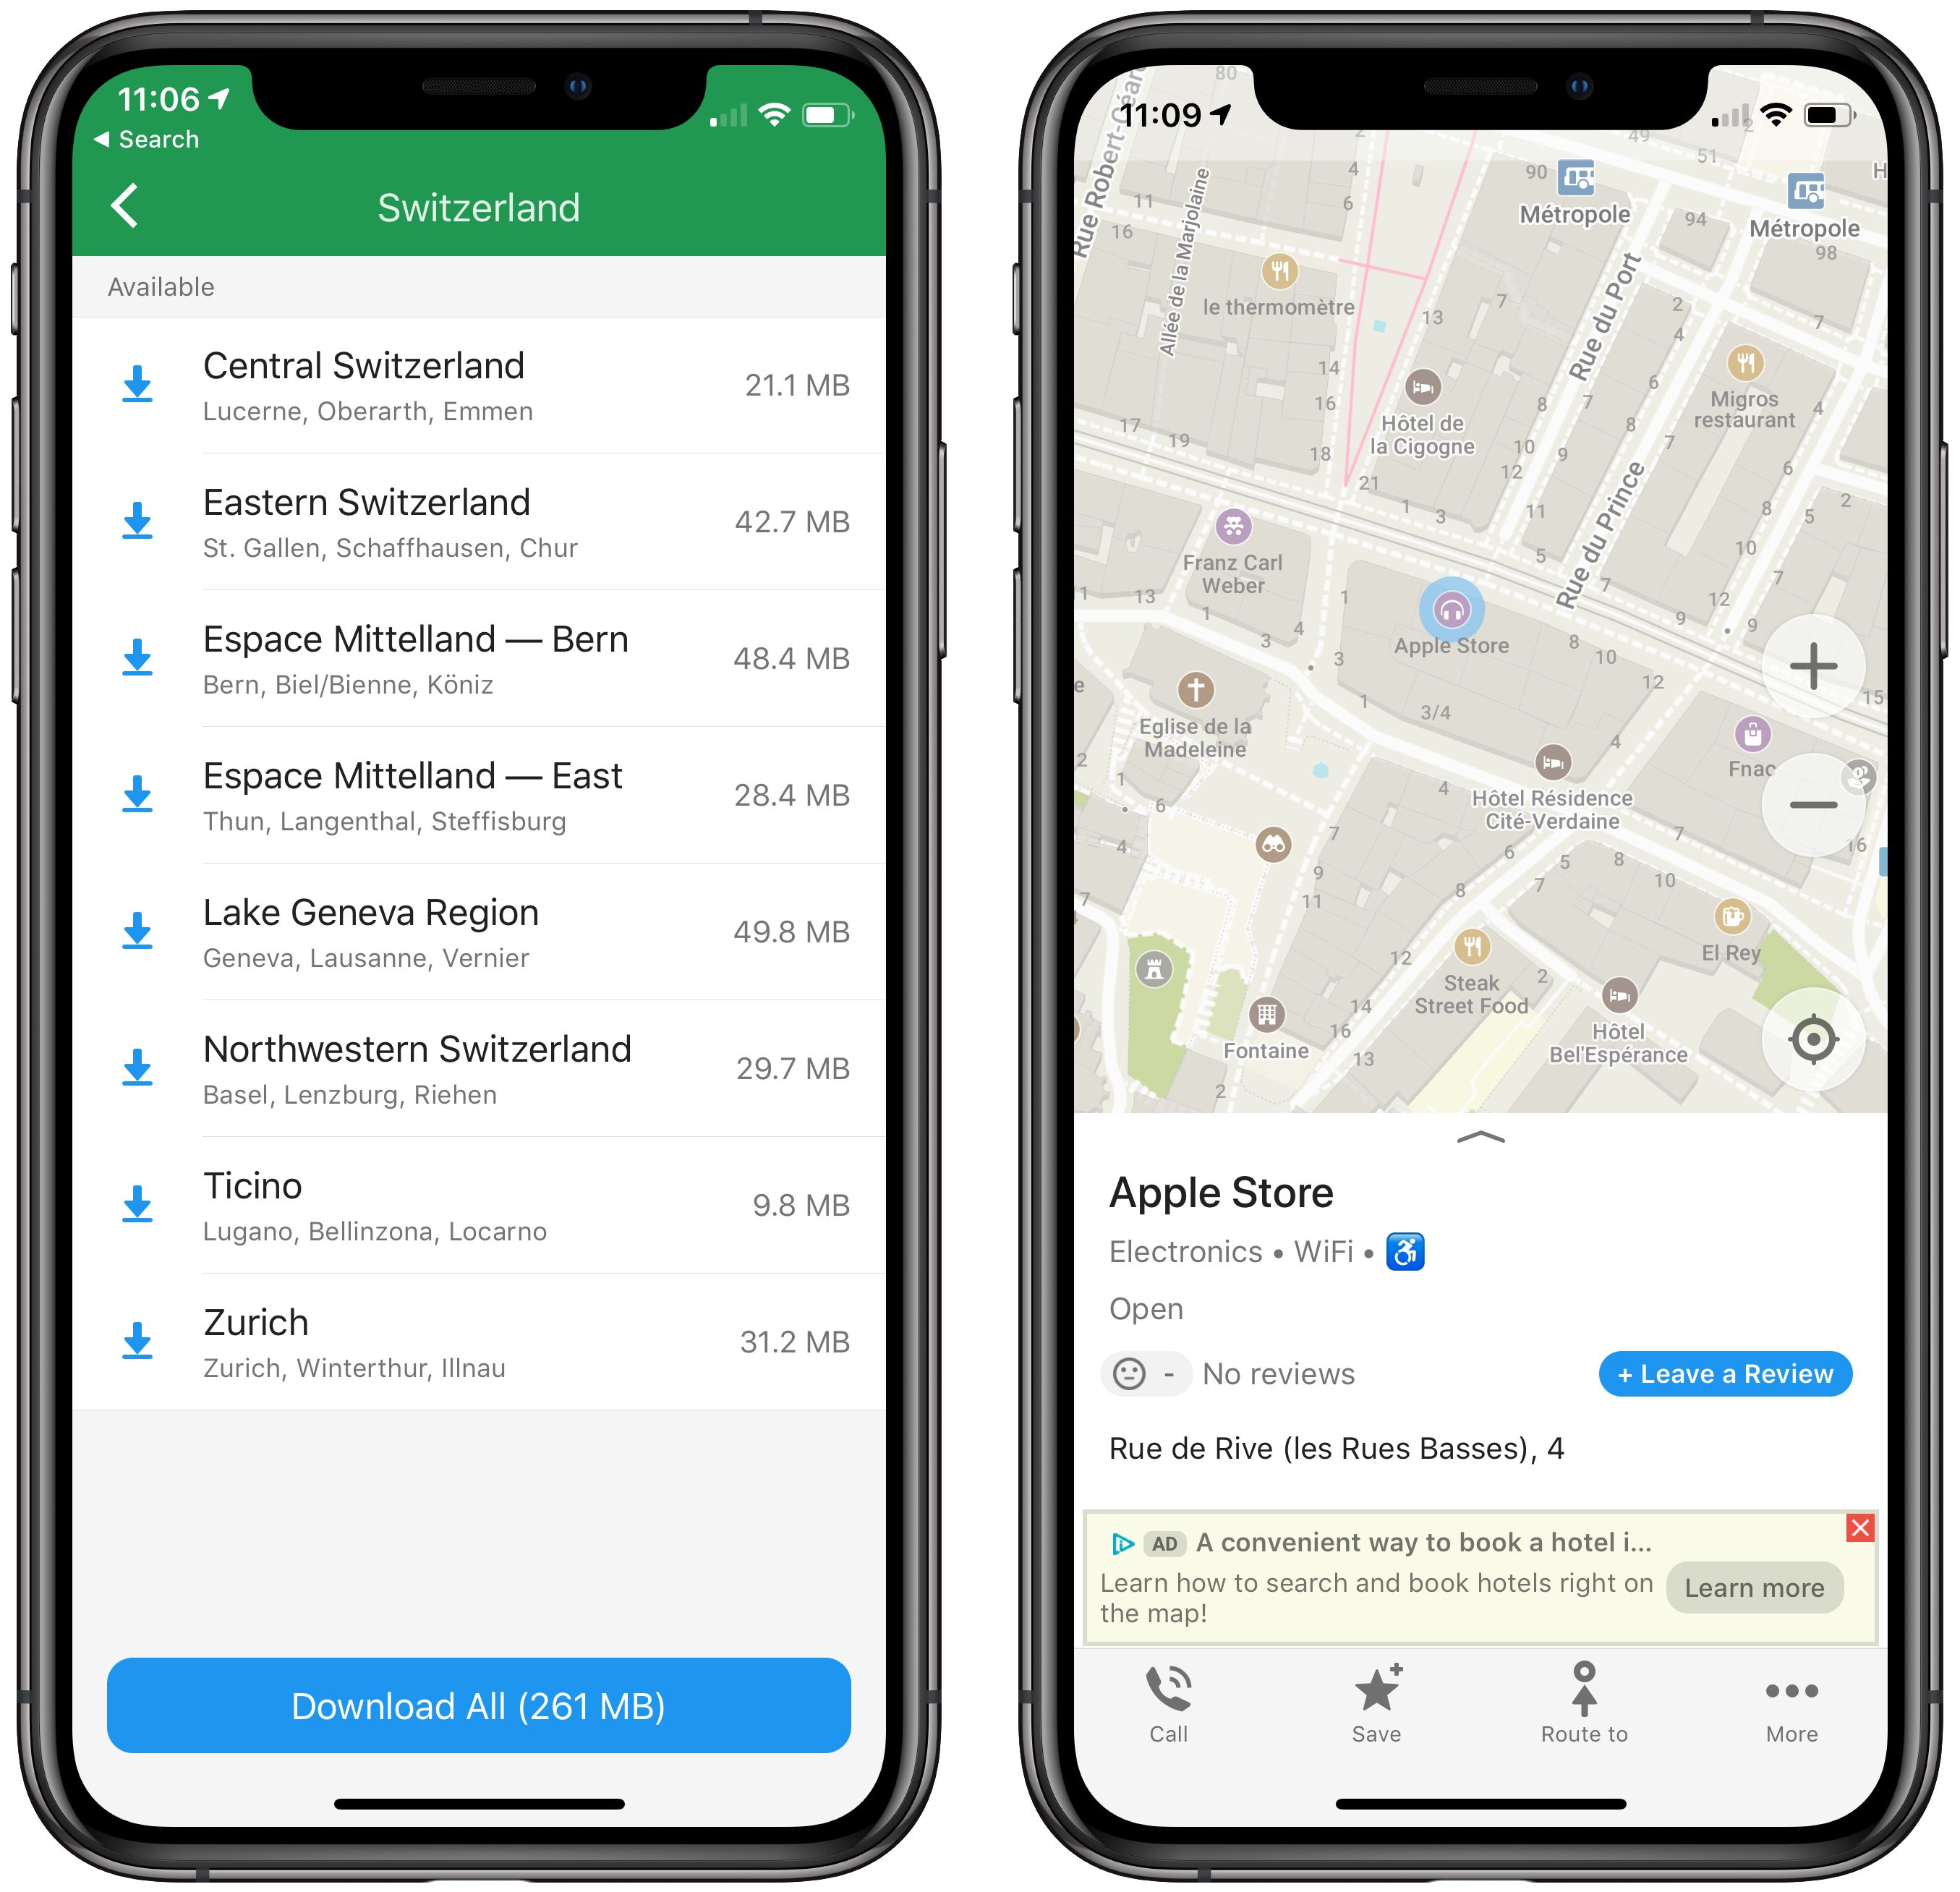
In conversations with friends after we got back, one person pointed out that we could have gotten Google Maps to download offline maps for the areas we were in. Just tap the hamburger menu in the upper-left corner, tap Offline Maps, tap Custom Map, pinch to fit the desired map area into the screen, and tap Download.
Another friend recommended a different app—Maps.me, which offers free, offline maps with turn-by-turn directions. It looks like a competent mapping app on the iPhone, although you must still download maps for the desired location while you do have connectivity. Note that Maps.me supports transit routes in only a limited number of cities. Oddly, that list includes Lausanne, but no other cities in Switzerland.
Apple Maps has no user-controllable provisions for offline usage, but it supposedly caches everything along a route once you tap Go. Plus, if you load an area and zoom in everywhere you might want to go in that area, Apple Maps may cache that data for offline viewing as well. Frankly, I think you’d be insane to gamble on an automatic caching algorithm providing reliable offline navigation. This limitation of Apple Maps is just another reason why you should always have multiple mapping apps available. If you have other recommendations, leave a comment!
A Low-Tech Finale
One final note that’s specific to Switzerland. The most disconcerting thing about the Swiss transit system for us was how we paid for passage. We had each bought a Swiss Travel Pass, which cost about $550 per person, but that meant that we paid only a small, discounted amount for the mountain train that took us up the Eiger to start our 12-mile hike on the Eiger Trail and the funicular/cable car combination up Moléson. Every other trip was free, as was entrance to nearly all museums in the country, so it turned out to be well worth the price.
But the Swiss Travel Pass was literally a piece of paper, and it turned out that you used by writing the month and day into a pair of boxes before you rode each day, since it was good for only 15 days of travel within a 30-day timeframe. We didn’t realize this because that detail was buried in the middle of a page of 6-point text in multiple languages. On the first bus we took, we continued to be confused about how to use our passes and the driver, who didn’t speak English, just grunted at us when we asked. It turns out that the buses are largely an honor system, with no pass checking that we saw.

However, two days later, when we took our first train, the conductor took pity on us for not having written the date on each pass before getting on the train and let us off with what I expect is the standard clueless tourist warning. It seemed like an oddly backward system for a country that prides itself on efficiency, and it left us longing for London’s tap-in, tap-out approach that works with Apple Pay and other NFC-enabled payment platforms. I have to think that the Swiss would love having everything encapsulated within an app that would engender additional appreciation of the precision and punctuality of their transit system.
If you have any other advice on how best to use mapping apps while traveling, please share them in the comments!


