#1617: Pages regains mail merge, HomeKit sensor improvements, keyboard flags in Monterey
American flags adorn flagpoles and lawns alike for the Fourth of July holiday here in the United States, but Mac users won’t see the Stars and Stripes as the icon for the US keyboard input menu anymore. Starting in macOS 12.4 Monterey, Apple has replaced the menu’s flags with monochromatic language icons, so we highlight a utility that brings the flags back. Also this week, Glenn Fleishman explains how to use the new mail merge feature in Pages, and Josh Centers shows you how you can use HomeKit improvements to streamline your home automation setup. Notable Mac app releases this week include 1Password 8.7.3, Timing 2022.3, Firefox 102, Piezo 1.7.9, Lightroom Classic 11.4.1, Transmit 5.8.7, Pixelmator Pro 2.4.5, PowerPhotos 2.0, Lunar 5.7, and CleanMyMac X 4.11.
Bringing Back Keyboard Flags in macOS 12.4 Monterey
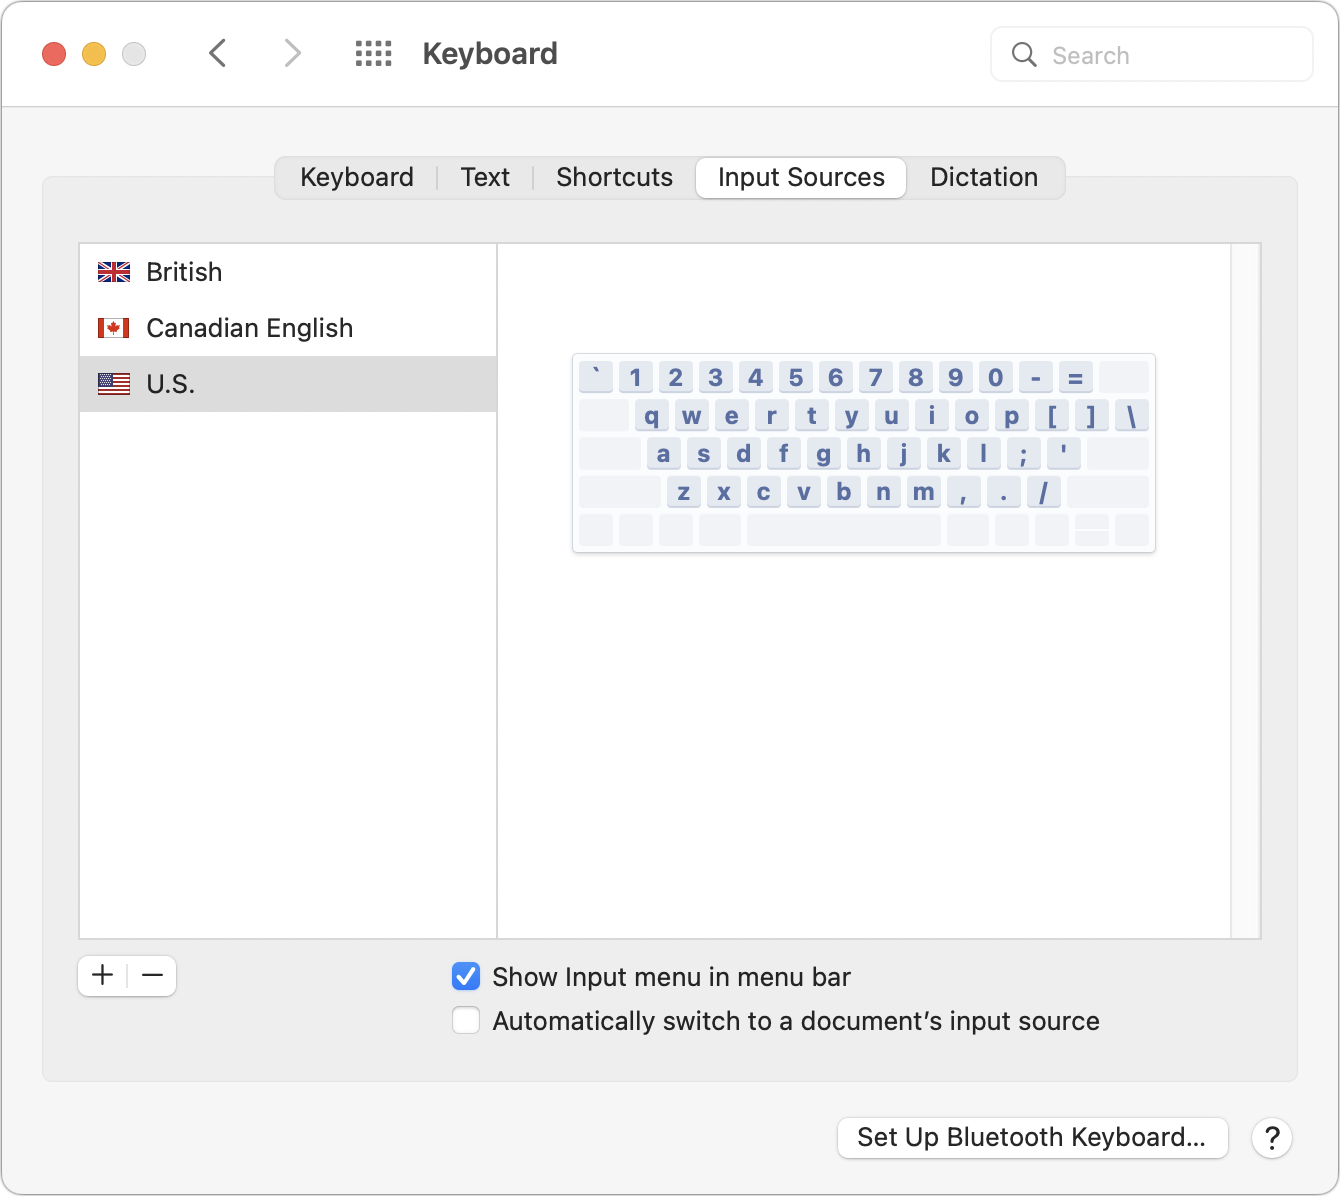
When Apple released macOS 12.4 Monterey, it seemed like a minor update (see “Apple Releases iOS 15.5, iPadOS 15.5, macOS 12.4, watchOS 8.6, tvOS 15.5, and HomePod Software 15.5,” 16 May 2022), but it included a small undocumented change that has irritated some users: it removed the colorful national flags associated with each keyboard input source. Previously, in System Preferences > Keyboard > Input Sources, you would see an American flag for the US keyboard, a Canadian flag for the Canadian English keyboard, a British flag for the British keyboard, and so on.
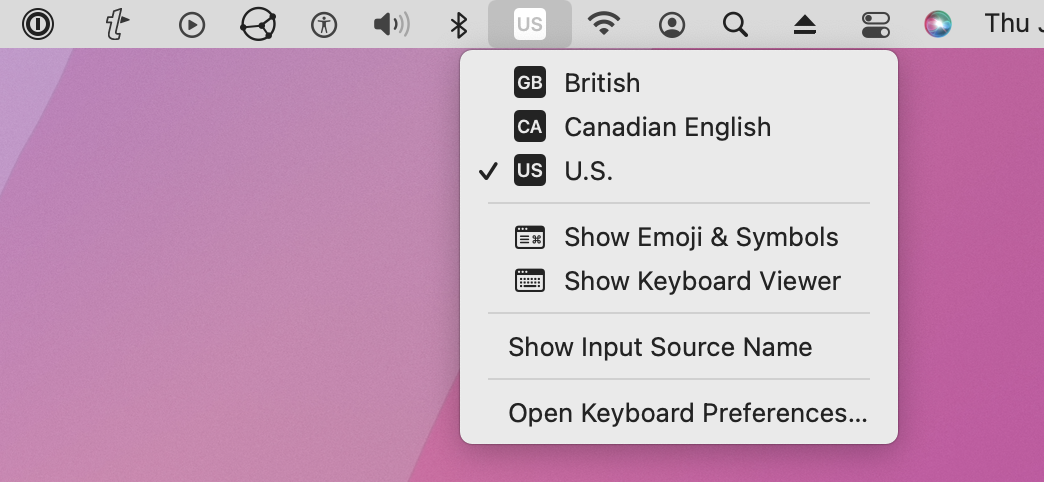
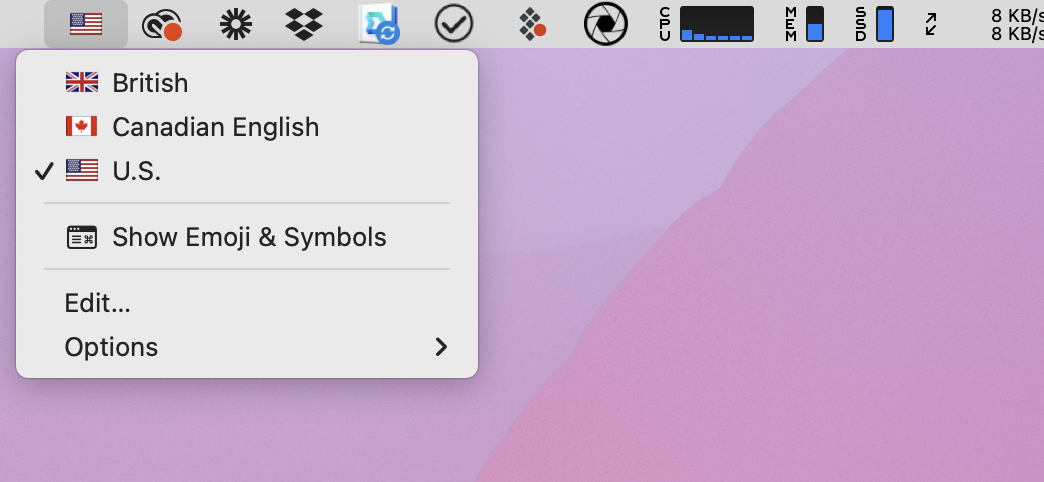
More importantly, you would also see these flags in the menu bar’s Input menu, with the currently selected keyboard’s flag as the menu icon.

With macOS 12.4, Apple chose to replace the flags with drab, monochromatic blocks containing a one- or two-character code to identify keyboards, which are nowhere near as visually distinct.
Apple has seemingly been on a war against color for years, most notably with respect to Finder window sidebar icons. However, Daring Fireball’s John Gruber says that a “little birdie” told him it was a deliberate move on Apple’s part to avoid denoting languages using national flags.
That makes some sense because languages aren’t always neatly tied to countries. But why now, after decades of presenting input languages this way? Especially considering that macOS has long used these little blocks to distinguish languages that don’t correspond to countries, such as Cherokee and Uyghur, and even some languages that seem to match up, like Japanese and Thai.
Regardless, several simple apps can restore the colorful flags to your menu bar.
Keyboard Flag Solutions
John Gruber highlighted a couple of App Store apps to solve this problem: the $0.99 Colorful Input Menu Flags and the $1.99 Keyboard Switcheroo. Neither app collects personal data. I decided to try out Keyboard Switcheroo on Gruber’s recommendation since he felt it was the more polished of the two.
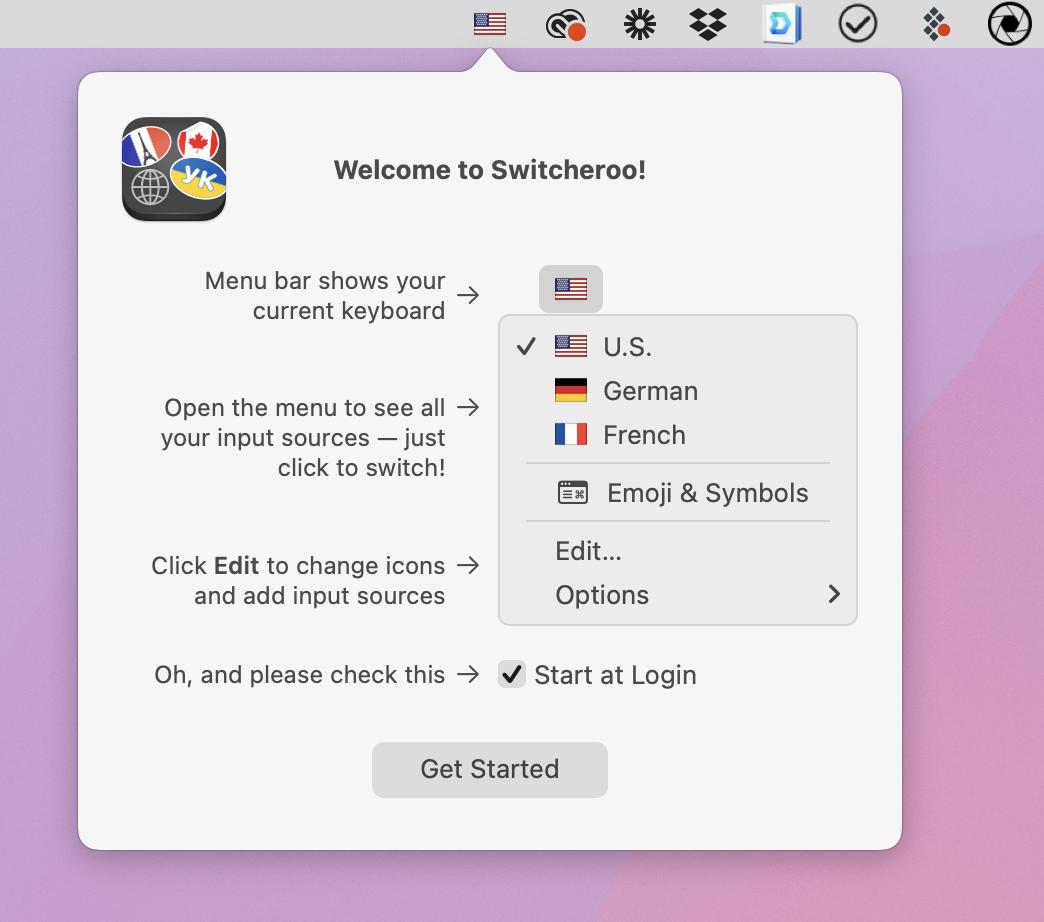
Keyboard Switcheroo works much like Apple’s old Input menu, with the key exception being a first-launch splash screen that offers basic instructions and prompts you to start Keyboard Switcheroo at login. Click Get Started to bypass that, and if you ever need to bring it back, choose Options > Help from the Switcheroo menu.
When I first installed Keyboard Switcheroo, it placed the icon at the far left of the menu bar. You can hold down Command and drag a menu bar icon to move it wherever you want, apart from the locked right-most positions.
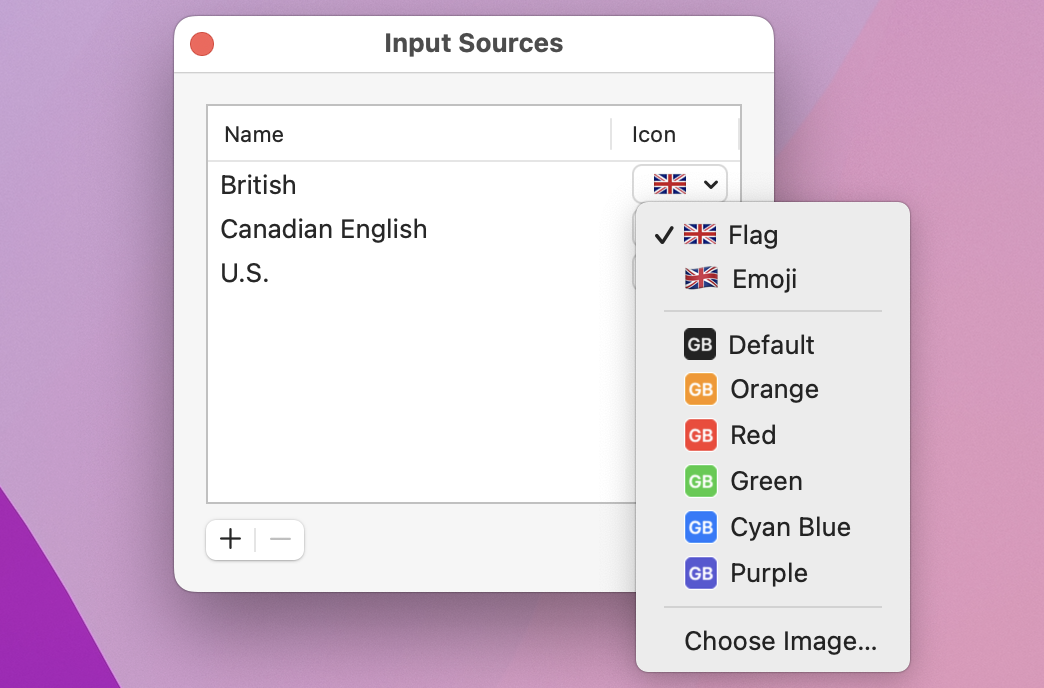
If you choose Edit from Keyboard Switcheroo’s menu, you can add languages directly without delving into System Preferences. (Note that changes in Keyboard Switcheroo aren’t reflected in System Preferences and vice versa.) You can also customize the language icons, choosing from the standard flag image, the flag’s emoji, text labels, or any image on your Mac.
So there you have it: a simple solution for a small but potentially annoying change in macOS 12.4.
Apple Enhances HomeKit with Sensor-Based Automations and Timed Turn Offs
Before I wrote Take Control of Apple Home Automation, I documented here in TidBITS how I set up my dehumidifier to turn on automatically whenever the humidity in our underground TV room rose to an unacceptable level (see “A Prairie HomeKit Companion: The Elgato Eve Room” 19 June 2017). In short, my Eve Room monitored the humidity level, and I set up an automation to turn on an Eve Energy outlet connected to our dehumidifier. At the time, the problem was that Apple’s Home app didn’t recognize the Eve Room as a sensor for automations, so I had to jump through some convoluted hoops with Eve’s HomeKit app.
While finally updating the book (waiting for the Matter partnership to materialize might not have been the best move; see “Home Automation Standard Gets an Official Name,” 17 May 2021), I took the opportunity to revisit that automation and take advantage of some subtle yet important changes to the Home app. In iOS 15.1, Apple finally made it so sensor-based automations could be triggered based on air quality, humidity, or light level (see “Apple Releases macOS 12 Monterey with iOS 15.1, iPadOS 15.1, watchOS 8.1, tvOS 15.1, and HomePod Software 15.1,” 25 October 2021).
With the right sensors, this new capability can open up a world of possibilities, and if you have a lot of HomeKit accessories, you may have more sensors than you realize.
The Hidden Sensor
In my old setup, I used an Eve Room to monitor humidity. It does other neat things, too, like track air quality and temperature. There’s only one problem: I can’t find it. It’s small, has little buttons and a screen, and has to be put in a prominent place, so my best guess is my kids started playing with it and left it somewhere.
Thankfully, while exploring Automation settings, I discovered that my Ecobee thermostat has a secret humidity sensor. The thermostat doesn’t appear as an accessory in the Home app, but I can query Siri about the humidity in my kitchen, where the Ecobee thermostat is installed, and it shows up as a sensor for automations, as you’ll see in the next section. It’s not in the same room as my dehumidifier but only a few feet away. Plus, it runs off my HVAC system’s power instead of a battery, so that’s one less thing to worry about. And since it’s attached to the wall, my kids won’t mess with it.

So before you go buying new sensors for automations, it’s worth checking in the Home app to see if you have sensors you didn’t know about.
Creating a Sensor-Based Automation
With all that out of the way, recreating my old automation was simple. If you’d like to do something similar, here’s how.
Open the Home app on an iPhone, iPad, or Mac, tap the + icon (below left), tap Add Automation, and then tap A Sensor Detects Something (below right). (If that option is grayed out, you don’t have any sensors available.)
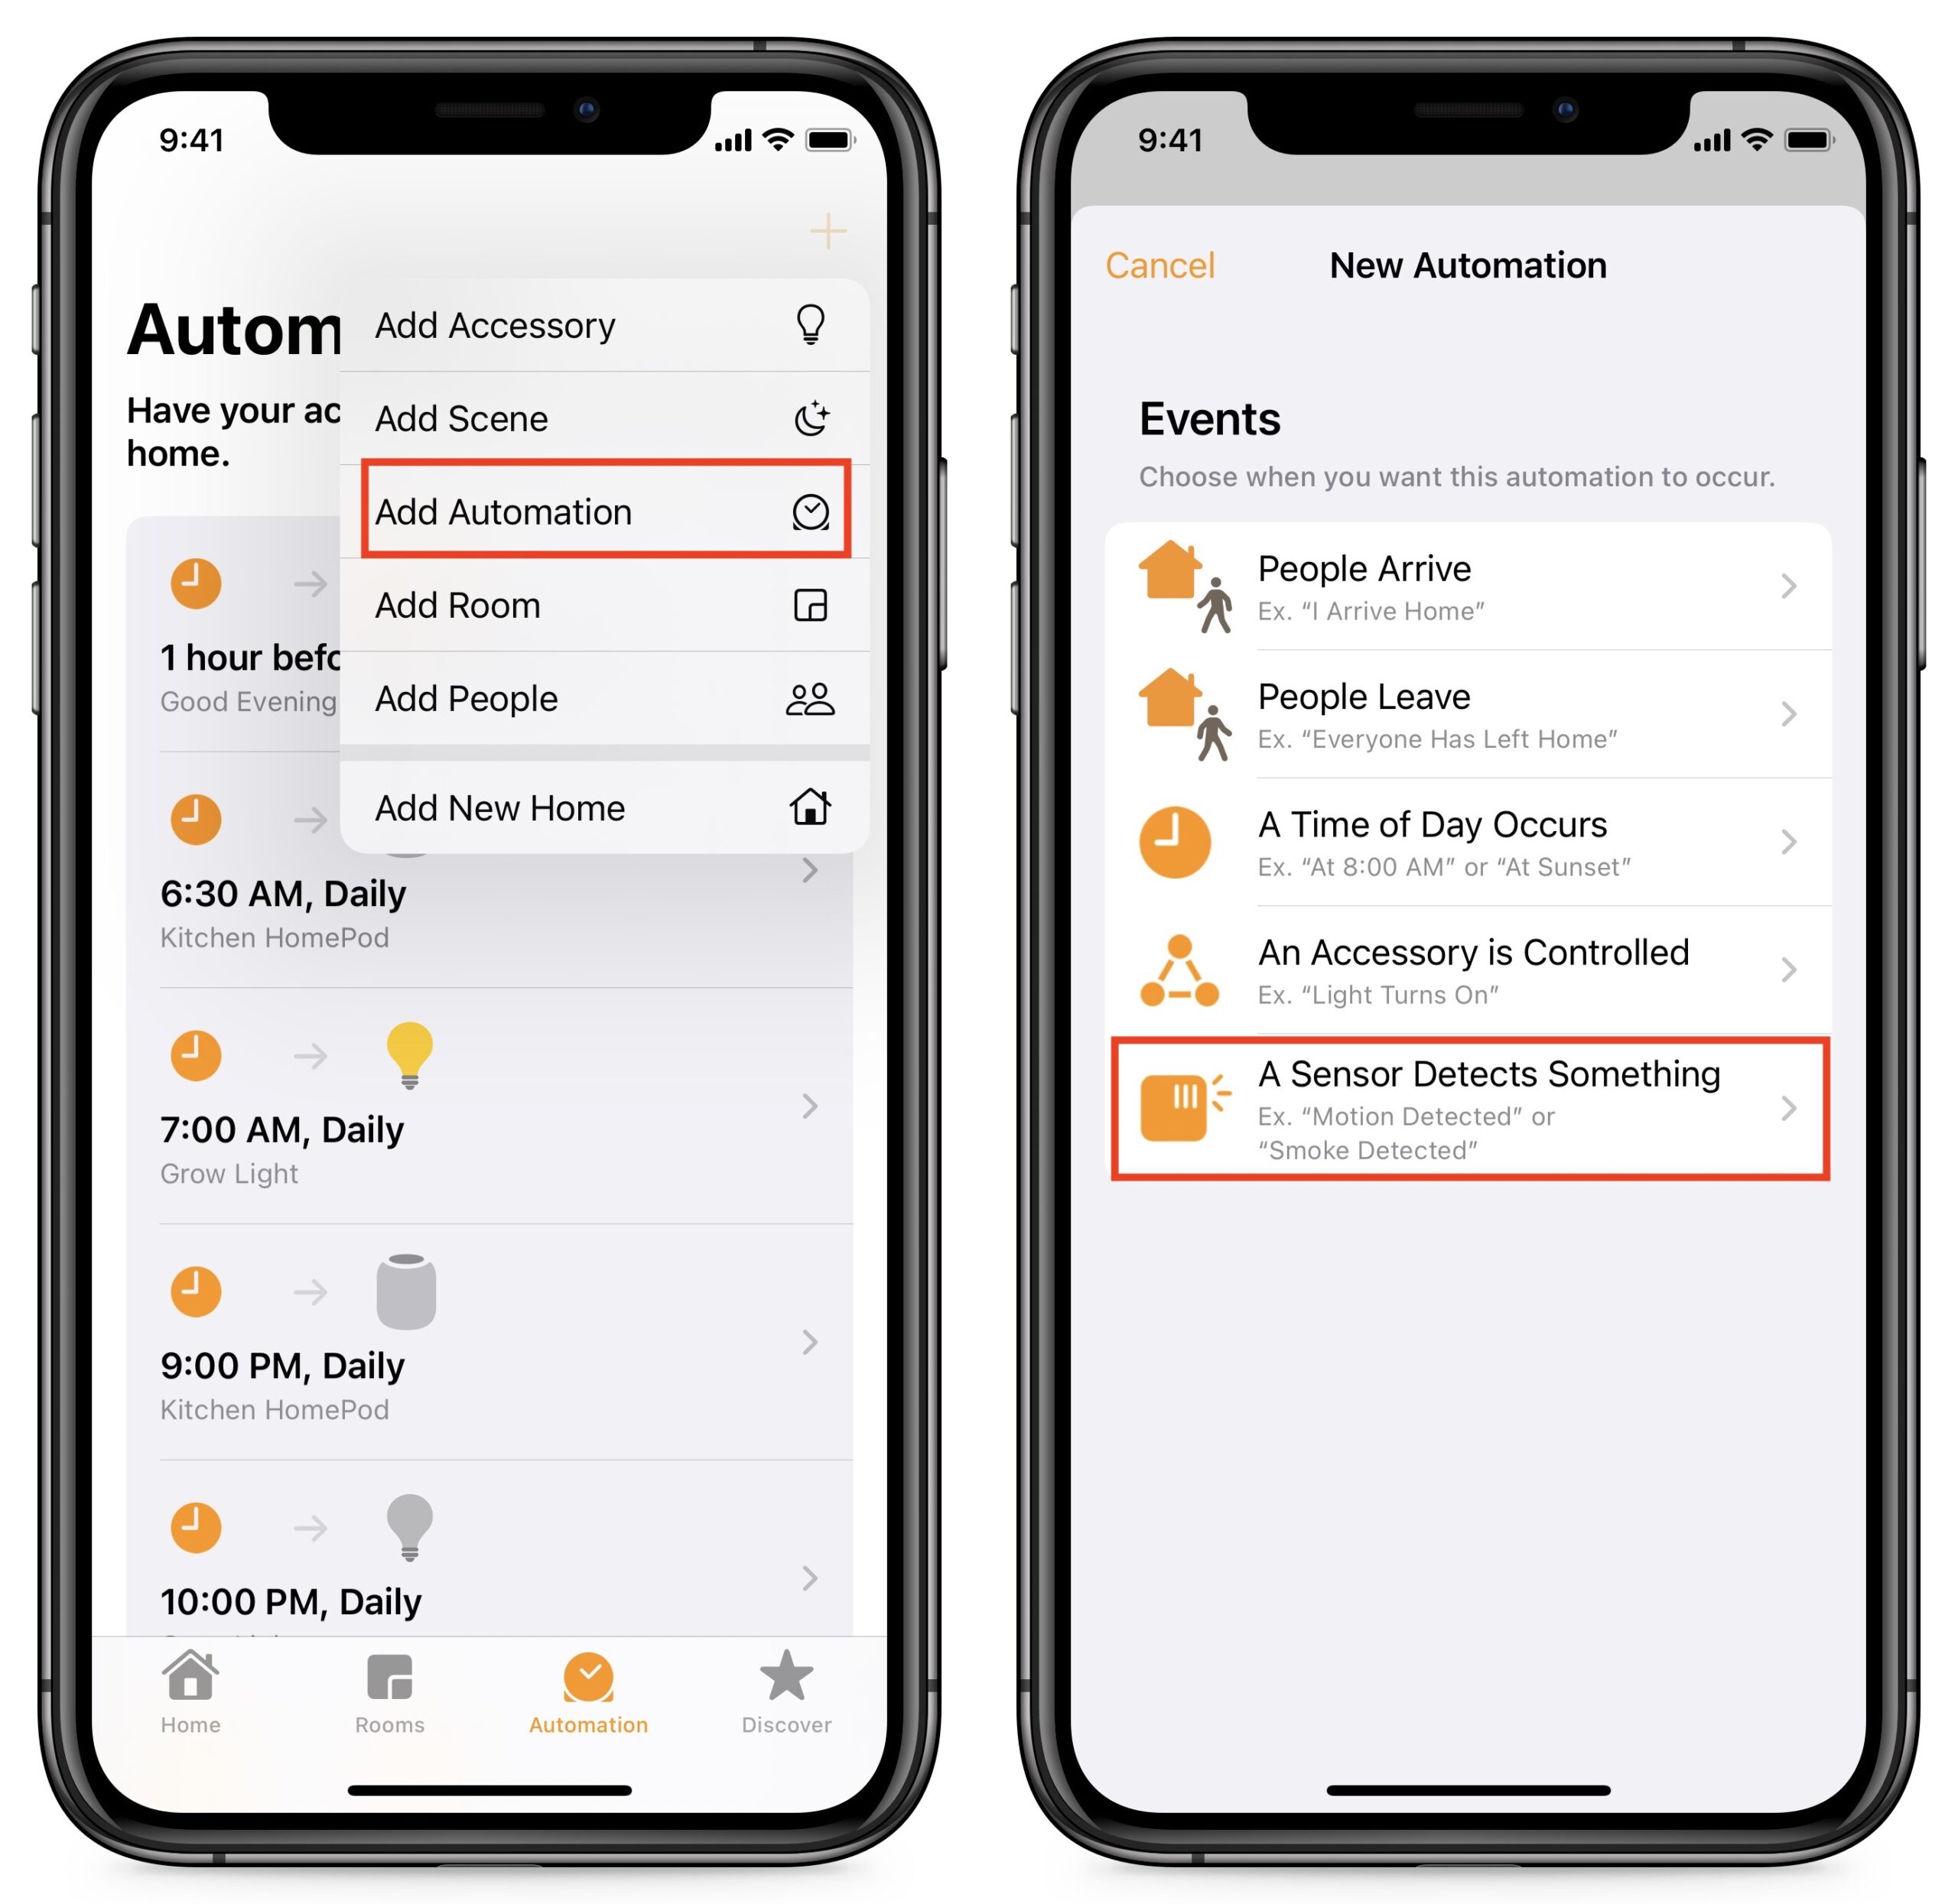
The next screen displays the available sensors in your home. Not all are well labeled—as you can see in the left screenshot below—so you have to learn how to read the icons:
- Thermometer: Temperature
- Green person: Motion
- Orange person: Occupancy (similar to the motion sensor, but less sensitive)
- Water drop: Humidity
- Wavy lines: Air quality
Tap a sensor to select it; you can choose only one sensor per automation. Tap Next to set up how to trigger the automation (below right). The details vary for every type of sensor, but they should be easy to understand. For instance, you can set a motion sensor to trigger based on whether or not it senses motion. For humidity, you can set a humidity percentage and then set the automation to trigger if it rises above or drops below that percentage.

At the bottom, you see settings for Time and People, which let you fine-tune the automation. Time lets you set times when the automation can trigger. By default, that’s any time, but you can set it for day, night, or specific hours. The People setting lets you trigger an automation based on who is home.
I used to caution users about the People setting because it didn’t work well in situations where cellular service was weak or nonexistent, like my house. That has improved since iOS 14, so I use it more now, primarily with low-impact automations like setting my cameras to record only when we’re out of the house. However, remember that Apple’s definition of “people” in this case is iPhone users in your Family Sharing group, so you still have to be careful. For instance, if we set it so the lights would turn off when we left home, heading out for date night could leave the babysitter and our kids in the dark.
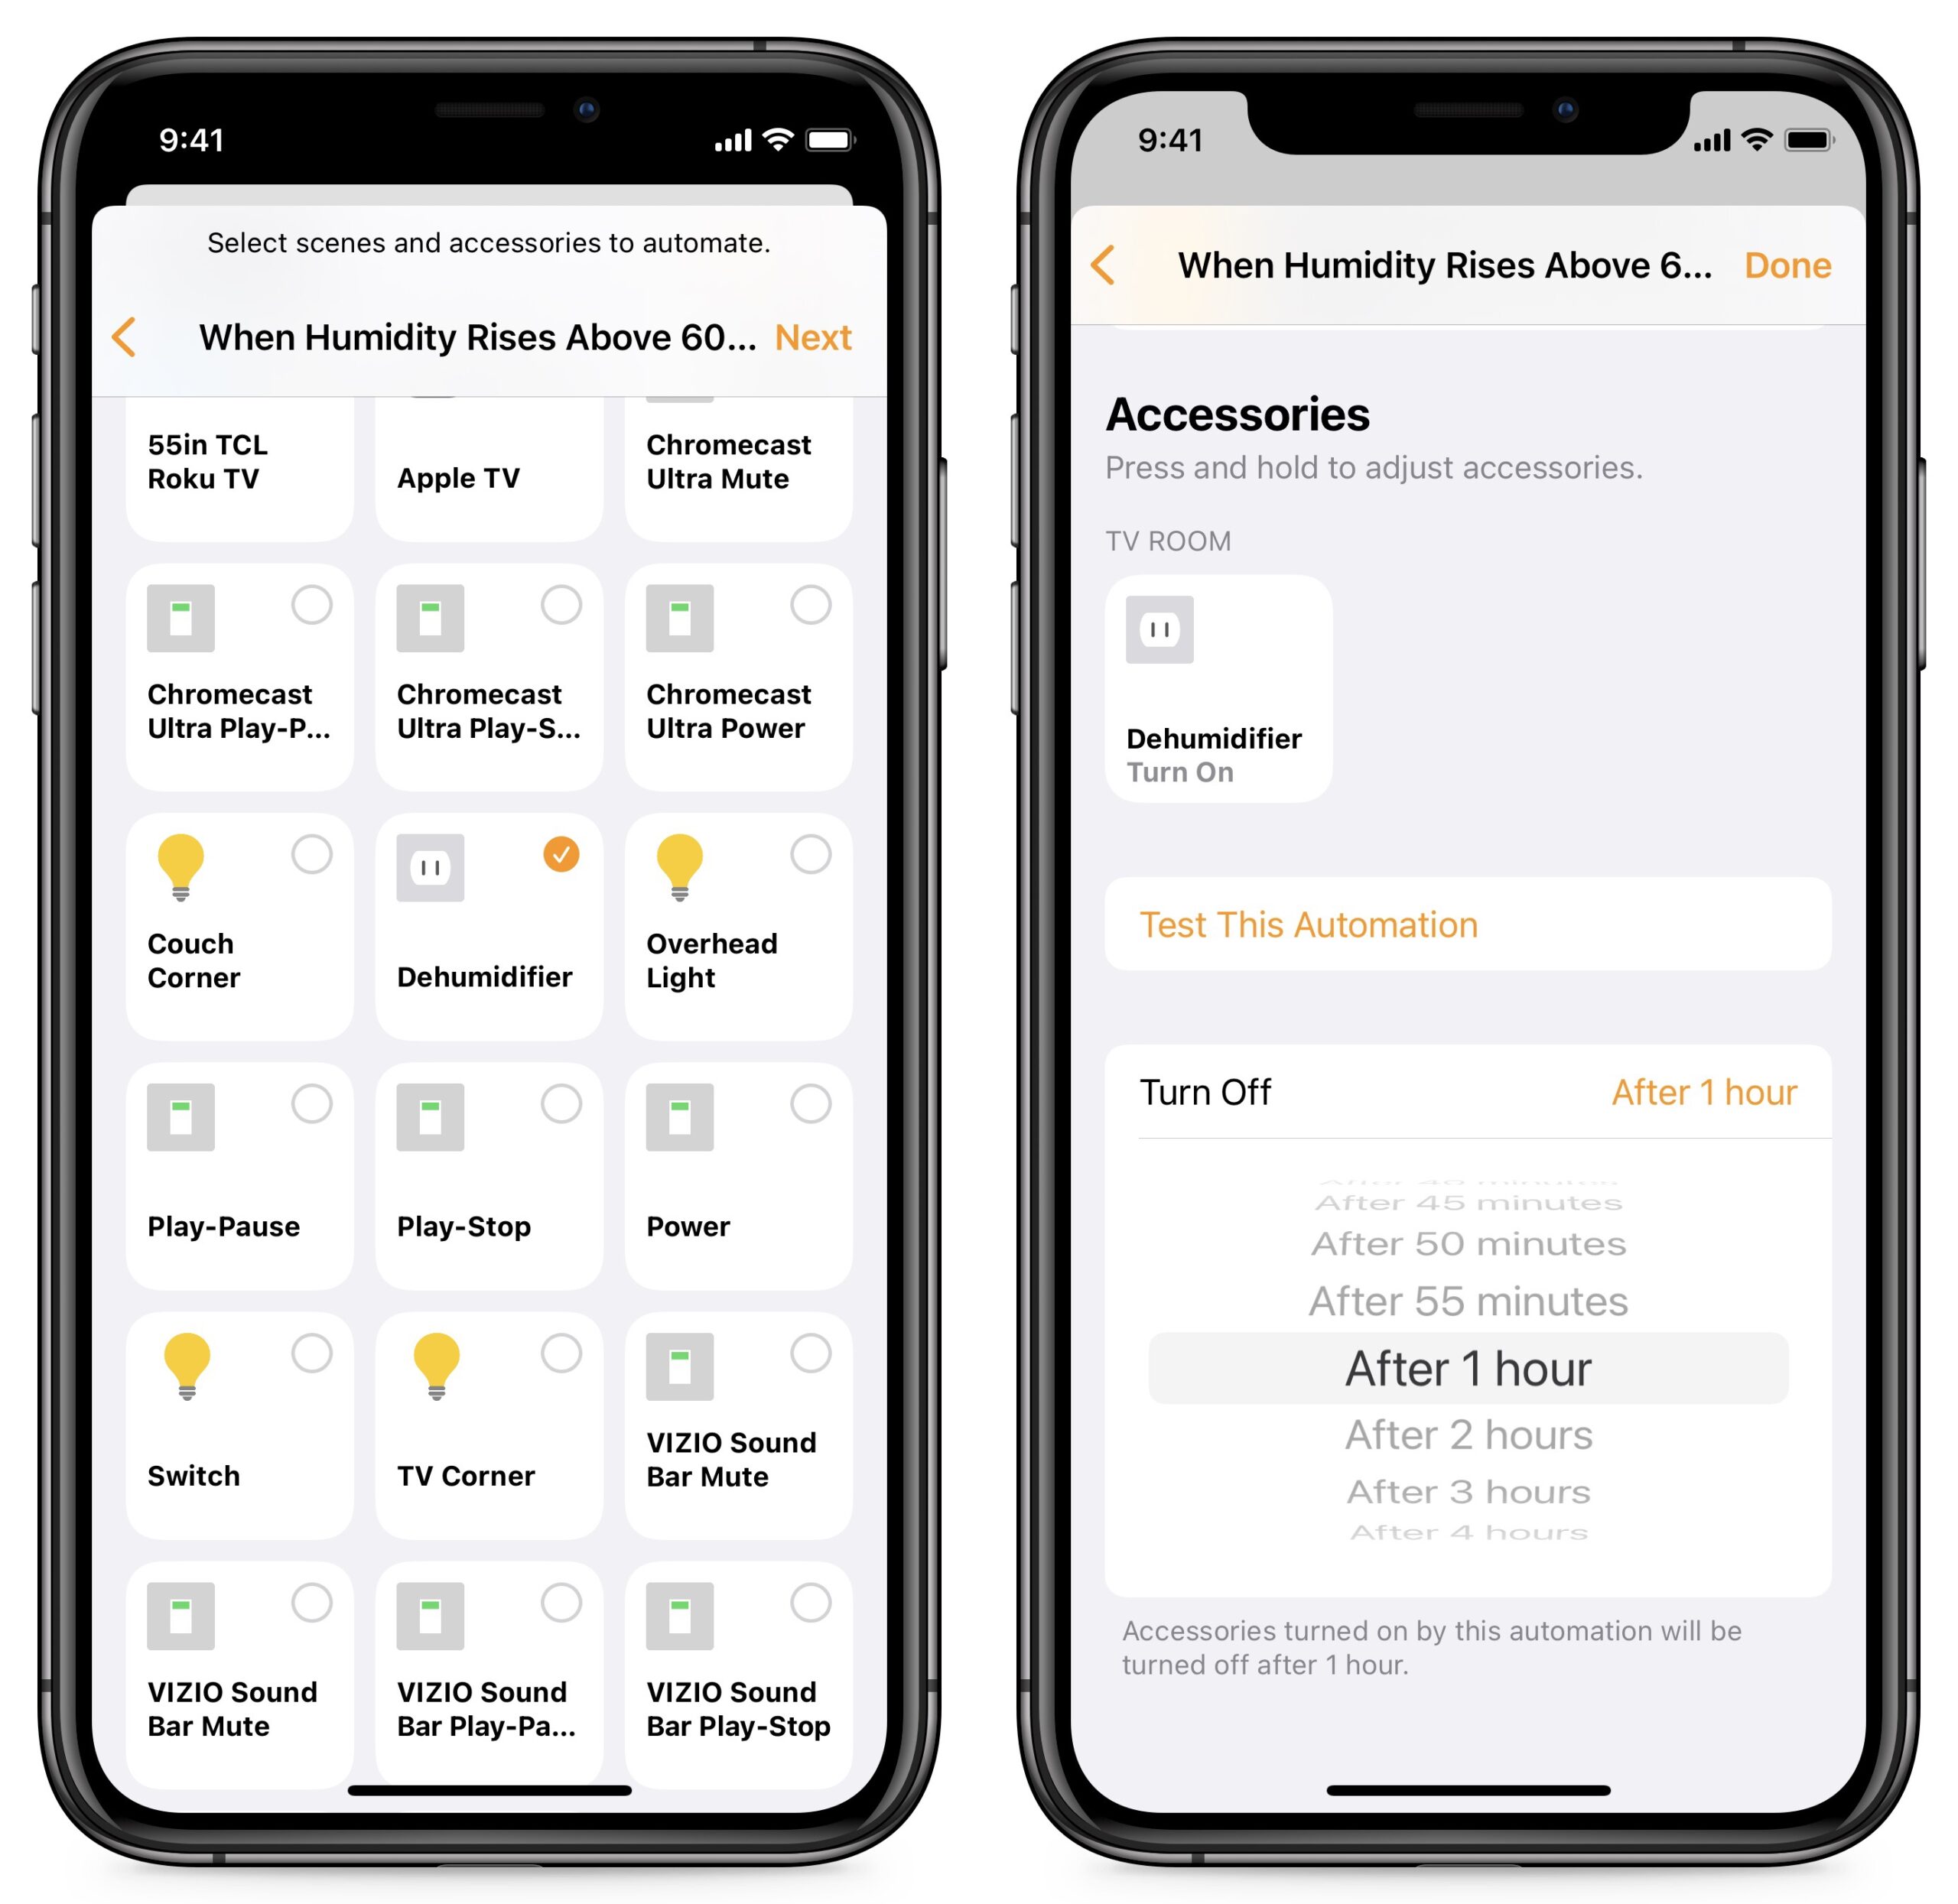
Once you have the criteria set, tap Next for a screen of all the scenes and accessories that the automation can trigger (below left). Tap those you want to include. Don’t worry yet about specifying what the accessory will do. After you have selected all the right accessories, tap Next, which brings you to the final screen (below right).
On the last screen, you can tap the top field to rename the automation, but most importantly, pay attention to the accessory tiles, which let you set what they do. For most accessories, a tap sets them to turn on or off. As with normal accessory control, you can long-press (or Control-click on the Mac) to fine-tune actions.
Automatically Turn Off Automations
I want to call your attention to another automation improvement that you’ll find at the bottom of this final screen: Turn Off, another worthwhile enhancement that Apple has made to HomeKit automations. After an automation turns on an accessory, the Turn Off feature enables it to turn the accessory off after a specified length of time.
Turn Off turns out to be useful in many contexts. Let’s say you want a motion sensor to turn on a light at night when you stumble out of bed to go to the bathroom. Previously, there was no simple way to turn that light off, but now the automation can automatically turn it off after a few minutes.
I’m using that setting to further streamline my dehumidifier system. Previously, I had set up two automations: one to turn the dehumidifier on once the humidity rose to a certain level and another to turn it off after the humidity dropped below another level. Now, instead of the second automation, I can set the dehumidifier to turn off after an hour. If the humidity is still high, it’ll kick back on.
Helpful as timed Turn Off is, it reveals a gap in the Home app’s capabilities. What we really need is for automations to be able to turn themselves off in the same ways they turn themselves on. So, for humidity, it could turn on when the level rises above 60% and off when it drops below 40%. Or, an automation triggered by a motion sensor could turn off a set number of minutes after motion is no longer detected.
In any case, I’ve hopefully given you some ideas for how to take more advantage of HomeKit in your home.
Apple Brings Mail Merge Back to Pages
After nearly a decade, Apple has finally brought mail merge back to Pages. Apple removed the feature from the iWork suite as part of the fundamental rewrite of Pages, Numbers, and Keynote in 2013. A concept dating back at least four decades, mail merge lets you insert placeholders in a template document that are replaced with entries in a column of data in a spreadsheet or similar tabular format. It’s commonly used to generate form letters, address labels, and name tags.
Microsoft Word has always had mail merge, but it’s far more complicated than the last time I used it. I recently wrestled with Word to produce shipping labels for a Kickstarter project’s rewards, and every step was painful, despite its built-in templates for Avery labels. (Avery is a major producer of printable labels in all varieties.) What I remember as a quick set of clicks and formatting in the 1990s and 2000s took hours of fiddling to produce something that still didn’t look exactly like I wanted.
Other options have disappeared. I used BeLight’s Labels & Addresses app for years, but the company opted not to upgrade it to 64-bit compatibility, so it died with macOS 10.15 Catalina. To its credit, BeLight gave users a free license to Swift Publisher, its desktop publishing software, which has some rudimentary tools for mail merge. But despite the effort BeLight put into the feature, I found it more painful than Word to use when merging from spreadsheet data. It’s easier if you only want to merge from Contacts.
Apple’s revived mail merge in Pages 12.1 is utter bliss, both on its own and by comparison to Word and Swift Publisher. That’s good news because many people don’t have a license for either of those apps.
The bad news? You can merge “letters, cards, and envelopes,” according to Apple. That is, page-based documents. Pages doesn’t yet handle labels or any blocks of placeholders that would require inserting multiple records on a single page that fill with the next item from the data source.
My ultimate solution for printing labels after many, many hours of testing was Avery’s Design & Print service (free account required), which is clever but limited. If you’re printing entries only from your contacts, Apple’s Contacts app offers built-in label printing with selectable Avery and DYMO templates. However, if you have page-based documents to merge, Pages has become your best option.
Getting Started
Start with mail merge in Pages by opening an existing document or creating a blank one. Keep the document in word-processing mode; if you choose File > Convert to Page Layout, mail merge becomes unavailable.
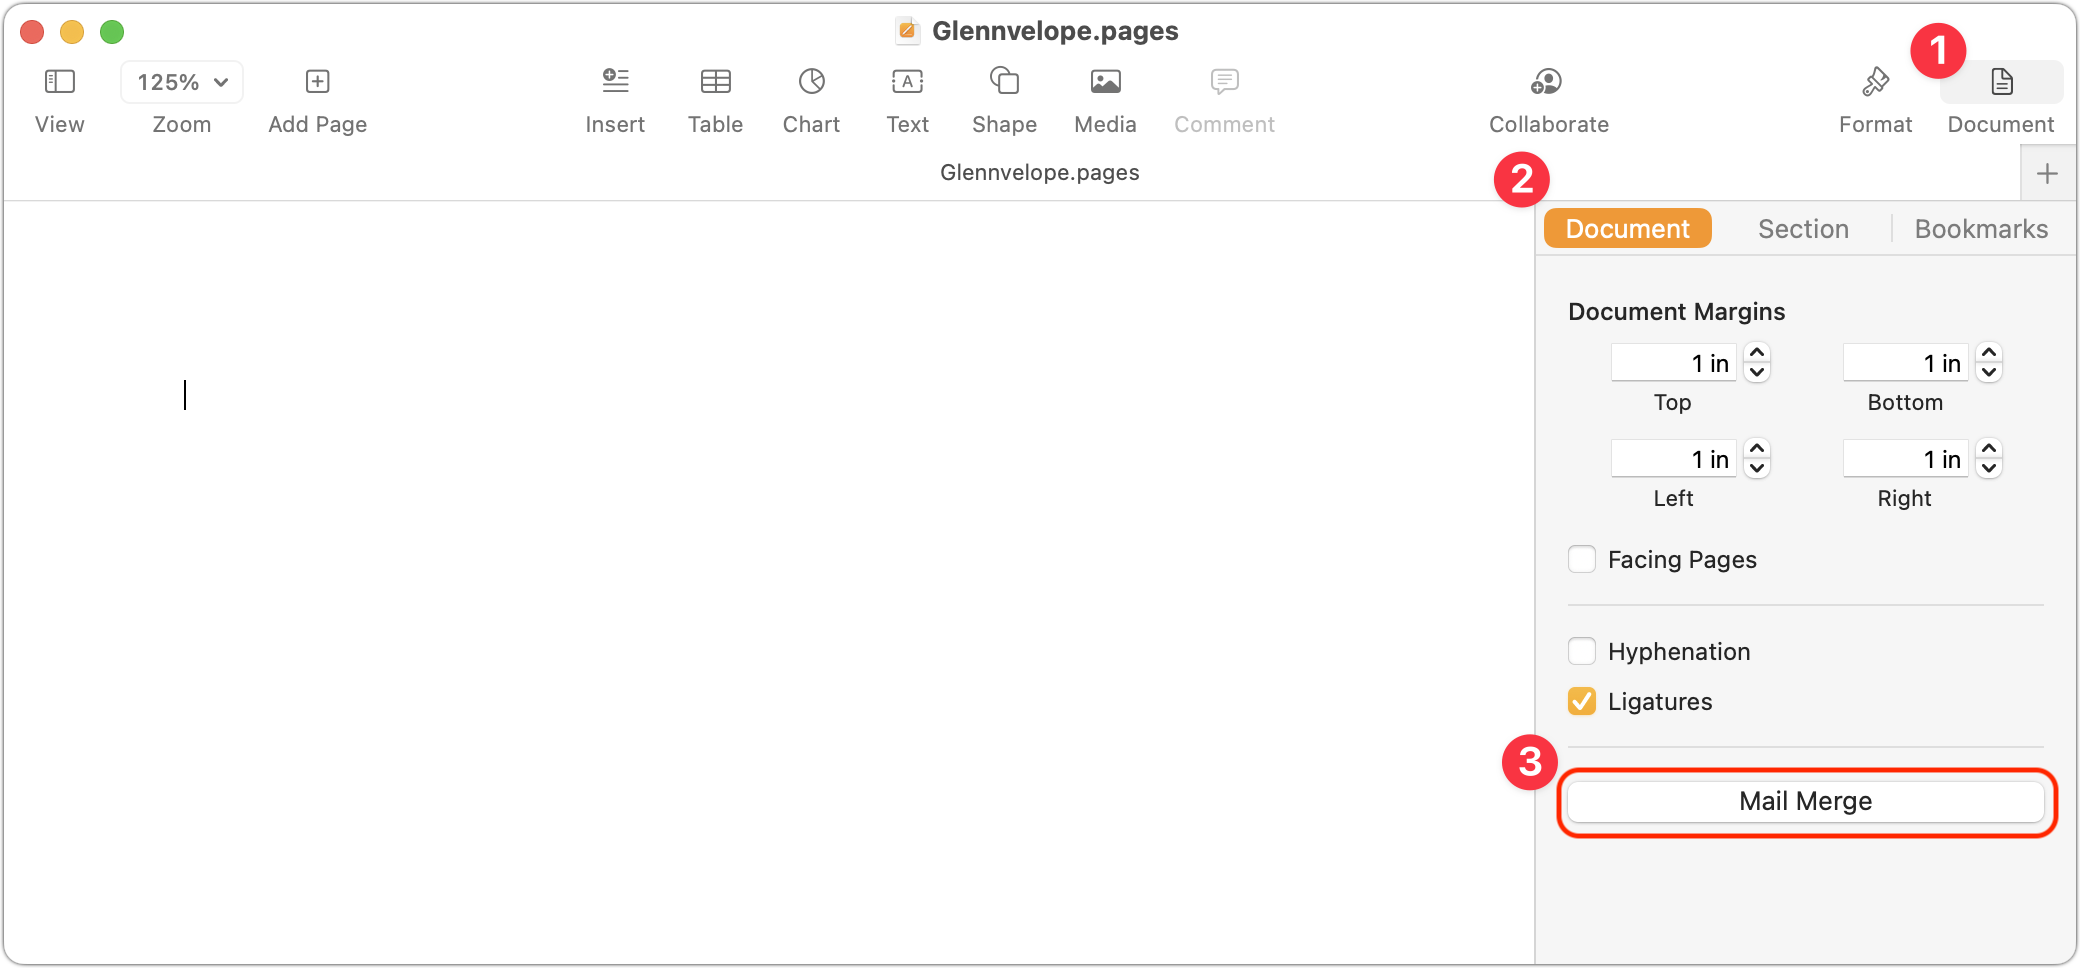
Click the Document icon at the far right of the toolbar to change the page dimensions, such as to an envelope or note size. Once you’re set, in the Document sidebar, click Mail Merge at the bottom to reveal the Mail Merge options sidebar. (My examples here are with Pages for macOS, but Apple also brought mail merge to Pages for iOS and iPadOS.)
You can merge with data from Contacts or a spreadsheet, as I explain in the next two sections.
Merge from Contacts
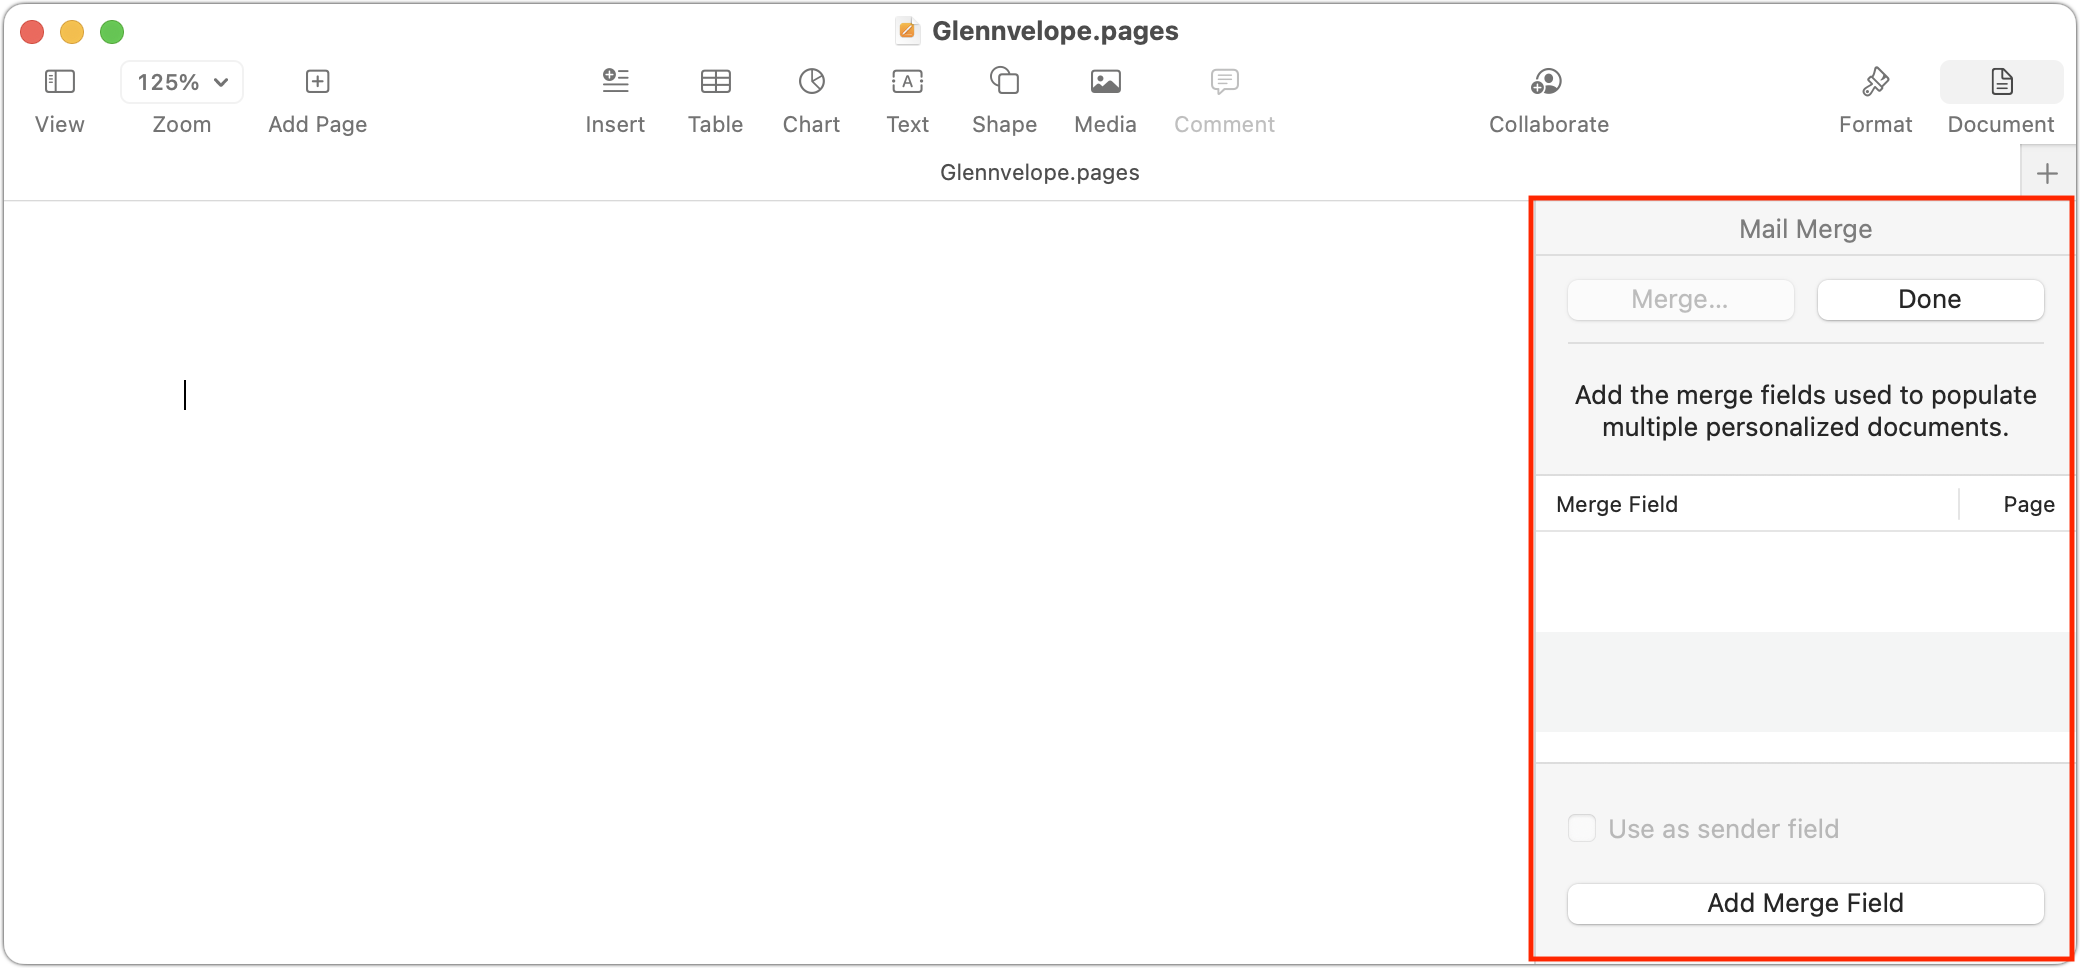
In the Mail Merge pane at the right, you can populate your document with fields that will be replaced by data:
- Position your cursor in the text where you want the field to go.
- Click Add Merge Field in the Mail Merge pane. (You can instead choose Insert > Mail Merge Field.)
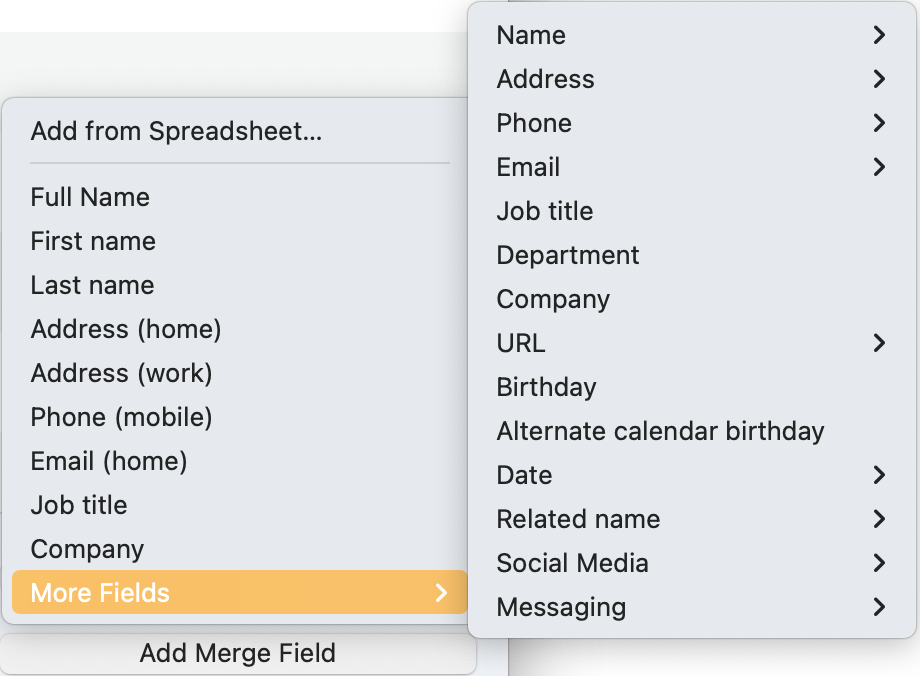
- The fields listed come from the Contacts app. Choose an item from the list or More Fields, which lets you drill down into other contact fields. (Note that multi-line entries, like an address, will insert hard returns at the ends of lines, like the address line; see a tip below.)

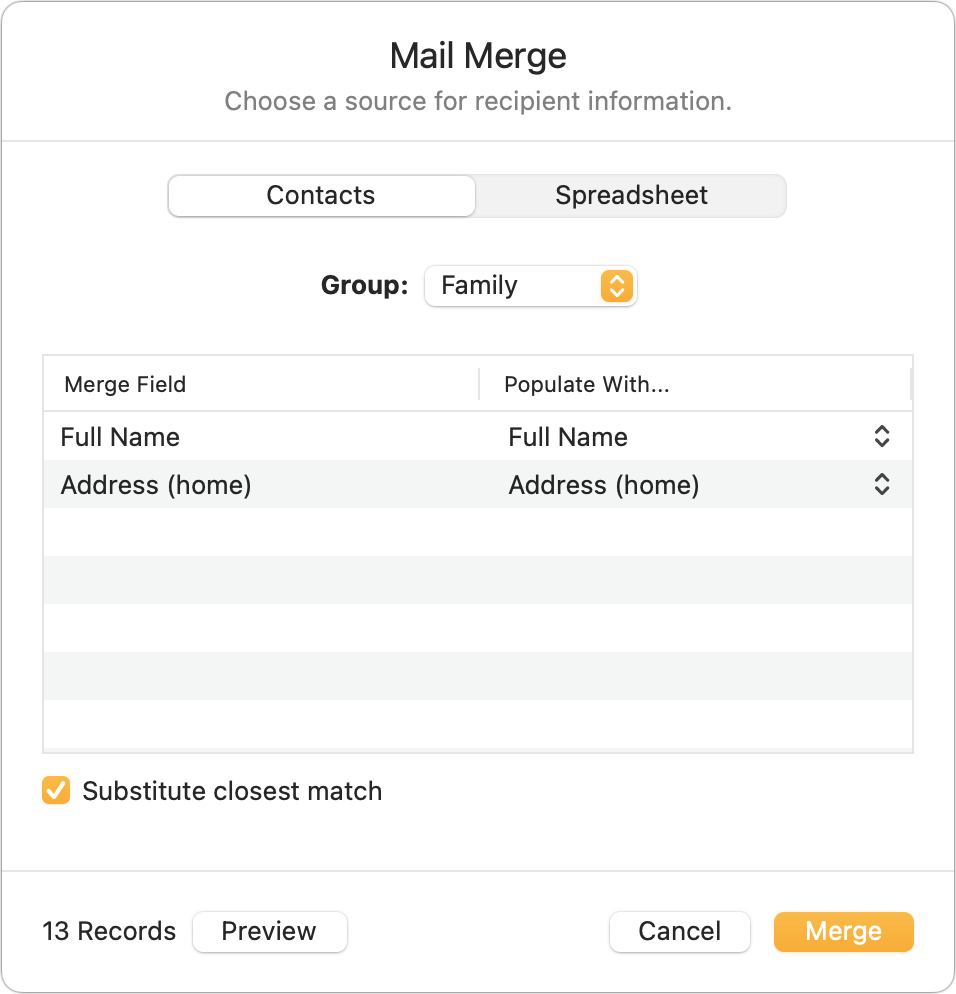
- When you’re finished adding fields, click the Merge button at the top of the pane to open the Mail Merge dialog.

- You can draw your data from All Contacts or filter by groups. (If the group you need doesn’t exist, go to the Contacts app, and create and populate it.)
- Click Preview to see what data will be filled in for each merged entry. Click Close to exit the preview.
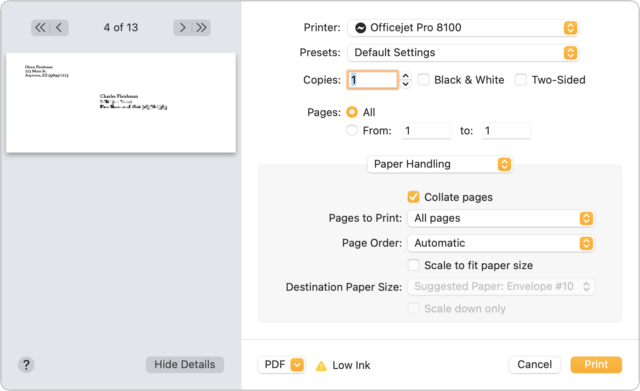
- If the preview looks correct, click Merge. Pages creates a new document with one page for each merged item.
- Save your merged document.
- You can now print the document as a series of pages, cards, or envelopes.

A few tips related to the above:
- You can access additional address options by drilling down in More Fields. Choose More Fields > Address and then one of the kinds of addresses, like home, and then you can select the full address as a multi-line entry or a single line without line breaks, or you can pick individual components of an address, like city and state.
- Mail merge documents can have multiple pages, which is useful for longer form letters. The Mail Merge pane shows the page number on which a field appears to the right of the field’s name in the fields list.
- While you can’t create labels, you could use a combination of Avery’s free downloadable Pages templates and mail merge. Create the mail merge, produce the merged document, open the Avery template and save it under a new name, and then copy and paste from the merged document into the fields on the Avery template. Tedious for hundreds of labels, but not too terrible for a handful!
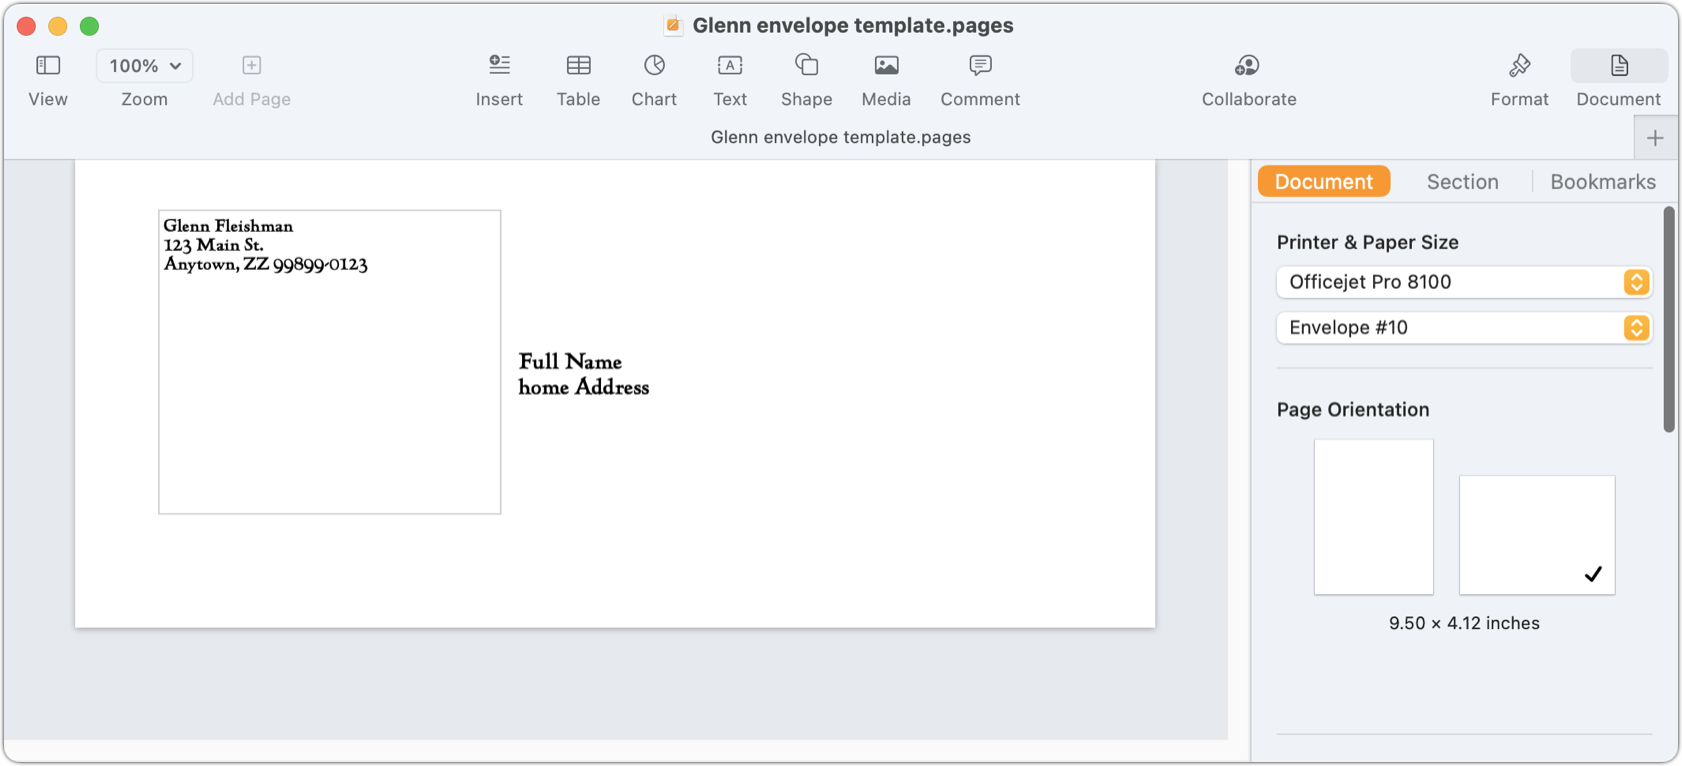
- When creating an envelope, even though you can’t switch to Page Layout mode, you can add a text box. I click the Text icon in the toolbar, drop my return address into that text box, and drag and resize it to the space I want in the upper-left corner. I make the return address text box fill the whole left side of the envelope because Pages’ built-in text wrap will then let me push the left edge of the addressee to where I want it.

Set up an envelope with your return address in a text box to control the position of the addressee’s delivery address.
Merge Using a Spreadsheet
Merging from your contacts is useful, but what about from a spreadsheet? It’s pretty much a breeze, too. Follow these steps:
- As with a Contacts-based merge, position your cursor in the text.
- Click the Add Merge Field in the Mail Merge pane.
- Choose Add from Spreadsheet at the top of the menu.
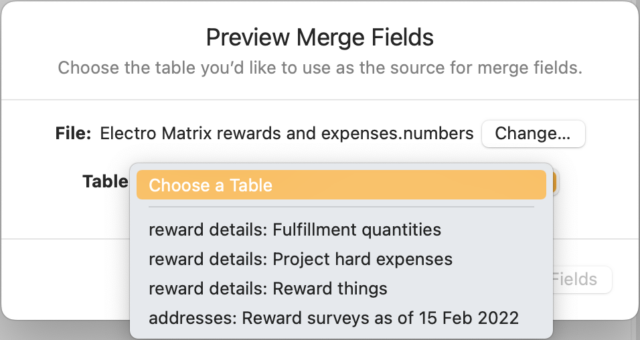
- Select a Numbers document and click Open.
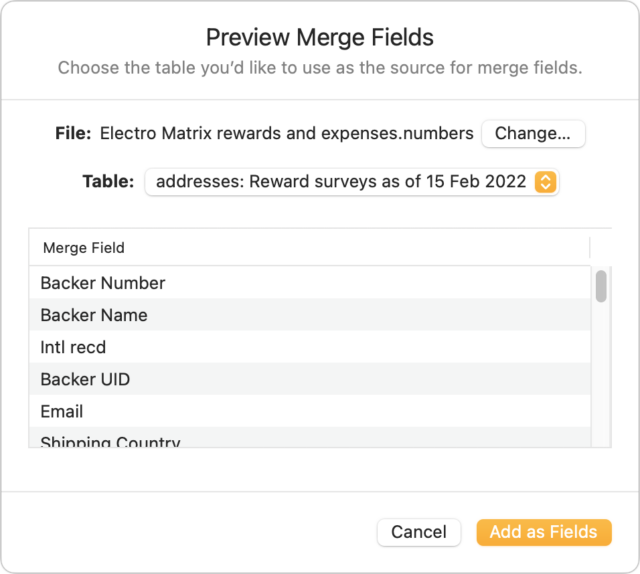
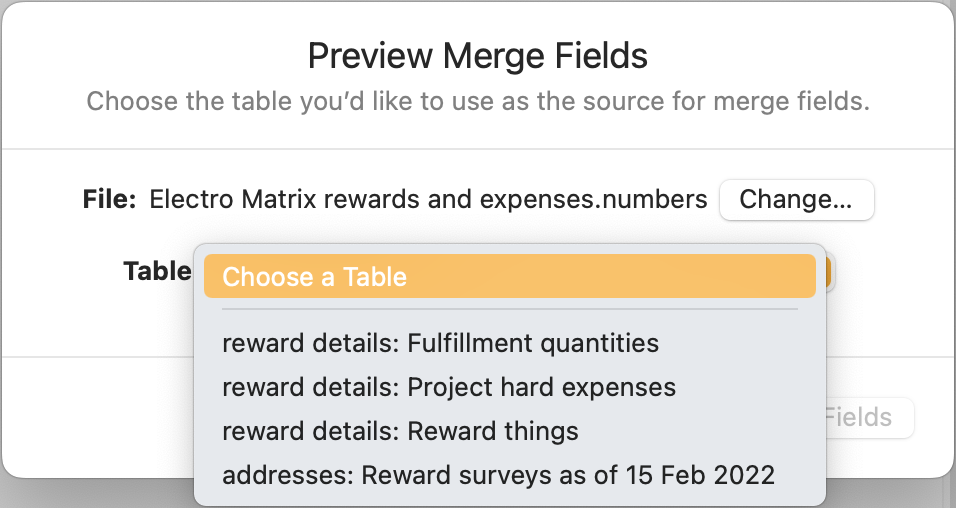
- Choose the desired table of source data from the Table field, which previews the fields that will be imported. If the Numbers spreadsheet contains multiple sheets, Mail Merge lists them as sheet name:table name. (You can also switch to a different spreadsheet by clicking Change.)
- Click Add as Fields.
- These fields now appear as items you can choose from the Add Merge Field menu in Step 3 in the previous instructions.

There’s no filtering option: your Numbers document must contain just the entries you want to merge.
Room for Improvement with Hope It Will Happen
There’s plenty of room for improvement in mail merge, but I count this as a stellar return engagement. Apple has consistently paid modest attention to its productivity apps, particularly in the last few years, often adding features or cleaning up around the edges.
What else would I like to see?
- Support for labels—the templates are already in Contacts!—and other repeating items on the same page
- Allow mail merge fields in Page Layout documents
- Link Numbers and Pages so you can mark fields in Numbers and export to create a merged Pages document directly
What mail merge capabilities would you like to see in Pages?