#1619: Stage Manager first impressions, Live Text in Preview redux, SMS 2FA failure fix, moving large folders with ChronoSync
Julio Ojeda-Zapata explores the new Stage Manager window management feature in the betas of iPadOS 16 and macOS 13 Ventura to give you a feel for how it works—complete with animated examples—and how it might change your multitasking experience. Seguing to solutions for today’s problems, Josh Centers suggests using ChronoSync Express to copy very large folders that stymie the Finder. Then, Adam Engst revisits his tip about disabling Live Text with an easier way to avoid inadvertent text selection in Preview. Finally, Adam discovers a simple fix for the problem of SMS two-factor authentication codes failing to arrive. Notable Mac app releases this week include Microsoft Office for Mac 16.63, BusyCal 2022.3.1, BBEdit 14.5.1, GrandPerspective 3.0, Camo Studio 1.7.1, Alfred 5.0, and OmniFocus 3.13.
TipBITS: How to Avoid Live Text in Preview More Easily
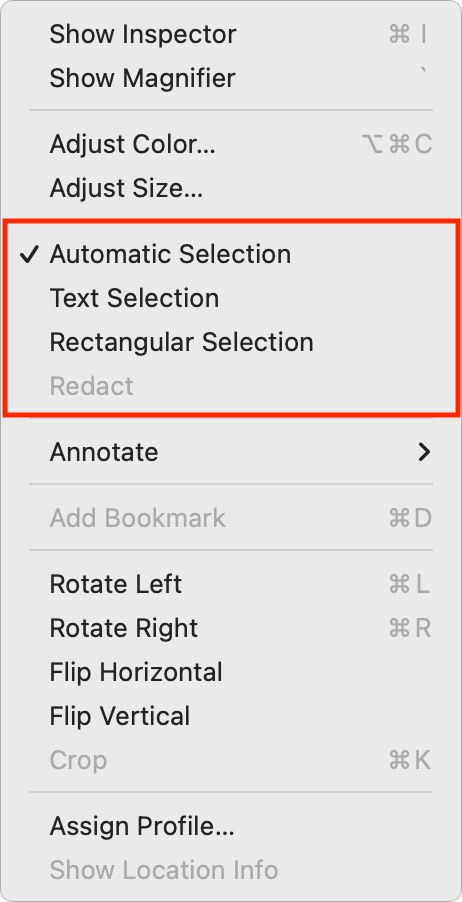
OK, this is embarrassing. After I published “TipBITS: Disable Live Text for Easier Selecting in Preview” (5 July 2022), Ken Nellis commented that after he read the article, he noticed that Preview in macOS 12 Monterey now has three selection-related options in its Tools menu: Automatic Selection, Text Selection, and Rectangular Selection. Ensuring that Live Text doesn’t hijack rectangular selections is that easy? Oops.
 I’m so familiar with Preview at this point that I didn’t notice the change in the menu structure because I rely almost entirely on keyboard shortcuts and toolbar buttons and menus. Indeed, when I checked Preview on a Mac running the pre-Live Text macOS 11 Big Sur, it had only two commands in that menu: Text Selection and Rectangular Selection. Plus, the Text Selection command was never previously available when working on an image; it was only for selecting text in a PDF. (Rectangular selections work in both images and PDFs.) So that’s my excuse, weak though it may be.
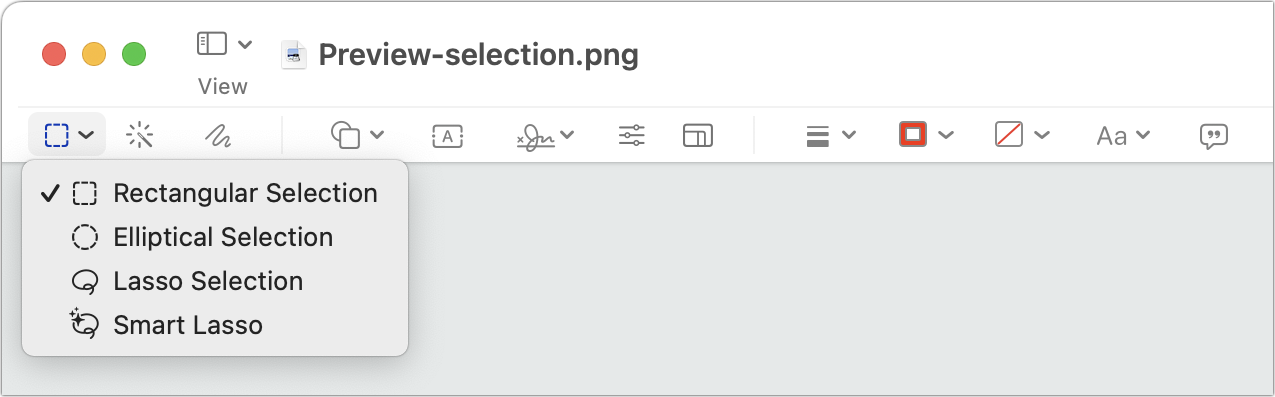
In the current version of Preview, Automatic Selection is the default, and it’s what was tripping me up before. In that mode, Preview guesses whether you want to select text or draw out a selection rectangle. Most of the time, it guesses correctly, but if it starts selecting text and you want a rectangle, choose Tools > Rectangular Selection or click the selection pop-up menu on the left side of Preview’s toolbar. Rectangular Selection is the default in that pop-up menu, and merely displaying the menu is enough to cause the Tools menu to switch to Rectangular Selection as well.
On the other side of the equation, if you keep getting a selection rectangle when you want to select text, choose Tools > Text Selection to force Preview to focus on characters.
My only remaining criticism, and I’ll file this with Apple as a feature request, is that Preview should never perform a text selection when there’s a rectangular selection in progress. Live Text annoyed me because I would open a screenshot that needed cropping, press Command-A to create a rectangular selection around the entire image, and get a text selection when I tried to move the blue selection handles.
If that happens now, I know that I can easily require a rectangular selection by clicking the selection pop-up menu, but even that shouldn’t be necessary. First-world problems, I know!
Not Receiving SMS Text Message 2FA Codes? Call Your Carrier
SMS text messages are a weak, dangerous way of providing two-factor authentication codes, as we discussed years ago in “Facebook Shows Why SMS Isn’t Ideal for Two-Factor Authentication” (19 February 2018). Unfortunately, even though the problems with SMS for 2FA are well-known, many companies and government organizations continue to use it. The problem is that, for most people, most of the time, it works. But I’ve just resolved a problem where SMS 2FA codes didn’t work, and it’s worth sharing in case you or someone else you know is experiencing a similar problem.
In August 2021, we switched from AT&T to T-Mobile, and it has been a highly positive move for the most part. At some point, however, I discovered that I couldn’t log in to my Social Security account because it needed me to enter a code texted to my cell phone number. Despite several tries over a few days, the code never arrived on my iPhone. Since I have no near-term plans to retire and all other SMS text messages were arriving properly, it wasn’t worth my time to figure out why.
A while later, I needed to log into the Finger Lakes Runners Club QuickBooks Online account, which also had an SMS-mediated login verification. That failed in the same way—the text message never arrived—but I was able to work around the problem by falling back to email. Although QuickBooks Online now offers app-based 2FA, turning it on requires being able to receive a text message first.
The problems continued. I couldn’t turn on 2FA with a site called TaxCaddy that our accountant uses for transferring and tracking tax-related documents. The local credit union website we use for online banking wanted to send me a text message for some reason, but it never arrived—it was no great loss because I had to use Tonya’s account anyway (and she never experienced any problems receiving 2FA codes). The straw that broke the proverbial camel’s back was another local bank’s website. It would let me log in and do most things but required an SMS 2FA code for making admin-level changes to users, which I needed so I could increase the amount my account could transfer between accounts.
So I called T-Mobile and explained my situation to the customer service rep. She understood the problem instantly and said she would remove the necessary block on my account. It took seconds, and as soon as she did it, I was able to verify that several of the previously blocked accounts could now send me text messages.

Why had this happened? The rep couldn’t say for sure, but it was likely associated with T-Mobile’s efforts to block scams. Most of those are voice-related, but apparently, they can also result in text messages being blocked. In other words, it’s an opaque system, and there’s no way of knowing exactly what happened. The commonality among the five websites I’d recorded as having troubles was that they all provided financial services. It seems odd that T-Mobile would block them, particularly government outfits like Social Security, but on the other hand, scammers might try to spoof text messages from such sites.
All’s well that ends well, but the moral of the story is that if you aren’t receiving SMS text messages, particularly those that carry 2FA codes, call your cellular carrier and ask if they’re being blocked.
Use ChronoSync to Move Large Folders
Imagine that you want to move a multi-gigabyte folder containing tens of thousands of files and subfolders to another drive to free up your Mac’s internal storage space. Your first instinct would be to use the Finder and drag the folder where you want it to go. That’s what the Finder is for, right? But it might not work.
Despite file management being one of its core functions, Finder isn’t always the best choice for moving files and folders. Its inadequacies are seldom obvious when moving small batches, but moving large, complex folders can turn into a hair-pulling experience. That’s because if Finder has a problem with a single file, it sometimes halts the entire transfer instead of skipping the problematic file.
In my case, it was a filename that was too long (and no, I don’t know how that was possible), but various things can cause a file transfer to fail, like file corruption, the Finder thinking the file is in use, the inexplicable Error Code 43 or Error Code 36, or the Finder hanging during a long file copy. Moving large amounts of data can take hours, and the last thing you want is a mysterious error wasting all that time.
I’ve dealt with this a lot lately, both in moving data to my Synology NAS and when I turned off iCloud Drive when troubleshooting sync issues, which dumped a 24 GB archive folder on my hard drive. (For more background, see “Using a Synology NAS to Escape the Cloud,” 29 April 2022.) I was leery of deleting the folder because I couldn’t be certain that iCloud had stored all the files, so I wanted to move it to my NAS to compare later. What started as a simple transfer ended up causing days of frustration.
A friend suggested using ChronoSync to move the folder. I’m familiar with ChronoSync, since we’ve covered it in our Watchlist for years, but I had always thought of it as a backup app. I checked Setapp and found that ChronoSync Express was included in my subscription. Otherwise, ChronoSync Express is $24.99 in the Mac App Store, and the full version of ChronoSync—which offers a few more features—costs $49.99. But ChronoSync Express is more than enough for syncing folders, and it does a darn good job of it.
Using ChronoSync Express to Move a Large Folder
Moving a folder with ChronoSync Express is a bit more work than drag and drop, but the app holds your hand through the process of creating the necessary task:
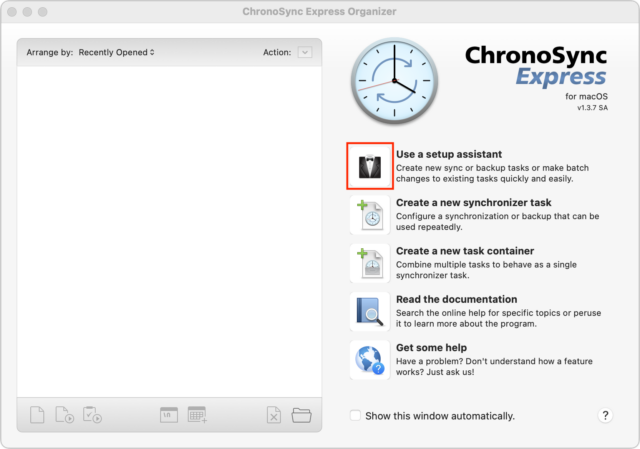
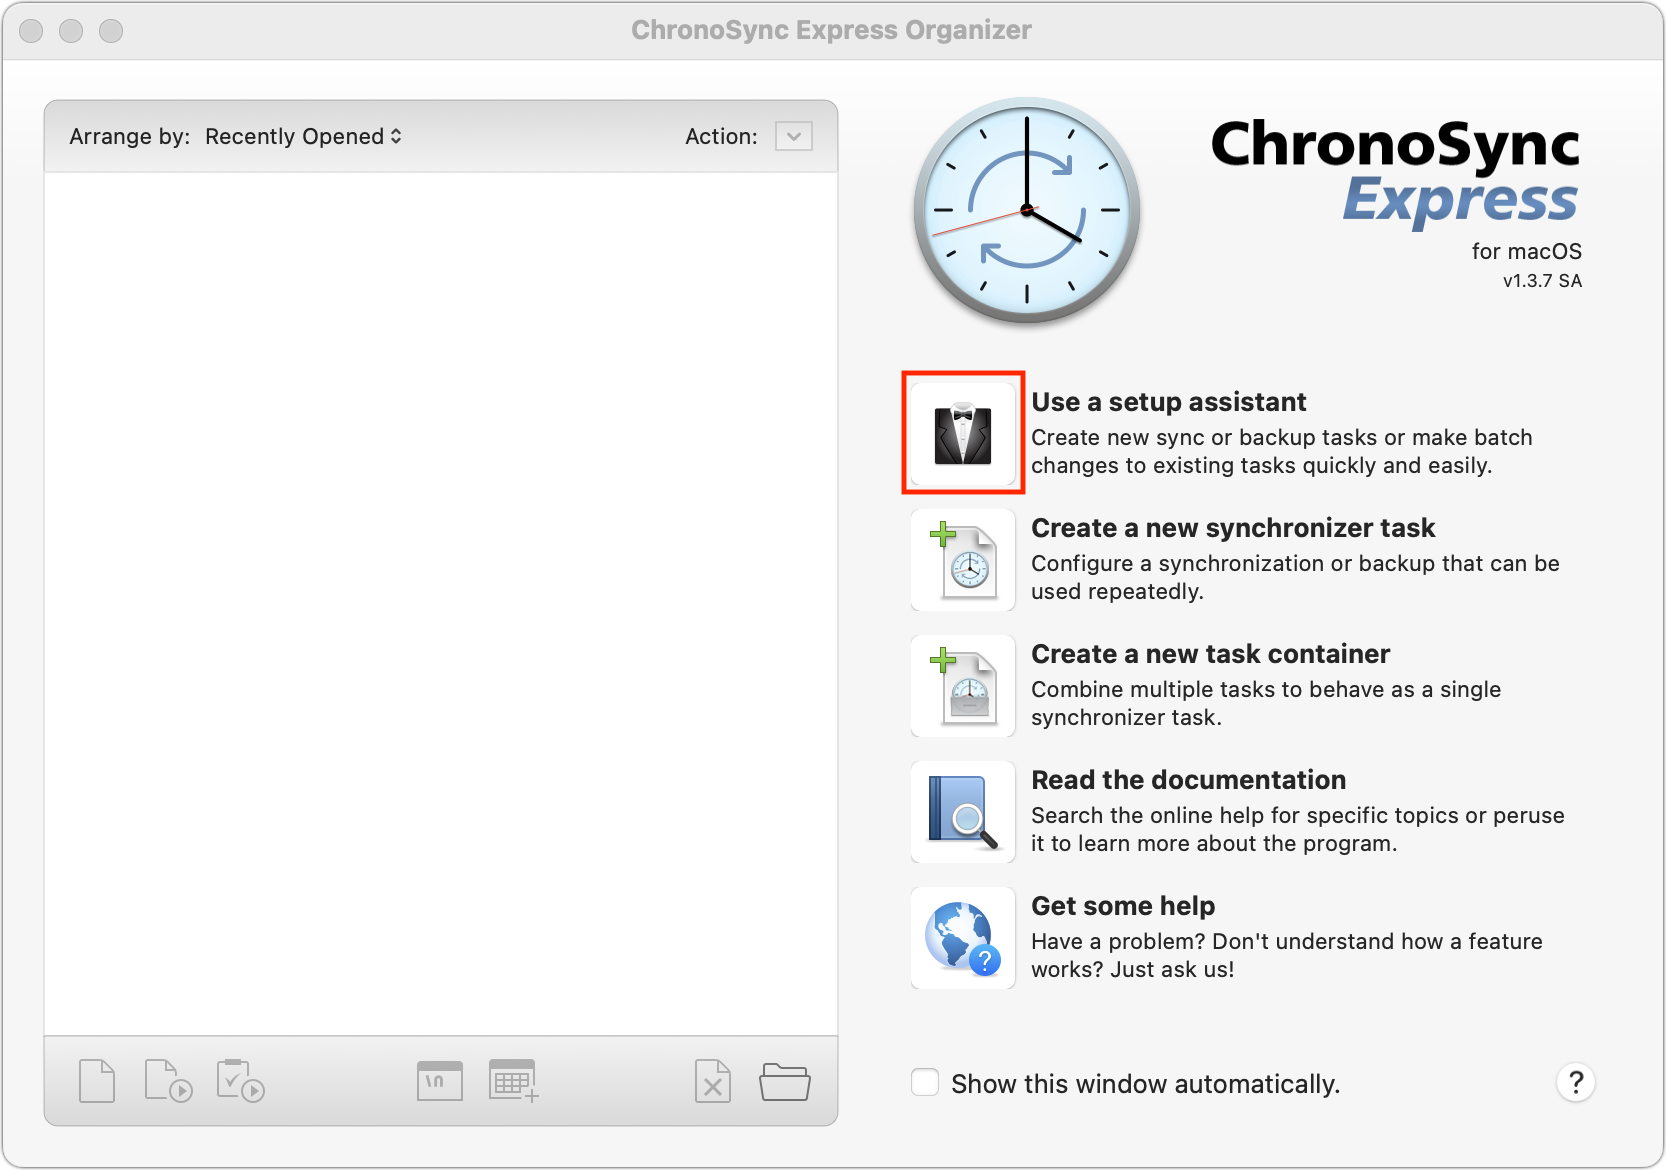
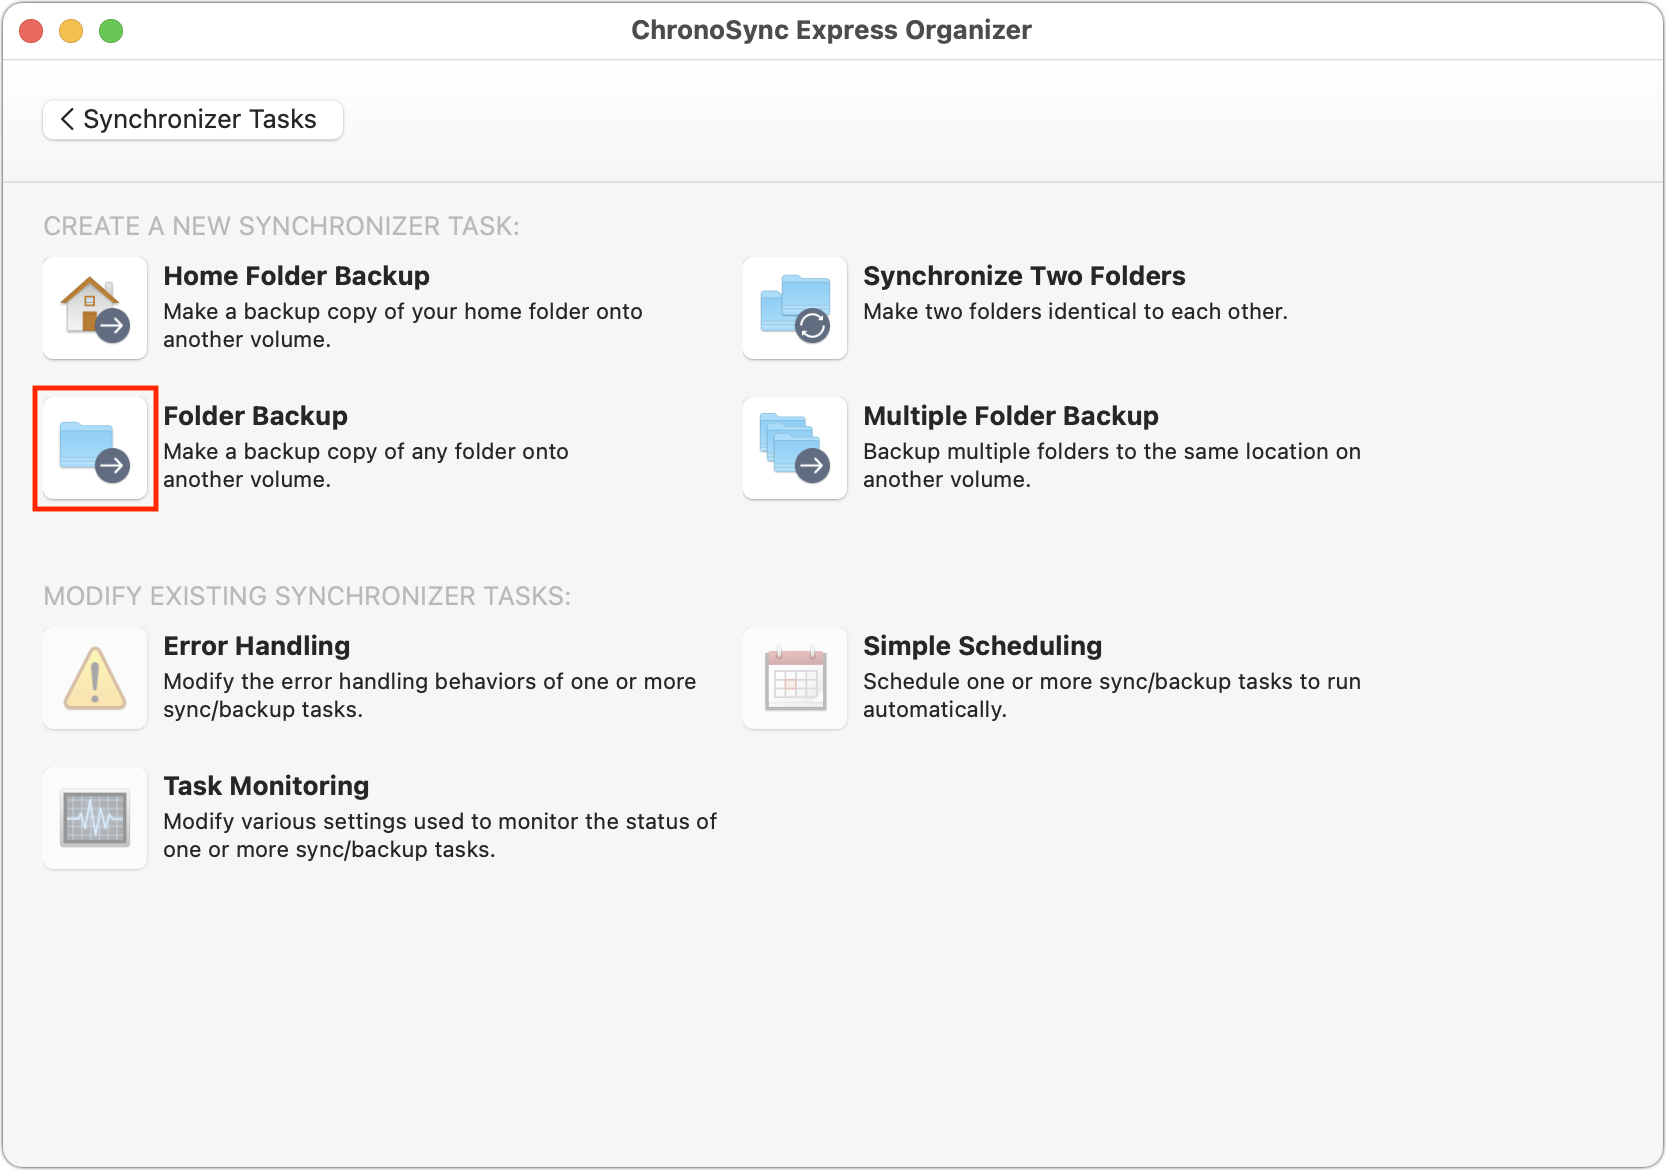
- Click the tuxedo button by “Use a setup assistant.” (You can also create a new synchronizer task manually by clicking the next button down; the steps are basically the same but take place in the task screen rather than as separate assistant screens.)
- Click the button by Folder Backup.

- Click Get Started.
- Drag the folder you want to copy into the Select a Source screen and click Next Step.
- Drag the destination folder into the Select a Destination screen and click Next Step.
- Keep “Backup all data” selected in the Backup Specific Types of Data screen and click Next Step.
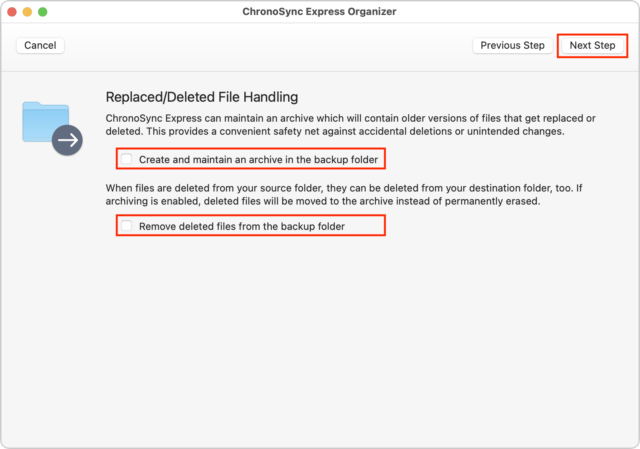
- In the Replaced/Deleted File Handling screen, deselect both checkboxes. Because we’re performing a one-way, one-time copy of the folder, we don’t need an archive, nor do we want to remove deleted files. Click Next Step.
- Enter a custom task name if you want and click Create Task.
- ChronoSync Express opens the new task with some instructions. Click OK to continue.

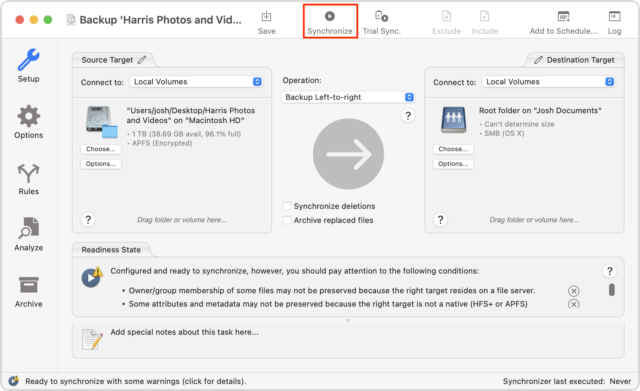
- You could click Synchronize to start the transfer immediately, but I recommend moving on to the next step for additional configuration.
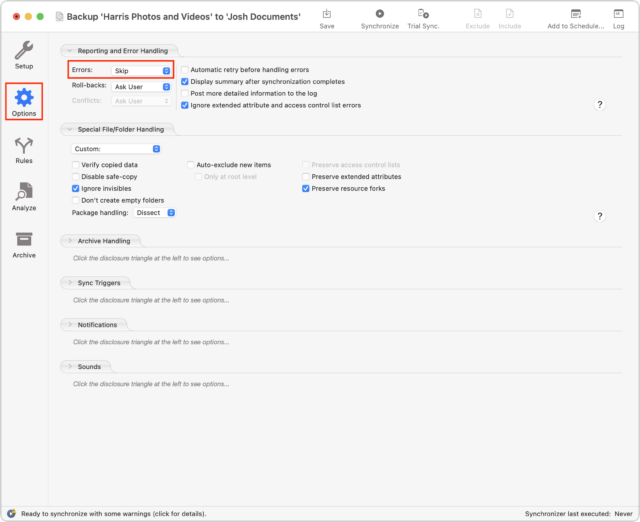
- If you’re in the same situation I was in, you may want to click Options in the sidebar, and in the Errors pop-up menu, choose Skip. The default setting, Report to User, pauses the transfer if there’s a problem, prompting you to intervene. That can be a hassle if you set a large transfer to run overnight, only to find that it only partially completed because it was prompting you for input. When you set that pop-up menu to Skip, ChronoSync Express moves on to copying the next file when it encounters an issue.
- Once you’ve changed the error reporting option, click Setup in the sidebar to return to the main task screen and click the Synchronize button to start the copy.
- After the copy finishes, choose Actions > Open Log to see if anything was skipped.


If you’re anticipating a lot of problems, instead of clicking Synchronize on the main task screen, click Trial Sync, which displays a list of files to be synchronized and warns you of potential problems before performing the full sync.
Needless to say, ChronoSync Express can do far more than merely transferring a folder that has stymied the Finder. But for reliably moving large folders while gracefully handling errors, it’s now my go-to tool.
First Impressions: Stage Manager on the iPad and Mac
For years, iPadOS users have groused about the iPad’s limited multitasking. Apple responded years ago with Split View and Slide Over window configurations and, more recently, fine-tuned how to initiate and manipulate such app states (see “iPadOS 15 Finally Makes Multitasking Discoverable,” 9 October 2021).
External display support has been another bugaboo. The iPad, when connected to a monitor, only mirrors the contents of its built-in screen to the other display. That, users took pains to note, was not all that useful beyond presentations.
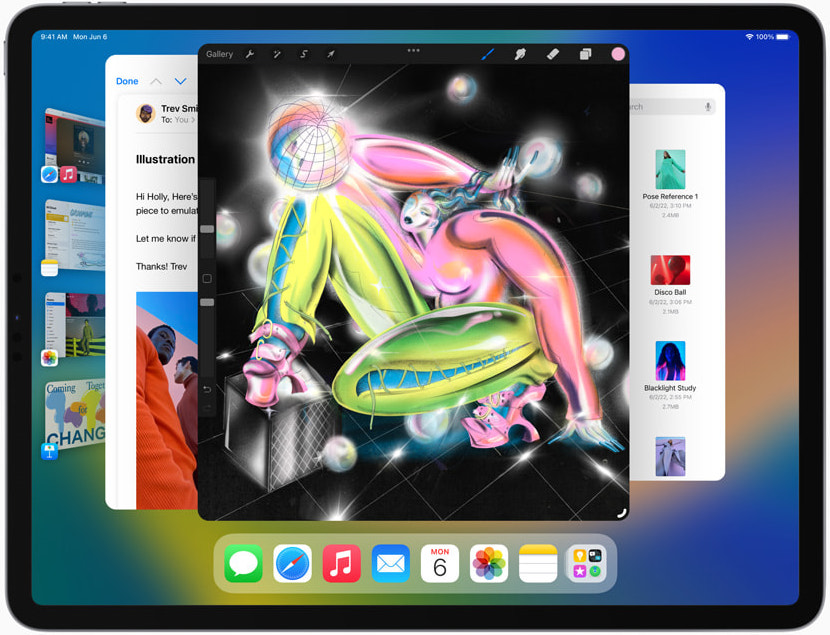
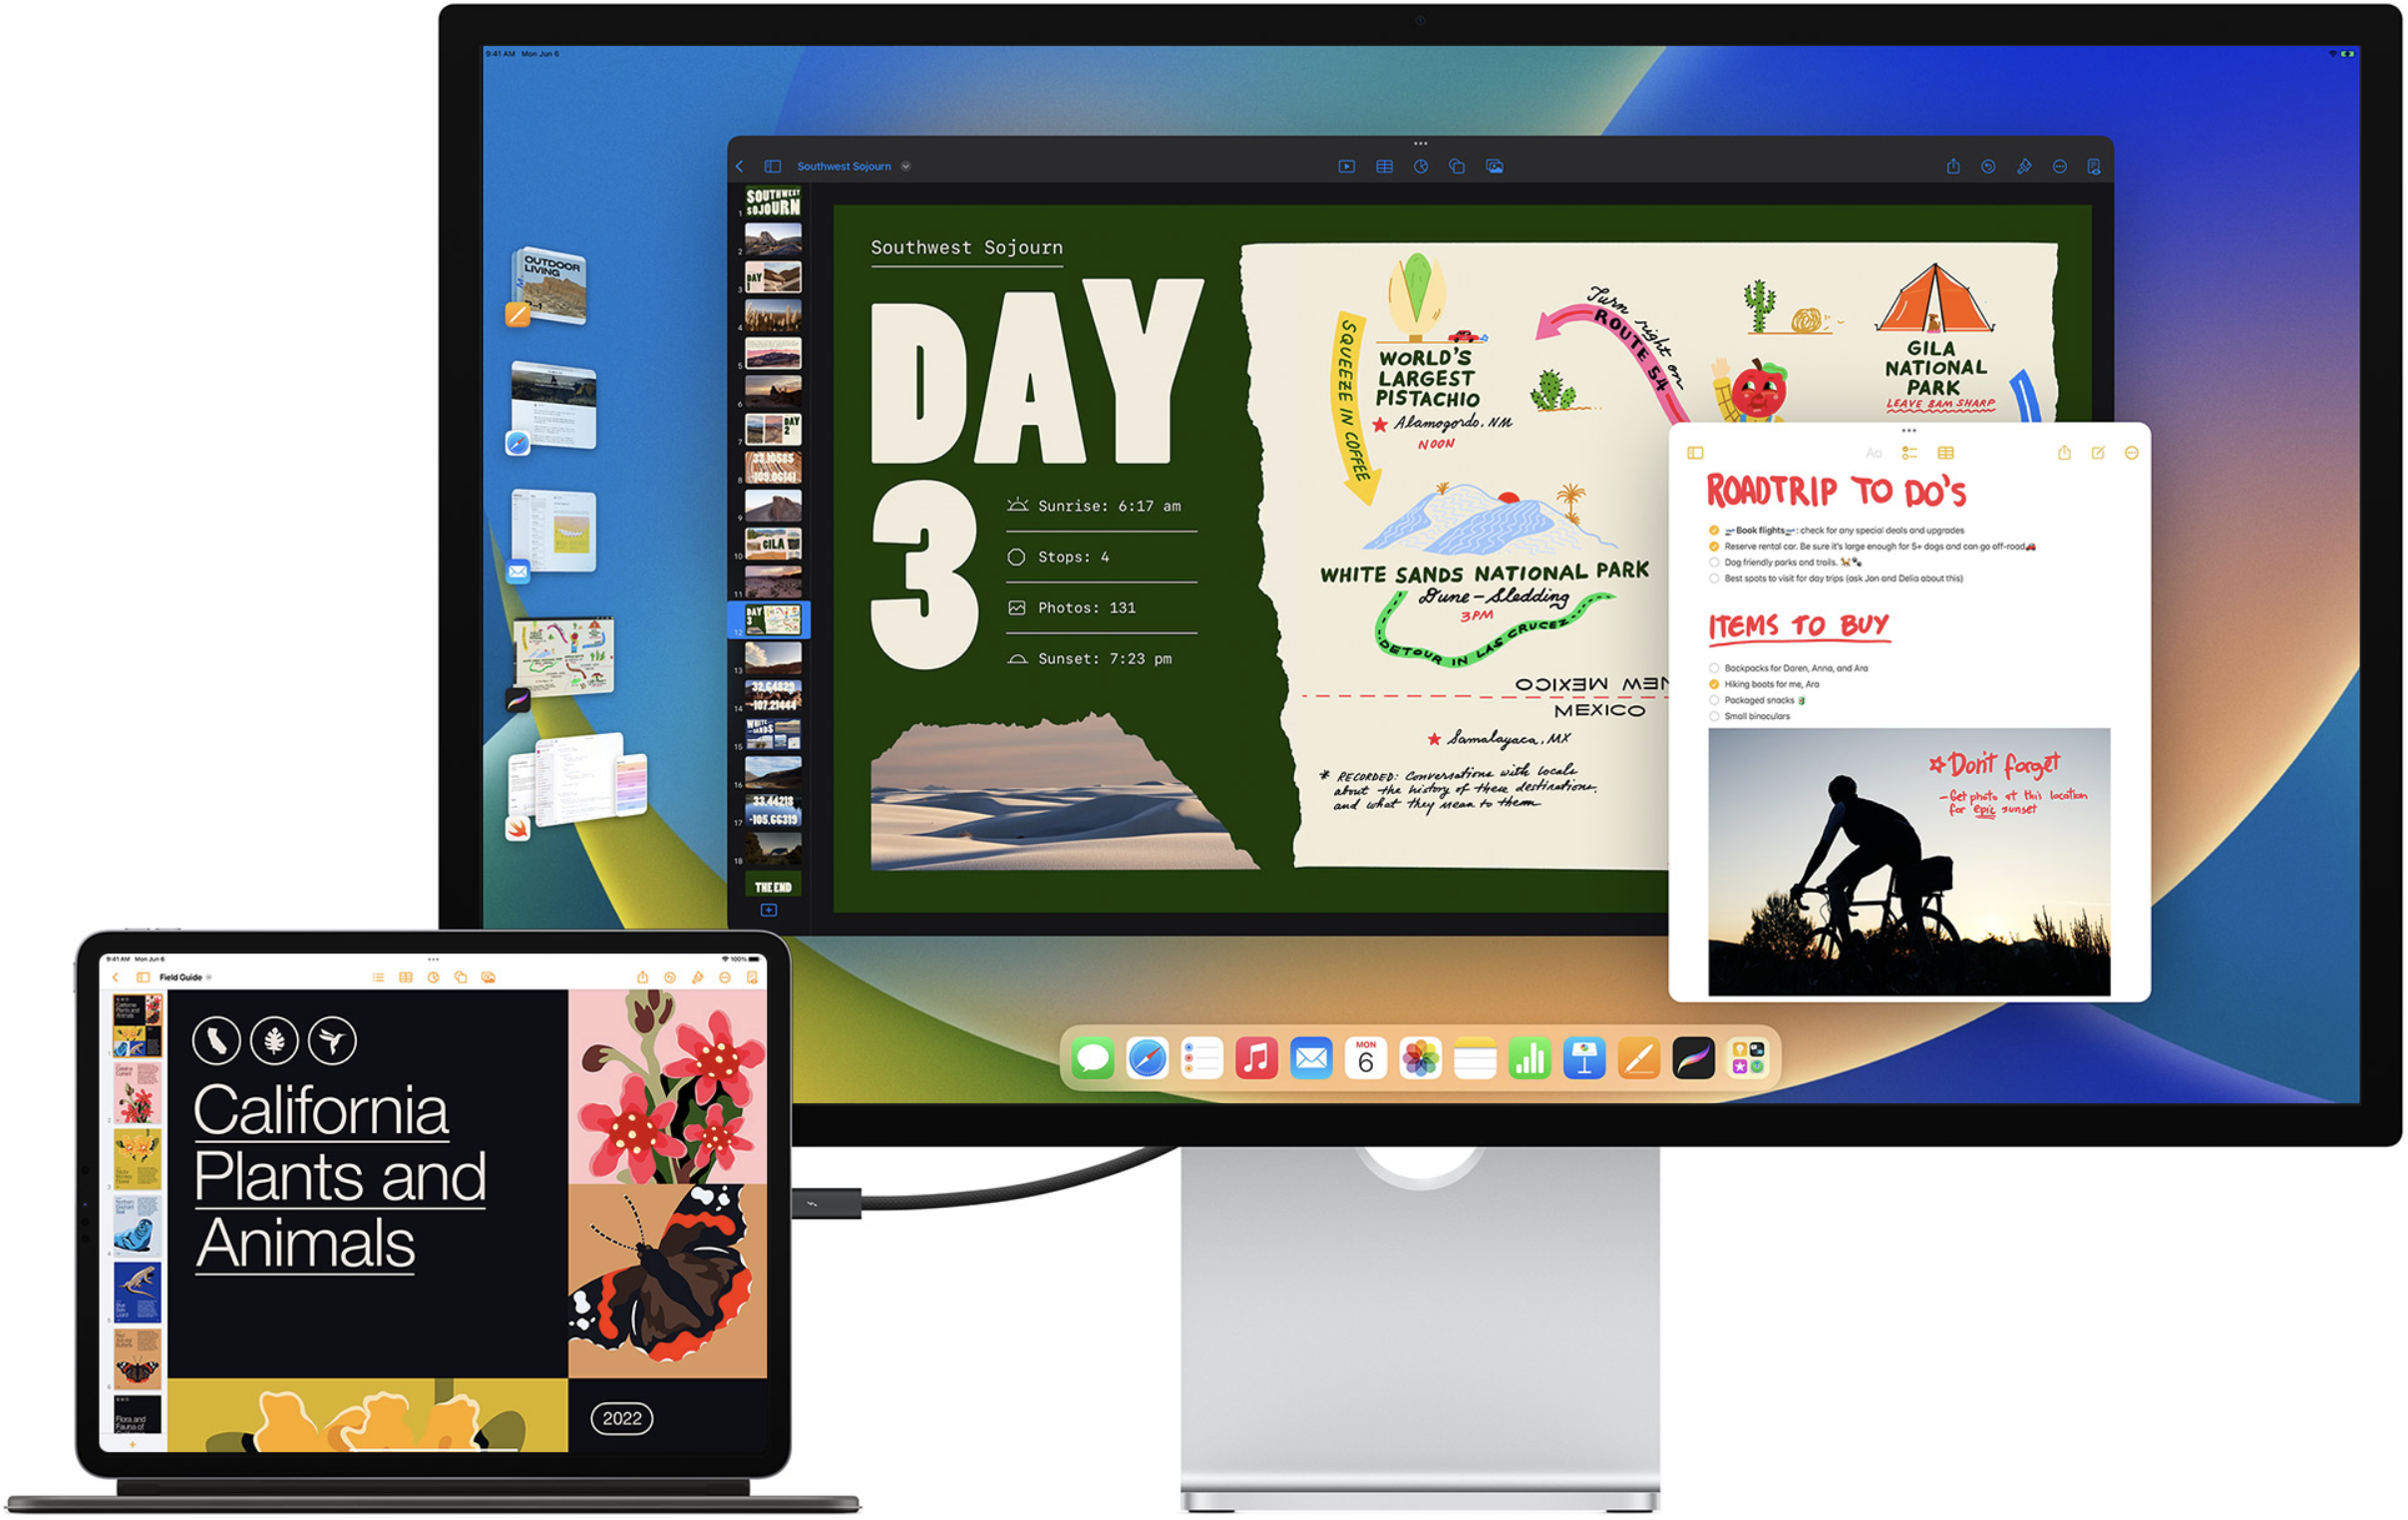
Enter Stage Manager, which Apple recently unveiled as a marquee iPadOS 16 feature. It adds a familiar, albeit somewhat limited, windowing system to the iPad. To the delight of some iPad users, multiple apps can now be resized, rearranged, and made to overlap on the screen—similar to what has occurred for decades on the Mac.
Multiple apps can be kept bunched together for specific tasks and projects. Perhaps most notably—and a tad confusingly—recent apps and app groups are shown on the left side of the screen in the form of angled thumbnails that act as a new kind of App Switcher or secondary Dock.
Stage Manager can work on an external display as well as on the iPad’s screen, and there is no mirroring (except for the Dock, which is replicated on each screen). Instead, different sets of apps and app groups live on each display, and you can move them from one to the other.
Apple didn’t restrict Stage Manager to the iPad. It’s also a feature of the recently unveiled macOS 13 Ventura. But while Stage Manager may feel superfluous on the Mac, which already has a full window management system, it’s more compelling on the iPad, given iPadOS’s paucity of windowing capabilities until now. For this reason, I’ll focus on the iPad but wrap up with a quick look at the Mac version of Stage Manager.
Don’t construe this article as a formal review of Stage Manager—I’m working from pre-release versions of iPadOS 16 and macOS 13 Ventura. If you’re feeling adventurous and have a non-essential device to dedicate to testing, Apple released public betas earlier this month (see “Apple Opens Public Betas for macOS 13 Ventura, iOS 16, iPadOS 16, watchOS 9, tvOS 16, and HomePod Software 16,” 11 July 2022). The betas are unsurprisingly flaky, which played havoc with my Stage Manager use at times, and may be missing capabilities yet to come.
Stage Manager Hardware Requirements
Before we dive in, a few notes on hardware. Most importantly, Stage Manager requires an iPad with an M1 processor. That includes any current-model iPad Pro and the fifth-generation iPad Air, which is what I am using (see “Apple Unveils Fifth-Generation iPad Air with M1, 5G, and Center Stage,” 8 March 2022). Josh Centers recently wrote about the controversial M1 requirement in “Explaining Stage Manager’s M1 iPad Requirement” (16 June 2022).
If you are using an external display, Stage Manager requires you to connect a keyboard and a mouse or trackpad since there’s no other way to manipulate objects on the external display. Apple got us a part of the way there when it added pointing-device support to iPadOS (see “The iPad Gets Full Trackpad and Mouse Support,” 28 March 2020), and now it’s making another leap with full multi-screen support.
Key Stage Manager Settings
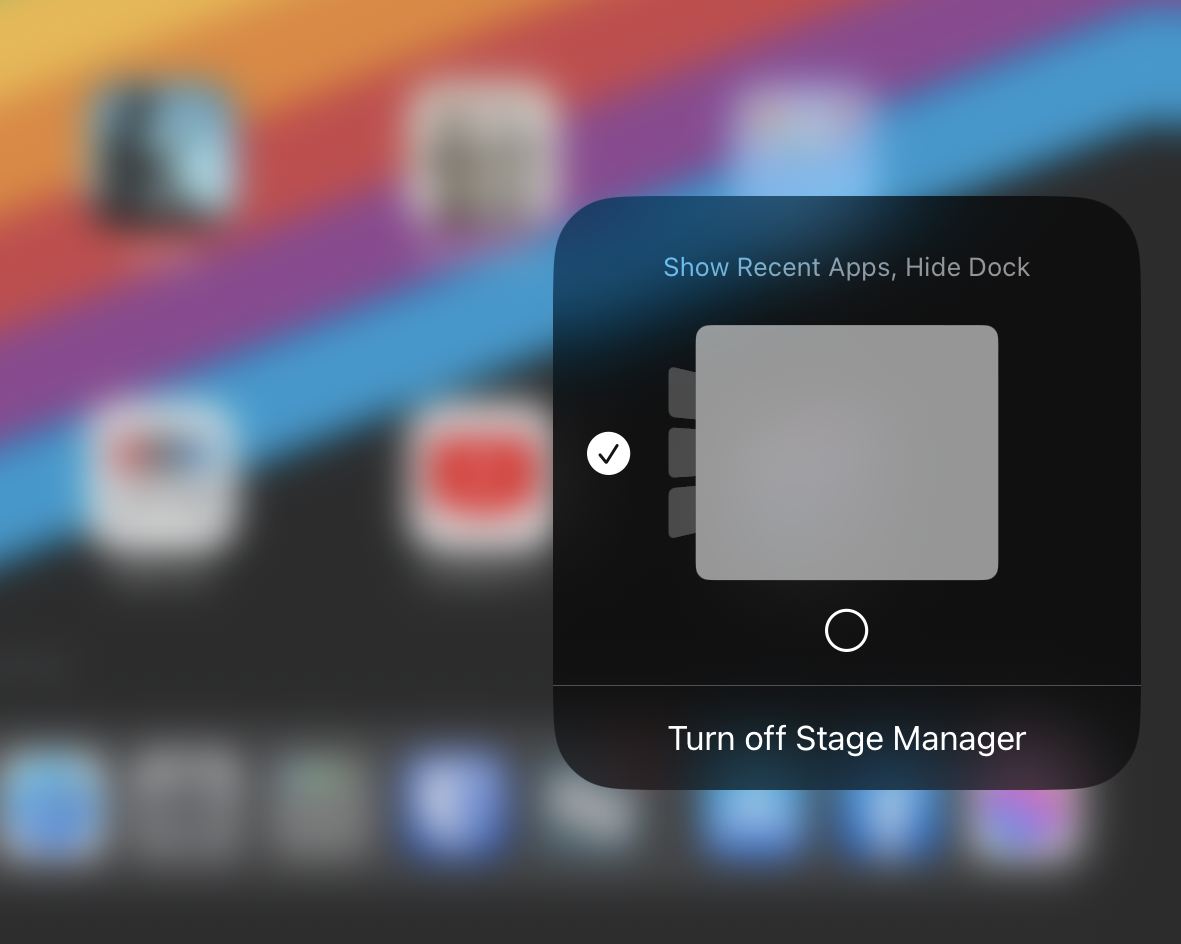
To activate Stage Manager, tap the Stage Manager button in Control Center. It shows a symbolic representation of an app window with dots (denoting other apps) beside it.
Pressing and holding that button brings up a couple of options. You can decide to show or hide the Dock when Stage Manager is on, but this feature feels a bit fussy, and I don’t think Apple has thought it through. Regardless, if the Dock isn’t visible, you can get it back with a short drag up from the bottom edge. Similarly, you can show or hide the Recent Apps switcher on the left side.
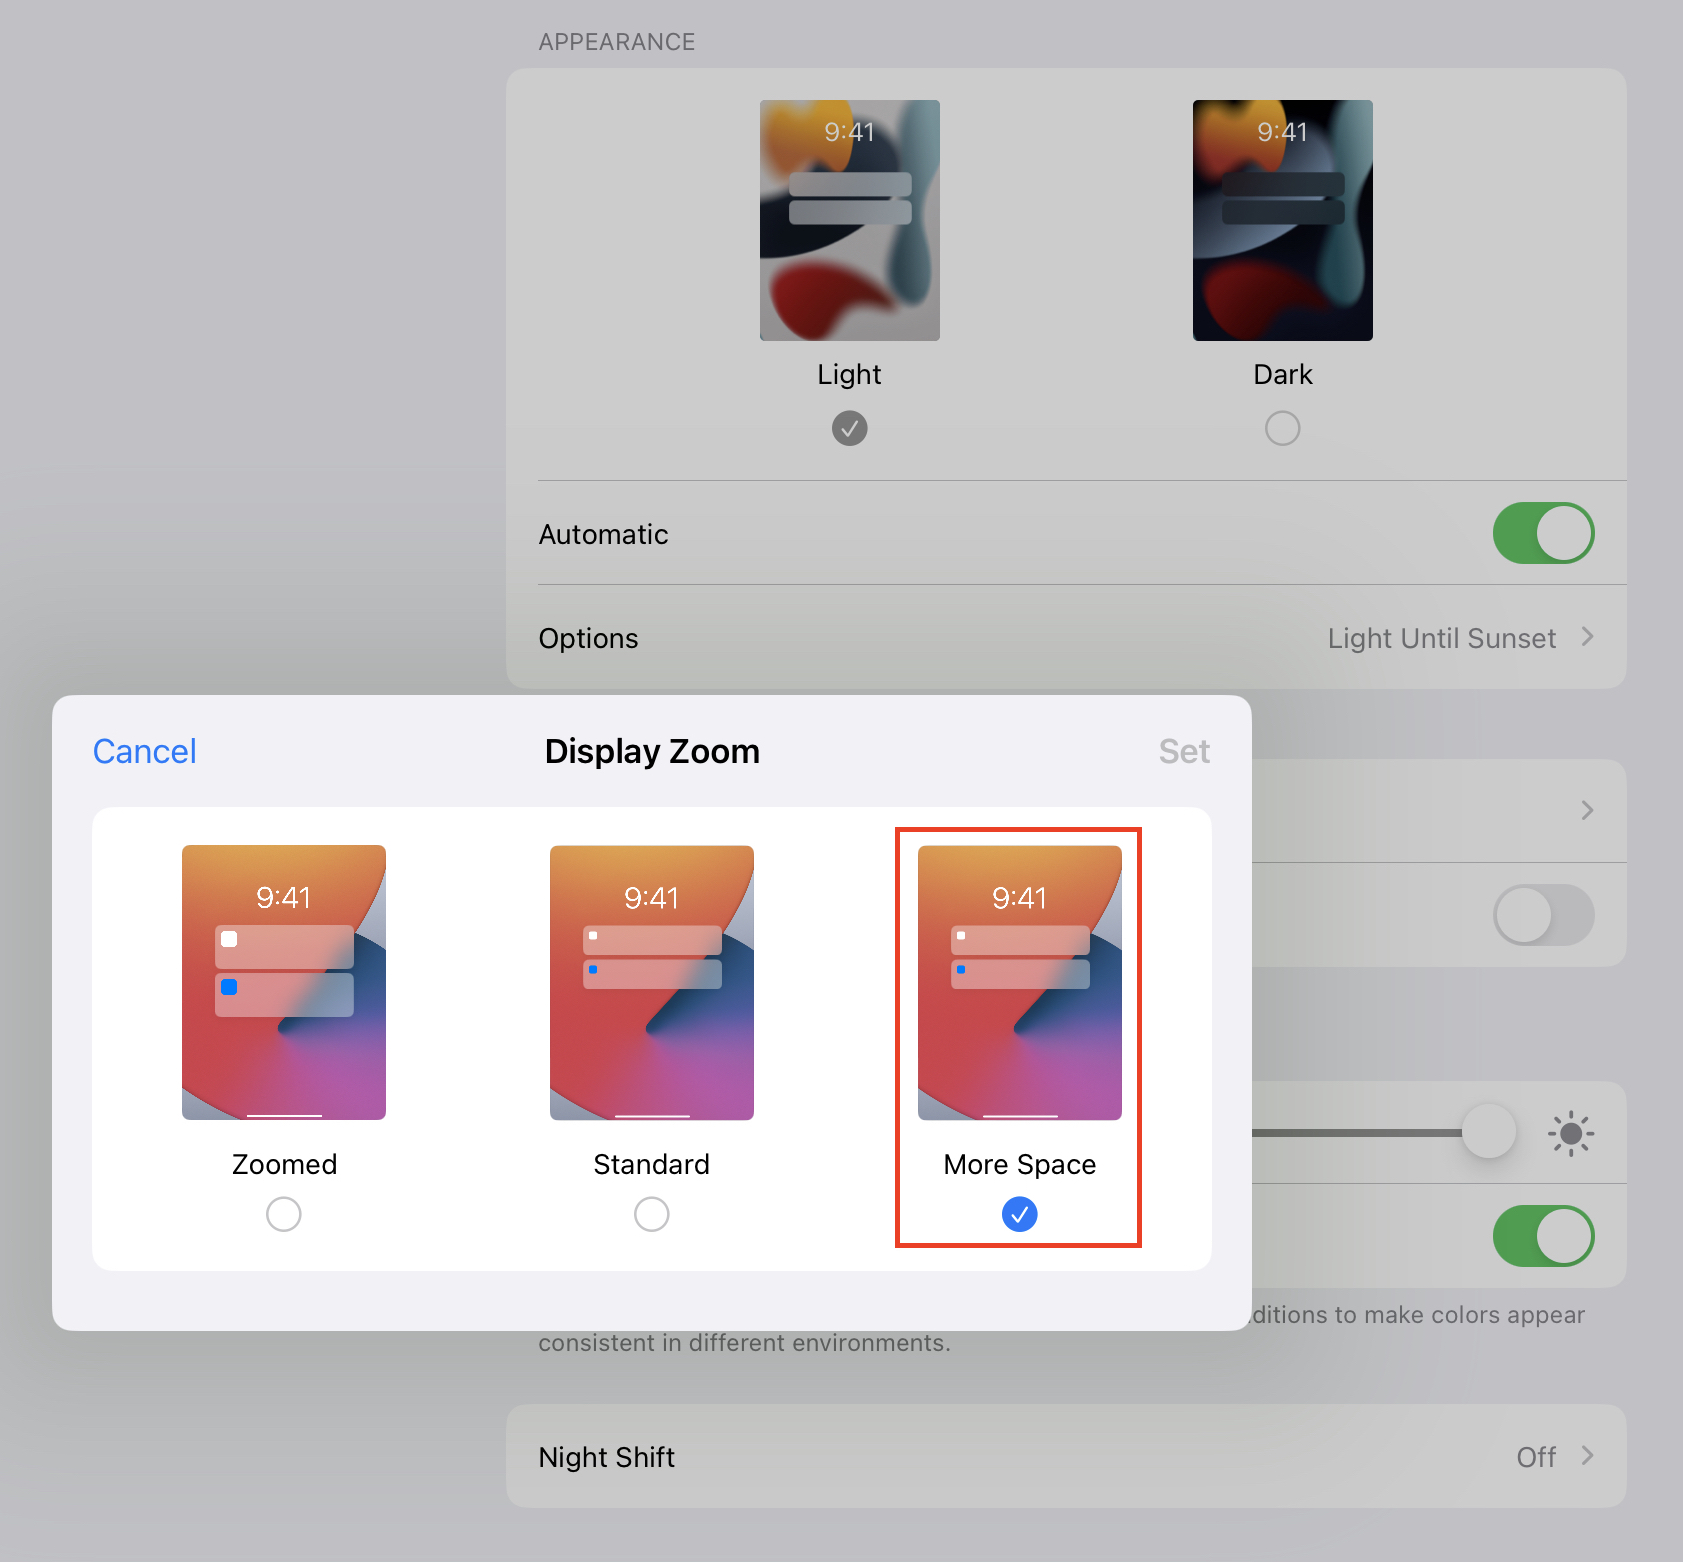
A couple of other relevant options live in Settings > Display & Brightness. First, go into Display Zoom. Along with the standard screen magnification options, there is a new More Space option. It makes onscreen objects smaller, giving you additional real estate—precisely what you want when working with multiple overlapping windows and the Recent Apps switcher, which takes up a lot of space on the screen.
Second, if you’re connected to an external screen, you should see symbolic representations of both displays, and you can tap each to tweak settings.
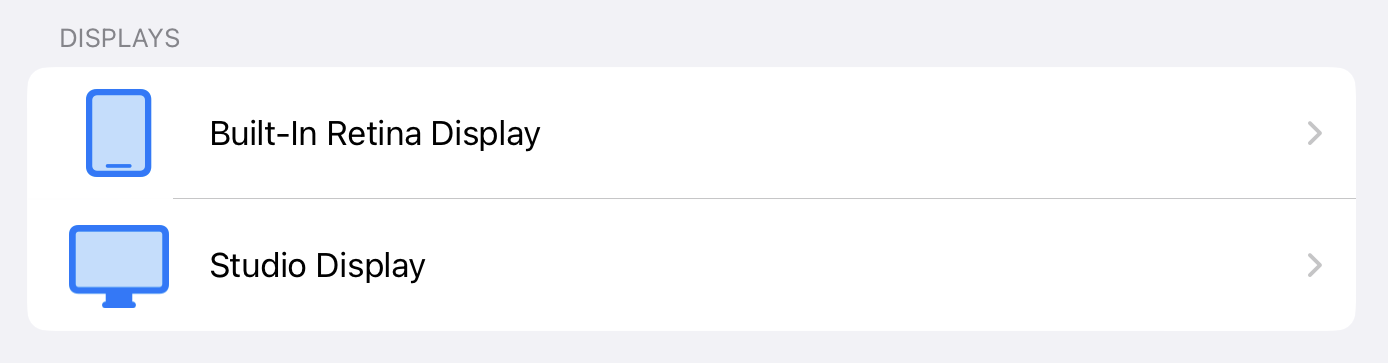
Near that graphical display list is an Arrangement option reminiscent of the Displays preference pane on a Mac. On my iPad, I positioned the external display on top of the iPad’s screen, mimicking the physical setup of my iPad Air sitting directly below my monitor, with my iPadOS cursor zipping up and down between the two screens.

Using Stage Manager on the iPad Screen
Stage Manager takes some getting used to on the iPad screen, so it’s best to play around until you start internalizing its subtleties. The key new variable is that app windows are no longer full-screen by default, but instead free-floating and a bit more Mac-like.
Nothing will happen at first when you activate Stage Manager in Control Center. The Home screen looks the same. But when you open an app from the Dock, the Home screen icons vanish, and your wallpaper visible around the app’s edges blurs. Minimizing the window (by choosing Minimize from the ••• menu at the top center of the window or flicking downward from the window’s top edge) brings the Home screen back.
I began my Stage Manager exploration by tapping to open an app, short-swiping upward to get the Dock back, tapping to open another app, going back to the Dock, and so on. You can do this five times to fill the four Recent Apps slots, with a fifth app active. If you continue opening and minimizing apps, the next new app will replace the oldest item in Recent Apps. Even after an app disappears from Recent Apps, it persists in the traditional App Switcher accessed by long-swiping up from the bottom edge of the display.
Let’s resize some windows! On the iPad screen, you accomplish this by dragging the little grabber on a bottom corner (the black squiggle that sometimes appears on the left, sometimes on the right) to change the window’s size and shape. Vertical resizing is limited, but you can alter a window’s width quite a bit. Make it super narrow, or the equivalent of full-screen if you want to hide the Recent Apps switcher temporarily.
If you want more than one app visible at a time, create app groups. This is supposed to work in one of two ways: by choosing the Add Another Window from the ••• menu found at the top center of every window or by dragging one window alongside or atop another. The first option works when adding a second window to a single one on the Home screen but currently generates a “Not Available Yet” error message when you try to add more windows. It is a beta.
No bother, though, because you can drag apps alongside or atop others from the Dock or from Recent Apps. Each app group can contain up to four apps.
When minimized into Recent Apps, such a group sports an icon for each of the apps found therein.
Next, we can tinker with app-group arrangements. You can move windows around within a group by dragging their upper edges. Windows can sit side by side, similar to the standard Split View, or overlap in little piles—you accomplish this by fiddling with the windows’ resizing grabbers until the apps snap into the desired positions.

Not every app will cooperate with Stage Manager, with some resisting resize attempts or displaying other quirks. Be patient, it’s early days.
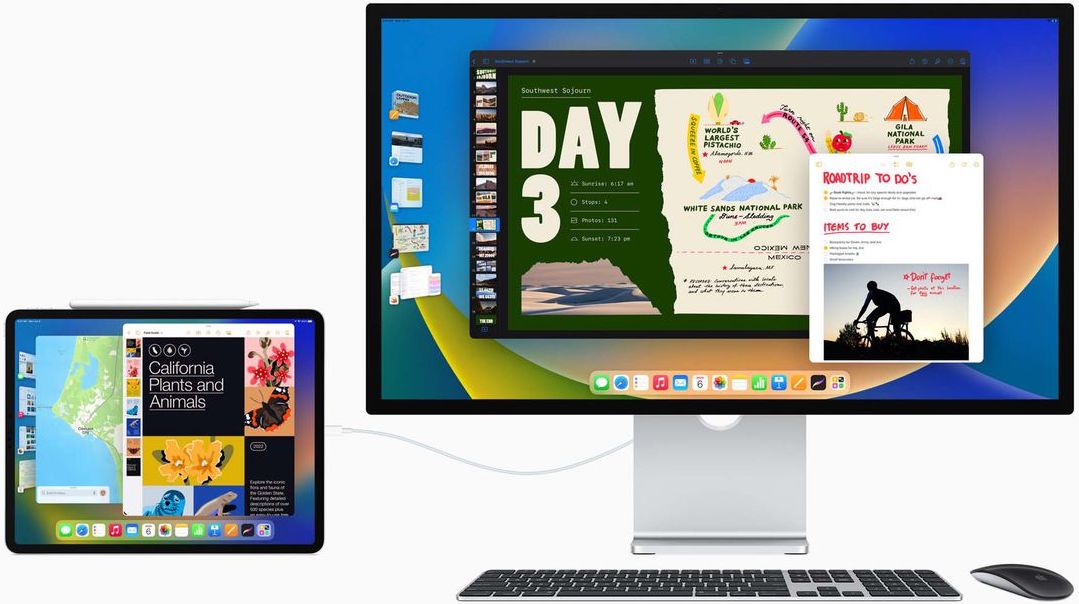
Using Stage Manager on an External Display
Stage Manager becomes a bit more full-featured and Mac-like on an external display. I used a couple of monitors—a Studio Display on loan from Apple (see “New Mac Studio and Studio Display Change Mac Buying Calculus,” 8 March 2022), connected via Thunderbolt, and my trusty 23.7-inch LG UltraFine Display (see “Apple Debuts LG’s All-New 23.7-inch UltraFine Display,” 20 May 2019), linked to the iPad with a USB-C cable. In both cases, I plugged the iPad into a powered Thunderbolt port (the Studio Display has one and the UltraFine Display has two).
While Stage Manager on an external display looks like the version on the iPad screen, there are a few differences.
Resizing is more sophisticated and Mac-like. There is no window grabber. Instead, you use your mouse or trackpad to hover your iPad pointer over an edge or corner of a window until the pointer changes to an arrow-style resizing guide, similar to what happens on the Mac.
You can then go on a window-resizing spree courtesy of all that additional space the external display provides. The four-app limit still applies, but there is much more room to maneuver. At one point, I had four windows neatly tiled on the Studio Display. Getting there was aggravating, though, partly due to beta bugs but mostly because iPadOS put up a fight; windows often don’t line up the flexible, effortless way that occurs on a Mac. Apple should address this for its iPadOS external-display support to achieve its full potential.
The fact that you are operating with two displays doubles your options and expands your possibilities. Do the math: you have four Recent Apps slots on each screen. Each slot can accommodate groups of up to four apps each, plus the active set on each screen. That works out to 40 windows vying for your attention, which could be helpful or harrowing.
You can move apps between screens. The ••• menu at the top center of each app window has a Move to Display option, which moves the app from its current display to the other one. You can also drag files between apps and screens using a mouse or trackpad—a picture from Photos on your iPad’s display to a Mail message on your external monitor, for instance.
Is Stage Manager Worth It on the iPad?
I have found Stage Manager for the iPad to be an amusing plaything, but I’m still unsure to what extent I will permanently embrace it. I tend to be minimalist in my iPad use, so I wonder whether Stage Manager is more multitasking power than I need. I never use Slide Over windows, and I’m a light Split View user at most, so I can’t imagine when I would want four sets of four-window app groups visibly available on my cramped iPad screen.
That said, I can think of scenarios where Stage Manager would be a huge improvement on certain much-used Split View maneuvers. I often keep an eye on my wife in Find My (with her permission, so I am poised for her arrival to unload groceries or gardening supplies), and I put that window next to whatever Google Doc or WordPress site I’m editing. When I’m not using Find My, my work email in Mail often takes its place. I prefer having these combos visible on the left side of my display instead of switching to them using the Dock, Home screen, or App Switcher.
Stage Manager on an external display gave me a jolt of excitement because it’s the sort of scenario I’ve daydreamed about. Other tech companies have been executing similar maneuvers for years. Perhaps the best-known example is Samsung’s Dex, with the company’s Android phones and tablets hooked up to external displays for Windows-style functionality distinct from what is on the device’s screen.
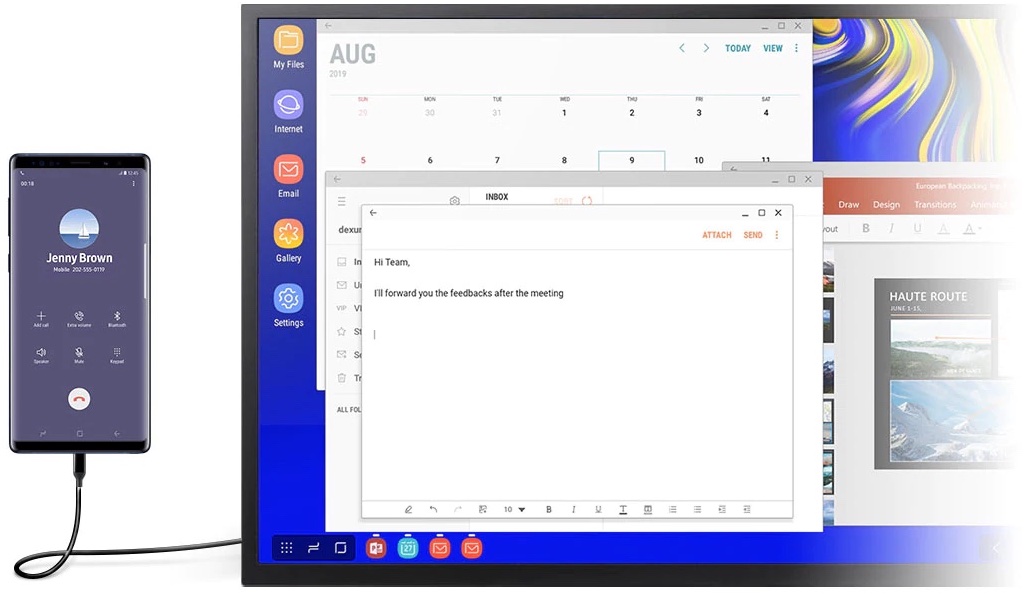
Better external display support was preordained once Apple added pointing-device support to iPadOS. Now, with users being able to run independent apps on an external screen, the potential for additional productivity is more clear. All that extra real estate makes it far more convenient for me to work on those WordPress sites or Google Docs, not to mention photo and video editing. I could see myself getting some serious work done here.
But let’s get real. Stage Manager on an iPad still isn’t the equivalent of using a Mac connected to an external display. While the iPad’s pointing-device support is just a few years old, and windowing support is barely out of the womb, Mac multitasking has seen decades of refinement. Stage Manager for iPad on an external display will do in a pinch, but I’ll always favor the Mac.
Using Stage Manager on the Mac
That’s why I’m kind of excited about the Mac version of Stage Manager. Even though the Mac already does windowing well, I’m feeling more bullish on the macOS version of Stage Manager than the iPad version because it fits in naturally with other windowing approaches on the Mac. I’ve been using it a lot.
It works much as it does on an iPad, with minor variations. You turn on Stage Manager via a button in Control Center, and you can make that a standalone button in the menu bar for even quicker access. Activating Stage Manager makes apps other than the active one whoosh into Recent Apps Switcher (see the animation below).
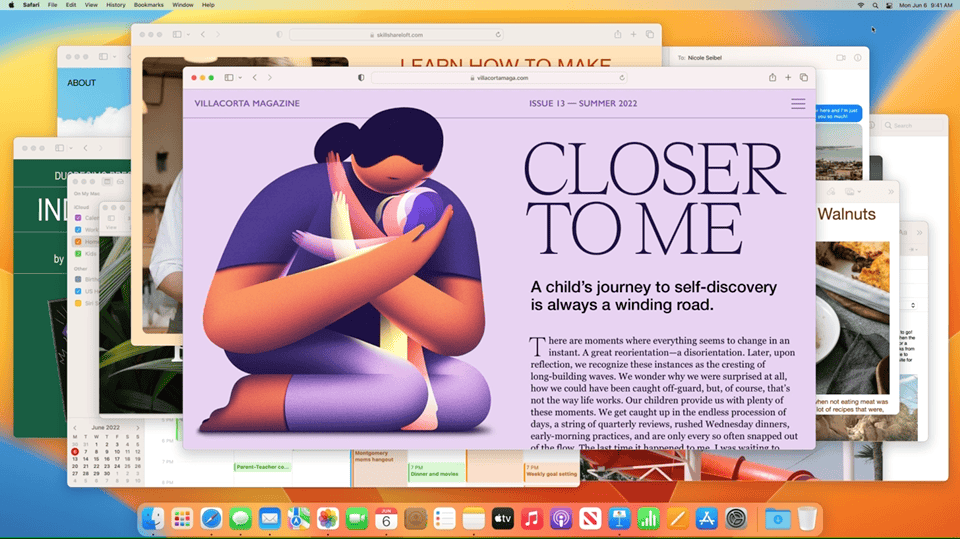
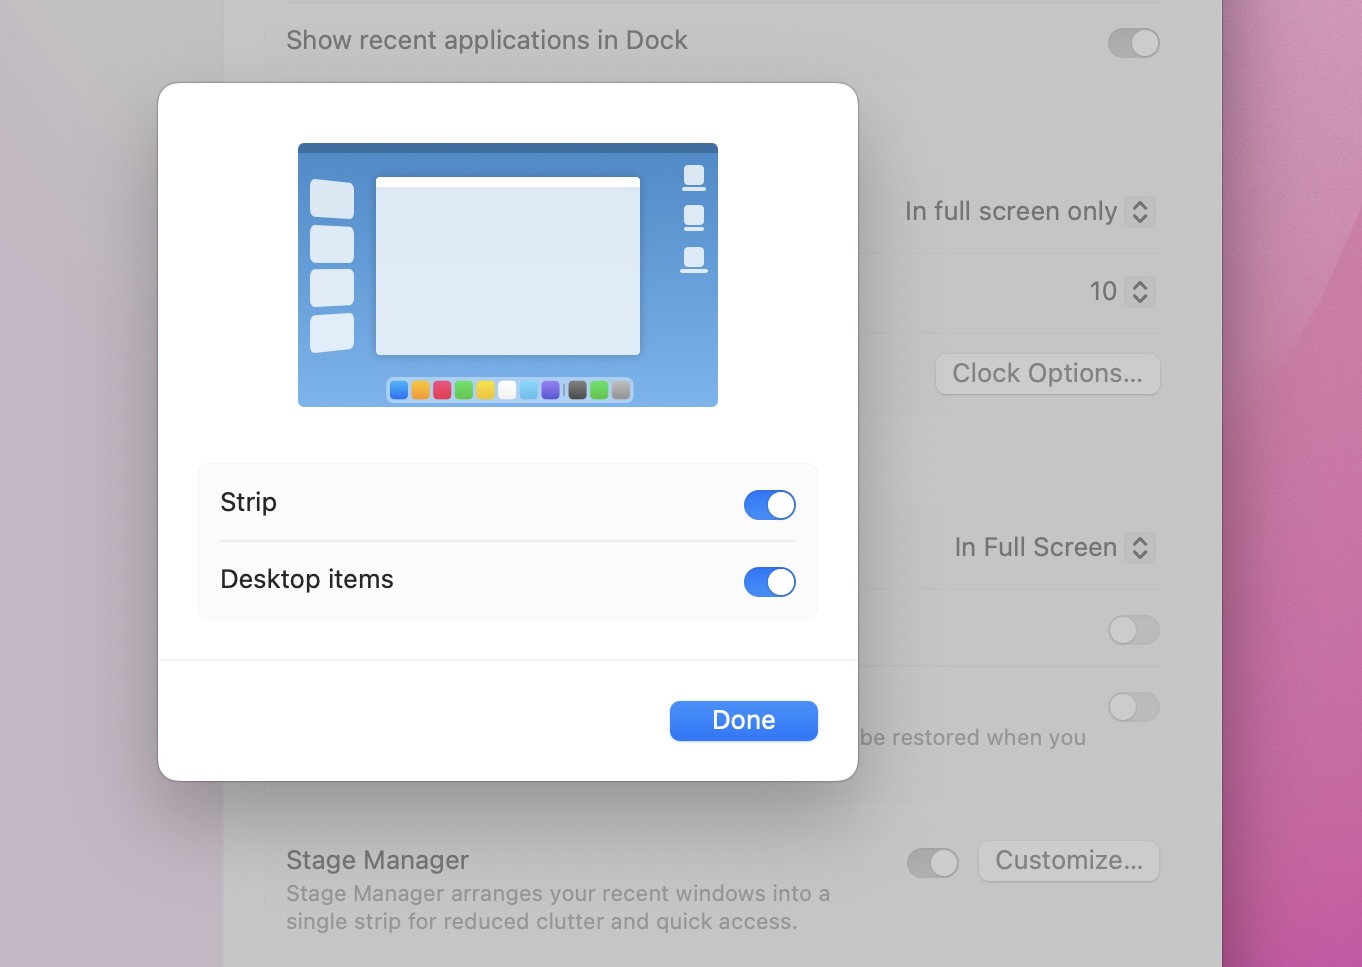
Files and folders on your Desktop might vanish from view, but clicking anywhere on the Desktop makes them visible again. Apple, perhaps anticipating complaints about this, recently added a setting in System Settings to show Desktop items at all times (my preferred scenario). Go to Desktop & Dock > Stage Manager > Customize to access a switch to keep Desktop items visible. There’s also a toggle to hide or show the Recent Apps switcher (what Apple calls the “Strip”). You can deactivate Stage Manager entirely via Desktop & Dock, too.
The Recent Apps switcher in macOS has up to six spots, compared to four on iPadOS, but Stage Manager will drop that to four or five spots on smaller or lower-resolution Mac screens. To create app groups, drag apps from Recent Apps alongside or atop others that are currently active. There doesn’t seem to be a limit on how many apps you can group.
When minimized, an app group shows icons for each app, but this ceases to be helpful once the group contains more than three or four apps.
If one of your apps has multiple open windows, you’ll see them all stacked together in Recent Apps, making it easy to flip through them with rapid-fire mouse clicks.
What if you’re accustomed to having your Dock on the left side of the screen? No problem: the Dock will appear on the far left edge, with Recent Apps just to the right.

You can hide the Recent Apps switcher in a couple of ways. There is a checkbox for that in Control Center, just below the toggle for switching Stage Manager off and on. If you enable that option, the Recent Apps switcher is still available (in a different 2D flattened style) by pushing your cursor to the left edge of the screen.
Likewise, it will disappear if you resize a window to occupy the full screen but reappear if you nudge the cursor to the left edge. Confusingly, you can’t get at Recent Apps if a window is in full-screen mode, thanks to clicking its green zoom button.
So far, Stage Manager is a win for me because it enforces tidiness. When I’m using one app or app group, others shrink into Recent Apps. My window-cluttered Desktop is largely a thing of the past.
Stage Manager does not compel users to abandon other native Mac windowing tools. You can still switch apps with Command-Tab. Mission Control works as usual. Spaces is still useful—perhaps even more so—because you can have different sets of apps and app groups arrayed in Stage Manager within each space. (But I seldom use Spaces, honestly.)
Likewise, Stage Manager doesn’t force me to give up beloved third-party windowing tools, some of which I have written about here (see “Automate Window Positioning With macOS and Apps,” 10 March 2020). With a few minor adjustments, you can use them to resize and reposition windows within Stage Manager.
Setting the Stage
With Stage Manager, Apple is pushing boundaries. A few interesting things appear to be going on here.
First, Apple is bringing iPadOS more up to speed with its hardware, which is so powerful that iPad users bemoan its wasted potential. It’s difficult to glean precisely where Apple is headed, but Stage Manager’s refined external display support suggests a time not too distant when iPad productivity will more closely approximate Mac productivity, courtesy of an increasingly sophisticated iPadOS. iPad apps will have to catch up too.
Second, Apple is making macOS more familiar for those who have come to the iPad first. Speculation has bubbled for years about Apple aiming to merge the iPad and Mac platforms. That’s not going to happen, but the simultaneous debut of Stage Manager on iPad and Mac shows again that Apple aspires to make the platforms increasingly similar and interoperable.
Finally—and I realize this is wild speculation, not least because of Stage Manager’s M1 requirement—imagine a future where Stage Manager also runs on the iPhone, at least when connected to an external display. Using my iPhone as both a phone and a desktop computer is among my most fevered Apple fantasies. When arriving somewhere with a large desktop display, keyboard, and trackpad at my disposal, I’d plug in my USB-C–equipped iPhone and get the full Stage Manager experience, similar to what occurs with Samsung Dex. In that fantasy, there may come a day when some people consider an iPhone their one and only computer—no Mac or even iPad needed. Or not—Apple prefers it when many of us purchase all three devices. But I can daydream.
Despite all my enthusiasm, perhaps the cleverest thing Apple has done with Stage Manager is to make it easy to turn off. I find myself frequently tiring of it, even on the Mac, and it is nice to banish it with a finger flick or mouse click. Please keep that option available, Apple.