#1420: Recover iOS update space, Mac App Store tips, download your Apple data, Design Award winners
After last week’s WWDC-fueled look into the future, we’re now returning to the practical present. Josh Centers kicks things off with coverage of the 2018 Apple Design Award winners. Adam Engst looks at how to recover space from an iOS update that has been downloaded but that you haven’t yet installed. Apple may be redesigning the Mac App Store in Mojave, but until then, you can use Sharon Zardetto’s advice to work more effectively in the App Store app and solve App Store problems. Finally, Kirk McElhearn joins us to explain how European users can download all their Apple data (other countries will be supported soon). Notable Mac app releases this week include Transmit 5.1.4, LaunchBar 6.9.5, MoneyWiz 3.0.2, and BusyCal 3.3.8.
Apple Announces 2018 Apple Design Award Winners
As it does every year at WWDC, Apple has chosen a variety of apps to honor with Apple Design Awards, focusing on impressively designed apps that take advantage of technologies that Apple wants to highlight. Here are the winners for 2018:
Apps
- Agenda (Mac, iPhone, and iPad): A “date-focused note-taking app for planning and documenting your projects.” We reviewed the Mac version in “Agenda Offers a New Take on Note-Taking and Task Management” (8 May 2018).
- Calzy (Mac, iPhone, iPad, and Apple Watch): A “beautiful modern calculator for your everyday use.”
- iTranslate Converse (iPhone and Apple Watch): A “revolutionary new speech translation app.”
- Triton Sponge (iPad): As an app for surgeons, Triton Sponge can evaluate a surgical sponge and calculate blood loss in a patient. Incredible.
Games and Amusements
- Alto’s Odyssey (iPhone, iPad, and Apple TV): A beautiful endless runner game that takes you on a sandboarding journey through the desert.
- Bandimal (iPhone and iPad): A “fun and intuitive music composer that lets kids discover the creative world of making music.”
- Florence (iPhone and iPad): An “interactive storybook from the award-winning lead designer of Monument Valley about the heart-racing highs and heartbreaking lows of a young woman’s very first love.” (For my review of Monument Valley, see “FunBITS: Monument Valley for iPhone and iPad,” 25 April 2014.)
- Frost (iPhone and iPad): “Draw paths to guide the flocking spirits to their home planets. Watch countless beautiful creatures emerge from light, bring balance to a world in constant motion, and unravel its mysteries.”
- Oddmar (iPhone and iPad): “Oddmar struggles with life in his village and is not worthy of a place in Valhalla. He is shunned by his fellow Vikings and must redeem himself of his squandered potential. One day he is offered an opportunity to prove himself, but at a price…”
- Playdead’s INSIDE (iPhone, iPad, and Apple TV): This spooky, mysterious game is from the maker of Limbo (see “FunBITS: Limbo Is Spooky Fun for iPhone and iPad,” 18 October 2013), so if that’s your thing, be sure to check it out.
Congratulations to all the winning developers!
TipBITS: How to Recover Space from an iOS Update
In the recent WWDC keynote, Apple highlighted how quickly many people upgraded to iOS 11 by claiming that half of the iOS user-base upgraded within 7 weeks. That sounds impressive, but as we all know, iOS is pretty pushy about updates—badging the Settings app icon and nagging you repeatedly to install the update. As part of that pushiness, if there’s sufficient free space on your device, iOS downloads its updates in the background so they’re available to install, regardless of whether you’re ready for them.

Therein lies the problem. Apple’s definition of “sufficient free space” may differ from yours, especially if you’re planning to shoot video of your kid’s soccer game and would rather use a few hundred megabytes for that instead of an update you don’t want to install yet.
Unfortunately, unlike in macOS, where you can avoid selecting the checkbox for “Download newly available updates in the background” in the App Store pane of System Preferences, iOS gives you no control over whether or not these updates are downloaded. Aside from the storage issue, that lack of control might also present a bandwidth problem for people who are charged by the bit, who need to be careful of data caps, or who have very slow Internet connections and prefer to initiate such downloads when on a faster link. We presume that such updates download only over Wi-Fi, but again, Apple provides no transparency into the process.
If you do run into this situation, where you need to recover the space being consumed by an iOS update in waiting, you can do so, at least until iOS decides to download the update again.
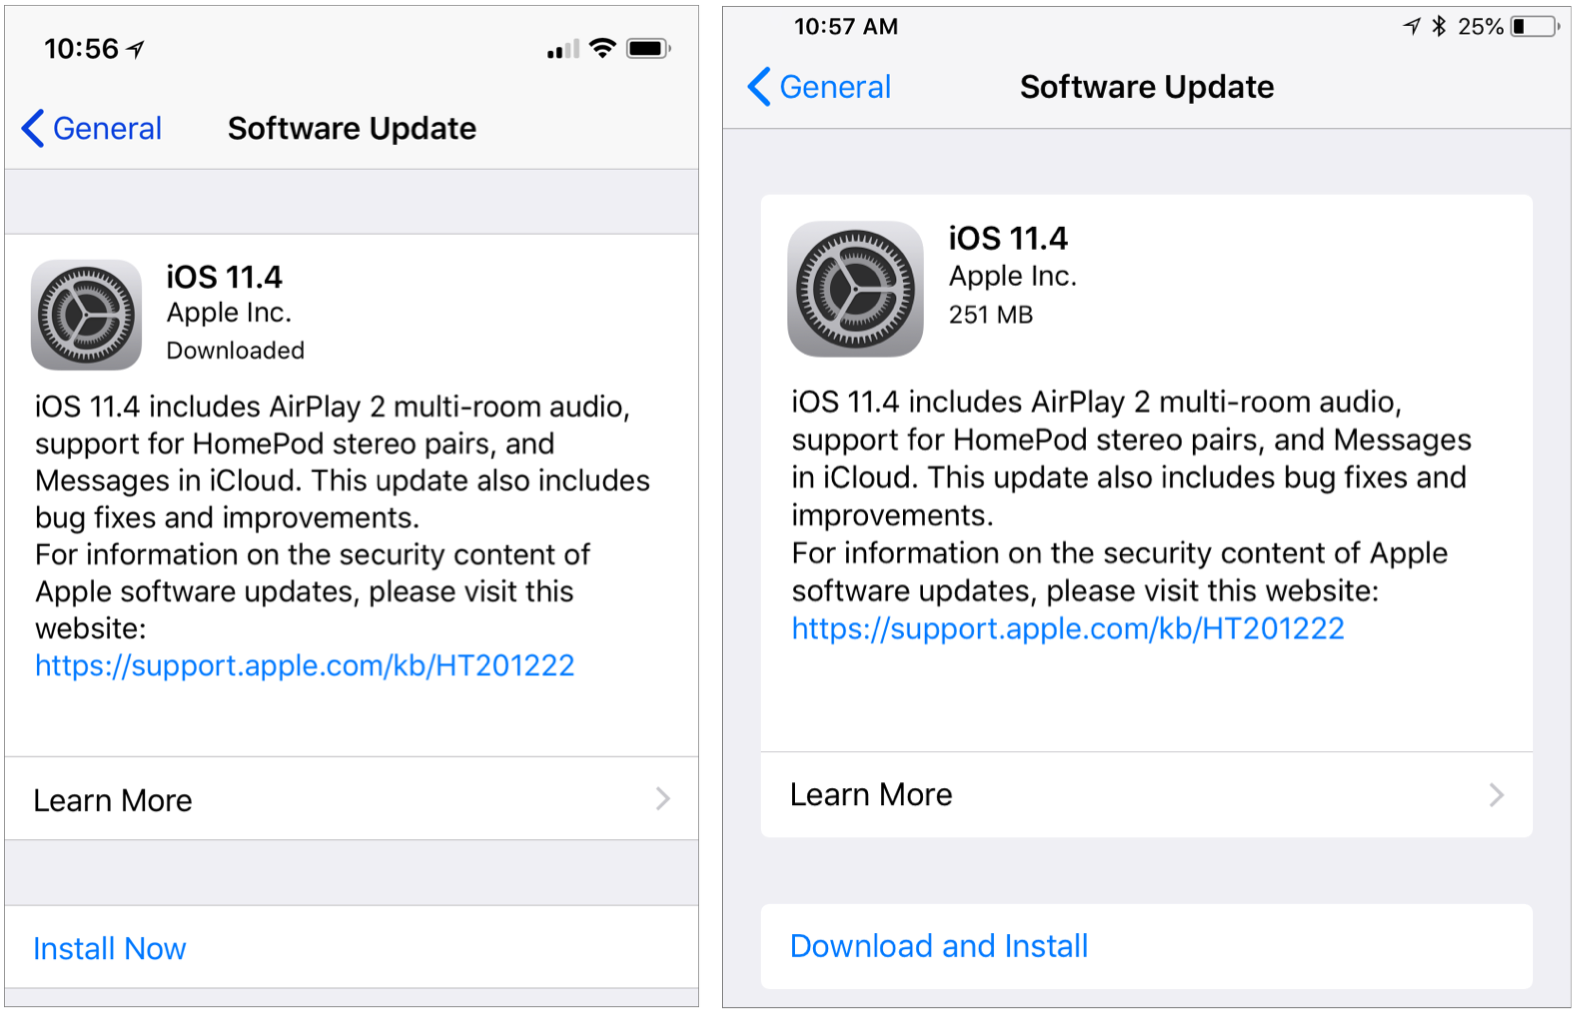
First, to see if this is the case, tap Settings > General > Software Update. If the link at the bottom is Install Now, the update has already been downloaded and can be deleted. (If it instead reads Download and Install, the update hasn’t been downloaded automatically and thus isn’t taking any space.)
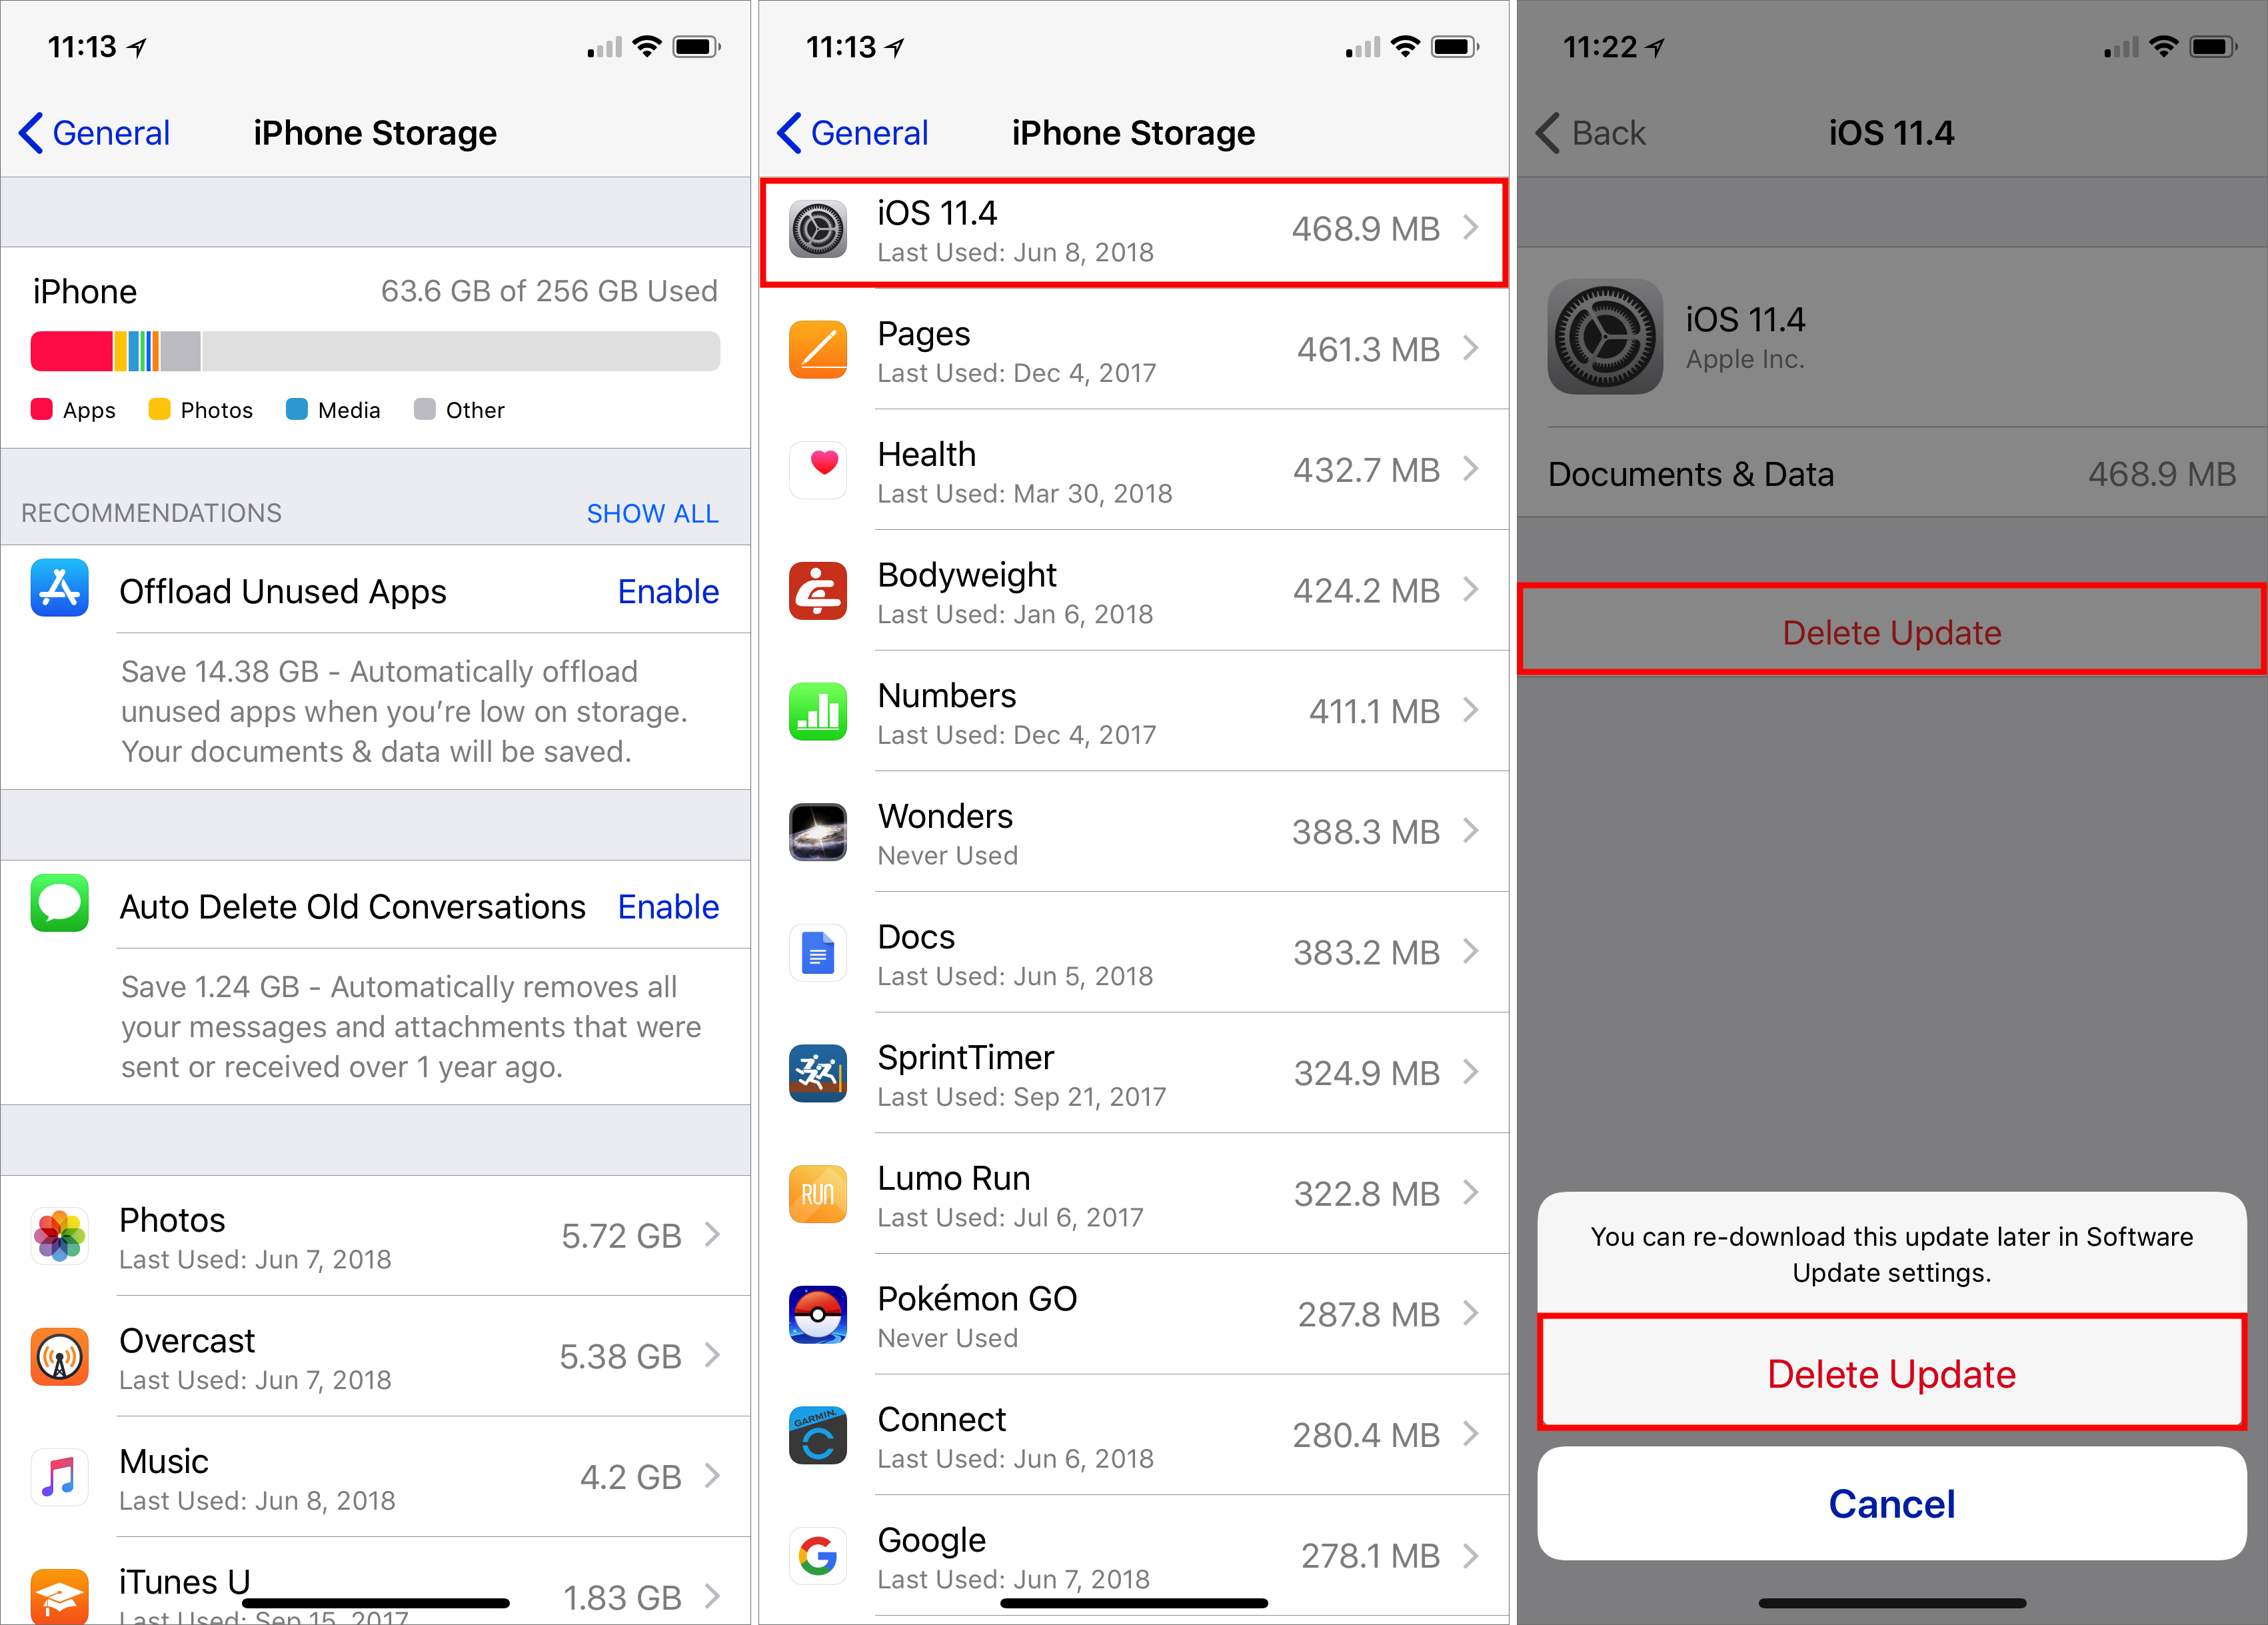
Next, go to Settings > General > iPhone/iPad Storage. This screen summarizes how your space is being used at the top, provides space-saving recommendations that are worth considering, and then lists each app in order of how much space it and its data take up. An iOS update might be relatively near the top if it’s a major update, such as from iOS 10 to iOS 11. Most updates within a major version are smaller, so you’ll need to scroll down in the list to find them. Tap the update, then tap Delete Update, and confirm that you want to delete it.
If you go back to Settings > General > Software Update, you’ll see that the link at the bottom has changed from Install Now to Download and Install. When you’re ready to install the update, tap that link to proceed.
Please don’t interpret this article as a suggestion that you should avoid installing updates. That’s a terrible idea. For stability and security reasons—not to mention getting new features—you should always install updates. But you can and should wait a few days after an update is released to make sure there aren’t any problems with it and then download at a time that works for you. The instructions above merely show you how you can manage your storage in the interim.
How to Download all Your Apple Data
You have undoubtedly noticed by now that something called GDPR has taken effect (see “Europe’s General Data Protection Regulation Makes Privacy Global,” 2 May 2018). The General Data Protection Regulation is a European Union framework for handling user data. Even if you’re not in Europe, you have been receiving email messages regarding updated privacy policies. Many companies are applying GDPR’s requirements to their entire customer base under the assumption that it’s better and easier to homogenize the way they manage user data, especially if other countries outside the EU adopt a similar approach to data management in the future. Plus it’s good publicity.
Apple is no exception to this movement. The company has changed the way it handles user data and the way it informs users about privacy. Because of this, it recently unveiled a new option that lets you download most of the data that is linked to your Apple ID. This feature is currently available to users in the European Union, as well as members of the European Single Market: Iceland, Liechtenstein, Norway, and Switzerland. Apple has said it will roll out this feature worldwide in the coming months.
To request your data, go to privacy.apple.com on a Mac or iPad (you can’t do this on an iPhone), sign in, answer the security questions that the Web site displays, and you’ll see four options:
- Get a copy of your data
- Correct your data
- Deactivate your account
- Delete your account
The second option isn’t particularly useful—it just provides links to the Apple ID Web site, where you can correct your name, address, and other data; and to Apple Online Store account settings. The last two options are somewhat self-explanatory: you can deactivate your account temporarily if you wish to take a break from Apple services (perhaps you want to delete your account but want to test the waters first to see if you’ll miss anything), or you can go nuclear and delete your account entirely.
The first option, however, is why we’re here.
Downloading Your Apple Data
To download your data, click the Get Started link at the end of the “Get a copy of your data” paragraph. It takes you to a page that explains what you can download and in which formats you’ll receive the data. Apple says this data will be provided “as spreadsheets or files in JSON, CSV, XML, or PDF format.” For many people, this choice will be confusing. Most people know what a PDF is, and many TidBITS readers probably know what a CSV file is, but how many will know what to do with an XML file or have even heard of a JSON file?
PDF is the most human-readable of these formats. CSV—comma-separated values—is basically a way of representing the columns and rows of spreadsheet data in a text file. XML and JSON are file formats that present data in a structured format, with tags, suitable for importing into other apps or uploading to Internet services.
You can download 15 types of data, as you can see in the screenshot. The page presents a series of categories: check those you want to download or click Select All.
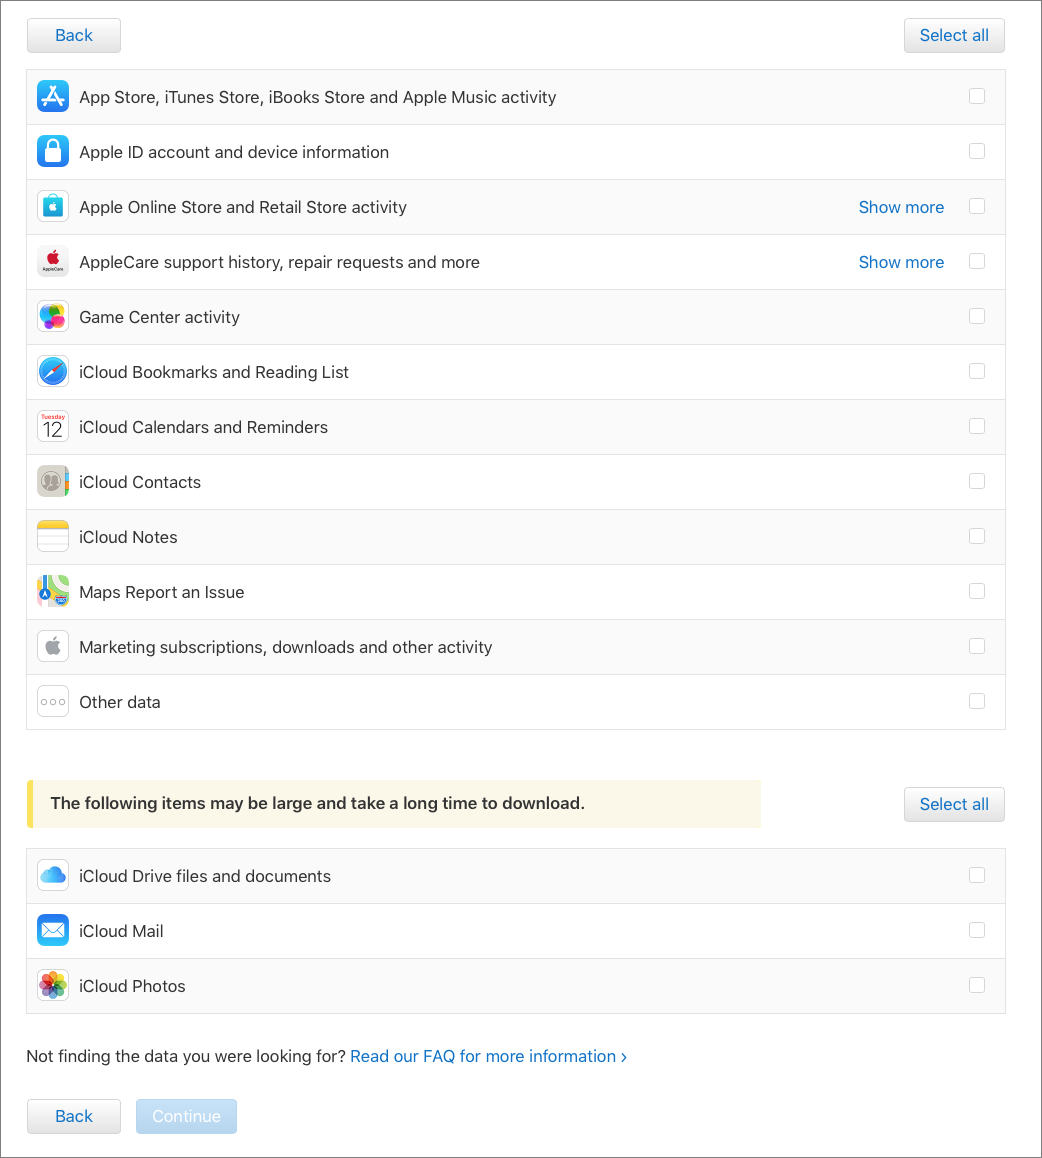
The data does not include iTunes Store, App Store, or iBooks Store purchases, which are, for the most part, available for re-downloading from each store. (If you want to transfer your purchased movies away from iTunes, Movies Anywhere might help—see “Movies Anywhere Frees Your Films From Platform Lock-In,” 14 October 2017.)
The organization of the data is a little odd and seems to be more by size than logic. The items in the top section either reflect your interactions with Apple or let you download small data stores: calendars, reminders, contacts, bookmarks, and notes. The bottom section provides access to larger data stores in iCloud: your files, email, and photos.
Although you can export all of the data out of the appropriate apps on your Mac, you may still want to download it if you’re moving away from Apple’s ecosystem and wish to import everything into another platform or service. Apple provides contacts, calendars, bookmarks, and email in (respectively) VCF, ICS, HTML, and EML formats, which are readily imported into other apps. The files, email, and photos in the bottom section are generally much larger downloads if you have a lot of files in your iCloud Drive or a lot of photos. Apple warns that they may take a long time to retrieve.
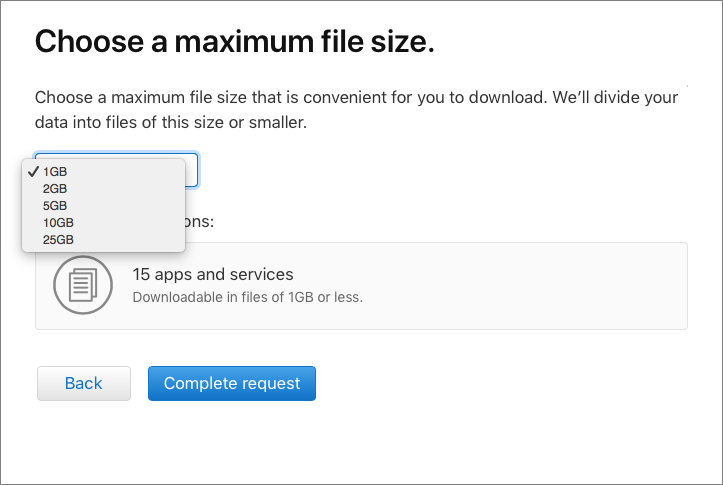
When you’ve made your selection, click Continue, and you’ll be asked to select the maximum size of the files that Apple provides for download. Assuming you’ve only selected the first group of items, the total will probably be less than 1 GB. If you have a lot of photos, on the other hand, it could be hundreds of gigabytes, so choose a file size that’s easy for you to manage and download. If you have a slow Internet connection, specify smaller files, so if the download flakes out mid-file you won’t have to re-download too much data.
Apple says that it may take up to seven days to provide this data. For me, it took six days.
Six Days Later…
I requested my data on 23 May 2018, and on May 30th, I received an email from Apple telling me that I could download it.
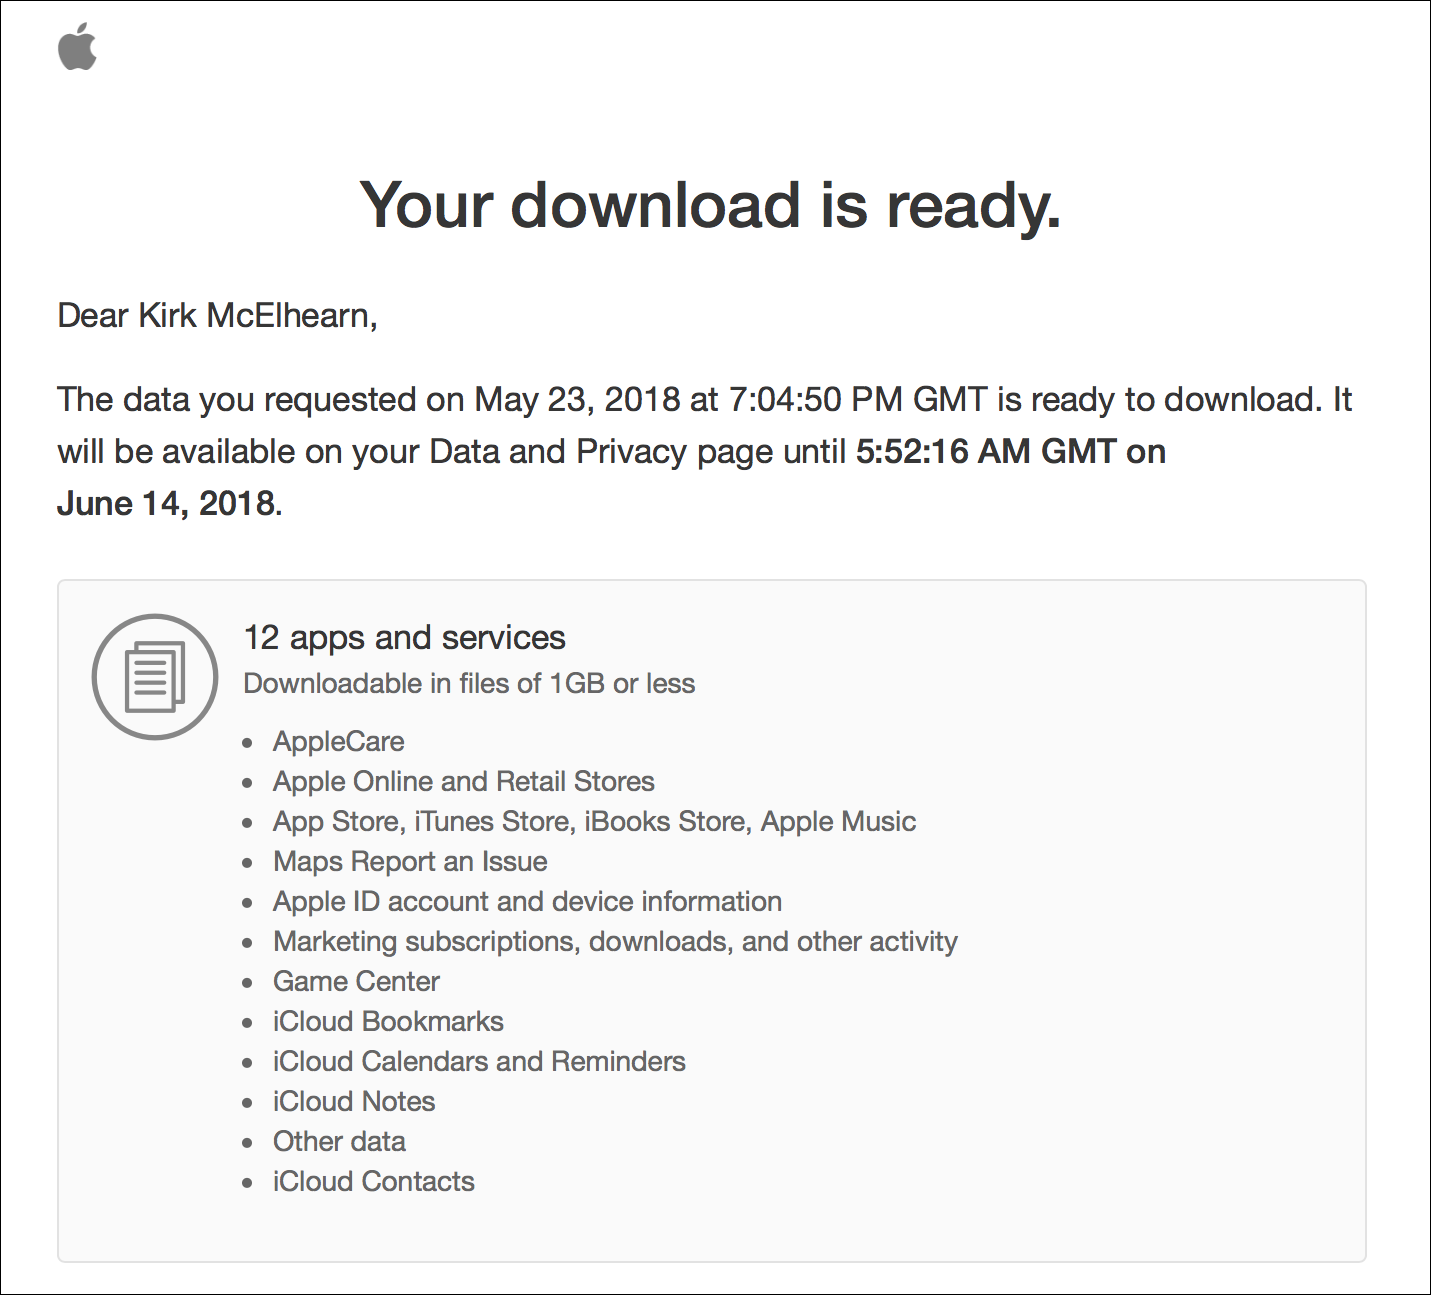
I was taken to a Web page where I could download data from these twelve categories. Each category downloads as a Zip archive—a couple of which contained two or three more Zip archives. Most of the data is in CSV format, with a few JSON files. You can view the CSV files in the Finder with Quick Look (click a file and press the Space bar), or you can open them with Excel or Numbers to view them more easily.
None of the data is very interesting. It’s a lot of spreadsheets of things you’ve bought from Apple—even updates to iOS apps, your support history (such as repairs, online chats, and screen sharing sessions), information about which devices are signed into your Apple ID, and more.
It was interesting to see a list of all the repairs I’ve had to my Apple hardware. It’s worth noting that this is an Apple ID I’ve been using for just the five years that I’ve lived in the UK—but there isn’t much detail. In one file, I see the serial numbers of different devices and dates, but nothing about what type of devices they are or what type of repairs were carried out.
The majority of the data is store-related: devices authorised to use the iTunes Store, and apps, music, videos, and ebooks that I’ve purchased. But one thing that is missing is my purchases from the Apple online store: the two Macs I bought last year, my iPhone 8+ and previous iPhones, my Apple Watches, Apple TVs, and more. There is an Online Store Activity folder in the Other Activity folder, but its contents are sparse. It merely contains Ratings and Reviews, Saved Cart, and Shipping Address History.
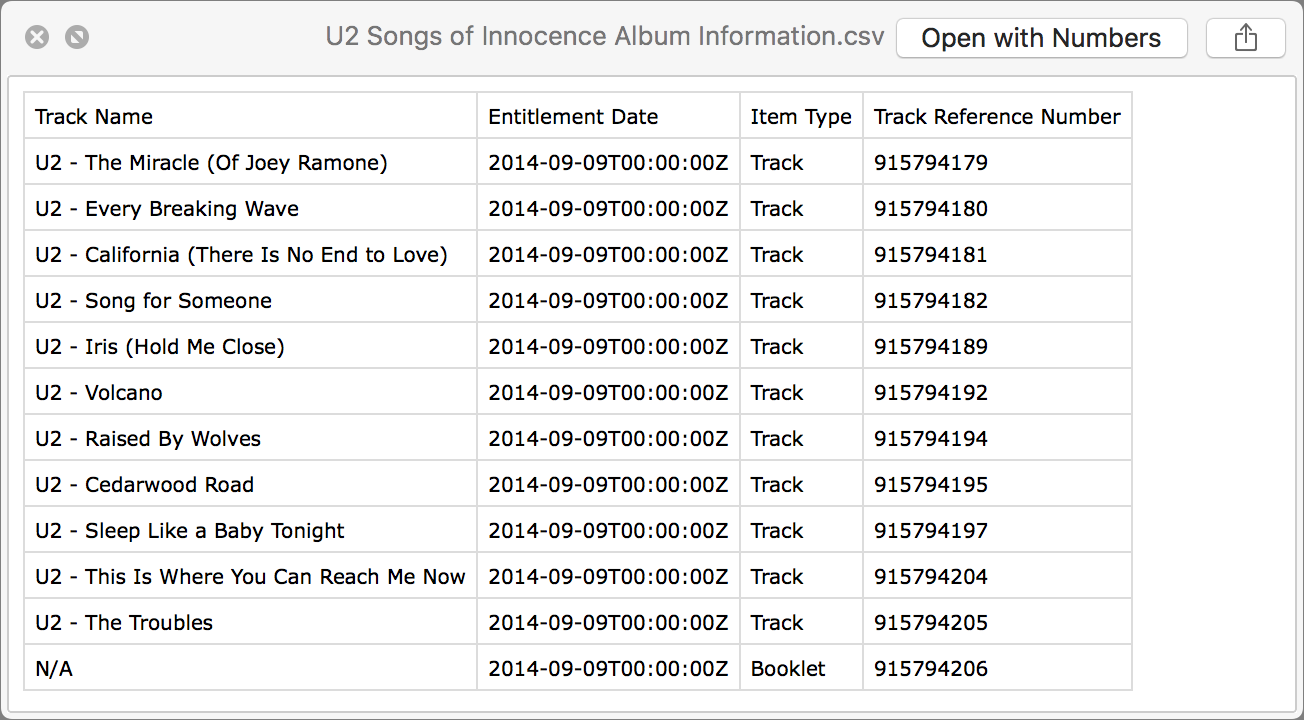
There was one file I didn’t expect to see. In case you thought you could forget about this, there is a special file about that free U2 album that Apple gave everyone in 2014 (see“How to Get (or Delete) Your Free U2 Album,” 10 September 2014). I don’t know what the file is for, other than as a reminder of that unpleasant incident.
It’s a good thing that Apple is providing a relatively simple way to access all this data, although some of the file formats may prove daunting for many users. To learn more, read Apple’s support document “Get a copy of the data associated with your Apple ID account,” which includes a FAQ that deals with some of the questions that may arise, such as those concerning file formats, why some data is masked, why dates may seem strange, and more.
Many people, like me, will download this data out of curiosity. But this service is more about giving you a way to import your data into other apps or services because part of GDPR is the right to data portability, so you can move your data without losing anything. Think of it as an aid if you decide to leave the Apple ecosystem and want to be able to retain the data you’ve accumulated over time rather than a way of checking up on what data Apple has been storing about you.
Everything You Wanted to Know about Using the Mac App Store (For Now)
There’s a new Mac App Store just around the corner, in macOS 10.14 Mojave, and thanks to changes in Apple’s policies, it’s wooing back some beloved Apple developers like Bare Bones Software and Panic (see “The Big News about macOS 10.14 Mojave Is Dark,” 4 June 2018).
For the next several months, though, you’ll still be shopping in the current Mac App Store, with the current App Store app, whose features aren’t always obvious and which has a few glitches. The utility that you bought in 2010 which hasn’t worked in years, for instance, doesn’t have to haunt your Purchased list forever. You can avoid pig-in-a-poke purchases by checking an item’s Info page, which includes reviews by users. You don’t have to supply your password for every single item you buy when you’re on a shopping spree. And if you experience an interrupted download, there are various ways to restart it.
Set App Store Password Preferences
Before you go shopping, take a trip to the App Store preferences to set your shopping password preferences. If you’re in the App Store app, choose App Store > Preferences or open System Preferences > App Store. Either way, you’ll end up in the App Store pane of System Preferences. At the bottom of the pane, set the two items under Password Settings:
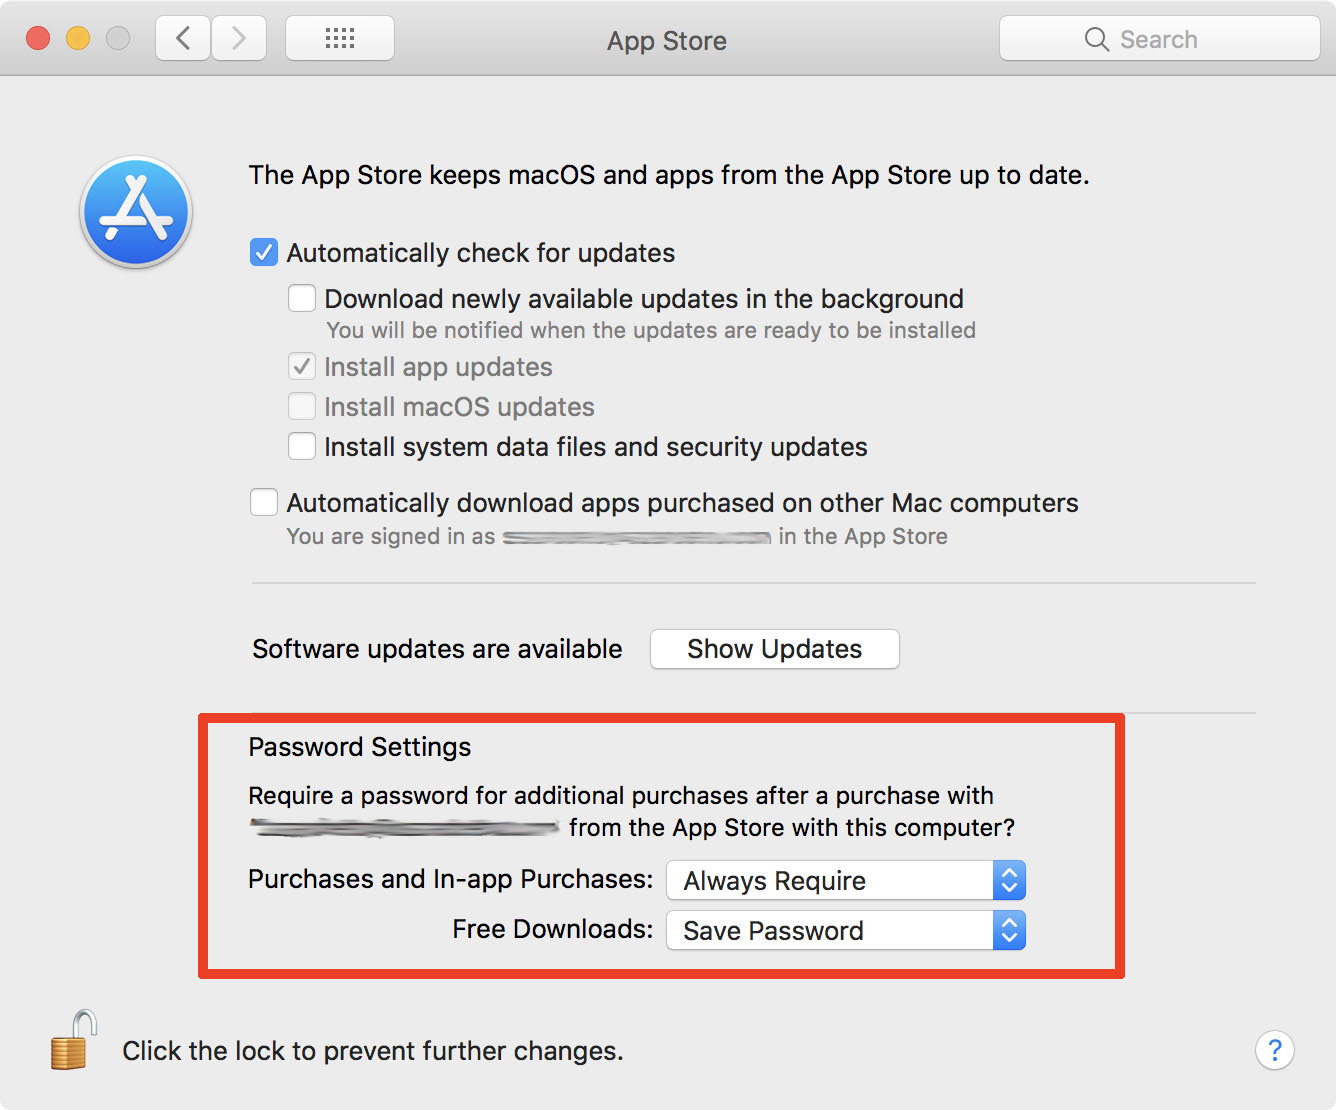
- Purchases and In-app Purchases: The Always Require option is self-explanatory. Require After 15 Minutes lets you click a few Buy or Get buttons in a row without repeated demands for your password. But pay attention to the second part of the label: Purchases and In-app Purchases. Although I’m sure no one has ever mistakenly clicked or tapped an option that makes an in-app purchase, you might be the first, and reentering your password is a small price to pay for avoiding other small prices. (And if you’re sharing your computer with a child, it’s even more important to keep this at Always Require so they can’t make additional in-app purchases after you’ve allowed the first one.)
- Free Downloads: It’s obvious what Require Password does, but the same can’t be said of the Save Password option. You can rightly assume it’s the poorly phrased opposite: once you’ve entered your password for anything else, a free app doesn’t need your password to be downloaded. (Signing in to the App Store at the beginning of a shopping session counts as entering your password.)
If you work on more than one Mac using the same Apple ID, you may also want to select Automatically Download Apps Purchased on Other Mac Computers in this preference pane. (Note that this says “automatically”; you can always manually download specific apps you’ve purchased on one Mac to another one linked to your Apple ID.)
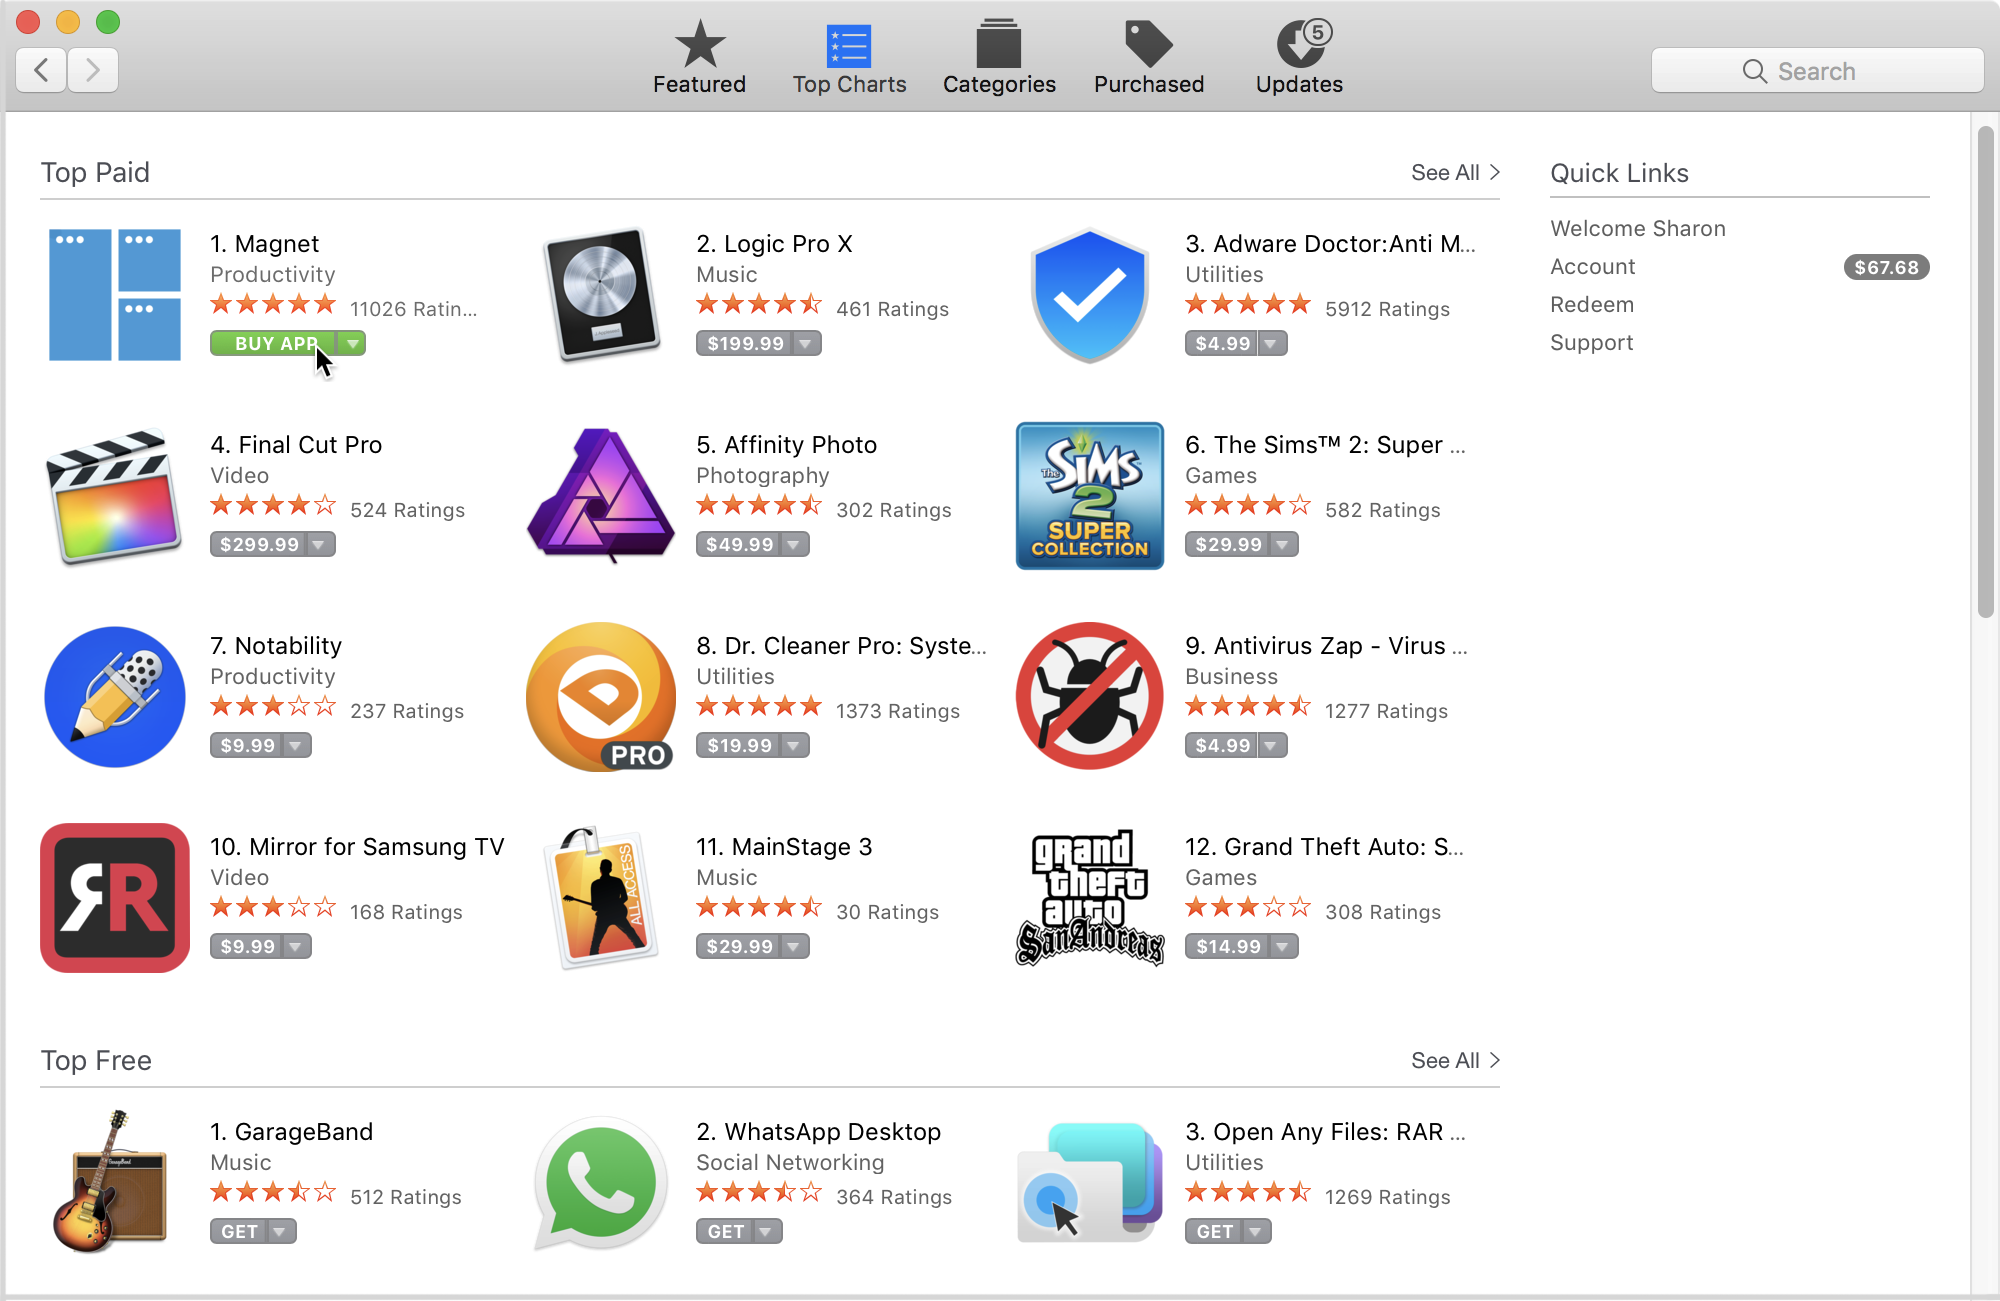
Buy/Install Basics
Now it’s time to go shopping: launch the App Store app (conveniently available by choosing Apple > App Store). If necessary, sign in with Store > Sign In. Use the Search field if you know what you’re looking for; click the Featured, Top Charts, or Categories button to browse. When you find what you want, click the item’s price, which changes to Buy App; click elsewhere in the window to revert to the price if you change your mind. Freebies have a Get button that changes to Install App when clicked.
If you want to know more about an app before you buy, click its name to go to its Info page, which not only has further information but also displays reviews and ratings from users. You can use the Buy or Get button from there or move back to the previous screen with a click of the Back (<) button or by choosing Store > Back.

The installation process of a downloaded app is nearly invisible. An installer file downloads, runs, and courteously erases itself. The app takes up residence in your Applications folder, and its icon appears in your Dock and Launcher screen.
Purge the Purchased List
Your App Store Purchased list (click the Purchased button in the toolbar) is a permanent record of your interactions with the store. My Purchased list, like my clothes closet, still includes things I bought in 2011. It also still lists OS X Lion, Mavericks, and Yosemite, as well as various utilities I tried out but which were either not what I’d hoped or stopped functioning after a system update.
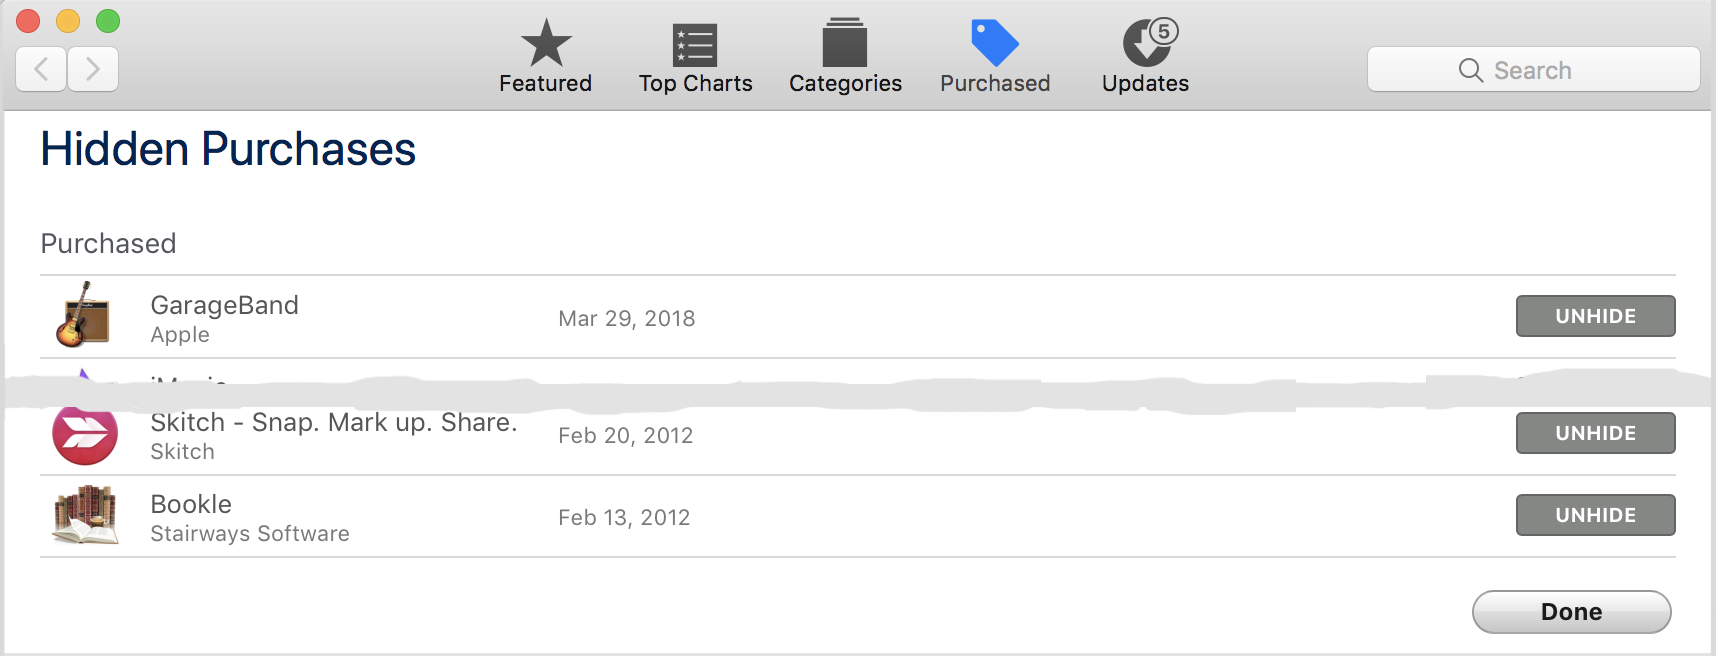
Because your Purchased list is permanent, you can’t delete any oldsters. But you can hide them: Control-click anywhere in the segment that describes the item, choose Hide Purchase in the pop-up menu, and confirm the decision in the dialog. These hidden items are still part of your purchase history—they’re just no longer displayed in this list.
![]()
Getting your hidden purchases back in the list is also a cinch, although it takes more steps. Choose Store > View My Account, and then, in the Hidden Items section, click Manage. Click the Unhide button for any item you want re-listed and click Done when you’re, you know, done.
Deal with Mac App Store Problems
Here’s how to deal with the most common issues.
You can’t connect to the Mac App Store
This Apple support article describes fixes for several common connection problems, starting with checking your Internet connection (of course, if that’s the problem, you won’t be able to read the article). It explains such things as how to check Apple’s Web site status, update your account, and check inside normally hidden system-level folders. (It also advises that you should make sure that your “date and time are set correctly for your time zone,” so you might want to start by trying that quick potential fix.)
Clicking Buy doesn’t (or doesn’t seem to) do anything, OR the app seemed to download, but it’s not in the Dock or in your Applications folder
Look for it in the Purchased tab in the App Store window; if it’s not in the list, choose Store > Reload Page.
If it appears in the list with a Download or Install button, click the button; you won’t be double-charged. If it has an Open button, check your Dock and/or Applications folder (or do a Finder search)—you may have been fooled by a small file with a very short download time.
If it’s not anywhere in the Purchased list, go back to it in the Store and click the Buy button again. (If there’s a Buy button, you weren’t charged for it.)
A download was interrupted
Most interrupted downloads pick up where they left off as soon as your Mac re-establishes its Internet connection. You might get a dialog asking if you want to resume the download, and sometimes you’ll have to supply your Apple ID again to prove that you’re still you.
No auto-resume or dialog? In the App Store window’s toolbar, click Purchased, find the app in the list, and click its Resume button. If you were on a buying spree and clicked to download multiple items, you can check whether any are still in transit or waiting in line by choosing Store > Check for Unfinished Downloads.
An app downloaded but didn’t install
If a download seems to go smoothly but the app doesn’t appear in your Dock (or Launchpad screen), go back to the Purchased list and click the app’s Install button if it has one.
If the button is Open, the App Store thinks it’s installed, so the problem might be that the installer downloaded but for some reason didn’t automatically run. Look in ~/Library/Application Support/App Store/ for an installer file, and launch it with a double-click.
You get “Unknown Error Occurred” when you click Buy
When I wrote about this a few years ago, Apple’s advice was to quit the App Store app, wait at least 10 seconds, and then relaunch it. Why 10 seconds—practically an eon in computer-cycle time? I don’t know, nor do I know why it’s no longer recommended. But I include it in case you’re using an older system and version of the App Store app and it would work for you; it won’t hurt, no matter your situation. Besides, quitting and relaunching a misbehaving app, wait or no wait, is the universal first-line palliative.
There’s a warning in red type by an item in the Purchased list
I’ve only ever seen this once, and it was several years ago. I have no idea whether it’s still an issue because I can’t fake a problem that might trigger it. If you get a warning right within the Purchased list about a download error (or something else—again, my experience here is limited) for a specific item, and you redownload the item and everything is fine but the warning stays, here’s how to get rid of it: Choose Store > View My Account, scroll to the bottom of the screen and click the Reset button for Reset All Warnings for Buying and Downloading.
Quick Tips
Here are some tips for working in the App Store app:
- “Reinstall” a macOS app: You see a reference to a Safari update—or Photos, or Mail—and realize that you’re a version behind, but can’t find an update for it? That’s because they, like other macOS apps (they’re listed here) are automatically updated when you update the operating system.
- Find a macOS installer: You won’t see macOS installers for macOS 10.12 Sierra or later in your Purchased list—unless it’s one that you haven’t yet downloaded—but they are available. If you need one, use the search field to find macOS installers, typing macos high sierra, for instance.
- Go to previous “screens” in the App Store: As you browse around for the latest offerings, you can easily move through screens you’ve already viewed. Click the Back and Forward buttons at the left of the toolbar, or use Command-[ and Command-] to trigger the commands in the Store menu.
- The App Store is checking your Applications folder: Check your Purchased list, and you’ll likely find a variety of buttons for the listed items, based on each app’s status: Download, Install, Open, or Update. I always thought the App Store app was merely keeping track of what I had done thus far with each item. But, no! Drag an installed app out of your Applications folder, and its button in the Purchased list reverts to Install. You may need to choose Store > Reload page to see this effect, but it’s automatically updated when the App Store app is relaunched. Put the app back in the Applications folder and its button in the Purchased list goes back to Open (or to Update, if that’s the status). This is equal parts convenient and creepy. Presumably, this works only if the item is still available in the Mac App Store, but I haven’t been able to test for that.
- Store credit: Your store credit is displayed under Quick Links next to the Account label when you’re in Featured, Top Charts, or Categories view. You can also check it by choosing Store > View My Account, where it’s at the bottom of the screen. Note that it’s the “Apple ID Balance,” not the “App Store Balance”: this is the same credit that shows in the iTunes Store and the iBooks Store.
- Outdated-app icons: On a related note, if an app (from the App Store or elsewhere) can’t run under the macOS version you’ve installed, its icon changes to include the slashed-circle international symbol, meaning “This app won’t run under your current system.”
![]()
Do you have any tips to share for the Mac App Store? Let us know in the comments. And for bonus points, how many of the above icons can you identify?