#1490: iOS 13.2.2, Mojave Security Update warning, iOS 13 app updates tip, hidden macOS control panels, iPhone 11 Night Mode
If you thought we might get through a week without Apple frantically fixing bugs in its operating systems, well, think again. The company released iOS 13.2.2 and iPadOS 13.2.2 to fix overly aggressive purging of background apps. Speaking of updates, whatever you do, don’t interrupt Mojave’s Security Update 2019-001 or bad things could happen to your drive. iOS 13 made it harder to find App Store updates, but we have a tip that shows you how to access them quickly. We also share a discovery from Mac automation guru Sal Soghoian about how you can use a hidden macOS feature and a Luna Display to turn an iPad into a custom control panel for your Mac. Finally, Glenn Fleishman joins us to take you on a deep dive into the iPhone 11’s Night mode. Notable Mac app releases this week include BusyCal 3.7.3, Coda 2.7.5, PDFpen and PDFpenPro 11.2, GraphicConverter 11.1.1, Lightroom Classic CC 9.0, Things 3.10.1, Merlin Project 6.0, 1Password 7.4, and HandBrake 1.3.
iOS 13.2.2 Stops Killing Background Apps
To address complaints about apps quitting unexpectedly in the background after the iOS 13.2 and iPadOS 13.2 updates, Apple has released iOS 13.2.2 and iPadOS 13.2.2. (Confusingly, iOS 13.2.1 was an update exclusively for the HomePod—see “iOS for HomePod 13.2.1 Resolves Bricking,” 4 November 2019.) You can install the updates, which weigh in at 588.2 MB on an iPhone X and 534.3 MB on a 10.5-inch iPad Pro, in Settings > General > Software Update, through the Finder in macOS 10.15 Catalina, or through iTunes in earlier versions of macOS.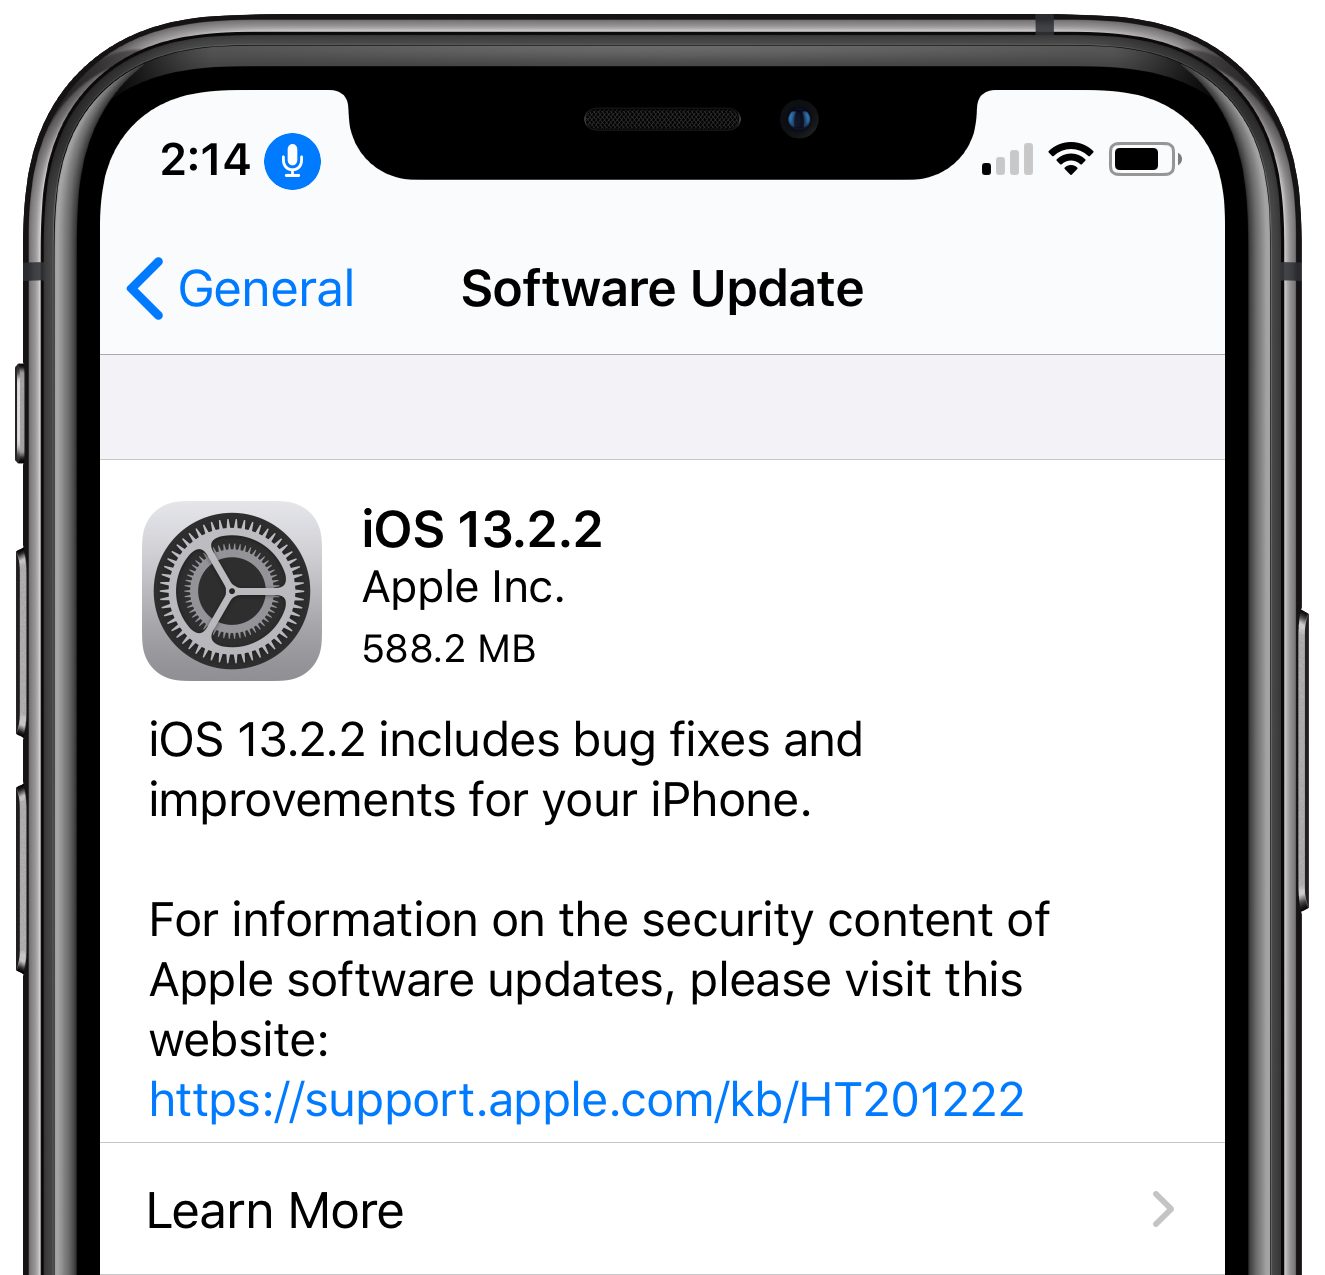
Although the problem with quitting background apps is the primary focus of these updates, they also address some obscure bugs that:
- Caused replies to S/MIME encrypted email messages between Exchange accounts to be unreadable
- Presented an authentication prompt when using Kerberos for single sign-on in Safari
- Interrupted charging on Lightning-powered Yubikey accessories
On the iPhone side, however, iOS 13.2.2 provides important fixes for bugs with cellular service, including:
- An issue where iPhones could temporarily lose cellular service after a call
- A problem that could make cellular data temporarily unavailable
Neither update has any public security fixes.
At the risk of sounding like a broken record, we recommend that if you haven’t yet upgraded to iOS 13, there’s little harm in holding off a little longer. But if you have jumped on the iOS 13 bandwagon, keep installing these updates and hold on tight, since it’s a bumpy ride.
Don’t Interrupt Security Update 2019-001 (Mojave)’s Installation
Over on the MacAdmins Slack, in the #mojave channel, there was a lengthy discussion of problems that some admins saw after users installed Security Update 2019-001 (Mojave). The topic is also discussed in a thread on the Jamf Nation site—thanks to reader Bruce Carter for the initial pointer.

The details vary, but all revolve around problems at boot, with complete lockups, accounts not available, current passwords not working, the login window reappearing after the user enters the password, or a crash screen after login. So far, it seems that only Macs with the T1 or T2 security chip are affected—that includes the MacBook Pro with Touch Bar (2016 and later), iMac Pro, MacBook Air (2018), and Mac mini (2018).
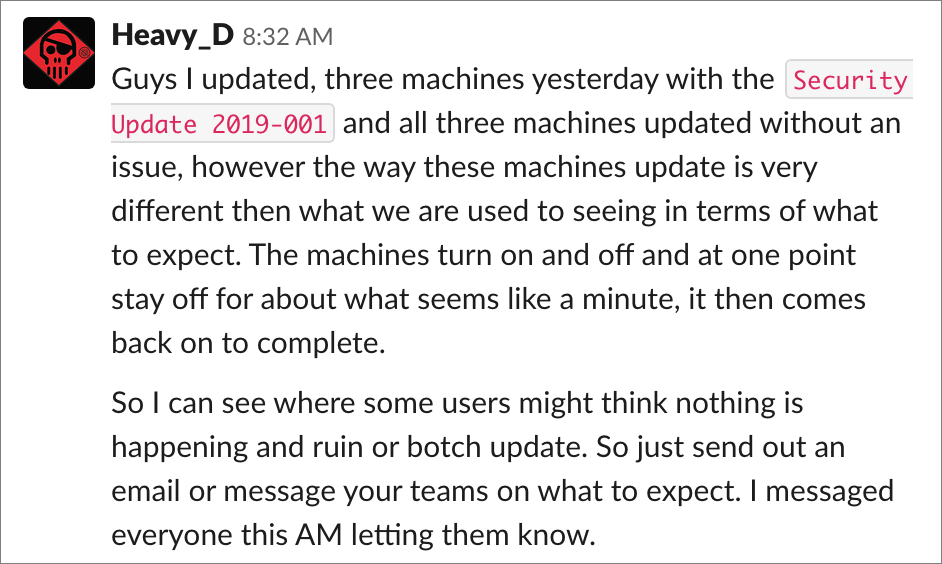
As far as I can tell, no one has actually seen the problem happen in person; users are always reporting it after the fact. (And in the admin world, user reports are taken with a very large grain of salt.) But in at least some cases, the users are admitting that they interrupted the update because it seemed to be taking too long. That’s key, because as user James Dean suggested on the MacAdmins Slack, for at least some users, this update appears to install itself in an unusual way, seemingly turning the Mac off and back on, and at one point keeping it off for what he says feels like a minute. (On Tonya’s T1-equipped MacBook Pro (2016), the installation took about 10 minutes, and I didn’t notice any particularly unusual behavior, though I wasn’t watching all that closely.)
While the Mac appears to be off, I suspect that the security update is upgrading BridgeOS, which is a modified version of watchOS embedded on the T1 or T2 chip that runs things like the Touch Bar and the FaceTime HD camera. Mr. Macintosh reports that Security Update 2019-001 for Mojave also updates BridgeOS to version 17.16.11081.0.0. Given that BridgeOS runs on the T1 or T2 chip that’s responsible for boot security (see “What Does the T2 Chip Mean for Mac Usage?,” 5 April 2019), it’s not a stretch to theorize that interrupting a BridgeOS update would cause havoc with subsequent boot attempts.
Solutions to the problem range from using previous passwords to reinstalling macOS via Internet recovery, sometimes after reinitializing the boot drive and then restoring data and settings from a backup. So far, it seems that admins and consultants have been able to bring every affected Mac back to life, though sometimes with data loss, depending on the state of backups.
In the end, my advice is simply to go ahead with installing Security Update 2019-001 (Mojave), with two important caveats. First, make sure you have good backups before starting, in case the worst happens. That’s always a good plan anyway. Second, do not interrupt the installation process! It may take longer than you expect, but let it run as long as it needs. As a corollary to this second piece of advice, only start the installation on a MacBook Pro or MacBook Air when it’s plugged in; the last thing you want is for it to lose power in the middle of the installation.
TipBITS: Quickly Access App Updates in iOS 13
For those of us who like to keep track of iOS app updates, one of the more annoying changes to iOS 13 and iPadOS 13 is how Apple eliminated the Updates tab in the App Store app in favor of a special tab for Apple Arcade. To see what app updates are available or have been installed, you now have to tap your face in the upper-right corner and then scroll down, which isn’t something you’d guess. (It took us a little searching to find it.)
Thankfully, Apple has taken mercy on us and provided a faster way: on the Home screen, tap and hold the App Store icon and choose Updates from the contextual menu (thanks to Giovanni Mattei for the tip). You may still have to scroll down to see the updates. This trick used to work only on iPhones with 3D Touch, but in giving up on the 3D Touch technology, Apple extended its long-press replacement to all devices, including iPads.
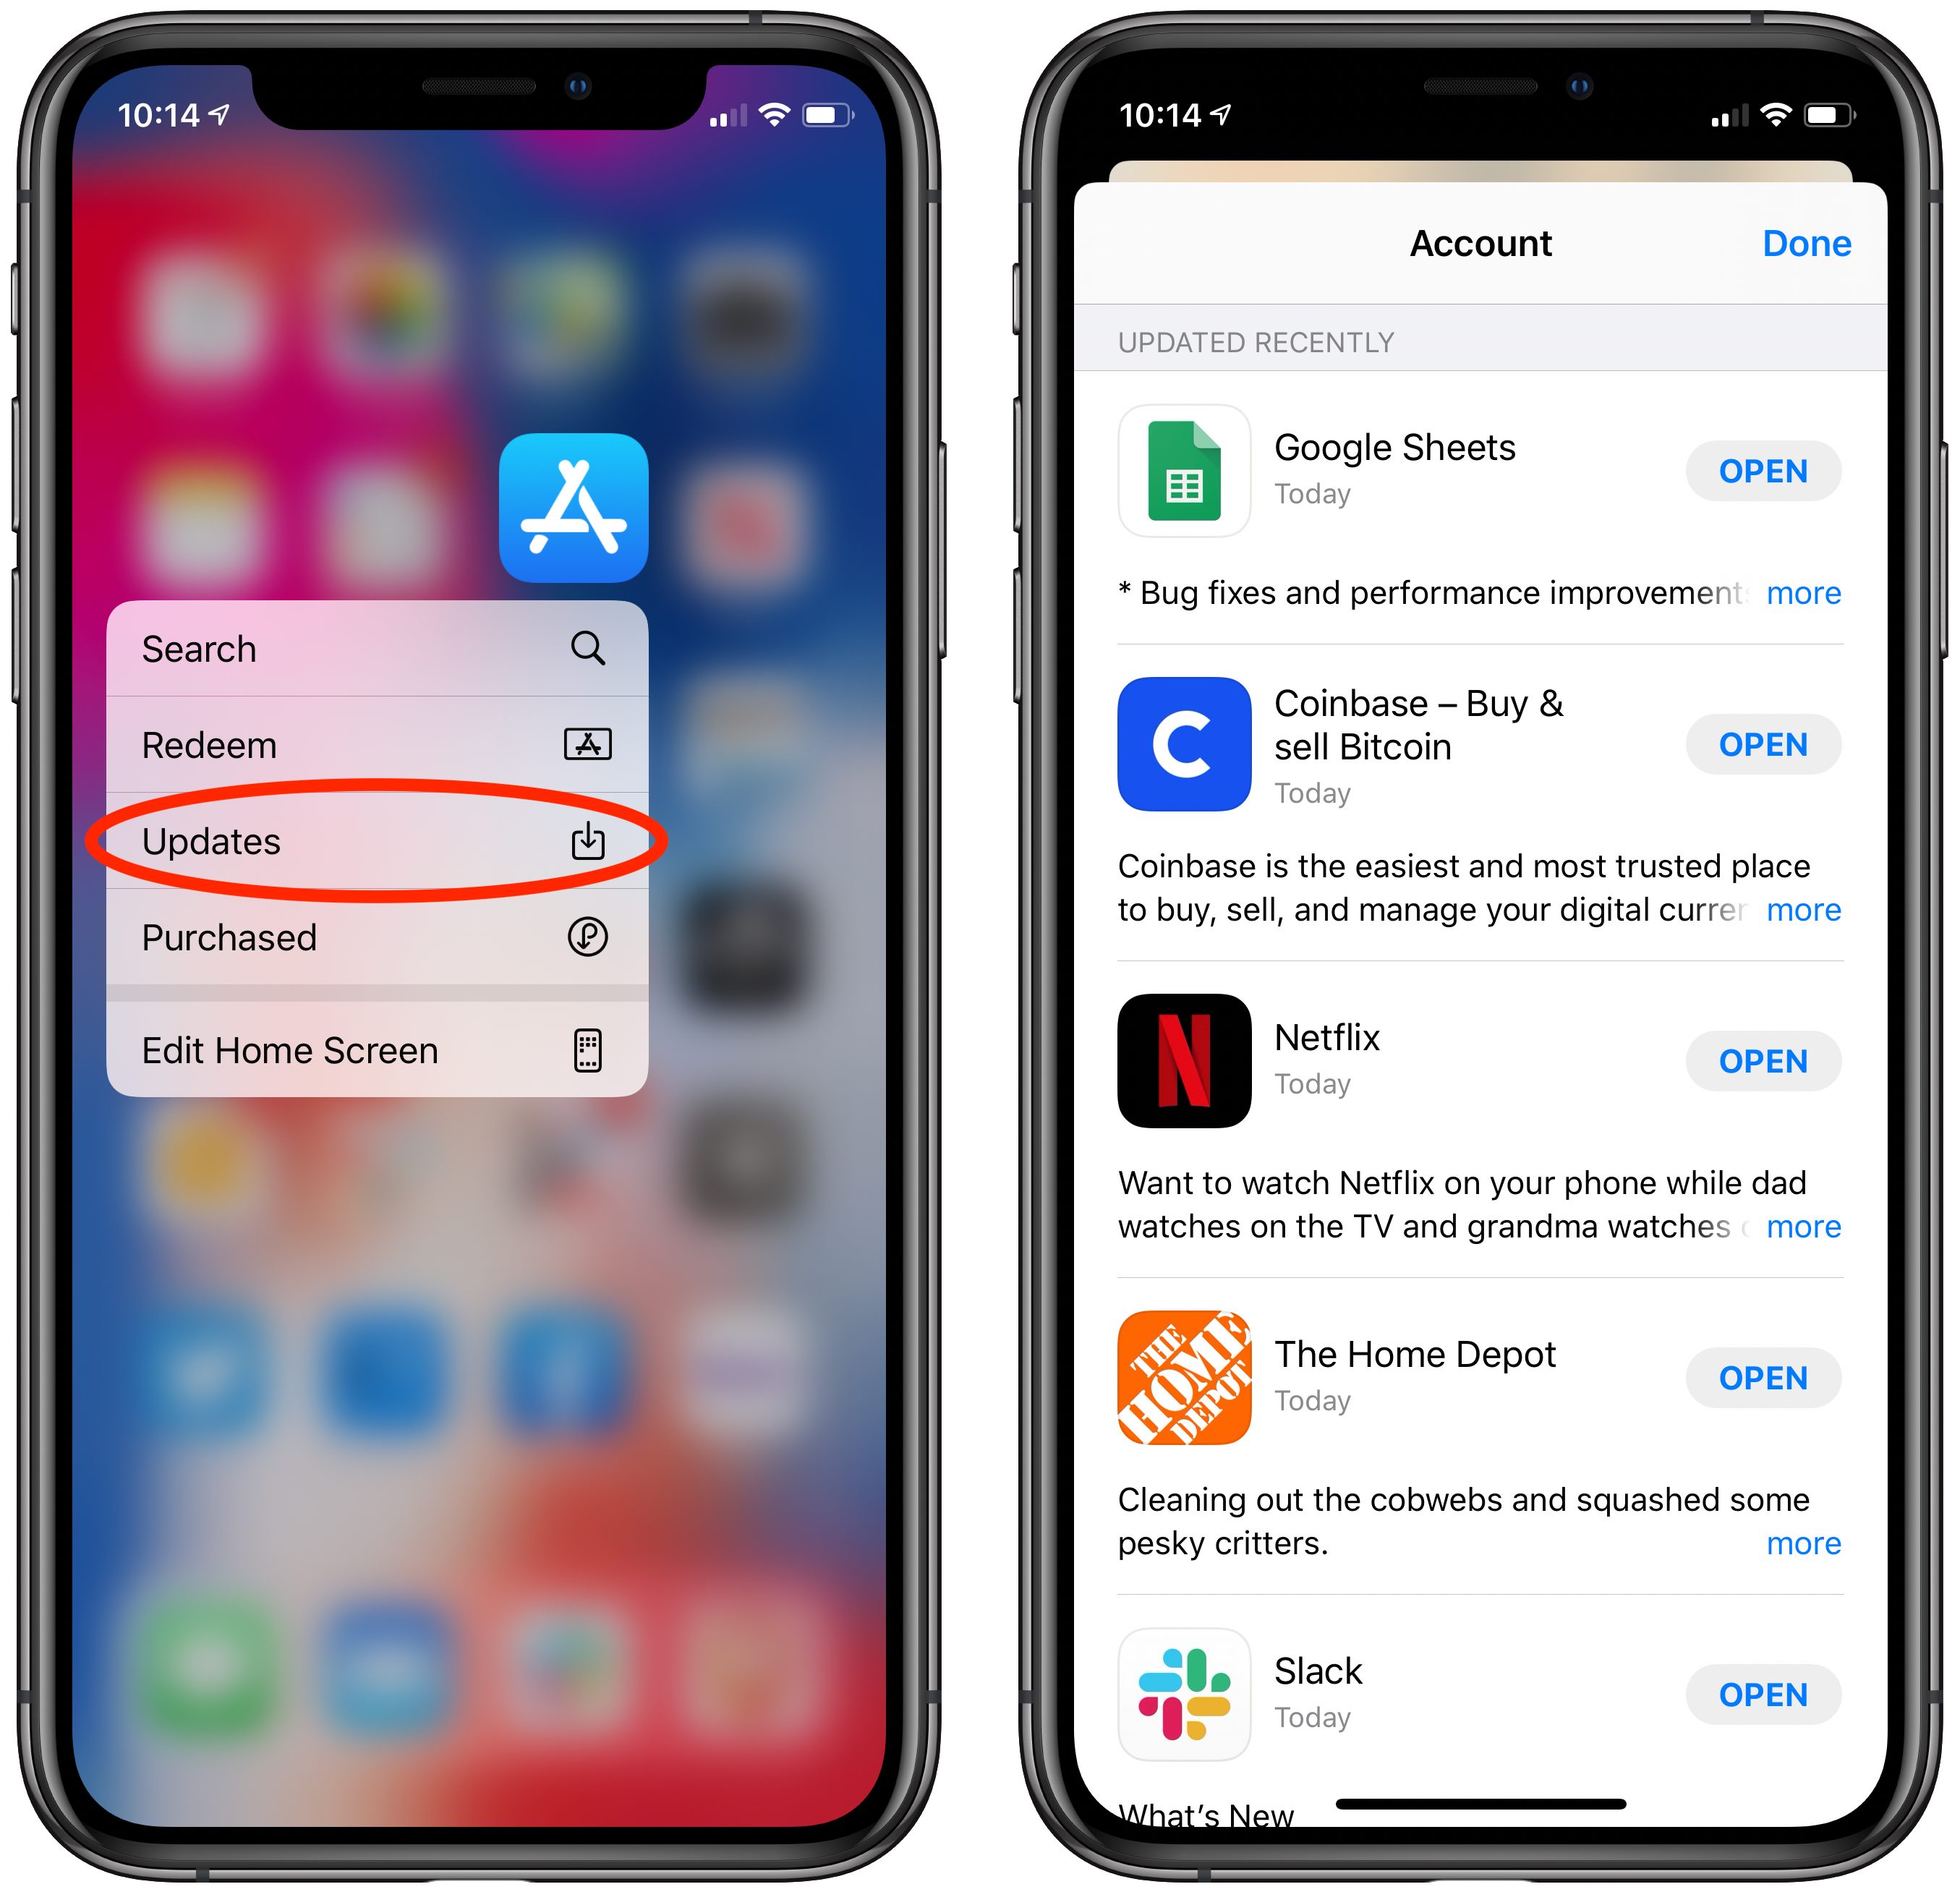
Here’s a bonus tip I discovered: while viewing your app updates, you can swipe left on an app listing to delete that app. So if you see an update come through for an app you never use anymore, you don’t have to go hunting for it on your Home screens.

Sal Soghoian Reveals macOS’s Hidden Custom Control Panels
In “TipBITS: How to Mirror Selected Screens in a Multiple Monitor Setup” (22 October 2019), I teased readers with a talk that automation guru Sal Soghoian gave at MacTech Conference a few weeks ago. Sal has now finished the videos that explain what he did in detail—which you’ll want to watch in their entirety—so I can now share what he said at MacTech.
In essence, Sal discovered and described how to use an accessibility feature hidden deep within macOS that lets you turn an iPad into a completely customizable control panel for a Mac. Tap a button on your iPad, and things happen on your Mac. Sal demoed this in macOS 10.15 Catalina, but it should also work in at least 10.14 Mojave, and possibly earlier versions of macOS as well.

To make the connection between the Mac and the iPad, you need a Luna Display dongle (see “Luna Display Turns an iPad into a Responsive Mac Screen,” 7 December 2018). Apple’s Sidecar technology won’t work because it doesn’t allow touch input on the iPad when it’s acting as a Mac screen (“Catalina’s Sidecar Turns an iPad into a Second Mac Monitor,” 21 October 2019). Luna Display works with any iPad running iOS 9.1 or later, which makes this a perfect use for an old iPad 2 or later. Of course, being able to tap the control panel buttons on the iPad connected by Luna Display is just a bonus—you can also click the buttons with a mouse on a standard Mac screen.
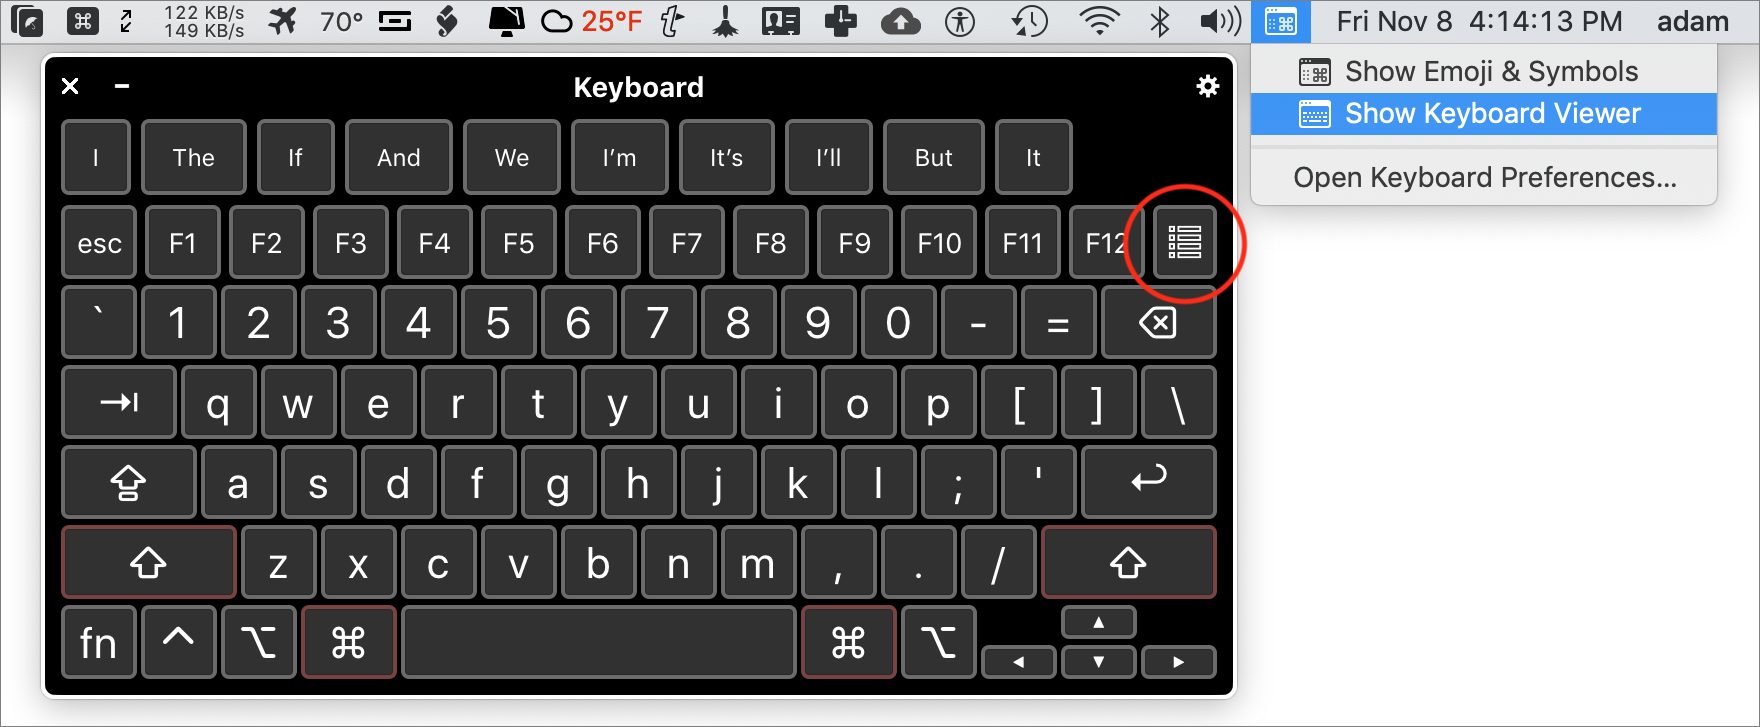
The next important piece of the puzzle is a built-in macOS accessibility app called Panel Editor, which lets you create custom accessibility keyboard panels. You can open Panel Editor from System Preferences > Accessibility > Keyboard > Accessibility Keyboard > Panel Editor. But before you open Panel Editor, be sure to select the Enable Accessibility Keyboard checkbox—which displays an on-screen keyboard—and in System Preferences > Keyboard > Keyboard, be sure to select “Show keyboard and emoji viewers in menu bar.”
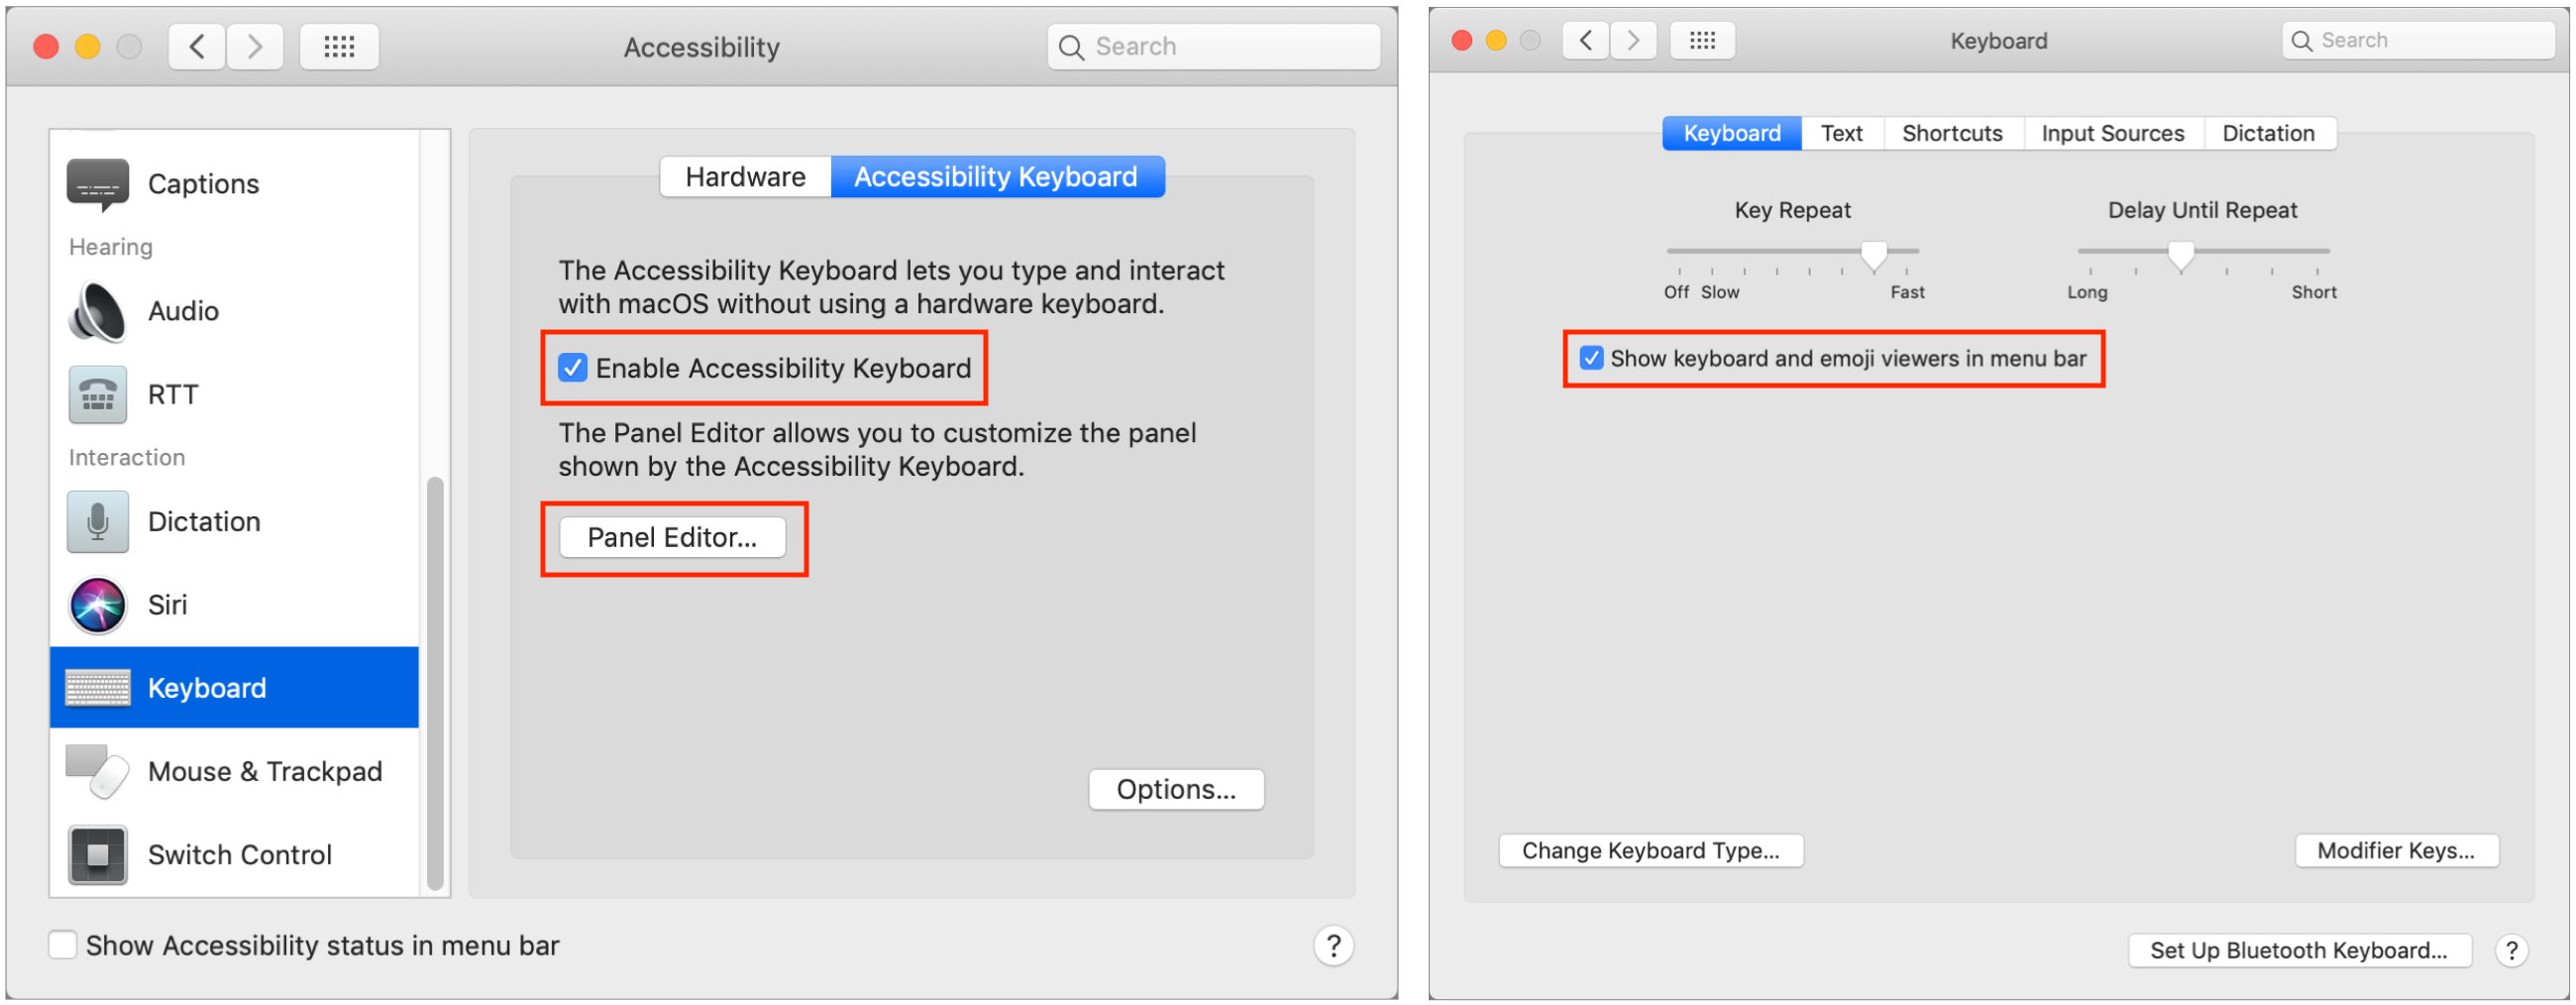
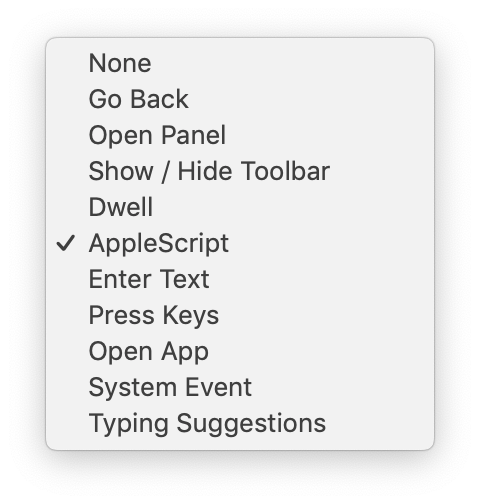 Once you’ve enabled all those settings, click the Panel Editor button in System Preferences > Accessibility > Keyboard > Accessibility Keyboard to open the app and create a new panel. These panels are technically “keyboards,” but Panel Editor lets you create buttons that can perform a variety of actions. You can create back buttons, show or hide the toolbar, enter text, press keys on the keyboard, open apps, trigger system events, and get typing suggestions. And—you probably knew this was coming as soon as I mentioned that Sal is behind this hack—a button can trigger an AppleScript.
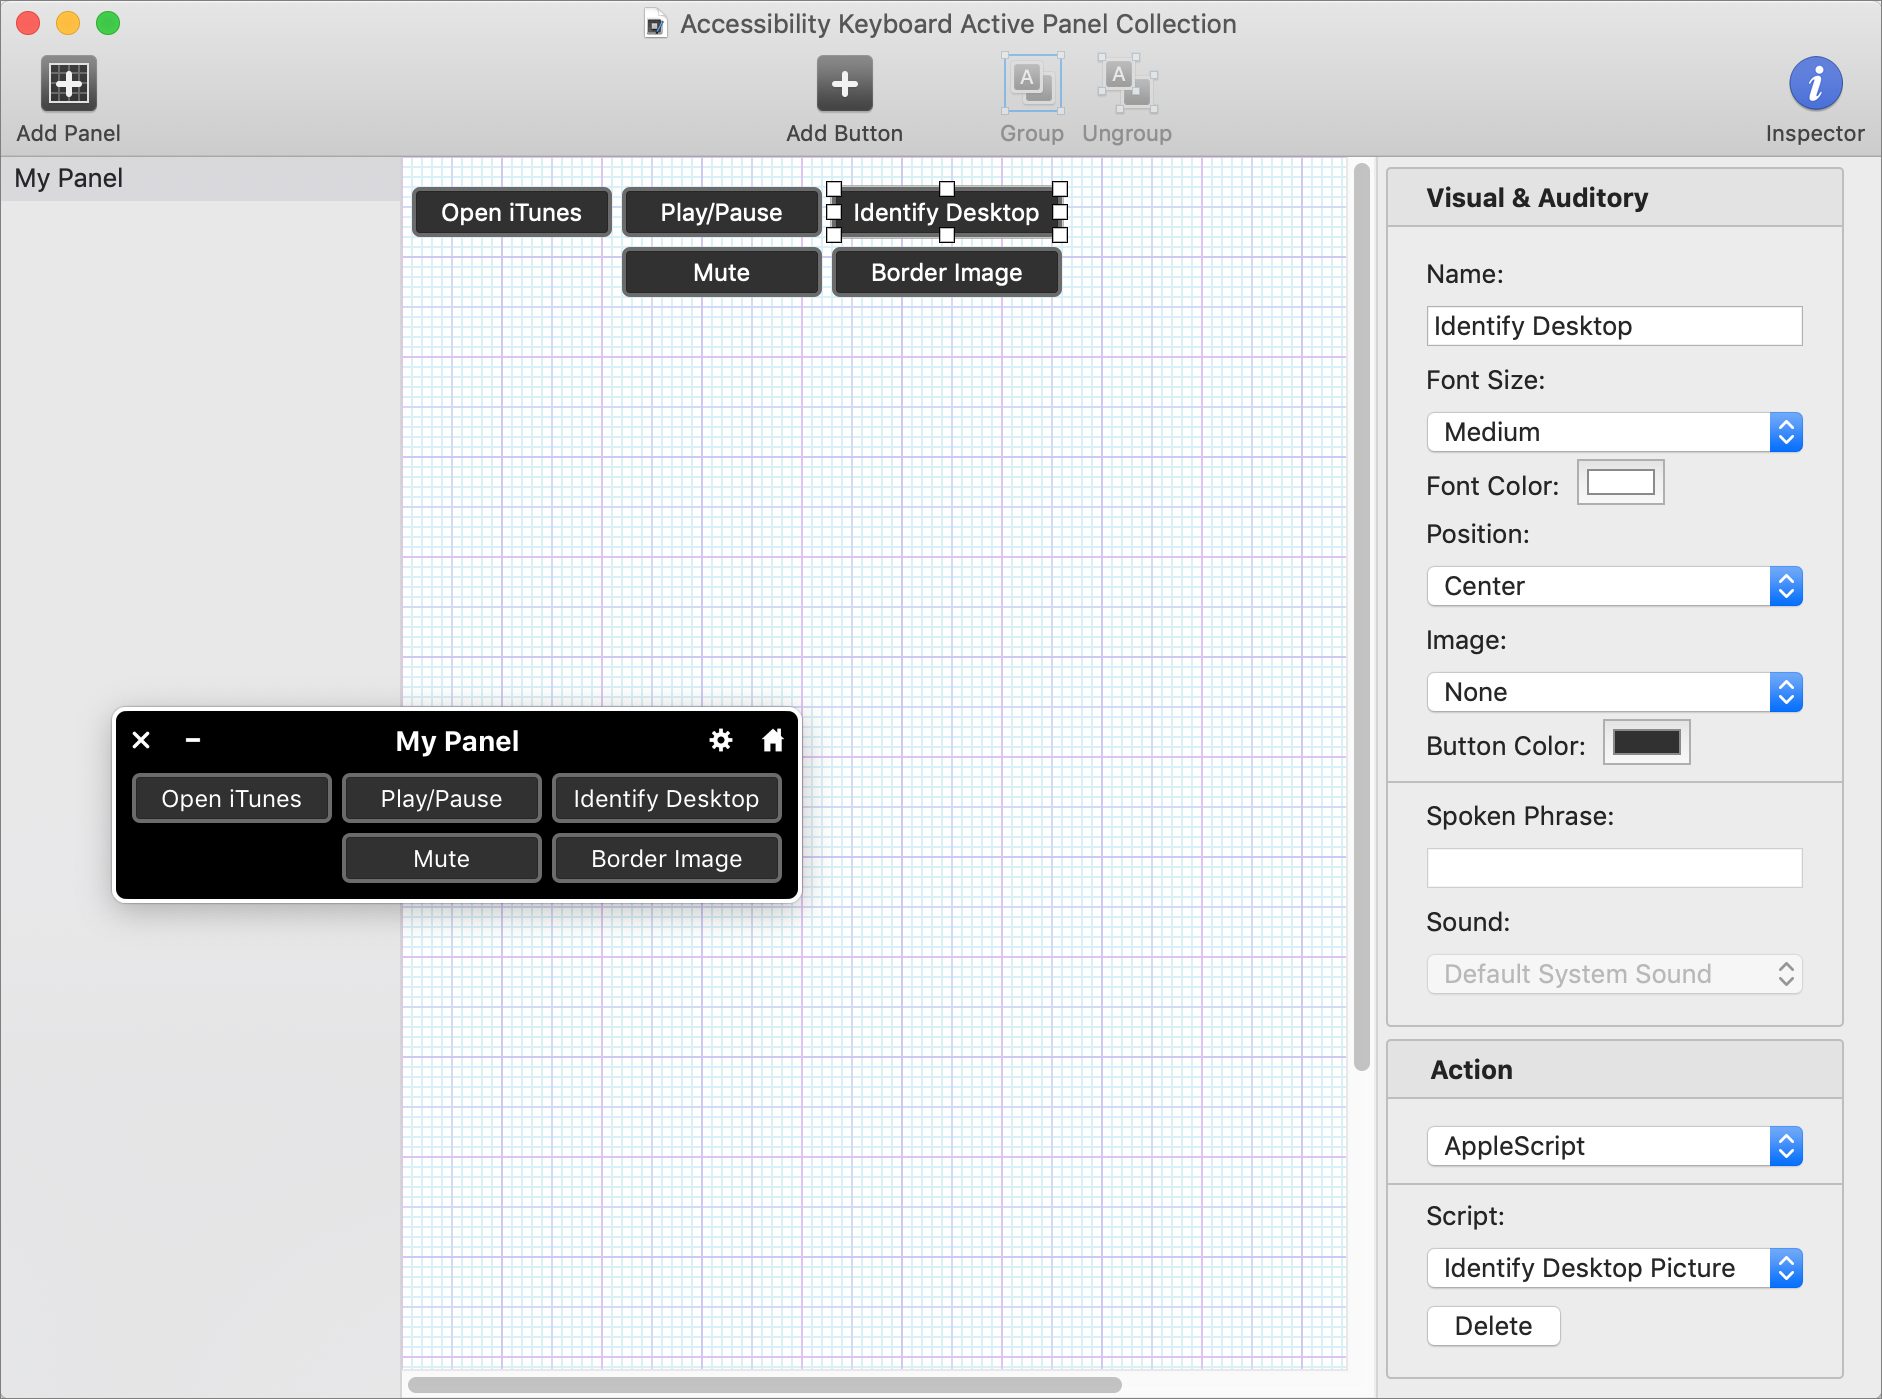
In my example above, I’ve created five buttons (which are shown floating above the Panel Editor window as well). Open iTunes uses the Open App action, Play/Pause and Mute use System Events actions, Identify Desktop runs an AppleScript, and Border Image invokes a Keyboard Maestro macro via the Press Keys action. That’s right, you aren’t limited to AppleScript. Along with Keyboard Maestro, you should be able to integrate Automator workflows via the Open App action. Nearly any action can become a custom button in Panel Editor.
To open your panel, click the Custom button at the upper-right corner of the Accessibility Keyboard and then click your panel. You can also click the gear icon and choose your panel from the pop-up menu. It’s a dark panel that floats above all other windows, and you can move it anywhere you like, such as that second screen provided by the iPad and Luna Display.
(One tip: if you’re doing this in Mojave, don’t close your panel because getting it back requires a trip to System Preferences > Accessibility > Keyboard > Accessibility Keyboard > Panel Editor and selecting Enable Accessibility Keyboard again. In Catalina, you can just choose Show Keyboard Viewer from the keyboard icon in the menu bar.)
My example panel has only a few buttons, but when you watch Sal’s video, you’ll see that he has created so many buttons that his custom panel fills the entire iPad screen. Many of them are generalized buttons for launching apps, changing system settings, and so on, but all the buttons in the middle trigger scripts that control Keynote. You may not be interested in automating Keynote, but if you’re an automation aficionado, just imagine all the actions you can attach to buttons.

I’ve glossed over some important details that Sal covers in his video, such as setting security permissions for the Assistive Control app and how to use an AppleScript Library to hold all your scripts, which you then call from the individual buttons.
However, there are two final important points to make:
- You can share your custom panels with other people, within a version of macOS (the Mojave version of Panel Editor can’t open panels saved from the Catalina version). That means you could develop a custom panel for company-specific actions and then give it to everyone in your office. To do this, in Panel Editor, choose File > Duplicate, then File > Move To to save an .ascconfig file. Then, to import it into Panel Editor on another Mac, choose File > Import Panels.
- Sal has shared both his custom Keynote panel (for Catalina) and the AppleScript Library containing all his scripts, so you can use them as is or to get started building custom panels.
Let us know in the comments if you’re thinking about creating your own custom panels and for what purpose!
iPhone 11 Night Mode Brings Good Things to Light
When it’s dark and you try to capture a picture with your camera, there are only so many photons to go around! Seriously: all photography boils down to light, light to photons, and insufficient photons to bad nighttime pictures.
Apple has made significant headway on this problem in the iPhone 11 and iPhone 11 Pro models with the introduction of Night Mode. The feature relies on the increased sensitivity of the iPhone 11’s wide-angle camera while leveraging computational photography to construct an image far better than would otherwise be possible with the camera’s optical capabilities.
Night Mode is a kind of “dark HDR.” Instead of shooting photos quickly with slightly different exposures and then combining the most expressive tonal ranges of each, Night Mode grabs many images over a longer interval and cleverly interleaves their best parts using a much more complicated set of decisions to produce a nighttime photo without significant pixel noise or blurriness.
Why is it so hard to take pictures in the dark? What has Apple tried so far? And, most importantly, how successful is Night Mode?
Electronic, Photonic
It’s hard for a camera to capture light in the dark because, literally, there isn’t very much of it. While it’s easy to think of light as a sort of suffusion from a source, we know that it’s really a bazillion individual photons, emitted from atoms that have been excited in such a way that shifts their electrons back and forth.
You don’t usually have to deal with the photonic nature of light until it gets dark because film and digital cameras generally take good to great pictures as long as there’s enough light to read by comfortably. With a lot of photons to capture, there’s no shortage and tones—intensities of light—are represented accurately.
In traditional cameras, there are two ways to capture more photons: open the aperture—the circular throttle in the lens—much wider to let more light onto the film than during bright shots, or increase the time the shutter is open to let more photons land on the film, known as the exposure time. The drawback of a longer exposure is that it cannot capture motion well, so fast-moving objects become a blur. High-speed cameras can crisply capture things like a runner crossing the finish line by using extremely short shutter times, but they require a lot of light to produce a clear photo. The calculus is a bit different in phone cameras. (Film cameras also had an ISO/ASA number, which referred to the grain size of the light-receptive crystals: bigger crystals, or a higher ISO/ASA, need less light to capture a tone but resulted in “grainier” photos.)
A digital camera’s sensor (typically a CCD or charge-coupled device) is essentially a photon collector. The sensor is more or less a specialized computer chip. Each pixel on the camera’s sensor acts like a hoop into which photons fall like basketballs. As the photon effectively enters the hoop—striking the sensor—it gives up its energy, producing an electron through the photoelectric effect. The electron is captured by the CCD in a “well,” a sort of bucket that collects them until the exposure period is over. Then the sensor uses that captured collection of electrons to determine the tonal value for the pixel.
(Tone is the only thing that digital camera sensors capture: color images are created by covering individual pixels with a filter of red, green, or blue. Typically there are twice as many green pixels as the other two, as green light best captures the neutral tonal range of a scene best.)
When there’s a lot of light in the scene, a digital camera has to use a short exposure to avoid filling the sensor’s wells so fast that all the detail is blown out. With less light, a longer exposure allows a balanced picture, though it can be blurry if anything in the scene is moving.
However, when it’s downright dark out, few photons strike the sensor at all. Because there’s background noise and the sensor relies on an electrical charge to image the scene, the sensor scoops up errant electrons along with the good ones.
The traditional way of capturing night shots is to increase the exposure time, but that doesn’t work when people are moving, even a little bit. A short exposure either doesn’t capture enough light or requires the camera to boost the ISO so much that it introduces noise—speckles of various colors that were never there.
Imagine a trillion people throwing golf balls from a great height into an ocean of densely packed square baskets. Some balls will fall directly into the basket the thrower was trying for, but others will hit a rim, bounce around, and fall into a different basket. Imagine further that when there are fewer balls to throw, the throwers’ aim is worse, and thus more balls are likely to land in the wrong spot, producing the wrong count—the speckled pixels in a dark photo.
A camera maker has a bunch of variables it can tweak to ameliorate this problem, all of which improve the results across all light conditions. A lens with a larger aperture will let in more light. A sensor with deeper wells can collect more electrons, and it’s possible to give the sensor greater sensitivity so it can distinguish more tones, more accurately, even in the deepest shadows. Bigger pixels in the sensor can also capture more light in the dimmest circumstances.
Over the past few years, Apple has tweaked all these camera variables. It opened the aperture by about 50 percent between the iPhone 6s and iPhone 7 updates, with the primary lens increasing from f/2.2 to f/1.8. (The f/stop measures the aperture’s diameter.) The iPhone X and subsequent models have featured sensors with bigger pixels and deeper wells.
(Paradoxically, increasing a sensor’s area and adding more pixels, instead of making the pixels larger, decreases sensitivity, because less light hits each smaller sensor. That’s why the megapixel count has become so much less important once the entirely adequate 12-megapixel size was reached a few years ago. Since then, all the focus has been on sensitivity and tonal range and discrimination. This works exactly like increasing film grain size to bump up the ISO/ASA speed.)
The wide-angle lens sensors in the iPhone 11 models improve even further. While the sensor size and pixel count remain the same, Apple boosted sensitivity by 33 percent. (Apple also dramatically improved sensitivity in the brightest conditions: the current camera can shoot exposures as short as 1/125,000th of a second, six times faster than the iPhone XS.)
The telephoto lens on the iPhone 11 Pro and iPhone 11 Pro Max can also be used with Night Mode. Apple opened the aperture on that lens from f/2.4 to f/2.0, about 50 percent better, while increasing its sensor’s sensitivity by over 40 percent.
Since the iPhone X, the wide-angle and telephoto lenses have both featured optical image stabilization, a mechanical system that counters small movements and increases the effective f/stop, because it enables longer exposures in the same light. (Optical image stabilization doesn’t help much with motion in the scene, because the actual exposure time remains the same.)
Before Night Mode, Apple had used its lens and sensor improvements to try to make low-light photography reach a minimum level of quality, letting you capture an okay picture a lot of the time instead of a blurry or muddy one. Apple also improved its built-in flash approach over this period, but because the elements can’t be angled and are LED-based, using it is a last resort. The iPhone flash often produces photos that are garish or overbright, but it can make a scene that was previously unphotographable into one you can record.
Night Mode is a quantum improvement over these previous efforts. It’s a sophisticated, multi-prong approach that can produce excellent pictures, not just images of last resort. Apple is not the first company to take this route, as Google and other phone makers have pursued synthesized low-light pictures, but Night Mode ranks with the best of the solutions.
Use Night Mode Effectively
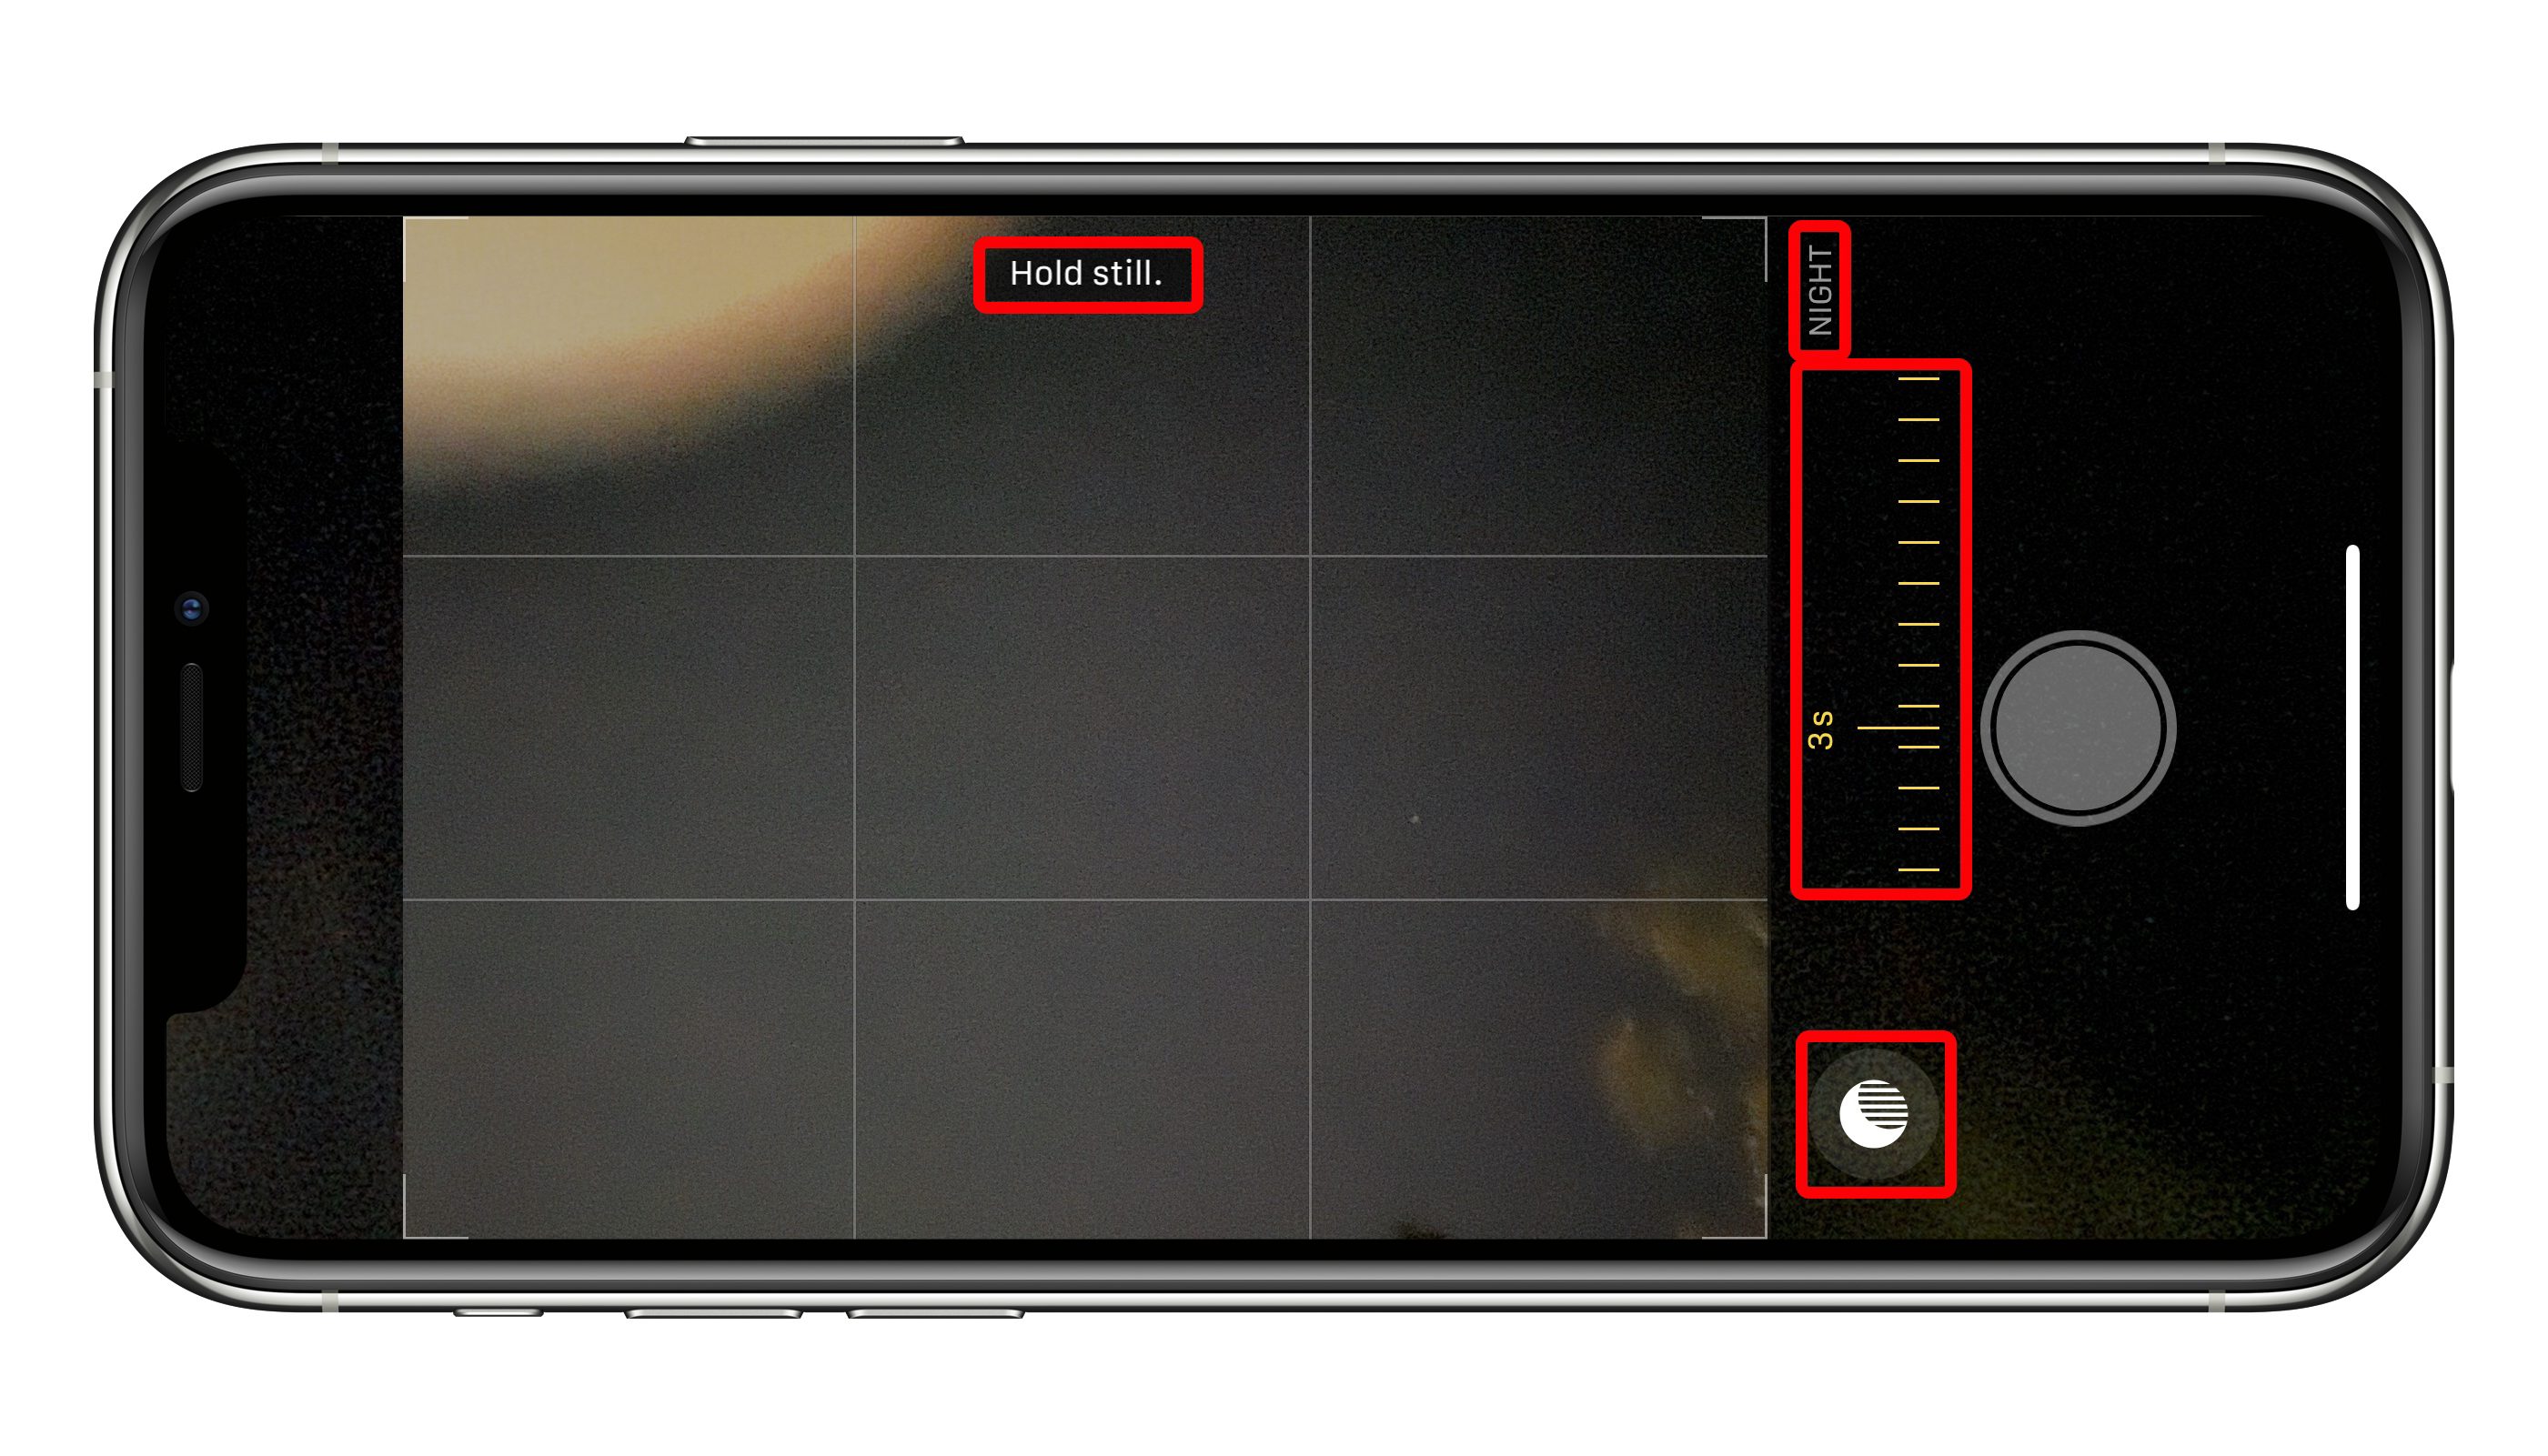
You don’t have to set up Night Mode. In fact, the Camera app always either suggests it or turns it on when it judges that the conditions are right. The Night Mode icon appears at the top left (or bottom left in landscape orientation) of the Camera app. If the app encounters a marginal lighting condition, it suggests Night Mode by showing its icon in white; tap it to turn it on. However, if the Camera app’s analysis reveals that the only way it can take a good photo is with Night Mode, it turns it on and shows its icon in yellow with a duration in seconds.
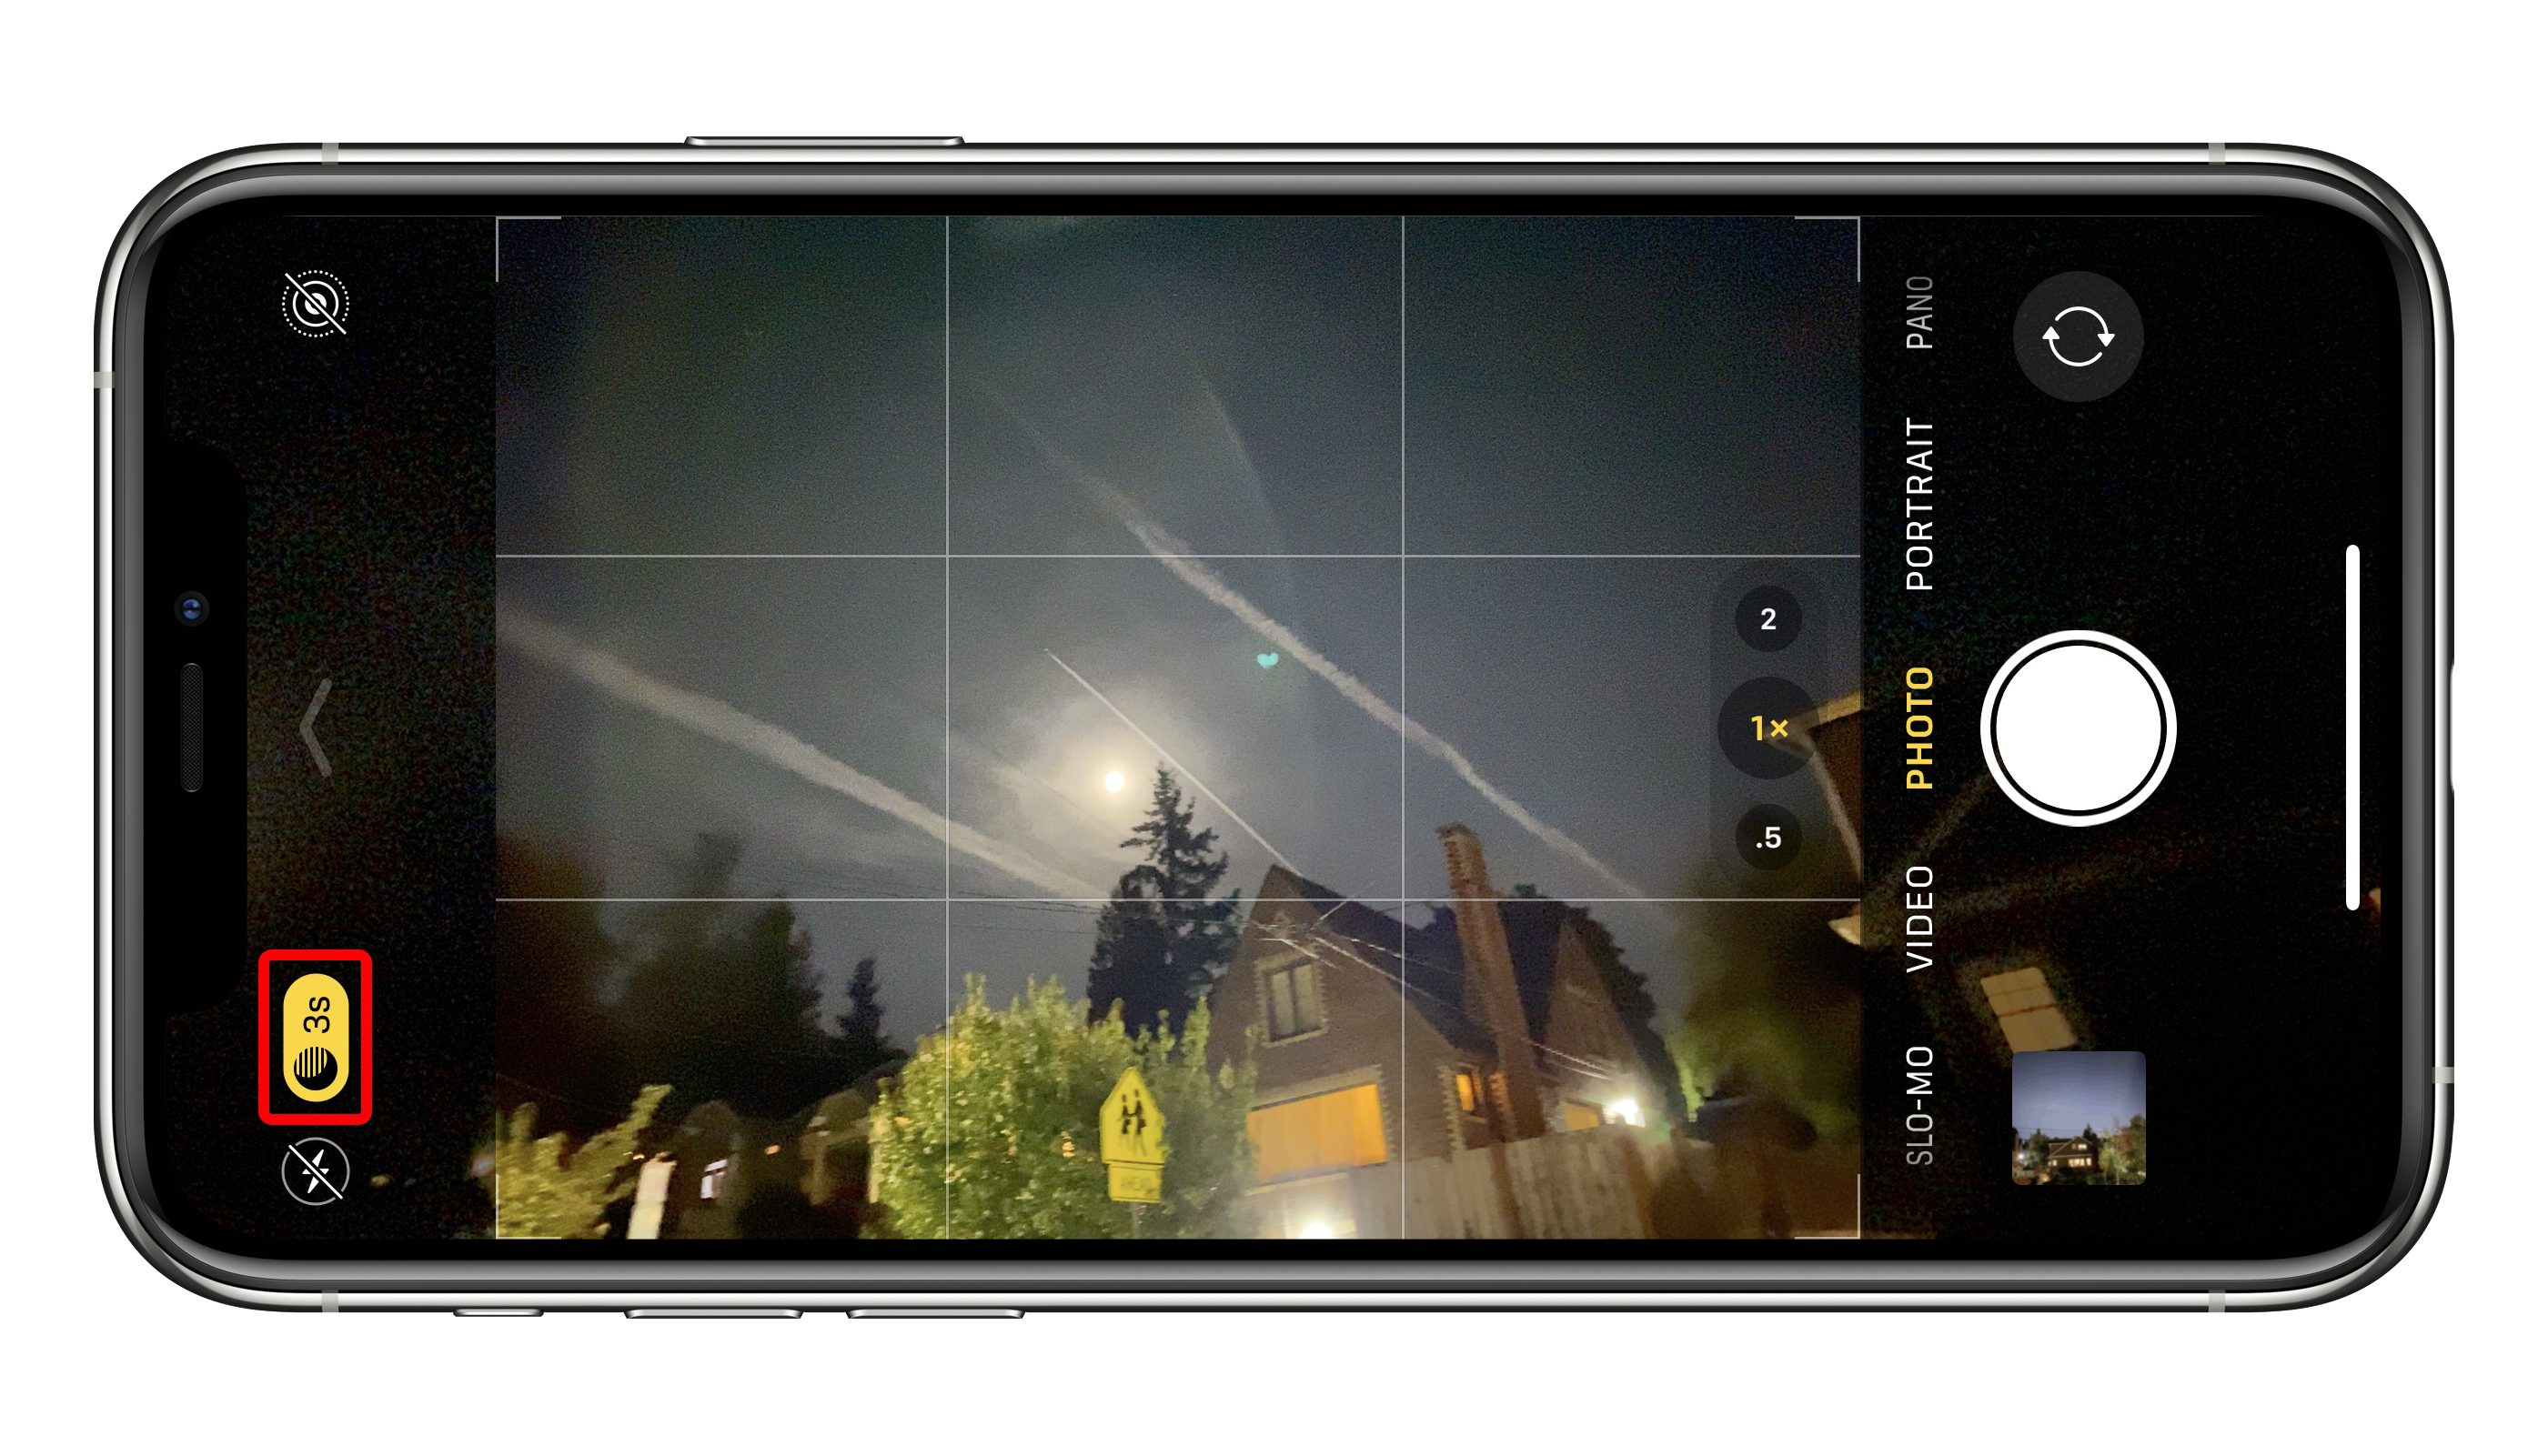
When you tap the shutter button, try to hold still while the image fades in to full intensity and the timer counts down. If you want to try a longer shot, tap the Night Mode icon to reveal a slider that lets you adjust the amount of time during which a picture is captured. You can also use the slider to swipe to the right all the way to Off if you want to override the Camera app. There’s no way to disable Night Mode as a general option, only on a per-shot basis.
Night Mode doesn’t keep its electronic shutter open for a longer period. Instead, as with HDR, the Camera app collects a series of images over the period of time marked. These images are then combined in a method similar to digital image stabilization in video. (That’s why I refer to the Night Mode’s time of capture as its “duration” instead of “exposure,” because it’s capturing a lot of different actual exposures.)

The Camera app can also detect if you have your iPhone on a tripod, monopod, or in another stable situation by consulting its internal sensors. If so, it might suggest a longer shot. You can adjust the duration to be as long as 28 seconds! (The maximum is a value that Night Mode sets, so you may see a shorter duration at times.)
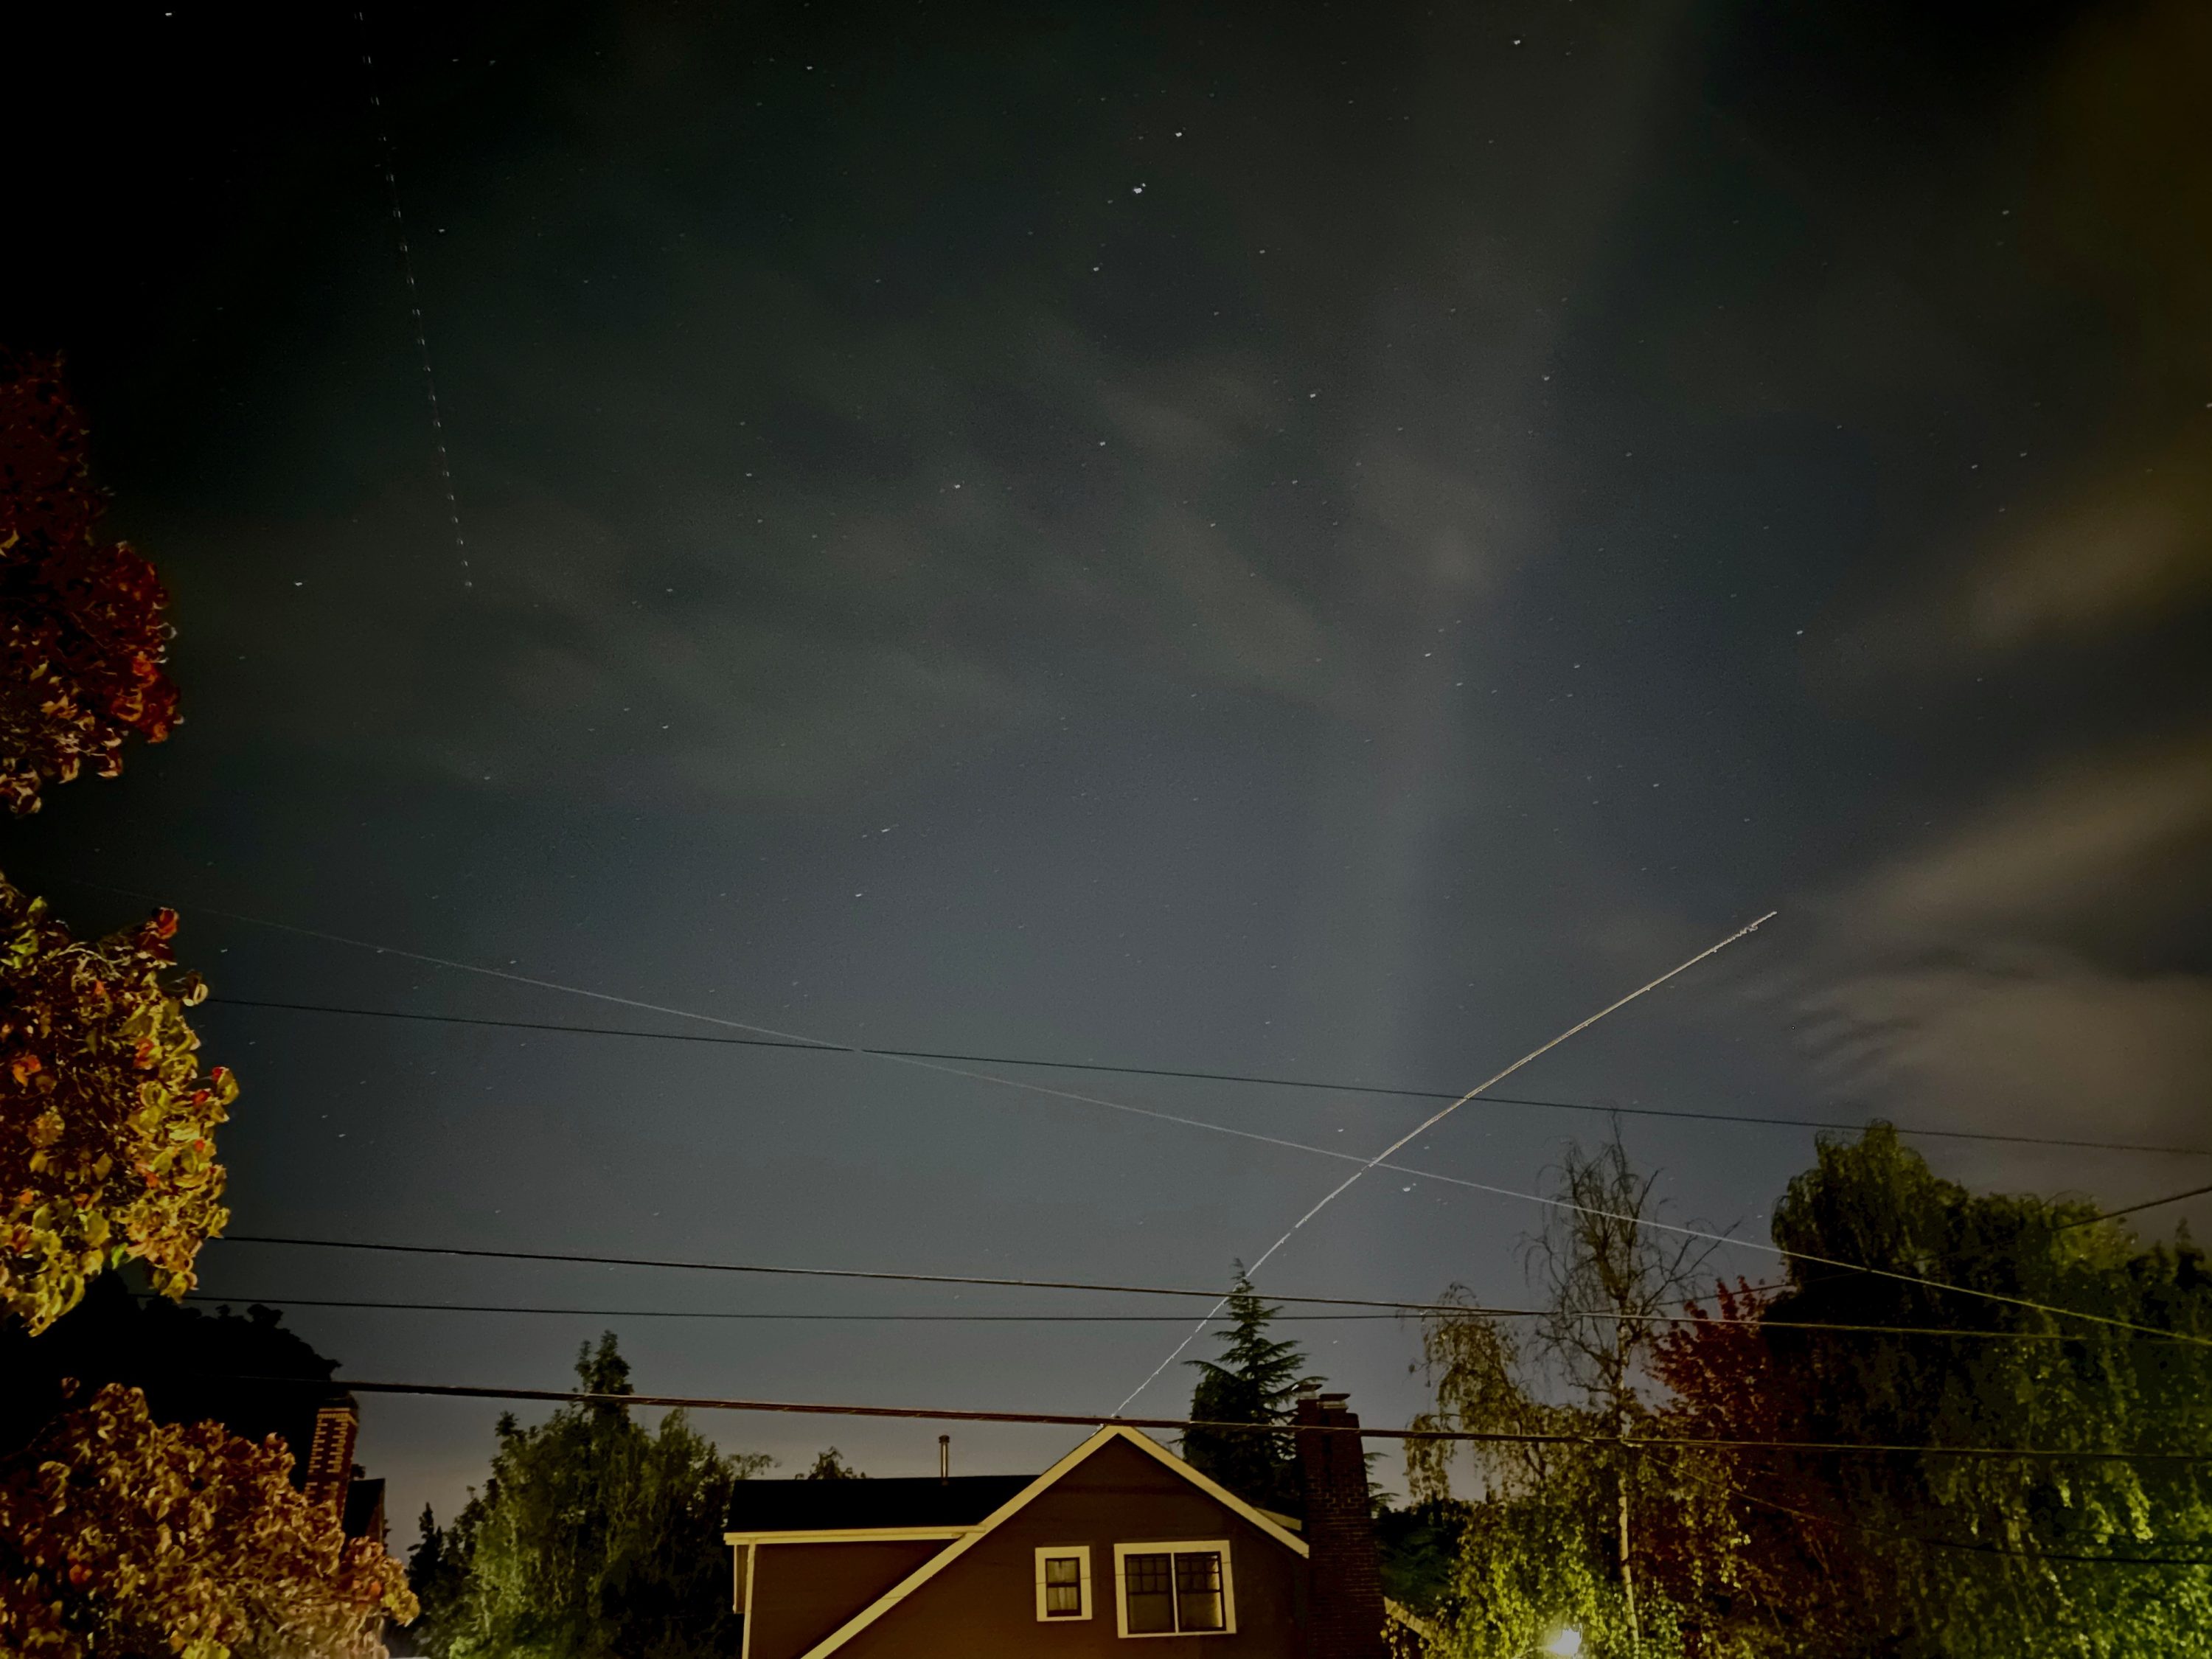
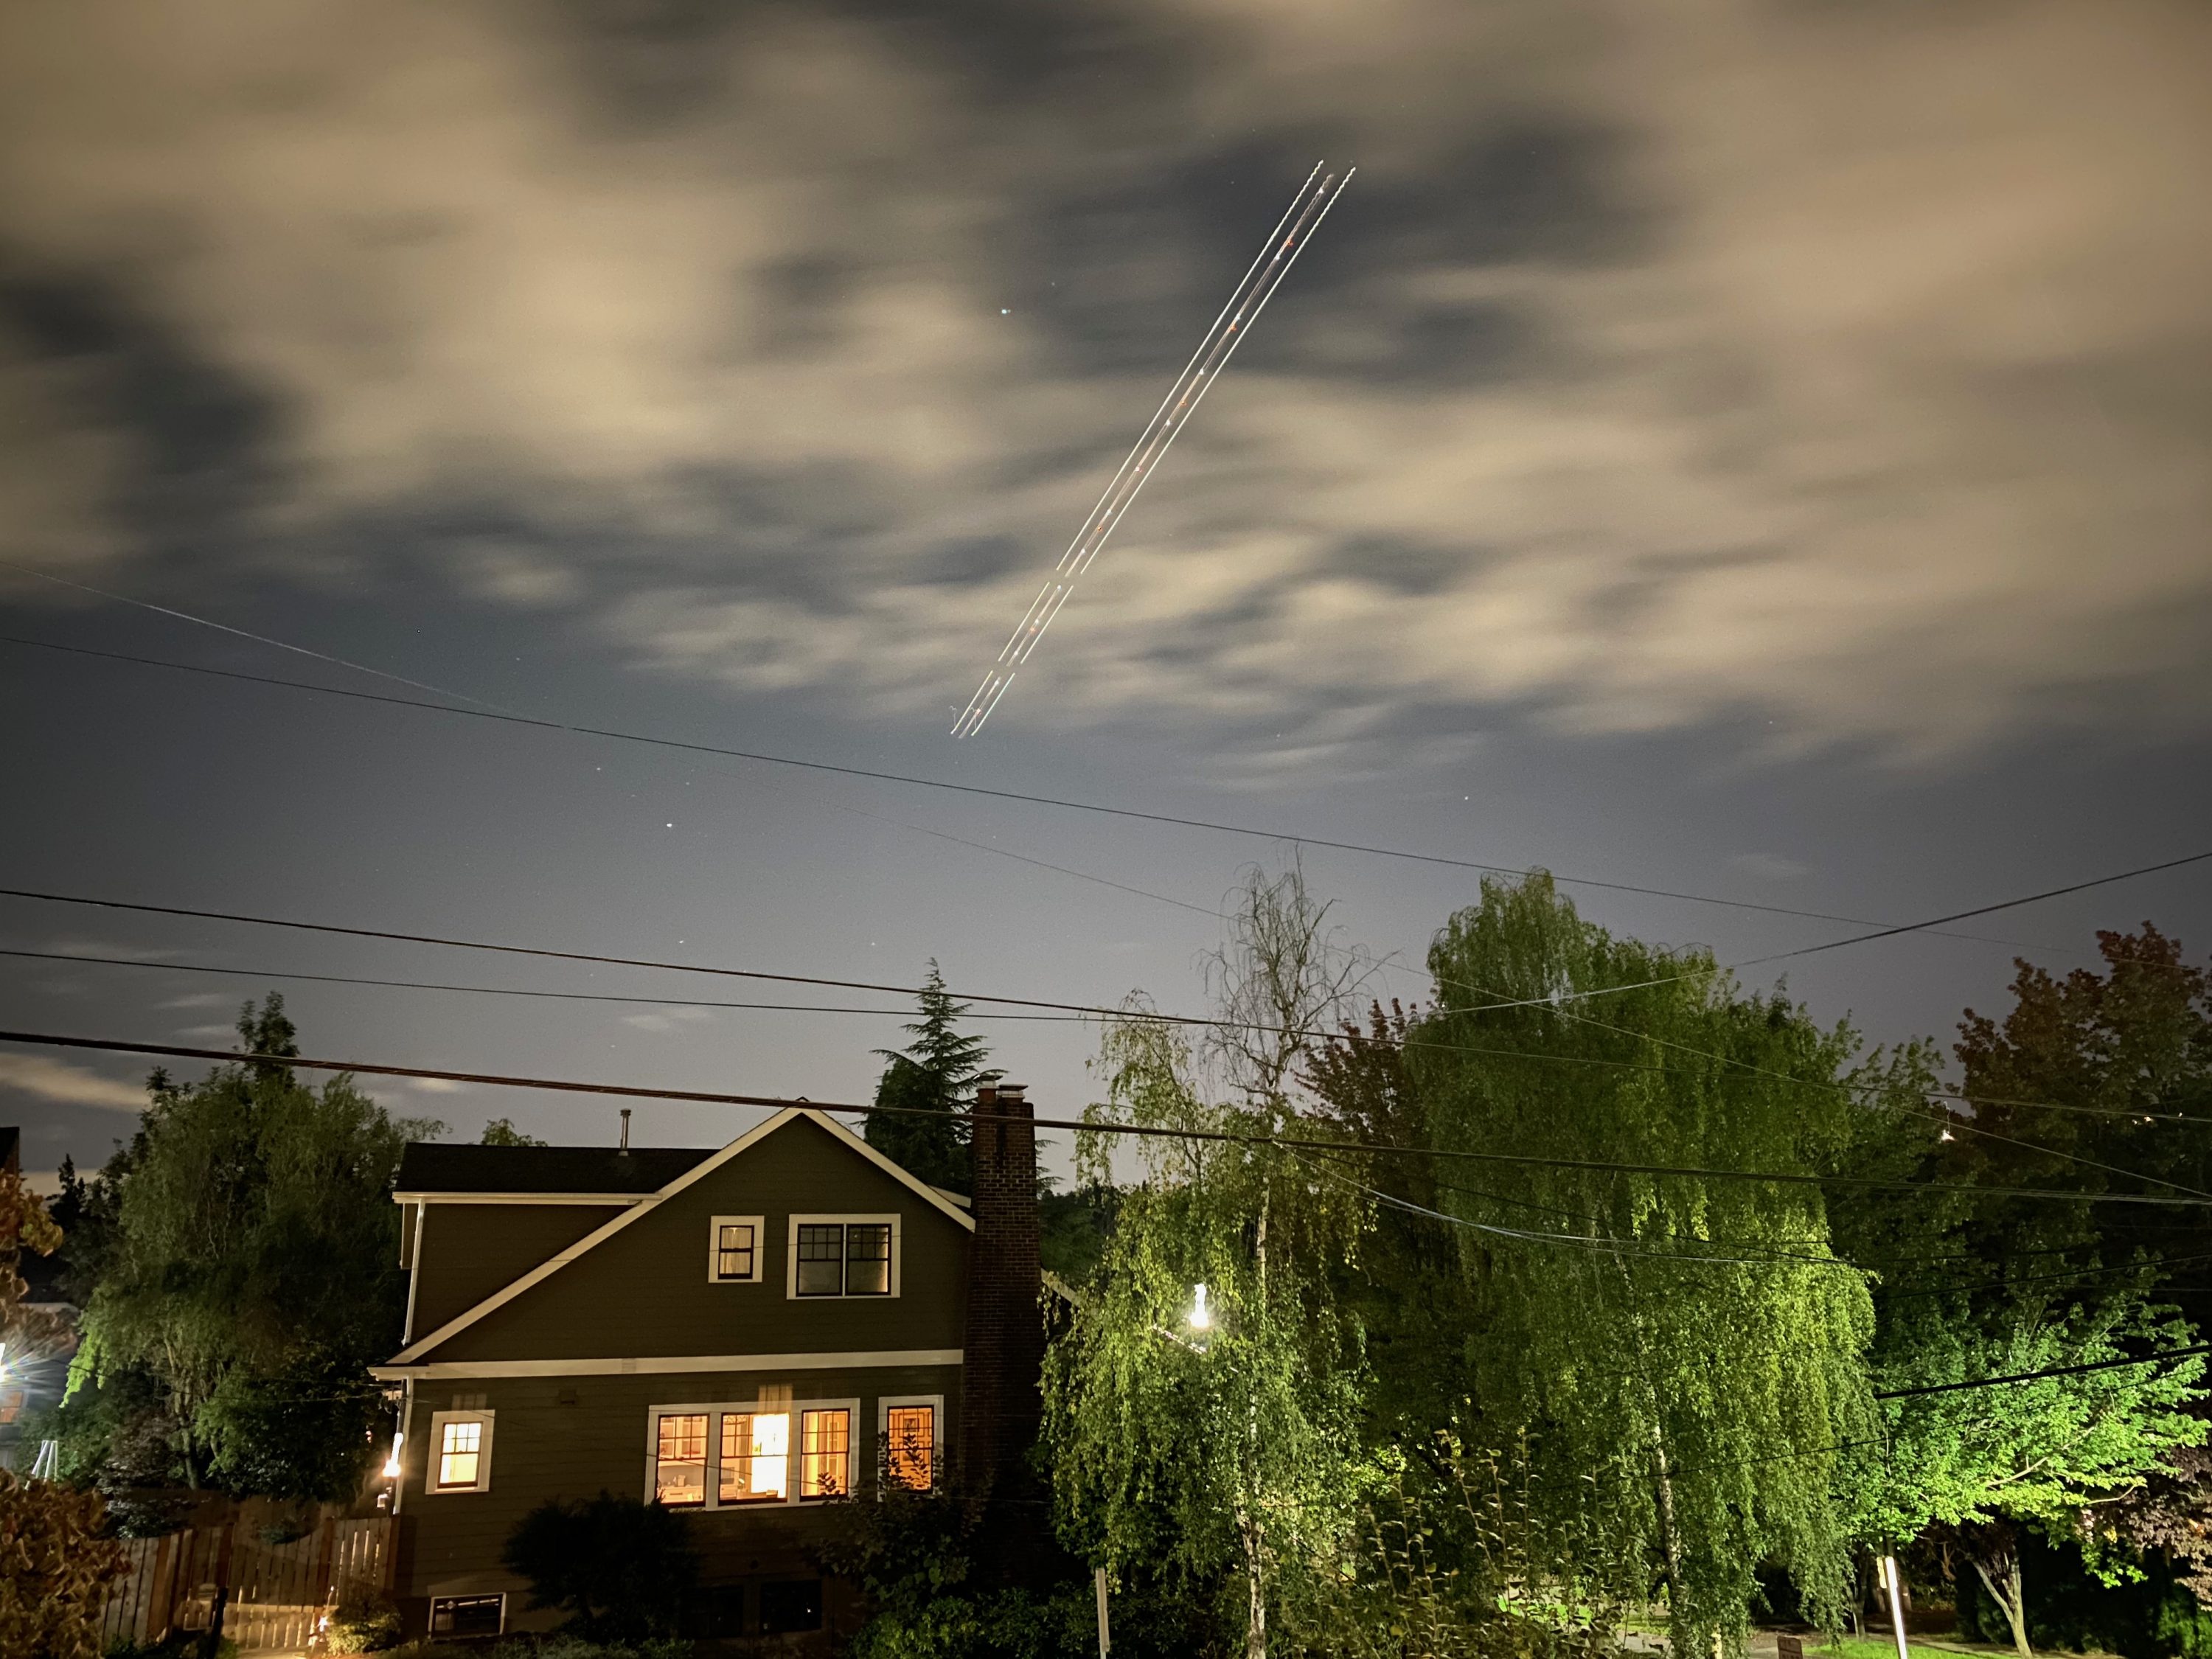
You can see the effect of multiple exposures over a very long capture clearly in some photos I’ve taken on a tripod at long durations. We live under a flight path in Seattle, so planes often fly over our house in a straight line heading south. Their lights, when shot in Night Mode, can result in artistic blurs. On one clear night when I was testing Night Mode, I also picked up satellites—possibly the International Space Station—that were invisible to my naked eye, but that tracked as blips across each duration that was long enough to show them.
In a briefing, Apple explained that the images captured use “adaptive bracketing,” a technique that captures the same scene multiple times with different settings. Some shots may have short exposures to capture motion, while others are longer to pull detail out of shadow areas. The new iPhone 11 sensor apparently provides Night Mode the quality needed to create these different exposures in the worst lighting conditions.
The Camera app then processes these images using machine learning via the Neural Engine that’s built into the iPhone 11’s A13 Bionic processor. These machine-learning algorithms rely on training, initially by humans, to figure out the most desirable characteristics of an image and then apply them with new and novel inputs. The algorithm knows the kind of appearance, color, and details people prefer from the training, and emphasizes that in constructing a single image from the Night Mode flurry of shots. (The Neural Engine also drives the new Deep Fusion feature, a kind of super HDR, that first appeared in iOS 13.2.)
Apple said that the resulting image is designed to preserve the sense that it’s night—it’s not trying to turn an evening scene into false daylight. That’s why Night Mode has an emphasis on preserving color while boosting brightness. Nonetheless, it’s not always successful. Sometimes, when I shoot a scene that’s quite dark except for some pinpoints of light—in a room, from street lights, or emanating from houses—the resulting photo feels more like dawn than night, and the colors can shift, too.
But the beauty of Night Mode relying so heavily on machine learning is that Apple’s algorithms will keep improving. Plus, we’ll learn what conditions produce optimum results—or use Photos or Lightroom to tweak the results better to our liking.
Regardless, I’ve found that Night Mode has dramatically changed when I even think about taking photos. Previously, the mediocre quality of low-light photos discouraged me sufficiently that I would take pictures only in a pinch or to record a moment. Now, I find myself snapping shots outdoors at night, and at late dinners in dim restaurants. In fact, the novelty of Night Mode may have turned me into a bit of a photographic pest. But like all sufficiently advanced technology that’s indistinguishable from magic, I’m sure I’ll get used to it soon enough.