#1492: TidBITS Thanksgiving hiatus, scroll bars in iOS 13, geolocation in Photos, Luna Display’s Mac-to-Mac mode
The TidBITS crew is taking a few days off for the Thanksgiving holiday here in the United States, so there will be no issue on 2 December 2019. Until then, keep up with us on the TidBITS Web site and in Apple News. As for this week, Josh Centers has a tip on using the new scroll bar feature in iOS 13. Donald O’Shea joins us to explain how to take advantage of geolocation with iPhone-captured photos in the Photos app. And to wrap up the issue, Julio Ojeda-Zapata explores the Luna Display’s new Mac-to-Mac mode, which lets you use one Mac as a second screen for another Mac. DEVONthink 3.0.2, Path Finder 9.0.4, ChronoSync 4.9.6 and ChronoAgent 1.9.4, OmniOutliner Essentials and Pro 5.5.1, SpamSieve 2.9.38, and Luminar 4.
No TidBITS Issue on 2 December 2019
This Thursday marks the Thanksgiving holiday in the United States, and we won’t be publishing an email issue on 2 December 2019 so our staffers and contributing editors can spend this coming week with family, friends, and food.

Many of us will again be consulting the handy worksheets from Joe Kissell’s Take Control of Thanksgiving Dinner for our dinner preparations—no one lays out what needs to be done better or more clearly than Joe, so check out his book if you’re looking for help.
Although the weekly email issue of TidBITS won’t appear next Monday, we’ll continue to publish articles to the TidBITS Web site. To keep up with everything, visit our site, subscribe to our RSS feed—remember that TidBITS members get a full-text feed—or follow us in Apple News or on Twitter. Look for the next email issue on 9 December 2019!
TipBITS: Scroll More Quickly in iOS 13
In previous versions of iOS, you may have noticed a scroll bar on the right side of the screen while scrolling through content on an iPhone or iPad. Alas, unlike the scroll bars on the Mac, it didn’t do much more than indicate your position and the amount of content on the page. (The larger the scroller—the gray bar that Apple used to call the elevator box in macOS—the less content on the page.) But in iOS 13 and iPadOS 13, Apple has finally made the scroll bar useful.
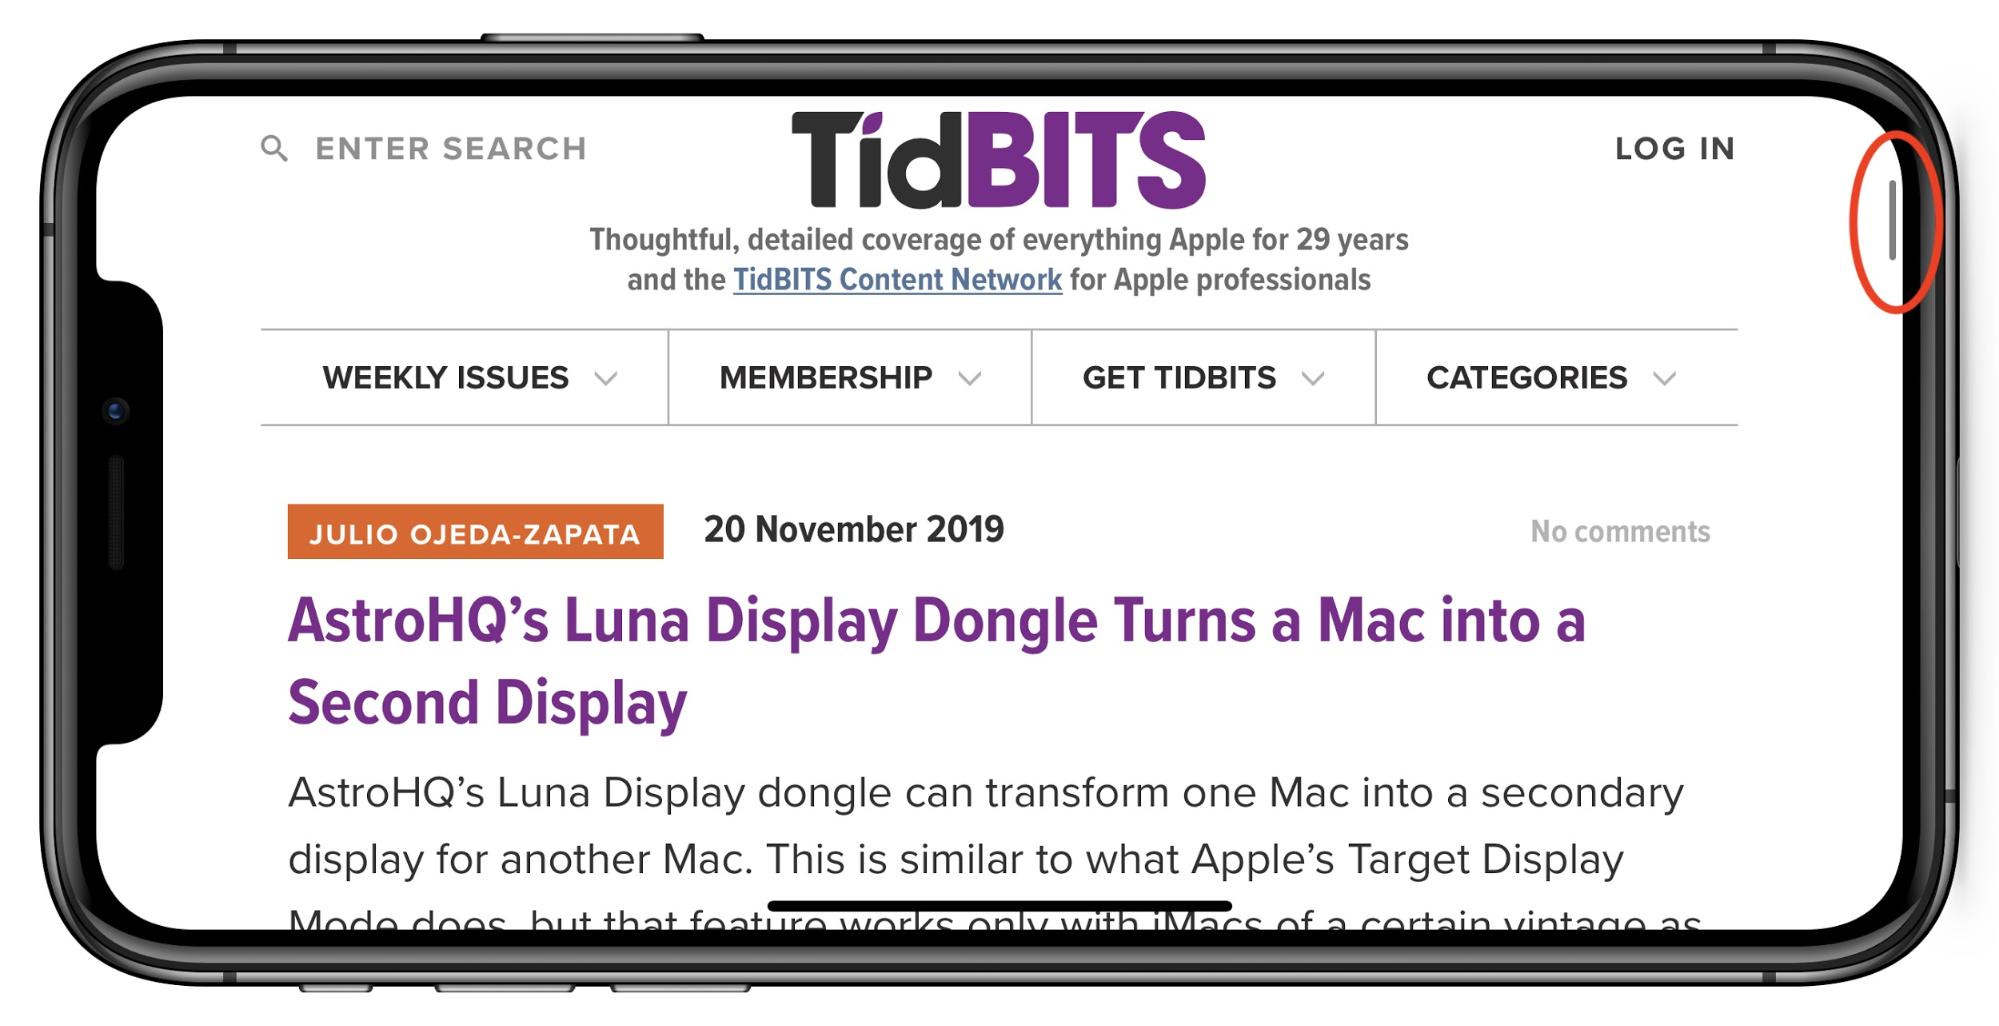
When you see the scroller—you may have to scroll a bit to make it appear—touch and hold it. It’s a bit tricky because it disappears a second or two after you stop scrolling. And even if you are fast, the scroller is a small target for a large finger. After pressing it for a second, it will enlarge, and you might feel a “click” on a recent iPhone. While keeping your finger on the scroller, move it up and down to zip quickly through the page.
Of course, nothing prevents you from using the traditional method of scrolling in iOS—by swiping up or down on the page—but the scroll bar makes it much easier to scroll long distances with minimal effort. It can take ages to swipe, swipe, swipe to the top or bottom of a long page, whereas dragging the scroller lets you jump to any position nearly instantly.
Here’s a short video showing how scrolling with the scroll bar works.
Interestingly, scrolling by dragging the scroller works just like clicking and dragging it does on the Mac, but is the reverse of the so-called “natural” scrolling that Apple introduced with iOS and later in macOS. With “natural” scrolling, you swipe up on a page to scroll down, or down on a page to scroll up, whereas you drag the scroller down to scroll down and drag it up to scroll up.
Since this new scroll bar behavior is system-wide, lots of apps can take advantage of it. Use it in Safari to scroll through long Web pages and in Mail to navigate interminable email messages. In the Twitter app, it can help you get around in your timeline, and it’s particularly useful if you need to edit a lengthy document in Pages. Notably, the Google Docs app does not support the system-wide scroll bar because Google provides its own enhanced scroller that lets you jump quickly to headings as well. But give it a try now so you have a chance of remembering it the next time you want to scroll through a long page.
Places, Please! Geolocation in Apple’s Photos
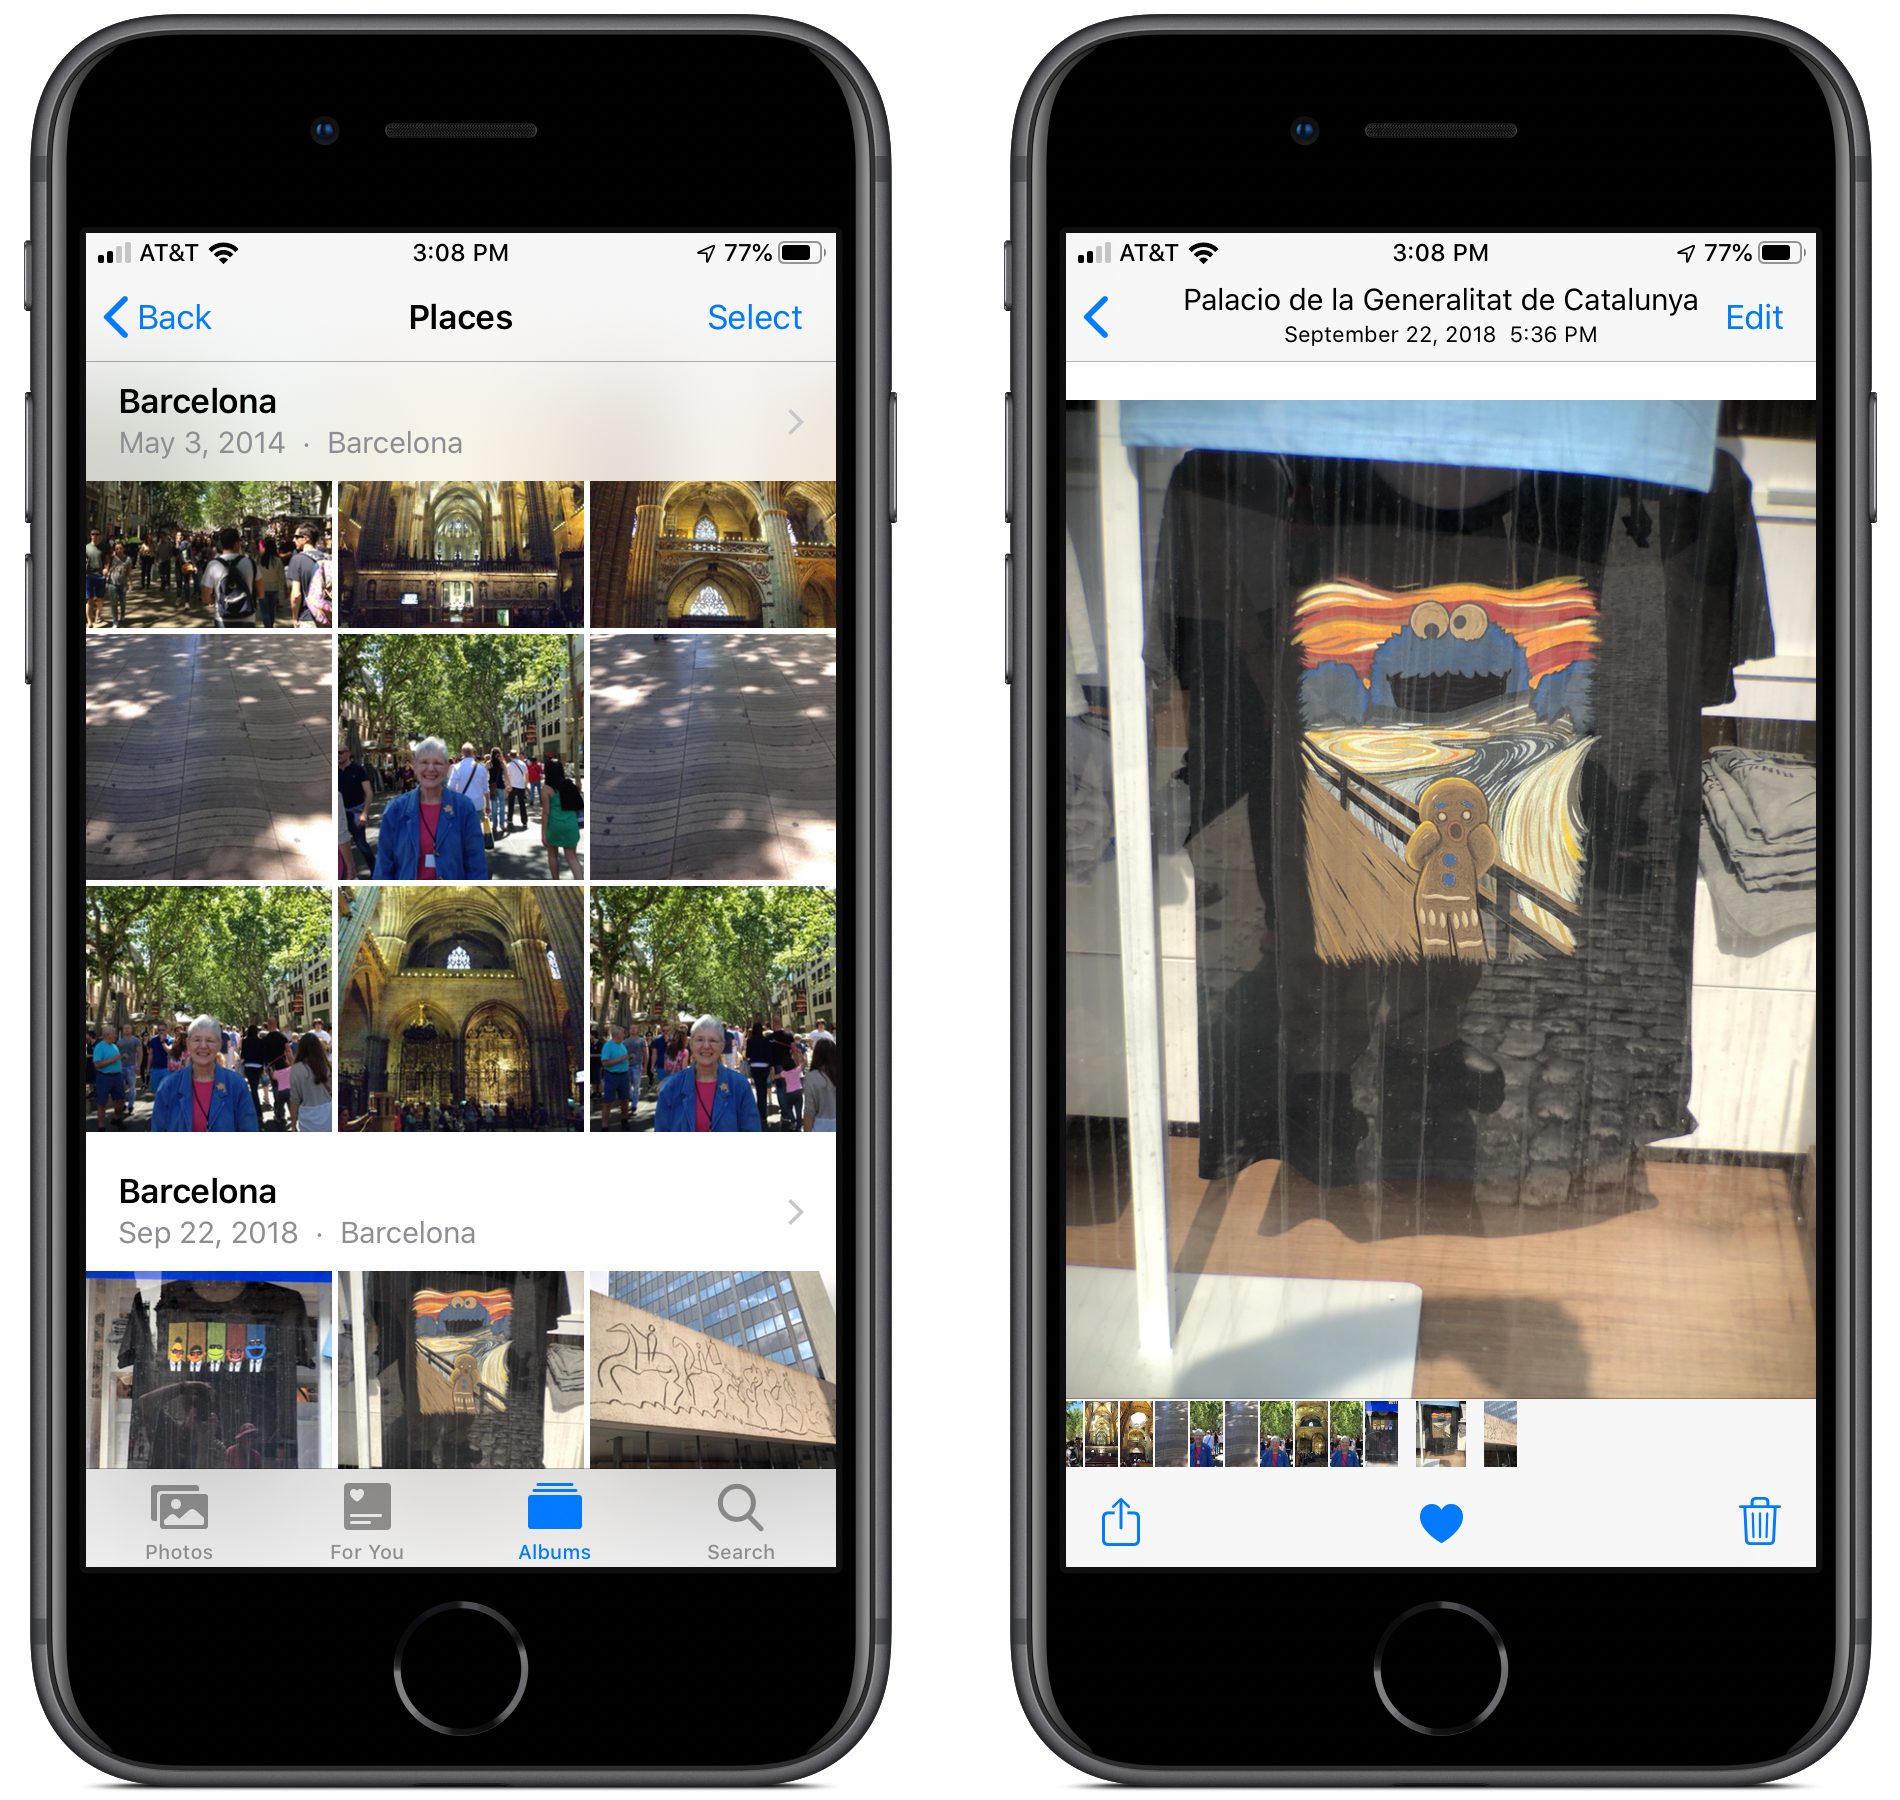
On a recent trip to Barcelona, my wife and I saw two T-shirts in a shop window: the Muppets as Reservoir Dogs and Cookie Monster in The Scream. Through the shop’s rain-streaked window, I took pictures of the shirts to send to our daughter, a puppeteer and a fan of the Muppets.

Later in the day, we decided that those T-shirts would make great Christmas presents for our daughter and granddaughter. But we had walked long enough and far enough in the meantime that we had no idea where the shop was located. We wandered around the area, searching for it in vain. Then I remembered the pictures I had taken of the T-shirts.
Apple’s Photos app has two special albums under the heading People & Places. Tapping Albums in the Camera app and then the Places album opens a map of your general location and displays stacks of photos with a count of photos in each pile.
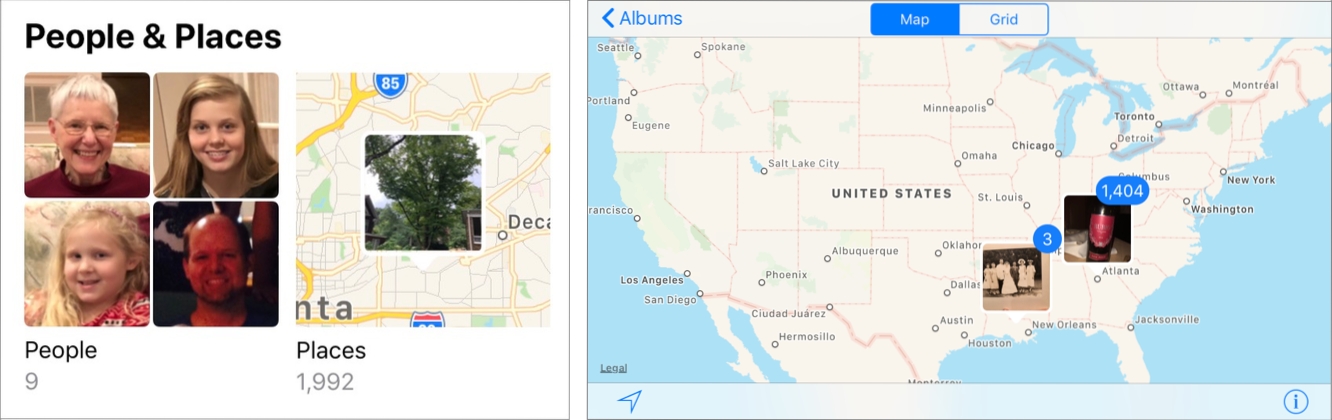
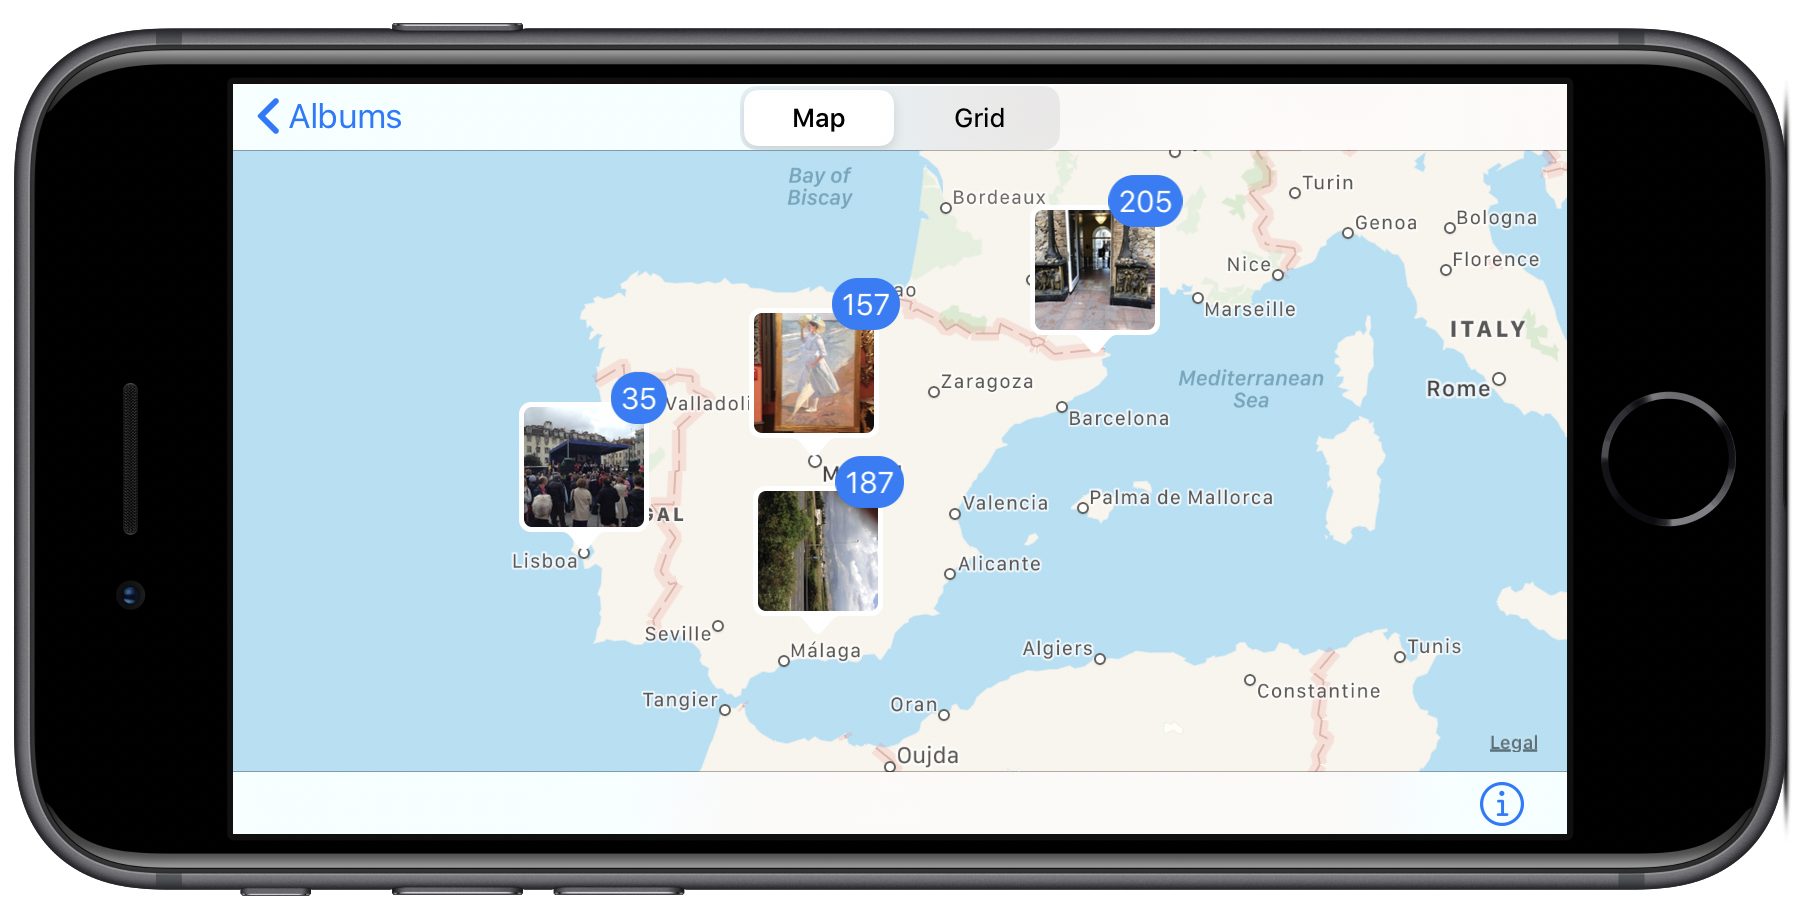
Swiping left on the map brought Europe into view, and tapping the pile of pictures near Barcelona presented me with the grid of pictures arranged by the location and date where the photos were taken.
Double-tapping the map zooms in and distributes the pictures into smaller stacks that match their more specific locations. You can also pinch out to zoom in further to locate photos, assuming you know where to look. If you have a large camera roll, that’s a lot more efficient than endlessly scrolling through it, looking for the right photo. If you continue to double-tap on the stacks or pinch out, you will end up with a small enough number of stacks that you should easily be able to find the picture you’re looking for.

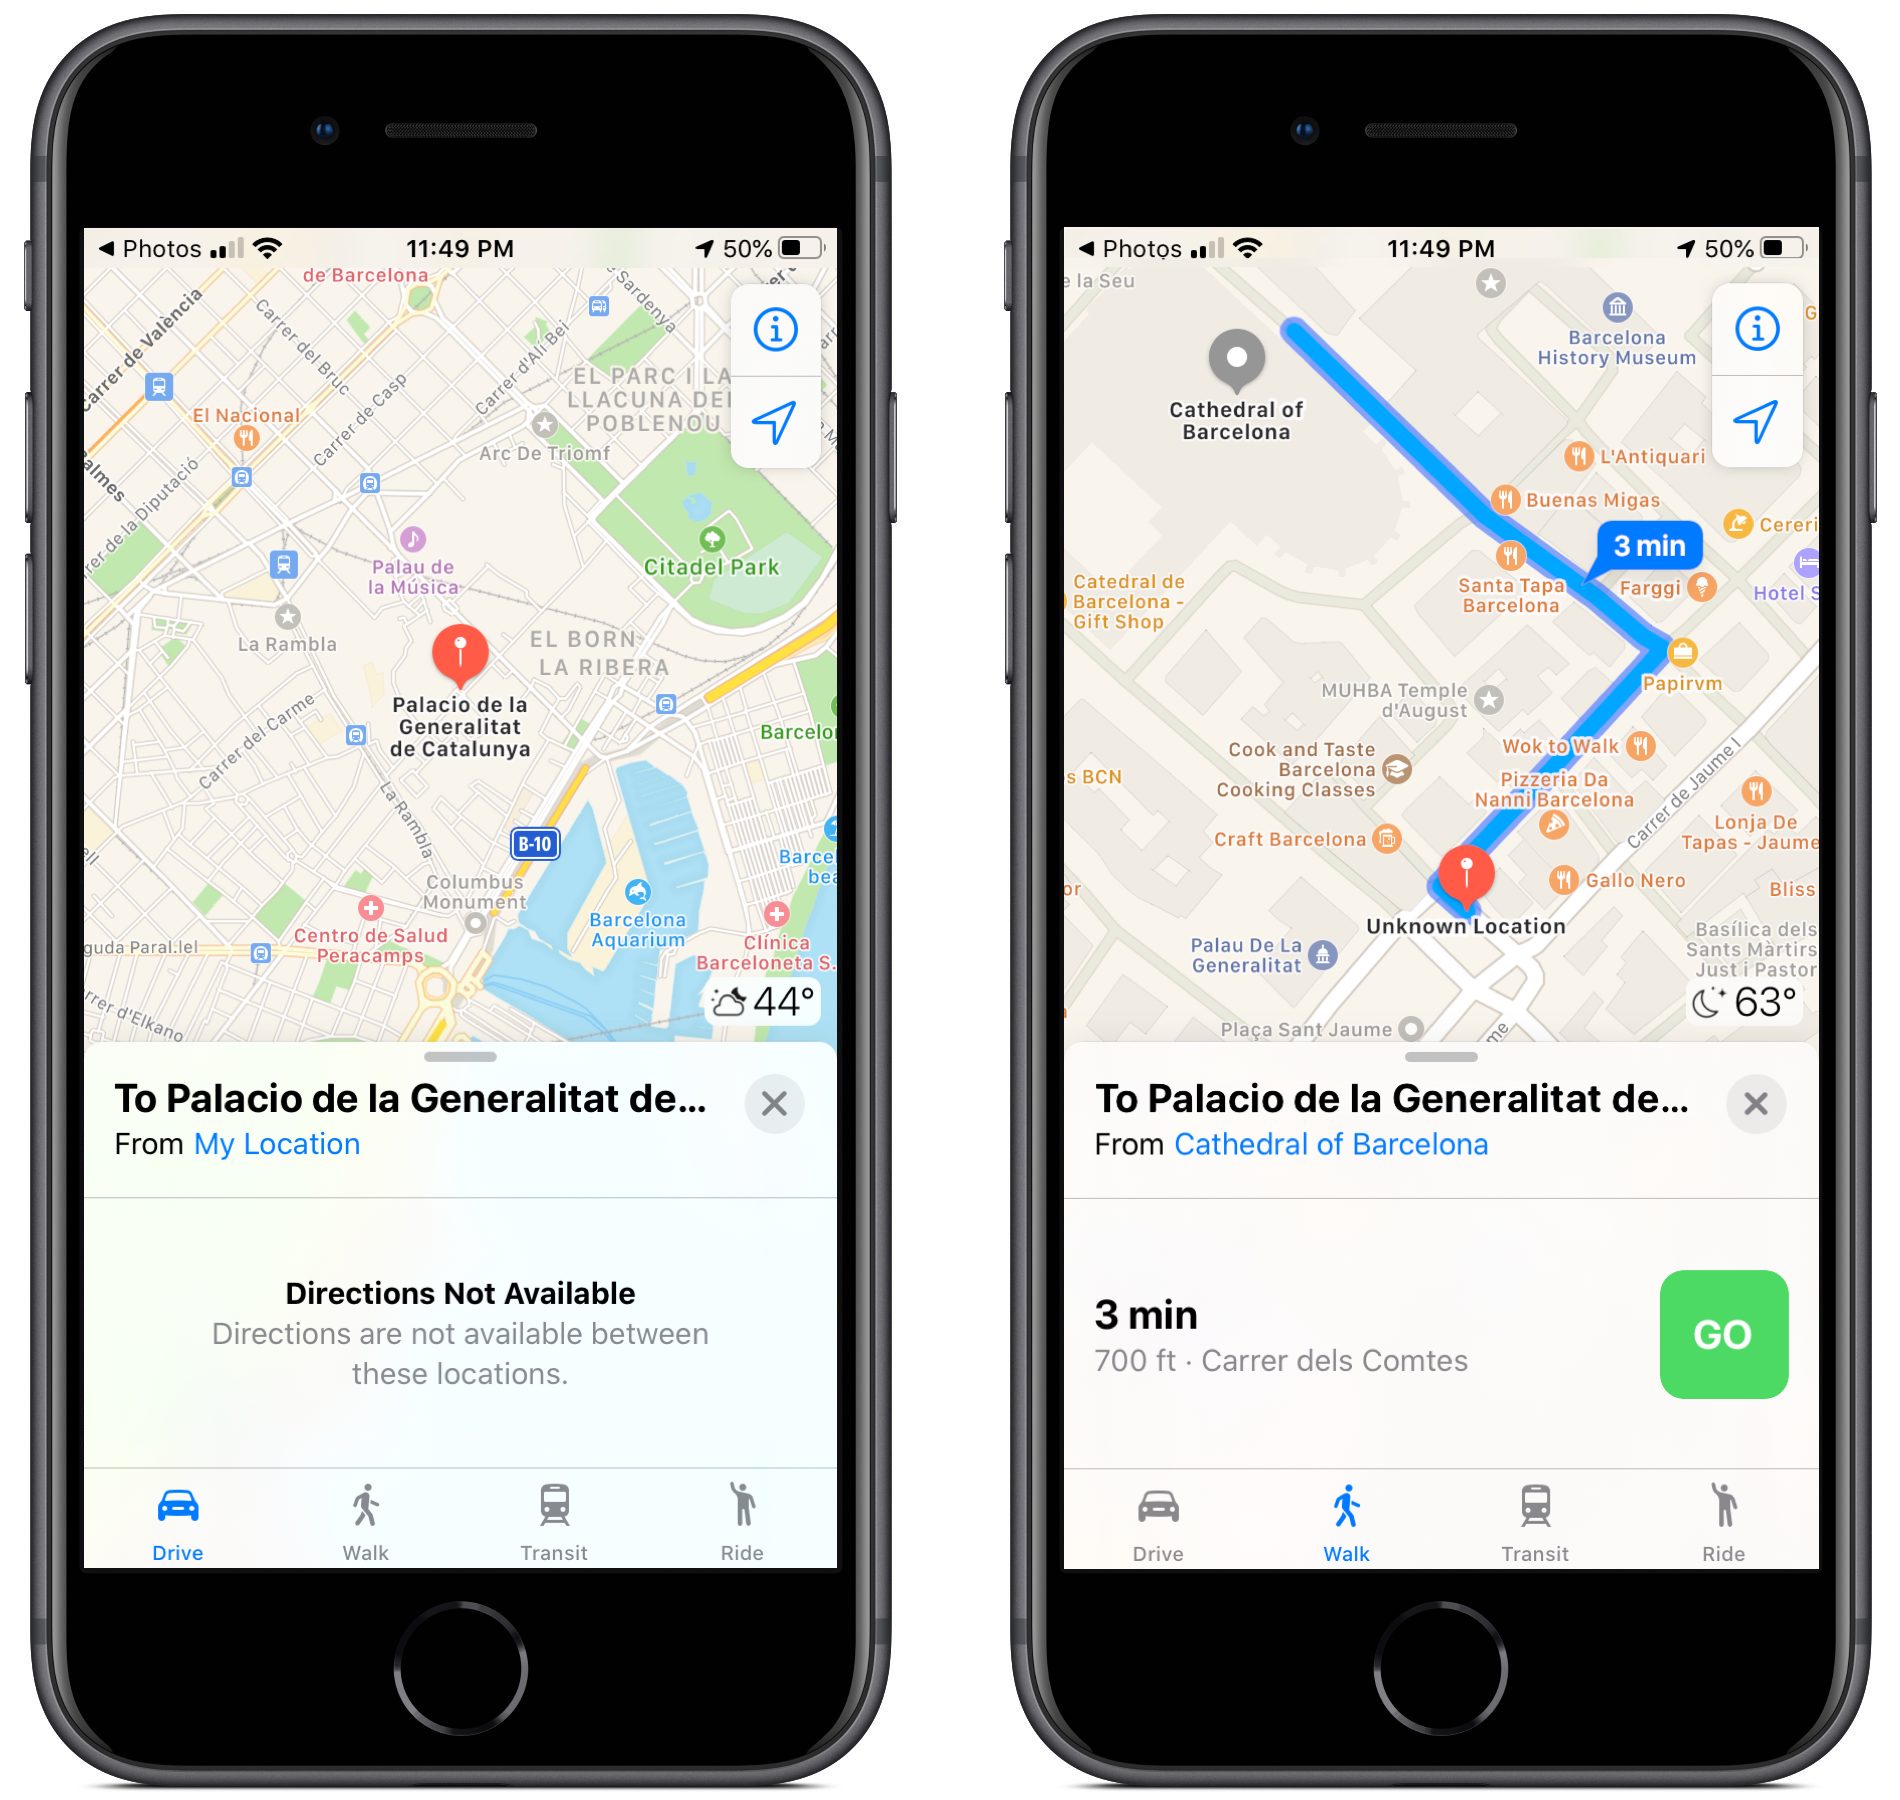
A single tap on the lower stack of 12 images brought me to the Places album showing those images, and then tapping the T-shirt image displayed it on my iPhone. (The top nine images were taken in 2014 on an earlier trip to Barcelona.)
When I swiped up on the photo, Photos displayed a map of the area with the thumbnail image of the photo where the shop was located. You can tap that thumbnail to open it on a full-screen version of the map and pinch out to zoom in for a more precise location.
However, it gets even better. Tapping the blue location title (Palacio de la Generalitat de Catalunya, Plaça de…) underneath the map causes Maps to open and display a large red map pin above the location title. Even more useful is that Maps lets you get directions to the location.
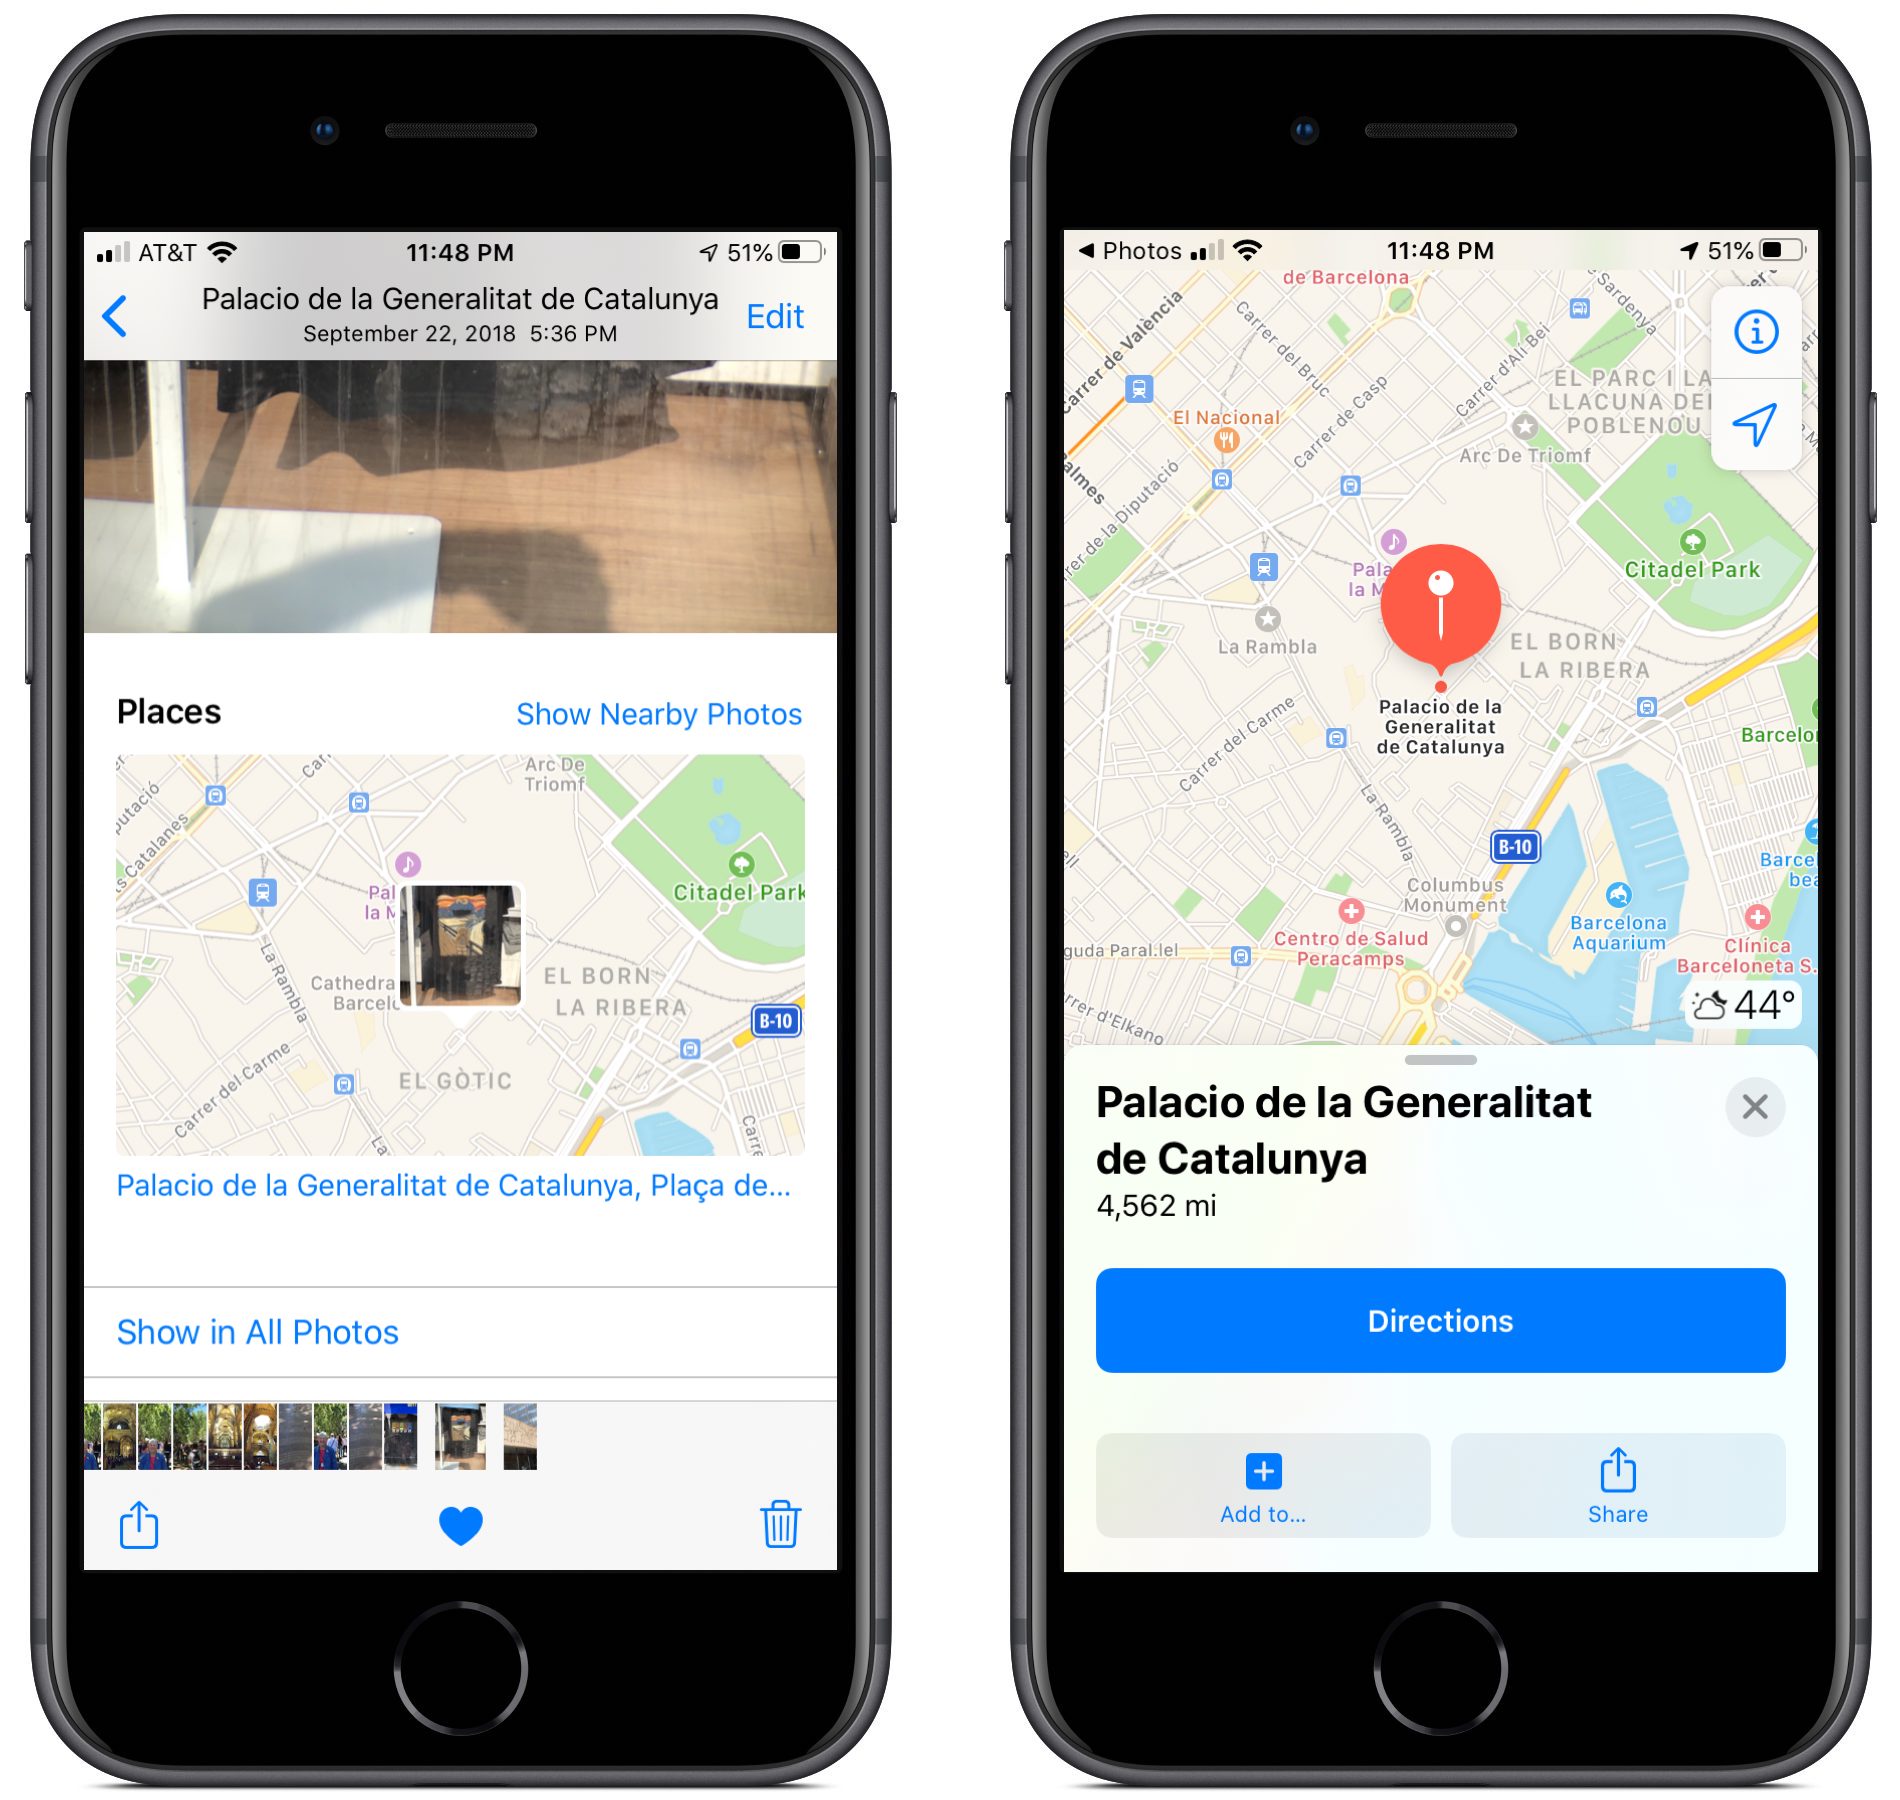
When I tap the Directions button, Maps indicates that, unfortunately for this example, no directions are available for getting to the T-shirt shop in Barcelona from my current location in Atlanta, 4500 miles away. However, tapping on “From My Location” lets me change it to, say, “From Cathedral of Barcelona,” after which I can tap the Walk icon at the bottom of the window to make Maps give directions for a short stroll to the shop.
(An earlier version of this article recommended the app Metapho for getting directions with Maps. At some point in iOS 13, Apple started displaying the address within Photos and letting us tap that to get directions in Maps, which is much easier. However, Metapho remains a fine app for looking at metadata stored with the photo.)
Other Uses for Places
Snapping photos on your iPhone can solve other location problems when you’re traveling. For example, imagine that your scheduled tour has just ended, and you are free to explore an unfamiliar city on your own. In many cases, there will be a meeting point to take the tour bus back to the hotel. You can take a photo to mark the meeting point and, if you use the procedure described above, get directions back to the bus.

One final recommendation. When you visit a new place, take a picture of the entrance. It serves as a marker within the camera roll for the beginning of images taken during your visit. That image might also be useful as the initial image of the site for a photo book, Web site, or slideshow. And you can recheck the exact location in the Places album.

So there you have it. Thanks to geolocation data stored within the photos you take, you can easily find a particular image by scanning a map for the location where it was shot. Even better, tapping that image’s location link in Photos gives you directions to get back to that spot using Maps.
Donald O’Shea is Emeritus Professor of Physics at Georgia Tech. He served as Editor of Optical Engineering from 1998 to 1999 and 2001 to 2009. He is the author of several textbooks in optics and optical design. His most recent is Designing Optics Using CODE V™, written with Julie L. Bentley (SPIE Press, 2018). He had subscribed to TidBITS from when it was distributed in HyperCard format, before the advent of the World Wide Web.
AstroHQ’s Luna Display Dongle Turns a Mac into a Second Display
Apple recently “Sherlocked” a company called AstroHQ, by that firm’s own acknowledgment, with a macOS 10.15 Catalina feature called Sidecar for converting an iPad into a secondary Mac monitor.
Sidecar essentially replicates the functionality of a physical Luna Display dongle that AstroHQ sells for $79.99—a seemingly steep price considering that Sidecar is free (see “Catalina’s Sidecar Turns an iPad into a Second Mac Monitor,” 21 October 2019, and “Luna Display Turns an iPad into a Responsive Mac Screen,” 7 December 2018).
So, what was AstroHQ to do? Company co-founder Matt Ronge took to Twitter earlier this month to announce Mac-to-Mac Mode for Luna Display.

If such a Mac-as-secondary-display set-up sounds vaguely familiar, you might be thinking of Apple’s own Target Display Mode, which does pretty much the same thing, but only under limited circumstances. You can use it to turn certain older iMacs into second displays for other Macs. But these setups tend to be temperamental.
TidBITS publisher Adam Engst used an older 21.5-inch iMac as a secondary display with his MacBook Air for a while, but the experience wasn’t entirely satisfying. He found that he often had to reinvoke Target Display Mode after the MacBook Air woke up, and he sometimes had to restart either the MacBook Air or the iMac to get it to work. Plus, it required keeping a keyboard attached to the iMac—purely to press Command-F2 to enable Target Display Mode—and while the iMac was hooked up, it somehow prevented audio from playing on the MacBook Air.
AstroHQ thinks the limited hardware requirements of Target Display Mode and its general flakiness give the Luna alternative an opening (shall we call it “Watsoning”?). For one thing, AstroHQ’s solution supports a wider range of dual-Mac scenarios—side-by-side MacBooks, for instance, or even a Mac mini with a MacBook functioning as its sole display.
But Mac-to-Mac Mode isn’t without its own issues. Most notably, although Mac-to-Mac Mode works with side-by-side iMacs, it doesn’t support either 21.5-inch or 27-inch iMacs with Retina displays—either 4K or 5K. That’s a shame, since it means you can’t use an older 27-inch iMac with Retina display as a 5K external monitor.
That said, Mac-to-Mac Mode does support standard 4K displays.
Getting Started with Mac-to-Mac Mode
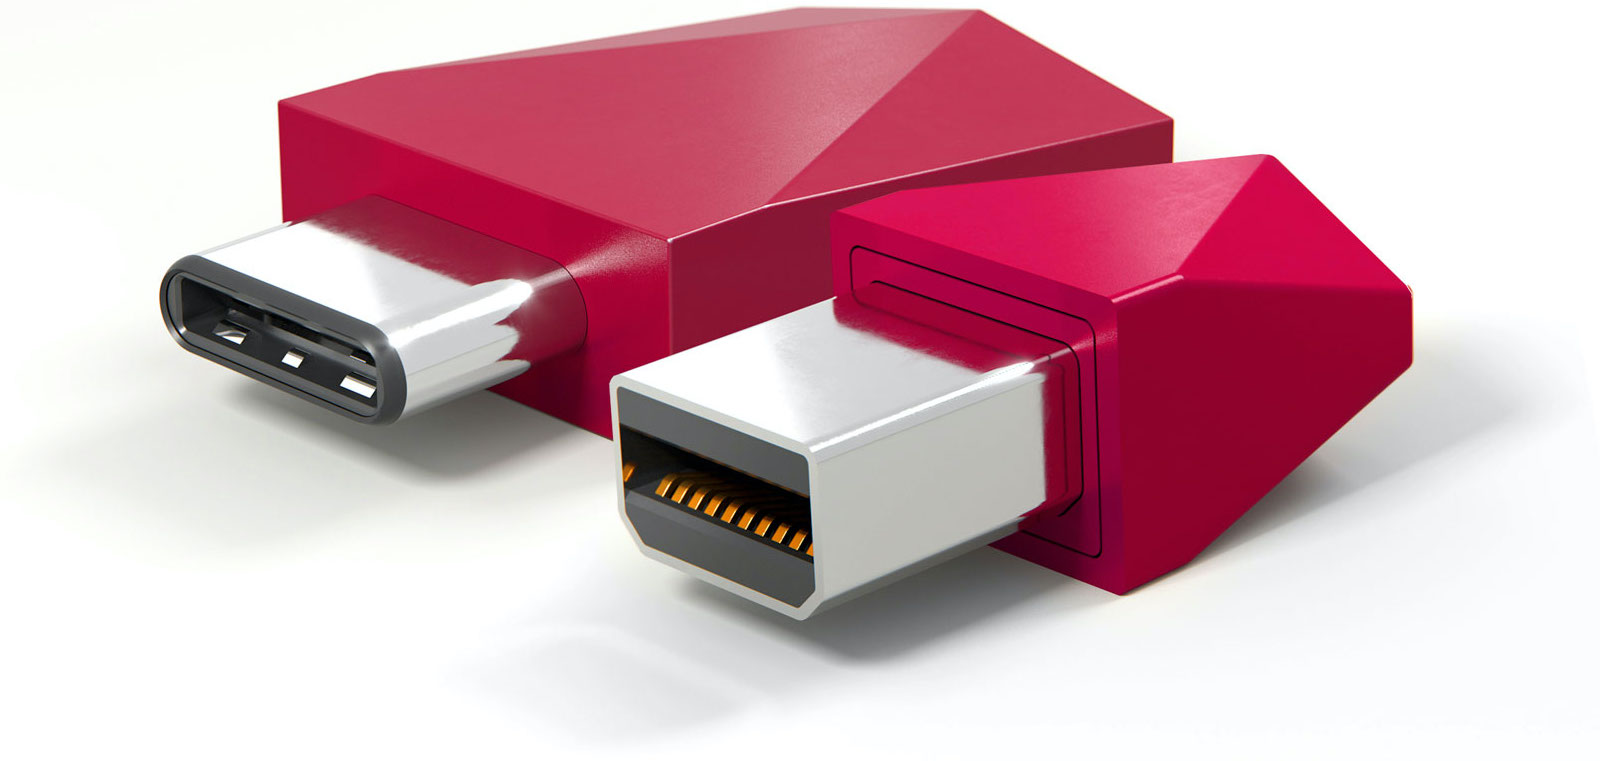 AstroHQ sells two versions of its Luna dongle—a USB-C model for use with newer Macs, and a Mini DisplayPort version for use with older machines.
In addition to one of the dongles, Mac-to-Mac Mode set-ups require the following:
- A “primary” or host Mac, from which screen content will be projected to a secondary Mac. You plug the Luna dongle into this Mac, which must be running OS X 10.11 El Capitan or later.
- The secondary Mac, which must be running 10.8 Mountain Lion or later.
- Two Luna apps. You run the Luna Display app on the primary Mac and the Luna Secondary app on the secondary Mac. Both apps are free when you buy the Luna Display dongle.
- A reliable network connection. Most people will typically use Mac-to-Mac Mode over Wi-Fi with both Macs on the same wireless network. It also works over Ethernet, if both Macs are connected to the same Ethernet network.
Enabling a Mac-to-Mac connection is straightforward, as it tends to be with a Luna-initiated Mac-to-iPad connection.
First, launch the Luna Display app on your primary Mac. If you’re running 10.14 Mojave or later, you might be asked to modify Accessibility settings in System Preferences, but you should need to do this only once.
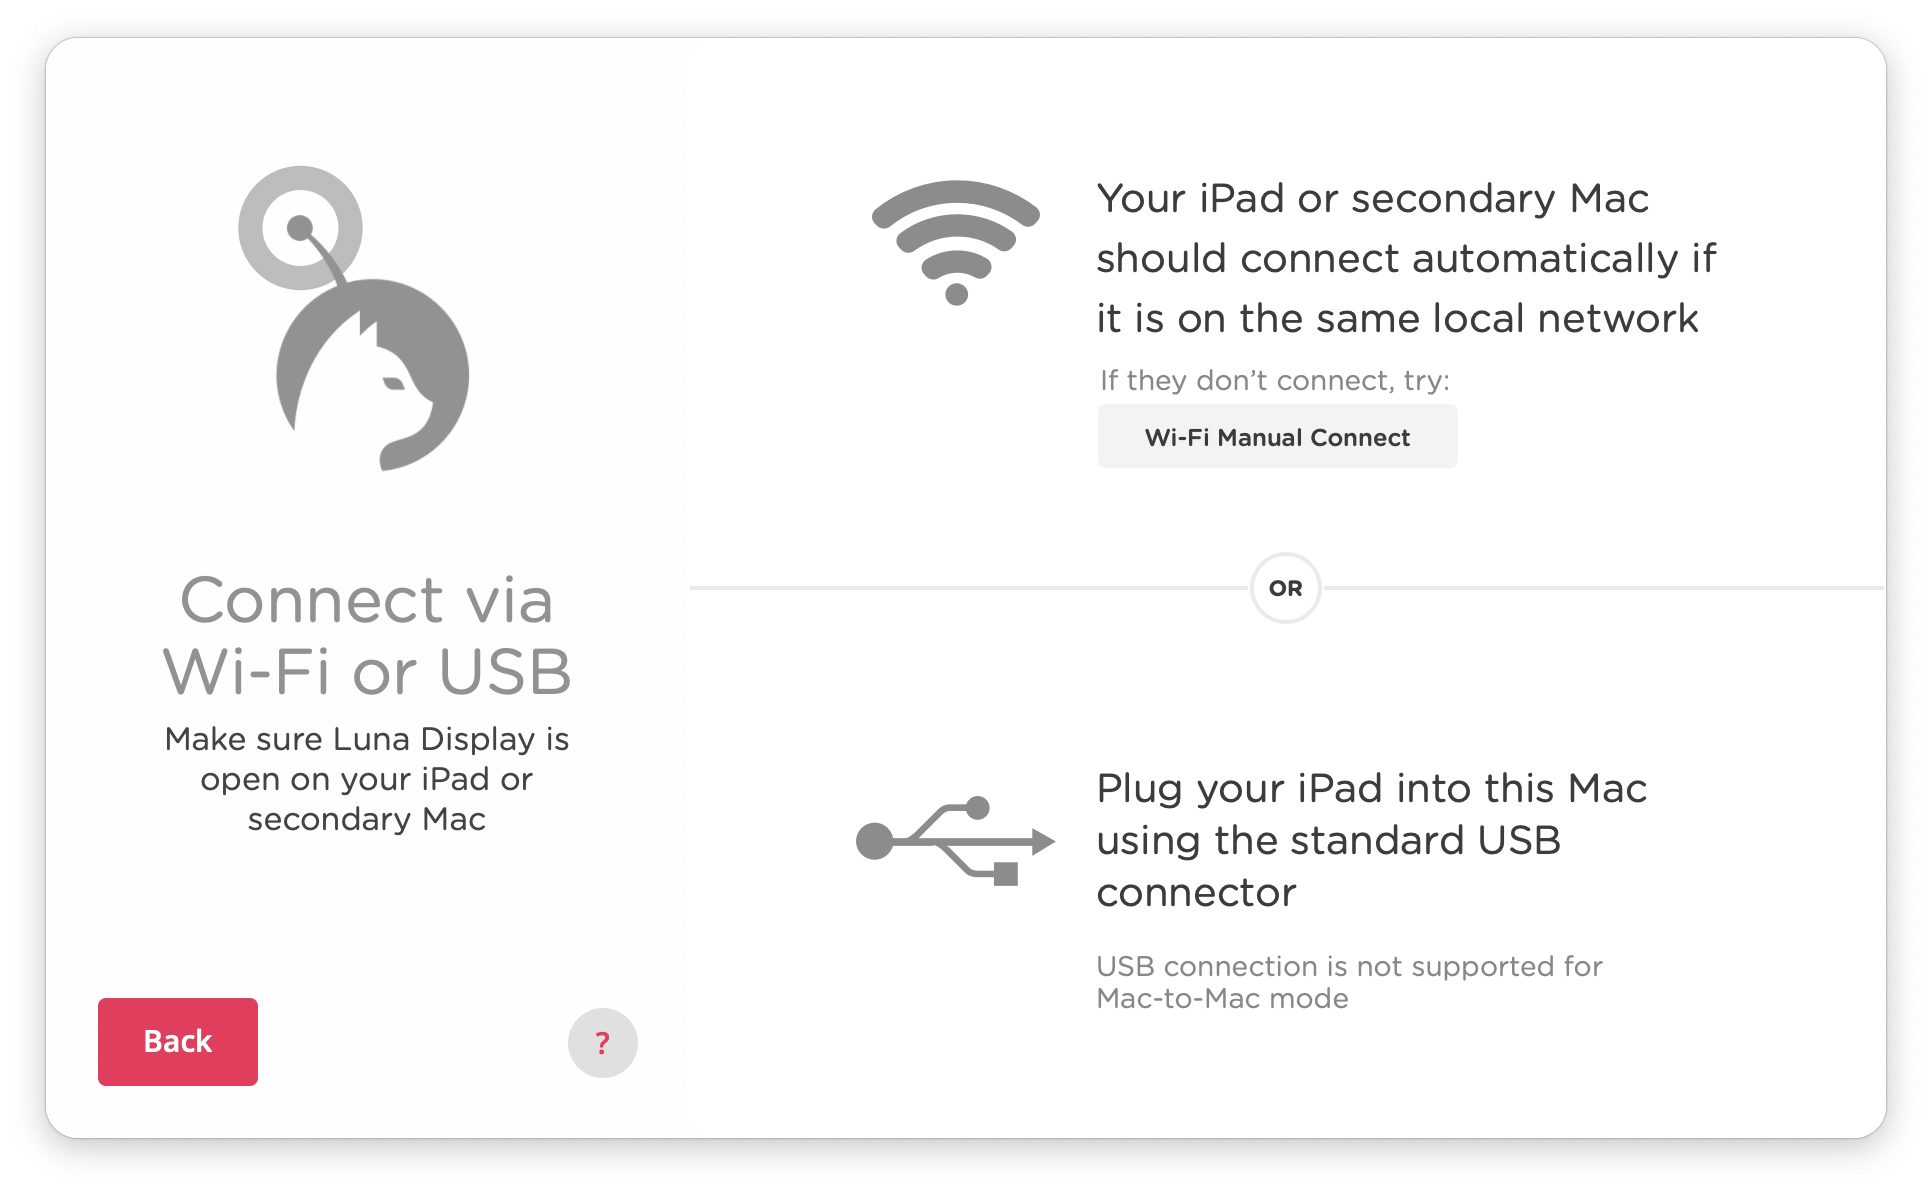
Second, open the Luna Secondary app on your secondary Mac. At this point, the two Macs should be able to link up automatically. After a bit of display flashing, your Desktop should expand from the primary Mac to the secondary Mac.

Automatic connections worked fine for me on some attempts, but not others for reasons I couldn’t discern.
If an automatic connection does not work, you can employ a workaround called Wi-Fi Manual Connect. Click this button in the apps on both Macs. You should then see a code appear in the app on the primary Mac. The same code also will show up in the app on the secondary Mac, but with a few digits omitted—fill those in, and you should be good to go.
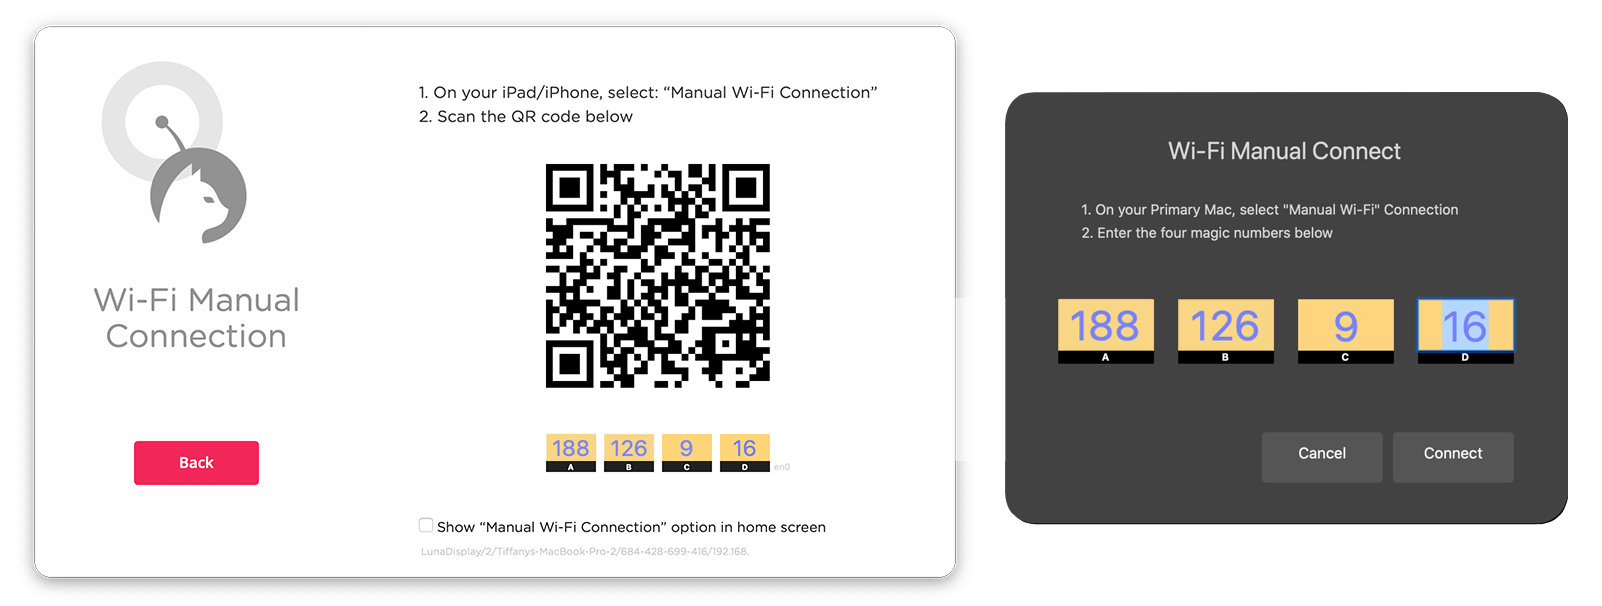
Wi-Fi Manual Connect worked well for me when automatic connections failed.
Once connected, you can use the Luna Display app on the primary Mac to tweak how the two Macs function in relation to each other, with the secondary Mac on the left or right. Clicking Custom dumps you into the standard Display settings for additional adjustments.

Using the Mac-to-Mac Mode
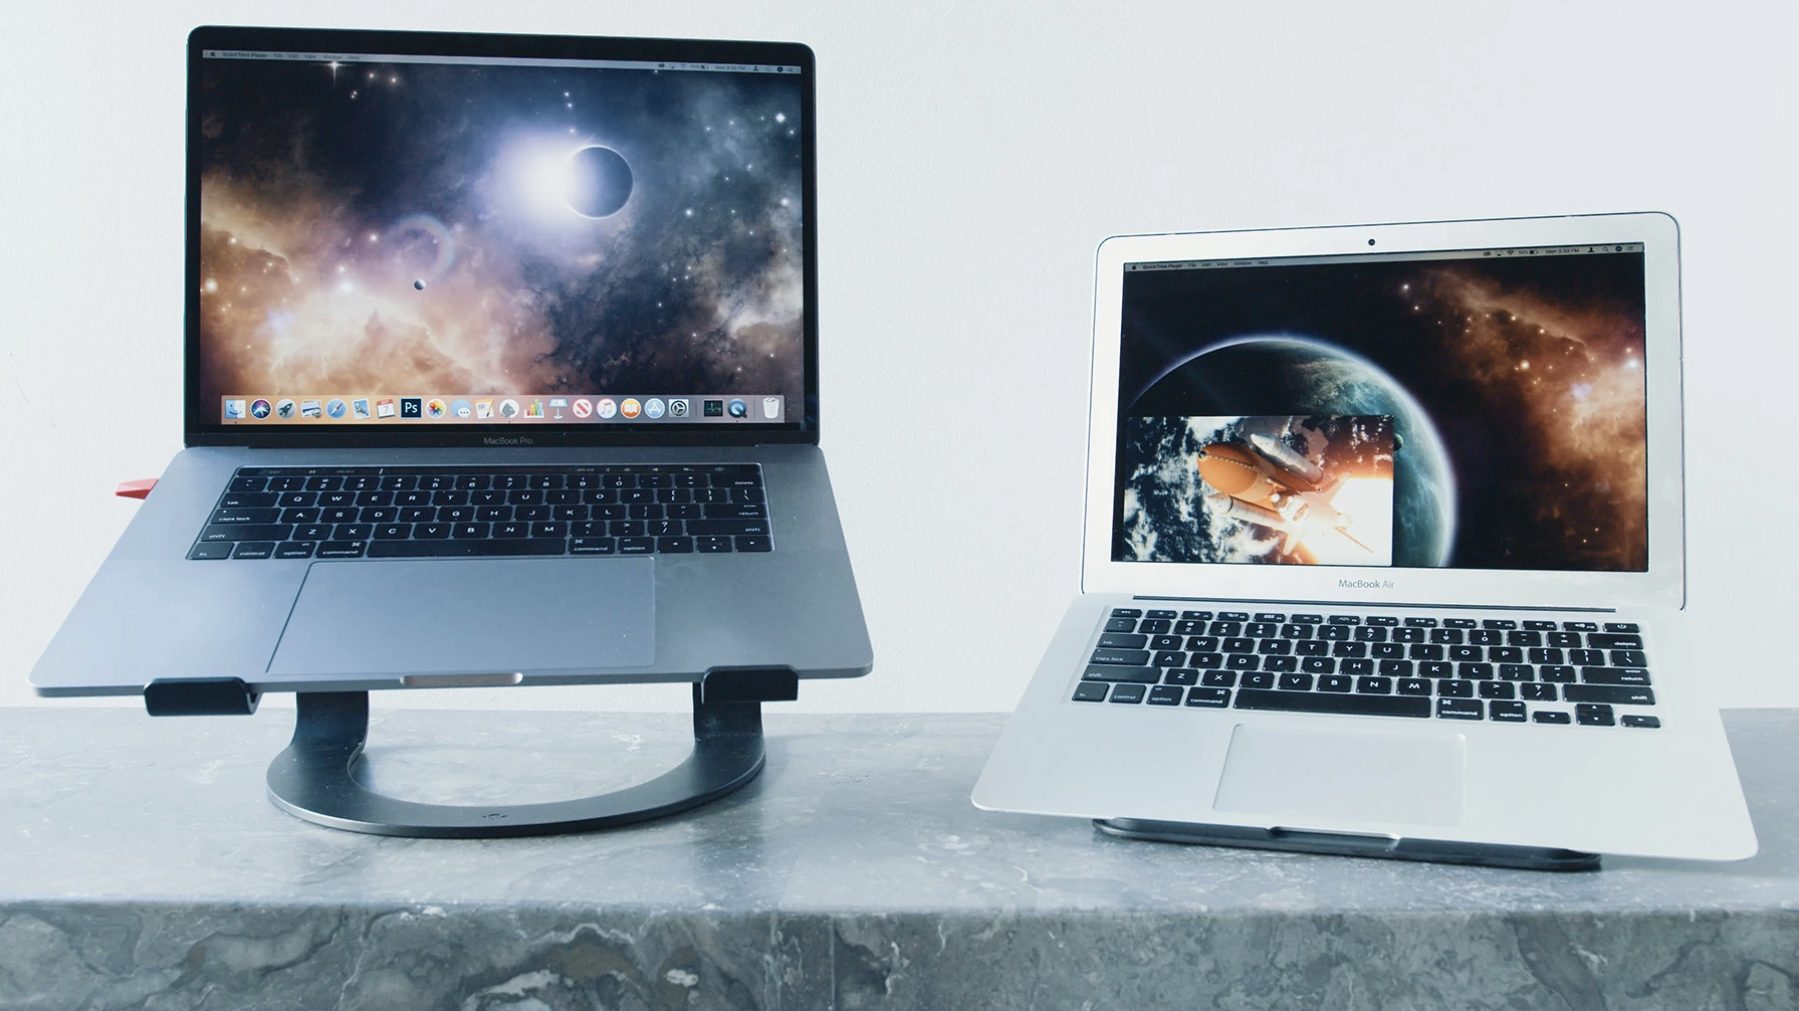
To test Mac-to-Mac Mode, I persuaded my wife to part temporarily with her trusty 2015 MacBook Air, which I paired with my 2018 Mac mini (see “It Lives! Apple Announces Pro-Focused Mac mini,” 30 October 2018) and its LG UltraFine external display (see “Apple Debuts LG’s All-New 23.7-inch UltraFine Display,” 20 May 2019).
With the MacBook Air in hand, I tested Mac-to-Mac Mode in three scenarios. Two of these involved the USB-C Luna Display dongle, and the third tapped the Mini DisplayPort version.
1: MacBook Air As Secondary Display
My goal here was to use my LG UltraFine display as the main screen for my Mac mini, with the MacBook Air off to one side as a secondary monitor, much as I would when using an iPad with the Luna Display.
This dual-screen setup worked well, with my Mac mini’s extended Desktop displaying on the MacBook Air with its full 1400-by-900-pixel resolution, and with good responsiveness.
The Mac-to-Mac Mode connection was impressively hard to break. I repeatedly closed and reopened the MacBook Air’s lid, with the Luna Display hookup continuing as if nothing had occurred. Putting the Mac mini to sleep did break the Mac-to-Mac Mode link, as you’d expect, but the Luna apps were waiting upon reawakening and automatically reinitiated the connection.
I did notice one bizarre anomaly. While both the MacBook Air’s built-in keyboard and the Mac mini’s external keyboard behaved as expected for text input, only the Mac mini’s mouse and trackpad acted normally. When using the MacBook Air’s trackpad, I couldn’t move the cursor onto the Mac mini’s display—It was notebook-only, for some reason.
2: MacBook Air As Primary Display
What if you have a Mac mini as a “headless” Mac—tucked away in a closet, perhaps? Luna Display’s Mac-to-Mac Mode lets you use a Mac laptop as a wirelessly connected monitor whenever you need it. AstroHQ has already proposed using an iPad with a Mac mini in this way.
In my case, Mac-to-Mac Mode on my wife’s MacBook Air enabled me to use my Mac mini while on the comfy sofa far from my office.
To test this single-display solution, I had to physically disconnect my LG screen from the Mac mini so that the MacBook Air would become the Mac mini’s sole display.
But first, a few macOS tweaks were required for this to function properly:
- Automatic login must be turned on via System Preferences > Users and Groups > Login Options. A pull-down menu at the top lets you designate a Mac account for automatic login. If the pulldown menu is grayed out, check if FileVault is turned on (it must be off) or if an iCloud password is used for authentication (which also disables automatic login).
- In that same Mac account, the Luna Display app must be set up to launch automatically on login (in System Preferences > Users and Groups > Login Items).
Once I had twiddled those settings, I rebooted my Mac mini while launching the Luna Secondary app on the MacBook Air. A few seconds later, the Luna apps on the Macs found each other, and—presto!—I was looking at the Mac mini desktop on the MacBook Air’s screen.
Everything worked reasonably well. Responsiveness was a bit slow but not bad. All input devices—the Mac mini’s Magic Mouse, Magic Trackpad, and Magic Keyboard, along with the MacBook Air’s built-in laptop keyboard and trackpad—behaved as expected. Dependability was decent; closing and reopening the MacBook Air’s lid had no effect on the Mac-to-Mac Mode link.
Because the MacBook Air and Mac mini connected over Wi-Fi, I was able to work anywhere within the range of my Wi-Fi network. In fact, I wrote much of this article on the MacBook Air in my first-floor living room, wrapped in a warm blanket on the sofa (because winter is nigh here in Minnesota), with the Mac mini running on the second floor in my home office. Sweet.
3: MacBook Air As Primary Computer
Until now, my Mac mini has served as the primary computer in my Mac-to-Mac Mode experiments, with my wife’s MacBook Air as a secondary display. But what if I flipped things around and made the MacBook Air my primary computer, with my Mac mini’s LG monitor serving as a secondary display for the MacBook Air?
That’s where the Mini DisplayPort version of the Luna Display dongle comes in. I plugged it into the MacBook Air for use with the primary Luna Display app, and then I ran the Luna Secondary app on the Mac mini. The goal was to extend the MacBook Air’s Desktop onto the LG display, via the Mac mini. At least, that was the idea.
Unfortunately, I could not get this setup to work reliably. The Mac-to-Mac Mode connection crashed repeatedly. At times I could move the cursor between displays, but at other times, it refused to move.
It was a mess, as AstroHQ’s Matt Ronge acknowledged when I got in touch. He said his team was scrambling to fix bugs that interfered with the use of the Mini DisplayPort model of the Luna for Mac-to-Mac Mode connections. I plan to check back on this and leave any updates in a comment below.
For now, though, although I can recommend the USB-C version of the Luna Display dongle with Mac-to-Mac Mode, if your main Mac only has a Mini DisplayPort or Thunderbolt 2 port, hold off for a bit.
Revisiting Luna Mac-to-iPad Mode
Dusting off my Luna dongles, months after writing about how they enable iPads as secondary Mac monitors, allowed me to revisit that scenario — and compare it to Apple’s equivalent, the Catalina Sidecar feature I reviewed just last month.
Because of Sidecar’s oddities, the Luna approach came as a relief in some ways. Of particular note: Using macOS with touch on an iPad screen is better with AstroHQ’s implementation. You can reach out and do just about anything with a fingertip — which seems sort of obvious, right? Ah, but as I detailed in my Sidecar review, fingertip interaction will work for some things on the iPad screen, and not others. In many cases, an Apple Pencil is required. Ugh.
So, for those who can afford the purchase of the Luna hardware, this is the best way to turn an iPad into a Mac display. Because Sidecar is free, though, most people will end up using that — which is fine since it works reasonably well, the touch issues aside, and should get better over time.
Mac-to-Mac Mode: Bottom Line
Using one Mac as a secondary display for another Mac will not have occurred to most users because, until now, this has been possible only under narrow circumstances involving specific iMac models. And, as Adam Engst notes, Apple’s Target Display Mode doesn’t work very well.
AstroHQ, scrambling to remain relevant after being Sherlocked, has therefore done the Mac world a huge favor with its Mac-to-Mac Mode. Though not yet fully baked, especially on the DisplayPort end, Luna hardware and its related software are a godsend for those with extra Macs ready to be repurposed as second displays.
This, of course, comes at a cost—the Luna dongles don’t come cheap, so every prospective user will have to weigh whether this is money well spent.