#1447: Apple lowers revenues by $5 billion, iOS 12’s Screen Time, Luna Display review, armrest mouse pad, Mac Admins podcast
Happy New Year! Alas, Apple didn’t start 2019 on a positive note, warning of lower than anticipated revenues due to slower sales in China—we look at what might be affecting iPhone upgrades. Are you dealing with RSI pain in your arm? Josh Centers recommends an armrest mouse pad that might help. He also explains how iOS 12’s Screen Time feature can help you—or your kids—get a handle on out-of-control iPhone or iPad usage. Looking for a fun podcast listen? Adam and Tonya were guests on the Mac Admins podcast, and another episode featured Apple employees speaking in public, a rare occurrence. Finally, Julio Ojeda-Zapata reviews Luna Display, a USB dongle that lets you use an iPad as a second screen for your Mac. Notable Mac app releases in the past few weeks include Fission 2.4.5, BusyCal 3.5.7 and BusyContacts 1.3.2, Audio Hijack 3.5.6, 1Password 7.2.4, Bookends 13.1.5, Evernote 7.7, EagleFiler 1.8.5, SpamSieve 2.9.35, HandBrake 1.2.0, and VLC Media Player 3.0.5.
Apple Warns of Lower Revenues, Blaming Slower Sales in China
For the first time since 2002, Apple has revised its guidance to investors, lowering revenue estimates for Q1 2019 to $84 billion, down from the early November projection of $89 to $93 billion. In an open letter to investors, CEO Tim Cook blamed the shortfall primarily on “economic deceleration,” particularly in the Greater China market, resulting in fewer sales of the iPhone, Mac, and iPad. The growth of Chinese GDP in the September 2018 quarter was the second lowest in the last 25 years, and Apple also believes that rising trade tensions with the United States have played a part in China’s economic slowdown. Despite the problems in China, Apple expects to set all-time revenue records in the United States, Canada, Germany, Italy, Spain, the Netherlands, and Korea.
While slower iPhone sales in China account for the lion’s share of Apple’s revenue woes, Cook acknowledged that iPhone upgrades weren’t as strong as Apple thought they would be in other markets too. He listed three causative factors, each of which is worth unpacking:
- “Consumers adapting to a world with fewer carrier subsidies.” iPhones seemed cheaper several years ago, when it was standard (at least in the US) for people to buy carrier-subsidized iPhones in exchange for being locked into an expensive 2-year cellular plan. In 2014, for instance, you could pay $199 for an iPhone 6—a far cry from today’s $749 iPhone XR and vastly less than the $1449 top-of-the-line iPhone XS Max. Even though iPhone installment programs remain common, customers still see that one-time price tag, which was previously hidden. Plus, the iPhone installment payment comes on top of a cell plan rather than being bundled in—even if the amounts are comparable to cell plans of yesteryear, the iPhone’s share is more obvious.
- “US dollar strength-related price increases.” Regardless of how people pay for iPhones, the list prices of recent models are notably higher. Apple has also raised prices on the Apple Watch, iPad Pro, and even accessories like the Apple Pencil and Smart Keyboard Folio. This claim about the strength of the US dollar implies that the increases may have been necessary to maintain gross margins on products that are also likely more expensive to build. Whatever the reason, higher prices will slow sales—lots of people have seen the stratospheric price tags on the new iPhones and decided to wait another year.
- “Some customers taking advantage of significantly reduced pricing for iPhone battery replacements.” Let’s hope this is a case of unintended consequences. Starting with the iPhone 6, 6s, and SE, Apple silently reduced performance on iPhones with weak batteries to avoid unexpected shutdowns. When that change was discovered, the resulting hue and cry caused Apple to lower the price of battery replacements from $79 to $29 for all of 2018 (see “Apple Apologizes for iPhone Battery Issue, Drops Replacement Prices to $29,” 3 January 2018). The lower price caused many people to replace the batteries in older iPhones rather than upgrading, and the coverage educated many others about the utility and possibility of battery replacements. Had Apple played the iOS performance card differently, many more people might have upgraded.
- iPhone size? The three previous items can be bundled into the general category of “Apple’s new iPhones aren’t enough better than what I have to justify the price.” Although Cook didn’t get into specifics, I believe Apple’s insistence on making iPhones ever larger has also reduced upgrades. Many people have complained to me about how they’re not upgrading from an iPhone 5s, iPhone 6, or iPhone SE mostly because the new models are so much larger.
As much as Apple’s reduced revenue guidance isn’t good news, Cook took pains to call out bright spots in the company’s financials. In particular, revenue outside the iPhone business grew by nearly 19% year-over-year, with all-time revenue records for the Services, Wearables, and Mac segments. The popularity of the Apple Watch Series 4 and the AirPods caused Wearables revenue to grow by almost 50% year-over-year, and Apple admitted to being unable to make enough of both to meet demand. Sales of the iPad Pro and the MacBook Air were also constrained due to supply problems.
So no, Apple is not doomed, although there will undoubtedly be pundits coming to that conclusion. The real question is what Apple can do to increase sales in China. In May 2017, analyst Ben Thompson of Stratechery pointed out in Apple’s China Problem that the most important layer of the smartphone stack in China is WeChat, not iOS, and by extension, any of Apple’s other services that support platform lock-in. Thompson says:
Connie Chan of Andreessen Horowitz tried to explain in 2015 just how integrated WeChat is into the daily lives of nearly 900 million Chinese, and that integration has only grown since then: every aspect of a typical Chinese person’s life, not just online but also off is conducted through a single app (and, to the extent other apps are used, they are often games promoted through WeChat).
There is nothing in any other country that is comparable, particularly the Facebook properties (Facebook, Messenger, and WhatsApp) to which WeChat is commonly compared. All of those are about communication or wasting time: WeChat is that, but it is also for reading news, for hailing taxis, for paying for lunch (try and pay with cash for lunch, and you’ll look like a luddite), for accessing government resources, for business. For all intents and purposes WeChat is your phone, and to a far greater extent in China than anywhere else, your phone is everything.
In other words, for people outside China, switching from an iPhone to an Android is non-trivial. You’d lose access to all your iOS apps, you wouldn’t be able to communicate as easily with friends using iMessage, you wouldn’t have Apple Pay or be able to use Apple Pay Cash, you wouldn’t be able to have an Apple Watch, you’d lose access to iCloud Photo Library, integration with your Mac would suffer, and so on. Android has alternatives for all these Apple ecosystem features, but switching to them would be painful.
For Chinese users who rely on WeChat, however, the iPhone is just another smartphone and has to compete every upgrade season on its hardware merits and perceived brand value against a crop of pretty good Chinese Android phones. That likely means that Apple’s every-other-year approach to major new iPhone releases may hurt it in China in off years such as this one.
Screwed Shoes, Squirrels, and Apple on the Mac Admins Podcast
If you’d like to hear more from Tonya and me, we had an awfully good time on the Mac Admins podcast, hosted by Tom Bridge, Charles Edge, and Marcus Ransom, in the 17 December 2018 episode, “Screw Your Shoes with Adam and Tonya Engst.” And yes, we’ll explain the podcast title, talk about how a squirrel ate our Internet connection, and admit that we’re racked with guilt about Internet advertising. As you’d probably expect, we also talk a lot about Internet technical publishing. Give it a listen—it’s a ton of fun.
While you’re at the Mac Admins site, if you’re a serious geek, and especially if you’re an Apple admin, I also encourage you to check out the 12 December 2018 episode, “The One with Apple.” That’s because the hosts pulled off a major coup in booking Apple’s Jeremy Butcher (Enterprise Product Marketing) and Doug Brooks (Mac Hardware Product Marketing) as guests and getting official approval from Apple to release the episode afterward. It’s unusual for Apple employees to speak in public—often when I’ve seen Apple presentations at conferences, they’re given on the condition that nothing said may be quoted publicly.
Much of the conversation won’t be of interest (or perhaps even understandable) to the average Mac user, but I thought two bits were generally notable. First was a nice summary of what the T2 chip does in modern Macs, which breaks down to security and integration. On the security side, the T2 enables Secure Boot, includes the Secure Enclave that stores private data locally, and makes Touch ID possible on the MacBook Pro and MacBook Air.
On the integration side of things, I hadn’t realized the level to which the T2 takes over from previously discrete logic board components, such as the System Management Controller, the audio controller, the camera’s image signal processor, and the SSD controller. Security and integration also meet in one interesting spot—apparently, the T2 physically disconnects the microphone on the MacBook Air when the lid is closed to ensure that it can’t be used to spy on you.
Second, in response to a direct question from Charles Edge about whether Apple product managers and developers are looking at online forums, the Apple guys said, “We are huge consumers of customer feedback and developer feedback. We might not always participate, but we are eager to listen and so we’ve got folks paying attention to all that stuff.… We listen voraciously.” I wonder how true that is outside of the enterprise world, but it’s good to hear that at least some parts of Apple are paying attention to what users say online.
Finally, I was impressed to hear that the Mac Admins hosts switched to Group FaceTime in honor of their Apple guests, and it reportedly worked well. That hadn’t been our experience in previous tests for TidBITS group calls, so we’ll have to give it another try.
Relieve RSI Pain with This Armrest Mouse Pad
After publishing “Anker’s Vertical Mouse Provides Cheap RSI Relief” (7 December 2018), I heard from many of you who also use a vertical mouse or are thinking about trying one. What I didn’t reveal in that review is that I’ve also been testing another accessory that further optimizes the vertical mouse’s ergonomics: an armrest-mounted mousepad.
While a vertical mouse relieves forearm strain by putting your hand and wrist in a more natural position, extending your arm to reach the mouse on your desk might still cause some pain in your shoulder and upper arm. You may also find the corner of the desk painful against your wrist, as I did.
I decided that if I could somehow use my mouse on my chair’s armrest, that would solve the problem. A bit of searching revealed just the ticket: the Skyzonal Ergonomic Adjustable Wrist Rest, which costs $29.99 from Amazon. But that price seemed steep for a piece of plastic, so I turned to AliExpress, where I found the same product for $17. It took about a week to arrive, but it’s always a crapshoot when ordering direct from China, so if you’re in a hurry, it might be worth paying the Amazon markup.
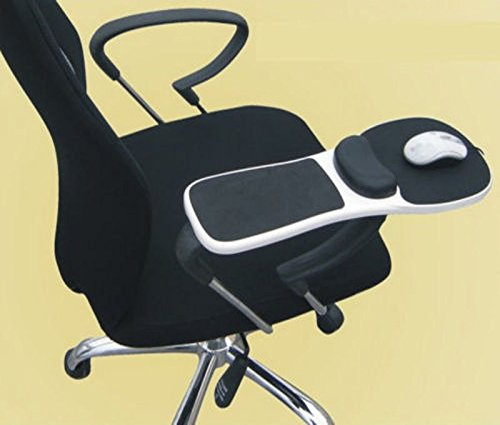
The soft, black mouse pad gel material on both ends makes the armrest more comfortable than a DIY solution would likely be. I’ve also been pleased with the included wrist rest, which has just the right amount of give and a nice, smooth texture. Many gel wrist rests are covered in a rough synthetic material that feels awful to me.

The problematic thing about this wrist rest is that its included straps aren’t nearly long enough to wrap around my chair’s armrest, something I had anticipated after reading Amazon reviews. I found a quick fix by channeling my inner Red Green, duct-taping the thing to my expensive Herman Miller Aeron chair, which worked better than expected. I eventually purchased some 27-inch Velcro straps, which are maybe a bit too long, but do the job quite nicely. The AliExpress listing for the mouse pad implied that it would include a desk clamp that would theoretically serve as an alternative to the straps, but there was no evidence of it in my package.
You might guess that there is some inherent awkwardness when using a mouse from your chair, and you’d be right, but I find the trade-offs worth it. I have to be careful when moving the chair so I don’t knock my mouse onto the floor, which happens more often than I care to admit. Another thing is, because I generally recline, the mouse tends to slide back onto the wrist rest. Before I take my hands off the mouse, such as when I need to type, I try to place the mouse against the wrist rest so it doesn’t slide around. I also had to disable the bottom-left hot corner for activating Mission Control, because I kept triggering it every time I let go of the mouse.
Typing took a bit of getting used to. I tend to scoot away from my desk while I’m just mousing, but I slide closer to type. I set the height of the armrest so that the mouse pad is an inch or two above the keyboard, which works okay, but prevents me from accessing the number keys. Also, I have to be careful not to tilt forward, which causes the mousepad to mash the keyboard. This is one time that not having a numeric keypad would be a win.
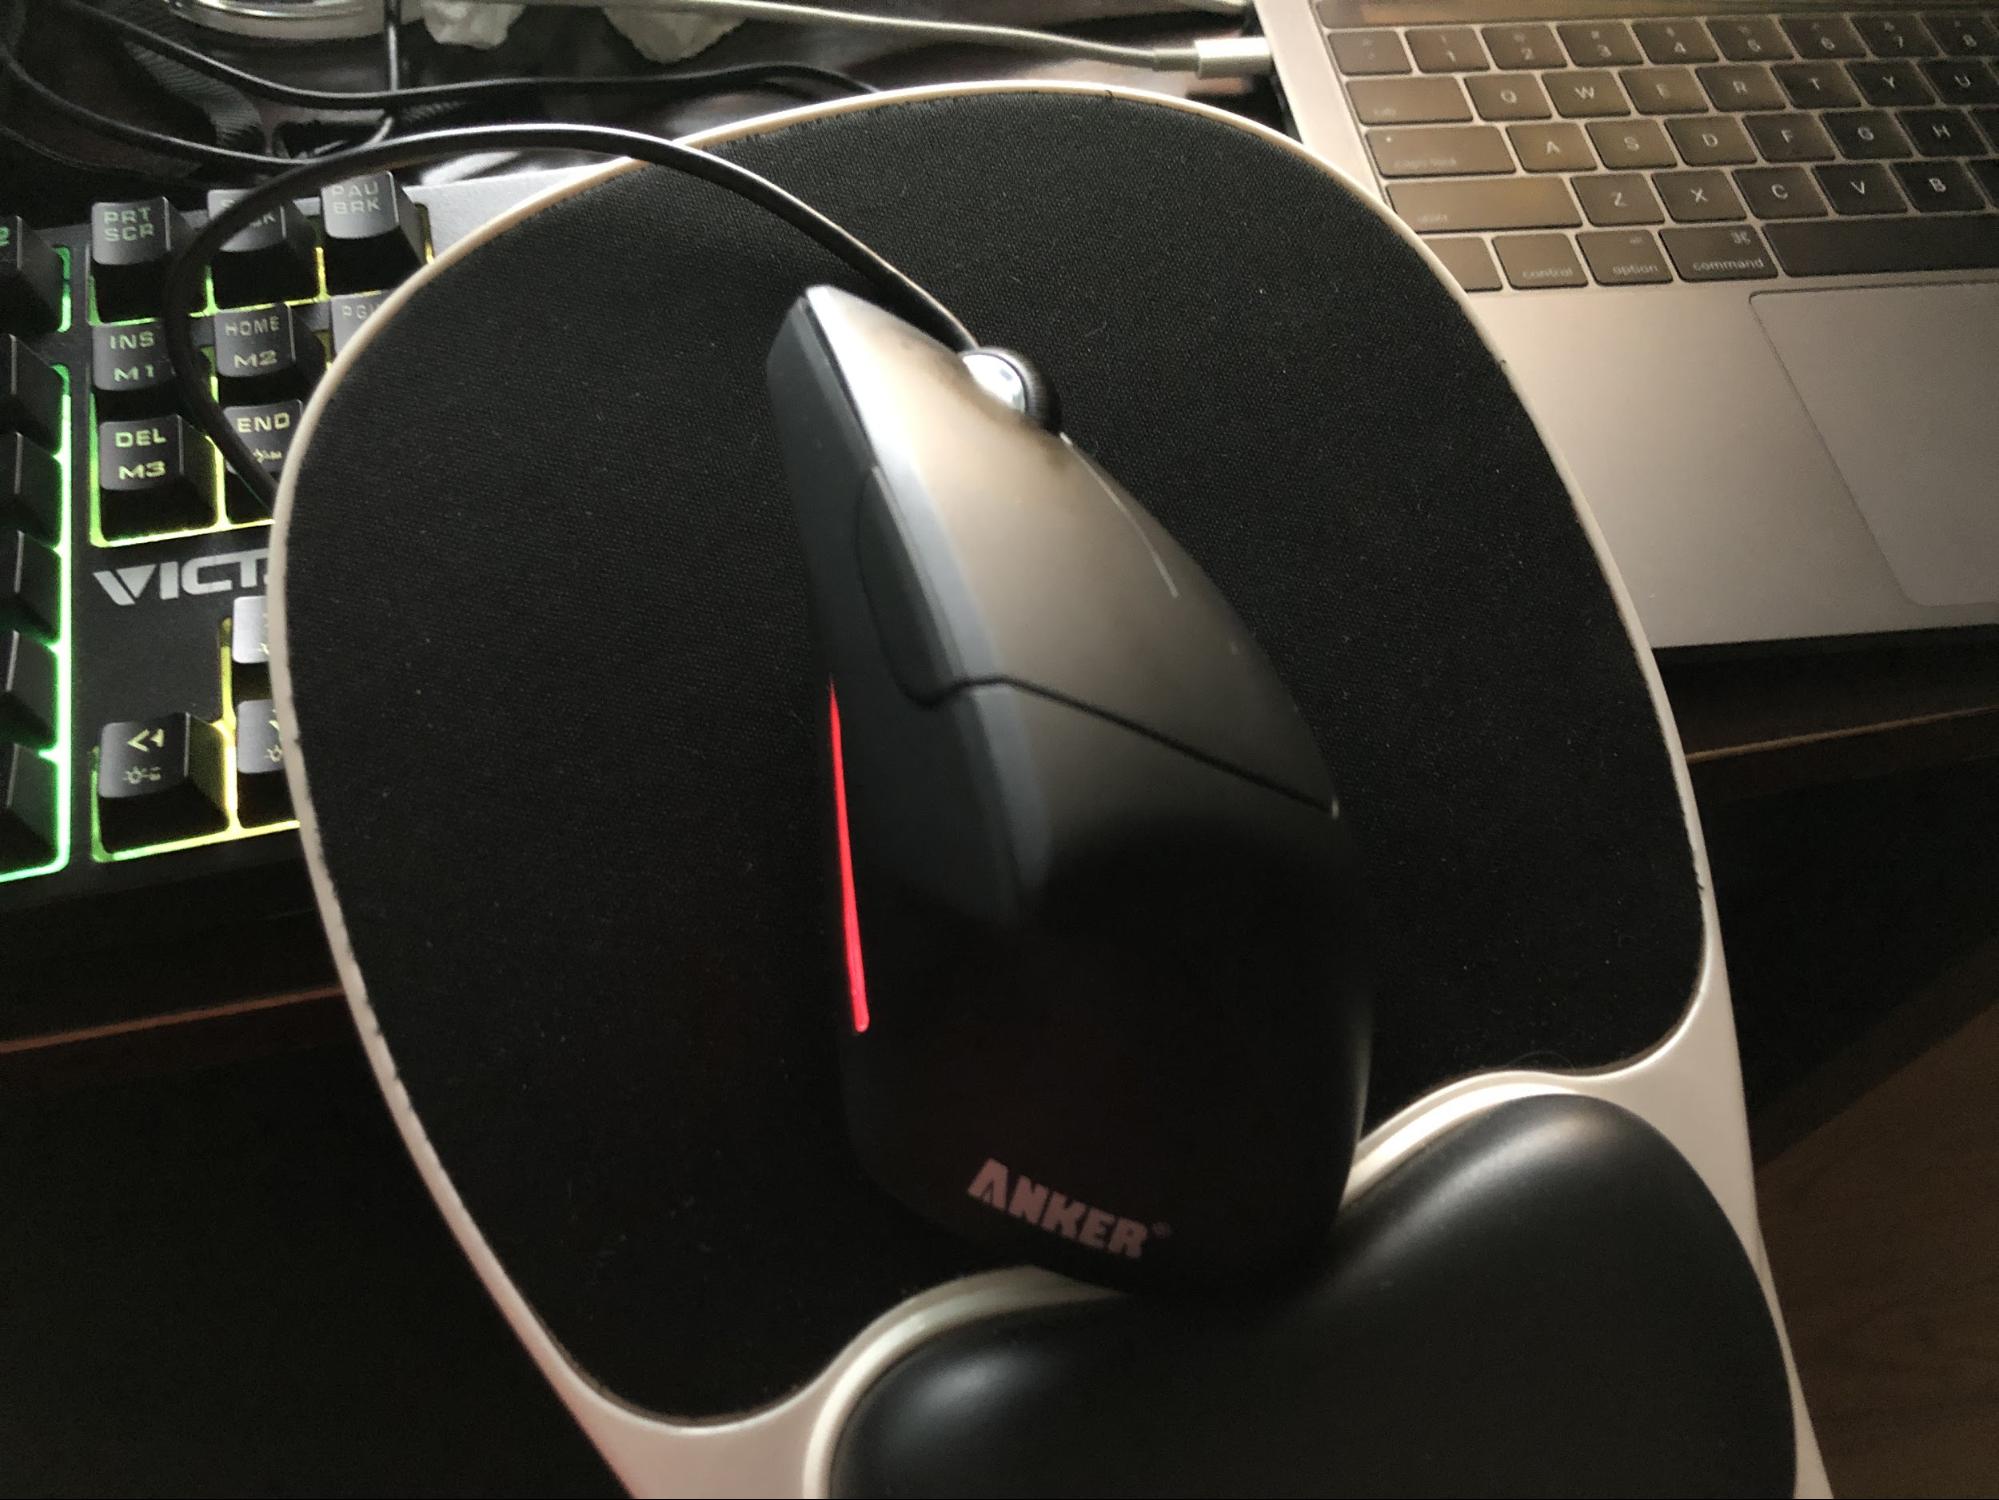
But the slight inconveniences that come with the armrest mouse pad are worth it because, for the first time in years, my right arm doesn’t hurt, regardless of how much mousing I do in a given day.
Inside iOS 12: Manage Device Usage with Screen Time
It seems like everyone’s nose is in their phone these days, drawing criticism that smartphones are addictive. To address this concern, Apple has introduced a suite of features in iOS 12, called Screen Time, that lets you see how often you use your iOS devices and control how often you use certain apps. Apple also moved iOS’s parental controls into Screen Time, giving you the capability to see and control (to an extent) the usage of children in your Family Sharing group.
Before I show you how to use Screen Time, let’s clear up a common misconception. Some have said that Screen Time won’t make a difference because people will just ignore its warnings. That’s not the point! Apple isn’t your mother—Screen Time is just a set of tools that help you manage your time.
With that attitude in mind, let’s learn how to use these new tools. For a guide to other new features in iOS 12, check out my book, Take Control of iOS 12.
Turn on Screen Time
To get started, turn on Screen Time in Settings > Screen Time. A screen appears telling you everything that Screen Time can do. Tap Continue and you’re asked if the device is yours or your child’s. Choose the former to go directly to Screen Time settings.
However, if you’re configuring your child’s device, iOS 12 walks you through setting up each of Screen Time’s features:
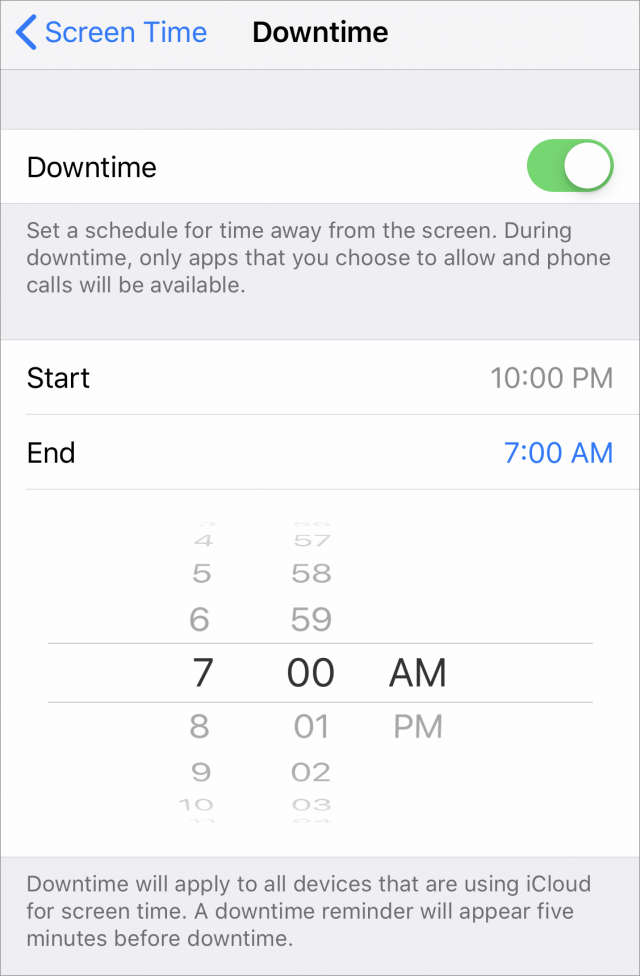
- Downtime: This lets you set a schedule during which Screen Time prevents you from using the device, from 10 PM to 7 AM by default. The idea here is to help you avoid tech temptations when you should be asleep.
- App Limits: Here you can limit daily usage for categories of apps: social networking, games, etc. You can choose any amount of time from 1 minute on up. You can’t limit specific apps here, but it is possible to get that specific—I’ll explain how later.
- Content & Privacy: This screen just tells you that you can configure content settings and lock privacy settings but doesn’t offer any actions.
Finally, Screen Time prompts you to set up a Screen Time passcode, which is separate from your device passcode and is required to bypass any of Screen Time’s restrictions. Without a passcode, your child (or you) can ignore all time limits, which somewhat misses the point.
If you’re setting up Screen Time for yourself, you may still want to set a passcode to make you think twice before bypassing your own set limits. Or you could let a trusted partner set the passcode so they can hold you accountable.
You can turn any of these options on or off at any time, so don’t feel compelled to configure them now. And while you can limit a child’s device during setup, you can also limit the device of any child in your Family Sharing group by going to Settings > Screen Time > Child’s Name. More on that toward the end.
Check Your Consumption
Screen Time provides you with a report every week, telling you how much time you spent with your devices and what you were doing. If you have children set up on Screen Time, you’ll also get a report on their usage.
You can also check your usage at any time with the chart in Settings > Screen Time, which shows your total screen usage for the day, along with a breakdown of the categories you’ve spent the most time on.

Tap that summary to see a more detailed graph that shows an hourly breakdown, or, if you switch to displaying the last 7 days, a daily breakdown. With these and other graphs in Screen Time, tap and hold to see specific values at different points in time overlaid on the otherwise unlabeled graph.

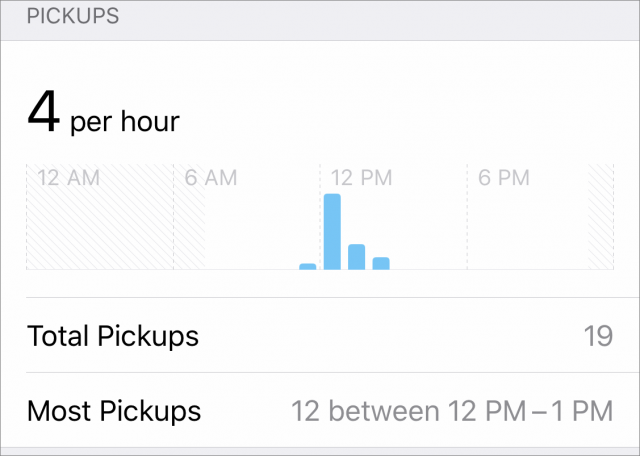
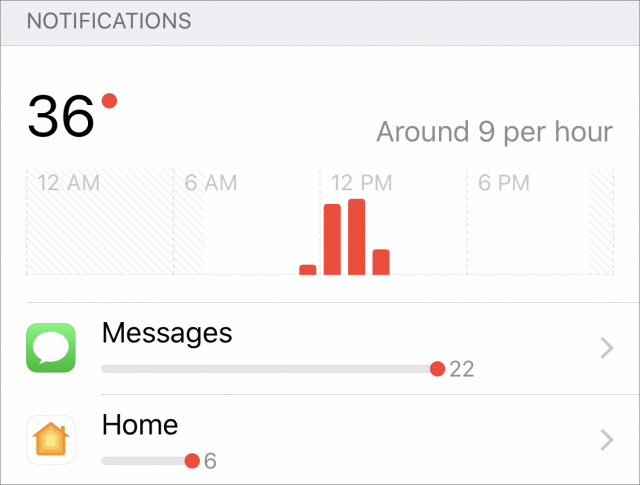
Scroll down to see additional details on your Most Used apps, Pickups, and Notifications:
- Most Used: This section lists your most used apps (and Web sites), in order of usage. You can tap Show Categories if you’d rather see entire app categories instead of individual apps. Tapping an app or category lets you set a restriction for it, which I explain below.
- Pickups: This section tells you how often you’ve picked up your device and when. Even if you’re not using your device much, you may be checking it incessantly. What counts as a pickup is somewhat unknown, but it’s not uncommon to get one in the middle of the night even if you just tap the screen to see what time it is.
- Notifications: Feel like you’re getting hammered by notifications? This section can help quantify your impressions. It tells you how many you’ve received in a designated time period, estimates how many you get every hour or day, and lists which apps send you the most. Most importantly, you can tap on an app to be taken to its notification settings, where you can turn off notifications for that app entirely.


Observing your device usage is a good start and may be all that many people need, but Screen Time also lets you take it a step further and limit your usage.
Restrict Screen Time
Screen Time offers three ways to limit your usage:
- Downtime: As I explained above, Downtime lets you block access to your devices during particular hours every day. Set it up in Settings > Screen Time > Downtime, where all you have to do is enable the Downtime switch and set start and end times. Unfortunately, there’s no way to have a different schedule on weekends.
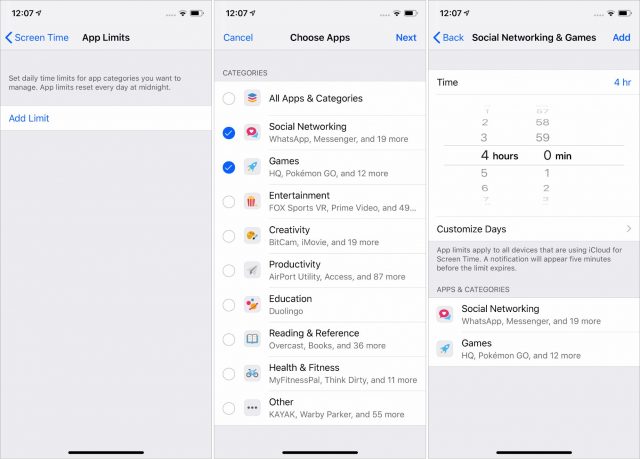
- Limit App Categories: To limit the amount of time you can spend using an entire category of apps, go to Settings > Screen Time > App Limits and tap Add Limit. In the Add screen, you can set how much time the limit should be for, and customize which days of the week which it should be active. If you’re setting the limit for yourself, you could keep Block at End of Limit off so it’s just a nag; for a child, you’ll likely want that switch on. App categories include Social Networking, Games, Entertainment, and more, although it seems unlikely you’d want to set a limit for Creativity or Productivity. These categories also apply to Web sites in Safari, so if you try to get around the social media limit by going to Facebook’s Web site, Screen Time will still have your number.
- Limit Individual Apps: Apple doesn’t make it obvious, but you can limit individual apps and Web sites by tapping the daily usage graph in Settings > Screen Time and then, in the Most Used section of the next screen, tapping an app or Web site and then Add Limit. Restricting a particular app could be helpful if you want to stop yourself from overusing an app that happens to be in the Creativity category without blocking anything else in that category.
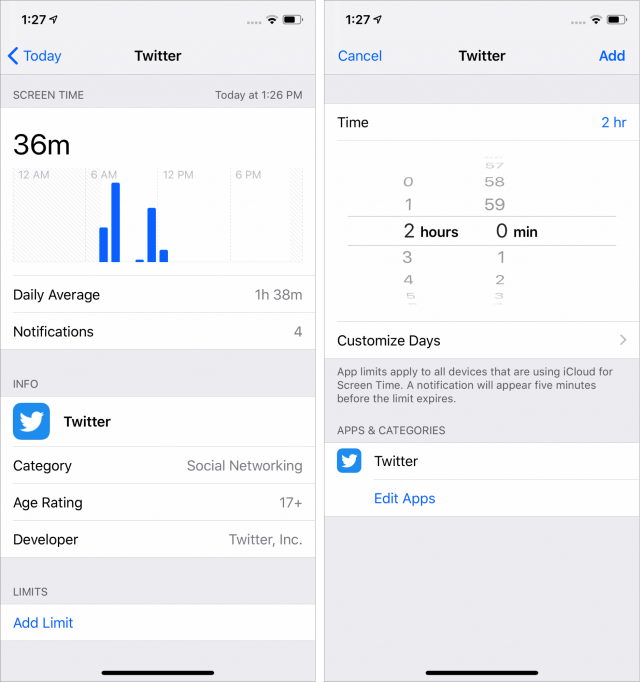
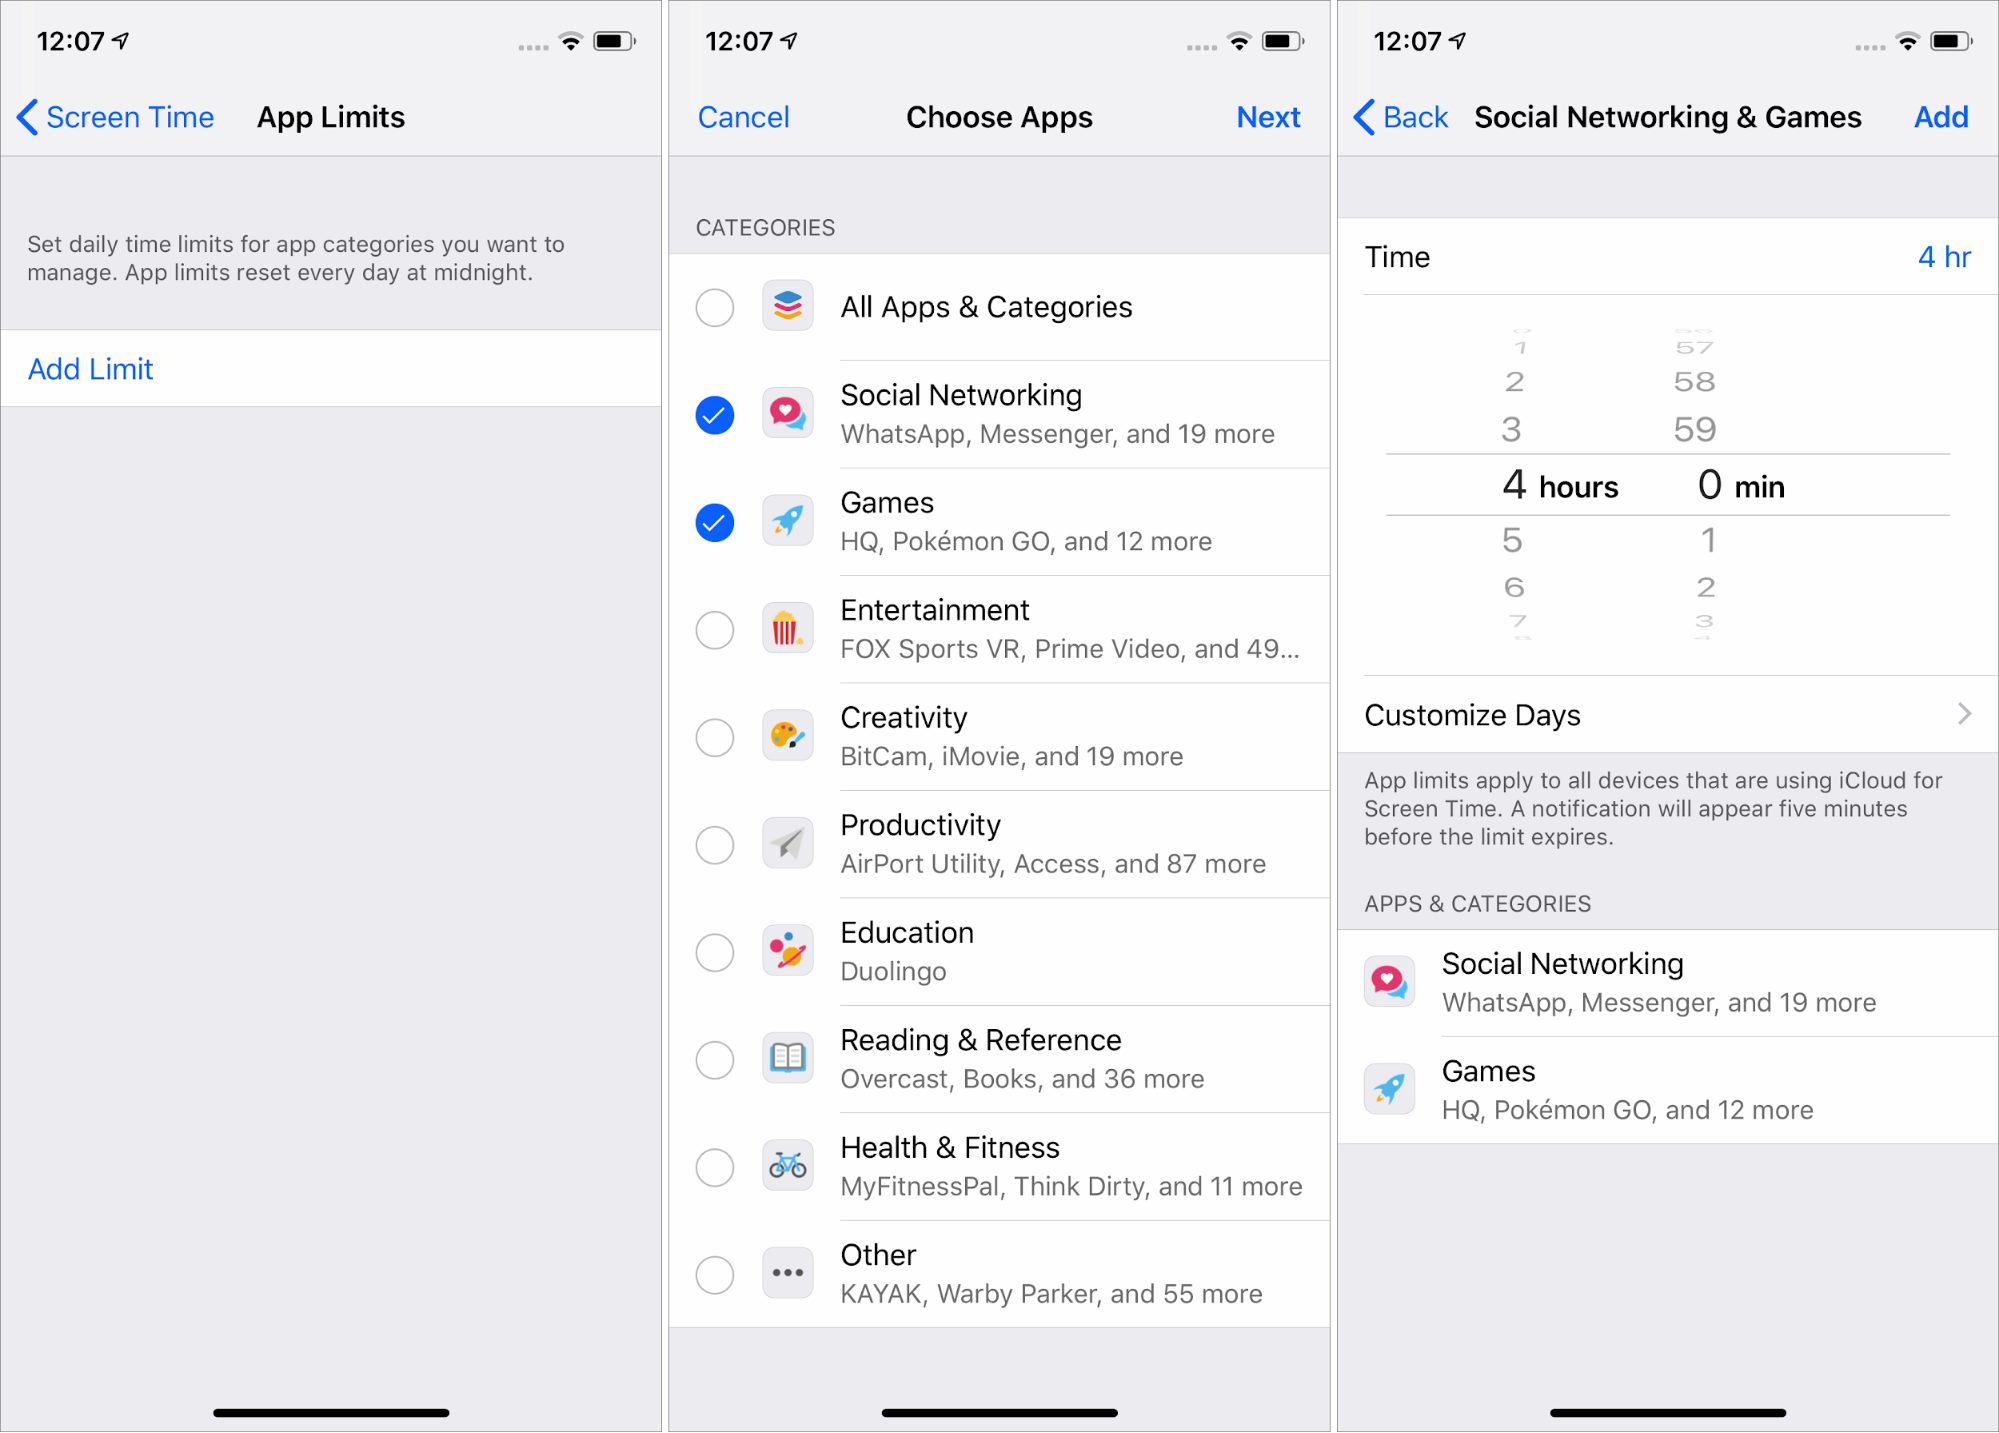

Regardless of which limit you’ve set, Screen Time warns you 5 minutes before the time limit expires. When that 5-minute warning runs out, Screen Time puts up another notification saying you’ve hit your limit.
If you want more time to finish something, you can tap Ignore Limit, which lets you ignore the limit for that app or Web site for the rest of the day or for just for 15 extra minutes. If you have a Screen Time passcode, you’ll have to enter it to bypass the limit. On the Home screen, you’ll note that limited apps are grayed-out and have a little Time Limit icon next to their names to indicate you can’t open them.

The problem with Downtime and the category-based App Limits is that they can be overly broad, locking you out of an app that’s both innocuous and perhaps even necessary. You can blacklist a particular app, as described above, but you can also go in the other direction and whitelist an app to ensure that it’s always available, regardless of what limit might be in play.
To pick these apps, go to Settings > Screen Time > Always Allowed and tap the green plus button next to desired apps. By default, Phone, Messages, FaceTime, and Maps are always allowed, but you can limit all of those except Phone. You also cannot restrict Clock, Find My iPhone, or Settings. You can’t restrict Safari itself, but content inside Safari is restricted based on your settings.
Kids have already been finding clever workarounds to Screen Time (see “How Kids Are Circumventing iOS 12’s Screen Time Limits,” 21 October 2018), and one way to put a stop to that is to create an app limit for All Apps & Categories and then individually whitelist approved apps. The big downside to this technique is that Apple doesn’t let you add Web sites to the whitelist, so when the Screen Time limit comes into effect, every Web site will be cut off (except apple.com, naturally).
Parenting with Screen Time
Apple has moved the content restrictions in iOS 12, to Settings > Screen Time > Content & Privacy Restrictions. Here’s a summary of what you can find there:
- iTunes & App Store Purchases: Here you can control whether your kids can install apps, delete apps, or make in-app purchases. If you’re managing a child’s device, I recommend setting all of these to Don’t Allow, and to always require a password to make those changes. Be sure to restrict deleting apps, because one Screen Time workaround is to delete an app and reinstall it.
- Allowed Apps: This category of allowed Apple apps might seem pointless given the App Limit controls, but the interesting bit here is that you can restrict access to Siri and dictation, if you’re so inclined.
- Content Restrictions: These controls let you restrict certain kinds of content based on ratings, but the problem is that it mostly applies only to iTunes content, so it won’t help with, say, YouTube or Netflix. The Web Content setting is interesting because it can block “adult” Web sites, but it’s highly unreliable and impossible to configure.
- Privacy: This is a long list of settings that let you adjust a child’s privacy settings and lock them in place. It’s probably a good idea to set these for a young child, but they may be a bit too heavy handed for an older child.
- Allow Changes: You’ll want to review each of these settings to see if you want your kids to be able to change them. Some of them you’ll likely want to restrict, like passcode changes and account changes, while others are of more questionable value, like TV provider. Volume limit might be good to restrict if your kid uses headphones and isn’t smart about keeping the volume reasonable.
If you’ve set up Family Sharing and enabled Screen Time for it (you can do this in Settings > Your Name > Family Sharing > Screen Time), Screen Time will gain a new Family section that contains the names of all your family members. The first time through, Screen Time will guide you through configuration; subsequently, tapping your child’s name in the Family list will show the full Screen Time interface—complete with the usage graph—for that child’s device. It’s a great way to see what your kids are really doing, without having to be looking over their shoulder repeatedly. And, of course, you can adjust all the Screen Time settings from your device as well.
What happen if your child runs into a limit and needs to keep working? Instead of an Ignore Limit link on the Time Limit screen, they’ll get an Ask For More Time link that requires the Screen Time passcode you set. Once you’ve entered your passcode, you can set the time limit to be ignored for 15 minutes, 1 hour, or the rest of the day. This can take place on the child’s device, or, if you’re using Family Sharing, you’ll get the notification on your iPhone or iPad.
Screen Time won’t replace good, old-fashioned parenting, but I’ve found it to be a useful tool to regulate my own screen usage. I had struggled with time management until iOS 12 made me aware of how much time I spent on social media every day, Thanks to Screen Time, I’ve reapportioned some of that time to exercise, reading, and learning Spanish with Duolingo (see “FunBITS: Duolingo Makes Learning Languages Enjoyable,” 14 June 2013). Hasta luego!
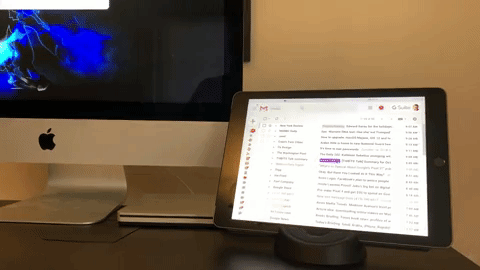
Luna Display Turns an iPad into a Responsive Mac Screen
It’s hard to beat a multi-screen setup for productivity. At my day job, I have two big displays hooked up to my employer-issued Windows PC so I can keep my email and Twitter on one screen while using the other to write and browse the Web. But at home, I’m limited to a single iMac screen, and I’m less productive because of it.
So what if an iPad could serve as a secondary Mac screen while tethered to my iMac through Lightning or Wi-Fi? This isn’t a new idea. Software—such as Duet Display and Air Display—has made such a setup possible for a while. However, the results aren’t always satisfactory, partly because of sluggish performance and subpar image quality.
Now there’s a hardware approach to the problem. Astro HQ has released a $79.99 Mac dongle called Luna Display that transforms any modern iPad into a Mac display, typically with better performance than software-only approaches provide (though the Duet Display makers are claiming a recent software update provides more competitive performance; more on that in a bit).
Astro HQ has released two variations of the Luna Display dongle, one for newer Macs with USB-C ports, and another for older Macs that rely on Mini DisplayPort.

The company has put a lot of effort into miniaturization, so that the ultracompact Luna doesn’t interfere with the use of adjoining ports, and into aesthetics, making it look like a multifaceted jewel jutting stylishly from your Mac.
The Luna Display does exactly what it promises: It enables an iPad connected to the Mac with a cable or via Wi-Fi to become a second display that either mirrors the Mac’s screen or extends its Desktop. This trick is good enough to be addicting, but it doesn’t always work perfectly.
The practicality of using an iPad in this way is determined largely by its screen size, but even a smaller iPad can be pressed into service for compact software tools—such as messaging windows and app toolbars—with satisfying results.
How Does Luna Display Work?
Before I share my experience setting up and using the Luna Display, let’s take a moment to scrutinize exactly what it does.
Astro HQ says its hardware-centric approach has advantages over software-only systems. For one thing, the Mac treats the Luna dongle as a monitor—which it really is, with all the essential hardware capabilities of an external display, and just lacking a glass panel.
Astro HQ co-founder Matt Ronge explained:
When Luna is in operation, it appears to the Mac as if a regular wired monitor is attached to that port. Luna uses the DisplayPort and USB protocols to communicate with the Mac. As far as the Mac is concerned, we are no different then a Dell or LG monitor.
Software, in the form of apps running on the iPad and the Mac, completes the Luna Display setup. At this point, the dongle taps into the Mac’s GPU. This approach, Ronge said, translates into low latency, a crisp picture on the iPad, and full Retina support.
Luna works best when the iPad in question is physically connected to the Mac via a USB cable, Ronge said, but performance over Wi-Fi is pretty good, too.
Astro HQ makes big promises—going so far as to claim that Luna Display can effectively turn an iPad into a touchscreen Mac. Though this is true, up to a point, you should keep your expectations in check given some limitations I encountered.
Luna Display Setup
I had little trouble setting up my Luna review unit on my 2015 21.5-inch non-Retina iMac with Mini DisplayPort, and on one of Apple’s 2018 MacBook Pro laptops via USB-C—each using my sixth-generation 9.7-inch iPad as the secondary display. I also tried out Apple’s brand new 2018 12.9-inch iPad Pro with my iMac and the Luna Display.
In addition to plugging in the Luna dongle, you have to download its iPad and Mac apps. Once these are installed and launched, they automatically look for each other. If the Mac and iPad are on the same Wi-Fi network, they detect each other that way. For the best performance, however, you can connect the iPad to the Mac with a charging cable.
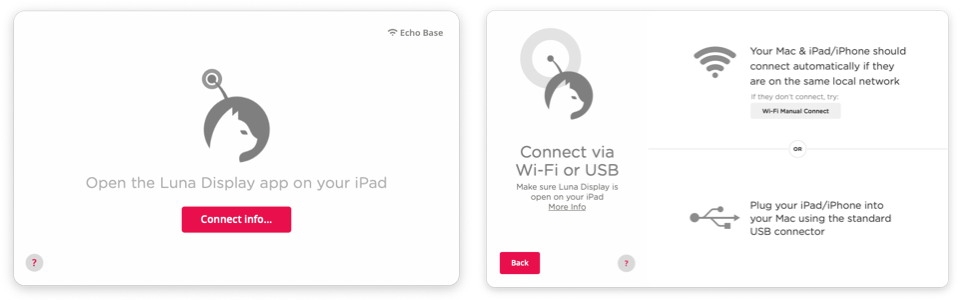
I had no trouble setting up the Luna Display using either method, but Astro HQ has built in an extra wireless setup option involving a scannable QR code, just in case.
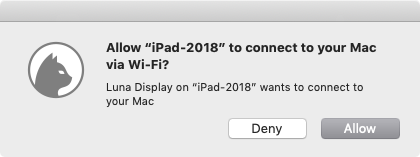
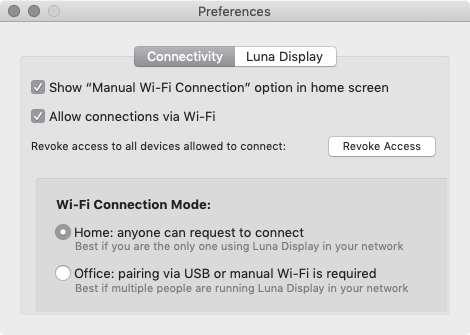
For security, the Luna software on both devices asked me to authorize the connection.
Luna Display’s Preferences window offers additional security features—including limiting it to USB, determining who can use the dongle, and revoking access—for those who want to lock down the device in corporate settings or just because they’re extra-cautious.
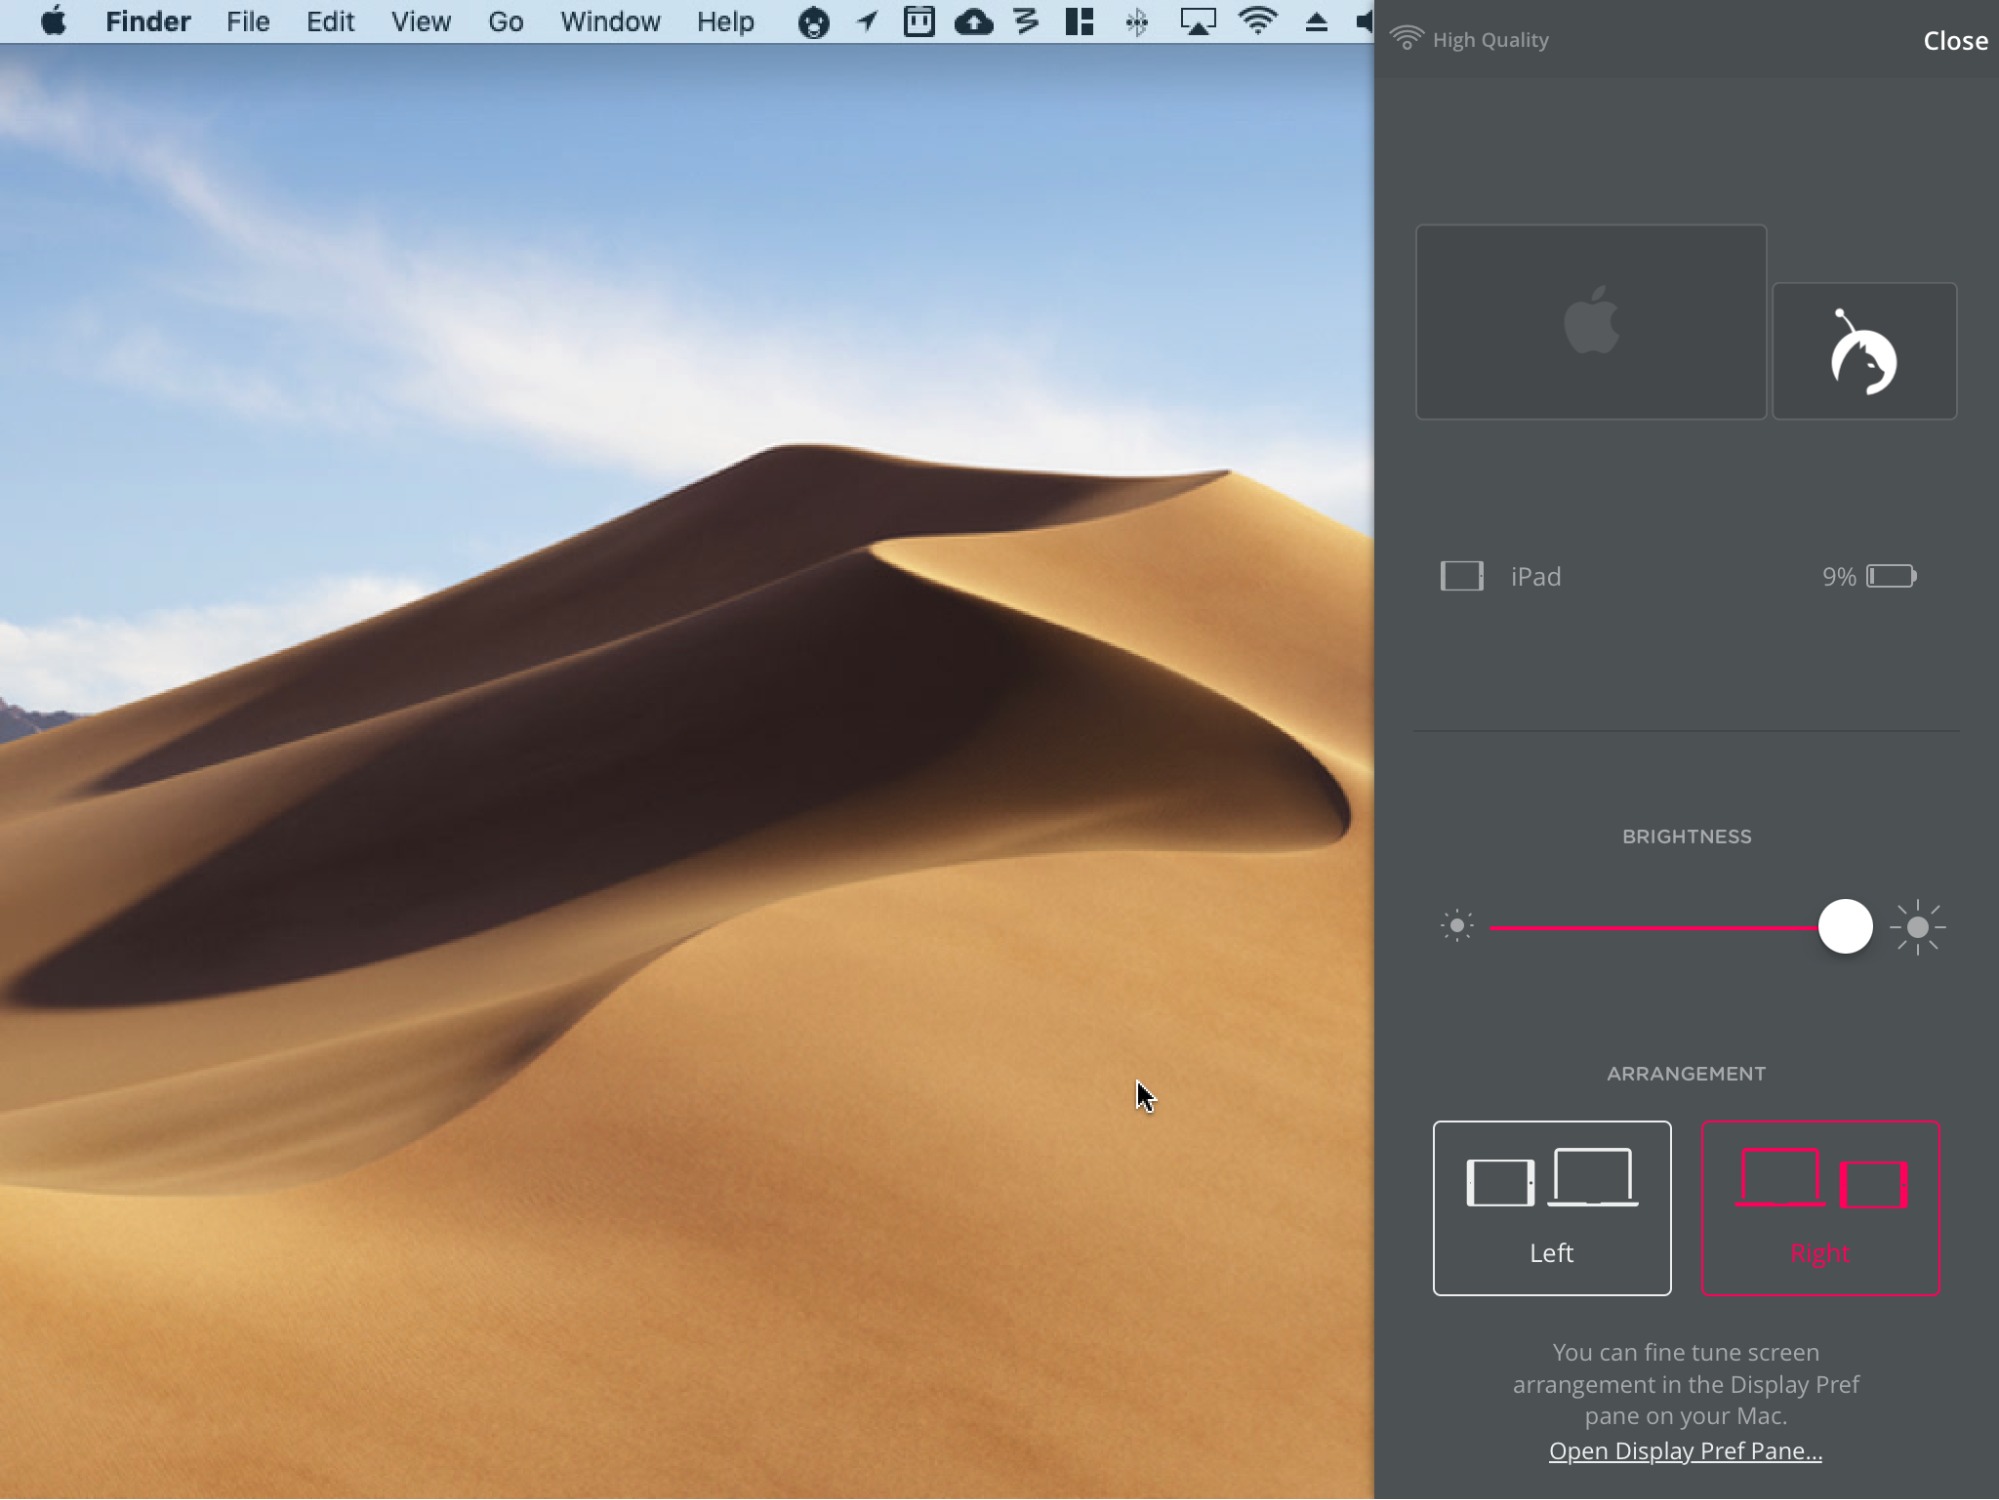
Once Luna Display established the connection, the familiar Mac interface appeared on my iPad.
You can fine-tune the screen via Luna’s controls on the iPad and the Mac. Options here include the iPad screen’s brightness and resolution, and how the two screens are arranged in relation to each other.
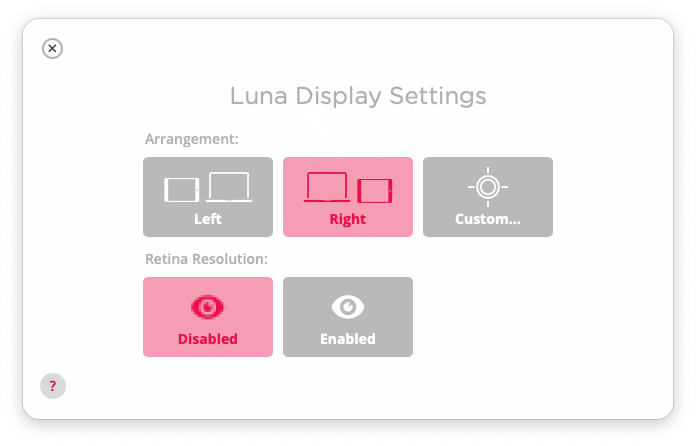
For further adjustments, open System Preferences > Displays on either screen, just as you would with any other dual-screen Mac setup.
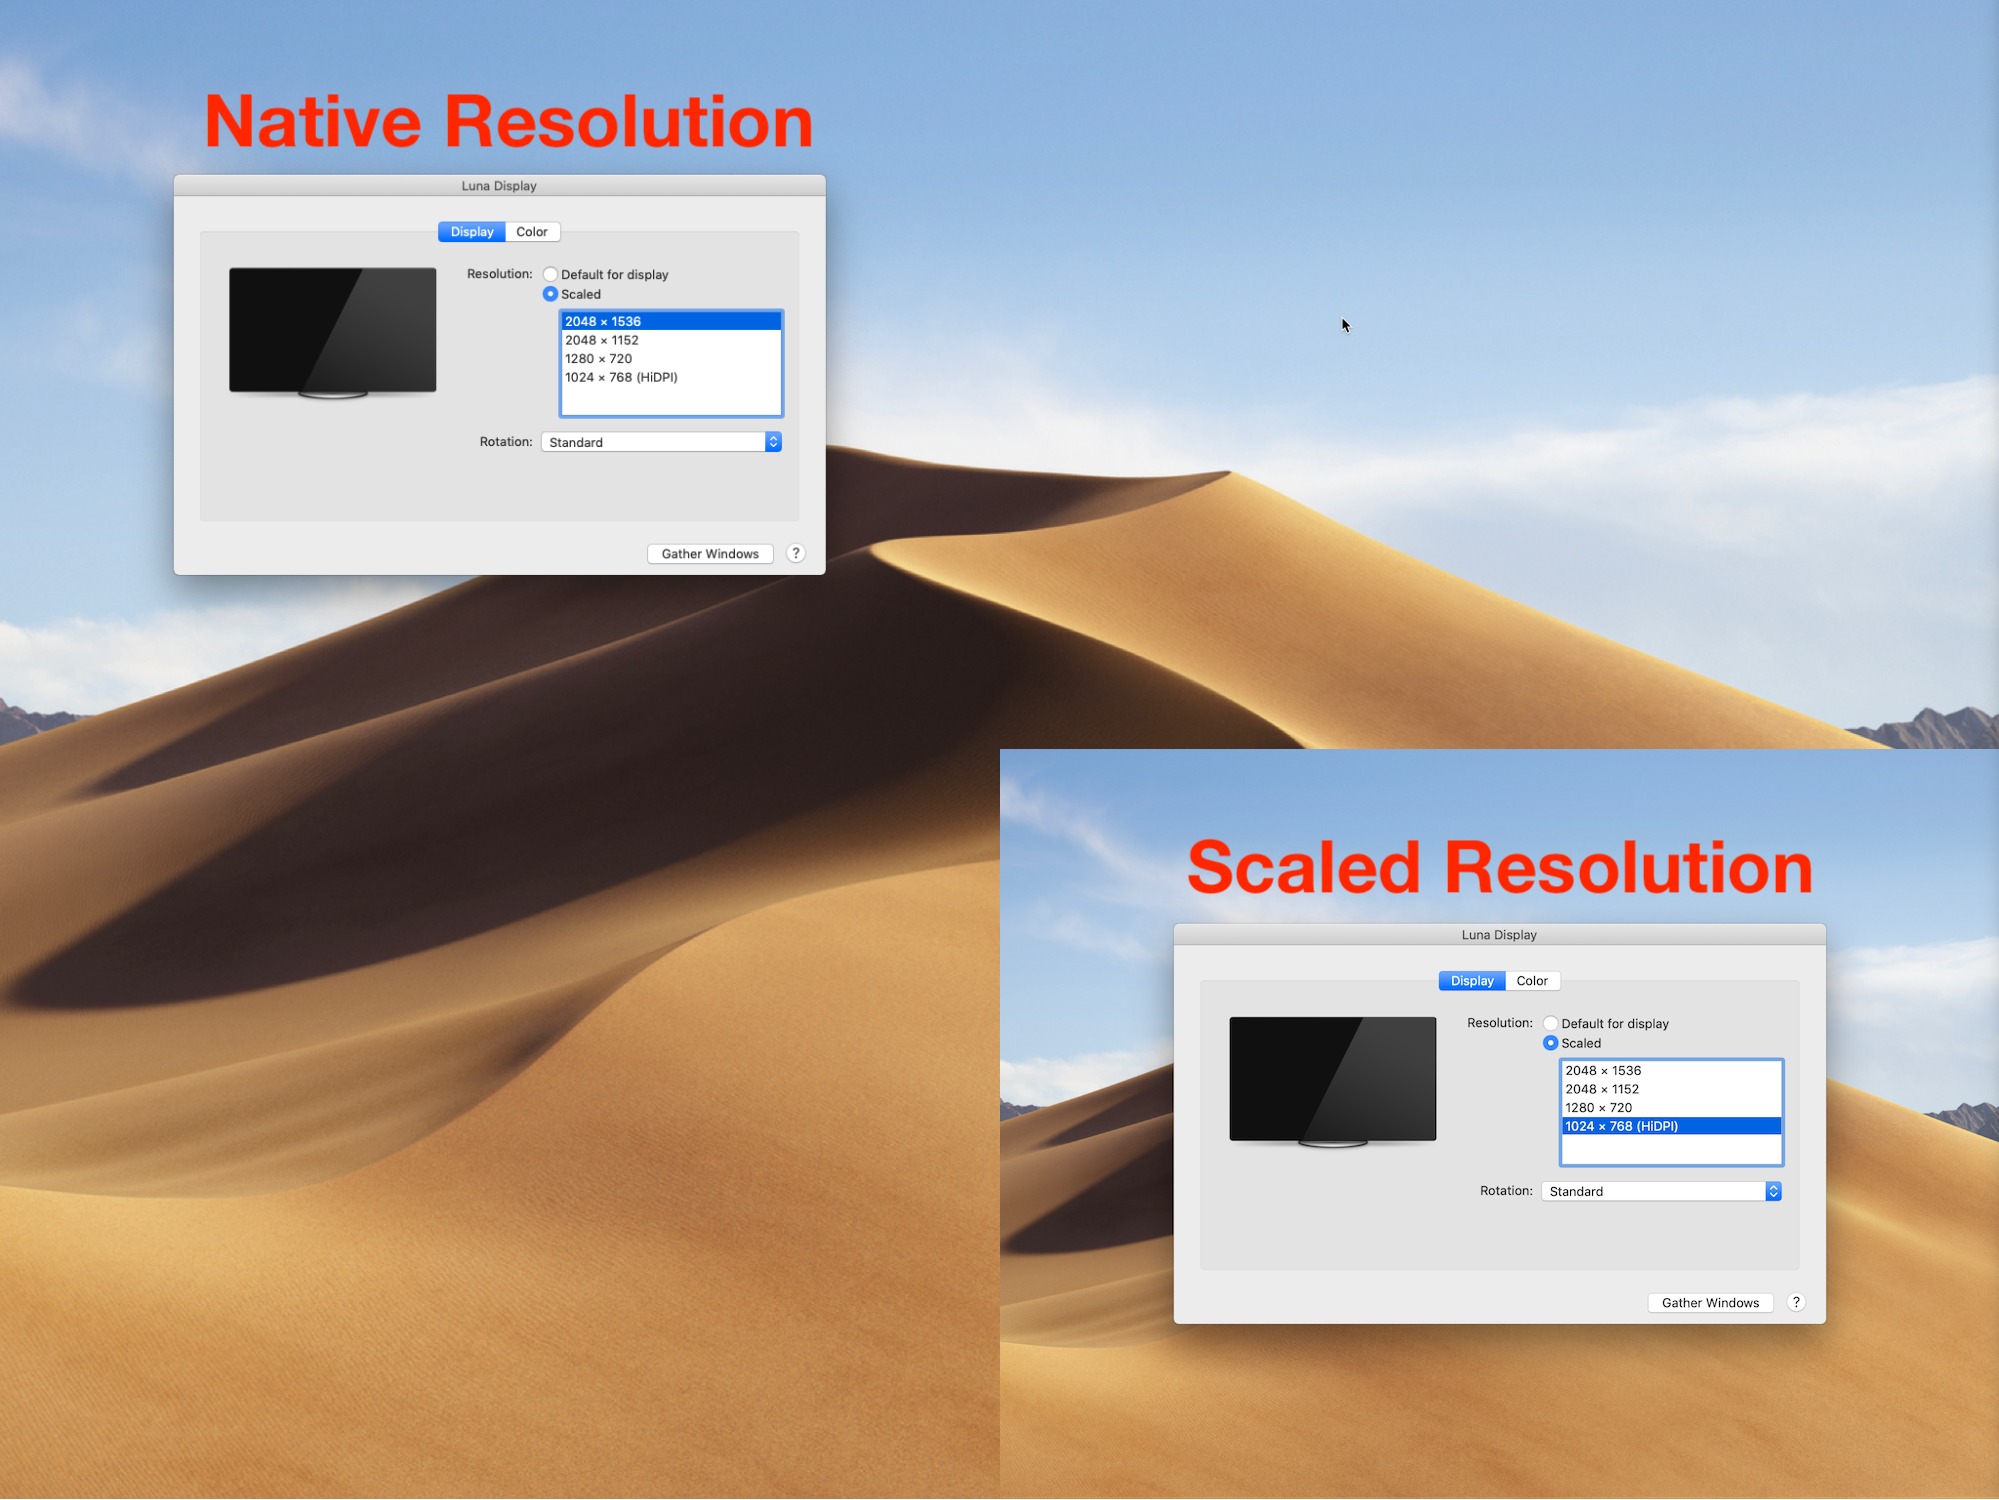
Retina Considerations
I was delighted with how this worked on my non-Retina iMac, which is my main computer. Things get even more interesting when you set up a Luna Display on a Retina Mac. You’re prompted to install a separate system extension, which enables you to adjust the iPad screen appearance in key ways.
Want to fully exploit every pixel on your screen for a super-high-res Mac display? You can do that (if you don’t mind that Mac interface elements become tiny). This is useful when you need a maximum amount of on-screen real estate, even if you might need to squint when tapping dock icons or accessing menus.
Otherwise, you can use pixel doubling—technically known as HiDPI—on the iPad for a Mac display that keeps the Dock and other features at a more readable size while providing a crisp visual appearance.
As Astro HQ’s Matt Ronge explains:
If your Mac is capable of driving the iPad at a full Retina resolution, it will enable that. This way every pixel on the iPad is used. Otherwise, what you’ll see will be scaled up to fit the iPad screen, where things are pixel doubled.
Using Luna Display
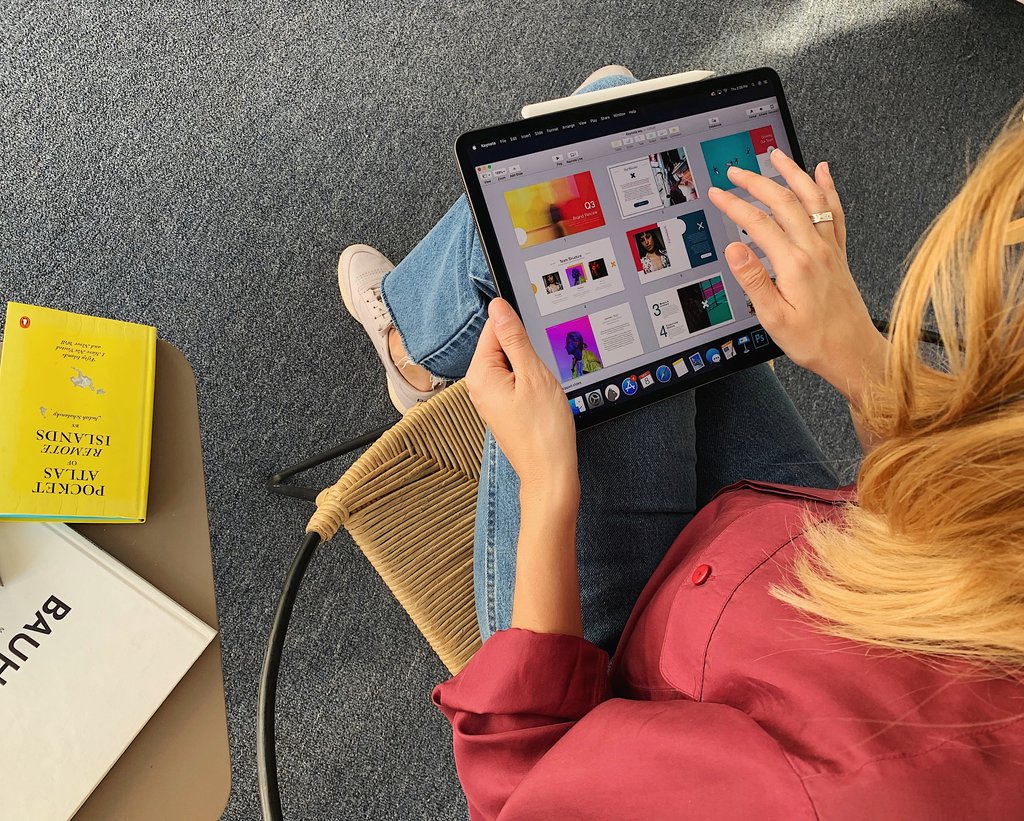
Using a Luna Display to transform my sixth-generation iPad into a Mac screen does not quite compare to the dual-monitor setup I have at the office simply because the iPad is much smaller than the iMac’s main display.
I therefore had to temper my expectations. After some experimentation, I mostly stopped treating my iPad as a primary display and gave up on getting much complex Mac work done within its claustrophobic confines.
On the other hand, the iPad functioned splendidly as an information console or “reference display.” I kept Gmail and Slack on there, each in full-screen mode, and navigated among them (and the apps on my iMac screen) with ease using Command-Tab keystrokes. This technique largely resolved a recurring problem of missing critical notifications if they were hidden behind windows on my Mac display. When trying this, make sure you’ve turned on the Displays Have Separate Spaces option in System Preferences > Mission Control.
In addition, the iPad turned out to be a great place to stash secondary windows and toolbars belonging to complex apps. When using Final Cut Pro, for instance, I could designate the iPad as the repository for my browser, viewers or timeline (via its View > Show in Secondary Display option).
Later on, I received Apple’s 2018 12.9-inch iPad Pro for review and briefly pressed it into service as a Luna-powered Mac display. It changed the experience profoundly. Because the screen on the 12.9-inch iPad Pro (2732 by 2048 pixels, scaled) is so much larger than that of the 9.7-inch iPad (2048 by 1536 pixels), it provided ample room for doing just about anything. Ronge said he had to release a software update to make the Luna Display fully compatible with the new iPad Pro models, and in my experience the upgrade is rock-solid.
However, using a Mac interface on an iPad screen was not without its problems.
Starting a dual-screen work session is a bit fiddly because it’s not clear which Luna app you should fire up first, the iOS app or the Mac app? Regardless of the order I chose, I sometimes required two or three tries to get everything working as it should.
Arranging windows was another minor ordeal because macOS isn’t great at dealing with changes in the number of screens. Consider installing a screen-management utility such as Moom or Magnet that automates resizing and moving around of Mac windows. Such a utility can be a lifesaver on frequently changing multi-screen setups.
Finally, the contents of the iPad’s display were sharp and clear when still, but they sometimes became distorted when in motion—such as when I scrolled through a Web page or my email inbox. You probably wouldn’t want to play a game on a Luna-driven display.
iPad as a Touchscreen Mac?
Perhaps most problematically, Astro HQ potentially over-promises with its claims that the Luna Display can effectively turn an iPad into a touchscreen Mac.
In fact, the company got quite a bit of buzz recently with a blog post about turning one of the new iPad Pro tablets into a wireless (and the only) screen for Apple’s new Mac mini. This makes sense up to a point. For those who might be stashing a Mac mini in a closet or on a rack, a wireless approach via a Luna Display provides on-screen access with a lot of convenience and flexibility.
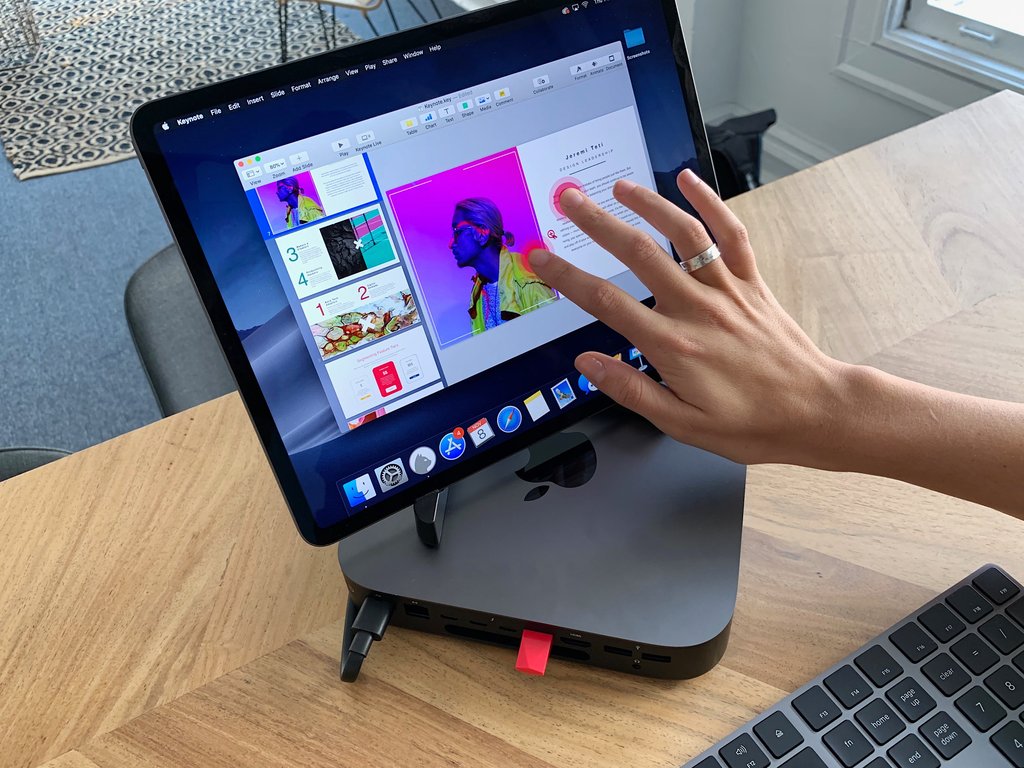
But Astro HQ’s demo video loses me a bit when the user in the video leans back and proceeds to engage in a full-on Mac session with finger and Apple Pencil gesturing. That might work fine with some Mac apps.
But, generally, such maneuvers make painfully apparent how terribly macOS would function as a touch operating system—compared to, say, Microsoft’s Windows 10 and Google’s Chrome OS, both of which have been retrofitted for finger and stylus control since touchscreen notebooks are increasingly prevalent in those ecosystems. Apple has famously resisted doing the same.
Astro HQ has another product line, called AstroPad, that’s aimed at artists who want to turn their iPads into Mac-connected graphics tablets via screen mirroring. This works beautifully, but such ease of touch use has not fully transferred to a general-purpose Mac environment via Luna Display. At least not yet, though Astro HQ is pointing tantalizingly in that direction.
Luna vs. the Competition
Circling back to the iPad, potential Luna Display purchasers should ask: “Do I really need this thing?”
If you are using Web-oriented apps like Gmail and Slack, perhaps not, since you can just install the iOS versions on your iPad, and save yourself the expense of a fancy dongle. Put the iPad next to your Mac, and you’re good to go. With a Bluetooth keyboard that supports pairing with multiple computing devices, you can switch easily between your Mac and iPad.
But if you are focused on native macOS apps and crave added on-screen real estate, the Luna Display might strike you as enticing. That’s especially true if you are using macOS-only apps like Final Cut Pro that work better when spread out over multiple displays. If you perk up at the prospect of placing your iPad next to your MacBook Pro at your favorite coffee shop for a true two-screen experience, the Luna might be for you.
Cost is certainly an issue. Coughing up $79.99 for a Luna Display is more painful than paying just $9.99 for Duet Display or Air Display, two of the top software-only alternatives for turning an iPad into a Mac display. You won’t always get the same level of performance and image crispness, but they’re good enough for many people.
Duet Display provides a toolbar at the bottom of the iPad’s screen for controlling audio, brightness, and more. The publisher, also called Duet, sweetens the deal with a $19.99-per-year Duet Air level that offers wireless connectivity (the basic Duet only works via wired tethering) and pixel-perfect rendering. For $24.99 per year, Duet Pro is aimed at digital artists, with sophisticated stylus support comparable to AstroPad.
Most notably, Duet has just taken direct aim at Luna Display by announcing it supports Mac hardware acceleration in the latest version of its Mac app (a free companion to its paid iOS app), which it said would improve performance in the recently released macOS 10.14.2.
Air Display is a bit more of a bargain than Duet Display because it supports wireless as well as physical tethering—no extra charge for the latter. Support for the Apple Pencil (as well as several third-party styluses) is built in. Air Display also recently added support for new iPad Pro resolutions. In addition, Air Display maker Avatron offers a $19.99 Mac version of the software that turns a spare Mac into an extra display for your primary Mac.
And for those like me who rely on Windows as well as macOS, note that Duet Display and Air Display both exist for the PC—something that Astro HQ said it might also pursue so Windows users can invest in Luna Display dongles too. I’d love to add a third display to my two-monitor PC setup at the office in this way.
Astro HQ has a few other things cooking. Ronge said he is figuring out how he can support the double-tap feature built into the new version of the Apple Pencil for activating various software functions. He is also investigating how to support portrait mode on the iPad—at the moment, Luna Display use is a strictly landscape-mode affair.
Bottom Line
The Luna Display is an impressive feat of engineering that—minor performance issues aside—keeps its promise to transform an iPad into a dependable and useful Mac display. It may cost more than comparable software-only solutions, but it’s well worth considering if you crave maximum flexibility and performance in your Mac-iPad setup.


