#1485: Catalina ships, Picture in Picture in tvOS 13, connecting to Wi-Fi in iOS 13, explaining Apple passcode requests
Apple shipped macOS 10.15 Catalina today, so if you’re an early adopter with a test Mac available, have fun installing it. For most people, though, Adam Engst recommends delaying the upgrade for a while. If you’re a sports fan who switches between games often, Josh Centers explains how you can use the new Picture in Picture feature in tvOS 13. For those who need to connect to new Wi-Fi networks frequently, Glenn Fleishman documents iOS 13’s new, easier method and then, for completeness, runs through the three other ways of connecting to Wi-Fi networks in iOS. Finally, if you’ve wondered why your Apple devices sometimes ask for the passcode or password of another of your devices, Glenn has the explanation. Notable Mac app releases this week include Pages 8.2, Numbers 6.2, and Keynote 9.2, Retrospect 16.5, Nisus Writer Express 4.0, Nisus Writer Pro 3.0.4, PDFpen and PDFpenPro 11.1.1, DEVONthink 3.0.1, Ulysses 18, KeyCue 9.5, Typinator 8.2, and PopChar X 8.7.
macOS 10.15 Catalina Ships, Upgrade with Caution
Apple today released macOS 10.15 Catalina, leaving just iOS 13 for the HomePod and watchOS 6 for the Apple Watch Series 1 and Series 2 as vaporware. Catalina advertises itself as an 8.09 GB download in System Preferences > Software Update, but its App Store page claims that it’s only 4.9 GB. For an overview of what’s new, see “No Mac Is an Island with macOS Catalina” (3 June 2019).

We’re dying to know if, as Michael Cohen pointed out in our TidBITS Slack group, Apple intentionally waited to release Catalina on the 477th anniversary of the Portuguese explorer Juan Rodríguez Cabrillo claiming Santa Catalina Island for Spain on 7 October 1542. It certainly wasn’t a discovery—the island had been inhabited by the native Pimugnans since 7000 BCE.
 Regardless of whether or not the release date is a historical coincidence, you’re now faced with the question of when to upgrade to Catalina. Note that I say “when” and not “if” because something, such as the purchase of a new Mac, the need for updated software, or compatibility with iOS, will force you to upgrade at some point. It’s better to do so proactively than reactively. When that time comes, we strongly recommend that you follow the advice in Joe Kissell’s Take Control of Upgrading to Catalina.
Nevertheless, for most people, we recommend delaying your upgrade for a while for a variety of reasons:
- Catalina won’t run 32-bit apps: No TidBITS readers should be surprised by this news at this point. If you rely on 32-bit apps, you’ll need to upgrade them (which may be expensive), find alternatives (which may be pricey and comes with a learning curve), or run them in a virtual machine (see “Moving to Catalina: Keep Your 32-Bit Mac Apps Running with Parallels,” 18 September 2019). If you still need to download Mojave, Apple has a support document explaining how to get it.
- Some backup apps aren’t yet compatible with Catalina: One of the big changes in Catalina is the way macOS runs from a read-only system volume that’s separate from the writeable data volume that stores your apps and documents. This change, along with others, has caused issues for backup apps. Developers are taking it into account, but it would be stupid to upgrade to Catalina before your backup app supports it. Pay attention to the TidBITS Watchlist for important updates. For instance, Carbon Copy Cloner 5.1.10 and later are compatible with Catalina, as is Retrospect 16.5, but Shirt Pocket has yet to make a statement about SuperDuper’s Catalina compatibility.
- Catalina’s notarization requirements may cause trouble: One of the ways Apple has increased security with Catalina is to require that apps distributed outside the Mac App Store be notarized by Apple to run. Those requirements don’t apply to previously distributed software, so older apps already on your Mac should continue to run, but you may not be able to install an older, unnotarized app in Catalina.
- Catalina forces apps to request more permissions than before: Again, in the interests of increasing security and privacy, Apple requires apps to request more permissions in Catalina than in previous versions of macOS. In Catalina, apps will have to ask for permission to access files in your Desktop and Documents folders, iCloud Drive, and external volumes. Plus, you’ll be prompted before any app can capture keyboard activity or a screenshot or screen recording. That’s good for security, but it’s possible that older software won’t know how to ask or won’t work correctly if you deny its request.
- There could be unanticipated backward-compatibility issues: This concern is purely speculative, but it has bitten Mac-using offices in the past. In essence, if you upgrade to Catalina, that may force you to upgrade an app you rely on. If the new version of that app saves its documents in a format that older versions can’t read, that could cause problems for users whose Macs either shouldn’t be upgraded right away or can’t be upgraded at all.
- Apple’s OS releases so far this year have been riddled with bugs: Apple’s software testing, coupled with reports from users of the public betas, has historically done a decent job of identifying and fixing the most common and annoying bugs in major operating system releases. This year, however, in less than two weeks, Apple has already released iOS 13.0, 13.1, 13.1.1, and 13.1.2; iPadOS 13.1, 13.1.1, and 13.1.2; and watchOS 6.0 and 6.0.1 (for only the Apple Watch Series 3 and later). We’re always happy to see Apple fix bugs quickly, but we’d prefer to wait longer for releases that are less buggy.
We have no way of knowing whether Catalina will suffer from the kind of bugs that Apple has been scrambling to fix in iOS, iPadOS, and watchOS, but it’s worth being cautious. We often recommend that those who aren’t early adopters wait until the .1 or .2 releases; when those come out, we’ll adjust our upgrade advice as appropriate. We’re not alone in recommending caution—at Six Colors, Jason Snell has published his full review of Catalina, titling it “macOS Catalina review: New era ahead, proceed with caution.”
Of course, if you love trying the latest and greatest and have a test Mac that you don’t rely on to get your work done, feel free to upgrade to Catalina right away! That’s what many of us are doing, and if we end up capsized by Pacific storms en route to Catalina, well, we knew what we were signing up for.
How to Use tvOS 13’s Picture in Picture
tvOS 13 is here, but the update is sufficiently subtle that you may not even realize you’re running it unless you’ve bumped into the new auto-play videos on the Home screen or one of the bugs that our readers have been reporting. I covered most of what’s new earlier this year in “An Early Look at tvOS 13” (10 June 2019), but an interesting new feature cropped up later in the beta cycle: Picture in Picture (PiP).
Finally! The iPad has had PiP for years, and it seemed like an obvious feature for the Apple TV. Unfortunately, Apple shipped PiP in tvOS 13 with a huge limitation: it works only inside the Apple TV app. In earlier betas, you could start playing a video in the Apple TV app, minimize the video into PiP, and browse around the tvOS interface while watching the video in the tiny PiP window. Likely for the sake of simplicity, in the shipping version of tvOS 13, any video playing in PiP disappears if you return to the Home screen.
Restricting PiP to the Apple TV app limits its appeal, but you might still find it useful. Here’s how to activate PiP:
- Start playing a video in the Apple TV app.
- Touch (don’t click!) the touchpad of the Siri Remote to reveal the PiP button. (If you’re using the Remote app or the remote in Control Center, pause and unpause the video to reveal the PiP button.)

- Swipe up to highlight the button, and then click the touchpad. (You might think you should swipe down to get to the button, but that displays menus at the top of the screen instead.)

The video will shrink into a small PiP window in the lower-right corner. To reveal PiP controls, press the TV button. To hide those controls, press Menu. Don’t accidentally press the TV button to hide the controls, because that will take you to the Apple TV’s Home screen.
There are three control buttons in the PiP window.

Swipe on the touchpad to highlight one and then click to activate it:
- Make the PiP window full screen: Click the left button.
- Move the PiP window: Click the center button to move the PiP window to the upper-right corner. Click it again to move it to the next corner, in a counter-clockwise rotation. And so on.
- Close the PiP window: Click the right button.
Remember, to leave the PiP controls so you can browse in the Apple TV app, press the Menu button, not the TV button.
What’s interesting is you can start playing another full-screen video in the Apple TV app while playing a video in PiP. Just navigate to it and play it like normal. The full-screen video’s sound will play normally, while the volume will be muted in the PiP video.
You can switch between videos or close the PiP window. Bring up the PiP controls as you did before, by either touching the Siri Remote touchpad or pausing and unpausing the video.

This time there are two buttons:
- Swap video: The left button lets you switch between videos, shrinking the full-screen video into the PiP window and expanding the previous PiP video to occupy the entire screen.
- Close the PiP window: The right button closes the PiP window.
Given that PiP works only in the Apple TV app, the main use case I can imagine for it is following a sports game in PiP while watching another game or some other show full-screen. But it feels like Apple could make PiP more useful by allowing it to work regardless of what app you’re using.
Are there other good use cases for PiP in tvOS 13? Do you plan to use it? Let us know in the comments.
How to Connect to Wi-Fi Networks Faster in iOS 13
Alongside all the marquee features, Apple always sneaks in something extra when it updates its operating systems. In iOS 13 and iPadOS 13, the company added yet another way to connect to a nearby Wi-Fi network, and this new method is a little faster to use than the previous best one.
This new connection option brings the total to four! You may have trouble remembering all of them or have found some awkward to invoke. A fourth method isn’t big news, but if you regularly need to connect to new Wi-Fi networks, you might find it more convenient.
I ran across this new Wi-Fi connection method while overhauling my book, Connect and Secure Your iPhone and iPad, for all the many changes in iOS 13 and the split into iPadOS 13, and then updating it again for 13.1. The book now includes these Wi-Fi connection tips, along with a hundred other new and improved elements, like explaining Apple’s latest anti-tracking technology in Safari and using the revamped Find My service. If you need help with networking and security on your iPhone or iPad, please pick up a copy from Take Control. (And feel free to ask me any questions it didn’t answer!)
Let’s look at each of the four ways of connecting to a Wi-Fi network, starting with the newest method.
Use Control Center
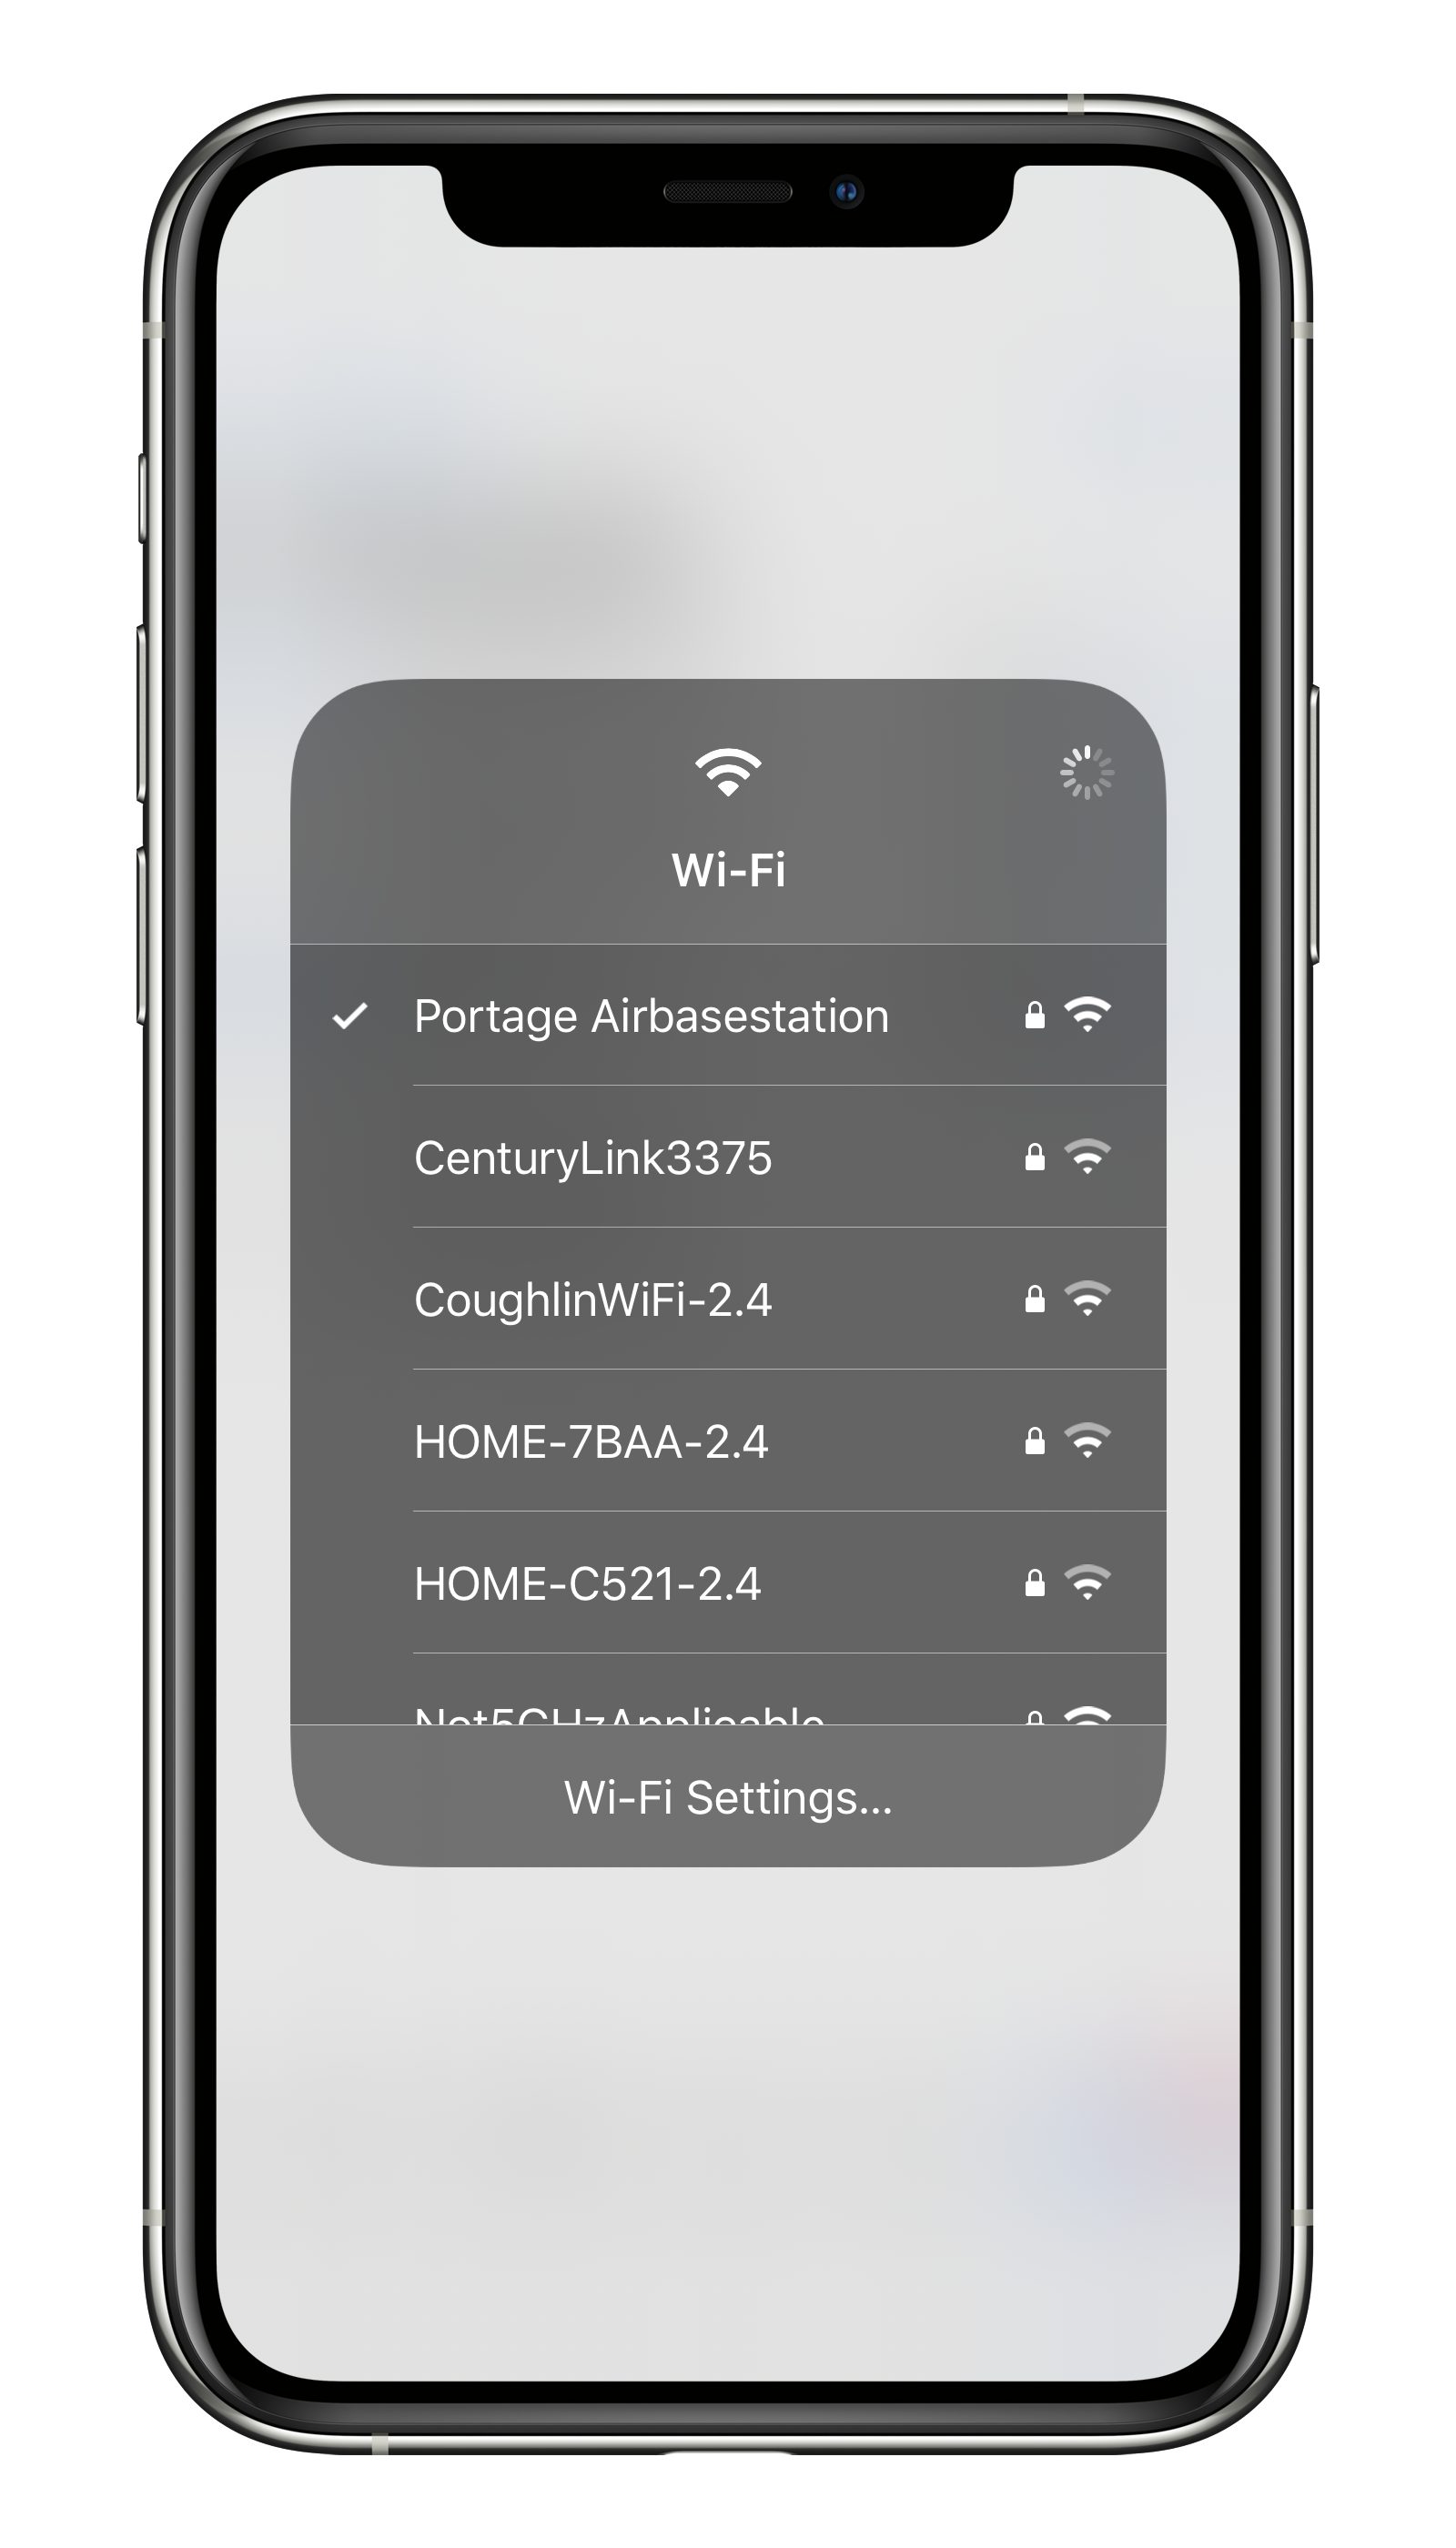
In iOS 13, Apple expanded the capabilities of Control Center to provide a new way to access the list of available Wi-Fi networks. Here’s how to reach the new interface:
- Swipe to reveal Control Center. (On an iPad or an iPhone X or later, swipe down from the top right of the screen; on older iPhones and the iPod touch, swipe up from the bottom of the screen.)
- Tap and hold the network card (the shaded rectangle containing the network buttons) to expand it.
- Tap and hold the Wi-Fi button to bring up a list of networks.
- Tap the network you want to join.
- Enter a password if prompted.
You can also tap Wi-Fi Settings at the bottom to open Settings > Wi-Fi.
This new option isn’t earth-shaking, but it’s definitely easier to get to, especially since you can start from the Lock screen without even unlocking your device.
Use the Settings App
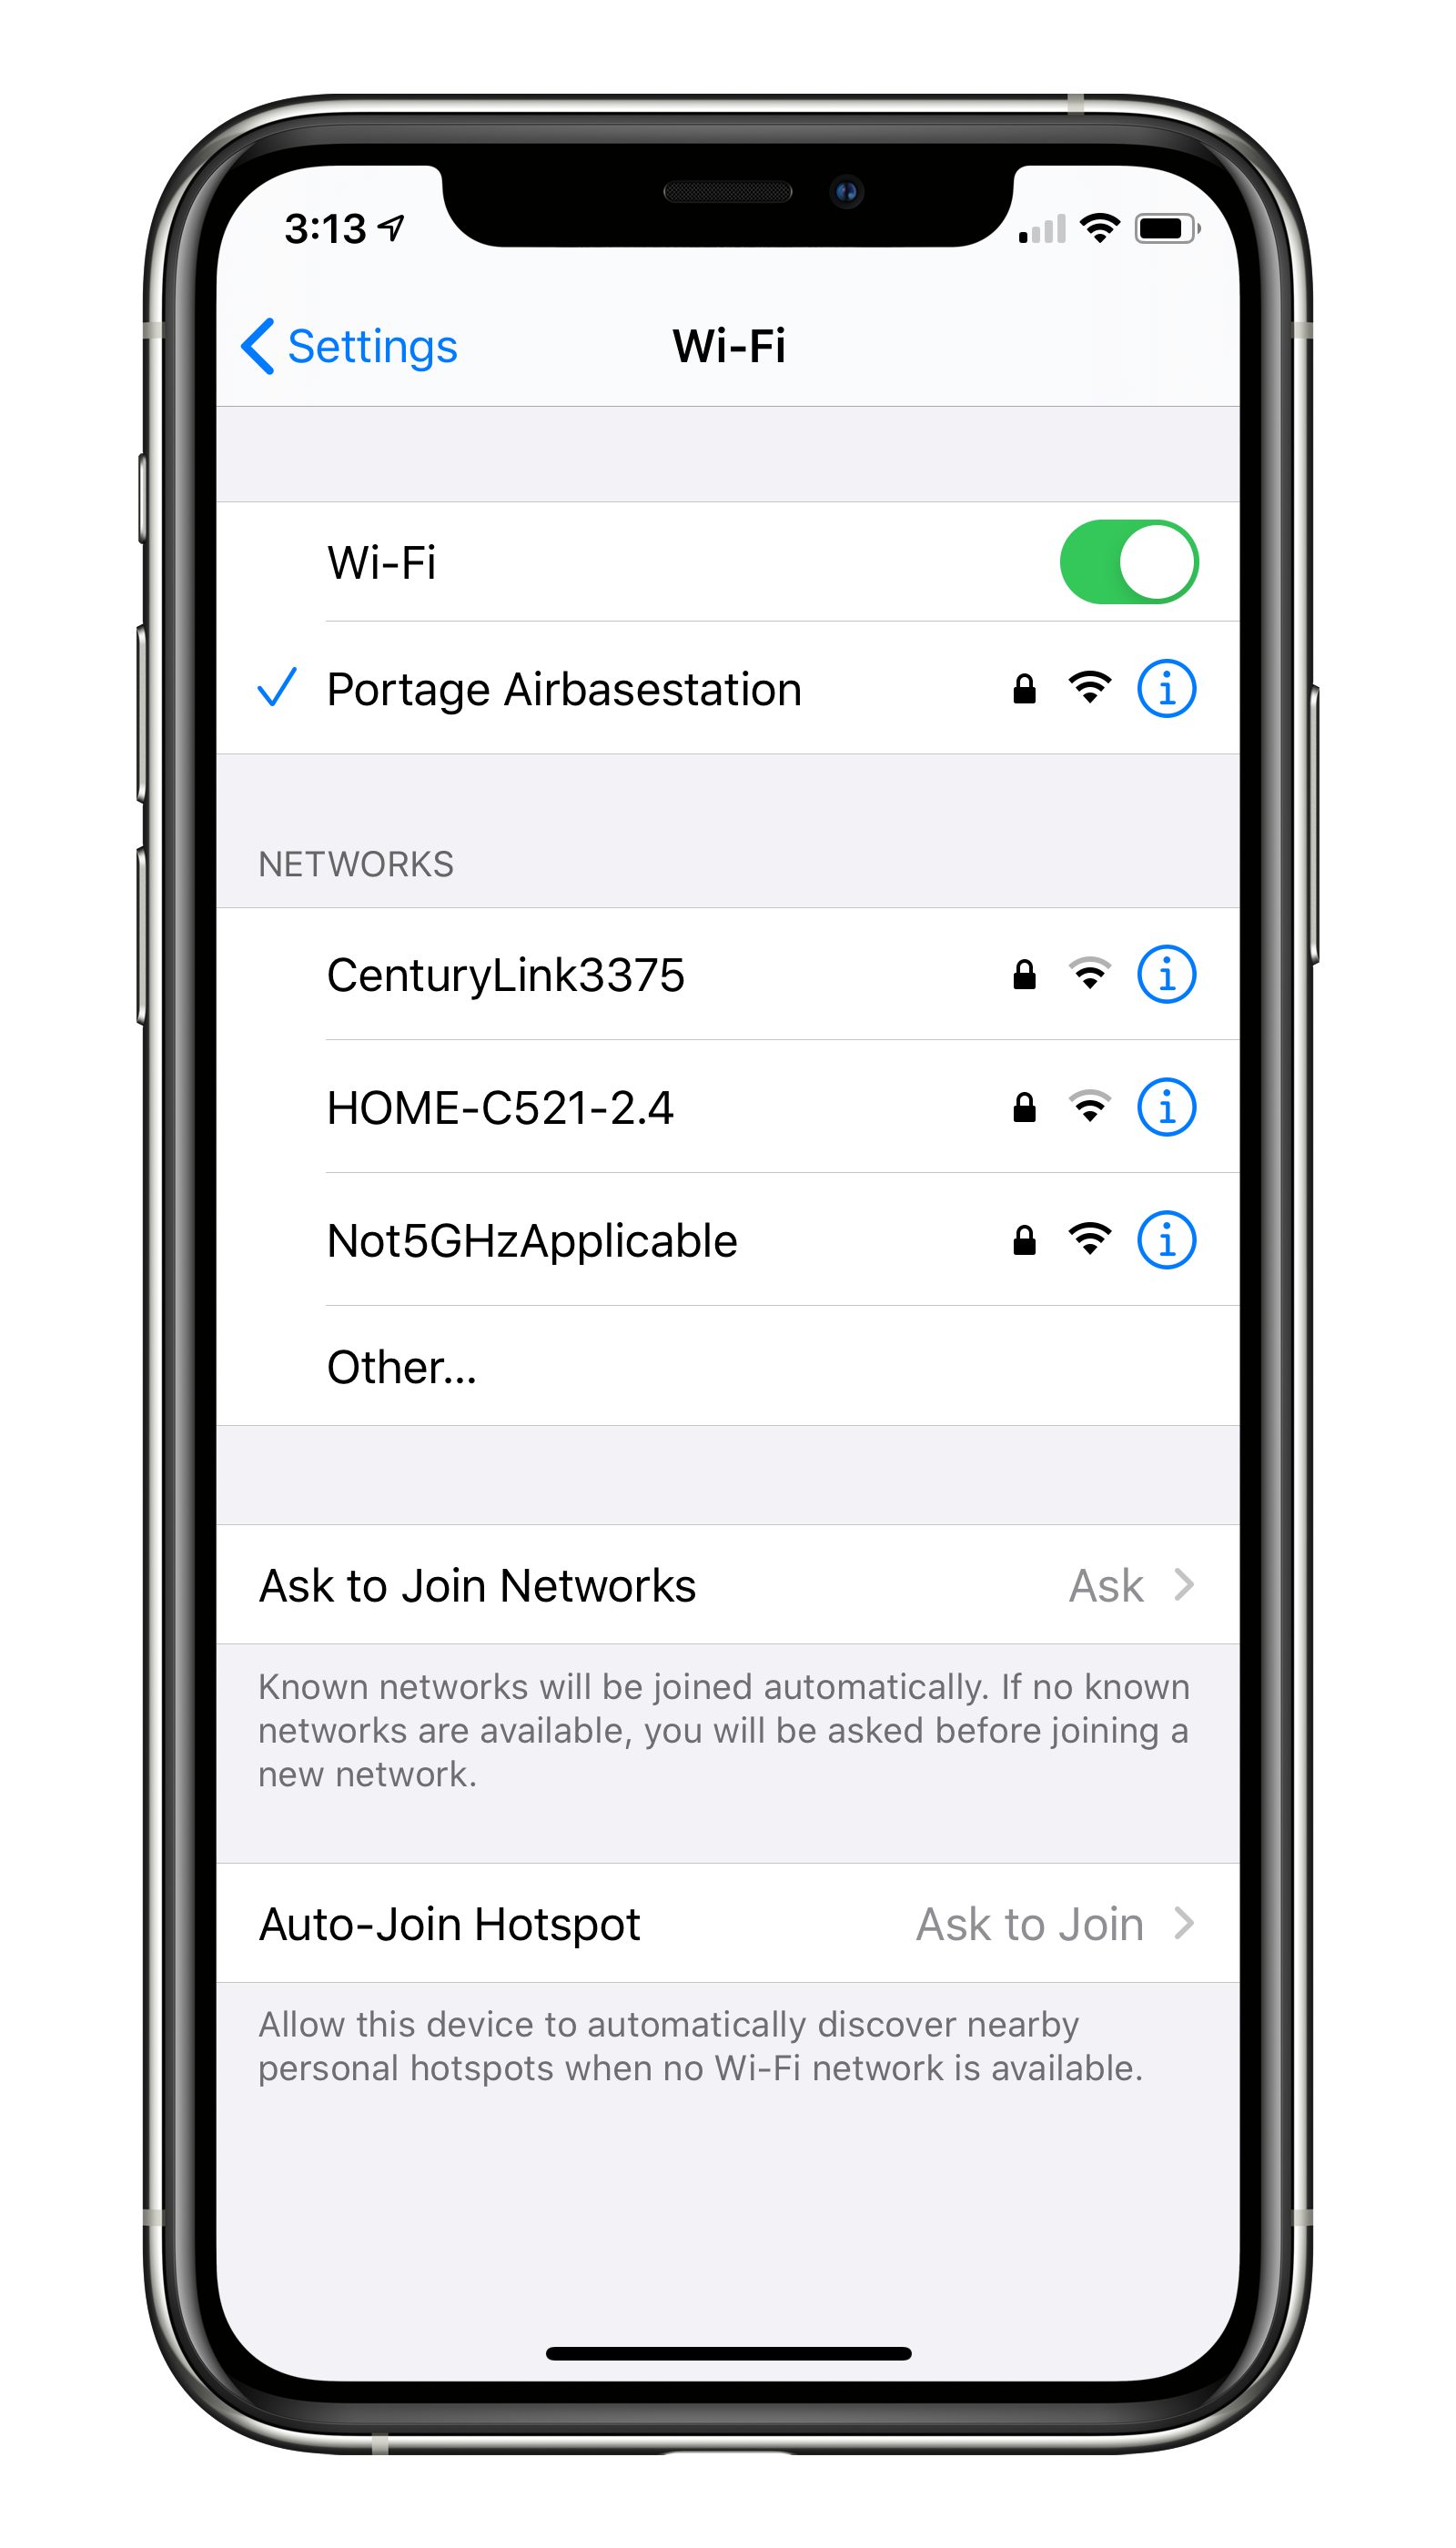
Since the earliest days of iOS, you’ve been able to connect to a Wi-Fi network through the Settings app:
- Open Settings > Wi-Fi.
- Tap a network name under Networks.
- Enter a password if prompted.
If the network you want to connect to doesn’t appear because it’s “closed” or “hidden”—an outdated security-through-obscurity method that some people still use—tap Other and enter the network name and password.
To make this process more automatic, you can set Ask to Join Networks to either Ask or Notify. With either choice, your device will still preferentially connect to a known, stored network. If no known networks are available, however, you’ll be prompted to join another network if Ask is selected. (Apple doesn’t explain the criteria for which one appears.) A list of all networks appears if you have Notify selected.
If you have one or more devices with Personal Hotspot enabled, you’ll get a Personal Hotspots list of networks as well. Plus, iOS 13 may also show a list of Popular Networks. It apparently determines them by passively scanning to see which networks around you other people are already connected to. This approach seems a little invasive, but it is using publicly broadcast information. I haven’t yet been able to make the Popular Networks list appear; it’s an Apple bullet point for the latest operating systems, but the company provides no clear explanation of it.
Apple also added Auto-Join Hotspot, which is a “failover” method. If iOS 13 can’t find a known Wi-Fi network, it will use Personal Hotspot to connect to an iPhone or cellular iPad logged into the same iCloud account. It can even enable Personal Hotspot on the other device if it’s off. (macOS 10.15 Catalina offers a similar option.)
One final tip. Family Sharing can now integrate with Personal Hotspot. If you’re part of a Family Sharing group, tap Settings > Personal Hotspot > Family Sharing. When you enable Family Sharing for Personal Hotspot on that screen, you can then set each member of your family to either have automatic access or be required to ask you for access. This feature could be welcome when traveling as a family.
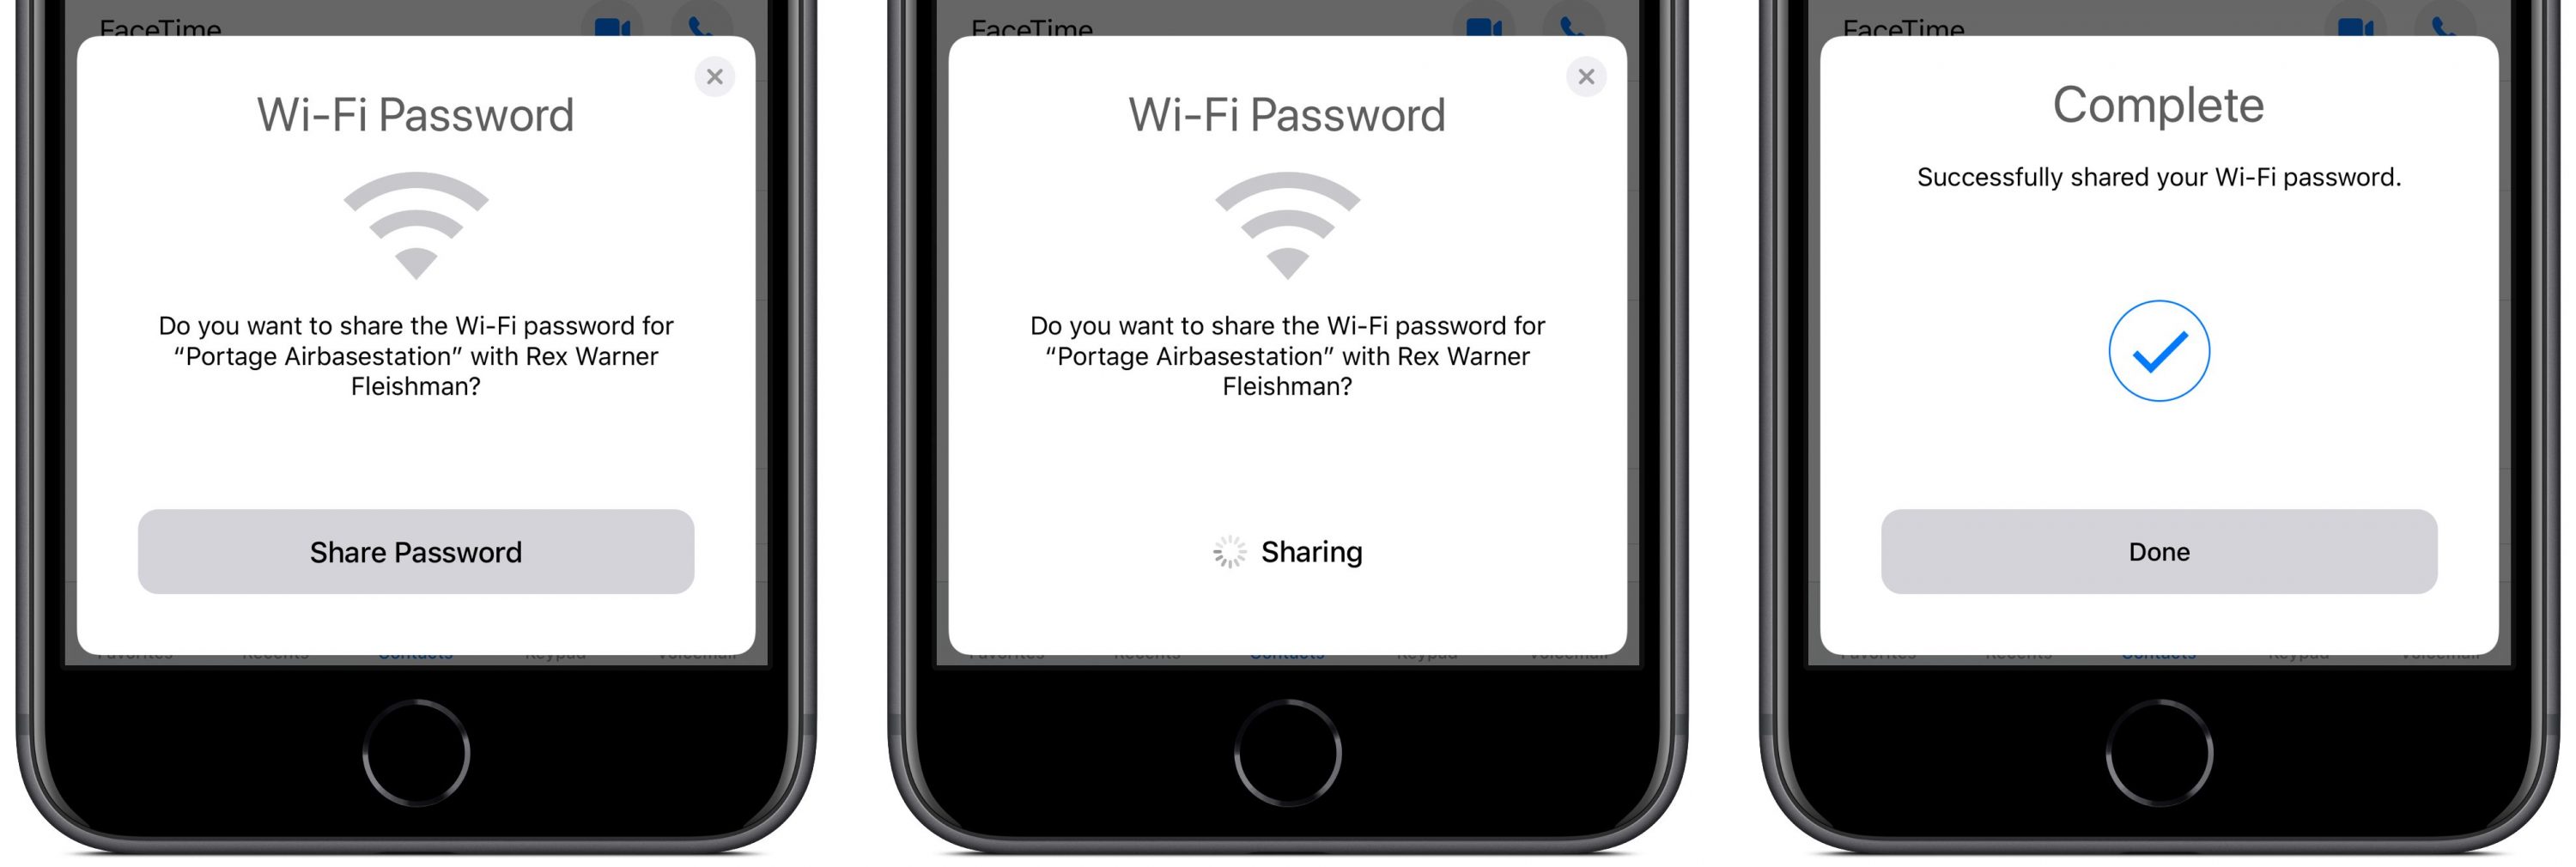
Join via a Contact
Since iOS 12, you can join a Wi-Fi network if someone near you has you in their contacts and has the password for a network you want to join. This is a handy feature if you’re, say, visiting a friend’s house and want to connect to their Wi-Fi. The key is that your friend’s contact item for you has to contain the email address you use with iCloud. Here’s how to use a friend’s password:
- Make sure your device is near their iPhone, iPad, or Mac—the feature relies on Bluetooth and proximity.
- Tap the network you want to join.
- On your friend’s device, a Wi-Fi Password pop-up appears that explains what network you want to join and your name. They need to tap Share Password.
- The password is sent securely and silently to your device, which joins the network without any prompts.
- Your friend taps Done to dismiss the dialog.
Join via a QR Code
Back in iOS 11, Apple added a nifty visual way to share network details with a minimum of fuss via a QR code that you scan in the Camera app. This hotspot-sharing format, which was developed in the Android world, encodes the network name and its password.
While Wi-Fi–enabling QR codes aren’t found in the wild all that commonly, I have seen them in coffee shops and gathering places, probably placed there by a QR Code aficionado like me. Some conferences also use them to help attendees connect to the conference network. You can also find them on some Wi-Fi routers, letting you make the first connection without finding the default network password.
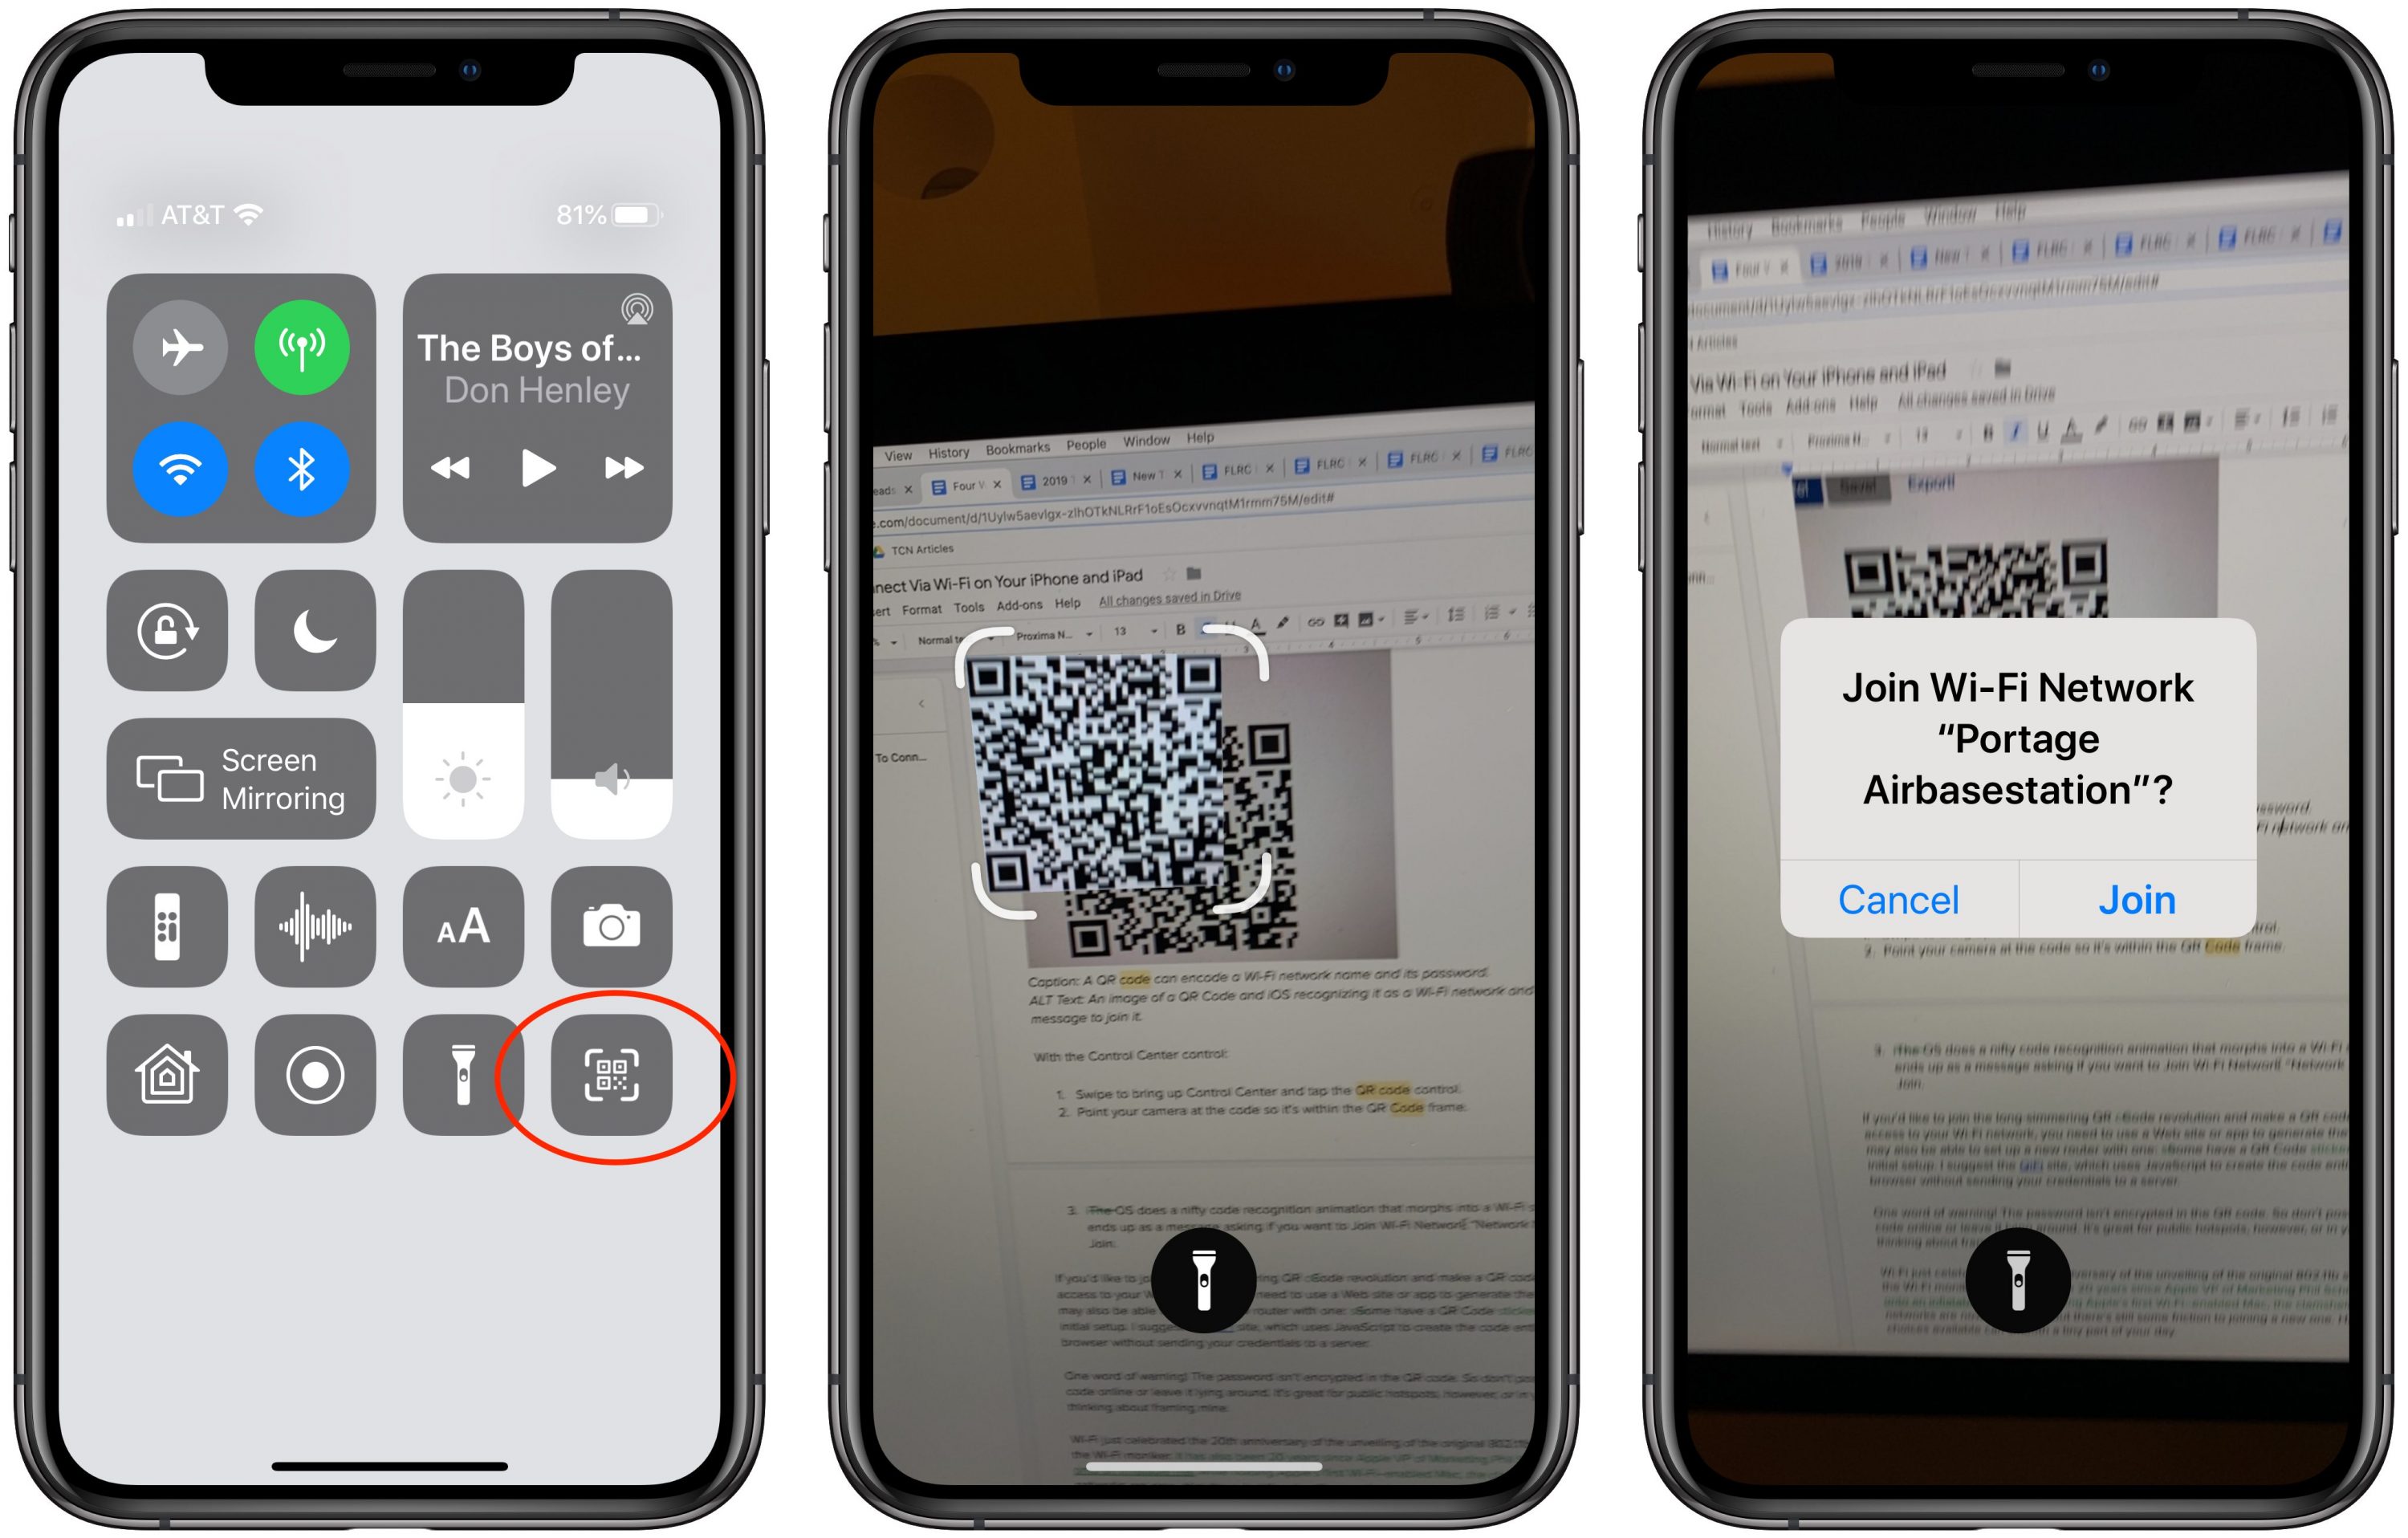
You can join a network via a QR code simply by pointing your iPhone or iPad camera at it. (Settings > Camera > Scan QR Code has to be turned on, which it is by default.) You can also use a Control Center control improved in iOS 13 and iPadOS 13 that looks just for QR codes. (Go to Settings > Control Center > Customize Controls and add QR Code Reader.)
To scan a Wi-Fi network QR code with the Camera app:
- Point your camera at the code so it’s entirely within the screen.
- iOS recognizes the code and displays a Wi-Fi QR Code notification saying Join “Network Name” Network. Tap that notification.
- Tap Join Network.
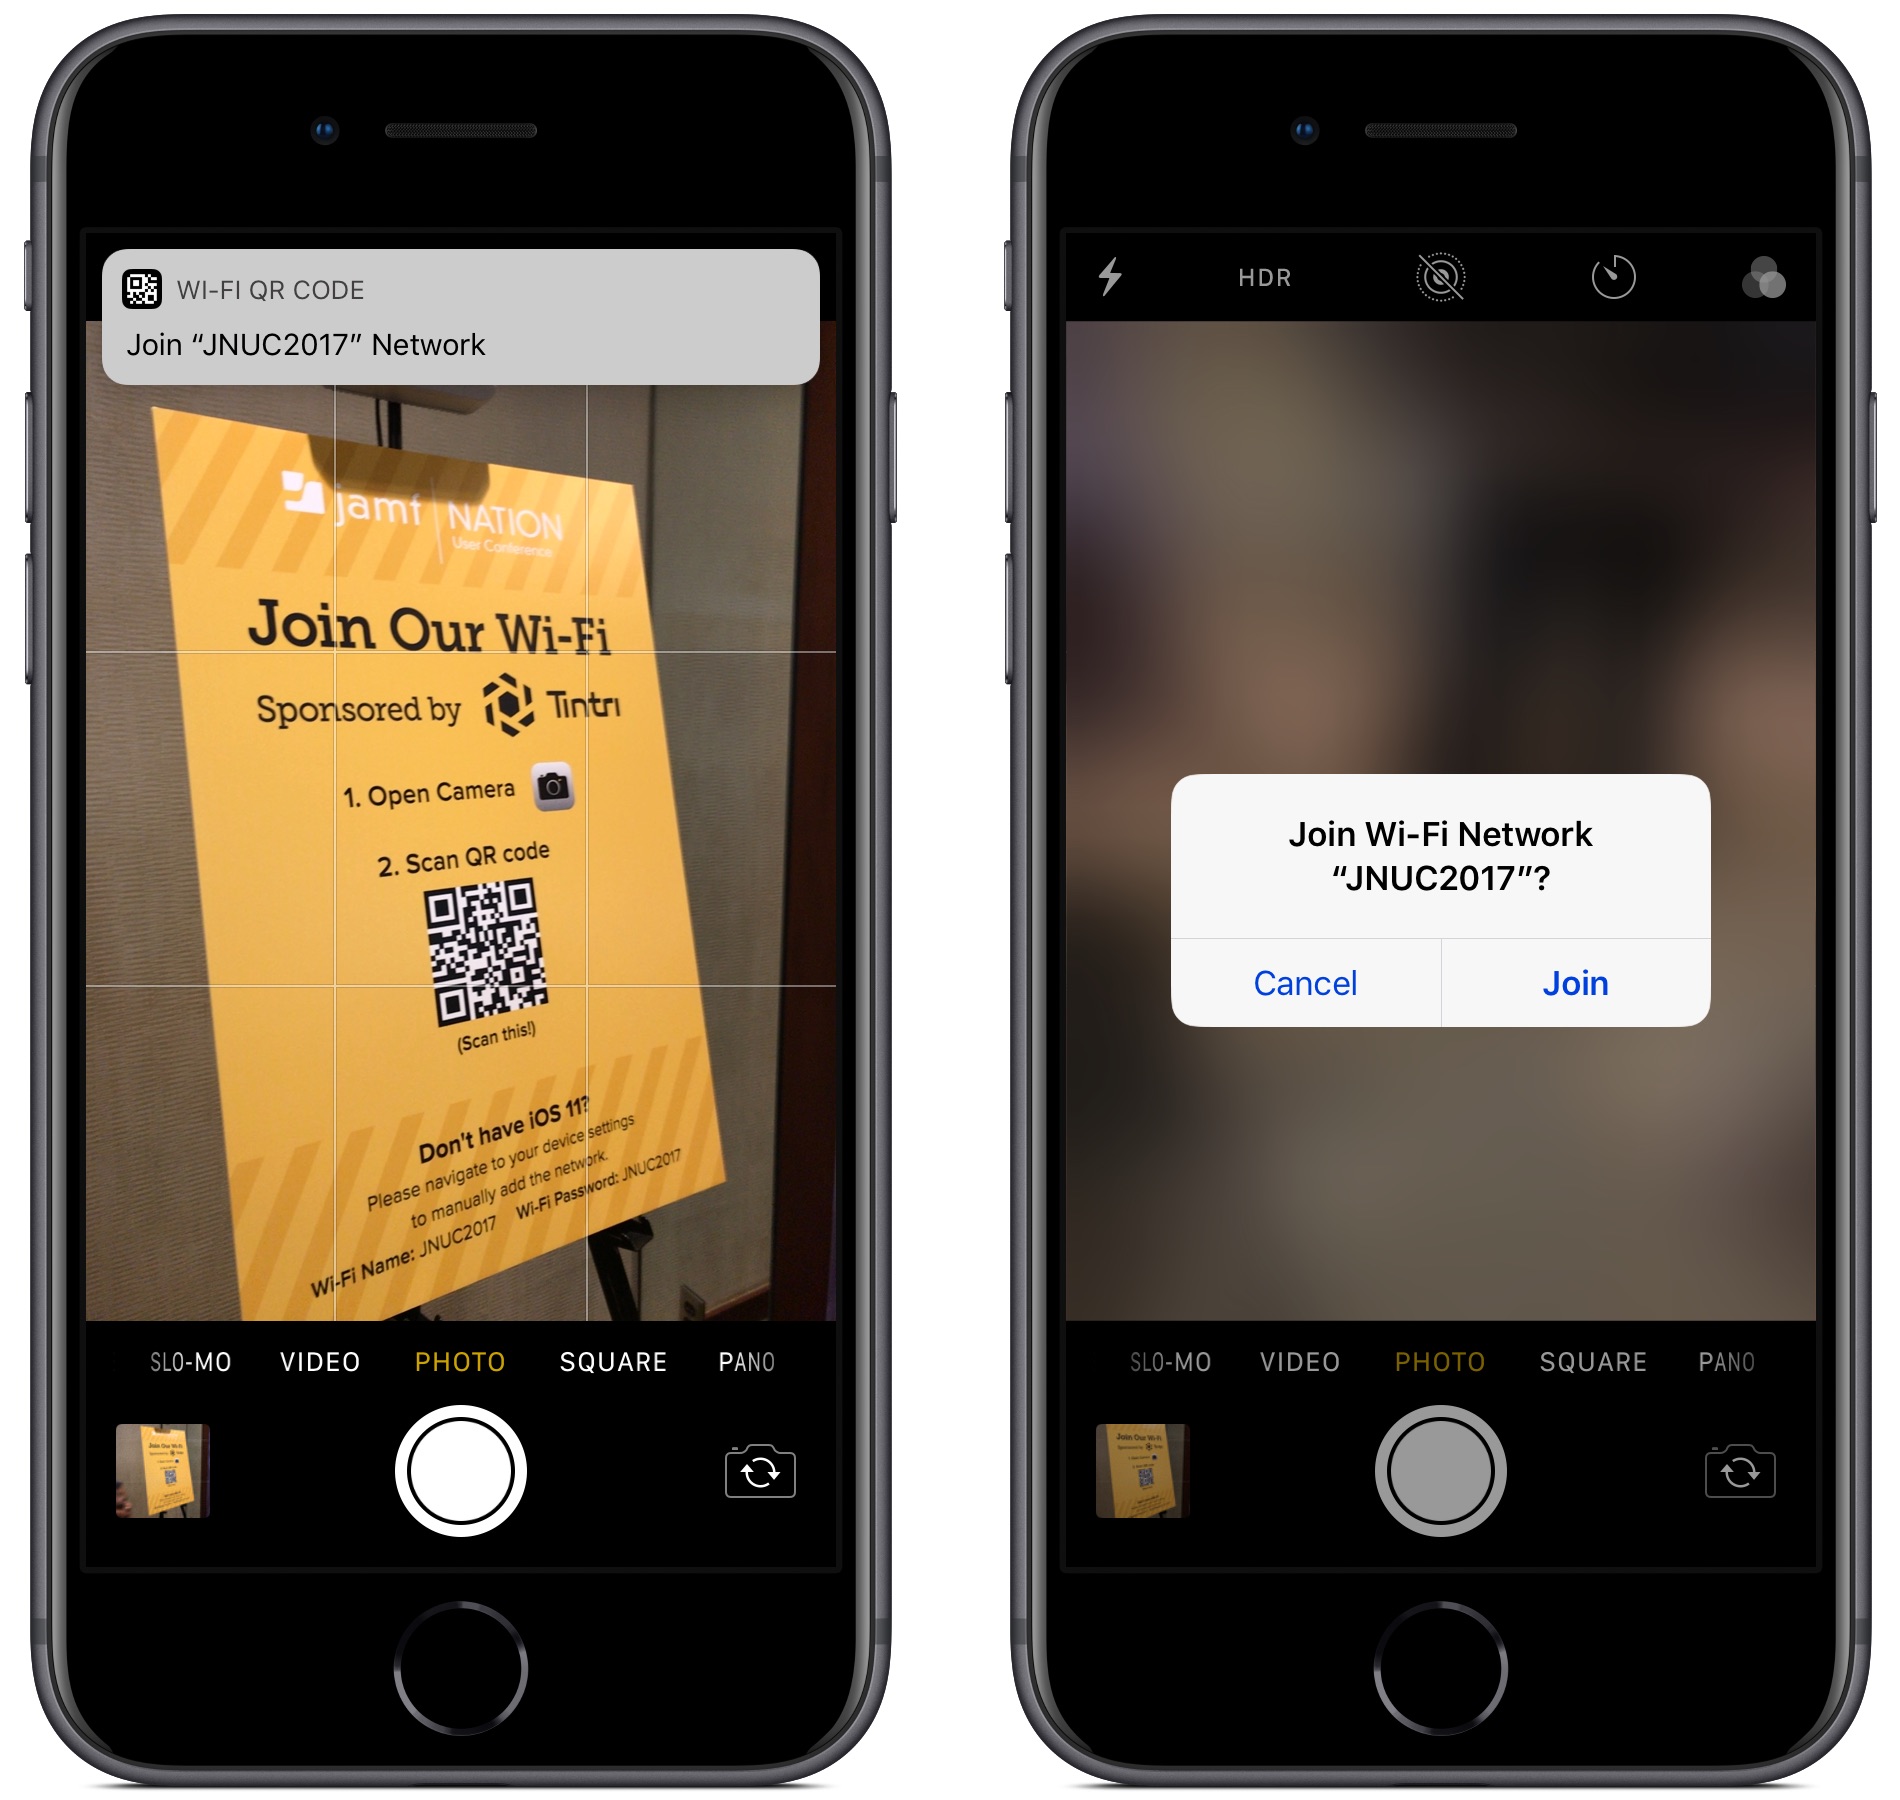
To scan a Wi-Fi network QR code from Control Center:
- Swipe to bring up Control Center and tap the QR Code button.
- Point your camera at the code so it’s within the QR Code frame.
- iOS does a nifty code recognition animation that morphs into a Wi-Fi symbol and ends up as a message asking if you want to Join Wi-Fi Network “Network Name”? Tap Join.
If you’d like to join the long-simmering QR Code revolution and make a QR code that gives access to your Wi-Fi network, you need to use a Web site or app to generate the code. I suggest the QiFi site, which uses JavaScript to create the code entirely in your browser without sending your credentials to a server. And if you get really into QR codes and want to build some automation to create them, check out Charles Edge’s article on the topic.
One word of warning—the Wi-Fi password isn’t encrypted in the QR code! So don’t post such a QR code online or leave it lying around. It’s great for public hotspots, however, or in your home. I’m thinking about framing mine.
Wi-Fi just celebrated the 20th anniversary of the unveiling of the original 802.11b standard and the Wi-Fi moniker. It has also been 20 years since Apple VP of Marketing Phil Schiller took one giant leap for wireless networking by jumping onto an inflatable mat while streaming a video on Apple’s first Wi-Fi–enabled Mac, the clamshell iBook. Wi-Fi networks are now ubiquitous, but there’s still some friction to joining a new one. Having more choices available can smooth a tiny part of your day.
Why Apple Asks for Your Passcode or Password with a New Login (and Why It’s Safe)
If you’ve set up or restored an Apple device recently and have two-factor authentication enabled on your Apple ID, you may have seen a message during configuration that defies your understanding of how Apple maintains device privacy and account security.
The message reads something like, “Enter Mac Password. Enter the password you use to unlock the Mac ‘name here’. This password protects your Apple ID, saved passwords, and other data stored in iCloud. Your password is encrypted and cannot be read by Apple.” The prompt might instead ask for your iPhone or iPad passcode.
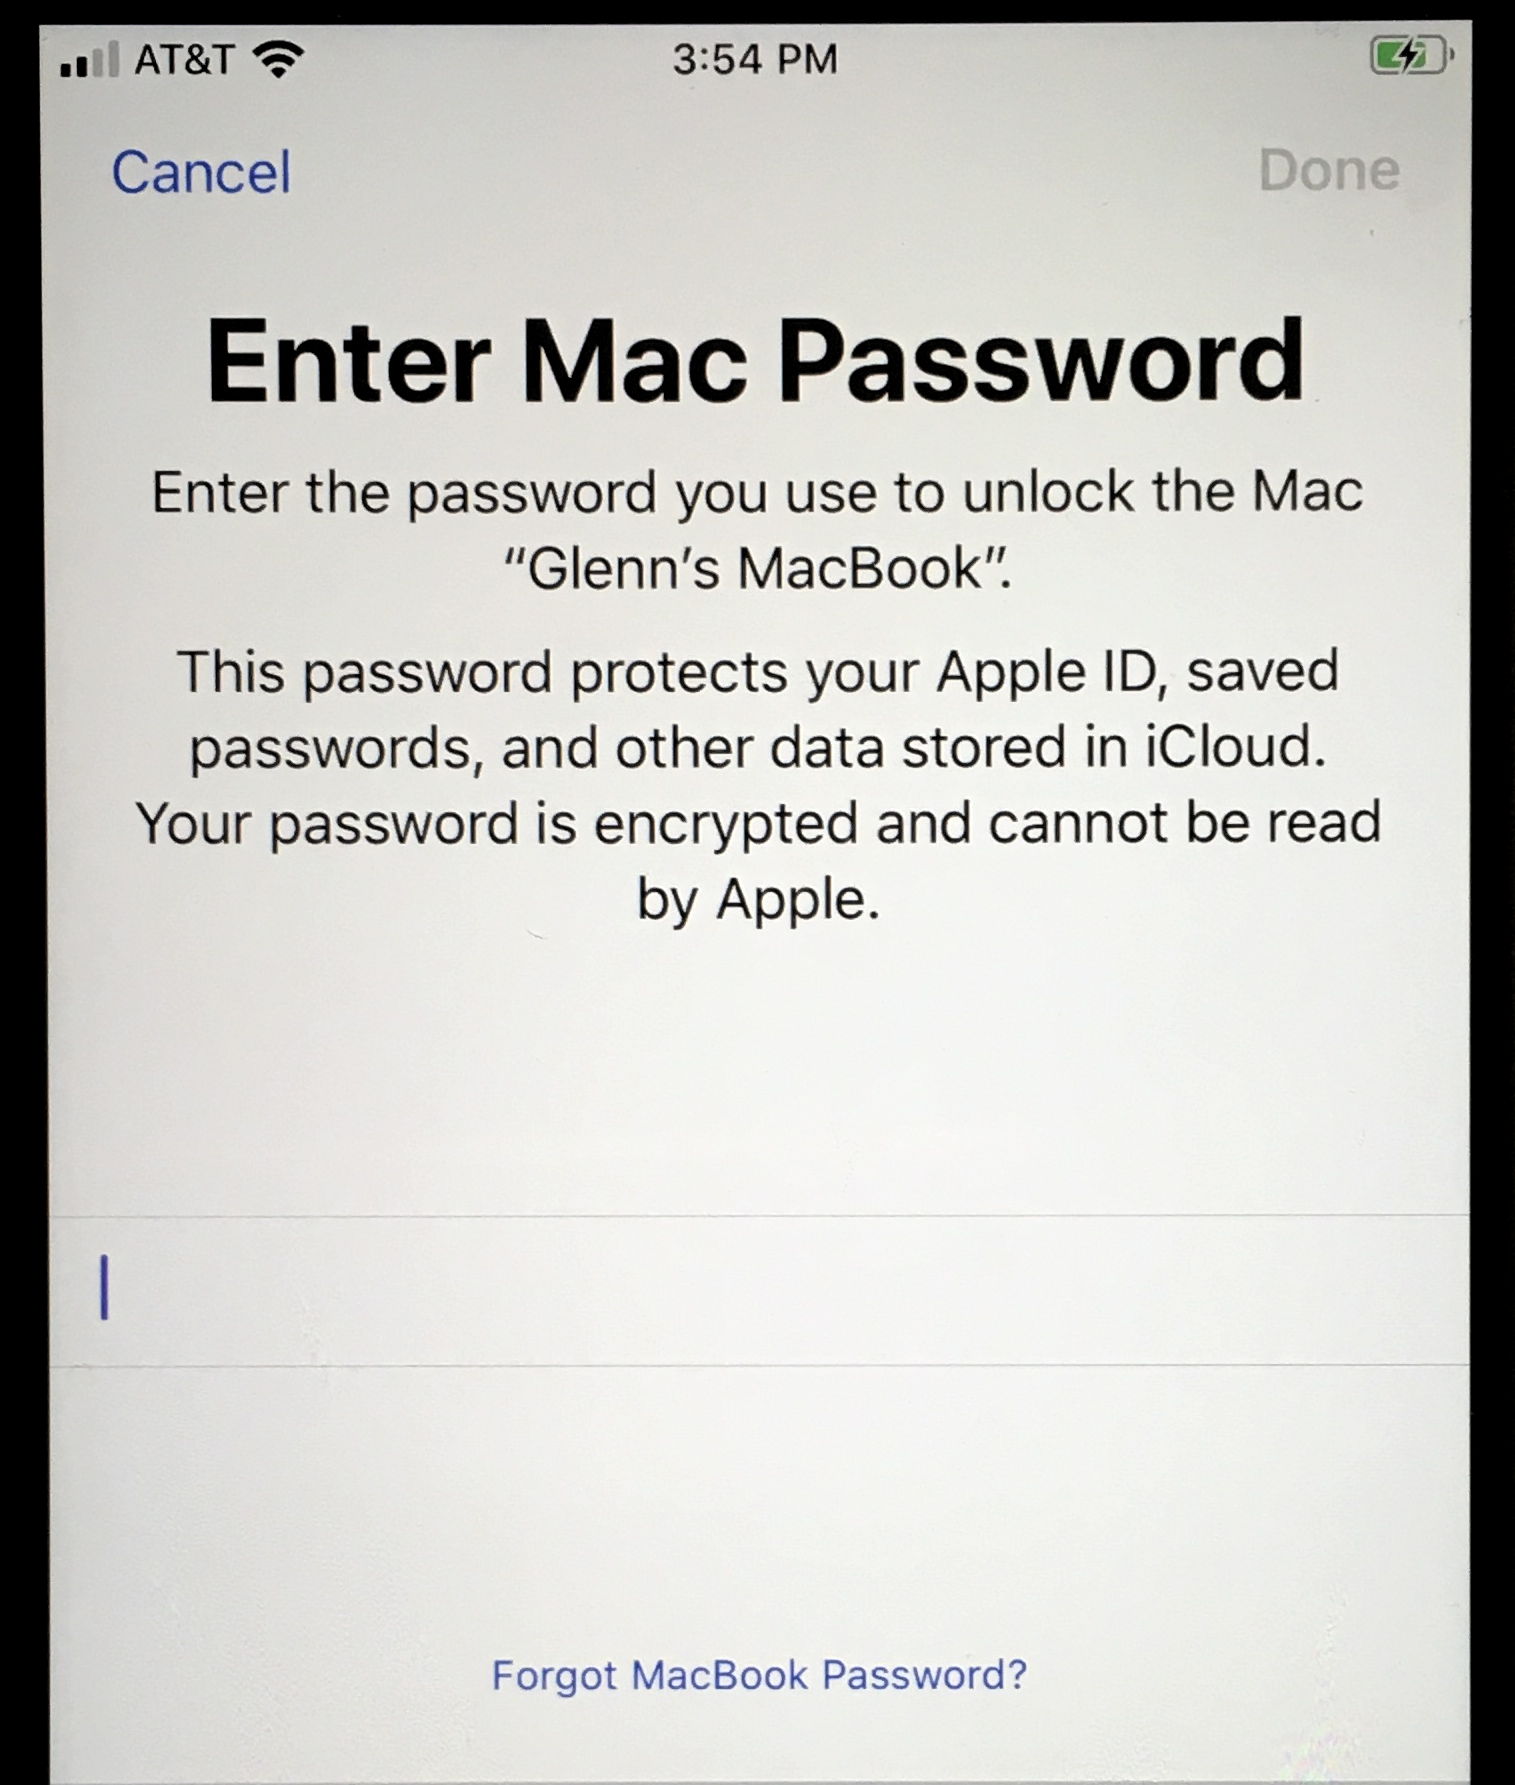
Doesn’t this seem contradictory, confusing, and just plain wrong? Why would Apple ask for the password or passcode for one of your other devices? Could it be some sort of scam? What exactly is going on here?
I encountered this issue, as did Take Control publisher Joe Kissell, in preparing the iOS 13 and iPadOS 13 revision to my long-running networking and security book, Connect and Secure Your iPhone and iPad. (It has a new, shorter title in this release, and is already updated for iOS 13.1—check it out if you’re looking for more information about iOS networking, privacy, and security.)
While I had heard of this prompt happening once last year, I had never seen it myself. Now I’ve figured out what is going on by reviewing Apple’s documentation and deducing the missing pieces. The short answer is that this prompt is actually Apple working to protect your security, and the explanation is accurate. But it’s not sufficiently detailed—that would require screens of text—to explain what’s going on. Here’s the skinny.
iCloud Stores Two Kinds of Secured Data for You
All the data that’s synced between your devices via iCloud is encrypted while in transit (generally using HTTPS) and at rest on Apple’s servers. Some of it is available in decrypted form if you were to access it via iCloud.com. For that subset, Apple maintains the encryption keys that protect the data when it’s at rest, and it could turn over that data if forced to by law enforcement.
Apple discloses which data is stored with encryption keys it possesses. In very rare circumstances, someone who compromised Apple’s keys or server security could extract that iCloud.com-accessible information from a transmission or from iCloud. It’s extremely unlikely, but it’s not strictly impossible.
This data could also be at risk in a successful phishing attack. Phishing requires only that an attacker fools someone into thinking they are entering their credentials into a legitimate site that is, instead, a man-in-the-middle. There are many kinds of phishing attacks, one severe type of which involves obtaining fraudulently issued HTTPS certificates that can have all the trappings of a legitimate and secure site.
The attacker could then simply use your login name and password to initiate an attempt to log in to iCloud, even triggering Apple to send you an extra login token used for two-factor authentication, which, if you entered it on the phishing site, could be used by the attacker at iCloud.
Apple users have been phished, of course, although as far as I know, Apple has never suffered from a fraudulent certificate attack. Some visitors to Google sites were phished in this way on multiple occasions several years ago. Since then, certificate-issuing and -tracking procedures and the way browsers check for legitimately issued documents have substantially reduced but not eliminated that particular risk.
Because of phishing risks, Apple has chosen to protect some data that it views as highly secure or very private with end-to-end encryption that prevents Apple from knowing anything about the contents of the synced data. Apple doesn’t possess any of the keys required to decrypt this data passing through its servers. Instead, those keys reside only on individual iPhones, iPads, and Macs.
There’s a full list of end-to-end encrypted services at Apple’s iCloud security overview page; they include iCloud Keychain, Screen Time information, Health data, Wi-Fi passwords, the People album in Photos, and the new Find My service’s crowdsourced location information. There are also likely other bits of data that facilitate device-to-device interactions.
As a result, you cannot view these categories of data at iCloud.com, only using your devices. In essence, iCloud acts as a sync service with zero knowledge about what it’s transmitting. If Apple were asked to disclose this information by a government, it could only produce unreadable encrypted data, by design. (This approach is distinct from the way Apple stores even more sensitive data—credit-card numbers, passcodes, and fingerprint or face parameters—in the Secure Enclave of iPhones, iPads, and Macs with T2 chips. That data never even leaves the Secure Enclave, and much of it is stored in the chip already irreversibly transformed through one-way encryption.)
Apple’s iCloud syncing system relies on public-key cryptography, which uses linked pairs of keys: one public and one private. The public key can be shared freely and used by anyone who wants to encrypt material meant for the owner of the private key, who can then decrypt that data. For iCloud Keychain and similar sensitive data, Apple has your devices generate and maintain a set of public and private keys that enable interaction with the information synced across iCloud. The devices never reveal their private keys and have the public keys of all the other devices connected to an iCloud account.
The data protected in this way is stored as individual packages—for example, a URL, account name, and password as a single unit—and identified with random metadata that’s meaningless except to establish a unique ID for each data package. Devices in the user’s sync set, including newly enrolled hardware, sync by exchanging metadata information. Let’s say your iPhone is missing a Web site login you just created on your Mac. The Mac encrypts the login entry with the public key of the iPhone, which receives it via iCloud sync, and then decrypts it with its private key. This approach is both typical and sensible.
The hard part isn’t syncing data privately. Rather, it comes when you want to add a new device to this set. To understand how that works, we need to understand the role of your iCloud password.
An Extra Element to Protect against Interception
Apple’s iOS 12 security white paper explains this system in some depth, noting that your iCloud Apple ID account password by itself can be used to enroll a new device. That isn’t as worrying as it might sound, because Apple doesn’t know your password. Instead, it stores only an encrypted form of the password. Whenever you enter your password, it’s run through a one-way encryption algorithm that performs a vast number of mathematical operations—the process is called “hashing”—that makes it effectively impossible to determine the original password. (This is also used for a lot of data stored in a Secure Enclave, like your passcode.)
You could enable an iCloud Security Code as an “out-of-band” element—something that is never transmitted by the same means as other data. Out-of-band elements are a common way to block data hijacking by requiring a secret that has never been put online. In this case, it’s something you create or Apple creates for you on one device and that you enter on another.
(Never heard of an iCloud Security Code? You’re not alone! It’s barely mentioned on Apple’s site, and Apple’s white paper doesn’t discuss the code deeply. I recall using one years ago, and TidBITS publisher Adam Engst had never heard the term before editing this article.)
But there’s a flaw in both the iCloud password and the iCloud Security Code approaches, and I wonder if that’s why Apple is now asking for passwords or passcodes from other devices in your sync set. The iCloud Security Code is yet another piece of information to remember and deal with and thus runs counter to Apple’s commitment to simplicity. It was also created when iCloud Keychain was the only set of data Apple secured end-to-end and synced via iCloud, and before both two-step verification and the later two-factor authentication for Apple ID. It may not be robust enough to match Apple’s current security and authentication requirements.
As for the iCloud password, it suffers from a different set of concerns. While Apple doesn’t know your iCloud password, whenever you log in at iCloud.com, your encrypted password is sent to Apple, which holds it just long enough to perform the hash and test it against its stored value. However, it’s not inconceivable—though, again, it’s unlikely—that the password could be captured during that transmission, phished, or stolen in some other way. Apple obviously thinks about it in this way: Since it’s conceivable that the password could be intercepted, Apple has to defend against interception as though it happens every day.
Some companies have tried to move away from the need to transfer even a hashed password. AgileBits, for instance, built 1Password.com around newer browser-based encryption algorithms—no unencrypted passwords or data are stored by AgileBits or ever sent to the browser. Instead, the browser itself performs all the necessary encryption and sends the encrypted data to AgileBits. After login, the 1Password.com servers only send encrypted packages to the user’s browser, which holds encryption keys locally and only for the duration of the session.
Apple hasn’t transitioned to this method with iCloud.com, and so it makes sense that instead of relying on an iCloud password, which could be stolen or phished, it has instead moved to this device-passcode/password system. Apple hasn’t yet documented this new approach, which is why I’m not being more precise about how it all works. None of the text on the screen users see appears on Apple’s support or marketing sites, and there’s no mention of the process in the white paper noted above or elsewhere. But I’ve heard about the process previously from readers, Take Control publisher Joe Kissell recently saw it on setting up a new device, and I finally saw it after upgrading to iOS 13 on my iPhone.
Here’s how the new system works, as far as I can determine:
- You log into your Apple ID on the device you’re setting up and confirm a second-factor login. (Password-only Apple ID accounts, which Apple strongly discourages and which we recommend against, don’t seem to get these dialogs.)
- On at least one of the devices in the iCloud sync set, Apple adds an encrypted version of that device’s passcode or password to the set of shared information. The only information attached to that payload that Apple can read is the type of device and the name of the device.
- Apple syncs this information to iCloud, and the setup process on the new device then pulls it down, prompting you to enter the passcode or password.
- Once you enter the correct passcode or password, the new device dumps the passcode/password data from the set, instead generating and relying on a new pair of encryption keys, just like the other devices. The new device becomes part of the trusted set of devices that can sync your end-to-end encrypted iCloud data.
It’s possible that Apple retains the encrypted passcode and password of the shared key for every device that’s in the set. However, that would seem to be an ongoing risk, as it would conceivably allow someone who obtains that secret to gain further access.
What this process appears to show is that Apple never sees, handles, or stores your device passcode or password in unencrypted form, and it never passes the passcode or password over anything but secure transport. It requires only your Apple ID account name and password, sent over HTTPS, as the first stage of logging into iCloud, but not for the later stages.
Overall, this new approach seems rational and secure. Apple would do well to give users more confidence in what’s happening by providing an explanatory support document, and I hope Apple will give in-depth details when it updates the iOS security white paper for iOS 13.